
20232418 2025-2026-1 《网络与系统攻防技术》实验八实验报告
20232418 2025-2026-1 《网络与系统攻防技术》实验八实验报告
1. 实验内容
1.1 能正常安装、启停Apache。理解HTML,理解表单,理解GET与POST方法,编写一个含有表单的HTML;
1.2 理解JavaScript的基本功能,理解DOM;
1.3 编写JavaScript验证用户名、密码的规则。在用户点击登陆按钮后回显“欢迎+输入的用户名”;
1.4 尝试注入攻击;
1.5 了解MySQL基础;
1.6 编写PHP网页,连接数据库,进行用户认证;
1.7 进行最简单的SQL注入,XSS攻击测试;
1.8 安装DVWA或WebGoat平台,并完成SQL注入、XSS、CSRF攻击。
2. 实验过程
2.1 Web前端HTML
HTML:超文本标记语言,用于创建和设计网页及其内容的标准标记语言。
表单:HTML中的一种元素,用于收集用户输入的数据,如文本、密码、选项等。
GET方法:一种HTTP请求方法,用于请求从服务器获取数据,并将参数附加在URL中。
POST方法:一种HTTP请求方法,用于向服务器提交数据,数据通常包含在请求体中,适合提交敏感或大量数据。
kali虚拟机上已安装Apache。先使用命令netstat -tupln | grep 80检查端口是否被占用,再用systemctl start apache2开启Apache,用systemctl status apache2.service确认服务状态。

可以看出Apache正常启动。
进入kali的/var/www/html目录下,用sudo vi 20232418gjt.html命令创建html文件,并输入以下内容:
<!DOCTYPE html>
<html lang="zh-CN">
<head>
    <meta charset="UTF-8">
    <meta name="viewport" content="width=device-width, initial-scale=1.0">
    <title>表单示例</title>
    <style>
        body {
            font-family: Arial, sans-serif;
            background-color: #f0f0f5;
            display: flex;
            justify-content: center;
            align-items: center;
            height: 100vh;
            margin: 0;
        }
        .container {
            background-color: #fff;
            padding: 30px;
            border-radius: 10px;
            box-shadow: 0 4px 8px rgba(0, 0, 0, 0.1);
            width: 400px;
            text-align: center;
        }
        .container img {
            border-radius: 50%;
            width: 100px;
            height: 100px;
            margin-bottom: 20px;
        }
        .container h2 {
            margin-bottom: 20px;
        }
        .form-group {
            margin-bottom: 15px;
        }
        .form-group label {
            display: block;
            margin-bottom: 5px;
        }
        .form-group input[type="text"],
        .form-group input[type="password"],
        .form-group input[type="email"],
        .form-group button[type="submit"] {
            width: 100%;
            padding-top: 10px;
            padding-bottom: 10px;
            border: 1px solid #ccc;
            border-radius: 5px;
        }
        .form-group button[type="submit"] {
            margin-top: 5px;
            background-color: #007BFF;
            color: #fff;
            border: none;
            cursor: pointer;
        }
        .form-group button[type="submit"]:hover {
            background-color: #0056b3;
        }
    </style>
</head>
<body>
    <div class="container">
        <img src="1.jpg" alt="Profile Picture">
        <h2>注册表单</h2>
        <form action="/submit-form" method="post">
            <div class="form-group">
                <label for="username">用户名</label>
                <input type="text" id="username" name="username" required>
            </div>
            <div class="form-group">
                <label for="email">邮箱</label>
                <input type="email" id="email" name="email" required>
            </div>
            <div class="form-group">
                <label for="password">密码</label>
                <input type="password" id="password" name="password" required>
            </div>
            <div class="form-group">
                <button type="submit">注册</button>
            </div>
        </form>
        <p>或者通过GET方法获取数据:</p>
        <form action="/get-data" method="get">
            <div class="form-group">
                <label for="search">搜索</label>
                <input type="text" id="search" name="search" required>
                <button type="submit">搜索</button>
            </div>
        </form>
    </div>
</body>
</html>
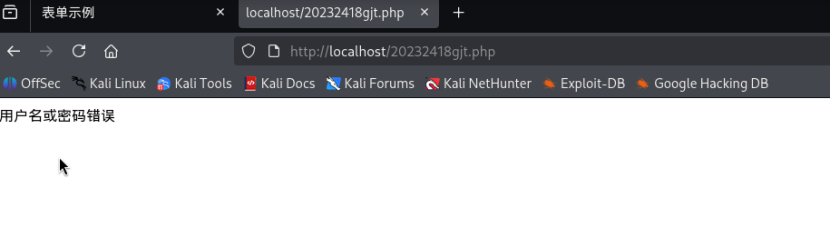
这段代码实现了一个响应式的Web表单页面,包含注册表单与搜索表单:前者以POST方式提交用户名、邮箱、密码等必填信息至指定接口,用于用户注册;后者以GET方式提交搜索内容实现数据查询;同时通过样式优化让页面在不同设备上居中显示、视觉美观,且输入框自带必填校验,需配合后端接口完成数据交互,是一个功能明确、样式统一的前端基础表单页面。
该HTML文件的效果如下图:

2.2 Web前端JavaScript
在2.1 HTML代码的基础上,删除表单的action和method属性,把注册表单改成登录表单,在登录按钮上加入onclick="submit_login()"的属性,写出以下代码:
<!DOCTYPE html>
<html lang="zh-CN">
<head>
<meta charset="UTF-8">
<meta name="viewport" content="width=device-width, initial-scale=1.0">
<title>表单示例</title>
<style>
body {
font-family: Arial, sans-serif;
background-color: #f0f0f5;
display: flex;
justify-content: center;
align-items: center;
height: 100vh;
margin: 0;
}
.container {
background-color: #fff;
padding: 30px;
border-radius: 10px;
box-shadow: 0 4px 8px rgba(0, 0, 0, 0.1);
width: 400px;
text-align: center;
}
.container img {
border-radius: 50%;
width: 100px;
height: 100px;
margin-bottom: 20px;
}
.container h2 {
margin-bottom: 20px;
}
.form-group {
margin-bottom: 15px;
}
.form-group label {
display: block;
margin-bottom: 5px;
}
.form-group input[type="text"],
.form-group input[type="password"],
.form-group input[type="email"],
.form-group button[type="submit"] {
width: 100%;
padding-top: 10px;
padding-bottom: 10px;
border: 1px solid #ccc;
border-radius: 5px;
}
.form-group button[type="submit"] {
margin-top: 5px;
background-color: #007BFF;
color: #fff;
border: none;
cursor: pointer;
}
.form-group button[type="submit"]:hover {
background-color: #0056b3;
}
</style>
</head>
<body>
<div class="container">
<img src="1.jpg" alt="Profile Picture">
<h2>登录表单</h2>
<!-- 登录表单:删除action和method,按钮添加onclick事件 -->
<form>
<div class="form-group">
<label for="username">用户名</label>
<input type="text" id="username" name="username" required>
</div>
<div class="form-group">
<label for="password">密码</label>
<input type="password" id="password" name="password" required>
</div>
<div class="form-group">
<button type="button" onclick="submit_login()">登录</button>
</div>
</form>
<p>或者通过GET方法获取数据:</p>
<form action="/get-data" method="get">
<div class="form-group">
<label for="search">搜索</label>
<input type="text" id="search" name="search" required>
<button type="submit">搜索</button>
</div>
</form>
</div>
<!-- 登录验证脚本 -->
<script>
function submit_login() {
var username = document.getElementById('username').value;
var password = document.getElementById('password').value;
var usernameRegex = /^.{4,}$/;
var passwordRegex = /^(?=.*[A-Za-z])(?=.*\d)[A-Za-z\d]{6,}$/;
if (!usernameRegex.test(username)) {
alert('用户名必须在4个字符以上');
return;
}
if (!passwordRegex.test(password)) {
alert('密码必须是6个字符以上,包含至少一个字母和一个数字');
return;
}
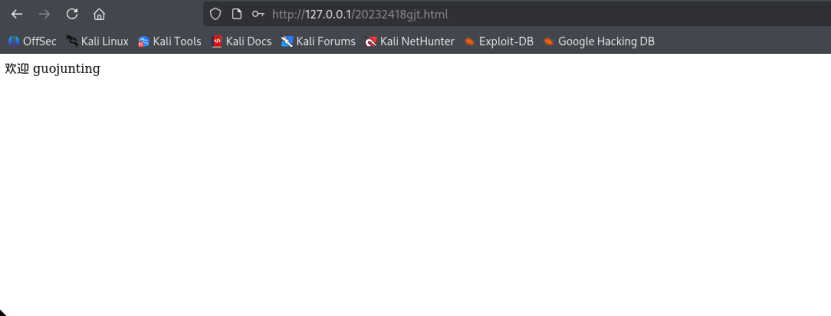
document.write('欢迎 ' + username);
};
</script>
</body>
</html>
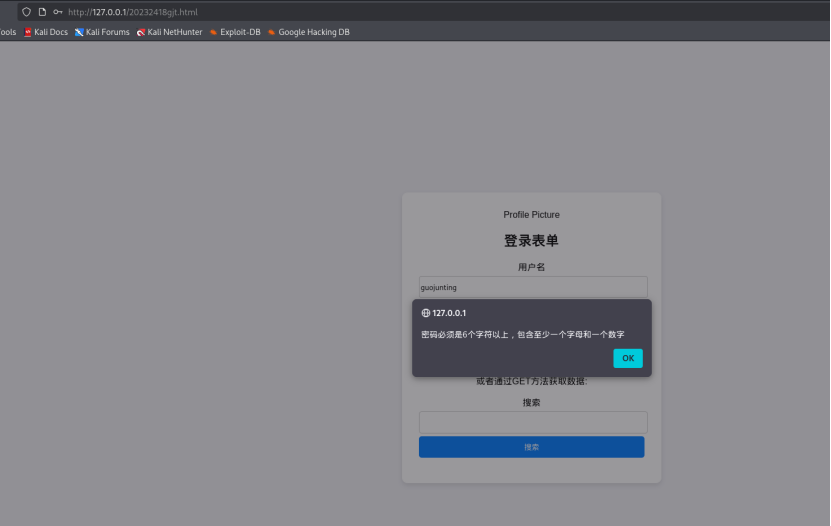
与之前的注册表单代码相比,这段代码将功能改为登录表单,移除邮箱输入框,登录表单无后端提交属性,而是通过点击事件触发前端本地验证(校验用户名≥4字符、密码≥6字符且含字母和数字),验证通过后直接在页面回显欢迎信息,仅做前端演示,搜索表单的GET查询功能保持不变。
最终实现的效果如下图:
在用户名一栏填入<h1>HTML injection succeed.</h1>,成功实现HTML注入,效果如图:

在用户名一栏填入<script type="text/javascript"> alert("JavaScript injection succeed.") </script>,成功实现JavaScript注入,效果如图:

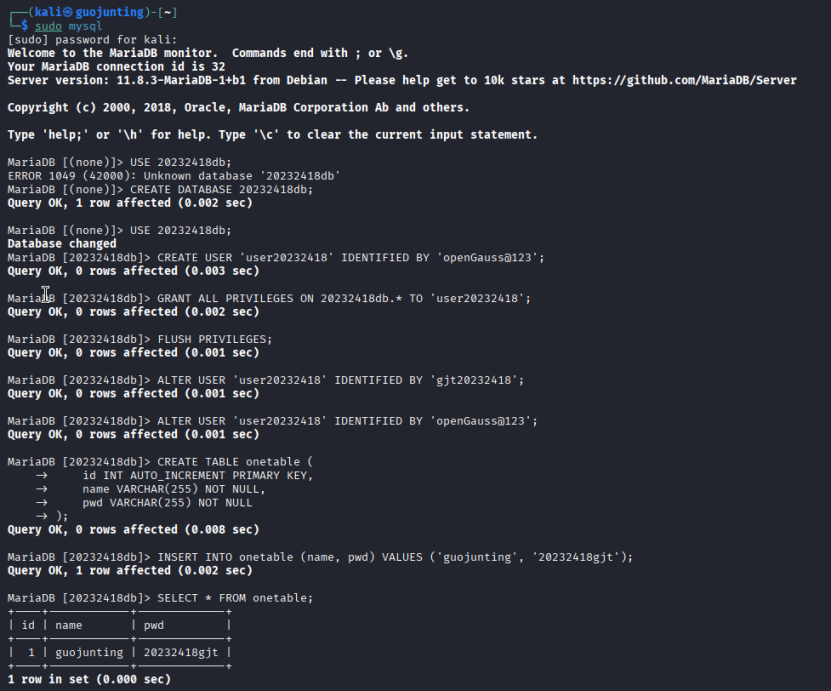
2.3 Web后端MySQL基础
使用命令systemctl start mysql启动kali虚拟机自带的MySQL,通过命令systemctl status mysql可查看服务的启用情况:
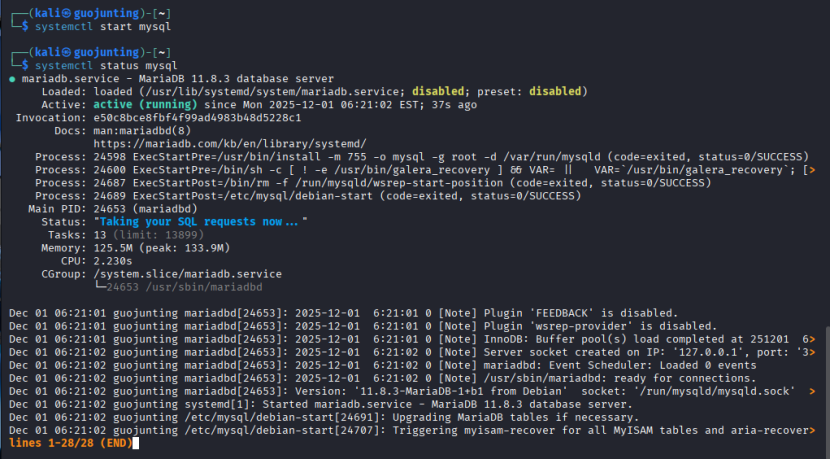
输入命令sudo mysql可进入数据库,随后进行数据库创建,用户创建、授权,建表、插入查看数据等操作。具体代码如下:
-- 创建数据库
CREATE DATABASE user_db;
-- 使用数据库
USE user_db;
-- 创建用户表
CREATE TABLE users (
    id INT AUTO_INCREMENT PRIMARY KEY,
    username VARCHAR(50) NOT NULL UNIQUE,
    password VARCHAR(50) NOT NULL
);
-- 插入测试数据
INSERT INTO users (username, password) VALUES ('administor', 'Admin123');
INSERT INTO users (username, password) VALUES ('testuser', 'Test456');
-- 创建数据库用户并授权
CREATE USER 'webuser'@'localhost' IDENTIFIED BY 'Web@123456';
GRANT ALL PRIVILEGES ON user_db.* TO 'webuser'@'localhost';
-- 刷新权限
FLUSH PRIVILEGES;
-- 查看数据
SELECT * FROM users;
2.4 Web后端编写PHP网页
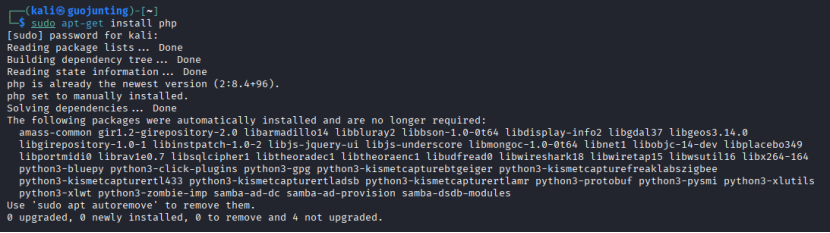
输入命令apt-get install php下载php,发现已经下载过了:
编写以下php代码(文件名为20232418gjt.php),实现连接数据库和用户认证:
<?php
// 数据库配置信息
$servername = "localhost";
$dbusername = "webuser";
$dbpassword = "Web@123456";
$dbname = "user_db";

// 创建数据库连接
$conn = new mysqli($servername, $dbusername, $dbpassword, $dbname);

// 检查连接是否成功
if ($conn->connect_error) {
    die("连接失败: " . $conn->connect_error);
}

// 获取表单提交的数据
$username = $_POST['username'];
$password = $_POST['password'];

// 构建SQL查询(未防护SQL注入,用于实验测试)
$sql = "SELECT * FROM users WHERE username = '$username' AND password = '$password'";
$result = $conn->query($sql);

// 验证用户身份
if ($result->num_rows > 0) {
    // 登录成功,回显用户名(未防护XSS,用于实验测试)
    echo "欢迎 " . $username . ",登录成功!";
} else {
    echo "用户名或密码错误!";
}

// 关闭数据库连接
$conn->close();
?>

在前面HTML代码中,修改登录表单的属性如下,删除按钮的onclick属性,修改后的代码如下:
<!DOCTYPE html>
<html lang="zh-CN">
<head>
    <meta charset="UTF-8">
    <meta name="viewport" content="width=device-width, initial-scale=1.0">
    <title>登录表单</title>
    <style>
        body {
            font-family: Arial, sans-serif;
            background-color: #f0f0f5;
            display: flex;
            justify-content: center;
            align-items: center;
            height: 100vh;
            margin: 0;
        }
        .container {
            background-color: #fff;
            padding: 30px;
            border-radius: 10px;
            box-shadow: 0 4px 8px rgba(0, 0, 0, 0.1);
            width: 400px;
            text-align: center;
        }
        .container img {
            border-radius: 50%;
            width: 100px;
            height: 100px;
            margin-bottom: 20px;
        }
        .container h2 {
            margin-bottom: 20px;
        }
        .form-group {
            margin-bottom: 15px;
        }
        .form-group label {
            display: block;
            margin-bottom: 5px;
        }
        .form-group input[type="text"],
        .form-group input[type="password"],
        .form-group input[type="email"],
        .form-group button[type="submit"] {
            width: 100%;
            padding-top: 10px;
            padding-bottom: 10px;
            border: 1px solid #ccc;
            border-radius: 5px;
        }
        .form-group button[type="submit"] {
            margin-top: 5px;
            background-color: #007BFF;
            color: #fff;
            border: none;
            cursor: pointer;
        }
        .form-group button[type="submit"]:hover {
            background-color: #0056b3;
        }
    </style>
</head>
<body>
    <div class="container">
        <img src="1.jpg" alt="Profile Picture">
        <h2>登录表单</h2>
        <form id="loginForm" action="http://localhost/20232418gjt.php" method="post">
            <div class="form-group">
                <label for="username">用户名</label>
                <input type="text" id="username" name="username" required>
            </div>
            <div class="form-group">
                <label for="password">密码</label>
                <input type="password" id="password" name="password" required>
            </div>
            <div class="form-group">
                <button type="submit">登录</button>
            </div>
        </form>
        <p>或者通过GET方法获取数据:</p>
        <form action="/get-data" method="get">
            <div class="form-group">
                <label for="search">搜索</label>
                <input type="text" id="search" name="search" required>
                <button type="submit">搜索</button>
            </div>
        </form>
    </div>

    <script>
        document.getElementById('loginForm').addEventListener('submit', function(e) {
            var username = document.getElementById('username').value;
            var password = document.getElementById('password').value;

            // 用户名正则:保留原规则(≥4字符)
            var usernameRegex = /^.{4,}$/;
            // 关键修改:放宽密码正则,允许特殊字符(仅要求≥6字符、含字母+数字)
            var passwordRegex = /^(?=.*[A-Za-z])(?=.*\d).{6,}$/; // 去掉 [A-Za-z\d] 限制,改为 . 匹配任意字符

            if (!usernameRegex.test(username)) {
                alert('用户名必须在4个字符以上');
                e.preventDefault();
                return;
            }
            if (!passwordRegex.test(password)) {
                alert('密码必须是6个字符以上,包含至少一个字母和一个数字');
                e.preventDefault();
                return;
            }
        });
    </script>
</body>
</html>
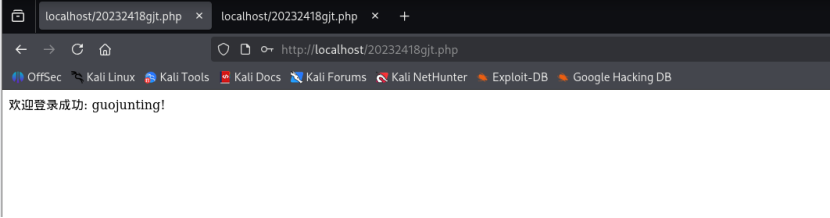
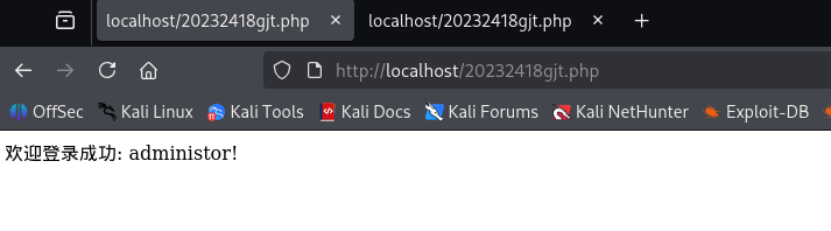
查看实现效果。发现可以正常进行用户认证。输入正确用户名(administor)和密码(Admin123)的结果如下图:
2.5 实现简单的SQL注入和XSS攻击
2.5.1 SQL注入测试
用户名:administor,密码:' OR '1'='1,实现SQL注入。此时构建的SQL语句为:
SELECT * FROM users WHERE username = 'administor' AND password = '' OR '1'='1'
由于'1'='1恒为真,查询会返回所有用户数据,从而绕过认证:
2.5.2 XSS攻击测试
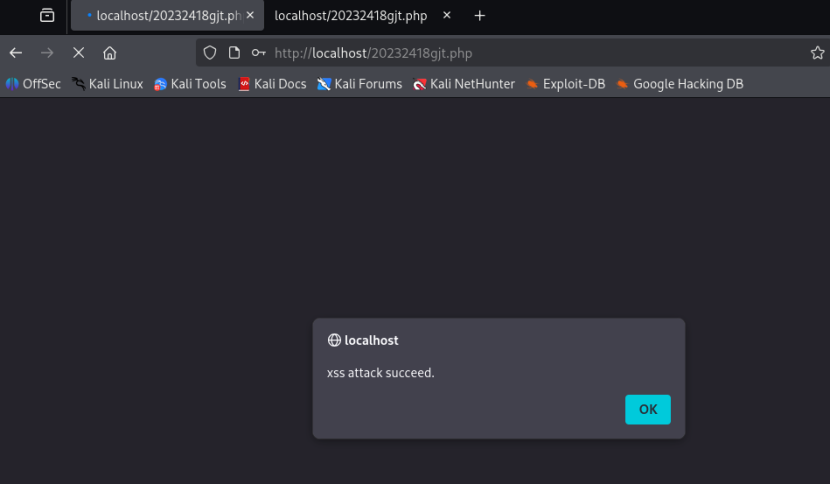
用户名:<script>alert("xss attack succeed.");</script>,密码:' OR '1'='1。由于PHP代码未对用户名进行HTML转义,直接输出到页面,导致脚本执行,实现XSS攻击:
2.6 安装WebGoat平台,并完成SQL注入、XSS、CSRF攻击
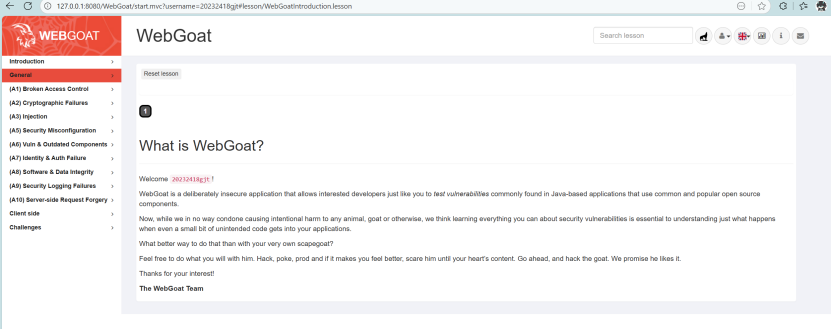
通过命令行部署WebGoat(基于Java环境),启动后访问127.0.0.1:8080/WebGoat,注册并登录:
2.6.1 完成SQL注入攻击
该部分完成(A3)Injection→SQL Injection(intro)部分的9-13题。
第9题:基于表单的SQL注入
后端通过拼接构造查询,只需在 last_name 处输入' OR '1'='1,闭合原引号并构造恒真条件,使查询返回所有用户数据:

第10题:数字型SQL注入
先判断注入点:login_count和user_id中仅login_count为数字型注入点。在login_count输入1 OR 1=1,user_id输入任意值(如1),拼接后查询变为SELECT * FROM user_data WHERE login_count = 1 OR 1=1 AND userid = 1,因1=1恒真,返回所有用户数据:

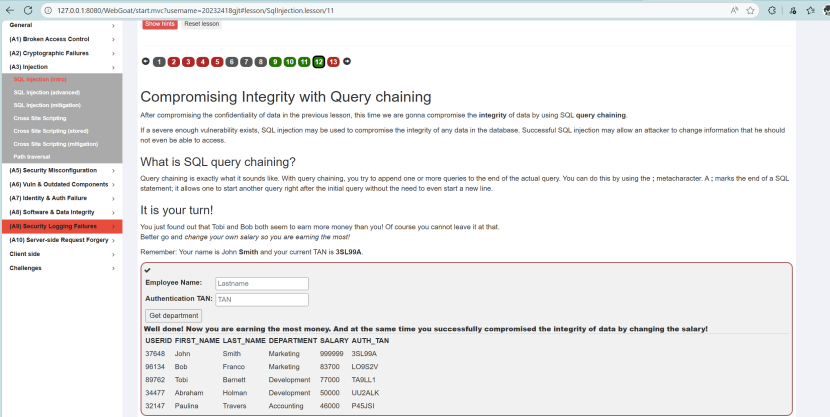
第11题:查询敏感数据注入
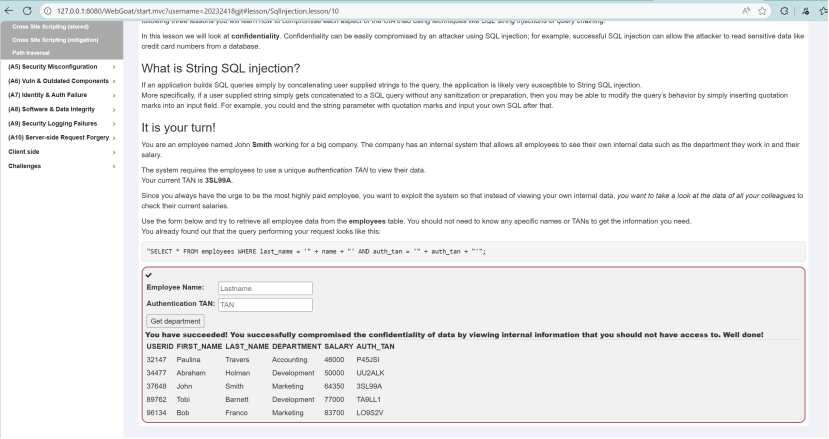
已知身份是 John Smith(姓氏 Smith)、TAN 是 3SL99A,需在Authentication TAN框输入3SL99A' OR '1'='1--:闭合原引号,用OR '1'='1构造恒真条件,--注释后续内容,使查询返回employees表所有员工薪资信息:
第12题:更新数据注入
在 “Authentication TAN” 框输入3SL99A'; UPDATE employees SET salary=999999 WHERE last_name='Smith';--:先闭合原 TAN 引号,用分号结束原查询,拼接 UPDATE 语句修改自身薪资为999999,--注释多余内容,实现篡改薪资:
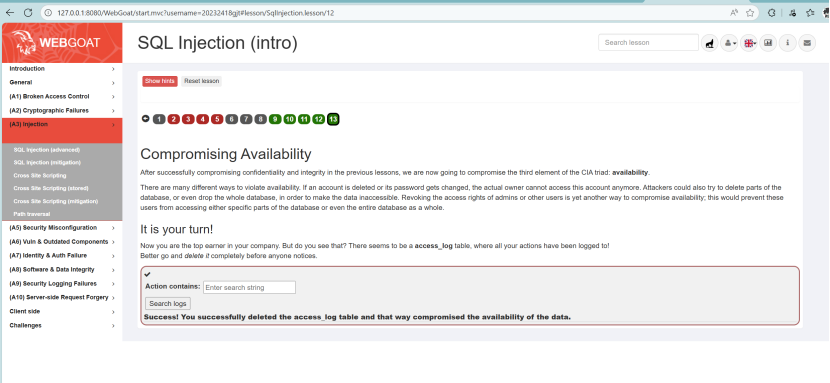
第13题:删除数据注入
在搜索框输入'; DROP TABLE access_log;--:闭合原查询引号,用分号拼接DROP TABLE语句删除日志表,--注释多余内容,破坏数据可用性(违反CIA三性中的可用性):
2.6.2 完成XSS攻击
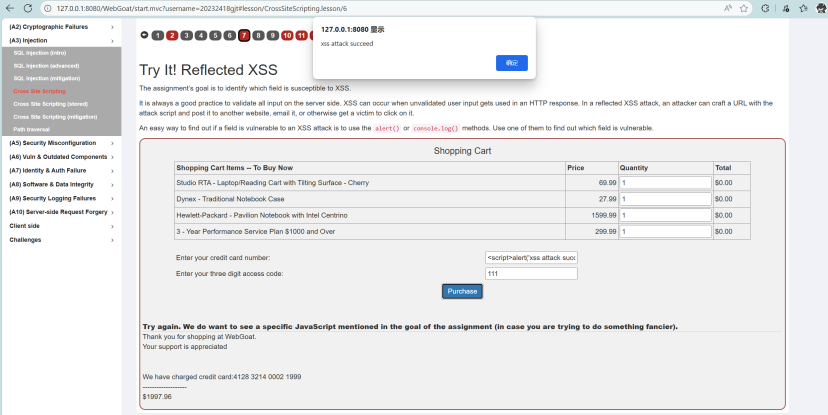
第7题:反射型XSS识别
分别在商品数量、信用卡号、验证码输入框输入<script>alert('XSS')</script>,提交后发现信用卡号输入框触发弹窗,说明该字段未过滤用户输入,存在反射型XSS漏洞:
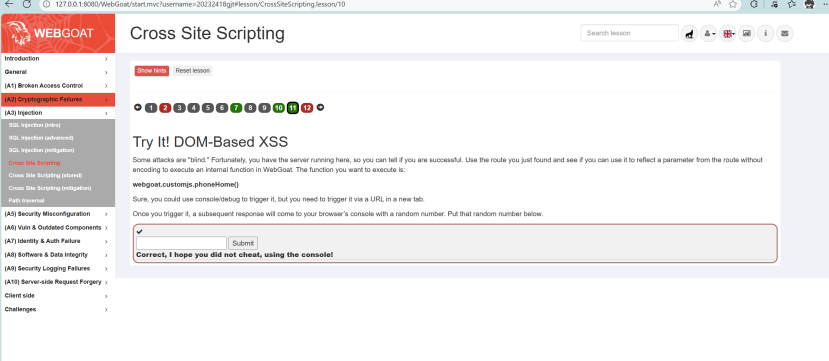
第10题:DOM型XSS路由识别
查看WebGoat的JS源码(Backbone框架),定位含“test”的测试路由。结合基础路由格式start.mvc#,拼接出测试路由start.mvc#test/,该路由未做安全过滤,填入输入框提交完成识别:

第11题:DOM型XSS利用
在新标签页访问http://127.0.0.1:8080/WebGoat/start.mvc#test/<script>webgoat.customjs.phoneHome()</script>,利用路由的DOM反射漏洞执行指定函数。在浏览器控制台(F12)获取返回的随机数,填入输入框提交完成任务:
2.6.3 完成CSRF攻击
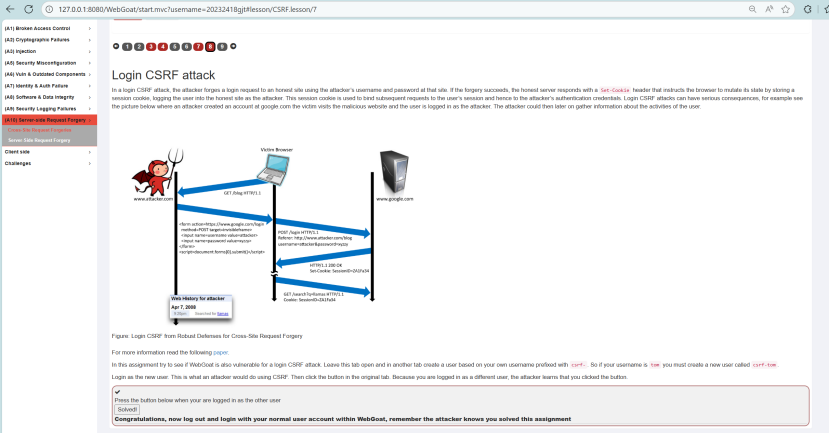
第8题:登录CSRF攻击
解题步骤:
- 新建标签页,注册以“csrf-”为前缀的用户(如
csrf-tom); - 登录该新用户(模拟攻击者账号);
- 回到原标签页,点击“Solved!”按钮;
此时WebGoat检测到当前登录用户为新创建的前缀用户,证明CSRF攻击成功(受害者被伪造登录为攻击者账号):
![image]()
3. 问题及解决方案
问题一:SQL注入测试失败
- 现象:输入
' OR '1'='1后,页面提示 "用户名或密码错误",注入未成功。 - 原因:PHP 配置中开启了
magic_quotes_gpc(自动转义单引号、双引号等特殊字符),导致注入语句中的单引号被转义,无法闭合SQL语句。 - 解决方案:
- 编辑PHP配置文件:
sudo vi /etc/php/8.4/apache2/php.ini(版本号根据实际安装情况调整); - 查找
magic_quotes_gpc配置项,设置为magic_quotes_gpc = Off; - 重启Apache服务:
sudo systemctl restart apache2; - 重新进行注入测试,注入语句可正常执行。
- 编辑PHP配置文件:
问题二:WebGoat启动后无法访问
- 现象:执行启动命令后,访问
127.0.0.1:8080无响应。 - 原因:端口8080被占用,或Java环境版本不兼容(WebGoat需Java 11+)。
- 解决方案:
- 检查端口占用:
netstat -tupln | grep 8080,终止占用进程或修改WebGoat启动端口; - 检查Java版本:
java -version,若版本低于11,安装OpenJDK 11; - 重新启动WebGoat,访问
127.0.0.1:8080/WebGoat(注意路径含WebGoat上下文)。
- 检查端口占用:
4. 学习感悟、思考等
本次《网络与系统攻防技术》实验,让我从理论到实践系统掌握了Web前后端开发与攻防核心能力:不仅熟悉了LAMP架构(Linux+Apache+MySQL+PHP)的部署与应用,实现了HTML表单设计、JavaScript前端验证、PHP数据库交互等基础开发任务,更通过SQL注入、XSS、CSRF等攻击实战,深入理解了常见Web漏洞的原理与危害——SQL注入源于未过滤的用户输入拼接SQL语句,XSS攻击利用前端脚本执行漏洞,CSRF则借助用户身份凭证伪造请求。
通过WebGoat平台的系统化训练,我不仅学会了漏洞利用的方法,更明确了对应的防护策略:SQL注入需采用参数化查询替代字符串拼接,XSS攻击要对用户输入进行HTML转义处理,CSRF漏洞需通过Token验证、Referer检查等方式防护。同时,实验过程中也意识到,很多漏洞的产生源于开发过程中对安全的忽视,如前端验证仅作为辅助手段,后端必须进行二次校验;数据库访问需遵循最小权限原则,避免过度授权。
未来,我将持续深化网络安全知识学习,关注漏洞情报与防护技术发展,在后续开发中始终以“攻击者思维”审视代码,将安全防护融入需求分析、编码实现、测试部署全流程,既做好功能开发,更守住安全底线,努力成长为兼具开发能力与安全意识的技术从业者。

 浙公网安备 33010602011771号