

Java学习笔记---多线程
多线程
基本概念
进程:程序执行一次的过程
线程:CPU调度执行的单位,一个进程可以包含若干个线程
核心概念
-
线程是独立执行的路径
-
在程序运行时,即使没有自己创建线程,后台也会有多个线程
-
main()为主线程,为系统的入口,用于执行整个程序
-
在一个系统中,如果开辟了多个线程,线程的运行由调度器安排,调度器于操作系统相关,先后顺序不可人为干预
-
对同一份操作系统资源,会存在资源抢夺的问题,需要加入并发控制
-
线程会带来额外的开销,如cpu的时间调度,并发控制的开销
-
每个线程在自己的工作内存交互,内存操作不当会造成数据不一致
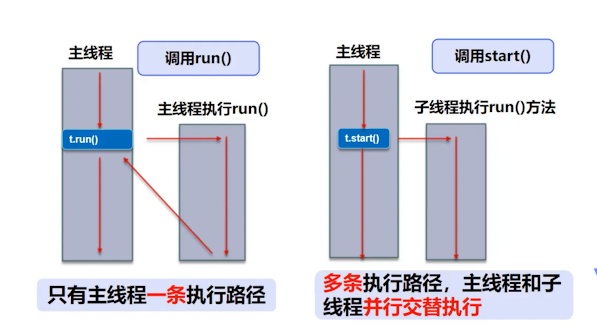
线程执行顺序:
![]()
创建线程*
创建线程的方法 1
继承Thread方法,重写run()方法,调用start()方法开启线程
// 创建线程的方法一:继承Thread类,重写run()方法,调用start()开启线程
// 线程开启不一定立即执行,由cpu调度
public class TestThread extends Thread{
    @Override
    public void run() {
        super.run();
        for (int i = 0; i < 100; i++) {
            System.out.println("Thread_1: "+i);
        }
    }

    public static void main(String[] args) {
        TestThread testThread = new TestThread();
        testThread.start();
        for (int i = 0; i < 500; i++) {
            System.out.println("Main_thread: "+i);
        }
    }
}
import org.apache.commons.io.FileUtils;

import java.io.File;
import java.io.IOException;
import java.net.URL;

//练习Thread,实现同步下载图片
public class TestThread2 extends Thread {
    private String url;
    private String name;

    public TestThread2(String url, String name) {
        this.url = url;
        this.name = name;

    }
//    下载图片线程的执行体
    @Override
    public void run() {
        super.run();
        WebDownload webDownload = new WebDownload();
        webDownload.downloader(url,name);
        System.out.println("Download "+ name);
    }

    public static void main(String[] args) {
        String url1 = "https://attach.52pojie.cn/forum/202103/14/094758zr7nbw7abxr5olz3.png";
        String url2 = "https://attach.52pojie.cn/forum/202103/24/165010n97pp7ngn2nzgb2k.jpg";
        String url3 = "https://attach.52pojie.cn/forum/202103/24/165012a521llx25518b99l.jpg";
        TestThread2 t1 = new TestThread2(url1,"ph1.png");
        TestThread2 t2 = new TestThread2(url2,"ph2.png");
        TestThread2 t3 = new TestThread2(url3,"ph3.png");
        t1.start();
        t2.start();
        t3.start();
    }
}
class WebDownload{
    public void downloader(String url, String name){
        try {
            FileUtils.copyURLToFile(new URL(url),new File(name));
        } catch (IOException e) {
            e.printStackTrace();
            System.out.println("IO异常");
        }
    }
}
创建线程方法2(推荐使用)
- 创建一个类继承runnable接口,重写run()方法
- 执行线程时,主线程中创建Thread()类,将实现runnable 接口的类对象作为参数传入Thread类中
- 调用Thread类的start()方法,开启线程
//创建线程的方式2:实现runnable接口,重写run()方法,执行线程时将继承runnable类对象作为参数传输一个Thread()类中
// 调用start()方法
public class TestThread3 implements Runnable{
    @Override
    public void run() {
        for (int i = 0; i < 400; i++) {
            System.out.println("Thread_2:"+i);
        }
    }

    public static void main(String[] args) {
//        创建runnable接口的实现类
        TestThread3 testThread3 = new TestThread3();
//        创建线程对象,通过线程对象来开启我们的线程,代理
        Thread thread = new Thread(testThread3);
        thread.start();

//        等价于 new Thread(testThread3).start();
    }
}
该方法的优点:
- 可以实现多继承,避免单继承的局限性,方便灵活,方便被同一对象被多个线程使用
应用
龟兔赛跑
//模拟龟兔赛跑
public class Race implements Runnable{

    private static String winner;

    @Override
    public void run() {
        for (int i = 0; i <= 100; i++) {
//            兔子中途睡觉
            if(Thread.currentThread().getName().equals("rabbit")&&i==20){
                try {
                    Thread.sleep(100);
                } catch (InterruptedException e) {
                    e.printStackTrace();
                }
            }
//
            System.out.println(Thread.currentThread().getName() + "-->跑了" + i + "步");
            boolean flag = gameOver(i);
            if (flag)
                break;
        }
    }
//    存在胜者或步数大于等于100时游戏结束
    public boolean gameOver(int steps){
        if(winner!=null)
            return true;
        else if(steps>=100){
            winner = Thread.currentThread().getName();
            System.out.println("Winner is "+winner);
            return true;
        }
        else
            return false;
        }

    public static void main(String[] args) {
        Race race = new Race();
//        创建乌龟和兔子线程
        new Thread(race,"rabbit").start();
        new Thread(race,"tortoise ").start();

    }
}
创建线程方法3
实现Callable接口
//线程的创建方式3:实现callable接口
public class TestCallable implements Callable<Boolean> {
    private String url;
    private String name;
    public TestCallable(String url,String name) {
        this.url = url;
        this.name = name;
    }
    @Override
    public Boolean call() {
        WebDownload webDownload = new WebDownload();
        webDownload.downloader(url,name);
        System.out.println("Download "+ name);
        return true;
    }

    public static void main(String[] args) {
        String url1 = "https://attach.52pojie.cn/forum/202103/14/094758zr7nbw7abxr5olz3.png";
        String url2 = "https://attach.52pojie.cn/forum/202103/24/165010n97pp7ngn2nzgb2k.jpg";
        String url3 = "https://attach.52pojie.cn/forum/202103/24/165012a521llx25518b99l.jpg";
        TestCallable t1 = new TestCallable(url1,"ph1.png");
        TestCallable t2 = new TestCallable(url2,"ph2.png");
        TestCallable t3 = new TestCallable(url3,"ph3.png");
//        创建执行服务
        ExecutorService service = Executors.newFixedThreadPool(3);
//        提交执行
        Future<Boolean> r1 = service.submit(t1);
        Future<Boolean> r2 = service.submit(t2);
        Future<Boolean> r3 = service.submit(t3);
//        获取结果
        try {
            boolean rs1 = r1.get();
            boolean rs2 = r2.get();
            boolean rs3 = r3.get();
            System.out.println(""+rs1+rs2+rs3);
        } catch (InterruptedException e) {
            e.printStackTrace();
        } catch (ExecutionException e) {
            e.printStackTrace();
        }
        // 停止服务
        service.shutdown();
    }
}
静态代理
真实对象和代理实现同一接口
代理对象代理真实角色
代理的优点:
代理可以对真实对象的功能进行扩充
//静态代理
//真实对象和代理对象实现同一个接口
//代理对象代理真实角色
public class StaticProxy {
    public static void main(String[] args) {
        She she = new She();
        WeddingCompany weddingCompany = new WeddingCompany(she);
        weddingCompany.happyMarry();
        new WeddingCompany(she).happyMarry();
        new Thread(() -> System.out.println("Fuck")).start();
    }
}
interface Marry{
    void happyMarry();
}
class She implements Marry{
    @Override
    public void happyMarry() {
        System.out.println("She is happy to marry him");
    }
}

class WeddingCompany implements Marry{
    private Marry she;
    @Override
    public void happyMarry() {
        before();
        this.she.happyMarry();
        after();
    }
//  传入代理对象she
    public WeddingCompany(Marry she) {
        this.she = she;
    }
//扩充功能
    private void after() {
        System.out.println("Planing");
    }

    private void before() {
        System.out.println("Payed");

    }
}
Lambda 表达式
函数式接口:只包含一个抽象方法的接口
lambda表达式可以用于简化创建函数式接口的对象
语法:
(params)->{expressions};
package com.thread.lambda;
//  1.定义一个函数式接口:一个接口只包含一个抽象方法
interface Like{
    void run();
}
//  2.实现接口类
class ILike implements Like{
    @Override
    public void run() {
        System.out.println("I like lambda");
    }
}
public class TestLambda {
//  3.静态内部类实现
    static public class ILike1 implements Like{
        @Override
        public void run() {
            System.out.println("I like lambda1");
        }
    }

    public static void main(String[] args) {
        Like iLike = new ILike();
        iLike.run();
        iLike = new ILike1();
        iLike.run();
//  4.局部内部类实现
        class ILike2 implements Like {
            @Override
            public void run() {
                System.out.println("I like lambda2");
            }
        }
        iLike = new ILike2();
        iLike.run();
//  5.匿名内部类,无类名,必须借助接口或父类
        iLike = new Like() {
            @Override
            public void run() {
                System.out.println("I like lambda3");
            }
        };
        iLike.run();

//  6.lambda简化
        iLike  = ()->{
            System.out.println("I like lambda4");
        };
        iLike.run();
    }
}
含有参数lambda表达式
package com.thread.lambda;
interface ILove{
    void love(String a);
}
class Love implements ILove{
    @Override
    public void love(String a) {
        System.out.println("I Love "+a);
    }
}
public class TestLambda2 {
    public static void main(String[] args) {
        ILove love = new Love();
        love.love("you");
//        Lamda表达式简化
        ILove love1 = (String a)->{
            System.out.println("I love in "+ a);
        };
        love1.love("you");
//        简化1参数类型
        ILove love2 = (a)->{
            System.out.println("I love "+a +" much");
        };
        love2.love("you");
//        简化2简化括号
        ILove love3 = a->{
            System.out.println("I love "+a+" very much ");
        };
        love3.love("you");
    }
}
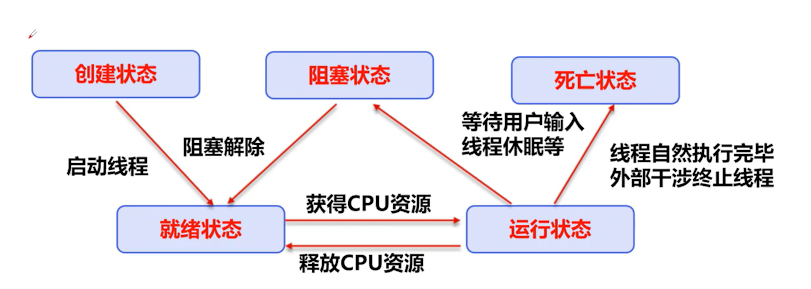
线程状态

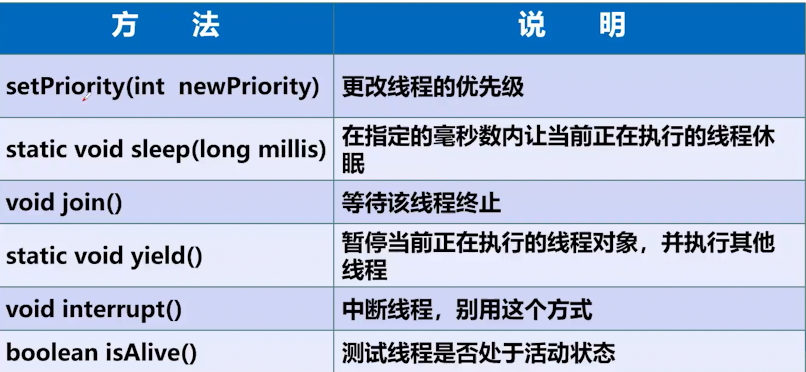
线程方法
停止线程
使用标志位停止线程
Java中推荐使用该方法
//标志位实现线程停止
//Java中不建议使用stop(),destroy()方法停止线程
public class StopThread implements Runnable{
//    设置标志位
    private boolean flag = true;
    @Override
    public void run() {
        int i=0;
        while (flag){
            System.out.println("run>>>Thread"+i++);
        }
    }
    public void stopThread(){
        this.flag=false;
    }

    public static void main(String[] args) {
        StopThread stopThread = new StopThread();
        new Thread(stopThread).start();
        for (int i = 0; i < 1000; i++) {
            System.out.println("MainThread "+ i);
            if(i==800){
//                调用stop方法切换标准位停止线程
                stopThread.stopThread();
            }
        }
    }
}
线程休眠
-
sleep(interval)指的是当前线程停止的毫秒数
-
sleep存在异常InterruptedException
-
sleep达到时间后进入就绪状态
-
sleep可以模拟网路延时,倒计时等
-
每个对象都有一个锁,sleep不会释放锁
模拟网络延时
//模拟网络延时,放大问题的发生性
public class ThreadSleep implements Runnable{
    private int tikNum = 10;
    @Override
    public void run() {
        while (true){
            if(tikNum==0){
                break;
            }
            System.out.println(Thread.currentThread().getName()+" get the "+tikNum--+"ed Ticket");

            try {
//                  模拟时间延迟
                Thread.sleep(100);
            } catch (InterruptedException e) {
                e.printStackTrace();
            }


        }
    }

    public static void main(String[] args) {
        ThreadSleep threadSleep = new ThreadSleep();
        new Thread(threadSleep,"Ming").start();
        new Thread(threadSleep,"Wang").start();
        new Thread(threadSleep,"cattle").start();

    }
}
模拟倒计时打印当前时间
//模拟倒计时
public class ThreadSleep2 {
    public static void main(String[] args) {
        try {
            tenSecCountDown();
        } catch (InterruptedException e) {
            e.printStackTrace();
        }
//        打印当前时间
        Date date = new Date(System.currentTimeMillis());//获取系统当前时间
        while (true){
            try {
                Thread.sleep(1000);
                System.out.println(new SimpleDateFormat("HH:mm:ss").format(date));
                date = new Date(System.currentTimeMillis());//更新当前时间
            } catch (InterruptedException e) {
                e.printStackTrace();
            }
        }

    }
    public static void tenSecCountDown() throws InterruptedException{
        int num = 10;
        while (num>0){
            Thread.sleep(1000);
            System.out.println(num--);
        }
    }
}
线程礼让
- 让正在执行的线程暂停,但不阻塞
- 让线程从运行状态转为就绪状态
- 让cpu重新调度,礼让不一定成功
//线程礼让
//不一定会礼让成功
public class ThreadYield {
    public static void main(String[] args) {
        Thread_1 thread = new Thread_1();
        new Thread(thread,"1").start();
        new Thread(thread,"2").start();

    }

}
class Thread_1 implements Runnable{
    @Override
    public void run() {
        System.out.println("Thread "+Thread.currentThread().getName()+" ->start");
        Thread.yield();//线程礼让
        System.out.println("Thread "+Thread.currentThread().getName()+" ->stop");
    }
}
Join
合并线程,待次线程执行完之后再执行其他线程
//join方法
public class ThreadJoin implements Runnable{
    @Override
    public void run() {
        for (int i = 0; i < 500; i++) {
            System.out.println("Primary Thread "+ i);
        }
    }
    public static void main(String[] args) {
        //插队线程开始
        ThreadJoin threadJoin = new ThreadJoin();
        Thread thread = new Thread(threadJoin);
        thread.start();
        //主线程
        for (int i = 0; i < 1000; i++) {
            if(i==200) {
                try {
                    thread.join();
                } catch (InterruptedException e) {
                    e.printStackTrace();
                }
            }
            System.out.println("Main Thread "+ i);
        }
    }
}
线程状态观测
Thread.State
thread.getState
public class ThreadState {
    public static void main(String[] args) throws InterruptedException {
        //线程创建
        Thread thread = new Thread(()->{
            for (int i = 0; i < 5; i++) {
                try {
                    Thread.sleep(1000);
                } catch (InterruptedException e) {
                    e.printStackTrace();
                }
            }
            System.out.println("///////");
        });
        //观察状态
        Thread.State state = thread.getState();
        System.out.println(state);

        //启动
        thread.start();
        //继续观察
        state = thread.getState();
        System.out.println(state);
        while (state!=Thread.State.TERMINATED){
            state = thread.getState();
            System.out.println(state);
            Thread.sleep(100);
        }
    }
}
线程优先级
Java中每个线程都有一个优先级,默认情况下为继承父类的优先级,可以通过setPriority方法来设置优先级再MIN_PRIORITY到MAX_PRIORITY之间
void setPriority(int newPriority);
static int MIN_PRIORITY;//线程最小优先级1
static int NORM_PRIORITY;//线程默认优先级5
static int MAX_PRIORITY;//线程最大优先级10
public class TestPriority{
    public static void main(String[] args) {
//        测试main线程优先级
        System.out.println(Thread.currentThread().getName()+"-->"+Thread.currentThread().getPriority());
//
        MyPriority myPriority = new MyPriority();
        Thread t1 = new Thread(myPriority);
        Thread t2 = new Thread(myPriority);
        Thread t3 = new Thread(myPriority);
        Thread t4 = new Thread(myPriority);
        Thread t5 = new Thread(myPriority);
//        设置线程优先级启动线程
        t1.start(); //默认5

        t2.setPriority(1);
        t2.start();

        t3.setPriority(5);
        t3.start();

        t4.setPriority(Thread.MIN_PRIORITY);//1
        t4.start();

        t5.setPriority(Thread.MAX_PRIORITY);//10
        t5.start();
    }

}
//创建线程
class MyPriority implements Runnable{
    @Override
    public void run() {
        System.out.println(Thread.currentThread().getName()+"-->"+Thread.currentThread().getPriority());
    }
}
注意:线程的优先级低意味着获取系统调度的概率低,不代表不会被调用。
守护线程
-
线程分用户线程和守护线程
-
守护线程为其他线程提供服务如记录操作日志、监控内存、垃圾回收等
-
虚拟机不用等待守护线程执行完毕
thread.setDeamon(true)
//测试守护线程
//上帝守护你
public class testDaemon {
    public static void main(String[] args) {
        God god = new God();
        You you = new You();
//设置上帝线程为守护线程并开启
        Thread godT = new Thread(god);
        godT.setDaemon(true);
        godT.start();
//开启用户线程
        new Thread(you).start();

    }

}
//用户线程
class You implements Runnable{
    @Override
    public void run() {
        for (int i = 0; i < 36500; i++) {
            System.out.println("Happy Everyday");
        }
        System.out.println("Good Bye World");
    }
}
//上帝线程
class God implements Runnable{
    @Override
    public void run() {
        while (true){
            System.out.println("God Bless You");
        }
    }
}
线程同步*
并发
多个线程操作同一个资源,并且每个线程都调用了一个修改该对象的方法。
线程并发操作同一个对象可能会造成数据的不安全
public class UnsafeBank {
    public static void main(String[] args) {
//        创建账户
        Account account = new Account(1100,"Wang");
//        创建取钱线程
        Thread you = new Drawing(account,800);
        Thread she = new Drawing(account,1200);
        you.start();
        she.start();

    }

}
// 账户
class Account{
    private int money;
    private String name;

    public Account(int money, String name) {
        this.money = money;
        this.name = name;
    }

    public int getMoney() {
        return money;
    }

    public void setMoney(int money) {
        this.money = money;
    }

    public String getName() {
        return name;
    }

    public void setName(String name) {
        this.name = name;
    }
}
//取钱线程
class Drawing extends Thread {
    Account account;
    int drawingMoney;
    String name;
    int balance;

    public Drawing(Account account, int drawingMoney) {
        this.account = account;
        this.drawingMoney = drawingMoney;
        this.name = account.getName();
        this.balance = account.getMoney();
    }
    @Override
    public void run() {
        super.run();
            if (balance - drawingMoney < 0) {
                System.out.println(Thread.currentThread().getName() + " Your balance is not enough");
                return;
            }
            try {
                sleep(1000);
            } catch (InterruptedException e) {
                e.printStackTrace();
            }
            account.setMoney(balance - drawingMoney);
            System.out.println("Successful account transaction");
            System.out.println(Thread.currentThread().getName() + " your balance is " + account.getMoney());
        }
    }
}
同步方法
Java中提供synchronized关键字方法来达到防止代码块受到并发访问干扰
synchronized提供两种用法
- synchronized方法
- synchronized块
public synchronized void method(int args){}//synchronized方法
synchronized(obj){}//synchronized块
synchronized方法机制
synchronized方法控制对象的访问,每个对象对应一把锁,每个synchronized对象的方法必须获得调用该方法对象的锁才能执行,否则线程会被阻塞,方法一旦执行,就独占该锁,知道该方法返回才释放锁,后面被阻塞的线程才能获得这个锁继续执行。
//    synchronized 同步方法,锁的是this
    private synchronized void  buyTicket() throws InterruptedException {
        if (ticNum<=0){
            flag = false;
            return;
        }
        System.out.println(Thread.currentThread().getName()+" get "+ticNum--+"th ticket");
    }
同步块
synchronized(obj){}
Obj为同步监视器
-
Obj可以是任何对象
-
同步方法中无需指点监视器,同步方法监视器就是本身this
同步监视器的执行过程
- 第一个线程访问锁定同步监视器
- 第二个线程访问,同步监视器被锁定,无法访问
- 第一个线程访问完毕,解锁监视器
- 第二个线程访问,同步器未被锁定,即锁定后访问
public class UnsafeList {
    public static void main(String[] args) {
        List<String>  list = new ArrayList<>();
        for (int i = 0; i < 10000; i++) {
            new Thread(()->{
//                synchronized 监视list
                synchronized (list){
                list.add(Thread.currentThread().getName());
            }}).start();
        }
        System.out.println(list.size());
    }
}
//        同步块加锁
//        锁的对象是变化的量
synchronized (account) {
            if (balance - drawingMoney < 0) {
                System.out.println(Thread.currentThread().getName() + " Your balance is not enough");
                return;
            }
            try {
                sleep(1000);
            } catch (InterruptedException e) {
                e.printStackTrace();
            }
            account.setMoney(balance - drawingMoney);
            System.out.println("Successful account transaction");
            System.out.println(Thread.currentThread().getName() + " your balance is " + account.getMoney());
        }
死锁
- 多个线程各自占有一些共享资源,并且都在等待其他线程释放被占用的共享资源,此时线程都停止执行,形成死锁.
- 一个拥有两个以上的对象锁时,就可能会发生"死锁问题"
//死锁:多个线程互相占用对方运行所需资源,形成僵持
public class DeadLock {
    public static void main(String[] args) {
        Makeup g1 = new Makeup(0,"g1");
        Makeup g2 = new Makeup(1,"g2");
        g1.start();
        g2.start();
    }

}
//
class Mirror{}


class Lipstick{}

class Makeup extends Thread {
//    镜子和口红
    static Lipstick lipstick = new Lipstick();
    static Mirror mirror = new Mirror();
    int choice;
    String name;

    public Makeup(int choice, String name) {
        this.choice = choice;
        this.name = name;
    }

    @Override
    public void run() {
        super.run();
        try {
            makeup();
        } catch (InterruptedException e) {
            e.printStackTrace();
        }
    }

    private void makeup() throws InterruptedException {
        if (choice == 0) {
//          线程1同时占用lipstick和mirror两把锁
            synchronized (lipstick) {
                System.out.println(name + " get lipstick lock");
                Thread.sleep(2000);
                synchronized (mirror) {
                    System.out.println(name + " get mirror lock");
                }
            }
        } else {
//          线程2也同时占用lipstick和mirror两把锁,形成死锁
            synchronized (mirror) {
                System.out.println(name + " get mirror lock");
                Thread.sleep(2000);
                synchronized (lipstick) {
                    System.out.println(name + " get lipstick lock");
                }
//                两个线程相互等待形成死锁
            }

        }
    }
}
解锁方法:一个线程同时只对一个对象加锁
synchronized (lipstick) {
        System.out.println(name + " get lipstick lock");
        Thread.sleep(2000);
        }
synchronized (mirror) {
        System.out.println(name + " get mirror lock");
        }

        }
        } else {
synchronized (mirror) {
        System.out.println(name + " get mirror lock");
        Thread.sleep(2000);
         }
synchronized (lipstick) {
        System.out.println(name + " get lipstick lock");
        }
Lock
-
JDK5开始,Java加入了显示定义同步锁来实现同步
-
锁提供了对共享资源的独占访问,每次只能对一个对象加锁,线程访问锁对象时,先获得lock对象
-
ReentrantLock类实现了Lock,同拥有于synchronized相同的并发现和内存语义.
-
再实现线程安全控制中常用ReentrantLock锁,可以显示加锁和释放锁
使用方法
class A{
    private final ReenTrantLock = new ReentrantLock();
    public void m(){
        lock.lock;
        try{

        }
        finally{
            lock.unlock();
        }
    }
}
示例1>抢票
public class TestLock {
    public static void main(String[] args) {
        TestLock2 testLock2 = new TestLock2();
        new Thread(testLock2).start();
        new Thread(testLock2).start();
        new Thread(testLock2).start();
    }
}
class TestLock2 implements Runnable {
    int tkNum = 10;
    private final ReentrantLock lock = new ReentrantLock();

    @Override
    public void run() {
        while (true) {
            try {
                lock.lock();//加锁
                if (tkNum > 0) {
                    try {
                        Thread.sleep(100);
                    } catch (InterruptedException e) {
                        e.printStackTrace();
                    }
                    System.out.println(tkNum--);

                }
                else break;
                }finally{
                    lock.unlock();//解锁
            }
        }
    }
}
synchronized和lock区别
- Lock用于显示锁(手动加锁和释放),synchronized锁时隐式锁,出了作用域自动释放
- Lock只有代码块加锁,synchronized由代码锁和方法锁
- Lock锁性能更好
线程协作
Java中解决线程通信的方法
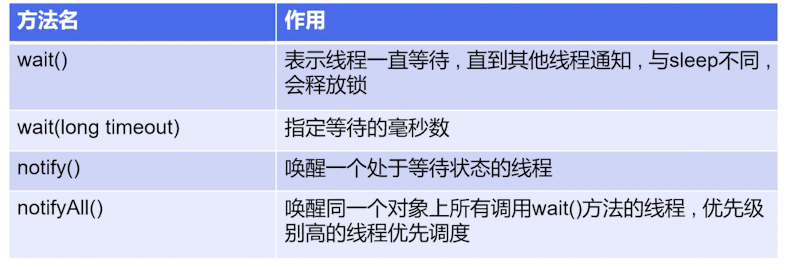
上诉所有方法均是object类的方法,只能在同步方法,或同步代码块中使用否则会抛出异常IllegalMonitorStateException
实例:生产者消费者问题
方法1:利用缓冲区解决,生产者将生产出来的产品放入容器,消费者从容器中消费产品。如果容器装满了产品,生产者线程停止生产,调用wait函数释放同步锁,开始等待。消费者线程获得同步锁,开始消费产品并调用notifyall函数,生产者线程停止wait可重于消费者线程竞争获得同步锁,进行生产。容器为空时同样调用这种方法,保证容器中产品的消费和生产保持动态平衡。
//测试:生产者消费者模型
//管程法:利用缓冲区解决
public class TestCom {
    public static void main(String[] args) {
        SynContainer container = new SynContainer();
        new Producer(container).start();
        new Consumer(container).start();
    }

}
//生产者
class Producer extends Thread{
    SynContainer container;

    public Producer(SynContainer container) {
        this.container = container;
    }

    @Override
    public void run() {
        super.run();
        for (int i = 0; i < 100; i++) {
            System.out.println("生产了"+i+"件产品");
            container.push(new Product(i));
        }
    }
}
//消费者
class Consumer extends Thread{
    SynContainer container;

    public Consumer(SynContainer container) {
        this.container = container;
    }

    @Override
    public void run() {
        super.run();
        for (int i = 0; i < 100; i++) {
            System.out.println("消费了第"+(container.pop().id+1)+"件产品");
        }
    }
}

//产品
class Product {
    int id;//产品编号

    public Product(int id) {
        this.id = id;
    }
}
//容器
class SynContainer{
    //    产品容器
    Product[] products = new Product[10];
    //    容器计数器
    int count;
    //生产者放入产品
    public synchronized void push(Product product){
        //容器满了,等待消费者消费
        if(count==products.length){
            try {
                this.wait();
            } catch (InterruptedException e) {
                e.printStackTrace();
            }
        }
        //没满,丢入产品
        products[count]=product;
        count++;
        //通知消费者消费
        this.notifyAll();
    }
    //消费者消费产品
    public synchronized Product pop(){
    //判断能否消费
    if(count==0){
    //等待生产者生产
        try {
            this.wait();
        } catch (InterruptedException e) {
            e.printStackTrace();
        }

    }
    count--;
    Product product = products[count];
    //消费完了,通知生产者生产
    this.notifyAll();
    return product;
    }
}
方法2:信号灯法:
产品定义了一个标志位,标志位为true时,生产者线程生产,消费者线程等待。生产者线程生产过后,标志位取非,调用notifyall函数让消费者停止等待。当标准为false时,消费者线程消费,生产者等待,消费者消费完过后,标准位取非,再调用notifyall函数让生产者线程停止等待。
往复执行保证生产消费平衡。
//生产者消费者问题:信号灯法,标志位
public class TestCom2 {
    public static void main(String[] args) {
        Product1 product1 = new Product1();
        new Producer1(product1).start();
        new Consumer1(product1).start();
    }
}

//生产者
class Producer1 extends Thread{
    Product1 product1;

    public Producer1(Product1 product1) {
        this.product1 = product1;
    }

    @Override
    public void run() {
        super.run();
        for (int i = 0; i < 20; i++) {
            if(i%2==0){
                this.product1.produce("Iron");
            }
            else {
                this.product1.produce("Aluminum");
            }
        }
    }
}


//消费者
class Consumer1 extends Thread{

    Product1 product1;

    public Consumer1(Product1 product1) {
        this.product1 = product1;
    }

    @Override
    public void run() {
        super.run();
        for (int i = 0; i < 20; i++) {
            product1.consume();

        }
    }
}


//产品
class Product1{
    String product;
    boolean flag = true;

//    生产
    public synchronized void produce(String product){
//      flag==false时暂停生产,解锁product1
        if(!flag){
            try {
                this.wait();
            } catch (InterruptedException e) {
                e.printStackTrace();
            }
        }
//      true时,显示生产,让消费者停止等待,flag取反
        System.out.println("Produced "+product);
        this.notifyAll();
        this.product=product;
        this.flag = !this.flag;
    }


//    消费
    public synchronized void consume(){
        if(flag){
            try {
                this.wait();
            } catch (InterruptedException e) {
                e.printStackTrace();
            }
        }
        System.out.println("Consumed "+product);
        this.notifyAll();
        this.flag = !this.flag;

    }

}
线程池
线程池出现
- 对于某些使用量大的资源,经常会对线程进行创建和销毁,不断的创建和销毁会极大的影响程序的运行效率。
解决思路:
- 提前创建好多个线程,放入线程池中,使用时直接获取,使用完后放回线程池中。
好处:
- 提高响应速度
- 降低资源消耗
- 便于线程管理
使用线程池
Executors ExecutorService
//测试线程池
public class TestPool {
    public static void main(String[] args) {
        //  1.创建服务,创建线程池
        //  newFixedThreadPool 创建固定大小线程池
        ExecutorService service = Executors.newFixedThreadPool(10);
        //  执行线程
        service.execute(new Thread_test());
        service.execute(new Thread_test());
        service.execute(new Thread_test());
        service.execute(new Thread_test());
        // 关闭链接
        service.shutdown();

    }

}

class Thread_test implements Runnable{
    @Override
    public void run() {
        for (int i = 0; i < 100; i++) {
            System.out.println(Thread.currentThread().getName()+i);
        }
    }
}

 浙公网安备 33010602011771号