用css3实现饼图
1、利用背景的锥形渐变(conic-gradient),此方法可以实现饼图:
 1 <!DOCTYPE html>
 2 <html>
 3 <head>
 4     <meta charset="utf-8">
 5     <title>利用圆锥渐变属性绘制扇形</title>
 6     <style>
 7         #grad1 {
 8             height: 200px;
 9             width: 200px;
10             background-color: red; /* 对于不支持渐变的浏览器 */
11             background-image: conic-gradient(red 0deg, red 90deg, yellow 90deg, yellow 180deg, green 180deg);
12             border-radius: 50%;
13         }
14     </style>
15 </head>
16 <body>
17
18     <h1>圆锥渐变 - 饼图</h1>
19
20     <div id="grad1"></div>
21
22 </body>
23 </html>

此方法简单,但是有个问题,无法选择各个扇形区域。
2、利用 Css3中的 clip-path实现饼图:
原理:clip-path 中的 path 模式和 svg 中的 path 是一样的,我们主要用到4个命令:M 移动,L 绘制直线,A 绘制弧形,Z 关闭路径。

上面是裁剪的路径流程示意图,中心点是固定的,需要计算出圆弧上的起止的两个坐标点。
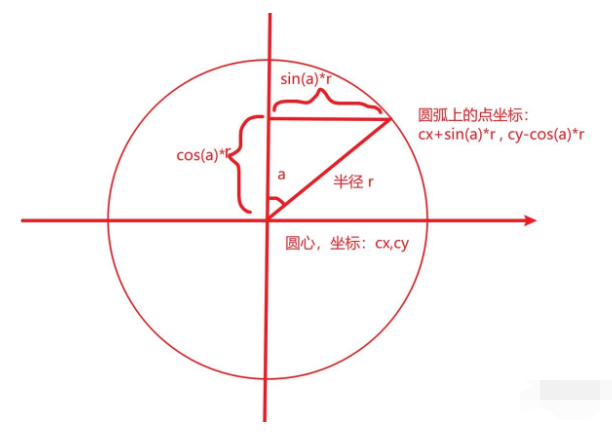
按图上的方法来计算坐标点(超出 90 度也适用),编写计算一个函数来计算对应百分比在圆弧上的点坐标。
1 function execPoint(cx, cy, r, ratio) {
2         // 计算弧度,一个整圆弧度是 2π
3         const rad = ratio* 2 * Math.PI
4         return {
5             x: cx + Math.sin(rad) * r,
6             y: cy - Math.cos(rad) * r
7         }
8     }
继续编写计算扇区路径的函数:
 1 function buildSectorPaths(data, width) {
 2         // 偏转量
 3         let offset = 0
 4         // 圆心坐标
 5         const cx = width / 2
 6         const cy = width / 2
 7         // 半径
 8         const r = width / 2
 9         const result = []
10         for (const datum of data) {
11             let path = `M ${cx},${cy}`
12             // 圆弧起点
13             const start = execPoint(cx, cy, r, offset)
14             path += ` L ${start.x},${start.y}`
15             // 圆弧终点
16             offset += datum.ratio
17             const end = execPoint(cx, cy, r, offset)
18             // 圆弧大关圆画大圆,否则画小圆
19             const angle = datum.ratio * 2 * Math.PI
20             path += ` A ${r},${r} 0,${angle > Math.PI ? 1 : 0},1 ${end.x},${end.y}`
21             path += ' Z'
22             result.push(path)
23         }
24         return result
25     }
完整的代码案例:
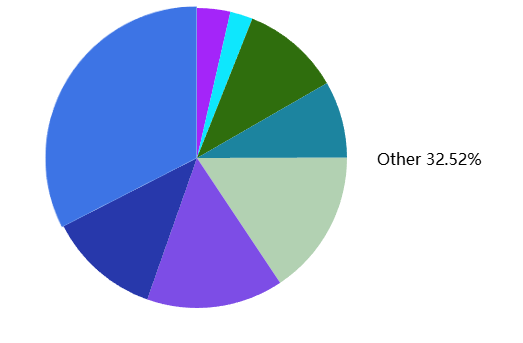
  1 <html lang="zh">
  2 <head>
  3     <meta charSet="utf-8" />
  4     <title>饼图demo</title>
  5     <style>
  6         .pie {
  7             width: 300px;
  8             height: 300px;
  9             position: relative;
 10             margin:0px auto;
 11         }
 12
 13             .pie .sector {
 14                 position: absolute;
 15                 width: 100%;
 16                 height: 100%;
 17                 transition: all .3s ease-in;
 18             }
 19
 20                 .pie .sector:hover { /** 鼠标放上去的时候,扇形放大 **/
 21                     transform: scale(1.1);
 22                 }
 23
 24             .pie .title {
 25                 display: none;
 26             }
 27
 28             .pie .sector:hover + .title { /** 鼠标放上去的时候,提示语的显示设置,这个可以进行优化 **/  /*加号用于选择紧接在另一个选择器之后的兄弟元素*/
 29                 position: absolute;
 30                 top: 50%;
 31                 left: 110%;
 32                 width: 120px;
 33                 transform: translateY(-50%);
 34                 display: block;
 35             }
 36     </style>
 37 </head>
 38 <body>
 39     <div id="pie">
 40     </div>
 41     <script>
 42     const data = [
 43         {ratio: 0.0358, title: 'Python 3.58%'},
 44         {ratio: 0.0244, title: 'C 2.44%'},
 45         {ratio: 0.1066, title: 'Java 10.66%'},
 46         {ratio: 0.0829, title: 'C++ 8.29%'},
 47         {ratio: 0.1568, title: 'C# 15.68%'},
 48         {ratio: 0.1474, title: 'Visual Basic 14.74%'},
 49         {ratio: 0.1209, title: 'JavaScript 12.09%'},
 50         {ratio: 0.3252, title: 'Other 32.52%'},
 51     ]
 52
 53
 54     function execPoint(cx, cy, r, ratio) {
 55         // 计算弧度,一个整圆弧度是 2π
 56         const rad = ratio * 2 * Math.PI
 57         return {
 58             x: cx + Math.sin(rad) * r,
 59             y: cy - Math.cos(rad) * r
 60         }
 61     }
 62
 63     /**
 64      * 构建裁剪路径
 65      * @param data 数据
 66      * @param width 元素宽度,宽高相同
 67      */
 68     function buildSectorPaths(data, width) {
 69         // 偏转量
 70         let offset = 0
 71         // 圆心坐标
 72         const cx = width / 2
 73         const cy = width / 2
 74         // 半径
 75         const r = width / 2
 76         const result = []
 77         for (const datum of data) {
 78             let path = `M ${cx},${cy}`
 79             // 圆弧起点
 80             const start = execPoint(cx, cy, r, offset)
 81             path += ` L ${start.x},${start.y}`
 82             // 圆弧终点
 83             offset += datum.ratio
 84             const end = execPoint(cx, cy, r, offset)
 85             // 圆弧大关圆画大圆,否则画小圆
 86             const angle = datum.ratio * 2 * Math.PI
 87             path += ` A ${r},${r} 0,${angle > Math.PI ? 1 : 0},1 ${end.x},${end.y}`
 88             path += ' Z'
 89             result.push(path)
 90         }
 91         return result;
 92     }
 93     function buildPie(containerEl, data) {
 94         containerEl.classList.add('pie')
 95         const paths = buildSectorPaths(data, 300)
 96         for (let i = 0; i < paths.length; i++) {
 97             const path = paths[i]
 98             const sector = document.createElement('div')
 99             sector.classList.add('sector')
100             sector.style.clipPath = `path('${path}')`
101             // 给个随机背景色
102             const r = Math.floor(Math.random() * 255);
103             const g = Math.floor(Math.random() * 255);
104             const b = Math.floor(Math.random() * 255);
105             sector.style.backgroundColor = `rgb(${r},${g},${b})`
106             containerEl.appendChild(sector)
107             // 新增加的标题
108             const title = document.createElement('div')
109             title.classList.add('title')
110             title.innerText = data[i].title
111             containerEl.appendChild(title);
112         }
113     }
114     const pie = document.getElementById('pie')
115     buildPie(pie, data)
116     </script>
117 </body>
118 </html>
效果图:
参考:https://zhuanlan.zhihu.com/p/456252382
https://www.runoob.com/cssref/func-conic-gradient.html
https://www.bilibili.com/opus/949223025540071461


 浙公网安备 33010602011771号