
1.简单入门springMVC
springMVC入门学习
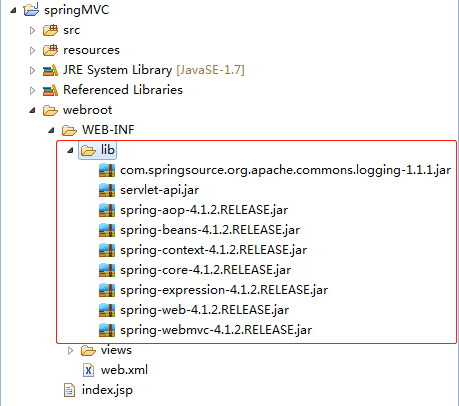
1.导入依赖jar
spring-beans-4.1.2.RELEASE.jar
spring-context-4.1.2.RELEASE.jar
spring-core-4.1.2.RELEASE.jar
spring-expression-4.1.2.RELEASE.jar
spring-web-4.1.2.RELEASE.jar
spring-webmvc-4.1.2.RELEASE.jar
spring-aop-4.1.2.RELEASE.jar
其它springMVC运行时依赖jar
com.springsource.org.apache.commons.logging-1.1.1.jar
在web.xml文件配置前端控制器
<?xml version="1.0" encoding="ISO-8859-1"?>
<web-app xmlns="http://java.sun.com/xml/ns/javaee" xmlns:xsi="http://www.w3.org/2001/XMLSchema-instance"
    xsi:schemaLocation="http://java.sun.com/xml/ns/javaee
                      http://java.sun.com/xml/ns/javaee/web-app_3_0.xsd"
    version="3.0" metadata-complete="true">

    <servlet>
        <servlet-name>springMVC</servlet-name>
        <servlet-class>org.springframework.web.servlet.DispatcherServlet</servlet-class>
        <init-param>
            <param-name>contextConfigLocation</param-name>
            <param-value>classpath:springMVC.xml</param-value>
        </init-param>
    </servlet>

    <servlet-mapping>
        <url-pattern>/</url-pattern>
        <servlet-name>springMVC</servlet-name>
    </servlet-mapping>

</web-app>
2.创建reources资源文件 springMVC.xml 具体内容如下显示
<?xml version="1.0" encoding="UTF-8"?>
<beans xmlns="http://www.springframework.org/schema/beans"
       xmlns:xsi="http://www.w3.org/2001/XMLSchema-instance" xmlns:p="http://www.springframework.org/schema/p"
       xmlns:context="http://www.springframework.org/schema/context"
       xmlns:aop="http://www.springframework.org/schema/aop" xmlns:jee="http://www.springframework.org/schema/jee"
       xmlns:tx="http://www.springframework.org/schema/tx"
       xmlns:mvc="http://www.springframework.org/schema/mvc"
       xsi:schemaLocation="
            http://www.springframework.org/schema/beans http://www.springframework.org/schema/beans/spring-beans.xsd
            http://www.springframework.org/schema/context http://www.springframework.org/schema/context/spring-context.xsd
            http://www.springframework.org/schema/jee http://www.springframework.org/schema/jee/spring-jee.xsd
            http://www.springframework.org/schema/aop http://www.springframework.org/schema/aop/spring-aop.xsd
            http://www.springframework.org/schema/tx http://www.springframework.org/schema/tx/spring-tx.xsd
            http://www.springframework.org/schema/mvc http://www.springframework.org/schema/mvc/spring-mvc.xsd
">

    <!--@RequestMapping标签MVC注解驱动 -->
    <mvc:annotation-driven/>

    <!--spring组件扫描哪些包 IOC组件扫描器-->
    <context:component-scan base-package="com.gzcgxt.erp"/>

    <!--配置视图解析器-->
    <bean class="org.springframework.web.servlet.view.InternalResourceViewResolver">
        <property name="prefix" value="/WEB-INF/views/"/>
        <property name="suffix" value=".jsp"/>
    </bean>

</beans>
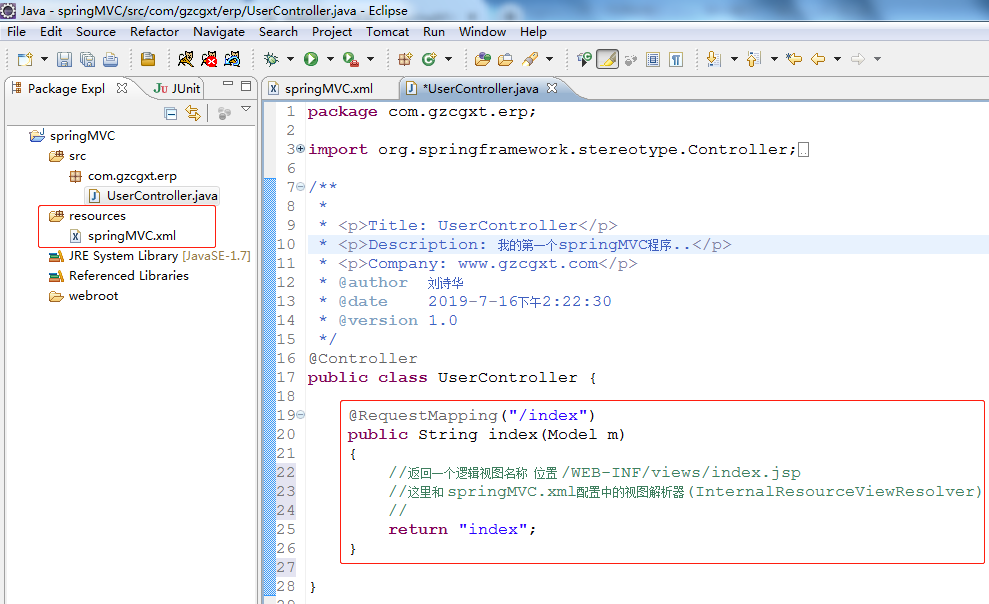
3.创建一个UserController控制器
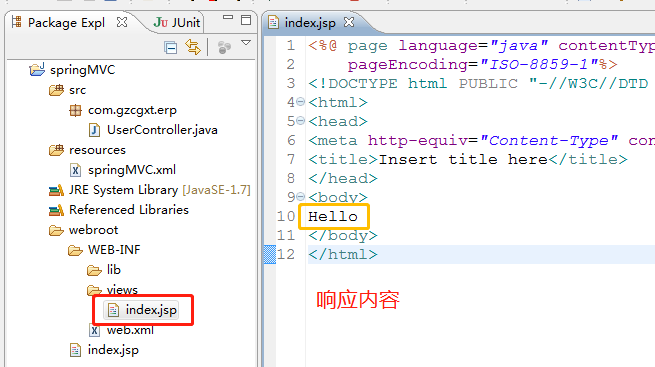
/WEB-INF/views/index.jsp 逻辑视图内容如下显示
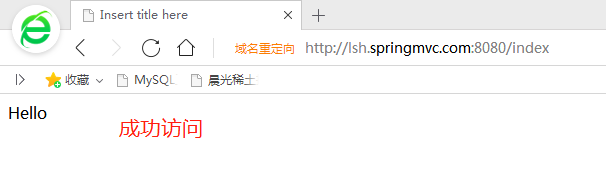
4.在tomcat服务器中配置好虚拟主机 路径设置在项目webroot就可以.
<Host appBase="lsh" autoDeploy="true"  name="lsh.springmvc.com"
                unpackWARs="true">
                <Context docBase="D:\OpenSource\mvndemo\springMVC\webroot"
                    path="" reloadable="true" crossContext="true" />
</Host>
5.测试运行

 浙公网安备 33010602011771号