android游戏开发框架libgdx的使用(十九)—使用自定义配置改进AVG游戏开发
本文使用的libgdx是0.92版本,和现在的最新版可能有一些不一样的地方。全文内容仅供参考。
先说明一下上一篇文章我使用了多张hiero图的字体绘制,因为我对源码进行了一些修改,本来想这次发出来的,但是我仔细调试了一下,发现对于多图的支持还是有问题,有些字会出现偏移。
这个只有继续尝试了…大家可以考虑使用ttf字库。
然后继续说上一篇,虽然实现了一个简单的效果,但是目前有很多不足。我把AVG游戏需要的资源全部提取出来,放在一个个文件夹中,然后通过配置文件加载这些数据。
libgdx的工具库
com.badlogic.gdx.utils就是libgdx的工具库,支持两种格式xml和json。
我最先倾向于使用json格式,但是反复想了想,虽然json的大小可能要小点,但是没有xml直观好读。
所以还是选择使用xml格式,读取xml文件使用XmlReader。
XmlReader reader=new XmlReader();
try {
    Element config=reader.parse(Gdx.files.internal("data/config.xml"));
    config.get("name"); //获取属性值,如果没有属性值则返回同名child的值
    config.getAttribute("name"); //获取属性值
} catch (IOException e) {
    e.printStackTrace();
}
配置文件格式分析
配置文件需要配置的内容其实就是上一篇我们硬编码进去的东西,有背景、边框、对话等。
我设计的比较随意,不一定是最好的,大家可以参考参考。
<?xml version="1.0" encoding="UTF-8"?>
<scene>
    <packfile>pack</packfile>
    <background>bg1</background>
    <border>
        <border-name>border</border-name>
        <border-left>26</border-left>
        <border-right>26</border-right>
        <border-top>31</border-top>
        <border-bottom>31</border-bottom>
    </border>
    <dialogues>
        <dialogue>
            <name>人物1</name>
            <data>这是对话1</data>
        </dialogue>
        <dialogue>
            <name>人物1</name>
            <data>这是对话2</data>
        </dialogue>
    </dialogues>
</scene>
如果对话比较长还可以继续添加<dialogue>节点。border-*那4个值就是NinePatch的左边距、右边距、上边距、下边距。
这里还有一个地方需要注意,如果我们需要切换场景怎么办?切换的场景可能是一个AVG场景,也可能是个一般的Screen。我本来想做个简单的IOC容器的,但后来想想也没有那么复杂。
在配置文件中加上一句
如果是一般Screen就是
<nextscreen type="standard">com.cnblogs.htynkn.screen.GameOver</nextscreen>
如果是AVG场景就是
<nextscreen type="avg">data/scene2/config.xml</nextscreen>
使用libgdx实现相关效果
其实整个原理和上一篇原理是一样的,唯一多的一个就是解析配置文件和场景跳转。
XmlReader xmlReader = new XmlReader();
try {
    Element config = xmlReader.parse(Gdx.files
            .internal(this.configFileName)); //加载配置文件
    atlas = new TextureAtlas(Gdx.files.internal(configFileName)
            .parent()
            + "/" + config.get("packfile")); //获取pack配置文件
    background = atlas.findRegion(config.get("background")); //创建背景图
    Element borderConfig = config.getChildByName("border"); //获取border配置
    border = new NinePatch(atlas.findRegion(borderConfig.getChild(0)
            .getText()), Integer.parseInt(borderConfig.getChild(1)
            .getText()), Integer.parseInt(borderConfig.getChild(2)
            .getText()), Integer.parseInt(borderConfig.getChild(3)
            .getText()), Integer.parseInt(borderConfig.getChild(4)
            .getText())); //实例化border
    dialogues = new ArrayList<String[]>();
    Element dialoguesConfig = config.getChildByName("dialogues"); //开始处理对话
    for (int i = 0; i < dialoguesConfig.getChildCount(); i++) {
        dialogues.add(new String[] {
                dialoguesConfig.getChild(i).get("name"),
                dialoguesConfig.getChild(i).get("data") });
    }
    Element screenConfig = config.getChildByName("nextscreen"); //处理场景
    if (screenConfig.getAttribute("type").equals("avg")) {
        nextScreen = new AVGScreen(this.game, screenConfig.getText());
    } else {
        try {
            nextScreen = (Screen) Class.forName(screenConfig.getText())
                    .newInstance();
        } catch (Exception e) {
            e.printStackTrace();
        }
    }

} catch (IOException e) {
    e.printStackTrace();
}
读取完成后构建舞台,然后绘制。唯一需要修改的就是场景跳转。
borderImage.setClickListener(new ClickListener() {

    @Override
    public void click(Actor actor, float x, float y) {
        if (currentSize < dialogues.size() - 1) {
            currentSize++;
        } else {
            if (nextScreen != null) {
                game.setScreen(nextScreen);
            }
        }
    }
});
完整代码:
package com.cnblogs.htynkn.ui;

import java.io.IOException;
import java.util.ArrayList;
import java.util.List;

import com.badlogic.gdx.Game;
import com.badlogic.gdx.Gdx;
import com.badlogic.gdx.Screen;
import com.badlogic.gdx.graphics.Color;
import com.badlogic.gdx.graphics.GL10;
import com.badlogic.gdx.graphics.Texture;
import com.badlogic.gdx.graphics.g2d.BitmapFont;
import com.badlogic.gdx.graphics.g2d.NinePatch;
import com.badlogic.gdx.graphics.g2d.TextureAtlas;
import com.badlogic.gdx.graphics.g2d.TextureRegion;
import com.badlogic.gdx.scenes.scene2d.Actor;
import com.badlogic.gdx.scenes.scene2d.Stage;
import com.badlogic.gdx.scenes.scene2d.ui.ClickListener;
import com.badlogic.gdx.scenes.scene2d.ui.Image;
import com.badlogic.gdx.scenes.scene2d.ui.Label;
import com.badlogic.gdx.scenes.scene2d.ui.Label.LabelStyle;
import com.badlogic.gdx.utils.Array;
import com.badlogic.gdx.utils.XmlReader;
import com.badlogic.gdx.utils.XmlReader.Element;

public class AVGScreen implements Screen {

    private String configFileName;
    private Stage stage; // 舞台
    private List<String[]> dialogues; // 对话
    private BitmapFont bitmapFont; // 文字
    private NinePatch border; // 边框
    private int currentSize; // 当前对话序号
    private TextureAtlas atlas;
    private TextureRegion background;
    private Screen nextScreen;
    private Game game;

    public AVGScreen(Game game, String configFileName) {
        this.game = game;

        bitmapFont = new BitmapFont(Gdx.files.internal("font/chinese.fnt"),
                false);

        this.configFileName = configFileName;
        XmlReader xmlReader = new XmlReader();
        try {
            Element config = xmlReader.parse(Gdx.files
                    .internal(this.configFileName));
            atlas = new TextureAtlas(Gdx.files.internal(configFileName)
                    .parent()
                    + "/" + config.get("packfile"));
            background = atlas.findRegion(config.get("background"));
            Element borderConfig = config.getChildByName("border");
            border = new NinePatch(atlas.findRegion(borderConfig.getChild(0)
                    .getText()), Integer.parseInt(borderConfig.getChild(1)
                    .getText()), Integer.parseInt(borderConfig.getChild(2)
                    .getText()), Integer.parseInt(borderConfig.getChild(3)
                    .getText()), Integer.parseInt(borderConfig.getChild(4)
                    .getText()));
            dialogues = new ArrayList<String[]>();
            Element dialoguesConfig = config.getChildByName("dialogues");
            for (int i = 0; i < dialoguesConfig.getChildCount(); i++) {
                dialogues.add(new String[] {
                        dialoguesConfig.getChild(i).get("name"),
                        dialoguesConfig.getChild(i).get("data") });
            }
            Element screenConfig = config.getChildByName("nextscreen");
            if (screenConfig.getAttribute("type").equals("avg")) {
                nextScreen = new AVGScreen(this.game, screenConfig.getText());
            } else {
                try {
                    nextScreen = (Screen) Class.forName(screenConfig.getText())
                            .newInstance();
                } catch (Exception e) {
                    e.printStackTrace();
                }
            }

        } catch (IOException e) {
            e.printStackTrace();
        }
    }

    @Override
    public void dispose() {
        bitmapFont.dispose();
        stage.dispose();
    }

    @Override
    public void hide() {
        // TODO Auto-generated method stub

    }

    @Override
    public void pause() {
        // TODO Auto-generated method stub

    }

    @Override
    public void render(float delta) {
        Gdx.gl.glClear(GL10.GL_COLOR_BUFFER_BIT);

        ((Label) stage.findActor("label"))
                .setText(dialogues.get(currentSize)[0] + " : "
                        + dialogues.get(currentSize)[1]);

        stage.act(Gdx.graphics.getDeltaTime());
        stage.draw();
    }

    @Override
    public void resize(int width, int height) {
        // TODO Auto-generated method stub

    }

    @Override
    public void resume() {
        // TODO Auto-generated method stub

    }

    @Override
    public void show() {
        currentSize = 0;

        stage = new Stage(Gdx.graphics.getWidth(), Gdx.graphics.getHeight(),
                false);
        Image backgroundImage = new Image(background);
        backgroundImage.x = backgroundImage.y = 0;
        backgroundImage.setFillParent(true);

        Image borderImage = new Image(border);
        borderImage.x = borderImage.y = 0;
        borderImage.width = Gdx.graphics.getWidth();
        borderImage.height = Gdx.graphics.getHeight() / 4;
        borderImage.setClickListener(new ClickListener() {

            @Override
            public void click(Actor actor, float x, float y) {
                if (currentSize < dialogues.size() - 1) {
                    currentSize++;
                } else {
                    if (nextScreen != null) {
                        game.setScreen(nextScreen);
                    }
                }
            }
        });

        LabelStyle labelStyle = new LabelStyle(bitmapFont, Color.WHITE);
        Label label = new Label("", labelStyle, "label");
        label.x = border.getLeftWidth() + 10;
        label.y = borderImage.height - border.getTopHeight() - 10;
        stage.addActor(backgroundImage);
        stage.addActor(borderImage);
        stage.addActor(label);
        Gdx.input.setInputProcessor(stage);
    }
}
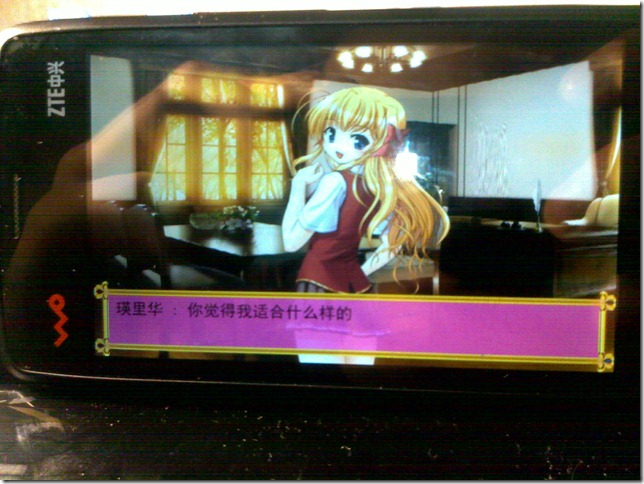
最后贴上效果图,这是我正在做的一个东西:
作者:黄云坤
出处:http://www.huangyunkun.com/
本文版权归作者所有,欢迎转载,但未经作者同意必须保留此段声明,且在文章页面明显位置给出原文连接,否则保留追究法律责任的权利。
支持:
新浪微博


 浙公网安备 33010602011771号