
Tensorflow2 自定义数据集图片完成图片分类任务
对于自定义数据集的图片任务,通用流程一般分为以下几个步骤:
-
Load data
-
Train-Val-Test
-
Build model
-
Transfer Learning
其中大部分精力会花在数据的准备和预处理上,本文用一种较为通用的数据处理手段,并通过手动构建,简单模型, 层数较深的resnet网络,和基于VGG19的迁移学习。
你可以通过这个例子,快速搭建网络,并训练处一个较为满意的结果。
1. Load data
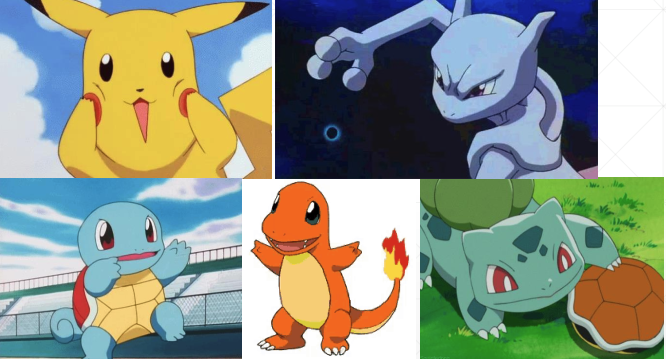
数据集来自Pokemon的5分类数据, 每一种的图片数量为200多张,是一个较小型的数据集。
官方项目链接:
https://www.pyimagesearch.com/2018/04/16/keras-and-convolutional-neural-networks-cnns/
1.1 数据集介绍
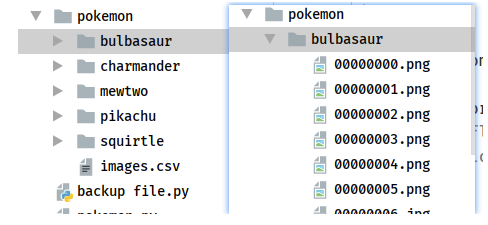
Pokemon文件夹中包含5个子文件,其中每个子文件夹名为对应的类别名。文件夹中包含有png, jpeg的图片文件。
1.2 解题思路
-
由于文件夹中没有划分,训练集和测试集,所以需要构建一个csv文件读取所有的文件,及其类别
-
shuffle数据集以后,划分Train_val_test
-
对数据进行预处理, 数据标准化,数据增强, 可视化处理
"""python
# 创建数字编码表
import os
import glob
import random
import csv
import tensorflow as tf
from tensorflow import keras
import matplotlib.pyplot as plt
import time
def load_csv(root, filename, name2label):
"""
将分散在各文件夹中的图片, 转换为图片和label对应的一个dataset文件, 格式为csv
:param root: 文件路径(每个子文件夹中的文件属于一类)
:param filename: 文件名
:param name2label: 类名编码表 {'类名1':0, '类名2':1..}
:return: images, labels
"""
# 判断是否csv文件已经生成
if not os.path.exists(os.path.join(root, filename)): # join-将路径与文件名何为一个路径并返回(没有会生成新路径)
images = [] # 存的是文件路径
for name in name2label.keys():
# pokemon\pikachu\00000001.png
# glob.glob() 利用通配符检索路径内的文件,类似于正则表达式
images += glob.glob(os.path.join(root, name, '*')) # png, jpg, jpeg
print(name2label)
print(len(images), images)
random.shuffle(images)
with open(os.path.join(root, filename), 'w', newline='') as f:
writer = csv.writer(f)
for img in images:
name = img.split(os.sep)[1] # os.sep 表示分隔符 window-'\' , linux-'/'
label = name2label[name] # 0, 1, 2..
# 'pokemon\bulbasaur\00000000.png', 0
writer.writerow([img, label]) # 如果不设定newline='', 2个数据会分为2行写
print('write into csv file:', filename)
读取现有文件
images, labels = [], []
with open(os.path.join(root, filename)) as f:
reader = csv.reader(f)
for row in reader:
# 'pokemon\bulbasaur\00000000.png', 0
img, label = row
label = int(label) # str-> int
images.append(img)
labels.append(label)
assert len(images) == len(labels)
return images, labels
def load_pokemon(root, mode='train'):
"""
# 创建数字编码表
:param root: root path
:param mode: train, valid, test
:return: images, labels, name2label
"""
name2label = {} # {'bulbasaur': 0, 'charmander': 1, 'mewtwo': 2, 'pikachu': 3, 'squirtle': 4}
for name in sorted(os.listdir(os.path.join(root))):
# sorted() 是为了复现结果的一致性
# os.listdir - 返回路径下的所有文件(文件夹,文件)列表
if not os.path.isdir(os.path.join(root, name)): # 是否为文件夹且是否存在
continue
# 每个类别编码一个数字
name2label[name] = len(name2label)
读取label
images, labels = load_csv(root, 'images.csv', name2label)
划分数据集 [6:2:2]
if mode == 'train':
images = images[:int(0.6 * len(images))]
labels = labels[:int(0.6 * len(labels))] # len(images) == len(labels)
elif mode == 'valid':
images = images[int(0.6 * len(images)):int(0.8 * len(images))]
labels = labels[int(0.6 * len(labels)):int(0.8 * len(labels))]
else:
images = images[int(0.8 * len(images)):]
labels = labels[int(0.8 * len(labels)):]
return images, labels, name2label
imagenet 数据集均值, 方差
img_mean = tf.constant([0.485, 0.456, 0.406]) # 3 channel
img_std = tf.constant([0.229, 0.224, 0.225])
def normalization(x, mean=img_mean, std=img_std):
# [224, 224, 3]
x = (x - mean) / std
return x
def denormalization(x, mean=img_mean, std=img_std):
x = x * std + mean
return x
def preprocess(x, y):
# x: path, y: label
x = tf.io.read_file(x) # 2进制
# x = tf.image.decode_image(x)
x = tf.image.decode_jpeg(x, channels=3) # RGBA
x = tf.image.resize(x, [244, 244])
data augmentation
x = tf.image.random_flip_up_down(x)
x = tf.image.random_flip_left_right(x)
x = tf.image.random_crop(x, [224, 224, 3]) # 模型缩减比例不宜过大,否则会增大训练难度
x = tf.cast(x, dtype=tf.float32) / 255. # unit8 -> float32
# U[0,1] -> N(0,1) # 提高训练准确度
x = normalization(x)
y = tf.convert_to_tensor(y)
return x, y
def main():
images, labels, name2label = load_pokemon('pokemon', 'train')
print('images:', len(images), images)
print('labels:', len(labels), labels)
# print(name2label)
.map()函数要位于.batch()之前, 否则 x=tf.io.read_file()会一次读取一个batch的图片,从而报错
db = tf.data.Dataset.from_tensor_slices((images, labels)).map(preprocess).shuffle(1000).batch(32)
tf.summary()
提供了各类方法(支持各种多种格式)用于保存训练过程中产生的数据(比如loss_value、accuracy、整个variable),
这些数据以日志文件的形式保存到指定的文件夹中。
数据可视化:而tensorboard可以将tf.summary()
记录下来的日志可视化,根据记录的数据格式,生成折线图、统计直方图、图片列表等多种图。
tf.summary()
通过递增的方式更新日志,这让我们可以边训练边使用tensorboard读取日志进行可视化,从而实时监控训练过程。
writer = tf.summary.create_file_writer('logs')
for step, (x, y) in enumerate(db):
with writer.as_default():
x = denormalization(x)
tf.summary.image('img', x, step=step, max_outputs=9) # STEP:默认选项,指的是横轴显示的是训练迭代次数
time.sleep(5)
if name == 'main':
main()
"""
2. 构建模型进行训练
2.1 自定义小型网络
由于数据集数量较少,大型网络的训练中往往会出现过拟合情况,这里就定义了一个2层卷积的小型网络。
引入early_stopping回调函数后,3个epoch没有较大变化的情况下,模型训练的准确率为0.8547
"""
# 1. 自定义小型网络
model = keras.Sequential([
layers.Conv2D(16, 5, 3),
layers.MaxPool2D(3, 3),
layers.ReLU(),
layers.Conv2D(64, 5, 3),
layers.MaxPool2D(2, 2),
layers.ReLU(),
layers.Flatten(),
layers.Dense(64),
layers.ReLU(),
layers.Dense(5)
])
model.build(input_shape=(None, 224, 224, 3))
model.summary()
early_stopping = EarlyStopping(
monitor='val_loss',
patience=3,
min_delta=0.001
)
model.compile(optimizer=optimizers.Adam(lr=1e-3),
loss=losses.CategoricalCrossentropy(from_logits=True),
metrics=['accuracy'])
model.fit(db_train, validation_data=db_val, validation_freq=1, epochs=100,
callbacks=[early_stopping])
model.evaluate(db_test)
"""
2.2 自定义的Resnet网络
resnet 网络对于层次较深的网络的可训练型提升很大,主要是通过一个identity layer保证了深层次网络的训练效果不会弱于浅层网络。
其他文章中有详细介绍resnet的搭建,这里就不做赘述, 这里构建了一个resnet18网络, 准确率0.7607。
"""
import os
import numpy as np
import tensorflow as tf
from tensorflow import keras
from tensorflow.keras import layers
tf.random.set_seed(22)
np.random.seed(22)
os.environ['TF_CPP_MIN_LOG_LEVEL'] = '2'
assert tf.version.startswith('2.')
class ResnetBlock(keras.Model):
def init(self, channels, strides=1):
super(ResnetBlock, self).init()
self.channels = channels
self.strides = strides
self.conv1 = layers.Conv2D(channels, 3, strides=strides,
padding=[[0, 0], [1, 1], [1, 1], [0, 0]])
self.bn1 = keras.layers.BatchNormalization()
self.conv2 = layers.Conv2D(channels, 3, strides=1,
padding=[[0, 0], [1, 1], [1, 1], [0, 0]])
self.bn2 = keras.layers.BatchNormalization()
if strides != 1:
self.down_conv = layers.Conv2D(channels, 1, strides=strides, padding='valid')
self.down_bn = tf.keras.layers.BatchNormalization()
def call(self, inputs, training=None):
residual = inputs
x = self.conv1(inputs)
x = tf.nn.relu(x)
x = self.bn1(x, training=training)
x = self.conv2(x)
x = tf.nn.relu(x)
x = self.bn2(x, training=training)
残差连接
if self.strides != 1:
residual = self.down_conv(inputs)
residual = tf.nn.relu(residual)
residual = self.down_bn(residual, training=training)
x = x + residual
x = tf.nn.relu(x)
return x
class ResNet(keras.Model):
def init(self, num_classes, initial_filters=16, kwargs):
super(ResNet, self).init(kwargs)
self.stem = layers.Conv2D(initial_filters, 3, strides=3, padding='valid')
self.blocks = keras.models.Sequential([
ResnetBlock(initial_filters * 2, strides=3),
ResnetBlock(initial_filters * 2, strides=1),
# layers.Dropout(rate=0.5),
ResnetBlock(initial_filters * 4, strides=3),
ResnetBlock(initial_filters * 4, strides=1),
ResnetBlock(initial_filters * 8, strides=2),
ResnetBlock(initial_filters * 8, strides=1),
ResnetBlock(initial_filters * 16, strides=2),
ResnetBlock(initial_filters * 16, strides=1),
])
self.final_bn = layers.BatchNormalization()
self.avg_pool = layers.GlobalMaxPool2D()
self.fc = layers.Dense(num_classes)
def call(self, inputs, training=None):
# print('x:',inputs.shape)
out = self.stem(inputs, training = training)
out = tf.nn.relu(out)
print('stem:',out.shape)
out = self.blocks(out, training=training)
# print('res:',out.shape)
out = self.final_bn(out, training=training)
# out = tf.nn.relu(out)
out = self.avg_pool(out)
print('avg_pool:',out.shape)
out = self.fc(out)
print('out:',out.shape)
return out
def main():
num_classes = 5
resnet18 = ResNet(5)
resnet18.build(input_shape=(None, 224, 224, 3))
resnet18.summary()
if name == 'main':
main()
"""
"""
# 2.resnet18训练, 图片数量较小,训练结果不是特别好
# resnet = ResNet(5) # 0.7607
# resnet.build(input_shape=(None, 224, 224, 3))
# resnet.summary()
"""
2.3 VGG19迁移学习
迁移学习利用了数据集之间的相似性,对于数据集数量较少的时候,训练效果会远优于其他。
在训练过程中,使用include_top=False, 去掉最后分类的基层Dense, 重新构建并训练就可以了。准确率0.9316
"""
# 3. VGG19迁移学习,迁移学习利用数据集之间的相似性, 结果远好于其他2种
# 为了方便,这里仍然使用resnet命名
net = tf.keras.applications.VGG19(weights='imagenet', include_top=False, pooling='max' )
net.trainable = False
resnet = keras.Sequential([
net,
layers.Dense(5)
])
resnet.build(input_shape=(None, 224, 224, 3)) # 0.9316
resnet.summary()
early_stopping = EarlyStopping(
monitor='val_loss',
patience=3,
min_delta=0.001
)
resnet.compile(optimizer=optimizers.Adam(lr=1e-3),
loss=losses.CategoricalCrossentropy(from_logits=True),
metrics=['accuracy'])
resnet.fit(db_train, validation_data=db_val, validation_freq=1, epochs=100,
callbacks=[early_stopping])
resnet.evaluate(db_test)
"""
附录:
train_scratch.py 代码
"""
import os
os.environ['TF_CPP_MIN_LOG_LEVEL'] = '2'
import tensorflow as tf
import numpy as np
from tensorflow import keras
from tensorflow.keras import layers, optimizers, losses
from tensorflow.keras.callbacks import EarlyStopping
tf.random.set_seed(22)
np.random.seed(22)
assert tf.version.startswith('2.')
设置GPU显存按需分配
gpus = tf.config.experimental.list_physical_devices('GPU')
if gpus:
try:
# Currently, memory growth needs to be the same across GPUs
for gpu in gpus:
tf.config.experimental.set_memory_growth(gpu, True)
logical_gpus = tf.config.experimental.list_logical_devices('GPU')
print(len(gpus), "Physical GPUs,", len(logical_gpus), "Logical GPUs")
except RuntimeError as e:
# Memory growth must be set before GPUs have been initialized
print(e)
from pokemon import load_pokemon, normalization
from resnet import ResNet
def preprocess(x, y):
# x: 图片的路径,y:图片的数字编码
x = tf.io.read_file(x)
x = tf.image.decode_jpeg(x, channels=3) # RGBA
# 图片缩放
# x = tf.image.resize(x, [244, 244])
# 图片旋转
# x = tf.image.rot90(x,2)
# 随机水平翻转
x = tf.image.random_flip_left_right(x)
# 随机竖直翻转
# x = tf.image.random_flip_up_down(x)
图片先缩放到稍大尺寸
x = tf.image.resize(x, [244, 244])
# 再随机裁剪到合适尺寸
x = tf.image.random_crop(x, [224, 224, 3])
x: [0,255]=> -1~1
x = tf.cast(x, dtype=tf.float32) / 255.
x = normalization(x)
y = tf.convert_to_tensor(y)
y = tf.one_hot(y, depth=5)
return x, y
batchsz = 32
create train db
images1, labels1, table = load_pokemon('pokemon', 'train')
db_train = tf.data.Dataset.from_tensor_slices((images1, labels1))
db_train = db_train.shuffle(1000).map(preprocess).batch(batchsz)
# create validation db
images2, labels2, table = load_pokemon('pokemon', 'valid')
db_val = tf.data.Dataset.from_tensor_slices((images2, labels2))
db_val = db_val.map(preprocess).batch(batchsz)
# create test db
images3, labels3, table = load_pokemon('pokemon', mode='test')
db_test = tf.data.Dataset.from_tensor_slices((images3, labels3))
db_test = db_test.map(preprocess).batch(batchsz)
1. 自定义小型网络
resnet = keras.Sequential([
layers.Conv2D(16, 5, 3),
layers.MaxPool2D(3, 3),
layers.ReLU(),
layers.Conv2D(64, 5, 3),
layers.MaxPool2D(2, 2),
layers.ReLU(),
layers.Flatten(),
layers.Dense(64),
layers.ReLU(),
layers.Dense(5)
]) # 0.8547
2.resnet18训练, 图片数量较小,训练结果不是特别好
resnet = ResNet(5) # 0.7607
resnet.build(input_shape=(None, 224, 224, 3))
resnet.summary()
3. VGG19迁移学习,迁移学习利用数据集之间的相似性, 结果远好于其他2种
net = tf.keras.applications.VGG19(weights='imagenet', include_top=False, pooling='max' )
net.trainable = False
resnet = keras.Sequential([
net,
layers.Dense(5)
])
resnet.build(input_shape=(None, 224, 224, 3)) # 0.9316
resnet.summary()
early_stopping = EarlyStopping(
monitor='val_loss',
patience=3,
min_delta=0.001
)
resnet.compile(optimizer=optimizers.Adam(lr=1e-3),
loss=losses.CategoricalCrossentropy(from_logits=True),
metrics=['accuracy'])
resnet.fit(db_train, validation_data=db_val, validation_freq=1, epochs=100,
callbacks=[early_stopping])
resnet.evaluate(db_test)
"""

 浙公网安备 33010602011771号