SpringBoot学习小结
前言
所有的技术框架的发展似乎都遵循了一条主线规律:
1.从一个复杂应用场景衍生一种规范框架,人们只需要进行各种配置而不需要自己去实现它,这时候强大的配置功能成了优点;
2.发展到一定程度之后,人们根据实际生产应用情况,选取其中实用功能和设计精华,重构出一些轻量级的框架;
3.之后为了提高开发效率,嫌弃原先的各类配置过于麻烦,于是开始提倡“约定大于配置″,进而衍生出一些一站式的解决方案。
这就是Java企业级应用->J2EE-> spring-> spring boot的过程。
总结笔记,课程来自: https://www.kuangstudy.com/course/play/1321003950052999170
一、SpringBoot是什么?
1.概念
- SpringBoot是一个javaweb开发的框架。
- 对比于其他Javaweb框架,更简化开发,约定大于配置。
2.目的
- 让大家更容易使用spring,更容易集成各种常用的中间件、开源软件。
- SpringBoot基于Spring开发, SpringBoot本身并不提供Spring框架的核心特性以及扩展功能,只是用于快速、敏捷地开发新一代基于Spring框架的应用程序。
- SpringBoot不是用来替代spring的解决方案,而是和spring框架紧密结合提升spring开发者体验的工具。
3.什么是微服务
- 微服务是一种架构风格,它要求我们在开发一个应用的时候,这个应用必须构建成一系列小服务的组合;可以通过http的方式进行互通。
- MVC架构,MVVM架构,微服务架构。
- 微服务架构,就是把每个功能元素独立出来。把独立出来的功能元素的动态组合,需要的功能元素才去拿来组合,需要多一些时可以整合多个功能元素。
- 所以微服务架构是对功能元素进行复制,而没有对整个应用进行复制。
优点:1.节省了调用资源。2.每个功能元素的服务都是一个可替换的、可独立升级的软件代码。
4.单体应用架构
- 单体应用架构(all in one)是指,我们将一个应用的中的所有应用服务都封装在一个应用中;
- 无论是ERP、CRM或是其他什么系统看,都把数据库访问,web访问,等等各个功能放到一个war包内。
优点:易于开发和测试,方便部署;当需要扩展时,只需要将war复制多份,然后放到多个服务器上,再做个负载均衡就可以了。
缺点:修改一个非常小的地方,都需要停掉整个服务,重新打包部署这个应用War包;对于一个大型应用,如何维护,如何分工合作都是问题。
5.如何构建微服务
二、SpringBoot原理
1.pom.xml
- spring-boot-dependencie:核心依赖在父工程中。大部分依赖的版本都是在父工程中管理着,我们拿过来调用即可,因此我们引用一些依赖时不需要指定版本。并且父工程中已经帮我们配置好资源过滤和一些插件。
2.启动器
<dependency>
    <groupId>org.springframework.boot</groupId>
    <artifactId>spring-boot-starter-web</artifactId>
</dependency>
- 启动器其实就是springboot的启动场景,比如spring-boot-starter-web启动器会帮我们自动导入web环境所有依赖。
- springboot会将所有的功能场景,都变成一个个启动器。
- 我们要使用什么功能,只需要找到对应的启动器就可以了即starter
3.主程序
3.1注解
-
@SpringBootConfiguration:springboot的配置。
@Configuration:spring配置类。
@Component:说明他也是spring的一个组件。
-
@EnableAutoConfiguration:自动导入配置。
-
@ComponentScan():扫描当前主启动类同级的包。(扫描的包到Registrar.class注册)
自动导包的核心AutoConfigurationImportSelector类:选择了什么东西
AutoConfigurationImportSelector类中的方法:
// 1.获得自动配置实体(调用“获取所有候选配置”的方法获取实体)。
protected AutoConfigurationEntry getAutoConfigurationEntry(AnnotationMetadata annotationMetadata)
// 2.获取所有候选配置(候选配置是哪些配置)。
List<String> getCandidateConfigurations(AnnotationMetadata metadata, AnnotationAttributes attributes){
List<String> configurations = SpringFactoriesLoader.loadFactoryNames(this.getSpringFactoriesLoaderFactoryClass(), this.getBeanClassLoader());
Assert.notEmpty(configurations, "No auto configuration classes found in META-INF/spring.factories. If you are using a custom packaging, make sure that file is correct.");
return configurations;
}
// 3.候选配置是所有标注@EnableAutoConfiguration注解的类下的所有配置。(即获取主启动类下的所有配置)
protected Class<?> getSpringFactoriesLoaderFactoryClass() {
return EnableAutoConfiguration.class;
}
// 4.获取所有的配置从哪里来,上面第二个方法调用了loadFactoryNames方法
public static List<String> loadFactoryNames(Class<?> factoryType, @Nullable ClassLoader classLoader) {
String factoryTypeName = factoryType.getName();
return (List)loadSpringFactories(classLoader).getOrDefault(factoryTypeName, Collections.emptyList());
}
// 5.loadFactoryNames方法调用了loadSpringFactories方法
// 6.loadSpringFactories方法从项目资源和系统资源中获取配置文件
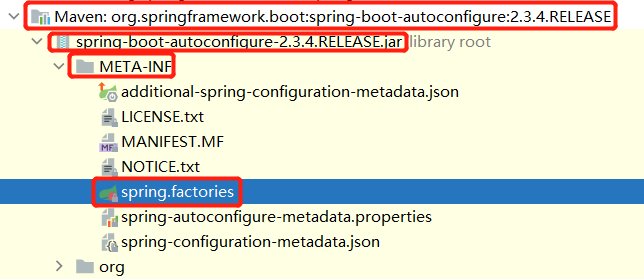
classLoader.getResources("META-INF/spring.factories") ClassLoader.getSystemResources("META-INF/spring.factories")
META-INF/spring.factories:自动配置的核心文件。
// 遍历所有的资源,封装成properties供我们使用
Properties properties = PropertiesLoaderUtils.loadProperties(resource);
结论: springboot所有自动配置都是在启动的时候扫描并加载: 所有的自动配置类都在spring.factories里面,但是不一定生效;要判断条件是否成立:只要导入了对应的start,就有对应的启动器,有了启动器,我们自动装配就会生效,然后自动配置就可以成功。
详细步骤:
- springboot在启动的时候,从类路径下/META-INF/spring.factories获取指定的值。
- 将这些自动配置的类导入容器,自动配置就会生效,帮我进行自动配置。
- 以前我们需要自动配置的东西,现在springboot帮我们做了。
- 整合javaEE,解决方案和自动配置的东西都在spring-boot-autoconfigure-2.2.0.RELEASE.jar这个包下。
- 它会把所有需要导入的组件,以类名的方式返回,这些组件就会被添加到容器中。
- 容器中也会存在非常多的XXXAutoConfiguration的文件(@Bean),就是这些类给容器中导入了这个场景需要的所有组件并自动配置。@Configuration(JavaConfig)
- 有了自动配置类,免去了我们手动编写配置文件的工作。
3.2Run方法
main方法中的run方法启动会开启一个服务。
@SpringBootApplication
public class SpringbootWeb01Application {
    public static void main(String[] args) {
        // 该方法返回一个ConfigurableApplicationContext对象
        // 参数一:应用入口的类, 参数二:命令行参数
        SpringApplication.run(SpringbootWeb01Application.class, args);
    }
}
3.3SpringApplication.run分析
主要两部分
- 一是SpringApplication的实例化。
- 二是run方法的执行。
3.4SpringApplication类主要做了四件事情
- 判断应用的类型是普通项目还是web项目。(普通项目直接就结束了,web项目可以一直启动)
- 查找并加载所有可用初始化器,设置到initializers属性中。
- 查找所有的应用程序监听器,设置到listeners属性中。(获取上下文处理bean)
- 推断并设置main方法的定义类,找到运行的主类。
4.自动装配再理解
springboot配置文件能够配置的东西都有一个固有的规律:
他们都有对应的xxxAutoConfiguration配置类,这个配置类都会绑定一个xxxProperties类,xxxProperties类和springboot的配置文件绑定;这样我们就可以在springboot配置文件中自定义配置了。
4.1自动装配原理再理解
- springboot启动会加载大量的自动配置类。
- 我们要看我们需要的功能有没有在springboot默认写好的自动配置类中。
- 我们看这个自动配置类中配置了哪些组件。(不存在就需要全部手动写,如果存在我们就不需要再手动配置;也可以自定义配置覆盖默认的配置)
- 给容器中自动配置类添加组件时,会从xxxProperties类中获取相应的属性。我们只需要在springboot配置中指定这些属性就可以了。
- xxxAutoConfiguration:自动配置类(给容器中添加组件)
- xxxProperties:封装配置文件中的属性
5.自动配置类中存放了大量的配置没有全部都生效的原因
spring的底层注解:根据不同的条件,来判断当前配置或者类是否生效。@Conditionalxxx
@ConditionalOnBean(仅仅在当前上下文中存在某个对象时,才会实例化一个Bean)
@ConditionalOnClass(某个class位于类路径上,才会实例化一个Bean)
@ConditionalOnExpression(当表达式为true的时候,才会实例化一个Bean)
@ConditionalOnMissingBean(仅仅在当前上下文中不存在某个对象时,才会实例化一个Bean)
@ConditionalOnMissingClass(某个class类路径上不存在的时候,才会实例化一个Bean)
@ConditionalOnNotWebApplication(不是web应用)
三、SpringBoot
1.yaml语法
SpringBoot使用一个全局的配置文件,配置文件名是固定的。
- application.properties(语法结构:key=value)
- application.yml(语法结构:key:空格value)
全局配置文件的作用:修改SpringBoot自动配置的默认值,它会在底层帮我们自动配置。
1.1基本语法
# 对象
student:
  name: 'zs'
  age: 12
# 对象的行内写法
student1: {name: 'zs',age: 12}
# 数组
pets:
  - cat
  - dog
  - pig
# 数组行内写法
pets1: [cat,dog,pig]
1.2@ConfigurationProperties绑定application.yml配置的属性(属性需要set方法才能取值)
/*
ConfigurationProperties作用
将yml配置文件中配置的每个属性的值,映射到这个组件中;
告诉SpringBoot将本类中的所有属性和yml配置文件中相关的配置进行绑定;
参数prefix="person":将yml配置文件中的person下面的所有属性和本类属性对应。
(只有这个组件是容器中的组件,才能使用容器提供的ConfigurationProperties功能)
 */
 // 可以直接拿到复杂类型的值
@Component
@ConfigurationProperties(prefix = "person")
@Data
public class Person {
    private String name;
    private Integer age;
    private Boolean flag;
    private Date birth;
    private Map<String,Object> map;
    private List<Object> list;
    private Dog dog;
}
// application.yml
person:
  name: zs
  age: 12
  flag: false
  birth: 2021/04/20
  map: {k1: v1,k2: v2}
  list: [code,music,girl]
  dog:
    name: 旺财
    age: 3
<!--spring-boot-configuration-processor依赖可以在yml配置时给出提示-->
<dependency>
    <groupId>org.springframework.boot</groupId>
    <artifactId>spring-boot-configuration-processor</artifactId>
    <optional>true</optional>
</dependency>
1.3@Configuration和@Value配合取值(没有set方法也可以取值)
// 复杂类型不能用@Value直接取值
@Configuration
@Data
public class Person {
    @Value("${person222.name}")
    private String name;
    @Value("${person222.age}")
    private Integer age;
    @Value("${person222.flag}")
    private Boolean flag;
    @Value("${person222.birth}")
    private Date birth;
    private Map<String,Object> map;
    private List<Object> list;
    private Dog dog;
}
// application.yml
person222:
  name: zs
  age: 12
  flag: false
  birth: 2021/04/20
  map: {k1: v1,k2: v2}
  list: [code,music,girl]
  dog:
    name: 旺财
    age: 3
1.4@PropertySource读取xxx.properties配置(没有set方法也可以取值)
@Component
@PropertySource(value = "classpath:test.properties")//可以这样配置@PropertySource({"classpath:test.properties"})
@Data
public class Person {
    // SPEL表达式取出配置文件的值
    @Value("${name}")
    private String name;
    @Value("${age}")
    private Integer age;
    private Boolean flag;
    private Date birth;
    private Map<String,Object> map;
    private List<Object> list;
    private Dog dog;
}
// test.properties
name=zhangsan
age=13

1.5松散绑定
yml配置属性的-可以和实体属性的驼峰对应绑定
@Component
@ConfigurationProperties(prefix = "person")
@Data
public class Person {
    private String firstName;
}
// application.yml
person:
  first-name: zs
1.6 JSR303数据校验
@Component
@ConfigurationProperties(prefix = "person")
@Data
@Validated //数据校验
public class Person {
    @Email(message="邮箱格式错误")
    private String name;
}
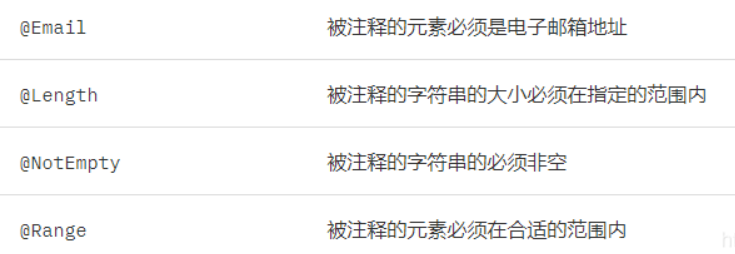
HibernateValidator是BeanValidation的参考实现;
HibernateValidator 提供了JSR 303规范中所有内置constraint的实现;
和附加的constraint
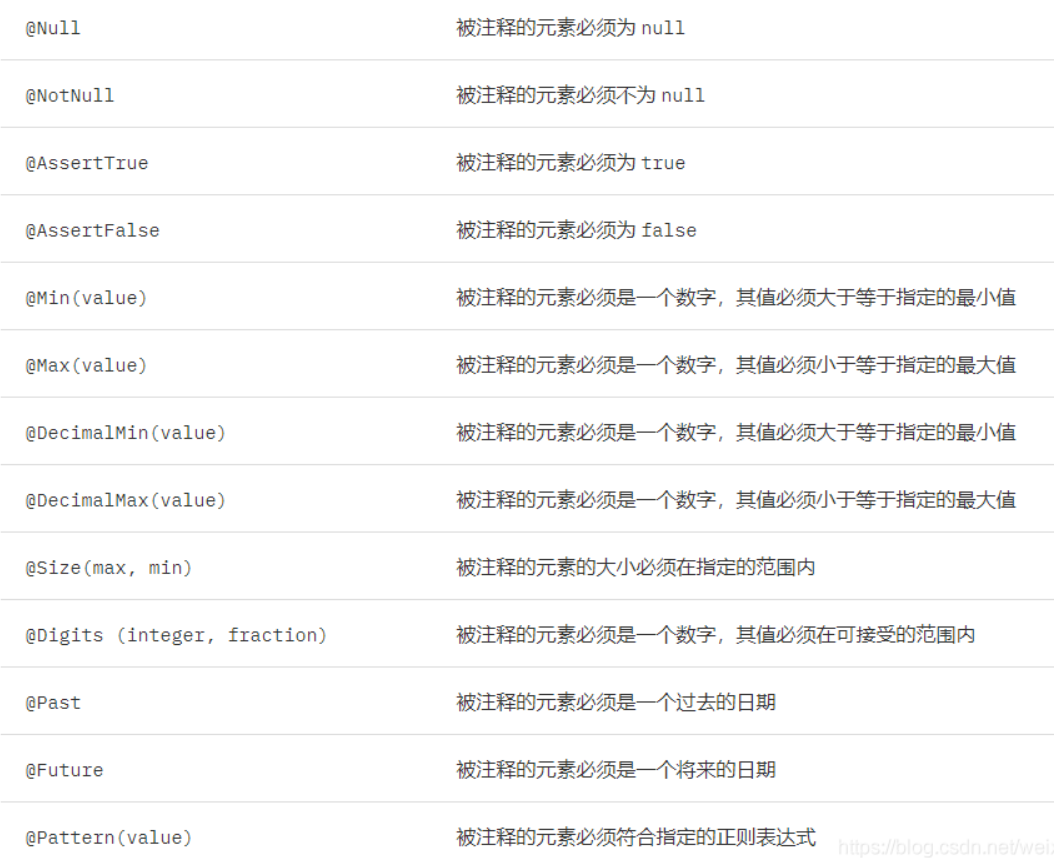
HibernateValidator附加的constraint
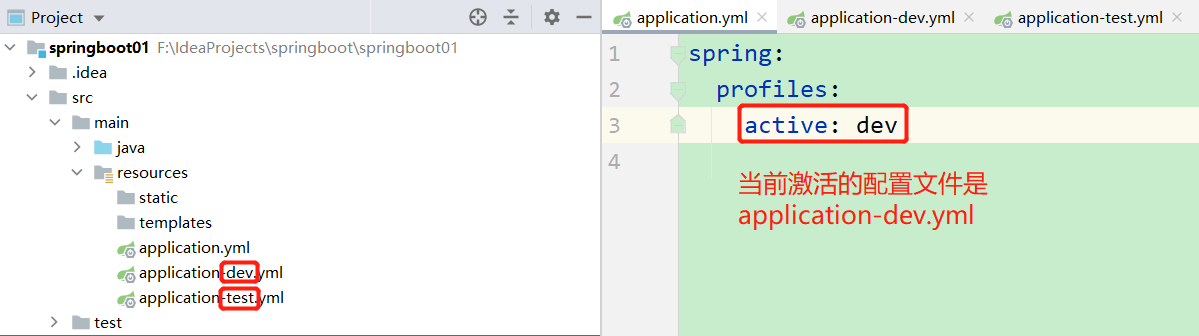
2.多环境配置和配置文件位置
2.1配置文件位置
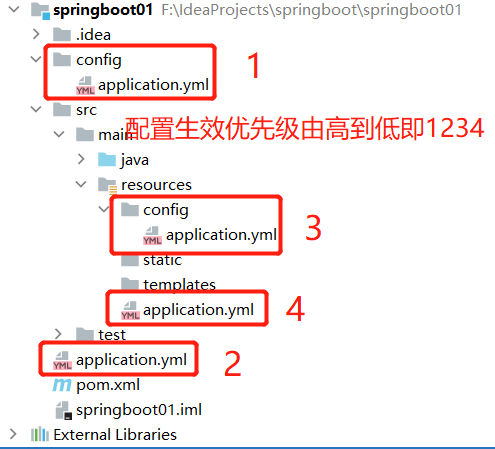
2.2多环境配置切换
四、SpringBootWeb开发
1.SpringBootWeb开发需要解决的问题
- 导入静态资源
- 首页定制
- 模板引擎Thymeleaf
- 装配扩展springMVC
- 增删改查
- 拦截器
- 国际化
- SpringMvcConfig配置
- 错误页定制
2.静态资源导入
- 在SpringBoot,可以使用以下方式处理静态资源。
- webjars文件夹下:映射访问localhost:8080/webjars/
- public文件夹,static文件夹,resources文件夹下和/**(即classpath:):映射访问localhost:8080/
- 文件夹优先级(即访问一个静态文件先查找resources文件夹):resources>static>public
3.首页定制和图标定制
3.1首页定制
- 首页名称需要是index.html
- index.html放在静态资源文件夹下(resources,static,public)
- localhost:8080/就可以访问到index.html页面
3.2老版本springboot支持(2.1.7)
- favicom.ico图标放在static文件夹下。
- 配置关闭默认的图标spring.mvc.favicon.ico.enabled=false
4.模板引擎Thymeleaf
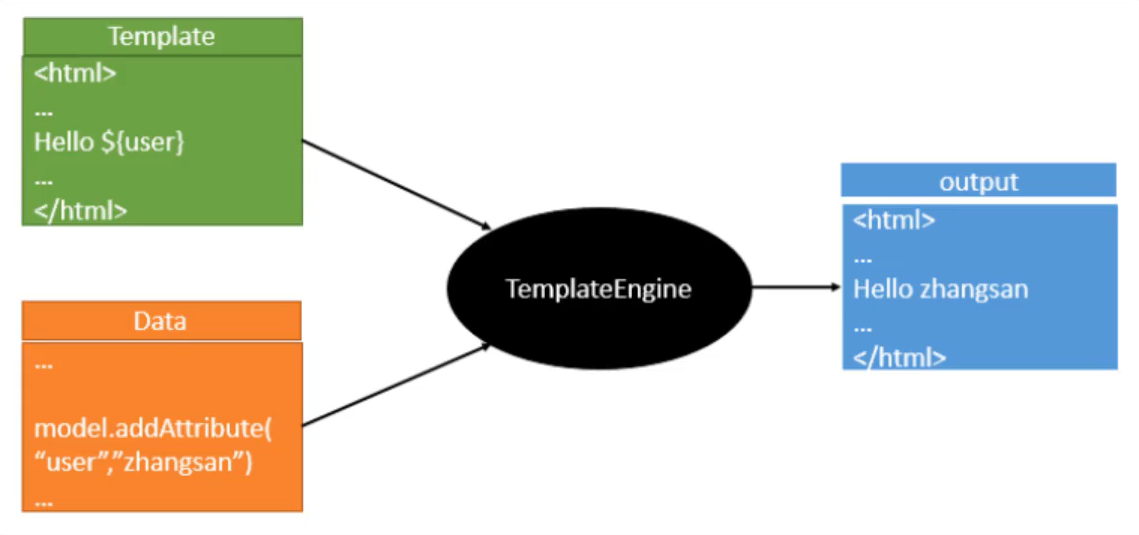
4.1thymeleaf使用步骤
-
导入jar包
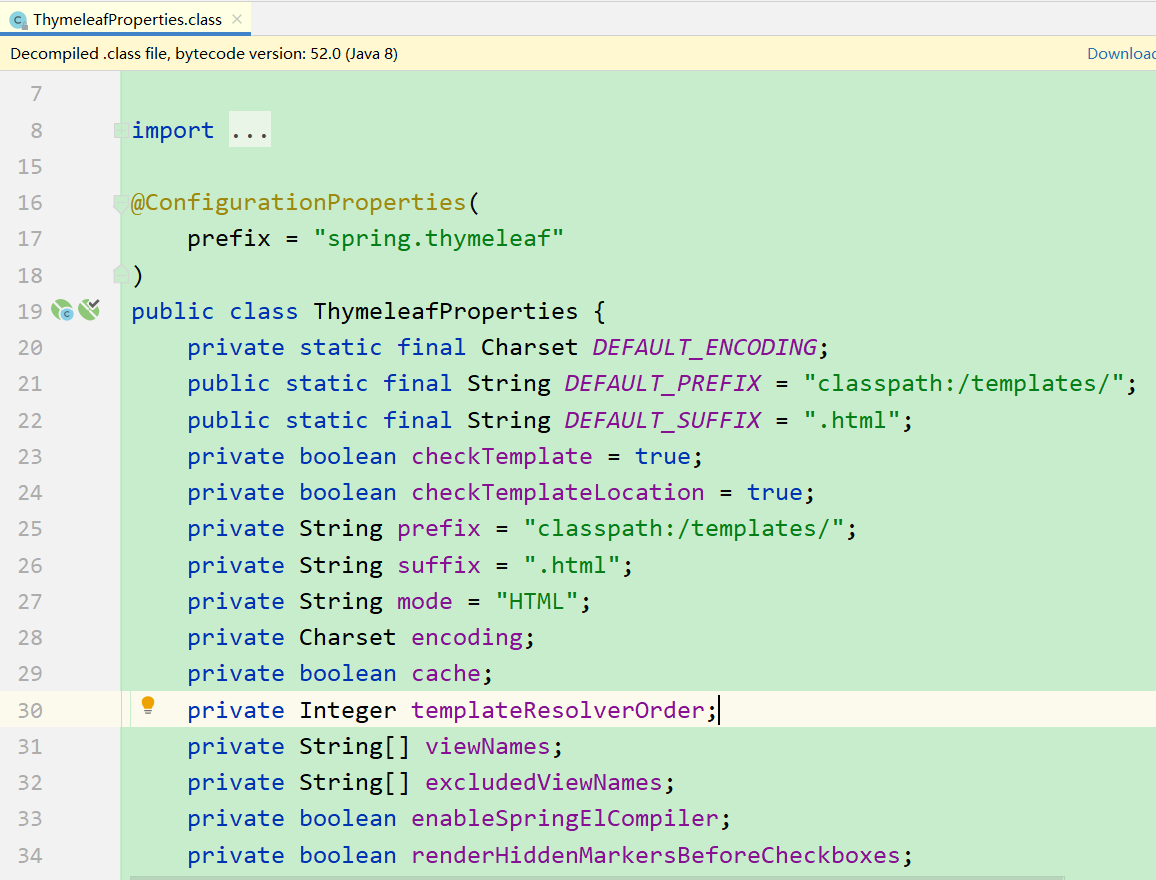
<!--thymeleaf,我们都是基于3.x开发;2.x项目会报错--> <dependency> <groupId>org.thymeleaf</groupId> <artifactId>thymeleaf-spring5</artifactId> </dependency> <dependency> <groupId>org.thymeleaf.extras</groupId> <artifactId>thymeleaf-extras-java8time</artifactId> </dependency> -
ThymeleafProperties默认配置
-
controller跳转
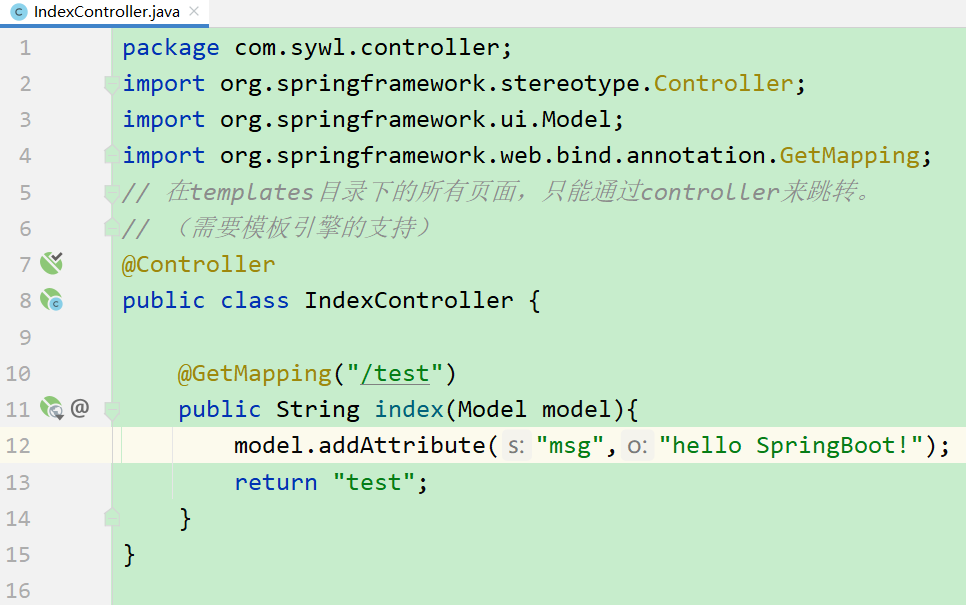
-
xxx.html放在templates文件夹下
xxx.html页面上使用thymeleaf语法,需要引入头文件
<!DOCTYPE html>
<html lang="en" xmlns:th="http://www.thymeleaf.org">
<head>
 <meta charset="UTF-8">
 <title>首页</title>
</head>
<body>
<div th:text="${msg}"></div>
</body>
</html>
4.2thymeleaf语法
-
html和css的元素都可以被thymeleaf接管。
-
${}用来取值,
-
@{}用来表示url。
-
消息文字的表达式#{} 。
-
提取公共页面。
-
th:fragment=”siderbar”
-
5.扩展springMVC
package com.sywl.config;
import org.springframework.context.annotation.Configuration;
import org.springframework.web.servlet.config.annotation.EnableWebMvc;
import org.springframework.web.servlet.config.annotation.ViewControllerRegistry;
import org.springframework.web.servlet.config.annotation.WebMvcConfigurer;
// 扩展springMVC:只加上@Configuration注解
// 如果再加上@EnableWebMvc就会全面接管springMVC配置。(默认的配置不生效)
@Configuration
@EnableWebMvc // 就是导入了DelegatingWebMvcConfiguration类:作用是获取容器中所有的WebMvcConfig
public class SpringMvcConfig implements WebMvcConfigurer {
    /**
     * 视图跳转
     * @param registry
     */
    @Override
    public void addViewControllers(ViewControllerRegistry registry) {
        // 访问/test跳转到test.html页面
        registry.addViewController("/test").setViewName("test");
    }
}
6.CRUD
......
7.拦截器
-
自定义拦截器。
package com.sywl.config; import org.springframework.web.servlet.HandlerInterceptor; import org.springframework.web.servlet.ModelAndView; import javax.servlet.http.HttpServletRequest; import javax.servlet.http.HttpServletResponse; /** * 自定义拦截器 */ public class LoginHandlerInterceptor implements HandlerInterceptor { @Override public boolean preHandle(HttpServletRequest request, HttpServletResponse response, Object handler) throws Exception { // 登录成功之后,应该有用户的session Object loginUser = request.getSession().getAttribute("loginUser"); if (loginUser == null) {// 1.没有登录 // 2.给出提示信息 request.setAttribute("msg", "没有权限,请先登录"); // 3.转发到登录页面 request.getRequestDispatcher("index.html").forward(request, response); return false; } else { return true; } } @Override public void postHandle(HttpServletRequest request, HttpServletResponse response, Object handler, ModelAndView modelAndView) throws Exception { } @Override public void afterCompletion(HttpServletRequest request, HttpServletResponse response, Object handler, Exception ex) throws Exception { } } -
通过springMVC配置文件注入自定义拦截器并设置拦截所有请求和排除拦截的路径。
package com.sywl.config;
import org.springframework.context.annotation.Bean;
import org.springframework.context.annotation.Configuration;
import org.springframework.web.servlet.LocaleResolver;
import org.springframework.web.servlet.config.annotation.InterceptorRegistry;
import org.springframework.web.servlet.config.annotation.ViewControllerRegistry;
import org.springframework.web.servlet.config.annotation.WebMvcConfigurer;
@Configuration
public class SpringMvcConfig implements WebMvcConfigurer {
 /**
  * 配置拦截器
  *
  * @param registry
  */
 @Override
 public void addInterceptors(InterceptorRegistry registry) {
     registry.addInterceptor(new LoginHandlerInterceptor())// 1.添加自定义拦截器
             // 2.添加拦截所有的的路径和页面
             .addPathPatterns("/**")
             // 3.排除不需要拦截的路径和页面
             .excludePathPatterns("/index.html", "/", "/user/login","/css/**","/js/**","/img/**");
 }
}
8.国际化
-
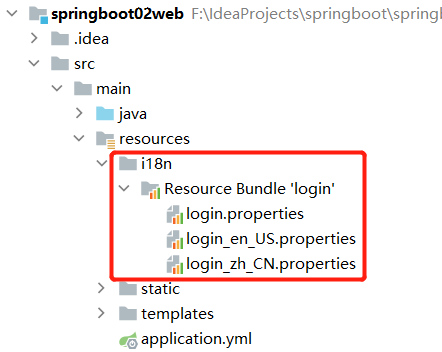
创建login.properties,login_zh_CN.properties,login_en_US.properties三个配置文件。
-
配置这三个文件。通过ResourceBundle可以同时配置三个文件。
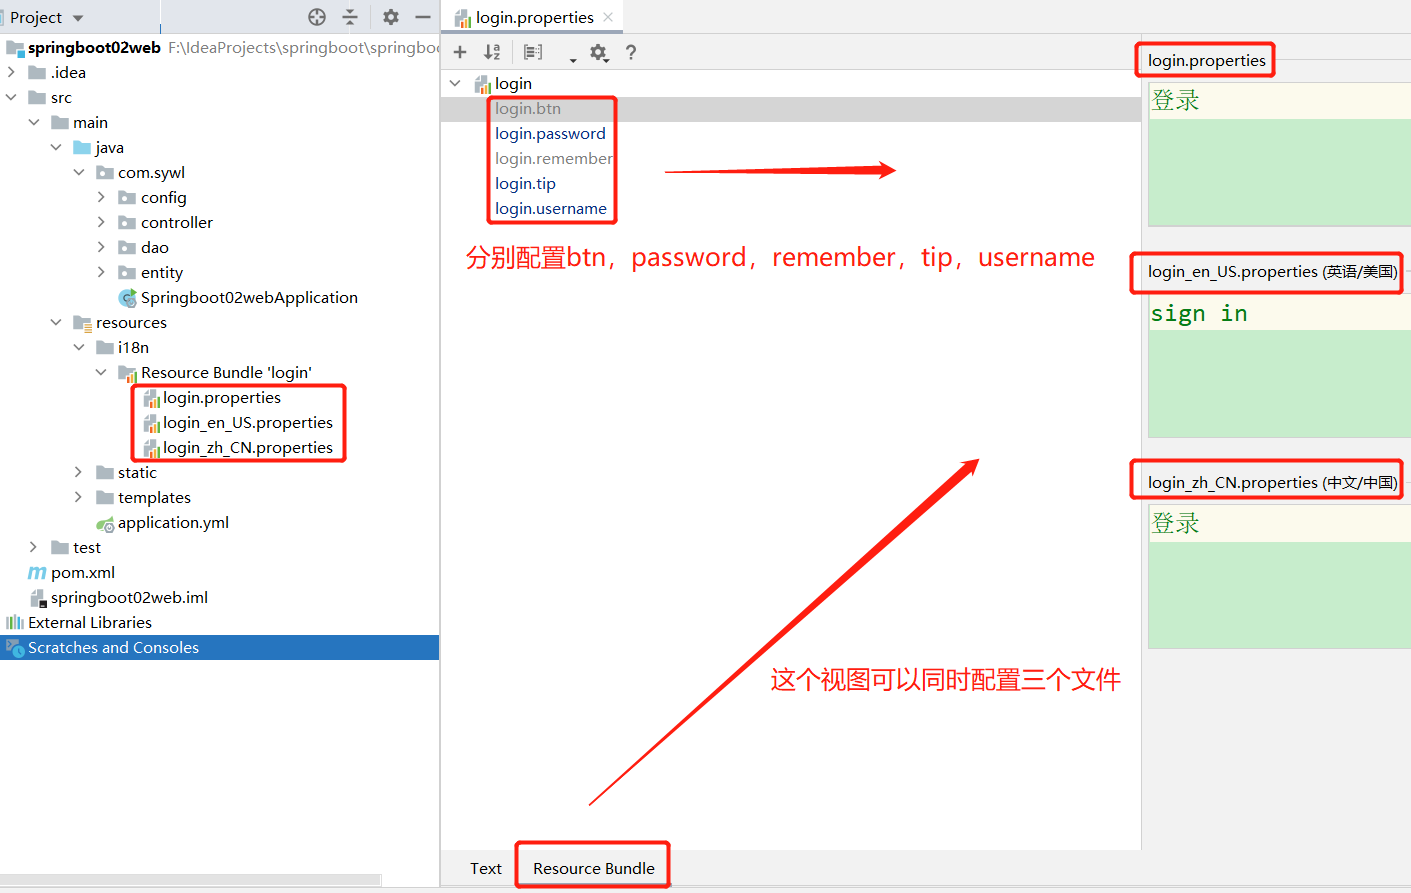
-
配置好的效果。

-
把配置好的属性通过 th:text=”#{login.username}” 放到对应的位置上。
-
自定义国际化组件。
package com.sywl.config; import org.springframework.util.StringUtils; import org.springframework.web.servlet.LocaleResolver; import javax.servlet.http.HttpServletRequest; import javax.servlet.http.HttpServletResponse; import java.util.Locale; /** * 自定义国际化组件 */ public class MyLocaleResolver implements LocaleResolver { /** * 解析请求 * @param httpServletRequest * @return */ @Override public Locale resolveLocale(HttpServletRequest httpServletRequest) { // 1.获取请求中的语言参数。 String language = httpServletRequest.getParameter("l"); // 2.如果没有就使用默认的。 Locale locale = Locale.getDefault(); // 3.如果请求的链接携带了国际化的参数。 if (!StringUtils.isEmpty(language)){ // zh_CN String[] split = language.split("_"); // 国家,地区 locale = new Locale(split[0], split[1]); } return locale; } @Override public void setLocale(HttpServletRequest httpServletRequest, HttpServletResponse httpServletResponse, Locale locale) { } } -
在springMVC配置文件把自定义国际化组件注入到spring容器中。
package com.sywl.config; import org.springframework.context.annotation.Bean; import org.springframework.context.annotation.Configuration; import org.springframework.web.servlet.LocaleResolver; import org.springframework.web.servlet.config.annotation.InterceptorRegistry; import org.springframework.web.servlet.config.annotation.ViewControllerRegistry; import org.springframework.web.servlet.config.annotation.WebMvcConfigurer; @Configuration public class SpringMvcConfig implements WebMvcConfigurer { /** * 自定义国际化组件注入到spring容器 * * @return */ @Bean public LocaleResolver localeResolver() { return new MyLocaleResolver(); } } -
登录界面切换国际化时带上参数。

9.SpringMvcConfig配置。
package com.sywl.config;
import org.springframework.context.annotation.Bean;
import org.springframework.context.annotation.Configuration;
import org.springframework.web.servlet.LocaleResolver;
import org.springframework.web.servlet.config.annotation.InterceptorRegistry;
import org.springframework.web.servlet.config.annotation.ViewControllerRegistry;
import org.springframework.web.servlet.config.annotation.WebMvcConfigurer;
@Configuration
public class SpringMvcConfig implements WebMvcConfigurer {
    @Override
    public void addViewControllers(ViewControllerRegistry registry) {
        // 访问localhost:8080/跳转到index.html
        registry.addViewController("/").setViewName("index");
        // 访问localhost:8080/index.html跳转到index.html
        registry.addViewController("/index.html").setViewName("index");
        // 访问localhost:8080/main.html跳转到dashboard.html
        // "redirect:/main.html"即跳转到dashboard.html
        registry.addViewController("/main.html").setViewName("dashboard");
    }
    /**
     * 自定义国际化组件注入到spring容器
     *
     * @return
     */
    @Bean
    public LocaleResolver localeResolver() {
        return new MyLocaleResolver();
    }
    /**
     * 配置拦截器
     *
     * @param registry
     */
    @Override
    public void addInterceptors(InterceptorRegistry registry) {
        registry.addInterceptor(new LoginHandlerInterceptor())// 1.添加自定义拦截器
                // 2.添加拦截所有的的路径和页面
                .addPathPatterns("/**")
                // 3.排除不需要拦截的路径和页面
                .excludePathPatterns("/index.html", "/", "/user/login","/css/**","/js/**","/img/**");
    }
}
10.错误页定制。
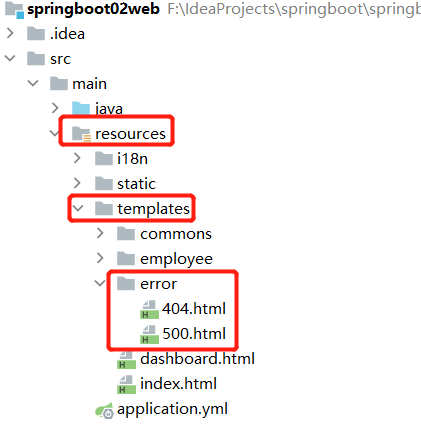
- 在Resources文件夹下的templates文件夹下创建error文件夹。
- 定义相应错误页面(400.html,500.html等等),放到error文件夹中,就完成了。
五、SpringBoot集成的技术框架
1.Druid
- Druid是阿里巴巴开源平台上一个数据库连接池实现,结合了C3P0、DBCP、PROXOOL等DB连接池的优点,同时加入了日志监控。
- Druid可以很好的监控DB连接池连接和SQL的执行情况,天生就是针对监控而生的DB连接池。
- SpringBoot2.0以上默认使用Hikari数据源,可以说 Hikari与Diud都是当前JavaWeb上最优秀的数据源。
- Druid配置。
2.springSecurity
SpringSecurity是针对Spring项目的安全框架,也是Springboot底层安全模块默认的技术选型;他可以实现强大的web安全控制,对于安全控制,我们仅需要引入spring-boot-starter-security模块,进行少量的配置,即可实现强大的安全管理。
- WebSecurityConfigurerAdapter类:可以继承这个类自定义security授权策略。
- AuthenticationManagerBuilder类:自定义security认证策略。
- @EnableWebSecurity:开启WebSecurity模式。
- 认证:authentication
- 授权:authorization
3.shiro
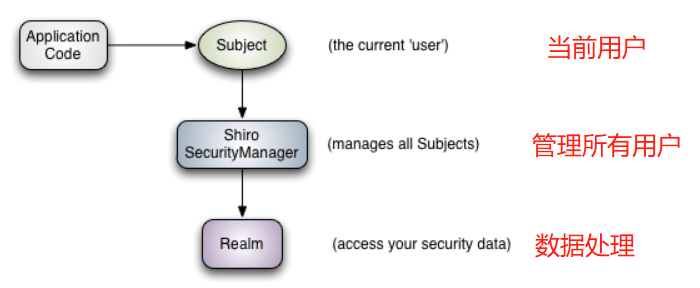
// 获取当前的用户对象Subject
Subject currentUser = SecurityUtils.getSubject();
// 通过当前用户获取shiro的session
Session session = currentUser.getSession();
// 判断当前用户是否被认证
currentUser.isAuthenticated()
// 获得当前用户的认证
currentUser.getPrincipal()
// 判断当前用户是否拥某些角色
currentUser.hasRole("schwartz")
// 判断当前用户是否拥某些权限(参数不同,产生不同效果)
currentUser.isPermitted("lightsaber:wield")
currentUser.isPermitted("winnebago:drive:eagle5")
// 注销
currentUser.logout();
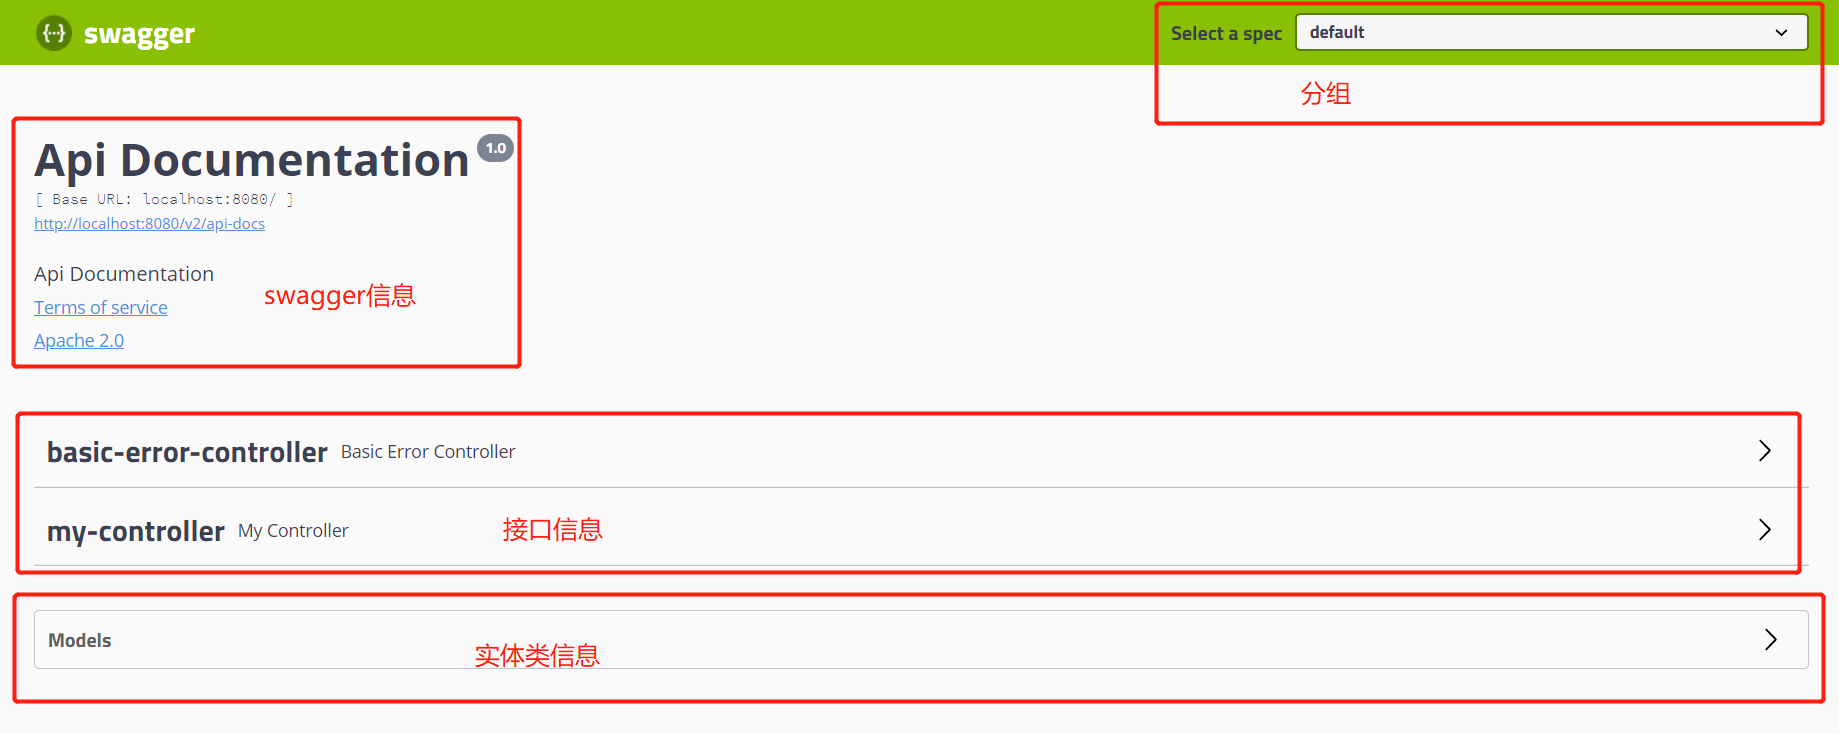
4.swagger
- swagger是最流行的api框架。
- restful api文档在线自动生成(api文档和api定义同步更新)。
- 可以直接运行在线测试api接口。
- 支持多种语言(Java,php)。
- 通过swagger接口给一些难理解的属性、接口增加注释。
5.redis
在springboot2.x之后,原来使用的jedis被替换为lettuce
- jedis:底层采用直线服务,多线程使用不安全。如果避免不安全,需要使用jedis Pool连接池。更像BIO模式。
- lettuce:底层采用netty,实例可以在多个线程中进行共享,不存在线程不安全的情况,可以减少线程数量了。更像NIO模式。
六、SpringBoot整合
1.整合JDBC
-
导入spring-jdbc和mysql驱动的依赖
<!--JDBC--> <dependency> <groupId>org.springframework.boot</groupId> <artifactId>spring-boot-starter-jdbc</artifactId> </dependency> <!--mysql--> <dependency> <groupId>mysql</groupId> <artifactId>mysql-connector-java</artifactId> <scope>runtime</scope> </dependency> -
配置好数据库连接。
-
springboot已经配置好了jdbc模板可以直接使用。
@RestController
public class JDBCController {
 @Autowired
 JdbcTemplate jdbcTemplate;
 @GetMapping("/list")
 public List<Map<String, Object>> selectDeptList() {
     String sql = "select * from depart";
     List<Map<String, Object>> maps = jdbcTemplate.queryForList(sql);
     System.out.println(maps);
     return maps;
 }
 @GetMapping("/add")
 public void add() {
     String sql = "insert into depart values (6,'部门6')";
     int update = jdbcTemplate.update(sql);
     System.out.println(update);
 }
 @GetMapping("/delete/{id}")
 public void delete(@PathVariable("id") Integer id) {
     String sql = "delete from depart where id = ?";
     int update = jdbcTemplate.update(sql,id);
     System.out.println(update);
 }
 @GetMapping("/update/{id}")
 public void update(@PathVariable("id") Integer id) {
     String sql = "update depart set id = ?,dept_name = ? where id = "+id;
     Object[] params = new Object[2];
     params[0] = 100;
     params[1] = "部门100";
     int update = jdbcTemplate.update(sql,params);
     System.out.println(update);
 }
2.整合druid
-
导入druid和mysql驱动的依赖。
<!--mysql-->
<dependency>
 <groupId>mysql</groupId>
 <artifactId>mysql-connector-java</artifactId>
 <scope>runtime</scope>
</dependency>
<!--druid-->
<dependency>
 <groupId>com.alibaba</groupId>
 <artifactId>druid</artifactId>
 <version>1.1.21</version>
</dependency>
2.配置好数据库连接和druid配置。
spring:
datasource:
 driver-class-name: com.mysql.jdbc.Driver
 url: jdbc:mysql://localhost:3306/z-springboot?useUnicode=true&characterEncoding=utf-8&serverTimezone=
 username: root
 password: xxx
 type: com.alibaba.druid.pool.DruidDataSource
 # druid数据源配置
 initialSize: 5
 minIdle: 5
 maxActive: 20
 maxWait: 60000
 timeBetweenEvictionRunsMillis: 60000
 minEvictableIdleTimeMillis: 300000
 validationQuery: SELECT 1 FROM DUAL
 testWhileIdle: true
 testOnBorrow: false
 testOnReturn: false
 poolPreparedStatements: true
 # 配置监控统计拦截的filters:stat(监控统计),log4j(日志记录),wall(防御sql注入)
 # 如果允许时报错java.lang.ClassNotFoundException:org.apache.log4j.Priority则需要导入log4j依赖
 filters: stat,wall,log4j
 maxPoolPreparedStatementPerConnectionSize: 20
 useGlobalDataSourceStat: true
 connectionProperties: druid.stat.mergeSql=true;druid.stat.slowSqlMillis=500
3.配置DruidConfig类
import com.alibaba.druid.pool.DruidDataSource;
import com.alibaba.druid.support.http.StatViewServlet;
import com.alibaba.druid.support.http.WebStatFilter;
import org.springframework.boot.context.properties.ConfigurationProperties;
import org.springframework.boot.web.servlet.FilterRegistrationBean;
import org.springframework.boot.web.servlet.ServletRegistrationBean;
import org.springframework.context.annotation.Bean;
import org.springframework.context.annotation.Configuration;
import javax.servlet.Filter;
import javax.sql.DataSource;
import java.util.HashMap;
@Configuration
public class DruidConfig {
 /**
  * 关联application.yml的druid配置
  * @return
  */
 @ConfigurationProperties("spring.datasource")
 @Bean
 public DataSource druidDataSource(){
     return new DruidDataSource();
 }
 // 后台监控:web.xml,ServletRegistrationBean
 // 因为springboot内置了Servlet容器,所以没有web.xml;替代方法:ServletRegistrationBean
 /**
  * druid后台监控配置
  * @return
  */
 @Bean
 public ServletRegistrationBean a(){
     // 1.配置访问路径localhost:8080/druid
     ServletRegistrationBean<StatViewServlet> bean = new ServletRegistrationBean<>(new StatViewServlet(),"/druid/*");
     // 2.后台需要有人登录,账号密码配置
     HashMap<String, String> initParameters = new HashMap<>();
     initParameters.put("loginUsername","xxx");// 登录的key是固定的:必须是loginUsername,loginPassword
     initParameters.put("loginPassword","xxx");
     // 3.配置允许谁可以访问:""意思是谁都可以访问
     initParameters.put("allow","");
     // 4.禁止谁能访问
     initParameters.put("sywl","localhost");
     // 设置初始化参数
     bean.setInitParameters(initParameters);
     return bean;
 }
 /**
  * druid过滤器
  * @return
  */
 @Bean
 public FilterRegistrationBean webStatFilter(){
     FilterRegistrationBean<Filter> bean = new FilterRegistrationBean<>();
     bean.setFilter(new WebStatFilter());
     HashMap<String, String> initParameters = new HashMap<>();
     // 可以过滤哪些请求(这些东西不进行统计)
     initParameters.put("exclusions","*.js,*.css,/druid/*");
     bean.setInitParameters(initParameters);
     return bean;
 }
}
3.整合mybatis
-
导入springboot整合mybatis的依赖和mysql驱动包的依赖。
<!--主要用来整合mybatis和spring boot,不是spring官方提供的--> <!--spring-boot-starter开头的是spring官方的。--> <dependency> <groupId>org.mybatis.spring.boot</groupId> <artifactId>mybatis-spring-boot-starter</artifactId> <version>2.1.1</version> </dependency> <dependency> <groupId>mysql</groupId> <artifactId>mysql-connector-java</artifactId> <scope>runtime</scope> </dependency> -
配置好数据库连接和mybatis配置。
// application.properties server.port=8888 spring.datasource.driver-class-name=com.mysql.jdbc.Driver spring.datasource.url=jdbc:mysql://localhost:3306/z-springboot?useUnicode=true&characterEncoding=utf-8 spring.datasource.username=root spring.datasource.password=xxx # mybatis mybatis.type-aliases-package=com.sywl.entity mybatis.mapper-locations=classpath:mybatis/mapper/*.xml # classpath:mybatis/mapper/*.xml是从resources文件夹下开始扫描。 # classpath:/mybatis/mapper/*.xml是从项目的根目录开始扫描。 -
UserMapper接口和UserMapper.xml
@Mapper// 这个注解表示这是mybatis的一个mapper类
@Repository
public interface UserMapper {
 List<User> selectUserList();
 User selectUserById(@Param("id")Integer id);
 void insertUser(User user);
 void deleteUser(@Param("id")Integer id);
 void updateUser(User user);
}
4.springSecurity使用
-
导入springSecurity依赖。
<dependency> <groupId>org.springframework.boot</groupId> <artifactId>spring-boot-starter-security</artifactId> </dependency> -
配置SecurityConfig类。
@Configuration public class SecurityConfig extends WebSecurityConfigurerAdapter { /** * 授权 * @param http * @throws Exception */ @Override protected void configure(HttpSecurity http) throws Exception { // 首页所有人可以访问,功能页只有对应有权限的人可以访问。 // 1.请求权限的规则 http.authorizeRequests() .mvcMatchers().permitAll() .mvcMatchers("/level1/**").hasRole("vip1") .mvcMatchers("/level2/**").hasRole("vip2") .mvcMatchers("/level3/**").hasRole("vip3"); // 2.开启登录页面(security自带的登录页)(没有权限默认跳转到登录页面) http.formLogin().loginPage("/toLogin")// 定制登录页:localhost:8080会访问RouterController的/toLogin .loginProcessingUrl("/login")// 设置表单提交的地址。(默认就是/login,但是定制登录页后变成/toLogin) .usernameParameter("user")// 设置表单提交的用户名的name,默认是username .passwordParameter("pwd");// 设置表单提交的密码的name,默认是password // 3.开启注销功能(logoutSuccessUrl设置登出成功跳转的页面,一般跳转到首页) // logoutUrl("/logout")是设置登出访问的请求地址。(默认是logout) // 防止网站传输:登出是get的请求 http.csrf().disable();// 关闭csrf功能(默认是开启的):登出失败可能的原因就是没有关闭csrf http.logout().logoutSuccessUrl("/").logoutUrl("/logout"); // 4.开启记住我功能:cookies 默认保存两周;自定义"记住我"的name http.rememberMe().rememberMeParameter("remember"); } /** * 认证:springboot2.1.x可以直接使用 * passwordEncoder:密码编码 * springSecurity 5.0+新增了需要加密算法 * @param auth * @throws Exception */ @Override protected void configure(AuthenticationManagerBuilder auth) throws Exception { /*User.UserBuilder user = User.withDefaultPasswordEncoder(); auth.jdbcAuthentication() .dataSource(datasource) .withDefaultSchema() .withUser(user.username("user")).password(user.password("password")).roles("ADMIN");*/ // 这些数据正常从数据库中取 auth.inMemoryAuthentication().passwordEncoder(new BCryptPasswordEncoder()) .withUser("sywl").password(new BCryptPasswordEncoder().encode("123456")).roles("vip2","vip3") .and() .withUser("root").password(new BCryptPasswordEncoder().encode("123456")).roles("vip1","vip2","vip3") .and() .withUser("guest").password(new BCryptPasswordEncoder().encode("123456")).roles("vip1"); } } -
扩展整合thymeleaf。
<!--thymeleaf整合security--> <dependency> <groupId>org.thymeleaf.extras</groupId> <artifactId>thymeleaf-extras-springsecurity4</artifactId> <version>3.0.4.RELEASE</version> </dependency> -
html页面使用sec:xxx 语法。
<div class="nav" th:fragment="nav-menu">
 <!--sec的密令:springboot最高只在2.0.9版本可以生效-->
 <div sec:authorize="!isAuthenticated()">
     <a th:href="@{/toLogin}">登录</a>
 </div>
 <div sec:authorize="isAuthenticated()">
     用户名:<span sec:authentication="name"></span>
     <a th:href="@{/logout}">注销</a>
 </div>
</div>
5.shiro使用
-
导入shiro依赖和shiro整合thymeleaf的依赖。
<!-- shiro整合spring的依赖 --> <dependency> <groupId>org.apache.shiro</groupId> <artifactId>shiro-spring</artifactId> <version>1.4.1</version> </dependency> <!--themeleaf整合shiro--> <dependency> <groupId>com.github.theborakompanioni</groupId> <artifactId>thymeleaf-extras-shiro</artifactId> <version>2.0.0</version> </dependency> -
自定义UserReam类继承AuthorizingRealm类重写两个方法。用于认证和授权
public class UserRealm extends AuthorizingRealm { @Autowired UserMapper userMapper; /** * 授权 * @param principalCollection * @return */ @Override protected AuthorizationInfo doGetAuthorizationInfo(PrincipalCollection principalCollection) { System.out.println("执行了授权"); SimpleAuthorizationInfo info = new SimpleAuthorizationInfo(); // 拿到当前登录对象:subject.getPrincipal()可以获得认证时SimpleAuthenticationInfo传递的user Subject subject = SecurityUtils.getSubject(); User currentUser = (User) subject.getPrincipal(); info.addStringPermission(currentUser.getPerms()); return info; } /** * 认证 * @param authenticationToken * @return * @throws AuthenticationException */ @Override protected AuthenticationInfo doGetAuthenticationInfo(AuthenticationToken authenticationToken) throws AuthenticationException { System.out.println("执行了认证"); // 1.拿到用户输入的用户名和密码 UsernamePasswordToken userToken = (UsernamePasswordToken) authenticationToken; // 2.连接真实数据库 User user = userMapper.selectUser(userToken.getUsername()); if (user==null){ return null; } Session session = SecurityUtils.getSubject().getSession(); session.setAttribute("loginUser",user); return new SimpleAuthenticationInfo(user,user.getPassword(),""); } } -
ShiroConfig配置类,配置Ream,SecurityManager,ShiroFilterFactoryBean。
@Configuration public class ShiroConfig { @Bean public ShiroFilterFactoryBean shiroFilterFactoryBean(@Qualifier("securityManager") DefaultWebSecurityManager securityManager) { ShiroFilterFactoryBean bean = new ShiroFilterFactoryBean(); bean.setSecurityManager(securityManager); /** * anon:无需认证就可以访问 * authc:必须认证了才能访问 * user:必须加有"记住我"功能才能用 * perms:拥有对某个资源的权限才能访问 * roLe:拥有某个角色权限才能访问 */ LinkedHashMap<String, String> filterMap = new LinkedHashMap<>(); filterMap.put("/user/add", "perms[user:add]"); filterMap.put("/user/update", "perms[user:update]"); filterMap.put("/user/*", "authc");// authc配置需要在perms下面 bean.setFilterChainDefinitionMap(filterMap); // 登录失败设置跳转到登录的请求 bean.setLoginUrl("/toLogin"); // 未授权跳转页面 bean.setUnauthorizedUrl("/unauth"); return bean; } @Bean(name = "securityManager") public DefaultWebSecurityManager securityManager(UserRealm userRealm) { DefaultWebSecurityManager securityManager = new DefaultWebSecurityManager(); securityManager.setRealm(userRealm); return securityManager; } @Bean public UserRealm userRealm() { return new UserRealm(); } /** * 整合shiroDialect:用来整合shiro thymeleaf *(需要导入shiro整合thymeleaf的依赖) * @return */ @Bean public ShiroDialect shiroDialect() { return new ShiroDialect(); } } -
登录方法。
@RequestMapping("/login") public String login(String username, String password, Model model){ Subject subject = SecurityUtils.getSubject(); UsernamePasswordToken token = new UsernamePasswordToken(username,password); try { subject.login(token); return "index"; } catch (UnknownAccountException e) { model.addAttribute("msg","用户名不存在"); return "login"; }catch (IncorrectCredentialsException e){ model.addAttribute("msg","密码错误"); return "login"; } } -
html使用shrio:xxx 语法需要导入头文件。
<!DOCTYPE html>
<html lang="en" xmlns:th="http://www.thymeleaf.org"
   xmlns:shiro="http://www.thymeleaf.org/thymeleaf-extras-shiro">
<head>
 <meta charset="UTF-8">
 <title>首页</title>
</head>
<body>
<h1>首页</h1>
<div th:if="${session.loginUser!=null}">
 <a th:href="@{/logout}">注销</a>
</div>
<div th:if="${session.loginUser==null}">
 <a th:href="@{/toLogin}">登录</a>
</div>
<hr>
<div shiro:hasPermission="user:add">
 <a th:href="@{/user/add}">add</a>
</div>
<div shiro:hasPermission="user:update">
 <a th:href="@{/user/update}">update</a>
</div>
</body>
</html>
5.整合swagger
-
导入依赖。
<!--https://mvnrepository.com/artifact/io.springfox/springfox-swagger2 --> <dependency> <groupId>io.springfox</groupId> <artifactId>springfox-swagger2</artifactId> <version>2.9.2</version> </dependency> <!--https://mvnrepository.com/artifact/io.springfox/springfox-swagger-ui --> <dependency> <groupId>io.springfox</groupId> <artifactId>springfox-swagger-ui</artifactId> <version>2.9.2</version> </dependency> -
配置类SwaggerConfig。
@Configuration @EnableSwagger2 // 开启swagger2 public class SwaggerConfig { } -
自定义swagger相关配置。
@Configuration @EnableSwagger2 // 开启swagger2 public class SwaggerConfig { // 注册多个Docket实例可以实现分组 @Bean public Docket docket(){ return new Docket(DocumentationType.SWAGGER_2) .apiInfo(info()) .groupName("sywl")// 组名 .enable(true)// 是否开启访问swagger;默认true .select() // 配置需要扫描接口的方式RequestHandlerSelectors // basePackage:指定要扫描的包 // any():扫描全部 // none():不扫描 // withClassAnnotation():扫描类上的注解;参数是注解的反射对象 // withMethodAnnotation():扫描方法上的注解 .apis(RequestHandlerSelectors.basePackage("com.sywl.controller")) // paths:过滤路径(只扫描这些请求下的接口) .paths(PathSelectors.ant("/user/**")) .build(); } /** * 配置swagger信息 * @return */ @Bean public ApiInfo info(){ // 作者信息 Contact contact = new Contact("sywl", "", "xxx@163.com"); return new ApiInfo("SwaggerApi文档", "这是一个文档描述", "1.0", "http://www.xxx.com", contact, "Apache 2.0", "http://www.apache.org/licenses/LICENSE-2.0", new ArrayList()); } } -
常用标识注解
- @ApiModel(“用户实体类”):用在实体类上,对类的说明。
- @ApiModelProperty(“用户名”):用在实体类的属性字段上,对字段的说明。
- @ApiOperation(“跳转首页的接口”):用在方法上,对方法的说明。
- @ApiParam(“用户名”):用在请求参数上,对请求参数的说明。
4.整合redis
-
导入依赖。
<dependency> <groupId>org.springframework.boot</groupId> <artifactId>spring-boot-starter-data-redis</artifactId> </dependency> -
配置redis连接。
// application.yml spring: redis: host: 127.0.0.1 port: 6379 username: root password: xxx -
测试。
七、springboot实现任务
- 异步任务:执行的程序需要时间时,需要开启一个线程执行,并给客户一个提示。
- 定时任务:可以在某一个时间点执行一个任务。
- 邮件发送:
1.异步任务
-
springboot开启异步任务。
@SpringBootApplication @EnableAsync // 开启异步任务 public class Springboot05taskApplication { public static void main(String[] args) { SpringApplication.run(Springboot05taskApplication.class, args); } } -
在需要开启线程的方法上加上
@Async
注解。
@Service public class AsyncService { @Async public void hello(){ try { Thread.sleep(3000); } catch (InterruptedException e) { e.printStackTrace(); } } } -
执行时,可以先给用户反馈信息”OK”,任务仍在执行,不需要用户在加载页面等待。
@RestController
public class AsyncController {
 @Autowired
 private AsyncService asyncService;
 @RequestMapping("/hello")
 public String Async(){
     asyncService.hello(); // 睡眠3秒
     System.out.println("正在处理数据");
     return "OK";
 }
}
2.邮件发送
-
导入mail依赖
<!--mail发送--> <dependency> <groupId>org.springframework.boot</groupId> <artifactId>spring-boot-starter-mail</artifactId> </dependency> -
配置mail
// application.yml spring: mail: username: xxx@qq.com password: xxx host: smtp.qq.com # QQ邮箱需要开启加密验证;其他的邮箱不需要。 properties: {mail.smtp.ssl.enable: true} -
编写邮件发送。
@SpringBootTest
class Springboot05taskApplicationTests {
 @Autowired
 private JavaMailSenderImpl mailSender;
 @Test
 void contextLoads01() {
     SimpleMailMessage message = new SimpleMailMessage();
     message.setSubject("你好啊!");
     message.setText("这是一个问候邮件");
     message.setFrom("xxx@qq.com");
     message.setTo("xxx@qq.com");
     mailSender.send(message);
 }
 @Test
 void contextLoads02() throws MessagingException {
     // 1.一个复杂的邮件。
     MimeMessage mimeMessage = mailSender.createMimeMessage();
     // 2.组装。
     MimeMessageHelper helper = new MimeMessageHelper(mimeMessage,true);
     helper.setSubject("你好啊!");
     helper.setText("<h1 style='color:red'>这一个问候邮件!</h1>",true);
     // 附件
     helper.addAttachment("1.jpg",new File("C:\\Users\\SYWL\\Desktop\\2.jpg"));
     helper.setFrom("xxx@qq.com");
     helper.setTo("xxx@qq.com");
     mailSender.send(mimeMessage);
 }
}
八、dubbo和Zookeeper
1.分布式理论
在《分布式系统原理与范型》一书中有如下定义:“分布式系统是若干独立计算机的集合,这些计算机对于用户来说就像单个相关系统”。
1.1分布式系统概念
分布式系统是由一组通过网络进行通信、为了完成共同的任务而协调工作的计算机节点组成的系统。
1.1分布式系统目的
为了用廉价的、普通的机器完成单个计算机无法完成的计算、存储任务。(其目的是利用更多的机器,处理更多的数据)
1.1发展
- 单一应用架构。
当网站流量很小时,只需—个应用,将所有功能都部署在一起,以减少部署节点和成本。此时,用于简化增删改查工作量的数据访问框架(ORM)是关键。
优点:适用于小型网站,小型管理系统,将所有功能都部署到一个功能里,简单易用。
缺点:1性能扩展比较难。2协同开发问题。3不利于升级维护。 - 垂直应用架构。
当访问量逐渐增大,单一应用增加机器帶来的加速度越来越小,将应用拆成互不相干的几个应用,以提升效率。此时,用于加速前端页面开发的Web框架(MVC)是关键。
优点:通过切分业务来实现各个模块独立部署,降低了维护和部署的难度,团队各司其职更易管理,性能扩展也更方便,更有针对性。
缺点:公用模块无法重复利用,开发性的浪费。 - 分布式服务架构。
当垂直应用越来越多,应用之间交互不可避免,将核心业务抽取出来,作为独立的服务,逐渐形成稳定的服务中心,使前端应用能更快速的响应多变的市场需求。此时,用于提高业务复用及整合的分布式服务框架(RPC)是关键。 - 流动计算架构。
当服务越来越多,容量的评估,小服务资源的浪费等问题逐渐显现,此时需增加一个调度中心基于访问压力实时管理集群容量,提高集群利用率。此时,用于提高机器利用率的资源调度和治理中心(SOA)[Service Oriented Architecture]是关键。
2.什么是RPC
RPC【Remote procedure cal】是指远程过程调用,是—种进程间通信方式,他是一种技术的思想,而不是规范。它允许程序调用另一个地址空间(通常是共亨网络的另一台机器上)的过程或函数而不用程序员显式编码这个远程调用的细节。(即程序员无论是调用本地的还是远程的函数,本质上编写的调用代码基本相同)
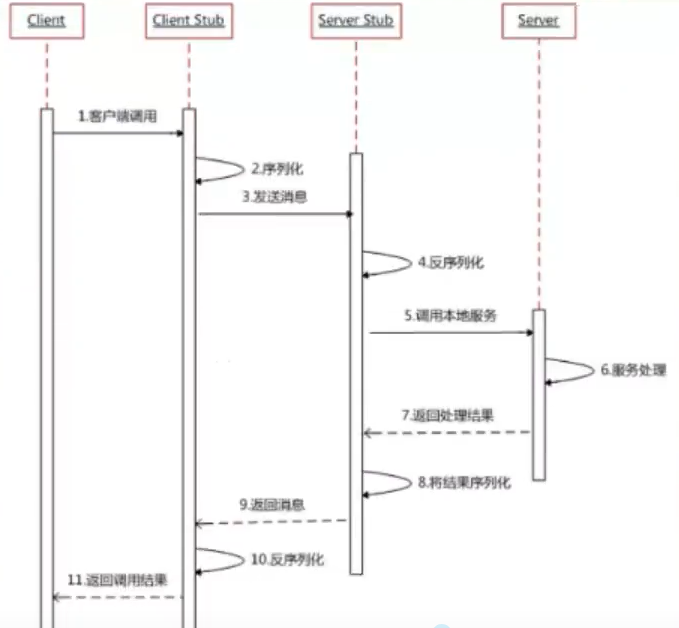
RPC两个核心模块:
- 通讯
- 序列化(数据传输需要转换)
3.什么是dubbo
Apache dubbob是一款高性能、轻量级的开源Java rpc框架。
它提供了三大核心能力:
- 面向接口的远程方法调用。
- 智能容错和负载均衡。
- 以及服务自动注册和发现。
4.dubbo
- 服务提供者(provider):暴露服务的服务提供方,服务提供者在启动时,向注册中心注册自己提供的服务。
- 服务消费者(Consomer):调用远程服务的服务消费方,服务消费者在启动时,向注册中心订阅自己所需的服务,服务消费者,从提供者地址列表中,基于软负载均衡算法,选一台提供者进行调用,如果调用失败,再选另一台调用。
- 注册中心(Registy):注册中心返回服务提供者地址列表给消费者,如果有变更,注册中心将基于长连接推送变更数据给消费者。
- 监控中心:服务消费者和提供者,在内存中累计调用次数和调用时间,定时每分钟发送一次统计数据到监控中心。
5.zookeeper
zookeeper是注册中心
- 下载zookeeper
https://downloads.apache.org/zookeeper/ - 修改配置文件名称
修改apache-zookeeper-3.6.3-bin/conf/zoo_sample.cfg名称为zoo.cfg - 启动zookeeper
windows下密令:双击apache-zookeeper-3.6.3-bin/bin/zkServer.cmd - 可以启动客户端连接
windows下密令:双击apache-zookeeper-3.6.3-bin/bin/zkCli.cmd
6.dubbo-admin
dubbo-admin是一个监控管理后台,查看我们注册了哪些服务,哪些服务被消费了
- 下载dubbo-admin
https://github.com/apache/dubbo-admin/tree/master - 进入到项目中打包
- dubbo-admin-master目录下打开cmd
- 执行打包密令mvn clean package -D maven.test.skip=true
- 启动dubbo-admin项目
- 启动jar包密令:java -jar xxx.jar
- 访问localhost:7001 (默认端口7001)
7.springboot整合dubbo+zookeeper
-
启动zookeeper注册中心
默认端口号是2181 -
提供者提供服务。
-
导入依赖。
<!--dubbo--> <dependency> <groupId>org.apache.dubbo</groupId> <artifactId>dubbo-spring-boot-starter</artifactId> <version>2.7.3</version> </dependency> <!--zkclient--> <dependency> <groupId>com.github.sgroschupf</groupId> <artifactId>zkclient</artifactId> <version>0.1</version> </dependency> <!--引入zookeeper,会有日志冲突,需要排除包--> <dependency> <groupId>org.apache.curator</groupId> <artifactId>curator-framework</artifactId> <version>5.1.0</version> </dependency> <dependency> <groupId>org.apache.curator</groupId> <artifactId>curator-recipes</artifactId> <version>5.1.0</version> </dependency> <dependency> <groupId>org.apache.zookeeper</groupId> <artifactId>zookeeper</artifactId> <version>3.6.3</version> <!--排除slf4j-log4j12--> <exclusions> <exclusion> <groupId>org.slf4j</groupId> <artifactId>slf4j-log4j12</artifactId> </exclusion> </exclusions> </dependency> -
配置注册中心地址,提供者提供的服务名,需要扫描的包。
// application.yml server: port: 8081 dubbo: application: name: provider-server # 注册的服务应用名称 registry: address: zookeeper://localhost:2181 # 注册中心地址 scan: base-packages: com.sywl.service # 哪些服务要被注册 -
在想被注册的服务上面增加一个dubbo的
@Service
注解。
import org.apache.dubbo.config.annotation.Service;
// zookeeper:服务注册与发现
@Service //dubbo的@sevice注解:可以被扫描到,在项目一启动就自动注册到注册中心
public class TickerServiceImpl implements TicketService {
@Override
public String getTicket() {
 return "你好啊";
}
}
-
-
消费者如何消费
-
导入依赖。
<!--dubbo--> <dependency> <groupId>org.apache.dubbo</groupId> <artifactId>dubbo-spring-boot-starter</artifactId> <version>2.7.3</version> </dependency> <!--zkclient--> <dependency> <groupId>com.github.sgroschupf</groupId> <artifactId>zkclient</artifactId> <version>0.1</version> </dependency> <!--引入zookeeper,会有日志冲突,需要排除包--> <dependency> <groupId>org.apache.curator</groupId> <artifactId>curator-framework</artifactId> <version>5.1.0</version> </dependency> <dependency> <groupId>org.apache.curator</groupId> <artifactId>curator-recipes</artifactId> <version>5.1.0</version> </dependency> <dependency> <groupId>org.apache.zookeeper</groupId> <artifactId>zookeeper</artifactId> <version>3.6.3</version> <!--排除slf4j-log4j12--> <exclusions> <exclusion> <groupId>org.slf4j</groupId> <artifactId>slf4j-log4j12</artifactId> </exclusion> </exclusions> </dependency> -
配置注册中心地址,消费者自己的的服务名。
// application.yml server: port: 8082 dubbo: application: name: consumer-server # 消费者去拿服务需要暴露自己的名字 registry: address: zookeeper://localhost:2181 # 注册中心地址 -
从远程注入服务
@Reference
import org.springframework.stereotype.Service;
@Service // 注入容器
public class UserService {
// 去注册中心拿provider-server提供的票
@Reference //引用(远程调用),需要定义服务提供者路径相同的接口名
TicketService tiketService;
public void buyTiket(){
 String ticket = tiketService.getTicket();
 System.out.println("在注册中心拿到服务:"+ ticket);
}
}
-

 浙公网安备 33010602011771号