
Turtlebot3-burger入门教程#noetic版#
Turtlebot3-burger入门教程#noetic版#
https://www.ncnynl.com/archives/202110/4660.html
Turtlebot3-burger入门教程#noetic版#-目录
Turtlebot3-burger入门教程#noetic版#-目录
相关设备
- TB3套件:采购地址
目录
- Turtlebot3-burger入门教程#noetic版#-目录
- Turtlebot3-burger入门教程#noetic版#-硬件清单
- Turtlebot3-burger入门教程#noetic版#-软件清单
- Turtlebot3-burger入门教程#noetic版#-PC安装
- Turtlebot3-burger入门教程#noetic版#-树莓派4安装
- Turtlebot3-burger入门教程#noetic版#-OpenCR安装
- Turtlebot3-burger入门教程#noetic版#-网络设置
- Turtlebot3-burger入门教程#noetic版#-雷达安装
- Turtlebot3-burger入门教程#noetic版#-启动测试
- Turtlebot3-burger入门教程#noetic版#-键盘控制
- Turtlebot3-burger入门教程#noetic版#-创建地图
- Turtlebot3-burger入门教程#noetic版#-自主导航
Turtlebot3-burger入门教程#noetic版#-硬件清单
Turtlebot3-burger入门教程#noetic版#-硬件清单
说明:
- 介绍Turtlebot3-burger的硬件组成及安装说明
相关设备
- TB3套件:采购地址
详细介绍
-
安装说明书:
-
核心硬件:
– 1x Burger 款机壳组
– 2x 智能马达: XL430
– 1x 控制器(ROS): OpenCR控制器
– 1x 锂电池/充电器组(11.1V, 1,800mAh)
– 1x 连接线组
– 1x SBC 单板电脑: Raspberry Pi 4
– 1x 雷射测距仪
– 1x MicroSD 16G 记忆卡
– 1x 组装工具组 -
TurtleBot3 Burger 汉堡款规格
– 最大速度: 0.22m/s
– 最大旋转速度: 2.84 rad/s (162.72 deg/s)
– 最大承载: 15kg
– 尺寸(LxWxH): 138 x 178 x 192 mm
– 重量: 0.995kg
– 爬高: 10mm 以下
– 预估操作时间: 2.5 hr
– 预估充电时间: 2.5 hr
– MCU: 32-bit ARM Cortex M7 with FPU (216 MHz, 462 DMIPS)
– IMU: 3 轴陀螺仪, 3 轴加速度计, 3 轴磁力计
– 电源: 3.3V/800mA; 5V/4A; 12V/1A
– 扩充脚位: GPIO 18-pin; Arduino 32-pin
– 周边: UART x3, CAN x1, SPI x1, I2C x1, ADC x5, 5pin OLLO x4
– Dynamixel 智能马达接口: RS485 x3; TTL x3
– 声音: 可编程蜂鸣
– 可编程 LED: 4个
– 状态 LED: 控制板 x1; 电池 x1; Arduino x1
– 按键: Push buttons x 2, Reset button x 1, Dip switch x 2
– 电池: Lithium polymer 11.1V 1800mAh / 19.98Wh 5C
– PC 连接: USB
– 韧体升级: 透过 USB / 透过 JTAG
– 充电器: 输入100-240V, AC 50/60Hz, 1.5A max; 输出12V DC, 5A
Turtlebot3-burger入门教程#noetic版#-软件清单
Turtlebot3-burger入门教程#noetic版#-软件清单
说明:
- 介绍turtlebot3-burger涉及的软件及相关介绍
- burger通过主从模式控制,软件包括PC(主机),树莓派(从机),OpenCR(驱动板)三部分组成
相关设备
- TB3套件:采购地址
详细介绍
-
PC端软件清单
- 系统:ubuntu 20.04
- 软件:ROS (noetic版本)
- 软件:Turtlebot3软件包
- 软件:arduino IDE
-
树莓派软件清单
- 系统:ubuntu mate 20.04
- 软件:ROS (noetic版本)
- 软件:Turtlebot3软件包
-
OpenCR软件清单
- Arduino固件
- bootloader
Turtlebot3-burger入门教程#noetic版#-PC安装
Turtlebot3-burger入门教程#noetic版#-PC安装
说明:
- 本教程介绍如何在在PC上安装对应的系统和软件
- 测试环境: Ubuntu 20.04 + ROS Noetic Ninjemys
相关设备
- TB3套件:采购地址
前提说明
-
若已在创客智造购买相关产品,可以咨询客服获取已配置好的虚拟机的下载链接
-
虚拟机安装使用教程:ROS与虚拟机-Windows 10下安装VMware15
-
通常该虚拟机上已配置Noetic和Foxy的环境,可通过修改
~/.bashrc的内容来切换 -
[Remote PC] 若当前需要从Foxy环境切换到Noetic环境,需要将文档末端的两项环境变量全部注释,
保存退出关闭此终端
$ rosversion -d
foxy
$ vim ~/.bashrc

#source ~/tools/environment/noetic/setRosNoeticEnvironment.sh
#source ~/tools/environment/foxy/setRos2FoxyEnvironment.sh

$ exit- [Remote PC]
打开新终端,将文档末端Noetic的环境变量的注释标志去掉,再保存退出
$ vim ~/.bashrc

source ~/tools/environment/noetic/setRosNoeticEnvironment.sh
#source ~/tools/environment/foxy/setRos2FoxyEnvironment.sh


$ source ~/.bashrc && rosversion -d
noetic
系统安装
安装ROS Noetic Ninjemys
- [Remote PC] apt 安装
# 设置源
$ sudo sh -c 'echo "deb http://packages.ros.org/ros/ubuntu $(lsb_release -sc) main" > /etc/apt/sources.list.d/ros-latest.list'
# 设置keys
$ sudo apt install curl # if you haven't already installed curl
$ curl -s https://raw.githubusercontent.com/ros/rosdistro/master/ros.asc | sudo apt-key add -
# 安装noetic
$ sudo apt update
$ sudo apt install ros-noetic-desktop-full
# 配置环境
$ echo "source /opt/ros/noetic/setup.bash" >> ~/.bashrc
$ source ~/.bashrc
# 安装相关依赖包
$ sudo apt install python3-rosdep python3-rosinstall python3-rosinstall-generator python3-wstool build-essential
# 初始化rosdep
$ sudo rosdep init
$ rosdep update
安装TurtleBot3及相关依赖包
- [Remote PC] 安装相关依赖包
$ sudo apt-get install ros-noetic-joy ros-noetic-teleop-twist-joy \
  ros-noetic-teleop-twist-keyboard ros-noetic-laser-proc \
  ros-noetic-rgbd-launch ros-noetic-rosserial-arduino \
  ros-noetic-rosserial-python ros-noetic-rosserial-client \
  ros-noetic-rosserial-msgs ros-noetic-amcl ros-noetic-map-server \
  ros-noetic-move-base ros-noetic-urdf ros-noetic-xacro \
  ros-noetic-compressed-image-transport ros-noetic-rqt* ros-noetic-rviz \
  ros-noetic-gmapping ros-noetic-navigation ros-noetic-interactive-markers \
ros-noetic-slam-karto ros-noetic-hector-mapping - [Remote PC] 安装TurtleBot3包
$ mkdir -p ~/turtlebot3_ws/src
$ cd ~/turtlebot3_ws/src/
$ git clone -b noetic-devel https://github.com/ROBOTIS-GIT/DynamixelSDK.git
$ git clone -b noetic-devel https://github.com/ROBOTIS-GIT/turtlebot3_msgs.git
$ git clone -b noetic-devel https://github.com/ROBOTIS-GIT/turtlebot3.git
$ git clone -b noetic-devel https://github.com/ROBOTIS-GIT/hls_lfcd_lds_driver.git
$ cd ~/turtlebot3_ws && catkin_make
$ echo "source ~/turtlebot3_ws/devel/setup.bash" >> ~/.bashrc- [TurtleBot] 安装LDS-02雷达包
$ sudo apt update
$ sudo apt install libudev-dev
$ cd ~/turtlebot3_ws/src
$ git clone -b develop https://github.com/ROBOTIS-GIT/ld08_driver.git
$ cd ~/catkin_ws/src/turtlebot3 && git pull
$ cd ~/turtlebot3_ws && catkin_make- [Remote PC] 配置模型的环境变量
$ echo "export TURTLEBOT3_MODEL=burger" >> ~/.bashrc
$ source ~/.bashrc
Turtlebot3-burger入门教程#noetic版#-树莓派4安装
Turtlebot3-burger入门教程#noetic版#-树莓派4安装
说明:
- 本教程介绍如何在在树莓派4上安装对应的系统和软件
- 测试环境: 树莓派4B 2G + Ubuntu MATE 20.04 + ROS Noetic Ninjemys
相关设备
- TB3套件:采购地址
前提说明
- 对于在创客智造上购买的Noetic版系统的tb3是已经配置好系统,不需要重复安装
系统安装
增加交换空间
- [TurtleBot] 创建一个交换空间且赋予权限
$ sudo fallocate -l 1G /swapfile
$ sudo chmod 600 /swapfile- [TurtleBot] 使用
mkswap命令设置Linux的交换空间
$ sudo mkswap /swapfile- [TurtleBot] 启用该交换空间
$ sudo swapon /swapfile- [TurtleBot] 设置开机挂载
$ sudo vim /etc/fstab
//将下面这句话添加到文件末
/swapfile swap swap defaults 0 0- [TurtleBot] 查看是否分配交换空间
$ sudo free -h
          total        used        free      shared  buff/cache   available
Mem:       912M         75M        254M        3.0M        582M        819M
Swap:      1.0G         35M        988M
安装ROS Noetic Ninjemys
- [TurtleBot] apt 安装
# 设置源
$ sudo sh -c 'echo "deb http://packages.ros.org/ros/ubuntu $(lsb_release -sc) main" > /etc/apt/sources.list.d/ros-latest.list'
# 设置keys
$ sudo apt install curl # if you haven't already installed curl
$ curl -s https://raw.githubusercontent.com/ros/rosdistro/master/ros.asc | sudo apt-key add -
# 安装noetic
$ sudo apt update
$ sudo apt install ros-noetic-desktop-full
# 配置环境
$ echo "source /opt/ros/noetic/setup.bash" >> ~/.bashrc
$ source ~/.bashrc
# 安装相关依赖包
$ sudo apt install python3-rosdep python3-rosinstall python3-rosinstall-generator python3-wstool build-essential
# 初始化rosdep
$ sudo rosdep init
$ rosdep update
安装TurtleBot3及相关依赖包
- [TurtleBot] 安装相关依赖包
$ sudo apt-get install ros-noetic-joy ros-noetic-teleop-twist-joy \
  ros-noetic-teleop-twist-keyboard ros-noetic-laser-proc \
  ros-noetic-rgbd-launch ros-noetic-rosserial-arduino \
  ros-noetic-rosserial-python ros-noetic-rosserial-client \
  ros-noetic-rosserial-msgs ros-noetic-amcl ros-noetic-map-server \
  ros-noetic-move-base ros-noetic-urdf ros-noetic-xacro \
  ros-noetic-compressed-image-transport ros-noetic-rqt* ros-noetic-rviz \
  ros-noetic-gmapping ros-noetic-navigation ros-noetic-interactive-markers \
ros-noetic-slam-karto ros-noetic-hector-mapping - [TurtleBot] 安装TurtleBot3包
$ mkdir -p ~/turtlebot3_ws/src
$ cd ~/turtlebot3_ws/src/
$ git clone -b noetic-devel https://github.com/ROBOTIS-GIT/DynamixelSDK.git
$ git clone -b noetic-devel https://github.com/ROBOTIS-GIT/turtlebot3_msgs.git
$ git clone -b noetic-devel https://github.com/ROBOTIS-GIT/turtlebot3.git
$ git clone -b noetic-devel https://github.com/ROBOTIS-GIT/hls_lfcd_lds_driver.git
$ cd ~/turtlebot3_ws && catkin_make
$ echo "source ~/turtlebot3_ws/devel/setup.bash" >> ~/.bashrc- [TurtleBot] 安装LDS-02雷达包
$ sudo apt update
$ sudo apt install libudev-dev
$ cd ~/turtlebot3_ws/src
$ git clone -b develop https://github.com/ROBOTIS-GIT/ld08_driver.git
$ cd ~/catkin_ws/src/turtlebot3 && git pull
$ cd ~/turtlebot3_ws && catkin_make- USB设置(以下允许将USB端口用于没有root权限的OpenCR板)
$ rosrun turtlebot3_bringup create_udev_rules- [TurtleBot] 配置模型的环境变量
$ echo "export TURTLEBOT3_MODEL=burger" >> ~/.bashrc
$ echo "export LDS_MODEL=LDS-02" >> ~/.bashrc #根据当时使用的雷达来设置
$ source ~/.bashrc
Turtlebot3-burger入门教程#noetic版#-OpenCR安装
Turtlebot3-burger入门教程#noetic版#-OpenCR安装
说明:
- 本教程主要介绍OpenCR驱动烧录noetic版的固件
- 测试环境:树莓派4B 2G + Ubuntu MATE 20.04 + ROS Noetic Ninjemys
相关设备
- TB3套件:采购地址
前提说明
-
对于在创客智造上购买的noetic版系统的tb3是已经烧录好固件,不需要重复安装
-
[TurtleBot] 同时其系统会内置一键烧录稳定固件的脚本
$ ~/tools/firmware/noetic/loadRosNoeticFirmware.sh
Now the Noetic's firmware of burger will be download to the openCR.

aarch64
arm
OpenCR Update Start..
opencr_ld_shell ver 1.0.0
opencr_ld_main
[  ] file name          : burger_noetic.opencr
[  ] file size          : 183 KB
[  ] fw_name            : burger_noetic
[  ] fw_ver             : 1.2.6
[OK] Open port          : /dev/ttyACM0
[  ]
[  ] Board Name         : OpenCR R1.0
[  ] Board Ver          : 0x17020800
[  ] Board Rev          : 0x00000000
[OK] flash_erase        : 1.12s
[OK] flash_write        : 1.60s
[OK] CRC Check          : 12A5C20 12A5C20 , 0.005000 sec
[OK] Download
[OK] jump_to_fw
固件烧录
- [TurtleBot] 安装相关依赖包
$ sudo dpkg --add-architecture armhf
$ sudo apt-get update
$ sudo apt-get install libc6:armhf- [TurtleBot] 设置环境变量
$ export OPENCR_PORT=/dev/ttyACM0
$ export OPENCR_MODEL=burger_noetic
$ rm -rf ./opencr_update.tar.bz2- [TurtleBot] 下载最新的固件
$ wget https://github.com/ROBOTIS-GIT/OpenCR-Binaries/raw/master/turtlebot3/ROS1/latest/opencr_update.tar.bz2
$ tar -xvf opencr_update.tar.bz2- [TurtleBot] 烧录固件
$ cd ./opencr_update
$ ./update.sh $OPENCR_PORT $OPENCR_MODEL.opencr
测试
-
测试前需要预先组装Turtlebot3
-
将机器人放置在开阔区域的平坦地面上
-
对于测试,建议安全半径为 1 米
-
连接上电源后打开供电开关
-
长按
PUSH SW 1数秒,正常情况下机器人向前移动30厘米 -
长按
PUSH SW 2数秒,正常情况下机器人将会原地旋转180度

Turtlebot3-burger入门教程#noetic版#-网络设置
Turtlebot3-burger入门教程#noetic版#-网络设置
说明:
- 介绍如何设置Turtlebot-Burger的主从模式
- 介绍如何同步时间,如果时间不同步,容易出现TF变换错误
相关设备
- TB3套件:采购地址
时间同步
- [TurtleBot && Remote PC] 安装chrony,参考文章
$ sudo apt-get install chrony$ sudo apt-get install ntpdate- [TurtleBot && Remote PC] 分别同步时间
$ sudo ntpdate ntp.ubuntu.com- [TurtleBot && Remote PC] 检测时间是否同步
$ date主从机设置
进行该步骤前,请将TurtleBot和Remote PC都连接到同一个网络的同一个网段下
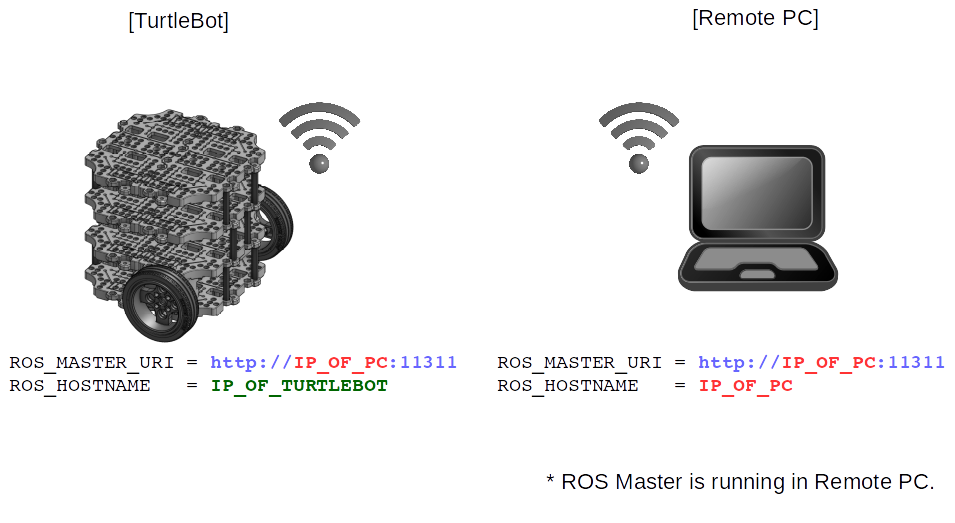
- ubuntu界面模式设置ip教程:参考链接 | 文章末有视频教程
对于在创客智造上购买的以配置Noetic版系统的tb3, 通常是根据下面的更改思路修改
~/tools/environment/noetic/setRosNoeticEnvironment.sh文档里的ip地址为树莓派当前获取的地址,然后再source一下~/.bashrc文件`让环境生效
- [TurtleBot && Remote PC] 执行如下命令获得对应的IP地址:
$ ifconfig-
假设
PC的IP地址为:192.168.0.100, turtlebot的IP为:192.168.0.101 -
[TurtleBot && Remote PC] 修改根目录下的 .bashrc 文件
$ gedit ~/.bashrc- TURTLEBOT配置如下:
export ROS_MASTER_URI=http://192.168.0.100:11311
export ROS_HOSTNAME=192.168.0.101- PC配置如下:
export ROS_MASTER_URI=http://192.168.0.100:11311
export ROS_HOSTNAME=192.168.0.100- ROS_MASTER 运行在远程PC上
- [TurtleBot && Remote PC] 让环境生效
$ source ~/.bashrc-
测试是否配置好主从机
-
[Remote PC] 启动roscore
$ roscore- [TurtleBot] 查看是否订阅到主机发布的话题
$ rostopic list
/rosout
/rosout_agg- 若出现错误
ERROR: Unable to communicate with master!即说明主从机未配置成功
演示视频
- 手动设置固定ip
- 主从机设置
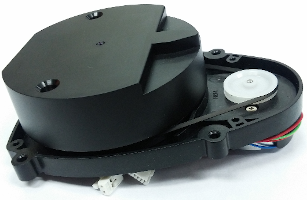
Turtlebot3-burger入门教程#noetic版#-雷达测试
Turtlebot3-burger入门教程#noetic版#-雷达测试
说明:
- 本教程主要介绍burger上如何进行雷达测试
- TurtleBot3的雷达自2022年起已更新为
LDS-02型号,请根据使用的雷达来进行对应的测试
相关设备
- TB3套件:采购地址
LDS-02雷达操作步骤
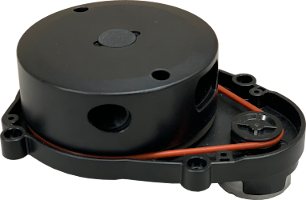
- [Remote PC] 启动roscore
$ roscore - [TurtelBot] 启动雷达
$ roslaunch ld08_driver ld08.launch- [Remote PC] 启动rviz
$ rviz- 设置
Fixed Frame参数的值为base_scan;侧边栏添加LaserScan项,设置Topic参数的值为/scan

LDS-01雷达操作步骤
- [Remote PC] 启动roscore
$ roscore- [TurtelBot] 启动雷达
$ roslaunch hls_lfcd_lds_driver hlds_laser.launch- [Remote PC] 查看雷达发布的话题信息
$ rostopic echo /scan- [Remote PC] 启动rviz
$ rosrun rviz rviz -d `rospack find hls_lfcd_lds_driver`/rviz/hlds_laser.rviz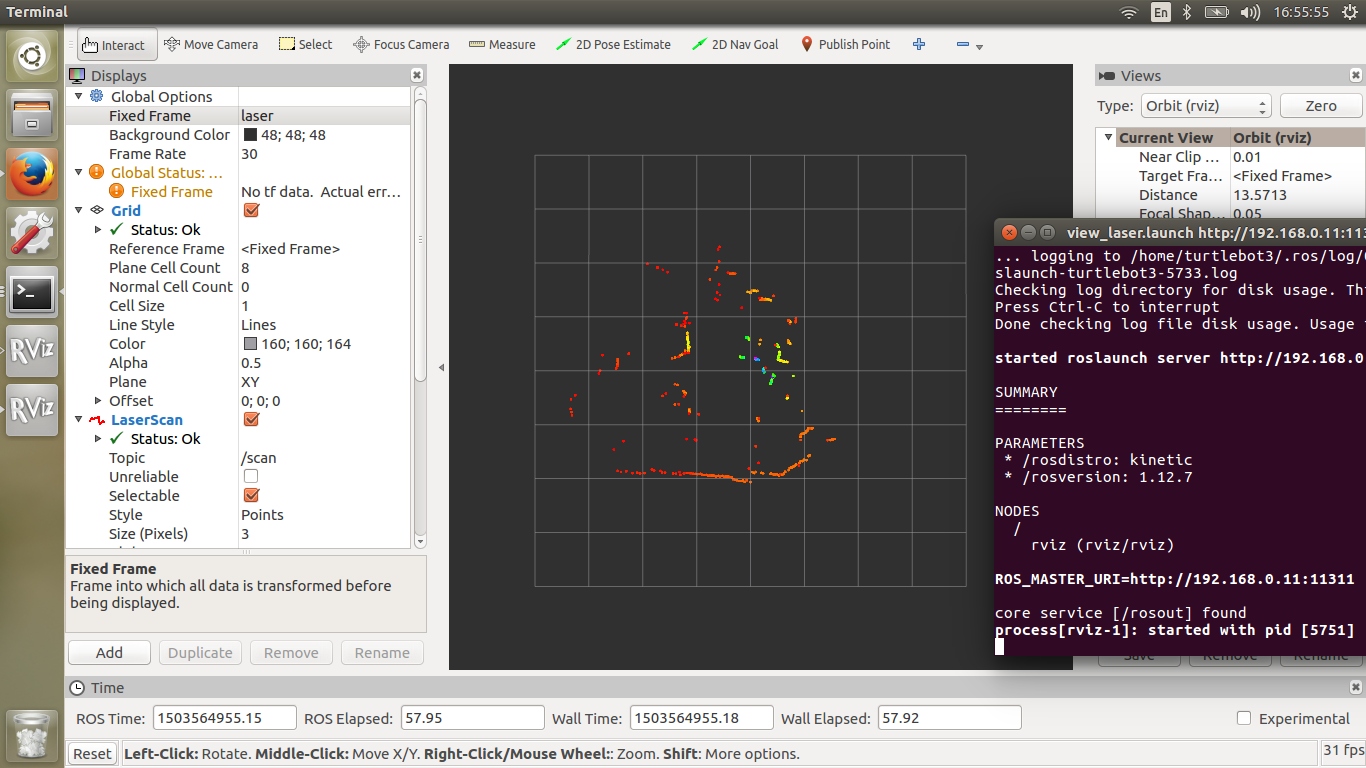
Turtlebot3-burger入门教程#noetic版#-启动测试
Turtlebot3-burger入门教程#noetic版#-启动测试
说明:
- 本教程介绍如何启动burger
相关设备
- TB3套件:采购地址
操作步骤
- [Remote PC] 启动roscore
$ roscore- [TurtleBot] 启动burger
$ roslaunch turtlebot3_bringup turtlebot3_robot.launch- [Remote PC] 启动rviz
$ export TURTLEBOT3_MODEL=burger
$ roslaunch turtlebot3_bringup turtlebot3_model.launch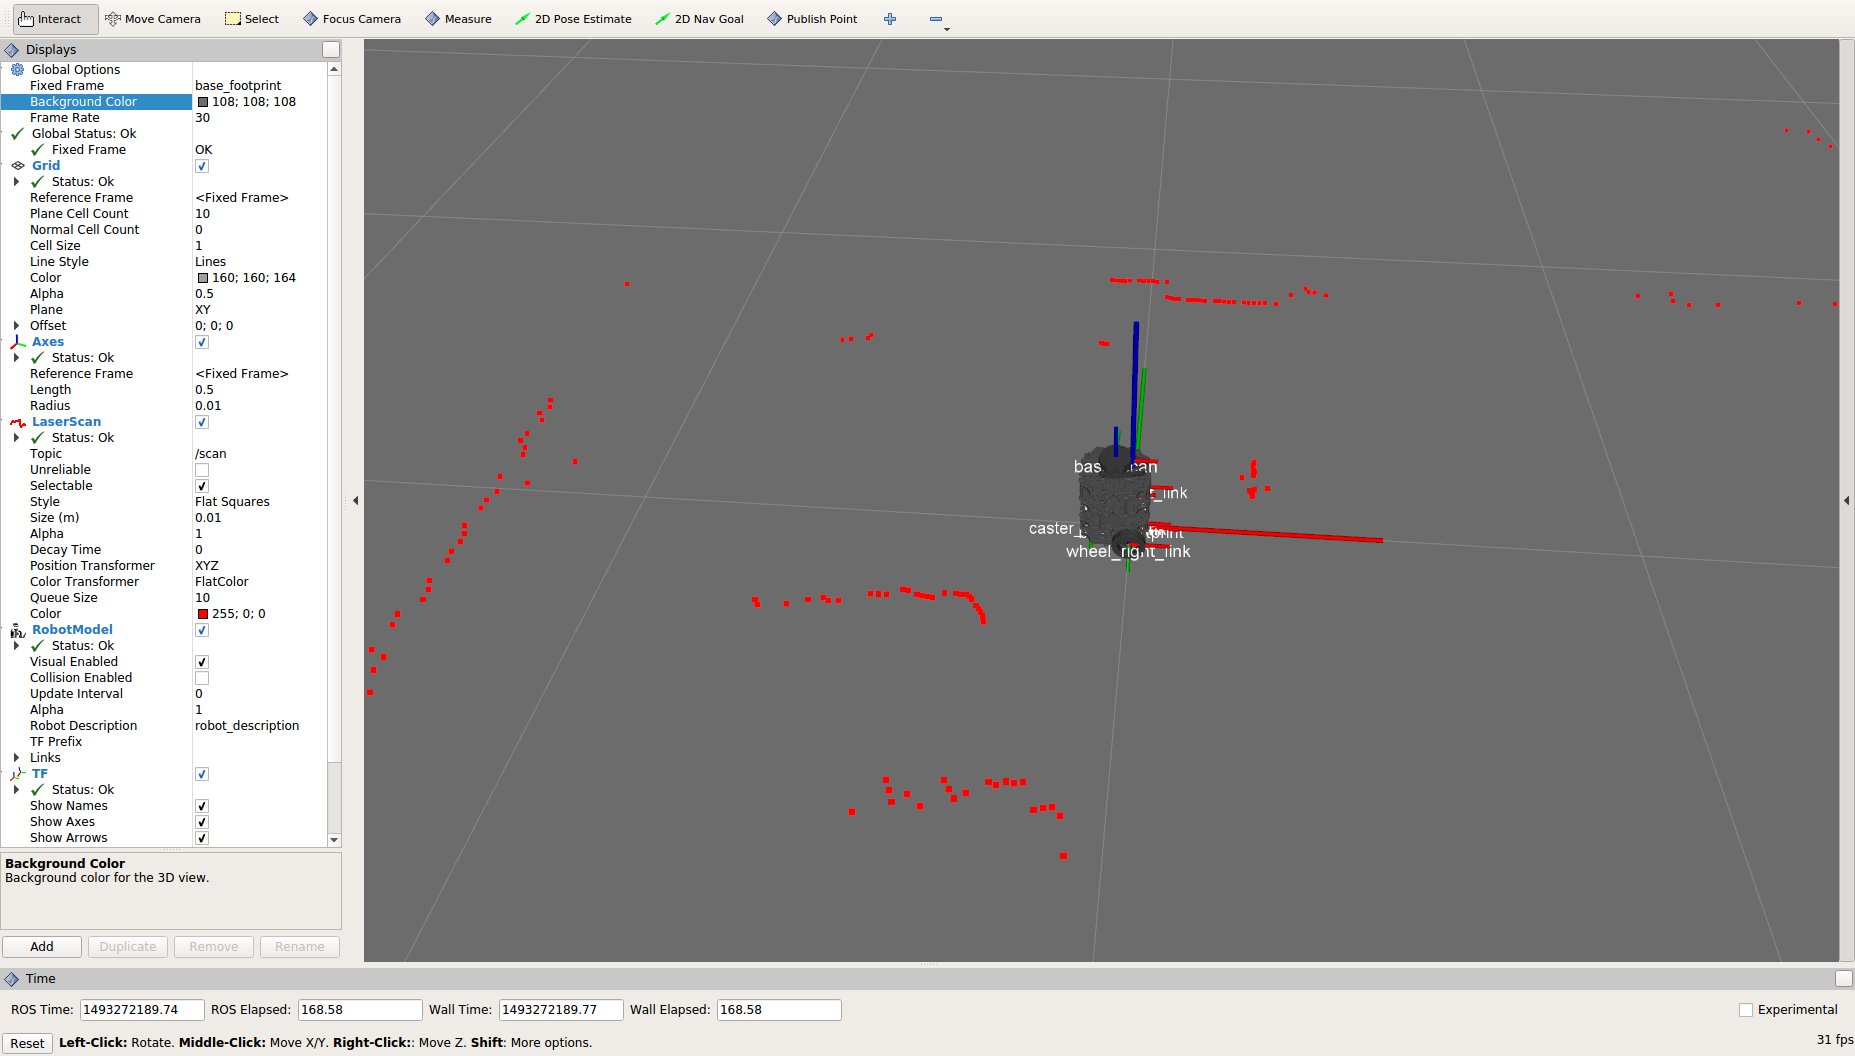
- [Remote PC] 查看剩余电量
$ rostopic echo /battery_state

header:
  seq: 1
  stamp:
    secs: 1623917363
    nsecs: 268977973
  frame_id: ''
voltage: 11.0799999237
current: 0.0
charge: 0.0
capacity: 0.0
design_capacity: 1.79999995232
percentage: 0.998198151588
power_supply_status: 0
power_supply_health: 0
power_supply_technology: 0
present: True
cell_voltage: []
location: ''
serial_number: ''
---
header:
  seq: 2
  stamp:
    secs: 1623917363
    nsecs: 303977973
  frame_id: ''
voltage: 11.0600004196
current: 0.0
charge: 0.0
capacity: 0.0
design_capacity: 1.79999995232
percentage: 0.996396422386
power_supply_status: 0
power_supply_health: 0
power_supply_technology: 0
present: True
cell_voltage: []
location: ''
serial_number: ''- 其中
voltage为当前电压值
Turtlebot3-burger入门教程#noetic版#-键盘控制
Turtlebot3-burger入门教程#noetic版#-键盘控制
说明:
- 本教程介绍Turtlebot3-burger通过键盘控制
相关设备
- TB3套件:采购地址
操作步骤
- [Remote PC] 启动roscore
$ roscore- [TurtleBot] 启动burger
$ roslaunch turtlebot3_bringup turtlebot3_robot.launch- [Remote PC] 启动进行简单远程操作测试
$ roslaunch turtlebot3_teleop turtlebot3_teleop_key.launch- [Remote PC] 如果文件成功启动,终端将显示以下内容
Control Your Turtlebot3!
---------------------------
Moving around:
        w
   a    s    d
        x

w/x : increase/decrease linear velocity
a/d : increase/decrease angular velocity
space key, s : force stop

CTRL-C to quit- 分别按
w、a、s、d、x键进行控制机器人- w 是增加线速度
- x 是降低线速度
- a 是增加角速度
- d 是降低角速度
- s 是停止
Turtlebot3-burger入门教程#noetic版#-创建地图
Turtlebot3-burger入门教程#noetic版#-创建地图
说明
- 本教程主要介绍如何通过turtlebot3进行创建地图
相关设备
- TB3套件:采购地址
操作步骤
- [Remote PC] 启动roscore
$ roscore- [TurtleBot] 启动Burger
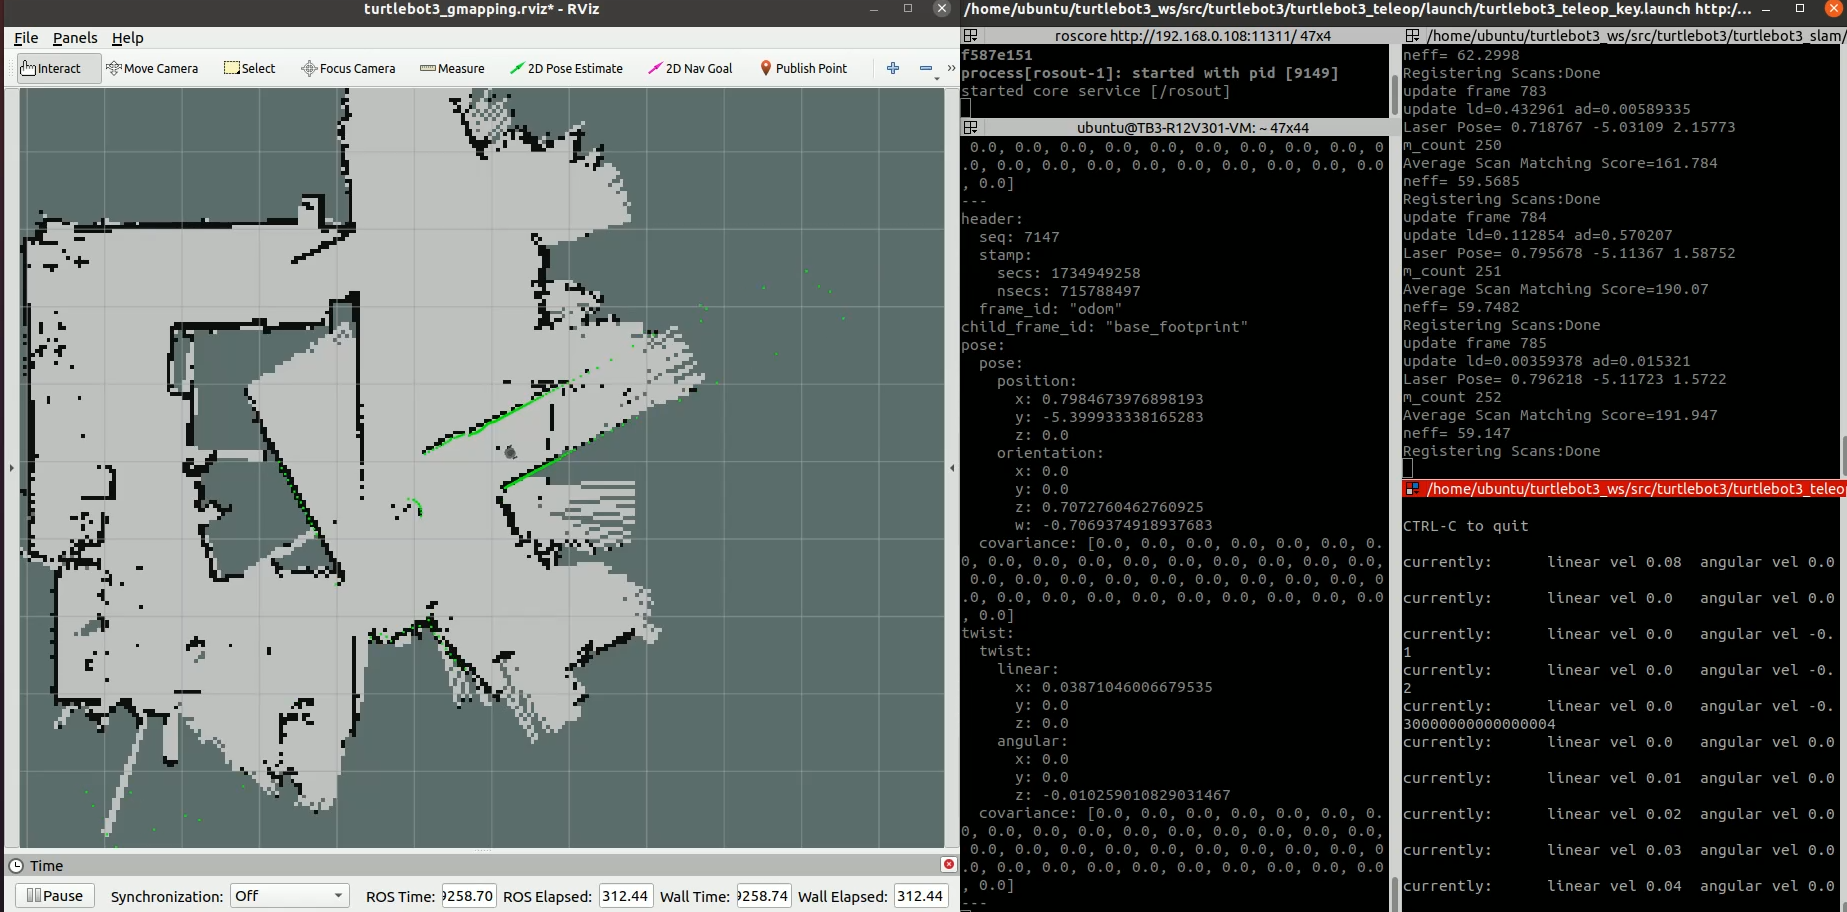
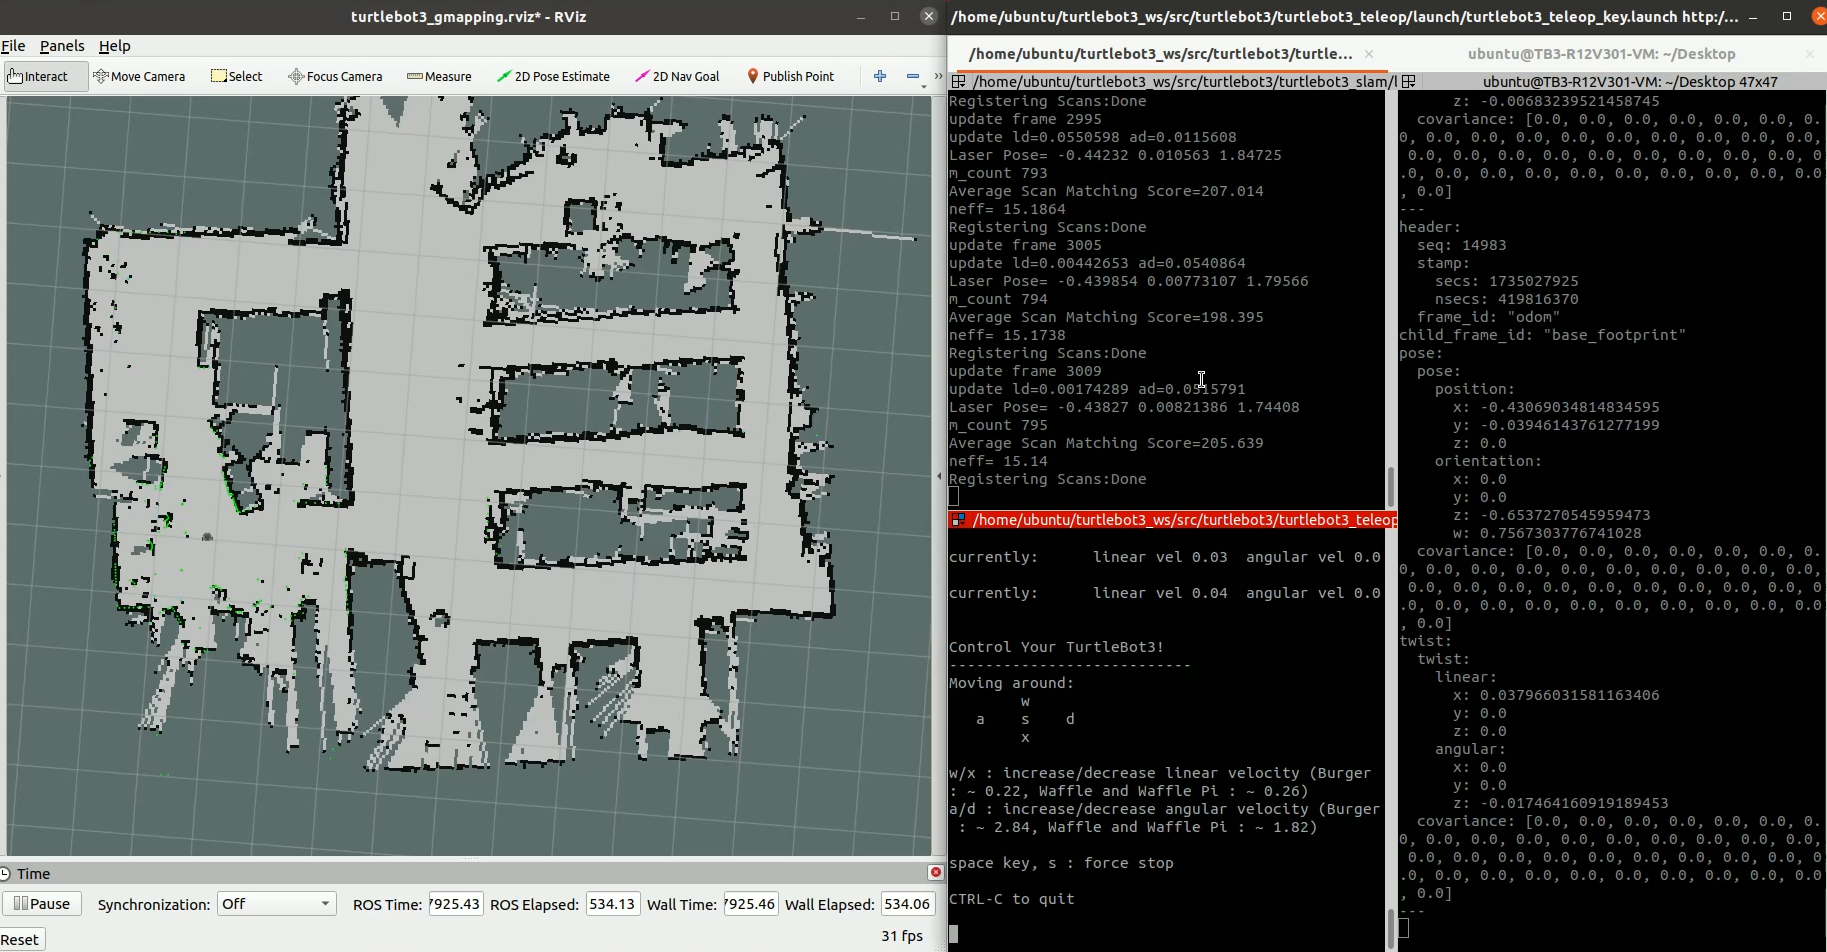
$ roslaunch turtlebot3_bringup turtlebot3_robot.launch- [Remote PC] 然后运行SLAM启动文件以及Rviz,默认的slam算法为
gampping
$ export TURTLEBOT3_MODEL=burger
# 默认使用gmapping算法
$ roslaunch turtlebot3_slam turtlebot3_slam.launch

# hector算法
$ roslaunch turtlebot3_slam turtlebot3_slam.launch slam_methods:=hector
# cartographer算法
$ roslaunch turtlebot3_slam turtlebot3_slam.launch slam_methods:=cartographer
# karto算法
$ roslaunch turtlebot3_slam turtlebot3_slam.launch slam_methods:=karto- [Remote PC] 启动键盘操作
$ export TURTLEBOT3_MODEL=burger
$ roslaunch turtlebot3_teleop turtlebot3_teleop_key.launch- 移动burger进行建图

- [Remote PC] 建图完成后保存地图
$ rosrun map_server map_saver -f ~/map- map.pgm和map.yaml 在 ~/ 目录里创建
FAQ
问题1:使用gmapping建图时,建图中途反复出现建图重叠错位
- 解决方法: 修改gmapping参数文件
turtlebot3/turtlebot3_slam/config/gmapping_params.yaml
# 更新gmapping到最新版本
$ sudo apt install ros-noetic-gmapping

# 修改对应参数
$ rosed turtlebot3_slam gmapping_params.yaml
## 用以下参数替换原来的参数项

map_update_interval: 5.0
maxUrange: 6.0
maxRange: 3.5
sigma: 0.05
kernelSize: 3
lstep: 0.05
astep: 0.05
iterations: 5
lsigma: 0.075
ogain: 3.0
lskip: 0
minimumScore: 50
srr: 0.01
srt: 0.02
str: 0.01
stt: 0.02
linearUpdate: 0.05
angularUpdate: 0.0456
temporalUpdate: -1.0
resampleThreshold: 0.5
particles: 30
xmin: -1.0
ymin: -1.0
xmax: 1.0
ymax: 1.0
delta: 0.05
llsamplerange: 0.01
llsamplestep: 0.01
lasamplerange: 0.005- 修改后建图
问题2:使用karto建图时,出现车走但rviz中车走一段又跳回原点的情况
- 使得建出来的地图在不停重叠
- 解决方法: 将
turtlebot3_ws/src/turtlebot3/turtlebot3_slam/config/karto_mapper_params.yaml中的use_scan_matching参数设置成false - 参考资料: https://blog.csdn.net/weixin_41349117/article/details/101019662
演示视频
Turtlebot3-burger入门教程#noetic版#-自主导航
Turtlebot3-burger入门教程#noetic版#-自主导航
说明:
- 介绍如何利用Turtlebot3-burger进行导航
相关设备
- TB3套件:采购地址
操作步骤
- [Remote PC] 启动roscore
$ roscore- [TurtleBot] 启动burger
$ roslaunch turtlebot3_bringup turtlebot3_robot.launch- [Remote PC] 启动导航和rviz
$ export TURTLEBOT3_MODEL=burger
$ roslaunch turtlebot3_navigation turtlebot3_navigation.launch map_file:=$HOME/map.yaml-
[Remote PC] 在开始导航之前,TurtleBot3应该知道它的位置和姿势。
-
要给出初始数据,请按照说明进行操作。
- 点击2D Pose Estimate按钮
- 通过单击并拖动地图上的方向来设置地图上的大致位置。
-
箭头的每个点意味着TurtleBot3的预期姿势。激光扫描仪将在近似位置绘制线条,如地图上的墙壁。
-
如果图形没有显示线条,请重复上述过程。
-
[Remote PC] 当TurtleBot3已经定位,它将自动计划路径
-
要发送目标位置:
- 点击 2D Nav Goal按钮
- 点击地图上你想要的TurtleBot驱动和拖动方向TurtleBot应该指向地方
-
如果目标位置的路径被阻止,这可能会失败。
-
要在机器人到达目标位置之前停止机器人,请发送TurtleBot3的当前位置。
演示视频

 浙公网安备 33010602011771号