
【electron+vue3+ts实战便笺exe】二、electron+vue3开发内容
不要让自己的上限成为你的底线
本来以为有万字的。。没想到才堪堪近6000字。为了水文的嫌疑,只挑了重点的地方讲,比如component内的组件就挑了右键弹窗去说明,建议在看本文的时候边查看项目,有不懂的可以在下方评论,谢谢。
github
github: https://github.com/heiyehk/electron-vue3-inote
包下载
release: https://github.com/heiyehk/electron-vue3-inote/releases
接上篇配置篇 【electron+vue3+ts实战便笺exe】一、搭建框架配置,这里更新了一下vue3的版本3.0.4,本篇文章只讲开发内容,主要还是vue3方面,长文警告。ps:smartblue这个主题好好看。。。
router
增加meta中的title属性,显示在软件上方头部
import { createRouter, createWebHashHistory } from 'vue-router';
import { RouteRecordRaw } from 'vue-router';
import main from '../views/main.vue';

const routes: Array<RouteRecordRaw> = [
  {
    path: '/',
    name: 'main',
    component: main,
    children: [
      {
        path: '/',
        name: 'index',
        component: () => import('../views/index.vue'),
        meta: {
          title: 'I便笺'
        }
      },
      {
        path: '/editor',
        name: 'editor',
        component: () => import('../views/editor.vue'),
        meta: {
          title: ''
        }
      },
      {
        path: '/setting',
        name: 'setting',
        component: () => import('../views/setting.vue'),
        meta: {
          title: '设置'
        }
      }
    ]
  }
];

const router = createRouter({
  history: createWebHashHistory(process.env.BASE_URL),
  routes
});

export default router;
utils
/* eslint-disable @typescript-eslint/ban-types */

import { winURL } from '@/config';
import { BrowserWindow, remote } from 'electron';

type FunctionalControl = (this: any, fn: any, delay?: number) => (...args: any) => void;
type DebounceEvent = FunctionalControl;
type ThrottleEvent = FunctionalControl;

// 防抖函数
export const debounce: DebounceEvent = function(fn, delay = 1000) {
  let timer: NodeJS.Timeout | null = null;
  return (...args: any) => {
    if (timer) clearTimeout(timer);
    timer = setTimeout(() => {
      fn.apply(this, args);
    }, delay);
  };
};

// 节流函数
export const throttle: ThrottleEvent = function(fn, delay = 500) {
  let flag = true;
  return (...args: any) => {
    if (!flag) return;
    flag = false;
    setTimeout(() => {
      fn.apply(this, args);
      flag = true;
    }, delay);
  };
};

// 创建窗口
export const createBrowserWindow = (bwopt = {}, url = '/', devTools = true): BrowserWindow | null => {
  let childrenWindow: BrowserWindow | null;
  childrenWindow = new remote.BrowserWindow(bwopt);

  if (process.env.NODE_ENV === 'development' && devTools) {
    childrenWindow.webContents.openDevTools();
  }
  childrenWindow.loadURL(`${winURL}/#${url}`);
  childrenWindow.on('closed', () => {
    childrenWindow = null;
  });
  return childrenWindow;
};

// 过渡关闭窗口
export const transitCloseWindow = (): void => {
  document.querySelector('#app')?.classList.remove('app-show');
  document.querySelector('#app')?.classList.add('app-hide');
  remote.getCurrentWindow().close();
};

// uuid
export const uuid = (): string => {
  const S4 = () => {
    return (((1 + Math.random()) * 0x10000) | 0).toString(16).substring(1);
  };
  return S4() + S4() + '-' + S4() + '-' + S4() + '-' + S4() + '-' + S4() + S4() + S4();
};
main.vue
main.vue文件主要是作为一个整体框架,考虑到页面切换时候的动效,分为头部和主体部分,头部作为一个单独的组件处理,内容区域使用router-view渲染。
html部分,这里和vue2.x有点区别的是,在vue2.x中可以直接
// bad
<transition name="fade">
  <keep-alive>
    <router-view />
  </keep-alive>
</transition>
上面的这种写法在vue3中会在控制台报异常,记不住写法的可以看看控制台🤣🤣
<router-view v-slot="{ Component }">
  <transition name="main-fade">
    <div class="transition" :key="routeName">
      <keep-alive>
        <component :is="Component" />
      </keep-alive>
    </div>
  </transition>
</router-view>
然后就是ts部分了,使用vue3的写法去写,script标签注意需要写上lang="ts"代表是ts语法。router的写法也不一样,虽然在vue3中还能写vue2的格式,但是不推荐使用。这里是获取route的name属性,来进行一个页面过渡的效果。
<script lang="ts">
import { defineComponent, ref, onBeforeUpdate } from 'vue';
import { useRoute } from 'vue-router';
import Header from '@/components/header.vue';

export default defineComponent({
  components: {
    Header
  },
  setup() {
    const routeName = ref(useRoute().name);

    onBeforeUpdate(() => {
      routeName.value = useRoute().name;
    });

    return {
      routeName
    };
  }
});
</script>
less部分
<style lang="less" scoped>
.main-fade-enter,
.main-fade-leave-to {
  display: none;
  opacity: 0;
  animation: main-fade 0.4s reverse;
}
.main-fade-enter-active,
.main-fade-leave-active {
  opacity: 0;
  animation: main-fade 0.4s;
}
@keyframes main-fade {
  from {
    opacity: 0;
    transform: scale(0.96);
  }
  to {
    opacity: 1;
    transform: scale(1);
  }
}
</style>
以上就是main.vue的内容,在页面刷新或者进入的时候根据useRouter().name的切换进行放大的过渡效果,后面的内容会更简洁一点。
header.vue
onBeforeRouteUpdate
头部组件还有一个标题过渡的效果,根据路由导航获取当前路由的mate.title变化进行过渡效果。vue3中路由守卫需要从vue-route导入使用。
import { onBeforeRouteUpdate, useRoute } from 'vue-router';
...
onBeforeRouteUpdate((to, from, next) => {
  title.value = to.meta.title;
  currentRouteName.value = to.name;
  next();
});
computed
这里是计算不同的路由下标题内边距的不同,首页是有个设置入口的按钮,而设置页面是只有两个按钮,computed会返回一个你需要的新的值

// 获取首页的内边距
const computedPaddingLeft = computed(() => {
  return currentRouteName.value === 'index' ? 'padding-left: 40px;' : '';
});
emit子传父和props父传子
vue3没有了this,那么要使用emit怎么办呢?在入口setup中有2个参数
setup(props, content) {}
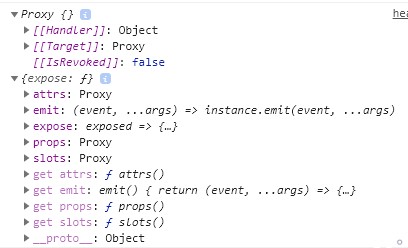
props是父组件传给子组件的内容,props常用的emit和props都在content中。
🧨这里需要注意的是,使用
props和emit需要先定义,才能去使用,并且会在vscode中直接调用时辅助弹窗显示
props示例
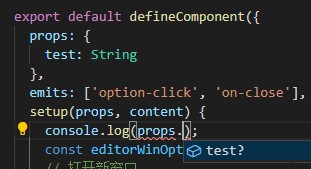
emit示例

export default defineComponent({
  props: {
    test: String
  },
  emits: ['option-click', 'on-close'],
  // 如果只用emit的话可以使用es6解构
  // 如:setup(props, { emit })
  setup(props, content) {
    console.log(props.test, content.emit('option-click'));
  }
})
electron打开窗口
import { browserWindowOption } from '@/config';
import { createBrowserWindow, transitCloseWindow } from '@/utils';
...
const editorWinOptions = browserWindowOption('editor');
// 打开新窗口
const openNewWindow = () => {
  createBrowserWindow(editorWinOptions, '/editor');
};
electron图钉固定屏幕前面
先获取当前屏幕实例
🧨这里需要注意的是,需要从
remote获取当前窗口信息
判断当前窗口是否在最前面isAlwaysOnTop(),然后通过setAlwaysOnTop()属性设置当前窗口最前面。
import { remote } from 'electron';
...
// 获取窗口固定状态
let isAlwaysOnTop = ref(false);
const currentWindow = remote.getCurrentWindow();
isAlwaysOnTop.value = currentWindow.isAlwaysOnTop();

// 固定前面
const drawingPin = () => {
  if (isAlwaysOnTop.value) {
    currentWindow.setAlwaysOnTop(false);
    isAlwaysOnTop.value = false;
  } else {
    currentWindow.setAlwaysOnTop(true);
    isAlwaysOnTop.value = true;
  }
};
electron关闭窗口
这里是在utils封装了通过对dom的样式名操作,达到一个退出的过渡效果,然后再关闭。
// 过渡关闭窗口
export const transitCloseWindow = (): void => {
  document.querySelector('#app')?.classList.remove('app-show');
  document.querySelector('#app')?.classList.add('app-hide');
  remote.getCurrentWindow().close();
};
noteDb数据库
安装nedb数据库,文档: https://www.w3cschool.cn/nedbintro/nedbintro-t9z327mh.html
yarn add nedb @types/nedb
数据储存在nedb中,定义字段,并在根目录的shims-vue.d.ts加入类型
/**
 * 储存数据库的
 */
interface DBNotes {
  className: string; // 样式名
  content: string; // 内容
  readonly createdAt: Date; // 创建时间,这个时间是nedb自动生成的
  readonly uid: string; // uid,utils中的方法生成
  readonly updatedAt: Date; // update,自动创建的
  readonly _id: string; // 自动创建的
}
对nedb的封装
自我感觉这里写的有点烂。。。勿喷,持续学习中
这里的QueryDB是shims-vue.d.ts定义好的类型
这里的意思是QueryDB<T>是一个对象,然后这个对象传入一个泛型T,这里keyof T获取这个对象的key(属性)值,?:代表这个key可以是undefined,表示可以不存在。T[K]表示从这个对象中获取这个K的值。
type QueryDB<T> = {
  [K in keyof T]?: T[K];
};
import Datastore from 'nedb';
import path from 'path';
import { remote } from 'electron';

/**
 * @see https://www.npmjs.com/package/nedb
 */
class INoteDB<G = any> {
  /**
   * 默认储存位置
   * C:\Users\{Windows User Name}\AppData\Roaming\i-notes
   */
  // dbPath = path.join(remote.app.getPath('userData'), 'db/inote.db');
  // dbPath = './db/inote.db';
  dbPath = this.path;

  _db: Datastore<Datastore.DataStoreOptions> = this.backDatastore;

  get path() {
    if (process.env.NODE_ENV === 'development') {
      return path.join(__dirname, 'db/inote.db');
    }
    return path.join(remote.app.getPath('userData'), 'db/inote.db');
  }

  get backDatastore() {
    return new Datastore({
      /**
       * autoload
       * default: false
       * 当数据存储被创建时,数据将自动从文件中加载到内存,不必去调用loadDatabase
       * 注意所有命令操作只有在数据加载完成后才会被执行
       */
      autoload: true,
      filename: this.dbPath,
      timestampData: true
    });
  }

  refreshDB() {
    this._db = this.backDatastore;
  }

  insert<T extends G>(doc: T) {
    return new Promise((resolve: (value: T) => void) => {
      this._db.insert(doc, (error: Error | null, document: T) => {
        if (!error) resolve(document);
      });
    });
  }

  /**
   * db.find(query)
   * @param {Query<T>} query: object类型,查询条件,可以使用空对象{}。
   * 支持使用比较运算符($lt, $lte, $gt, $gte, $in, $nin, $ne)
   * 逻辑运算符($or, $and, $not, $where)
   * 正则表达式进行查询。
   */
  find(query: QueryDB<DBNotes>) {
    return new Promise((resolve: (value: DBNotes[]) => void) => {
      this._db.find(query, (error: Error | null, document: DBNotes[]) => {
        if (!error) resolve(document as DBNotes[]);
      });
    });
  }

  /**
   * db.findOne(query)
   * @param query
   */
  findOne(query: QueryDB<DBNotes>) {
    return new Promise((resolve: (value: DBNotes) => void) => {
      this._db.findOne(query, (error: Error | null, document) => {
        if (!error) resolve(document as DBNotes);
      });
    });
  }

  /**
   * db.remove(query, options)
   * @param {Record<keyof DBNotes, any>} query
   * @param {Nedb.RemoveOptions} options
   * @return {BackPromise<number>}
   */
  remove(query: QueryDB<DBNotes>, options?: Nedb.RemoveOptions) {
    return new Promise((resolve: (value: number) => void) => {
      if (options) {
        this._db.remove(query, options, (error: Error | null, n: number) => {
          if (!error) resolve(n);
        });
      } else {
        this._db.remove(query, (error: Error | null, n: number) => {
          if (!error) resolve(n);
        });
      }
    });
  }

  update<T extends G>(query: T, updateQuery: T, options: Nedb.UpdateOptions = {}) {
    return new Promise((resolve: (value: T) => void) => {
      this._db.update(
        query,
        updateQuery,
        options,
        (error: Error | null, numberOfUpdated: number, affectedDocuments: T) => {
          if (!error) resolve(affectedDocuments);
        }
      );
    });
  }
}

export default new INoteDB();
使用ref和reactive代替vuex,并用watch监听
创建exeConfig.state.ts
用ref和reactive引入的方式就可以达到vuex的state效果,这样就可以完全舍弃掉vuex。比如软件配置,创建exeConfig.state.ts在store中,这样在外部.vue文件中进行更改也能去更新视图。
import { reactive, watch } from 'vue';

const exeConfigLocal = localStorage.getItem('exeConfig');

export let exeConfig = reactive({
  syncDelay: 1000,
  ...
  switchStatus: {
    /**
     * 开启提示
     */
    textTip: true
  }
});

if (exeConfigLocal) {
  exeConfig = reactive(JSON.parse(exeConfigLocal));
} else {
  localStorage.setItem('exeConfig', JSON.stringify(exeConfig));
}

watch(exeConfig, e => {
  localStorage.setItem('exeConfig', JSON.stringify(e));
});
vuex番外
vuex的使用是直接在项目中引入useStore,但是是没有state类型提示的,所以需要手动去推导state的内容。这里的S代表state的类型,然后传入vuex中export declare class Store<S> { readonly state: S; }
想要查看某个值的类型的时候在vscode中
ctrl+鼠标左键点进去就能看到,或者鼠标悬浮该值
declare module 'vuex' {
  type StoreStateType = typeof store.state;
  export function useStore<S = StoreStateType>(): Store<S>;
}
index.vue
- 这里在防止没有数据的时候页面空白闪烁,使用一个图片和列表区域去控制显示,拿到数据之后就显示列表,否则就只显示图片。
- 在这个页面对
editor.vue进行了createNewNote创建便笺笔记、updateNoteItem_className更新类型更改颜色、updateNoteItem_content更新内容、removeEmptyNoteItem删除、whetherToOpen是否打开(在editor中需要打开列表的操作)通信操作 - 以及对软件失去焦点进行监听
getCurrentWindow().on('blur'),如果失去焦点,那么在右键弹窗打开的情况下进行去除。 deleteActiveItem_{uid}删除便笺笔记内容,这里在component封装了一个弹窗组件messageBox,然后在弹窗的时候提示是否删除和不在询问的功能操作。- 🧨如果
勾选不在询问,那么在store=>exeConfig.state中做相应的更改 - 这里在设置中会进行详细的介绍
- 🧨如果
开发一个vue3右键弹窗插件
vue3也发布了有段时间了,虽然还没有完全稳定,但后面的时间出现的插件开发方式说不定也会多起来。
插件开发思路
- 定义好插件类型,比如需要哪些属性
MenuOptions - 判断是否需要在触发之后立即关闭还是继续显示
- 在插入
body时判断是否存在,否则就删除重新显示
import { createApp, h, App, VNode, RendererElement, RendererNode } from 'vue';
import './index.css';

type ClassName = string | string[];

interface MenuOptions {
  /**
   * 文本
   */
  text: string;

  /**
   * 是否在使用后就关闭
   */
  once?: boolean;

  /**
   * 单独的样式名
   */
  className?: ClassName;

  /**
   * 图标样式名
   */
  iconName?: ClassName;

  /**
   * 函数
   */
  handler(): void;
}

type RenderVNode = VNode<
  RendererNode,
  RendererElement,
  {
    [key: string]: any;
  }
>;

class CreateRightClick {
  rightClickEl?: App<Element>;
  rightClickElBox?: HTMLDivElement | null;

  constructor() {
    this.removeRightClickHandler();
  }

  /**
   * 渲染dom
   * @param menu
   */
  render(menu: MenuOptions[]): RenderVNode {
    return h(
      'ul',
      {
        class: ['right-click-menu-list']
      },
      [
        ...menu.map(item => {
          return h(
            'li',
            {
              class: item.className,
              // vue3.x中简化了render,直接onclick即可,onClick也可以
              onclick: () => {
                // 如果只是一次,那么点击之后直接关闭
                if (item.once) this.remove();
                return item.handler();
              }
            },
            [
              // icon
              h('i', {
                class: item.iconName
              }),
              // text
              h(
                'span',
                {
                  class: 'right-click-menu-text'
                },
                item.text
              )
            ]
          );
        })
      ]
    );
  }

  /**
   * 给右键的样式
   * @param event 鼠标事件
   */
  setRightClickElStyle(event: MouseEvent, len: number): void {
    if (!this.rightClickElBox) return;
    this.rightClickElBox.style.height = `${len * 36}px`;
    const { clientX, clientY } = event;
    const { innerWidth, innerHeight } = window;
    const { clientWidth, clientHeight } = this.rightClickElBox;
    let cssText = `height: ${len * 36}px;opacity: 1;transition: all 0.2s;`;
    if (clientX + clientWidth < innerWidth) {
      cssText += `left: ${clientX + 2}px;`;
    } else {
      cssText += `left: ${clientX - clientWidth}px;`;
    }
    if (clientY + clientHeight < innerHeight) {
      cssText += `top: ${clientY + 2}px;`;
    } else {
      cssText += `top: ${clientY - clientHeight}px;`;
    }
    cssText += `height: ${len * 36}px`;
    this.rightClickElBox.style.cssText = cssText;
  }

  remove(): void {
    if (this.rightClickElBox) {
      this.rightClickElBox.remove();
      this.rightClickElBox = null;
    }
  }

  removeRightClickHandler(): void {
    document.addEventListener('click', e => {
      if (this.rightClickElBox) {
        const currentEl = e.target as Node;
        if (!currentEl || !this.rightClickElBox.contains(currentEl)) {
          this.remove();
        }
      }
    });
  }

  /**
   * 鼠标右键悬浮
   * @param event
   * @param menu
   */
  useRightClick = (event: MouseEvent, menu: MenuOptions[] = []): void => {
    this.remove();
    if (!this.rightClickElBox || !this.rightClickEl) {
      const createRender = this.render(menu);
      this.rightClickEl = createApp({
        setup() {
          return () => createRender;
        }
      });
    }
    if (!this.rightClickElBox) {
      this.rightClickElBox = document.createElement('div');
      this.rightClickElBox.id = 'rightClick';
      document.body.appendChild(this.rightClickElBox);
      this.rightClickEl.mount('#rightClick');
    }
    this.setRightClickElStyle(event, menu.length);
  };
}

export default CreateRightClick;
右键弹窗插件配合electron打开、删除便笺笔记
在使用的时候直接引入即可,如在index.vue中使用创建右键的方式,这里需要额外的说明一下,打开窗口需要进行一个窗口通信判断,ipcMain需要从remote中获取
- 每个便笺笔记都有一个
uid,也就是utils中生成的 - 每个在打开笔记的时候也就是编辑页,需要判断
该uid的窗口是否已经打开 - 窗口之间用
ipcRenderer和ipcMain去通信 - 判断通信失败的方法,用一个定时器来延时判断是否
通信成功,因为没有判断通信失败的方法 countFlag = true就说明打开窗口,countFlag = false说明没有打开窗口
ipcRenderer和ipcMain通信
🧨on是一直处于通信状态,once是通信一次之后就关闭了
// countFlag是一个状态来标记收到东西没
// index问editor打开了没有
ipcRenderer.send('你好')

// 这时候editor收到消息了
remote.ipcMain.on('你好', e => {
  // 收到消息后显示
  remote.getCurrentWindow().show();
  // 然后回index消息
  e.sender.send('你好我在的');
});

// index在等editor消息
ipcRenderer.on('你好我在的', () => {
  // 好的我收到了
  countFlag = true;
});

// 如果没收到消息,那标记一直是false,根据定时器来做相应操作
右键弹窗的使用
🧨这里的打开笔记功能会把选中的笔记uid当作一个query参数跳转到编辑页
import CreateRightClick from '@/components/rightClick';
...
const rightClick = new CreateRightClick();
...
const contextMenu = (event: MouseEvent, uid: string) => {
  rightClick.useRightClick(event, [
    {
      text: '打开笔记',
      once: true,
      iconName: ['iconfont', 'icon-newopen'],
      handler: () => {
        let countFlag = false;
        ipcRenderer.send(`${uid}_toOpen`);
        ipcRenderer.on(`get_${uid}_toOpen`, () => {
          countFlag = true;
        });
        setTimeout(() => {
          if (!countFlag) openEditorWindow(uid);
        }, 100);
      }
    },
    {
      text: '删除笔记',
      once: true,
      iconName: ['iconfont', 'icon-delete'],
      handler: () => {
        deleteCurrentUid.value = uid;
        if (exeConfig.switchStatus.deleteTip) {
          deleteMessageShow.value = true;
        } else {
          // 根据弹窗组件进行判断
          onConfirm();
        }
      }
    }
  ]);
};
...
editor.vue重点
这个editor.vue是view/文件夹下的,以下对本页面统称编辑页,更好区分editor组件和页面
开发思路
- 打开
新增编辑页窗口时就生成uid并向数据库nedb添加数据,并向列表页通信ipcRenderer.send('createNewNote', res) - 需要使用富文本,能实时处理格式
document.execCommand - 页面加载完时进行聚焦
createRange和getSelection - 对列表页实时更新,编辑的时候防抖函数
debounce可以控制输入更新,这个时间在设置是可控的 图钉固定在header.vue已经说明选项功能能选择颜色,打开列表之后需要判断是否已经打开列表窗口- 在
点击关闭的时候需要删除数据库本条数据,如果没有输入内容就删除数据库uid内容并向列表页通信removeEmptyNoteItem - 在列表页时关闭本窗口的一个通信
deleteActiveItem_{uid} - 列表页
打开笔记时,携带uid,在编辑页根据是否携带uid查询该条数据库内容
富文本编辑做成了一个单独的组件,使编辑页的代码不会太臃肿
document.execCommand文档
https://developer.mozilla.org/zh-CN/docs/Web/API/Document/execCommand
首先在编辑页对路由进行判断是否存在,如果不存在就创建,否则就查询并把查询到的笔记传给editor组件
<Editor :content="editContent" :className="currentBgClassName" @on-input="changeEditContent" />
const routeUid = useRoute().query.uid as string;
if (routeUid) {
  // 查询
  uid.value = routeUid;
  getCurUidItem(routeUid);
} else {
  // 生成uid并把uid放到地址栏
  const uuidString = uuid();
  uid.value = uuidString;
  useRouter().push({
    query: {
      uid: uuidString
    }
  });
  // 插入数据库并向列表页通信
  ...
}
富文本聚焦和ref获取dom节点
原理是通过getSelection选择光标和createRange文本范围两个方法,选中富文本节点。
获取
import { defineComponent, onMounted, ref, Ref, watch } from 'vue';
...
// setup中创建一个和<div ref="editor">同名的变量,就可以直接拿到dom节点,一定要return!!!
let editor: Ref<HTMLDivElement | null> = ref(null);

onMounted(() => {
  focus();
});

const focus = () => {
  const range = document.createRange();
  range.selectNodeContents(editor.value as HTMLDivElement);
  range.collapse(false);
  const selecton = window.getSelection() as Selection;
  selecton.removeAllRanges();
  selecton.addRange(range);
};

...
return {
  editor,
  ...
}
editor组件的父传子以及watch监听
🧨这里需要注意的是因为在父组件传给子组件,然后子组件进行更新一次会导致富文本无法撤回,相当于重新给富文本组件赋值渲染了一次,因此这里就只用一次props.content
export default defineComponent({
  props: {
    content: String,
    className: String
  },
  emits: ['on-input'],
  setup(props, { emit }) {
    let editor: Ref<HTMLDivElement | null> = ref(null);
    const bottomIcons = editorIcons;
    const editorContent: Ref<string | undefined> = ref('');

    // 监听从父组件传来的内容,因为是从数据库查询所以会有一定的延迟
    watch(props, nv => {
      if (!editorContent.value) {
        // 只赋值一次
        editorContent.value = nv.content;
      }
    });
  }
});
editor组件的防抖子传父
exeConfig.syncDelay是设置里面的一个时间,可以动态根据这个时间来调节储存进数据库和列表的更新,获取富文本组件的html然后储存到数据库并传到列表页更新
const changeEditorContent = debounce((e: InputEvent) => {
  const editorHtml = (e.target as Element).innerHTML;
  emit('on-input', editorHtml);
}, exeConfig.syncDelay);
富文本组件的粘贴纯文本
vue自带的粘贴事件,@paste获取到剪切板的内容,然后获取文本格式的内容e.clipboardData?.getData('text/plain')并插入富文本
const paste = (e: ClipboardEvent) => {
  const pasteText = e.clipboardData?.getData('text/plain');
  console.log(pasteText);
  document.execCommand('insertText', false, pasteText);
};
(🎉🎉🎉额外的)getCurrentInstance选择dom方式
官方和网上的例子是这样:
<div ref="editor"></div>
setup(props, { emit }) {
  let editor = ref(null);
  return { editor }
})
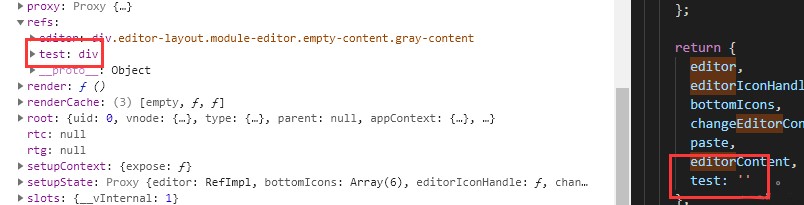
直接获取dom节点,但其实不管这个editor是什么,只要从setup中return,就会直接标记instance变量名,强行把内容替换成dom节点,甚至不用定义可以看看下面例子
<div ref="test"></div>
import { defineComponent, getCurrentInstance, onMounted } from 'vue';
...
setup(props, { emit }) {
  onMounted(() => {
    console.log(getCurrentInstance().refs);
    // 得到的是test dom以及其他定义的节点
  });
  return {
    test: ''
  }
})
但是为了规范还是使用下面这样
<div ref="dom"></div>
const dom = ref(null);

return {
  dom
};
此处推广一下一个98年大佬的vue3源码解析github: https://github.com/Kingbultsea/vue3-analysis
setting.vue
这里的话需要用到exeConfig.state.ts的配置信息,包括封装的input、switch、tick组件
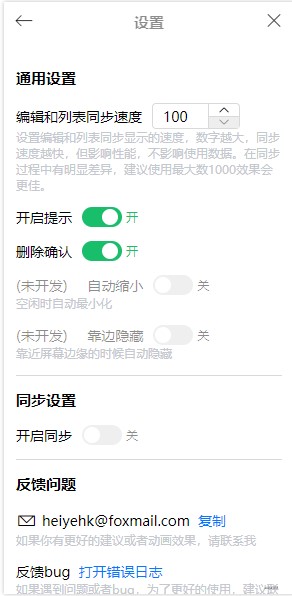
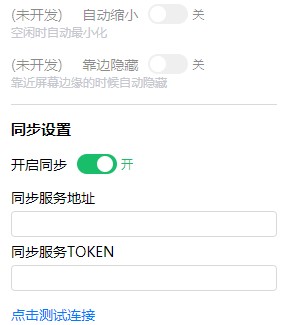
在这里说明一下,自动缩小、靠边隐藏和同步设置暂时还没有开发的
自动缩小: 编辑页失去焦点时自动最小化,获得焦点重新打开靠边隐藏: 把软件拖动到屏幕边缘时,自动隐藏到边上,类似QQ那样的功能同步设置: 打算使用nestjs做同步服务,后面可能会出一篇有关的文章,但是功能一定会做的
directives自定义指令
根据是否开启提示的设置写的一个方便控制的功能,这个功能是首先获取初始化的节点高度,放置在dom的自定义数据上面data-xx,然后下次显示的时候再重新获取赋值css显示,当然这里也是用了一个过渡效果
使用方法
<div v-tip="switch"></div>
export default defineComponent({
  components: {
    Tick,
    Input,
    Switch
  },
  directives: {
    tip(el, { value }) {
      const { height } = el.dataset;
      // 储存最初的高度
      if (!height && height !== '0') {
        el.dataset.height = el.clientHeight;
      }
      const clientHeight = height || el.clientHeight;
      let cssText = 'transition: all 0.4s;';
      if (value) {
        cssText += `height: ${clientHeight}px;opacity: 1;`;
      } else {
        cssText += 'height: 0;opacity: 0;overflow: hidden;';
      }
      el.style.cssText = cssText;
    }
  }
})
原生点击复制
原理是先隐藏一个input标签,然后点击的之后选择它的内容,在使用document.execCommand('copy')复制就可以
<a @click="copyEmail">复制</a>
<input class="hide-input" ref="mailInput" type="text" value="heiyehk@foxmail.com" />
const mailInput: Ref<HTMLInputElement | null> = ref(null);
const copyEmail = () => {
  if (copyStatus.value) return;
  copyStatus.value = true;
  mailInput.value?.select();
  document.execCommand('copy');
};

return {
  copyEmail
  ...
}
electron打开文件夹和打开默认浏览器链接
打开文件夹使用shell这个方法
import { remote } from 'electron';

remote.shell.showItemInFolder('D:');
打开默认浏览器链接
import { remote } from 'electron';

remote.shell.openExternal('www.github.com');
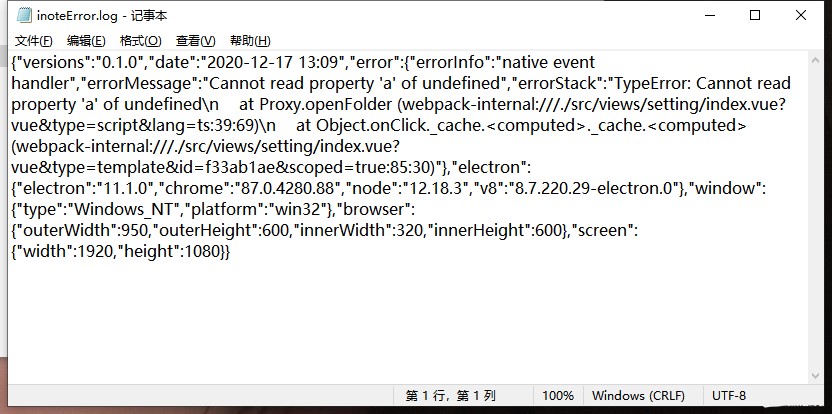
错误收集
收集一些使用中的错误,并使用message插件进行弹窗提示,软件宽高和屏幕宽高只是辅助信息。碰到这些错误之后,在软件安装位置输出一个inoteError.log的错误日志文件,然后在设置中判断文件是否存在,存在就打开目录选中。
- 版本号
- 时间
- 错误
- electron版本
- Windows信息
- 软件宽高信息
- 屏幕宽高
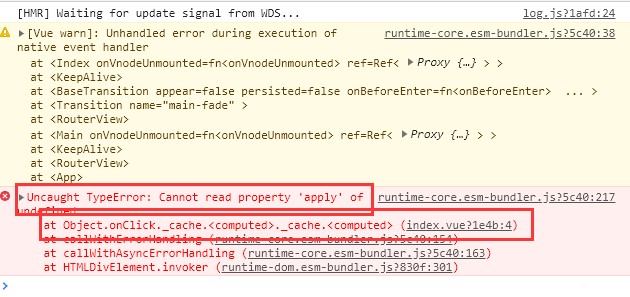
比如这个框中的才是主要的信息
vue3 errorHandler
main.ts我们需要进行一下改造,并使用errorHandler进行全局的错误监控
import { createApp } from 'vue';
import App from './App.vue';
import router from './router';
import outputErrorLog from '@/utils/errorLog';

const app = createApp(App);

// 错误收集方法
app.config.errorHandler = outputErrorLog;

app.use(router).mount('#app');
errorLog.ts封装对Error类型输出为日志文件
获取软件安装位置
remote.app.getPath('exe')获取软件安装路径,包含软件名.exe
export const errorLogPath = path.join(remote.app.getPath('exe'), '../inoteError.log');
输出日志文件
flag: a代表末尾追加,确保每一行一个错误加上换行符'\n'
fs.writeFileSync(errorLogPath, JSON.stringify(errorLog) + '\n', { flag: 'a' });
errorLog.ts的封装,对Error类型的封装
import { ComponentPublicInstance } from 'vue';
import dayjs from 'dayjs';
import fs from 'fs-extra';
import os from 'os';
import { remote } from 'electron';
import path from 'path';
import useMessage from '@/components/message';

function getShortStack(stack?: string): string {
  const splitStack = stack?.split('\n    ');
  if (!splitStack) return '';
  const newStack: string[] = [];
  for (const line of splitStack) {
    // 其他信息
    if (line.includes('bundler')) continue;

    // 只保留错误文件信息
    if (line.includes('?!.')) {
      newStack.push(line.replace(/webpack-internal:\/\/\/\.\/node_modules\/.+\?!/, ''));
    } else {
      newStack.push(line);
    }
  }
  // 转换string
  return newStack.join('\n    ');
}

export const errorLogPath = path.join(remote.app.getPath('exe'), '../inoteError.log');

export default function(error: unknown, vm: ComponentPublicInstance | null, info: string): void {
  const { message, stack } = error as Error;
  const { electron, chrome, node, v8 } = process.versions;
  const { outerWidth, outerHeight, innerWidth, innerHeight } = window;
  const { width, height } = window.screen;

  // 报错信息
  const errorInfo = {
    errorInfo: info,
    errorMessage: message,
    errorStack: getShortStack(stack)
  };

  // electron
  const electronInfo = { electron, chrome, node, v8 };

  // 浏览器窗口信息
  const browserInfo = { outerWidth, outerHeight, innerWidth, innerHeight };

  const errorLog = {
    versions: remote.app.getVersion(),
    date: dayjs().format('YYYY-MM-DD HH:mm'),
    error: errorInfo,
    electron: electronInfo,
    window: {
      type: os.type(),
      platform: os.platform()
    },
    browser: browserInfo,
    screen: { width, height }
  };

  useMessage('程序出现异常', 'error');

  if (process.env.NODE_ENV === 'production') {
    fs.writeFileSync(errorLogPath, JSON.stringify(errorLog) + '\n', { flag: 'a' });
  } else {
    console.log(error);
    console.log(errorInfo.errorStack);
  }
}
使用此方法后封装的结果是这样的,message插件具体看component
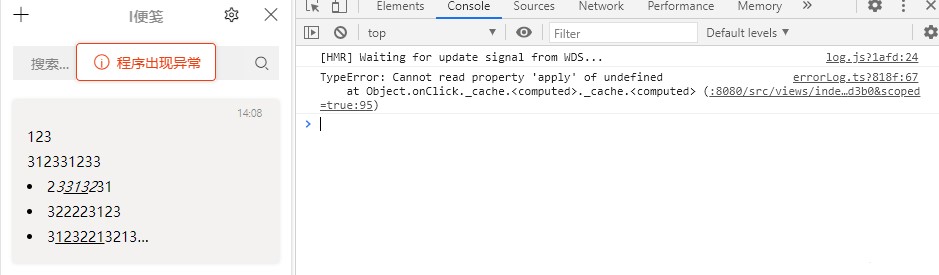
这个是之前的错误日志文件
获取electron版本等信息
const appInfo = process.versions;
打包
这个倒是没什么好讲的了,主要还是在vue.config.js文件中进行配置一下,然后使用命令yarn electron:build即可,当然了,还有一个打包前清空的旧的打包文件夹的脚本
deleteBuild.js
打包清空dist_electron旧的打包内容,因为eslint的原因,这里就用eslint-disable关掉了几个
原理就是先获取vue.config.js中的打包配置,如果重新配置了路径directories.output就动态去清空
const rm = require('rimraf');
const path = require('path');
const pluginOptions = require('../../vue.config').pluginOptions;

let directories = pluginOptions.electronBuilder.builderOptions.directories;
let buildPath = '';

if (directories && directories.output) {
  buildPath = directories.output;
}

// 删除作用只用于删除打包前的buildPath || dist_electron
// dist_electron是默认打包文件夹
rm(path.join(__dirname, `../../${buildPath || 'dist_electron'}`), () => {});
结尾
以上就是本篇主要开发内容了,有错误的地方可以在下方评论,我会及时改正。有不理解或者缺少的地方也可以在下方评论。顺便,能让我上个推荐吗= =
人学始知道不学非自然
如果有不好的地方勿喷,及时评论及时改正,谢谢!内容有点多。

 浙公网安备 33010602011771号