
day10 文件管理
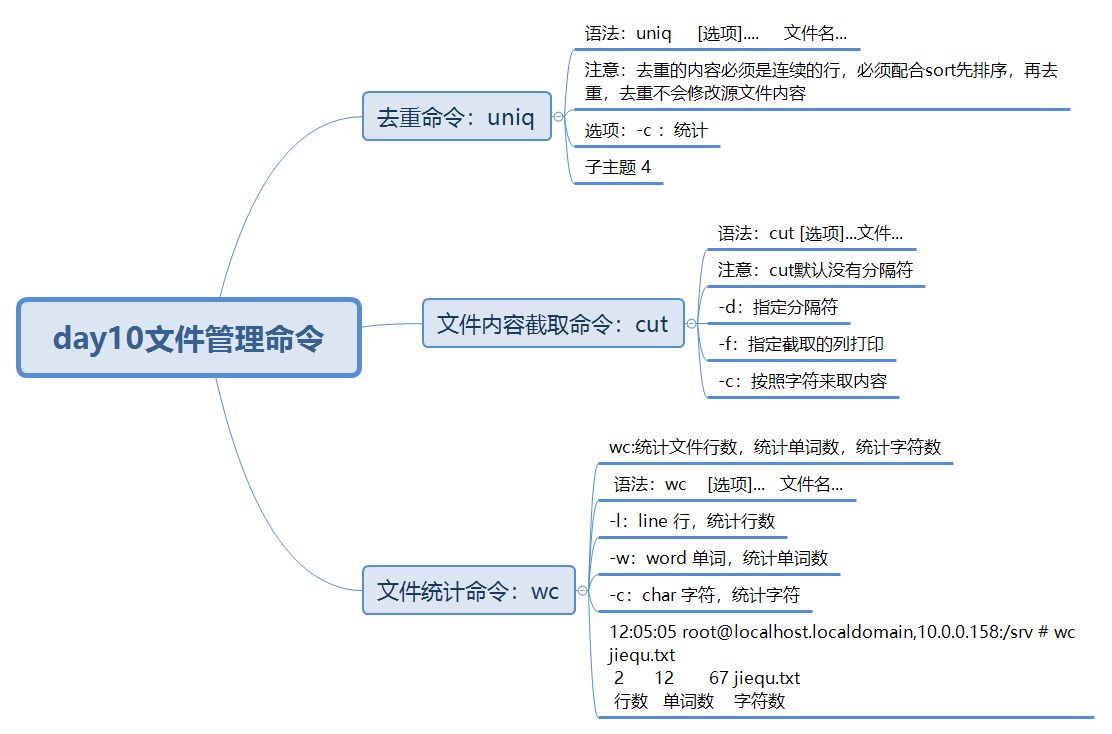
day10 文件管理命令
去重命令
uniq
# 语法
uniq     [选项]....     文件名...
# 注意:去重的内容必须是连续的行,必须配合sort先排序,再去重,去重不会修改源文件内容

# 选项
-c :统计

举例
# uniq
? 11:21:24 root@localhost.localdomain,10.0.0.158:/srv # cat quchong.txt
1
2
3
4
11
22
33
44
1
2
3
4
11
22
22
22
  0 ? 11:21:29 root@localhost.localdomain,10.0.0.158:/srv # uniq quchong.txt
1
2
3
4
11
22
33
44
1
2
3
4
11
22

# 配合sort使用
✓ 11:22:46 root@localhost.localdomain,10.0.0.158:/srv # cat quchong.txt
1
2
3
4
11
22
33
44
1
2
3
4
11
22
22
22
  0 ✓ 11:23:03 root@localhost.localdomain,10.0.0.158:/srv # sort -n quchong.txt |uniq
1
2
3
4
11
22
33
44

# -c

  0 ✓ 11:23:42 root@localhost.localdomain,10.0.0.158:/srv # cat quchong.txt
1
2
3
4
11
22
33
44
1
2
3
4
11
22
22
22
  0 ✓ 11:25:30 root@localhost.localdomain,10.0.0.158:/srv # sort  -n quchong.txt |uniq -c
      2 1
      2 2
      2 3
      2 4
      2 11
      4 22
      1 33
      1 44
文件内容截取命令
# cut :截取
语法
cut [选项]...文件...
# 注意:cut默认没有分隔符

选项
-d:指定分隔符
-f:指定截取的列打印
-c:按照字符来取内容

举例
# -d -f
截取QQ号
✓ 11:59:23 root@localhost.localdomain,10.0.0.158:/srv # cat jiequ.txt
I'm hjx,18 years old QQ 133411023
I'm wq,73 years old QQ 383838384
  0 ✓ 11:59:31 root@localhost.localdomain,10.0.0.158:/srv # cut -d ' ' -f 6 jiequ.txt
133411023
383838384

截取年龄
  0 ✓ 12:00:35 root@localhost.localdomain,10.0.0.158:/srv # cat jiequ.txt
I'm hjx,18 years old QQ 133411023
I'm wq,73 years old QQ 383838384
  0 ✓ 12:01:28 root@localhost.localdomain,10.0.0.158:/srv # cut -d ' ' -f 2 jiequ.txt |cut -d ',' -f 2
18
73

# -c
 ✓ 12:00:35 root@localhost.localdomain,10.0.0.158:/srv # cat jiequ.txt
I'm hjx,18 years old QQ 133411023
I'm wq,73 years old QQ 383838384
 ✓ 12:02:44 root@localhost.localdomain,10.0.0.158:/srv # cut -d ',' -f 2 jiequ.txt |cut -c '1-2'
18
73
文件统计命令
wc:统计文件行数,统计单词数,统计字符数
# 语法
wc    [选项]...   文件名...
# 选项
-l:line 行,统计行数
-w:word 单词,统计单词数
-c:char 字符,统计字符

# 举例
12:05:05 root@localhost.localdomain,10.0.0.158:/srv # wc jiequ.txt
 2      12       67 jiequ.txt
 行数   单词数    字符数

 127 ✗ 12:11:25 root@localhost.localdomain,10.0.0.158:/srv # wc -l jiequ.txt
2 jiequ.txt
  0 ✓ 12:11:32 root@localhost.localdomain,10.0.0.158:/srv # wc -w jiequ.txt
12 jiequ.txt
  0 ✓ 12:11:38 root@localhost.localdomain,10.0.0.158:/srv # wc -c jiequ.txt
67 jiequ.txt
作业
1.过滤出/etc/passwd以nologin结尾的内容,并统计行数
✗ 12:17:52 root@localhost.localdomain,10.0.0.158:/ # grep -n 'nologin$' /etc/passwd
2:bin:x:1:1:bin:/bin:/sbin/nologin
3:daemon:x:2:2:daemon:/sbin:/sbin/nologin
4:adm:x:3:4:adm:/var/adm:/sbin/nologin
5:lp:x:4:7:lp:/var/spool/lpd:/sbin/nologin
9:mail:x:8:12:mail:/var/spool/mail:/sbin/nologin
10:operator:x:11:0:operator:/root:/sbin/nologin
11:games:x:12:100:games:/usr/games:/sbin/nologin
12:ftp:x:14:50:FTP User:/var/ftp:/sbin/nologin
13:nobody:x:99:99:Nobody:/:/sbin/nologin
14:systemd-network:x:192:192:systemd Network Management:/:/sbin/nologin
15:dbus:x:81:81:System message bus:/:/sbin/nologin
16:polkitd:x:999:998:User for polkitd:/:/sbin/nologin
17:sshd:x:74:74:Privilege-separated SSH:/var/empty/sshd:/sbin/nologin
18:postfix:x:89:89::/var/spool/postfix:/sbin/nologin
2.使用ifconfig命令获取当前的IP地址
✓ 12:20:57 root@localhost.localdomain,10.0.0.158:/ # ifconfig
ens160: flags=4163<UP,BROADCAST,RUNNING,MULTICAST>  mtu 1500
        inet 10.0.0.158  netmask 255.255.255.0  broadcast 10.0.0.255
3.将/etc/sysconfig/selinux文件中的SELINUX=enforcing替换为SELINUX=disabled
✓ 12:22:36 root@localhost.localdomain,10.0.0.158:/ # sed -i 's/SELINUX=enforcing/SELINUX=disabled/' /etc/sysconfig/selinux
  0 ✓ 12:26:22 root@localhost.localdomain,10.0.0.158:/ # cat /etc/sysconfig/selinux

# This file controls the state of SELinux on the system.
# SELINUX= can take one of these three values:
#     enforcing - SELinux security policy is enforced.
#     permissive - SELinux prints warnings instead of enforcing.
#     disabled - No SELinux policy is loaded.
SELINUX=disabled
# SELINUXTYPE= can take one of three values:
#     targeted - Targeted processes are protected,
#     minimum - Modification of targeted policy. Only selected processes are protected.
#     mls - Multi Level Security protection.
SELINUXTYPE=targeted
4.分析如下日志内容,每个域名被访问次数
cat web.log
https://blog.driverzeng.com/index.html
https://blog.driverzeng.com/1.html
http://post.driverzeng.com/index.html
http://mp3.driverzeng.com/index.html
https://blog.driverzeng.com/3.html
http://post.driverzeng.com/2.html

 ✓ 12:39:09 root@localhost.localdomain,10.0.0.158:/srv # sort -n web.blg |cut -d ':' -f 2 |cut -d '/' -f 3 |uniq -c
      1 mp3.driverzeng.com
      2 post.driverzeng.com
      3 blog.driverzeng.com
5.用普通用户身份登陆虚拟机上完成练习
 12:45:10 root@localhost.localdomain,10.0.0.158:~ # useradd hjx
  0 ✓ 12:47:32 root@localhost.localdomain,10.0.0.158:~ # su hjx
  [hjx@localhost root]$
6.在用户家目录下创建6个文件 song1.mp3 ~ song6.mp3
[hjx@localhost ~]$ touch song{1..6}.mp3
[hjx@localhost ~]$ ll
total 0
-rw-rw-r--. 1 hjx hjx 0 Mar 27 12:55 song1.mp3
-rw-rw-r--. 1 hjx hjx 0 Mar 27 12:55 song2.mp3
-rw-rw-r--. 1 hjx hjx 0 Mar 27 12:55 song3.mp3
-rw-rw-r--. 1 hjx hjx 0 Mar 27 12:55 song4.mp3
-rw-rw-r--. 1 hjx hjx 0 Mar 27 12:55 song5.mp3
-rw-rw-r--. 1 hjx hjx 0 Mar 27 12:55 song6.mp3
7.把上题创建的songX.mp3文件移动到Music目录下(不存在则创建)
[hjx@localhost ~]$ mkdir Music
[hjx@localhost ~]$ mv song{1..6}.mp3 Music
[hjx@localhost ~]$ ls Music/
song1.mp3  song2.mp3  song3.mp3  song4.mp3  song5.mp3  song6.mp3
8.在用户家目录下创建三个目录,分别为 friends,family,work
[hjx@localhost ~]$ mkdir friends family work
9.切换到friends目录下,把Music目录下的song1.mp3 ~ song3.mp3 拷贝到当前目录
[hjx@localhost friends]$ cp -a /home/hjx/Music/song{1..3}.mp3 /home/hjx/friends/
[hjx@localhost friends]$ ll
total 0
-rw-rw-r--. 1 hjx hjx 0 Mar 27 13:21 song1.mp3
-rw-rw-r--. 1 hjx hjx 0 Mar 27 13:21 song2.mp3
-rw-rw-r--. 1 hjx hjx 0 Mar 27 13:21 song3.mp3
10.切换到family目录下,把Music目录下的song4.mp3 ~ song6.mp3 移动到当前目录
[hjx@localhost family]$ mv /home/hjx/Music/song{4..6}.mp3 /home/hjx/family/
[hjx@localhost family]$ ll
total 0
-rw-rw-r--. 1 hjx hjx 0 Mar 27 13:21 song4.mp3
-rw-rw-r--. 1 hjx hjx 0 Mar 27 13:21 song5.mp3
-rw-rw-r--. 1 hjx hjx 0 Mar 27 13:21 song6.mp3
11.切换到用户主目录
[hjx@localhost family]$ su root
Password:
  0 ✓ 13:32:24 root@localhost.localdomain,10.0.0.158:/home/hjx/family #
12.删除family目录
✓ 13:39:09 root@localhost.localdomain,10.0.0.158:/ # rm -rf /home/hjx/family/
  0 ✓ 13:39:29 root@localhost.localdomain,10.0.0.158:/ # ll /home/hjx/
total 0
drwxrwxr-x. 2 hjx hjx 57 Mar 27 13:30 friends
drwxrwxr-x. 2 hjx hjx 57 Mar 27 13:31 Music
drwxrwxr-x. 2 hjx hjx  6 Mar 27 13:12 work
13.切换到friends目录,把目录下的所有文件删除
14.切换到主目录,把friends目录删除.
✓ 13:39:53 root@localhost.localdomain,10.0.0.158:/ # cd /home/hjx/friends/
✓ 13:40:35 root@localhost.localdomain,10.0.0.158:/home/hjx/friends # rm -rf ./*
✓ 13:41:51 root@localhost.localdomain,10.0.0.158:/home/hjx/friends # ll
total 0
15.请将blog.driverzeng.com_access.log文件上传至/root目录下
✓ 13:46:25 root@localhost.localdomain,10.0.0.158:~ # rz

  0 ✓ 13:46:47 root@localhost.localdomain,10.0.0.158:~ # ll
total 876
-rw-r--r--. 1 root root 164034 Mar 27 13:43 blog.driverzeng.com_access.log
16.请将blog.driverzeng.com_access.log日志中的IP地址过滤出来
0 ✓ 13:59:21 root@localhost.localdomain,10.0.0.158:~ # cut -d ' ' -f 1 blog.driverzeng.com_access.log
17.请将上题中的IP地址统计出访问量排名TOP10的用户
✓ 14:06:32 root@localhost.localdomain,10.0.0.158:~ # cut -d ' ' -f 1 blog.driverzeng.com_access.log |sort|uniq -c |sort -nr | head -10
     26 180.97.165.74
     20 120.220.184.68
     10 180.97.165.27
      9 180.97.165.66
      9 120.220.184.50
      9 120.220.184.15
      8 120.220.184.80
      8 120.220.184.63
      8 120.220.184.21
      7 180.97.165.40
18.请统计出上面日志中,用户最喜欢访问的页面是什么?
✓ 14:27:45 root@localhost.localdomain,10.0.0.158:~ # cut -d ' ' -f 7 blog.driverzeng.com_access.log |grep -E '/[a-z].*' | sort |uniq -c |sort -nr |head
     14 /favicon.ico
     11 /wp-admin/admin-ajax.php
     10 /zenglaoshi/hyrzzz/01.cur
     10 /zenglaoshi/category/linux/linux%e5%9f%ba%e7%a1%80%e7%af%87/%e6%96%87%e4%bb%b6%e7%ae%a1%e7%90%86-linux%e5%9f%ba%e7%a1%80%e7%af%87
     10 /zenglaoshi/category/linux/linux%e5%9f%ba%e7%a1%80%e7%af%87
     10 /wp-content/themes/QQ/fonts/fontawesome-webfont.woff2?v=4.7.0
      9 /zenglaoshi/hyrzzz/11.cur
      9 /wp-content/themes/QQ/images/favicon.ico
      8 /zenglaoshi/category/linux/linux%e5%9f%ba%e7%a1%80%e7%af%87/page/2
      8 /zenglaoshi/1703.html
19.请根据日志统计出,这一天曾老师博客的访问量?
✓ 14:30:15 root@localhost.localdomain,10.0.0.158:~ # wc -l blog.driverzeng.com_access.log
537 blog.driverzeng.com_access.log
20.请写出管道符的含义
将管道符前面的命令标准输出交给管道符后面的命令标准输入
21.找出/etc/passwd 文件中头尾一致的行
✓ 14:46:37 root@localhost.localdomain,10.0.0.158:~ # grep -n -E -o '^[a-z]*|[a-z]*$'  /etc/passwd | uniq -c |sort -nr
      2 8:halt
      2 7:shutdown
      2 6:sync
22.找出/etc/passwd 中的两位或三位数或四位数
✓ 14:58:14 root@localhost.localdomain,10.0.0.158:~ # grep -E '[0-9][0-9]|[0-9][0-9][0-9]|[0-9][0-9][0-9][0-9]' /etc/passwd
23.请打印出/etc/passwd文件的第8行内容
15:07:35 root@localhost.localdomain,10.0.0.158:~ # sed -n '8p' /etc/passwd
halt:x:7:0:halt:/sbin:/sbin/halt
24.测试文件如下
touch ceshi.txt

2019-1010-1920 192.345.23.3 cause:“wrong password” type:“A” loginIn
2019-1010-1920 192.345.23.1 cause:“Bad block” type:“A” loginIn
2019-1010-1920 192.345.23.3 cause:“wrong password” type:“S” loginIn
2019-1010-1920 192.345.23.1 cause:“Bad tempt” type:“A” loginIn
25.提取测试文件的第三列(一条命令)
✓ 15:09:38 root@localhost.localdomain,10.0.0.158:~ # cut -d ' ' -f 3 ceshi.txt
cause:“wrong
cause:“Bad
cause:“wrong
cause:“Bad
26.提取测试文件的cause字段的原因值(一条命令)
 ✓ 15:14:55 root@localhost.localdomain,10.0.0.158:~ # cut -d '“' -f 2 ceshi.txt |cut -d '”' -f 1
wrong password
Bad block
wrong password
Bad tempt
27.对上题提取的关键词进行统计,并按照升序或者降序排列(一条命令)
✓ 15:27:00 root@localhost.localdomain,10.0.0.158:~ # cut -d '“' -f 2 ceshi.txt |cut -d '”' -f 1 |wc
      4       8      50
思维导图

 浙公网安备 33010602011771号