vue-cli3.x搭建移动端项目(vant+rem+axios简单封装+vue-navigation+过场动画)
安装
-
node:vue cli 需要node版本>=8.9, (官方推荐:8.11.0+ ),没有的自行下载:node下载地址
-
安装vue脚手架:vue脚手架目前已经升级到4.x,所以直接
npm install -g @vue/cli默认下载的是cli4.x ,想要安装cli3.x只需要输入命令://我这里装的是3.11.0版本 npm install -g @vue/cli@3.11.0输入以下命令查看是否安装成功,成功的会显示版本号
vue -V![]()

创建项目
-
方式一:使用命令创建项目:
//<Project Name>是项目名 不支持驼峰(含大写字母) vue create <Project Name> -
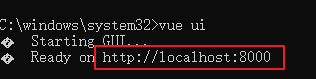
方式二(推荐):也可以使用可视化页面来创建项目,运行 :
vue ui然后会出现一个地址
![]()
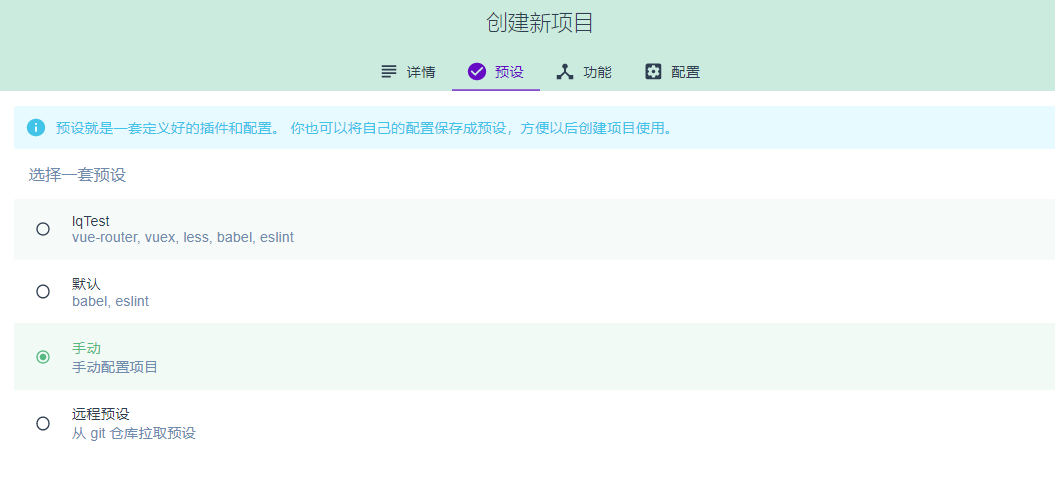
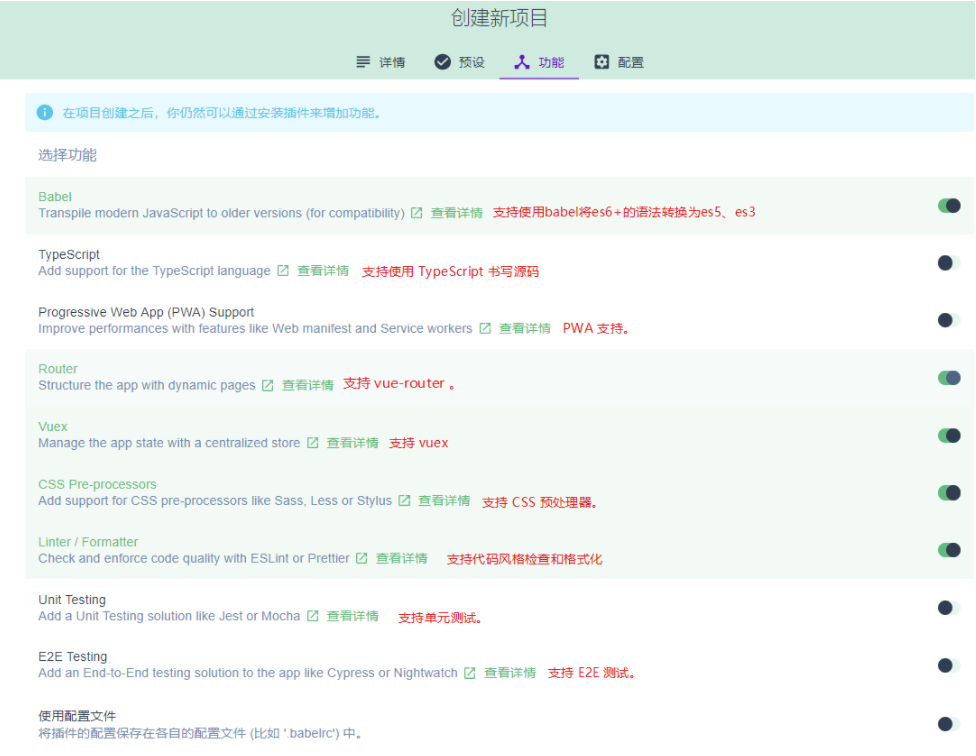
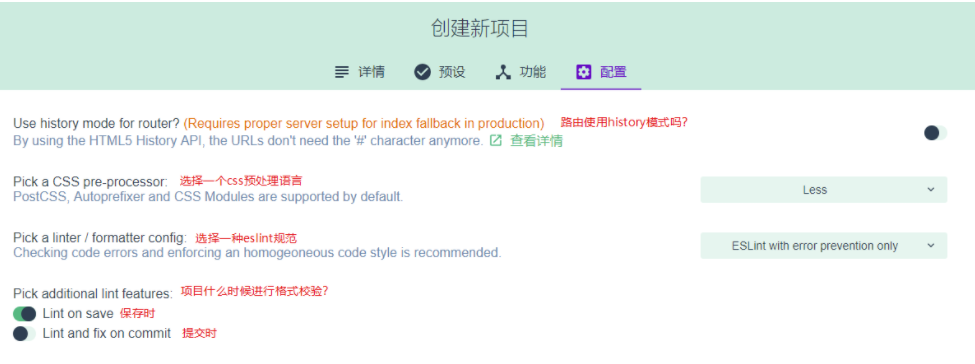
在浏览器中打开,然后新建项目,根据自己需求去创建,以下是我自己的配置可供参考:
![]()
![]()
![]()
![]()

安装vant
安装
- 方式一:npm安装:
npm i vant -S - 方式二:通过脚手架安装,运行
vue ui,然后找到安装依赖,搜索安装即可
![]()

引入
- 方式一:全局引入
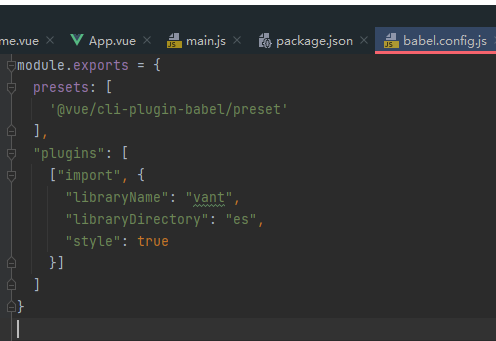
// 在src/main.js进行全局引入 // import Vue from 'vue'; //有了就不用引 import Vant from 'vant'; import 'vant/lib/index.css'; Vue.use(Vant); - 方式二:自动按需引入组件
// 安装插件:babel-plugin-import 是一款 babel 插件,它会在编译过程中将 import 的写法自动转换为按需引入的方式。 npm i babel-plugin-import -D // 在.babelrc 中添加配置 // 注意:webpack 1 无需设置 libraryDirectory { "plugins": [ ["import", { "libraryName": "vant", "libraryDirectory": "es", "style": true }] ] } // 对于使用 babel7 的用户,可以在 babel.config.js 中配置 module.exports = { plugins: [ ['import', { libraryName: 'vant', libraryDirectory: 'es', style: true }, 'vant'] ] };![]()
使用
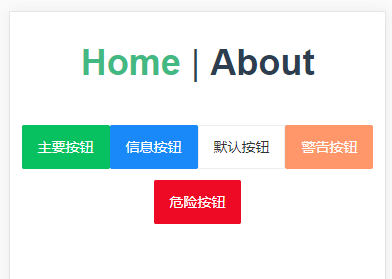
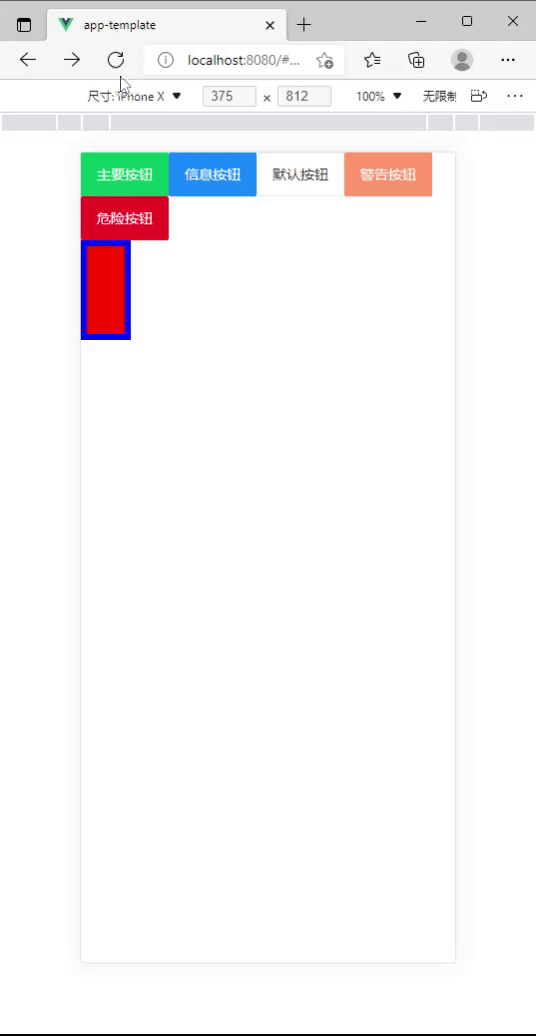
在项目中打开home组件,把vant的代码复制进template里看一下行不行
  <van-button type="primary">主要按钮</van-button>
  <van-button type="info">信息按钮</van-button>
  <van-button type="default">默认按钮</van-button>
  <van-button type="warning">警告按钮</van-button>
  <van-button type="danger">危险按钮</van-button>
成功是这样的:
如果你是自动按需引入组件的话,则需要再main.js中引入
import {Button} from 'vant'
Vue.use(Button)

// 引入多个:
import { Button, Row, Col } from 'vant'
Vue.use(Button).use(Row).use(Col)
如果想在页面中单独使用组件,则需要在改组件中这样引入:
//有的组件有专门的引入方式,自行去看vant官网

import { Button } from 'vant';
export default {
   name: 'Home',
   components: {
       [Button.name]: Button
   },
}
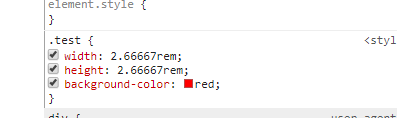
加入rem
- 安装命令:
// postcss-pxtorem 需要指定版本,不然运行会报错:PostCSS plugin postcss-pxtorem requires PostCSS 8. npm install postcss-pxtorem@5.1.1 --save-dev npm i -S amfe-flexible - main.js中引入
import 'amfe-flexible/index.js' - 在项目根目录下新建postcss.config.js,加入以下代码
module.exports = { plugins: { 'autoprefixer': { overrideBrowserslist: [ 'Android 4.1', 'iOS 7.1', 'Chrome > 31', 'ff > 31', 'ie >= 8' ] }, 'postcss-pxtorem': { rootValue: 37.5, //基数,375px 即100%宽度,写px会自动rem处理,如果不想被rem处理,可以使用PX来写。 propList: ['*'] } } } - 重跑项目,随便写个div,在浏览器审查元素,查看是否已转换为rem
![]()
配置vue.config.js
根目录下新建vue.config.js,下面是通用配置,直接复制代码使用
module.exports = {
    publicPath:'/',//部署应⽤包时的基本路径
    outputDir:'dist',//构建输出目录
    assetsDir:'assets',//静态资源目录(js,css,img,fonts)
    lintOnSave: false,//是否开启eslint保存监测,有效值:true  ||  false  ||  'error'
    devServer:{
        open:false, //项目运行起来自动打开浏览器
        host:'0.0.0.0',// 配置主机地址
        port:8080,//端口号
        https:false,// 开启https
        hotOnly:true, //热更新
        proxy:{
            //配置跨域
            '/api':{ // /api 的意义在于,声明axios中url已/api开头的请求都适用于该规则,
                target:'http://192.168.57.220:8868',
                ws:true,
                changOrigin:true,
                pathRewrite:{  //地址重写,将'/api'替换成''
                    '^/api':''
                }
            }
        }
    },
}
简单封装axios
先安装
npm i axios -S
再src下新建api、http文件夹,http下新建http.js
我们在http.js中进行封装axios
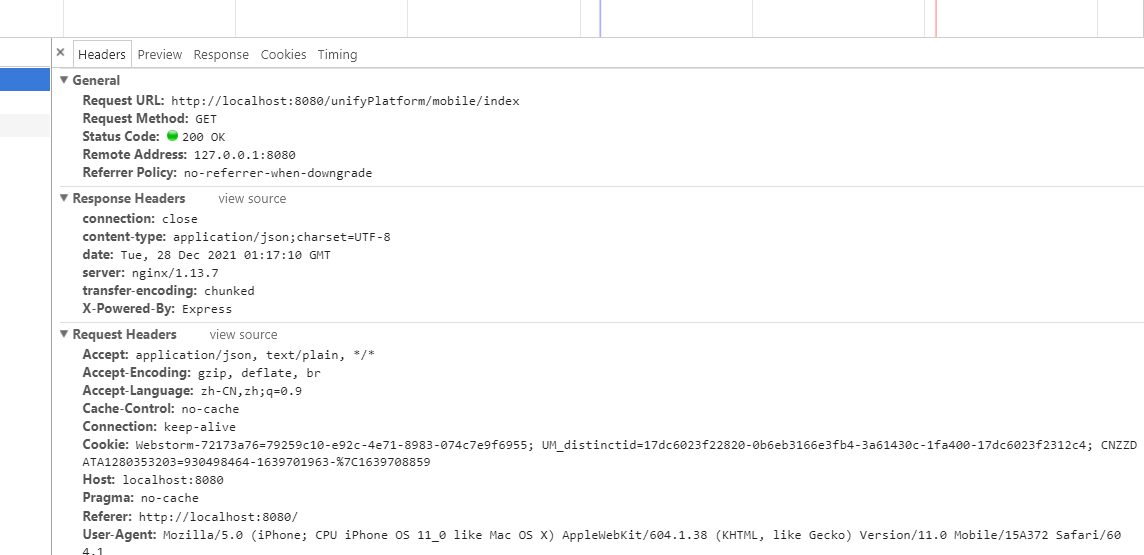
import axios from 'axios';

var http = axios.create({
    baseURL: '/unifyPlatform/mobile',
    timeout: 5000,
    responseType: 'json',
    headers: {
        'Content-Type': 'application/json;charset=UTF-8'
    },
})


export function api(method, url, params) {
    if (method.toUpperCase() == 'GET') {
        return http.get(url)
            .then(res => res)
            .catch(err => {
                throw Error(err)
             })
    } else if (method.toUpperCase() == 'POST') {
        return http.post(url, params)
            .then(res => res)
            .catch(err => {
                throw Error(err)
             })
    }
}
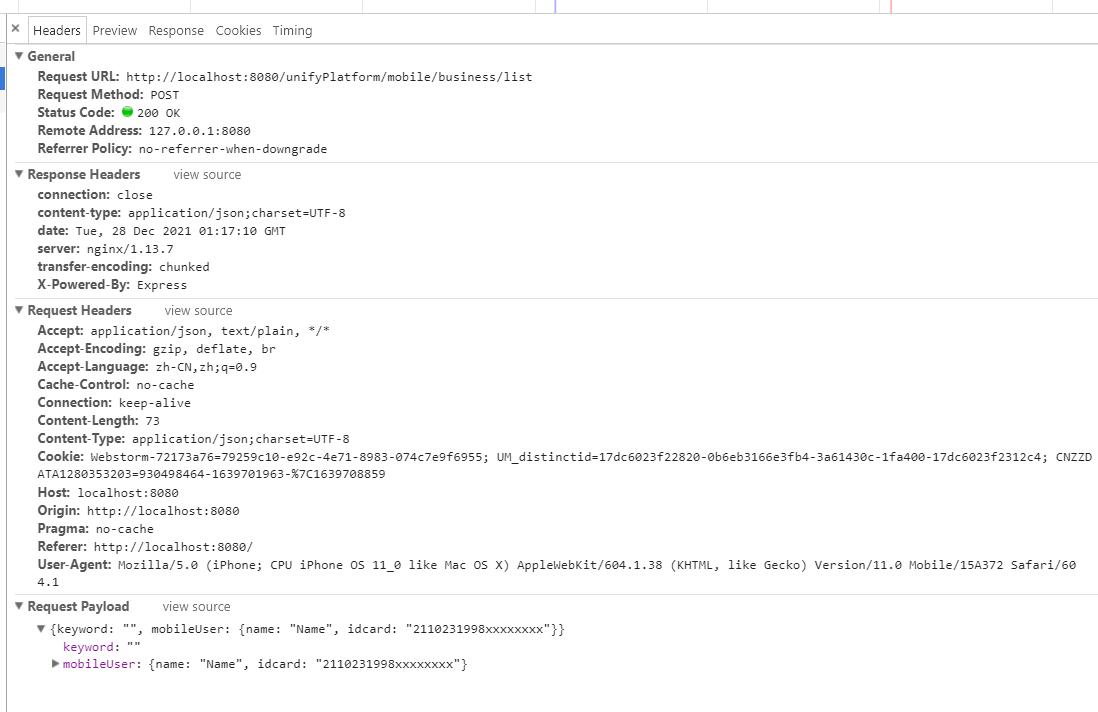
再api文件夹下新建home.js
import {api} from '../http/http.js'

//get接口测试
export function testGet() {
    return api('GET','/index')
}

//post接口测试
export function testPost(params) {
    return api('POST','/business/list', params)
}
修改vue.config.js
proxy:{
    '/':{
        target:'http://192.168.1.1:8080',
        ws:true,
        changOrigin:true,
        pathRewrite:{  //地址重写,将'/api'替换成''
            '^/api':''
        }
    }
}
home.vue中引入
import { testGet, testPost } from "@/api/home.js"
export default {
  name: "Home",
  data() {
    return {
      params: {
        keyword: "",
        userInfo: {
          name: "Name",
          idcard: "2110231998xxxxxxxx",
        },
      },
    };
  },
  created() {
    testGet().then((data) => {
      console.log("testGet", data);
    });

    testPost(this.params).then((data) => {
      console.log("testPost", data);
    });
  }
}
效果


到这里 项目就可以满足基本使用了,如果有兴趣,可以继续往下看,根据自己的需求看是否需要配置
去除eslint报错
个人比较烦一些报错,我这里新增了两个不希望eslint报错的配置:
//package.json:

"rules": {
  "no-unused-vars": "off",   //禁止声明变量不使用:关闭
  "vue/no-unused-components": "off"  //禁止vue引入组件不使用:关闭
}


//注意:
//json文件不能写注释
//改变了eslintrc文件中的配置,一定要重启项目才能生效
样式初始化
在src/assets下新建css、js、img、fonts、json(放json数据,如城市级联)文件夹,用来存放一些资源文件
在css文件夹下新建base.less,用于重置浏览器的默认样式,以下是我使用的,可根据自己需求自行增减
点击查看代码
html {
  -webkit-text-size-adjust: 100%;
  -ms-text-size-adjust: 100%;
  -webkit-overflow-scrolling : touch;
  }
  html, body, #app{width:100%;height:100%;}

  input[type="submit"], input[type="reset"], input[type="button"], input {
    font-family: Arial, Helvetica, sans-serif;
    resize: none;
    border: none;
  }

  body, div, ul, li, ol, h1, h2, h3, h4, h5, h6, input, textarea, select, p, dl, dt, dd, a, img, button, form, table, th, tr, td, tbody, article, aside, details, figcaption, figure, footer, header, hgroup, menu, nav, section {
    -webkit-tap-highlight-color: rgba(0, 0, 0, 0);
    font-size:14px;
    box-sizing:border-box;
  }

  article, aside, details, figcaption, figure, footer, header, hgroup, menu, nav, section {
    display: block;
  }

  img {
    width: 100%;
    height: auto;
    width: auto\9; /* ie8 */
    display: block;
    -ms-interpolation-mode: bicubic;/*为了照顾ie图片缩放失真*/
  }

  body, div, ul, li, ol, h1, h2, h3, h4, h5, h6, input, textarea, select, p, dl, dt, dd, a, img, button, form, table, th, tr, td, tbody, article, aside, details, figcaption, figure, footer, header, hgroup, menu, nav, section {
    margin: 0;
    padding: 0;
  }
  body {
    font: 12px/1.5 'Microsoft YaHei','宋体', Tahoma, Arial, sans-serif;
    color: #555;
    background-color: #fff;
  }
  em, i {
    font-style: normal;
  }
  ul,li{
    list-style-type: none;
  }
  strong {
    font-weight: normal;
  }
  .clearfix:after {
    content: "";
    display: block;
    visibility: hidden;
    height: 0;
    clear: both;
  }
  .clearfix {
    zoom: 1;
  }
  a {
    text-decoration: none;
    color: #969696;
    font-family: 'Microsoft YaHei', Tahoma, Arial, sans-serif;
  }
  a:hover {
    text-decoration: none;
  }
  ul, ol {
    list-style: none;
  }
  h1, h2, h3, h4, h5, h6 {
    font-size: 100%;
    font-family: 'Microsoft YaHei';
  }
  img {
    border: none;
  }
  input{
    font-family: 'Microsoft YaHei';
  }

  .one-txt-cut{
    overflow: hidden;
    white-space: nowrap;
    text-overflow: ellipsis;
  }

  .txt-cut{
    overflow : hidden;
    text-overflow: ellipsis;
    display: -webkit-box;
    -webkit-box-orient: vertical;
  }

  a:link,a:active,a:visited,a:hover {
    background: none;
    -webkit-tap-highlight-color: rgba(0,0,0,0);
    -webkit-tap-highlight-color: transparent;
  }
  input[type=button], input[type=submit], input[type=file], button { cursor: pointer; -webkit-appearance: none; }
然后在mian.js中引入即可
import "./assets/css/base.less"
同时也可以在同级文件夹中新建一个global.less,用于写一些全局样式,比如修改vant里的一些样式来定制ui风格,不要忘了在main.js中引入
安装vue-navigation
在移动端经常遇到这样的情形:有三个页面,首页---> 列表--> 详情,我们每次从详情返回列表的时候,列表都要重新加载一次,这个对于用户体验比较差,同时也增加了服务器的压力。所以这时候我们需要把列表页缓存起来,那我们就可以使用vue提供的keep-alive进行缓存。
如果我们仅仅把该组件的keep-alive改为true的话,遇到这样场景就会有bug:当首页进入列表时,假如此时列表的第一条数据为 "姓名:张三" ,那我们点击这条数据进入 张三 的详情页,若详情中有修改功能的话,我们将张三的名字改为 李四 再返回列表。此时列表因为被keep-alive缓存了,所以列表的第一条数据还是 张三,这时我们就需要动态的改变keep-alive的值,但是如果我们页面层级比较多的时候,判断起来真的是超级麻烦而且容易乱,那我们就可以借助vue-navigation来帮我们解决这个问题。
vue-navigation就完美的实现了 前进刷新,后退缓存 的效果,这正是我们需要的。
安装
npm i -S vue-navigation
引入
import Navigation from 'vue-navigation'
Vue.use(Navigation, {router})
使用
打开app.vue,用navigation标签包裹起来就大功告成了
<template>
  <div id="app">
    <navigation>
      <router-view/>
    </navigation>
  </div>
</template>
此时刷新页面,查看url会有VNK的字样就说明安装完成了

方法
vue-navigation还提供了一下监听方法,可以在不同的事件响应方法中执行不同的功能操作:
- on()
- once()
- off()
每个方法都有 to、from 这个两个参数(分别代表来源路由、目标路由),to、from 包含了
- name:路由的名称(包含 key,类型为 string)
- route:vue-route 的路由信息对象
vue-navigation支持监听的事件类型
- forward:前进
- back:后退
- replace:替换
- refresh:刷新
- reset:重置
例:
// app.vue:

<template>
  <div id="app">
    <navigation>
      <router-view/>
    </navigation>
  </div>
</template>

<script>
export default {
  name: 'App',
  created() {
      // 当路由前进时触发
      this.$navigation.on('forward', (to, from) => {
        console.log('forward to', to, 'from ', from)
      })
      // 当路由后退时触发
      this.$navigation.on('back', (to, from) => {
        console.log('back to', to, 'from ', from)
      })
      // 当路由替换时触发
      this.$navigation.on('replace', (to, from) => {
        console.log('replace to', to, 'from ', from)
      })
      // 当路由刷新时触发
      this.$navigation.on('refresh', (to, from) => {
        console.log('refresh to', to, 'from ', from)
      })
      // 当路由重置时触发
      this.$navigation.on('reset', () => {
        console.log('reset')
      })
    }
}
</script>
此外,vue-navigation 提供了如下两个方法可以对路由记录进行操作:
- getRoutes():获取路由记录
- cleanRoutes():清空路由记录
例:
//在组件中使用
this.$navigation.getRoutes();

//在全局环境中使用
this.$navigation.cleanRoutes();
如果发现跳转路由时候有报错:
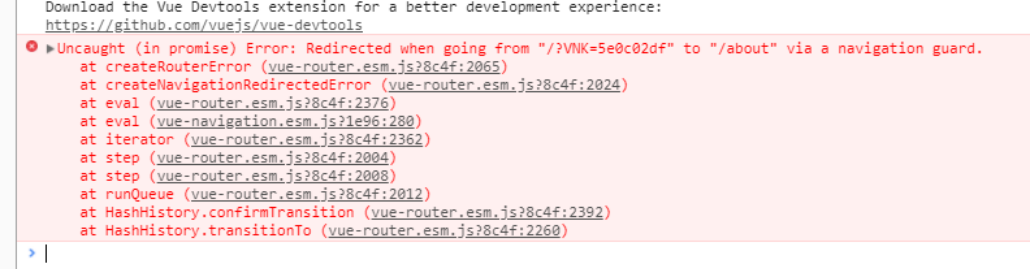
这是因为router的版本太高的问题,和vue/lic有冲突,此时我们只需要安装低版本的的路由就可以了,直接重装覆盖:
npm i vue-router@3.0.7 -S
我们可以利用这些监听方法,加入移动端的过场动画:
移动端的过场动画
直接贴完整代码
//app.vue:

<template>
  <div id="app">
    <transition :name="transitionName">
      <navigation>
        <router-view />
      </navigation>
    </transition>
  </div>
</template>

<script>
export default {
  name: "App",
  data() {
    return {
      transitionName: "",
    };
  },
  created() {
    // 前进
    this.$navigation.on("forward", (to, from) => {
      this.transitionName = "slide-left";
    });
    // 后退
    this.$navigation.on("back", (to, from) => {
      this.transitionName = "slide-right";
    });
  },
};
</script>
<style lang="less">

.slide-right-enter-active,
.slide-right-leave-active,
.slide-left-enter-active,
.slide-left-leave-active {
  position: fixed;
  top: 0;
  left: 0;
  width: 100vw;
  height: 100vh;
  will-change: transform;
  transition: all 0.5s;
}

// 路由前进-离开元素
.slide-left-enter {
  opacity: 0;
  transform: translate(100%, 0);
}
// 路由前进-进场元素
.slide-left-leave-active {
  opacity: 0;
  transform: translate(-100%, 0);
}

// 路由后退-进场元素
.slide-right-enter {
  opacity: 0;
  transform: translate(-100%, 0);
}
// 路由后退-离开元素
.slide-right-leave-active {
  opacity: 0;
  transform: translate(100%, 0);
}
</style>
保留滚动条高度
我们使用vue-navigation虽然可以缓存页面,但是如果有列表,它却无法记住滚动条高度,试想一下我如果下滑到列表的第100条数据,然后进详情再返回列表,此时的列表滚动条高度就会重置,我再次查看第100条数据的时候又要滑很久,这样用户体验就会比较差,所以需要我们保留滚动条的高度
我的实现原理是:配合vue-navigation,在路由前进时获取滚动条高度,然后记录在路由的meta中,等路由返回的时候,我们直接在路由的meta中获取滚动高度值,然后赋值给页面。
<template>
  <div id="app">
    <transition :name="transitionName">
      <navigation>
        <router-view />
      </navigation>
    </transition>
  </div>
</template>

<script>
export default {
  name: "App",
  data() {
    return {
      transitionName: "",
    };
  },
  created() {
    // 前进
    this.$navigation.on("forward", (to, from) => {
      this.transitionName = "slide-left";
      this.$nextTick(() => {
        if (document.querySelector('.slide-left-leave-active #scrollDom')) {
          from.route.meta.scrollTop = document.querySelector('.slide-left-leave-active #scrollDom').scrollTop;
        }
      });
    });
    // 后退
    this.$navigation.on("back", (to, from) => {
      this.transitionName = "slide-right";
      this.$nextTick(() => {
        if (document.querySelector('.slide-right-enter-active #scrollDom')) {
          document.querySelector('.slide-right-enter-active #scrollDom').scrollTop = to.route.meta.scrollTop;
        }
      });
    });
  },
};
</script>
<style lang="less">

.slide-right-enter-active,
.slide-right-leave-active,
.slide-left-enter-active,
.slide-left-leave-active {
  position: fixed;
  top: 0;
  left: 0;
  width: 100vw;
  height: 100vh;
  will-change: transform;
  transition: all 0.5s;
}

// 路由前进-离开元素
.slide-left-enter {
  opacity: 0;
  transform: translate(100%, 0);
}
// 路由前进-进场元素
.slide-left-leave-active {
  opacity: 0;
  transform: translate(-100%, 0);
}

// 路由后退-进场元素
.slide-right-enter {
  opacity: 0;
  transform: translate(-100%, 0);
}
// 路由后退-离开元素
.slide-right-leave-active {
  opacity: 0;
  transform: translate(100%, 0);
}
</style>
代码里的 #scrollDom 是关键,我们在写页面的时候如果有需要保留滚动条的话,我们只需要给滚动元素的父盒子,就是带有overflow:scroll属性的那个元素,加上id="scrollDom"就可以了,但是注意,一个页面只能有一个scrollDom,不然会就有冲突
//列表页
<template>
  <div  >
    <ul id="scrollDom">
        <li v-for="i in 150" @click='goInfo' :key="i">{{i}}</li>
    </ul>
  </div>
</template>

<script>
export default {
  data() {
    return {};
  },
  methods: {
      goInfo(){
        this.$router.push('/e')
      },
  },
};
</script>
<style lang="less">
ul{
    height: 90vh;
    overflow:scroll;
    background-color: pink;
}
</style>
安装FastClick
解决移动端点击事件300毫秒延迟
npm install fastclick --save
在main.js中引入就可以了
import FastClick from 'fastclick'
FastClick.attach(document.body)
最后,一定要打包试试看有没有报错!!!有时候项目运行的很正常,但是打包会报错,所以在写业务之前一定要打包试试。

 浙公网安备 33010602011771号