
Bot in Discord with discord.js (13)
Chapter 16 - 嵌入式元素
embed
嵌入式元素(Embed)是一种一般由机器人发送的、通常具有彩色边框、嵌入图像、文本字段和其他奇特的属性的消息。比如下图:
Embed 一般来说,可以具有以下域:
- author
- color
- description
- fields
- footer
- image
- thumbnail
- title
- url
- video
其中,各 fields 的格式为 { name: '名字', value: '值', inline: true或false } ,
footer 的格式为 { text: '页脚文字', icon_url: '页脚图标地址' } ,
author 的格式为 { name: '作者名', icon_url: '作者图标地址', url: '作者网站' } ,
thumbnail 和 image 的格式:{ url: '图片地址' } ,
timestamp 只接受 ISO8601 格式的时间值。
有了上面这些知识,我们就可以组建一个 embed JSON 对象了:
// directly use a JSON object to represent an embed
const exampleJSONEmbed = {
    color: 0xC1F8C0,
    title: '标题标题',
    url: 'https://discord.js.org/',
    author: {
        name: '作者名字',
        url: 'https://discord.js.org',
        icon_url: 'https://i.imgur.com/AfFp7pu.png'
    },
    description: '这里给出一些介绍',
    thumbnail: {
        url: 'https://i.imgur.com/fwO0TqB.jpeg'
    },
    fields: [
        { name: '普通域标题', value: 'Some value here1' },
        { name: '普通域标题', value: 'Some value here11,下面那个是空白域' },
        { name: '\u200B', value: '\u200B' },
        { name: '内联域标题1', value: 'Some value here111', inline: true },
        { name: '内联域标题2', value: 'Some value here3', inline: true },
        { name: '内联域标题3', value: 'Some value here4', inline: true }
    ],
    image: {
        url: 'https://i.imgur.com/yA1u8wt.jpeg'
    },
    // here timestamp field only accepts ISO8601 number or string
    timestamp: (new Date()).toISOString(),
    footer: {
        text: '页脚文字',
        icon_url: 'https://i.imgur.com/AfFp7pu.png'
    }
};
然后我们构建一个叫 /embed 的简单斜杠命令,把它放进去,在接着,将 JSON 对象 exampleJSONEmbed 直接放入 .reply 的 embeds 参数列表,用于回复斜杠命令:
await interaction.reply({ embeds: [exampleJSONEmbed] });
效果图:
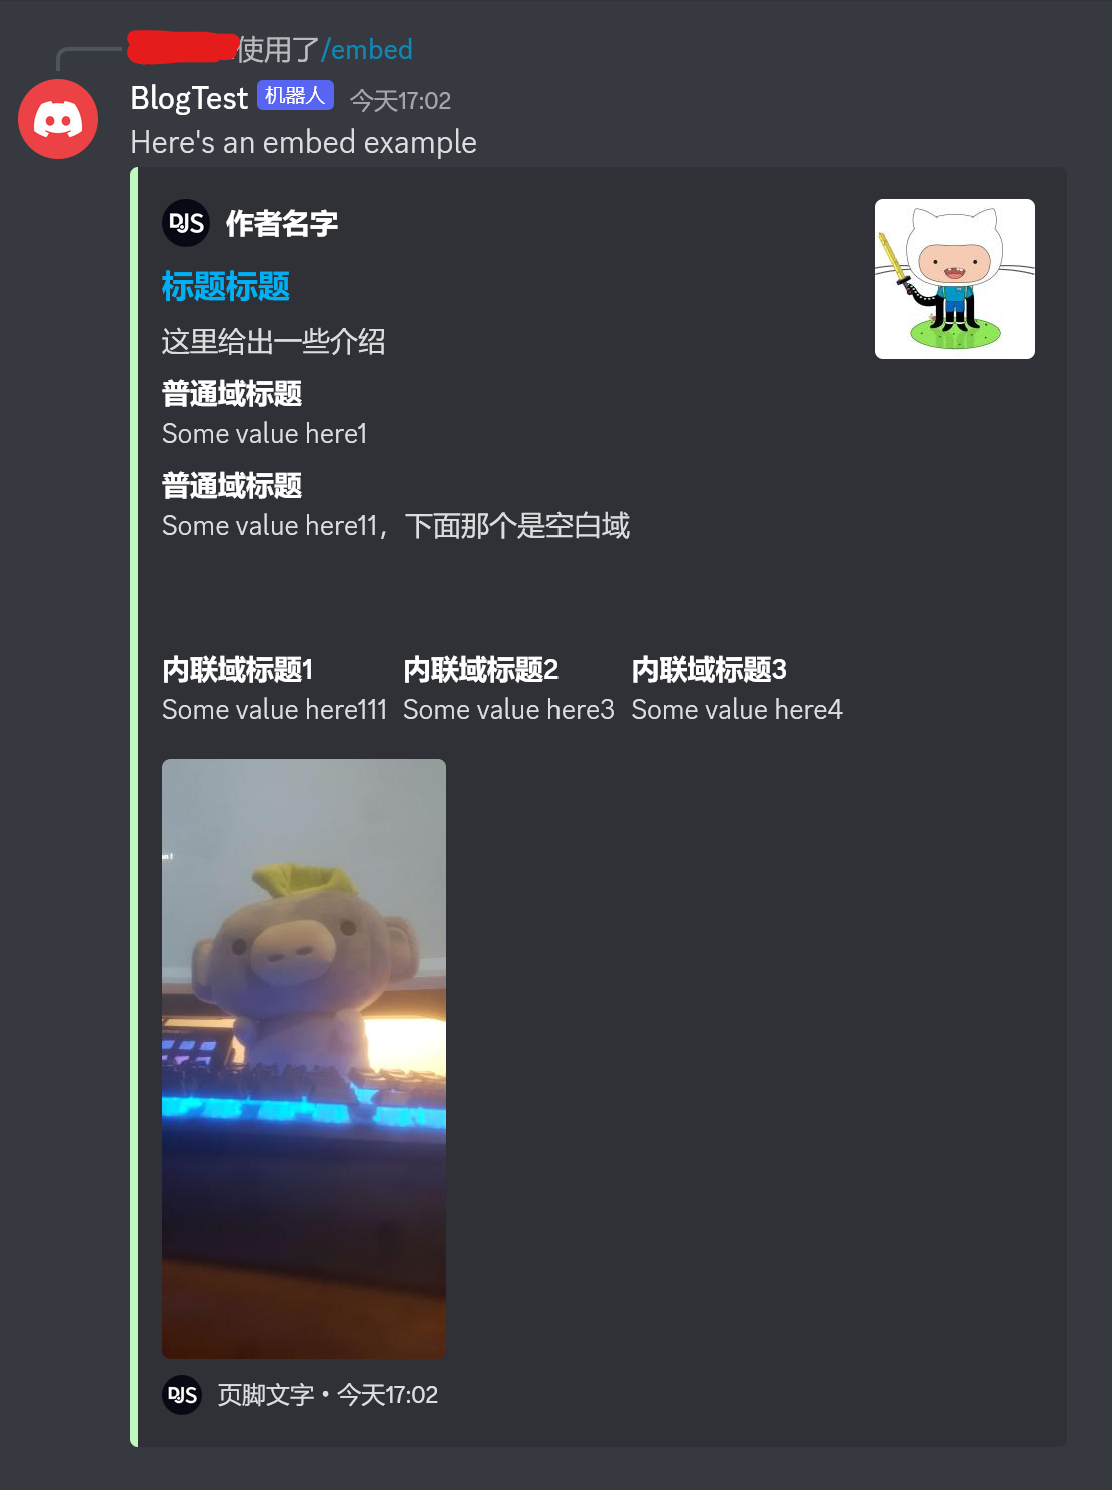
每次都要从 JSON 对象开始构建的话,代码就不好看了。更何况,我们之前使用的按钮、下拉列表等组件都有自己的 Builder。难道嵌入式元素没有这样的一个 Builder 吗?
有的。这个 Builder 叫 EmbedBuilder。
我们删掉上面的代码,将上面 “直接用 JSON 对描述的 embed” 重新用 “new EmbedBuilder()” 来构建。
// This EmbedBuilder() has to be inside a command or listener
const exampleEmbed = new EmbedBuilder()
    .setColor(0xC1F8C0)
    .setTitle('标题标题')
    .setURL('https://discord.js.org/')
    .setAuthor({ name: '作者名字', iconURL: 'https://i.imgur.com/AfFp7pu.png', url: 'https://discord.js.org' })
    .setDescription('这里给出一些介绍')
    .setThumbnail('https://i.imgur.com/fwO0TqB.jpeg')
    .addFields(
        { name: '普通域标题', value: 'Some value here1' },
        { name: '普通域标题', value: 'Some value here11,下面那个是空白域' },
        // add a blank field in the embed
        { name: '\u200B', value: '\u200B' },
        { name: '内联域标题1', value: 'Some value here111', inline: true },
        { name: '内联域标题2', value: 'Some value here3', inline: true },
    )
    .addFields({ name: '内联域标题3', value: 'Some value here4', inline: true })
    .setImage('https://i.imgur.com/yA1u8wt.jpeg')
    // .setTimestamp() accept a Number, a null or a Date value
    .setTimestamp()
    .setFooter({ text: '页脚文字', iconURL: 'https://i.imgur.com/AfFp7pu.png' });
这时的 exampleEmbed 已经不是 JSON 了,而是一个 Embed 类型的对象。
接着回复斜杠命令:
await interaction.reply({ embeds: [exampleEmbed] });
效果图:

两种构建方法做出来的 embed 是一模一样的。
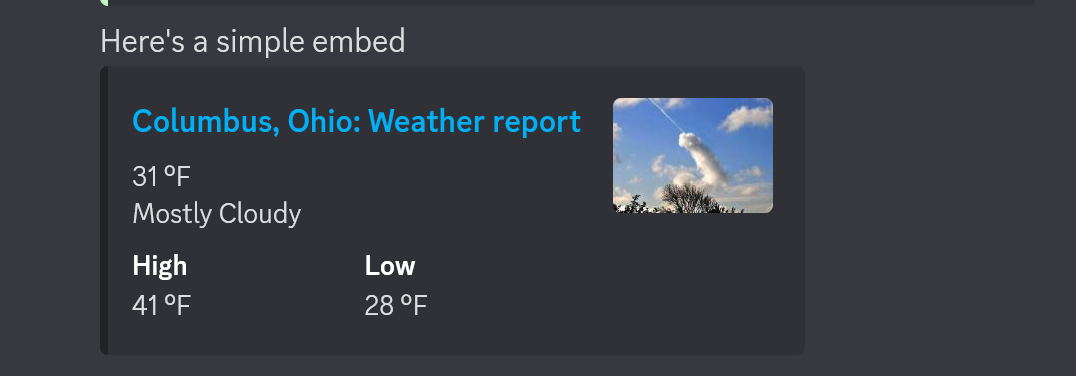
很多时候,我们用不着指定这么多值,可能只需要 title、thumbnail 和 description 等就够了。我们给出一个简单的 embed:
const simpleEmbed = new EmbedBuilder()
    .setTitle('Columbus, Ohio: Weather report')
    .setURL('https://weather.com/weather/today/l/8db513f8f8993797550b32062dfa5d4d83dd97b28ad0b55ec0033a14fe58a86dc0163883d8c5bf8f66aa6173005f3ebc')
    .setThumbnail('https://i.imgur.com/sRwMnNA.jpeg')
    .setDescription('31 °F\nMostly Cloudy')
    .setFields(
        { name:'High', value: '41 °F', inline: true},
        { name:'Low', value: '28 °F', inline: true},
    );

await interaction.channel.send({ content: "Here's a simple embed", embeds: [simpleEmbed] });
效果图:
为了三个 embed 放在一起对比,我写了 commands/embeds/embed.js ,但是这个文件基本上只是三个 embed 的复制粘贴,所以为了避免本文冗长,我把相关 commit 留在这里,读者可以自己去看:
https://github.com/wtflmao/discord_bot_example/commit/642a555373d40759fb7afce1c32bb0d16d16fb56
https://gitee.com/wtflmao/discord_bot_example/commit/642a555373d40759fb7afce1c32bb0d16d16fb56
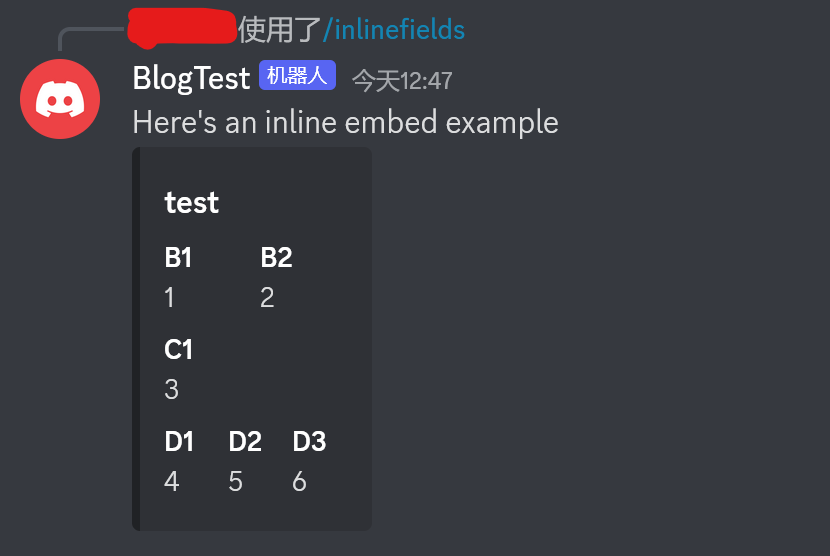
fileds
你可能注意到了, fields 是个数组,接受最多 25 个 field。
内联(inline)的 field 可用于将连续的几个 field 并排显示而不是默认的一行一个。
要并排显示字段,你至少需要将两个连续的字段设置为内联。
比如:
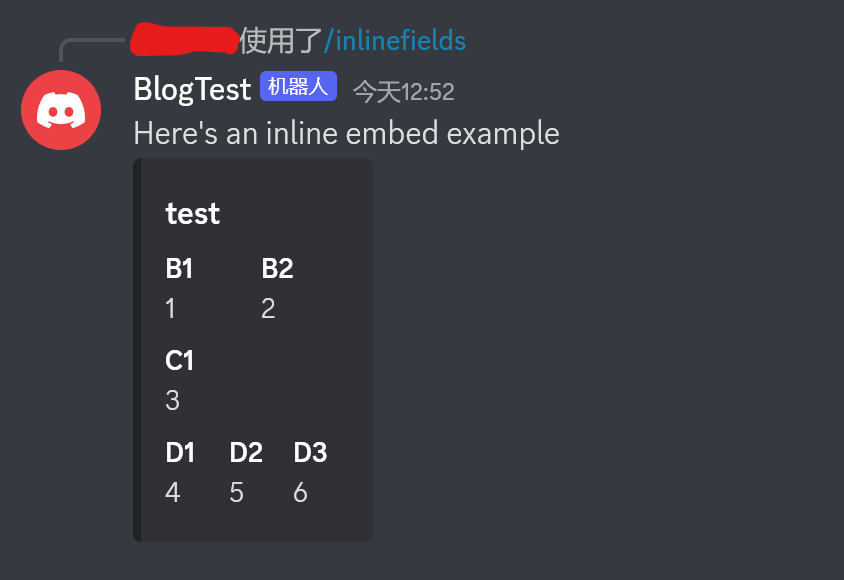
const exampleEmbed = new EmbedBuilder()
    .setTitle('test')
    .addFields(
        { name: 'B1', value: '1', inline: true },
        { name: 'B2', value: '2', inline: true }
    )
    .addFields({ name: 'C1', value: '3' })
    .addFields(
        { name: 'D1', value: '4', inline: true },
        { name: 'D2', value: '5', inline: true },
        { name: 'D3', value: '6', inline: true }
    );
效果图:
上面的代码是为了美观,才将位于同一行上显示的 fields 在源代码这边也聚在了一块儿。事实上,下面的代码虽然看起来和上面的不一样,但是效果是一模一样的。
commands/embeds/inlineFields.js
const exampleEmbed = new EmbedBuilder()
    .setTitle('test')
    .addFields({ name: 'B1', value: '1', inline: true })
    .addFields(
        { name: 'B2', value: '2', inline: true },
        { name: 'C1', value: '3' },
        { name: 'D1', value: '4', inline: true }
    )
    .addFields(
        { name: 'D2', value: '5', inline: true },
        { name: 'D3', value: '6', inline: true }
    );
要构建一个空白 field,可以这样做:
.addFields({ name: '\u200B', value: '\u200B' }),
空白 field 既可以独立成行,也可以作为内联 fields 的成员之一。
Discord API 对 embed 做出了一些限制:
- title 最长 256 字符
- description 最长 4096 字符
- 最多 25 个 field
- 一个 field 的 name 最长 256 字符
- 一个 field 的 value 最长 1024 字符
- footer 的 text 最长 2048 字符
- author 的 name 最长 256 字符
- embed 所构成的 JSON 最长不超过 6000 字符
- 一条消息最多 10 个 embeds
使用附件(attachment)的 embed
通过使用 AttachmentBuilder(),我们可以利用 URL 为 embed 的相关域构建一个图片附件,这样,我们就可以使用 attachment://fileName.extension 来访问相关附件。
虽然我们还没学到 AttachmentBuilder,但是我们先简单用一下还是可以的。
什么时候应该使用(本地上传的)附件?什么时候应该使用(存储于远程服务器的)图片的 URL?
对于那些经常重复使用的、相同的图片,建议提前上传存储至云端并确定文件 URL,比如 aws,这样就可以加速机器人的响应了。如果由附件上传,将会导致相同的图片被一遍又一遍的等候上传至 Discord 服务器,浪费时间。
对于那些机器人动态生成的图片,直接使用附件上传就好了,附件将上传至 Discord 的 CDN 服务器,无需由你来确定文件位置的 URL。
commands/embeds/embedWithAttachment.js:
const { AttachmentBuilder, EmbedBuilder, SlashCommandBuilder } = require('discord.js');
module.exports = {
data: new SlashCommandBuilder()
.setName('embedattachment')
.setDescription('Replies with embed!'),
async execute(interaction) {
// 这里的工作目录 “./” 是 "discord_bot_example"
const dogeCoffee = new AttachmentBuilder('assets/dogeCoffee.jpg');
const githubIcon = new AttachmentBuilder('assets/githubIcon.jpg');
// 这个 EmbedBuilder() 必须位于命令里或者监听器里
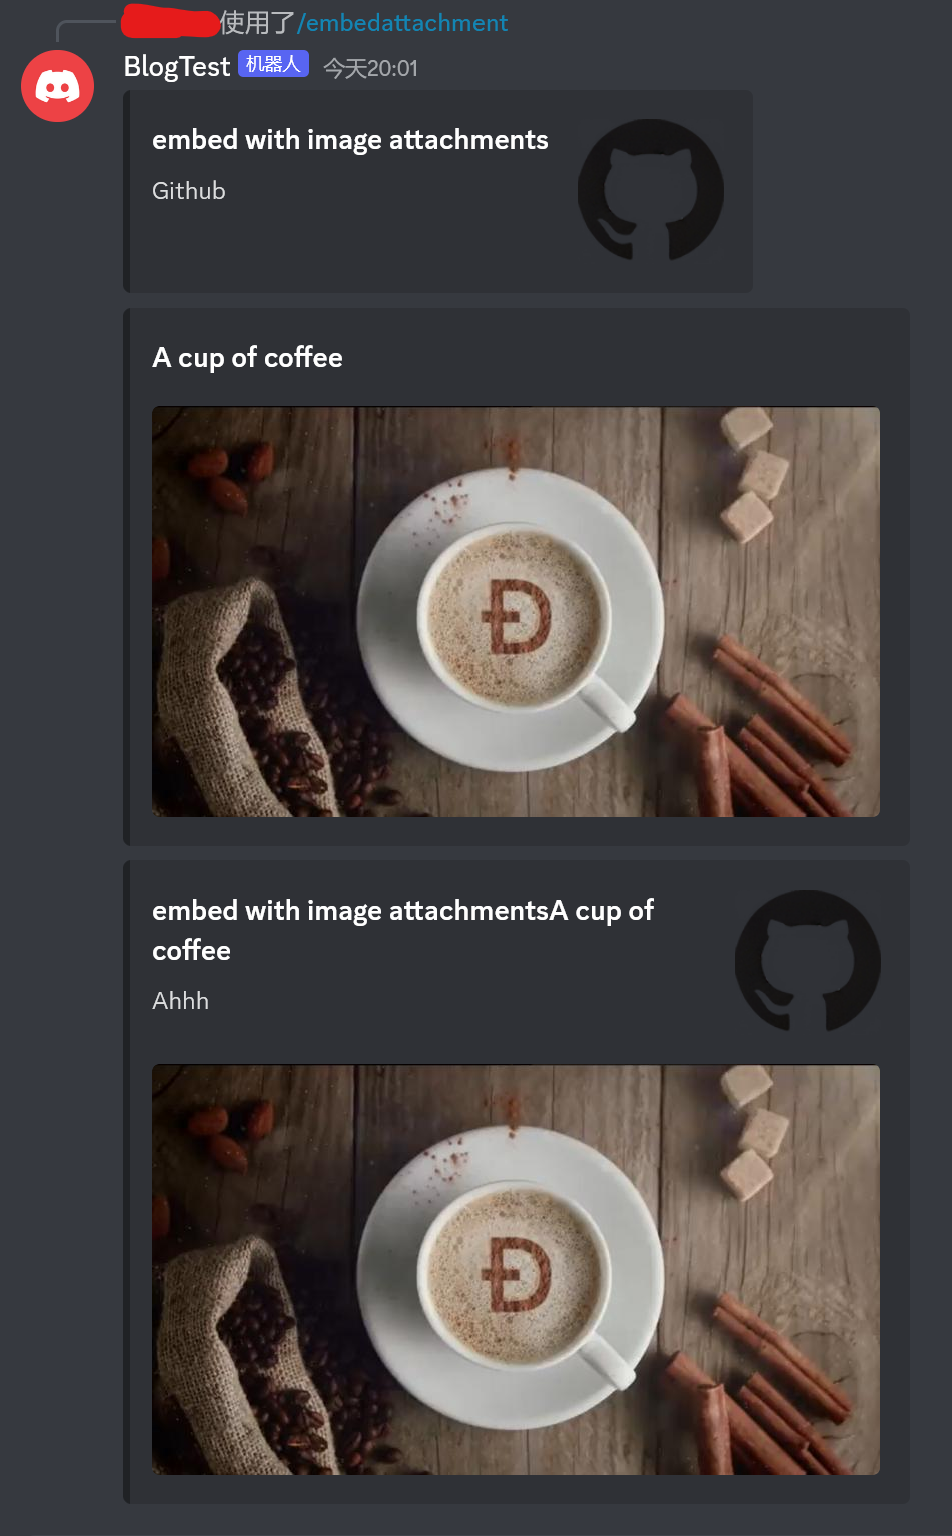
const embed = new EmbedBuilder()
.setTitle('embed with image attachments')
.setThumbnail('attachment://githubIcon.jpg')
.setDescription('Github')
await interaction.reply({ embeds: [embed], files: [githubIcon]});
// 直接使用 JSON 描述一个 embed
const embed2json = {
title: 'A cup of coffee',
image: {
url: 'attachment://dogeCoffee.jpg',
},
};
const embed2 = new EmbedBuilder(embed2json);
await interaction.channel.send({ embeds: [embed2], files: [dogeCoffee]});
// 把两个 embed 撺掇撺掇,组成个新的 embed
const embed3 = new EmbedBuilder()
.setTitle(embed.toJSON().title + embed2json.title)
.setImage(embed2.toJSON().image.url)
.setThumbnail(embed.toJSON().thumbnail.url)
.setDescription("Ahhh");
await interaction.channel.send({ embeds: [embed3], files: [dogeCoffee, githubIcon]});
},
};
其中,assets/dogeCoffee.jpg:

assets/githubIcon.jpg:

效果图:
相关commit:
https://github.com/wtflmao/discord_bot_example/commit/642a555373d40759fb7afce1c32bb0d16d16fb56
https://gitee.com/wtflmao/discord_bot_example/commit/642a555373d40759fb7afce1c32bb0d16d16fb56
如果图像不是显示在嵌入内部而是显示在外部,请仔细检查你的语法以确保它如上所示。
embed edit
如果你需要将已回复的消息的 embed 做出修改并立即生效,你需要可以使用 message.edit()。
下面咱们来一块儿看看:
首先建立个斜杠命令,并搞个叫做 embed 的 embed:
const { EmbedBuilder, SlashCommandBuilder } = require('discord.js');
const wait = require('node:timers/promises').setTimeout;
module.exports = {
data: new SlashCommandBuilder()
.setName('embededit')
.setDescription('Replies with embed!'),
async execute(interaction) {
const infoLogoUrl = "https://encrypted-tbn0.gstatic.com/images?q=tbn:ANd9GcSOsaJUWS9y-_JQWtIggodoouMyxM-lJyPa1Q&usqp=CAU";
// This EmbedBuilder() has to be inside a command or listener
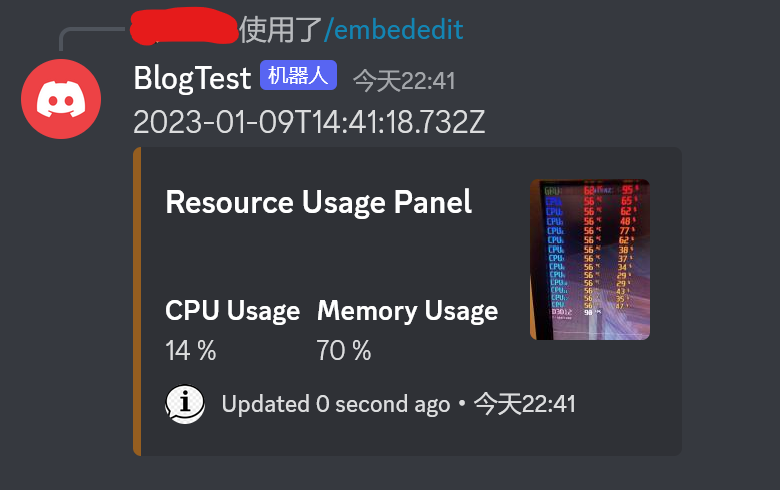
const embed = new EmbedBuilder()
.setTitle('Resource Usage Panel')
.setColor(0x955F20)
.setThumbnail('https://i.imgur.com/rVtny54.jpeg')
.setDescription('\u200B')
.addFields(
{ name: 'CPU Usage', value: '14 %', inline: true },
{ name: 'Memory Usage', value: '70 %', inline: true },
)
.setTimestamp()
.setFooter({ text: 'Updated 0 second ago', iconURL: infoLogoUrl })
await interaction.reply({ embeds: [embed], content: `${(new Date()).toISOString()}` });
...
效果图:

接着,我们利用之前在 “Chapter 12 - 按钮” 学到的 message collector 对我们刚 interaction.reply() 回复的消息进行捕获,并保存到 message 变量里:
...
// 生成 2 到 9 闭区间内的一个整数作为随机数
// 这里生成随机数用于程序暂停执行 x 秒
let time = 2 + Math.floor(8 * Math.random());
await wait(time * 1000);
// 捕获我们刚回复的消息
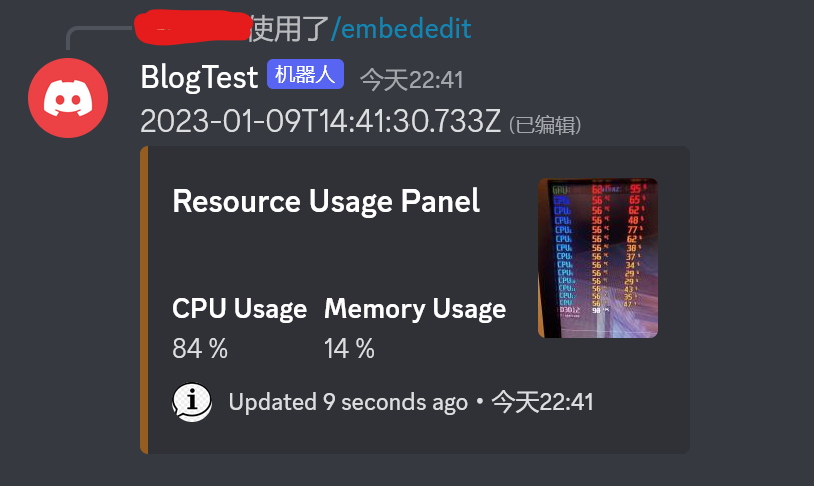
const message = await interaction.fetchReply();
// 将 message 的第一个 embed(embed[0])复制一份作为模板
const receivedEmbed = message.embeds[0];
// 这里 EmbedBuilder.from() 接受一个 JSON 对象或 Embed 类型值
// 由于 EmbedBuilder() 构造出来的 embed 都是 immutable 不可修改的值,因此我们不能在原 embed 上做修改,只好以原 embed 为底子,在新 embed 上面做出修改。
const newEmbed = EmbedBuilder.from(receivedEmbed)
.setFields(
{ name: 'CPU Usage', value: `${Math.floor(100 * Math.random())} %`, inline: true },
{ name: 'Memory Usage', value: `${Math.floor(100 * Math.random())} %`, inline: true },
)
.setFooter({ text: `Updated ${time} seconds ago`, iconURL: infoLogoUrl });
// 直接调用 message.edit() 来修改我们这条消息并生效,无需多余的 interaction.editReply()
await message.edit({ embeds: [newEmbed], content: `${(new Date()).toISOString()}` })
// 再次生成 2 到 9 的随机整数
time = 2 + Math.floor(8 * Math.random());
await wait(time * 1000);
// 再次从已有的 embed 构建一个新 embed,省事
const newEmbed2 = EmbedBuilder.from(newEmbed)
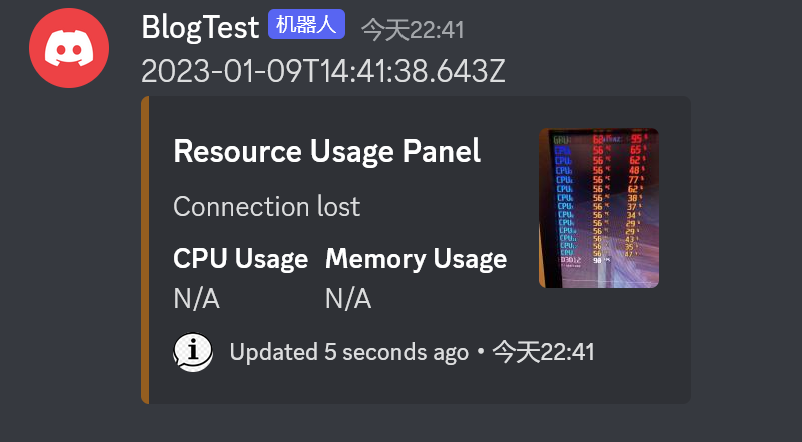
.setDescription("Connection lost")
.setFields(
{ name: 'CPU Usage', value: `N/A`, inline: true },
{ name: 'Memory Usage', value: `N/A`, inline: true },
)
.setFooter({ text: `Updated ${time} seconds ago`, iconURL: infoLogoUrl });
// 直接删除斜杠命令回复的那条 message,然后直接在相同的频道里发一条新的消息
await interaction.deleteReply();
await interaction.channel.send({ embeds: [newEmbed2], content: `${(new Date()).toISOString()}` });
},
};
把上面两端代码 拼接在一块儿,就是 commands/embeds/embedEdit.js 的完整代码,相关 commit:
https://github.com/wtflmao/discord_bot_example/commit/642a555373d40759fb7afce1c32bb0d16d16fb56
https://gitee.com/wtflmao/discord_bot_example/commit/642a555373d40759fb7afce1c32bb0d16d16fb56
完整效果图:
补充
- 在 embed 里,你可以 @ 用户或身份组,但是这不会触发任何 @ 的提醒。
- 任何在 embed 里的 @ 只能在 description 和 field 的 value 里被正确渲染,否则就会被渲染成普通文字(@加snowflake id)。
- embed 允许 masked links,比如
[我的博客](https://cnblogs.com/hhzm '可选的悬浮文字'),但这也只允许出现在 description 和 field 的 value 里。 - timestamp 的值是 ISO8601 标准值(GMT+0),但是 Discord 会根据客户端时区,展示时区转换后的时间。
小结
我学习了 Embed。
原文作者:闪电豹猫。原文链接:https://www.cnblogs.com/hhzm/p/17041326.html

 浙公网安备 33010602011771号