Bot in Discord with discord.js (1)
Bot in Discord with discord.js (1)
前言
利用 discord.js 建立一个 Discord 机器人。
我也是第一次上手,利用博客来记录我的学习过程,定期整理后再发到公众号。
在简单对比了 discord.js (JavaScript),discordgo (Go),discord.py (Python),Discord4J (Java),JDA (Java) 和 D++ (C++) 等项目后,我选择了 discord.js。
为什么选择了discord.js 呢?因为它:
- 面向对象
- 快速高效
- 功能丰富
- 灵活
- 100% 基于 Promise
又根据 Atwood 定律:任何可以使用 JavaScript 来编写的应用,并最终也会由 JavaScript 编写。所以,没得办法。
免责声明:先说好,不要将本教程的代码用于生产环境,因为它们通常有着已知或未知的漏洞。任何代码在上线之前,都应该经过充分的代码审查。本教程只是为了说明基本原理并自娱自乐。
下面,咱们开始吧。
Chapter 1 - 环境搭建
环境
你需要自行下载安装 node.js。
包管理器 npm,yarn,pnpm 有一个就行了。本文使用 npm。
本文编写时,我的本地开发环境
- Windows 10 21H2 19044
- Node.js 16.16.0 LTS ,版本需要至少 16.9.0
- 包管理器:npm 8.11.0
- 包管理器:Yarn 1.22.19
- 包管理器:pnpm 7.5.0
- IDE: Jetbrains Webstorm 2022.1.3
- 编辑器:Sublime Text v4126
操作系统可以选择 Linux 发行版、FreeBSD 或 Mac OS,Windows 不是必须的选择,但操作系统你得有。
IDE 也不是必须的,用 VS Code, Sublime Text, Vim, nano 或者记事本都可以。
Node.js 是必须安装的。
本文编写时,我的云端环境
云端环境是用来在我的笔记本关机时,让机器人保持继续运行的环境。
云端环境不是必须的,如果你有的话,要保证它能连上 Discord 服务器(可以通过 ping www.discord.com 和 cdn.discordapp.com 来初步验证一下连通性)。
从 Discord Developer Portal 注册机器人账号
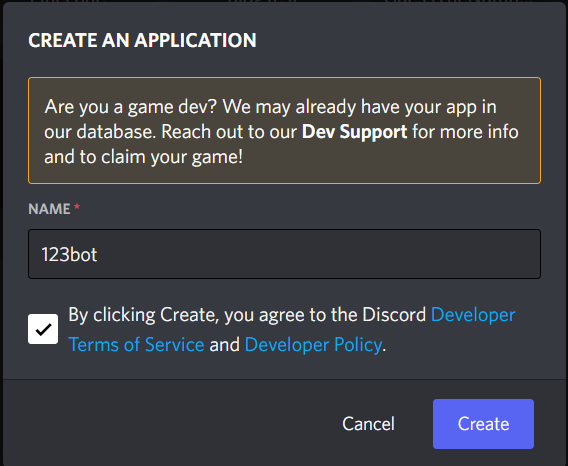
打开链接 https://discord.com/developers/applications ,登录你的 Discord 账号,选择 New Application 来创建新应用程序。
在 NAME 一栏填写你的应用名称,这个名称将会是机器人的外显账号名称,后期可修改。
按下 Create 以完成创建。
点开新创建的应用,点击左侧菜单栏的 General Information,记下 APPLICATION ID,这就是通常所说的机器人的 "client_id",这个 ID 是公开可查的,不是秘密。
点击左侧菜单栏的 Bot,点击 Add Bot ,再点击弹出对话框的 Yes, do it! 创建机器人。注意此操作是不可逆的,也就是说机器人一旦创建,就不可被销毁删除。哪怕销毁应用程序,机器人账号仍会在 Discord 的世界里存在,只是变成无人能管理的孤儿账号了。
关于机器人账号和普通用户账号的区别,这里 (https://discord.com/developers/docs/topics/oauth2#bots) 有介绍。
完成机器人账号创建后,在本页面的 Build-A-Bot 栏目中,你可以给机器人账号更换用户名和头像。
点击按钮 Reset Token 并点击 Yes, do it! 来首次获取我们的机器人账号 Token。
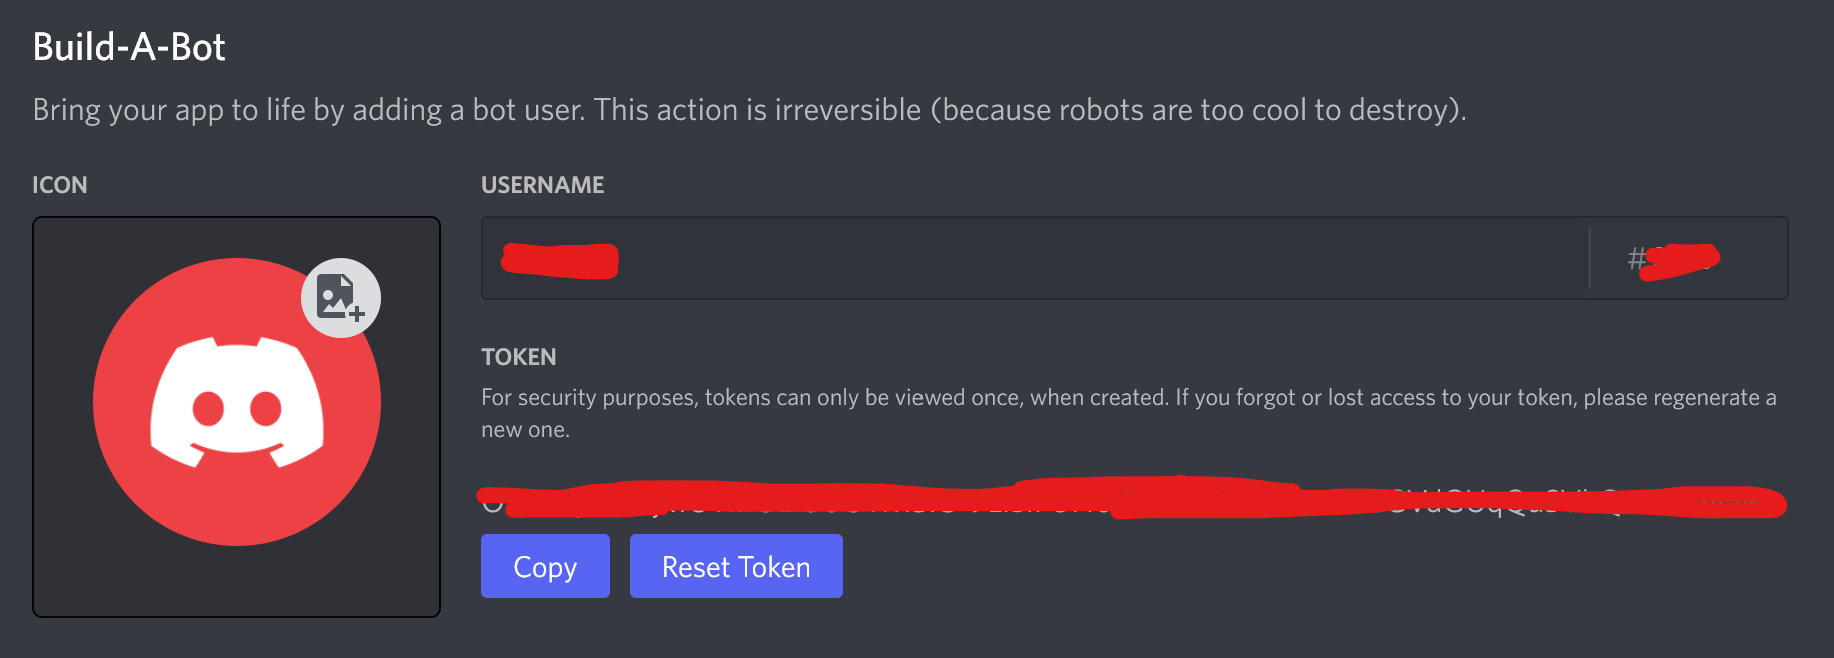
注意:Token (令牌)万万不可给别人看到,这是十分机密的一串文字,任何人有了它,就拥有了完全掌控机器人行为的能力了,比如机器人恶意封禁和私聊服务器里的人、发送 @everyone 等恶劣行为都可能会发生。请妥善保管好这个密钥,
注意:Discord 出于安全目的,令牌在创建时只能查看一次。 如果您忘记或无法访问您的令牌,请重新生成一个新令牌,旧令牌将自动失效。
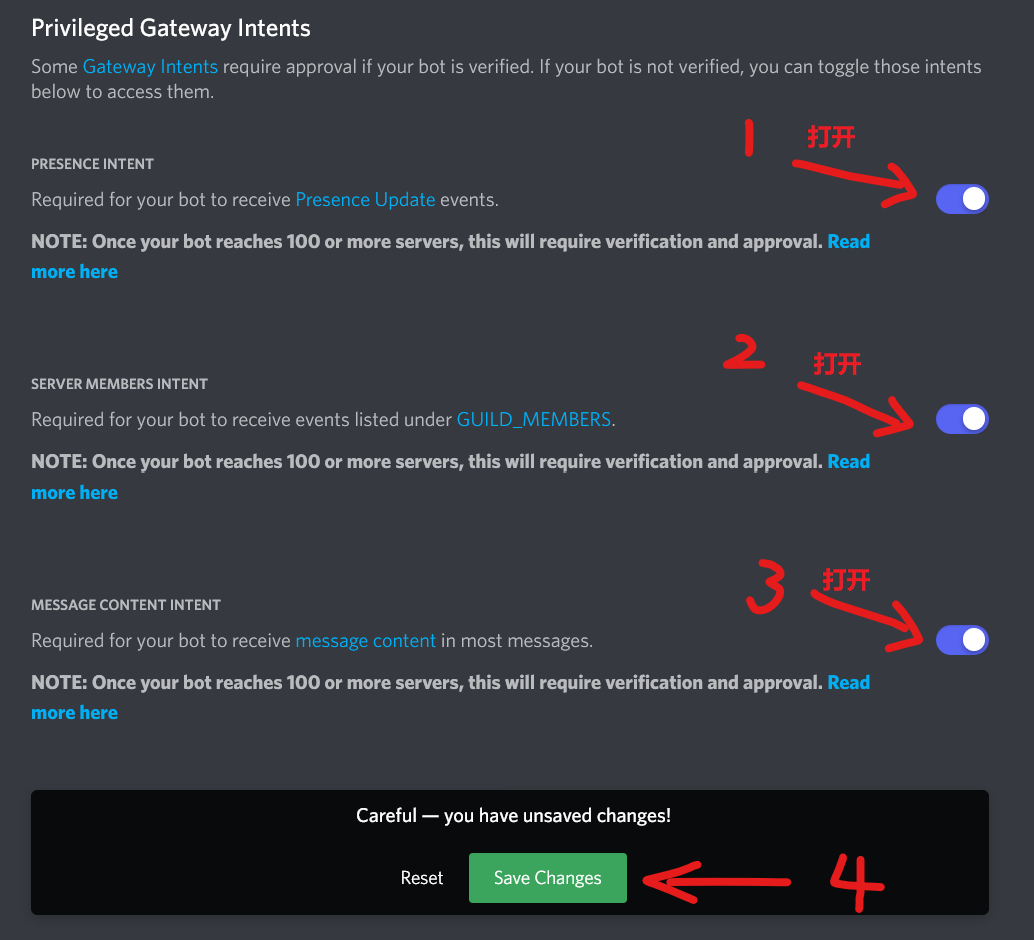
接着,在 Bot 页面的 Privileged Gateway Intents 栏目中,勾选 Presence Intent、Server Members Intent 和 Message Content Intent。
然后点击下端弹出的绿色保存设置 (Save Changes) 按钮,来保存设置。
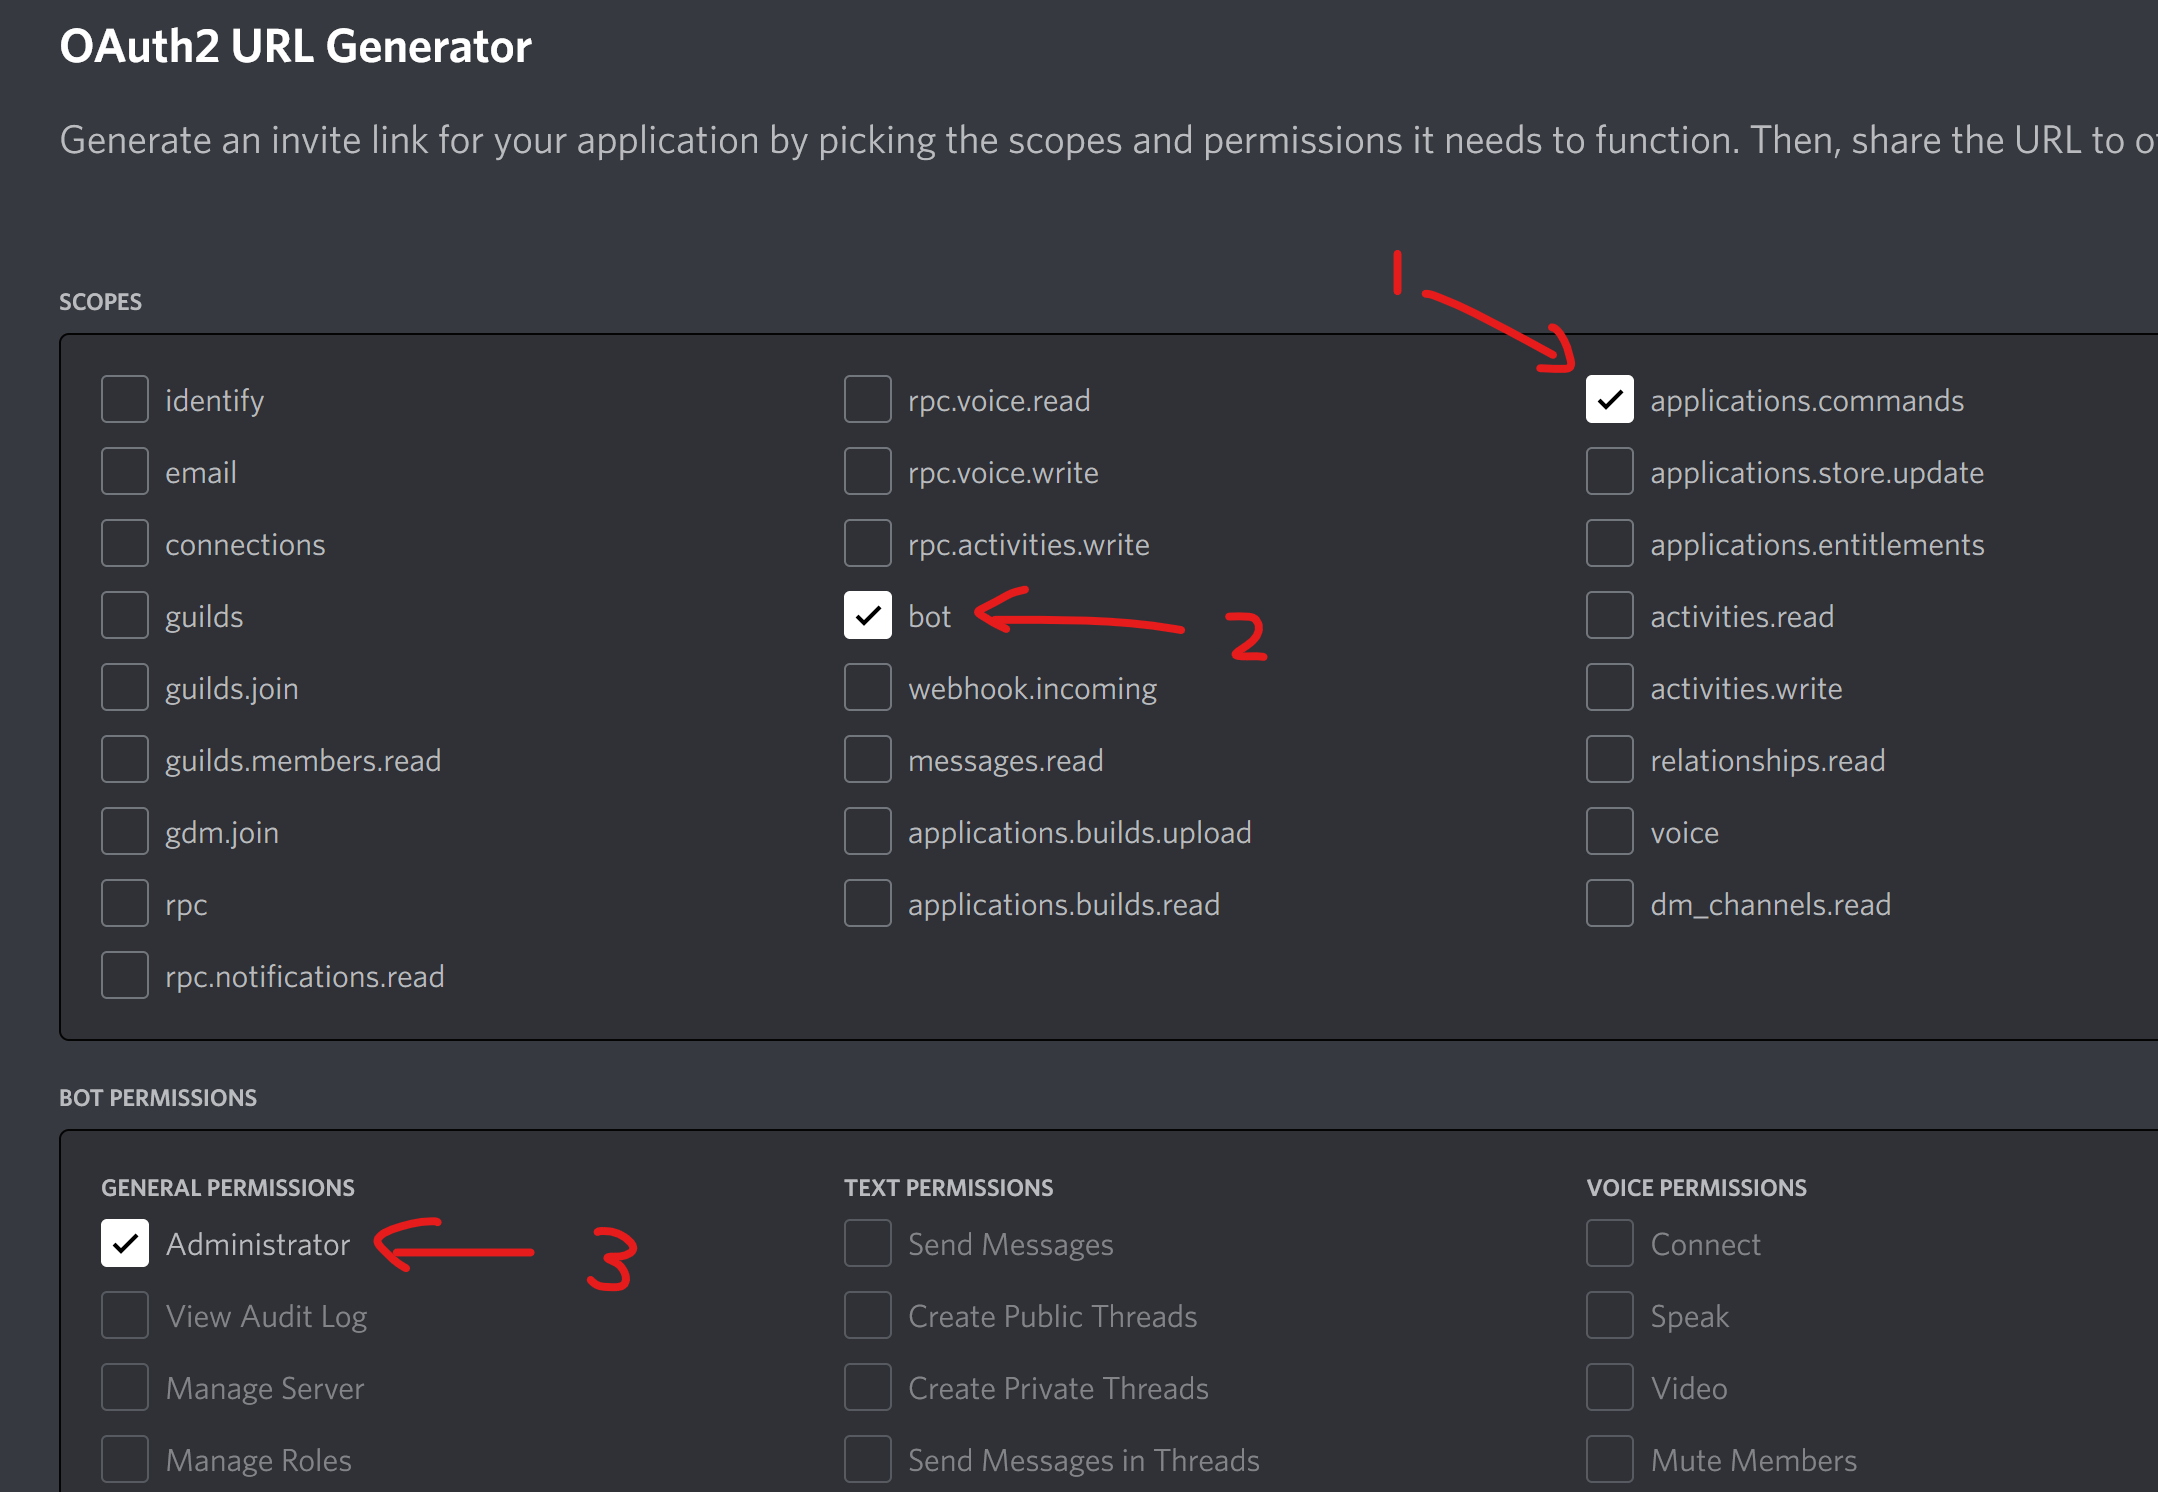
点击左侧菜单栏的 OAuth2 - URL Generator 。
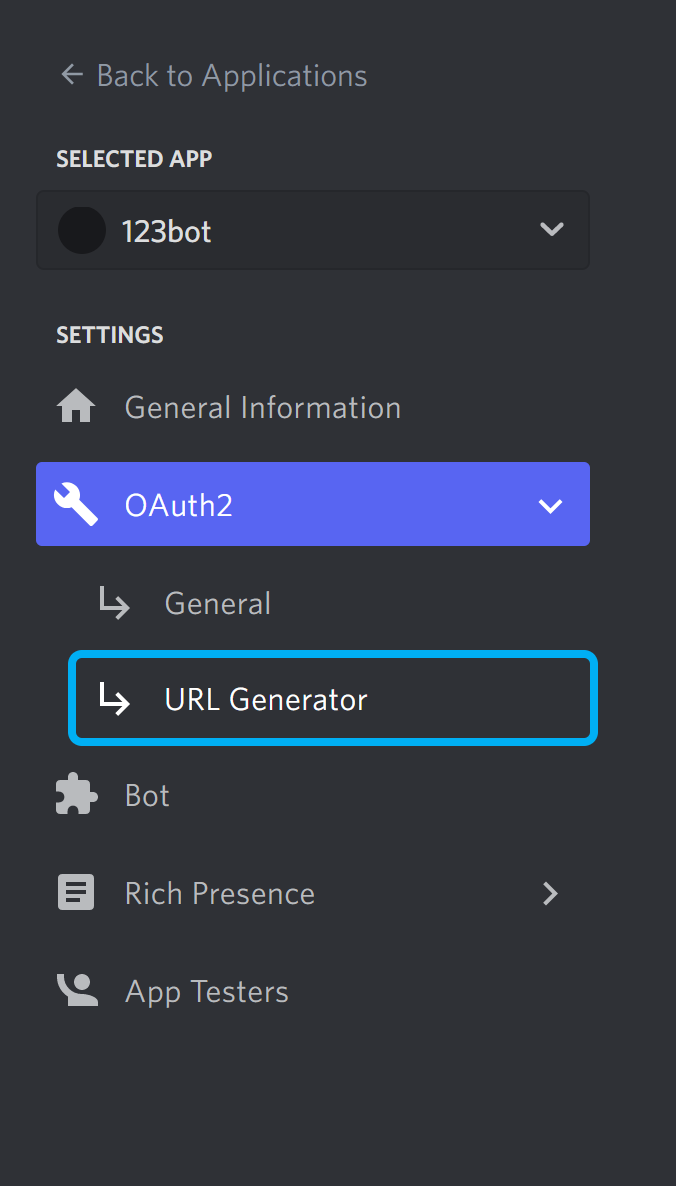
在 SCOPES 里勾选 bot 和 applications.commands ,为了方便,在 BOT PERMISSIONS 里直接勾选第一条 Administrator (注意咱们只是为了玩哈,才直接赋予管理员权限的)。
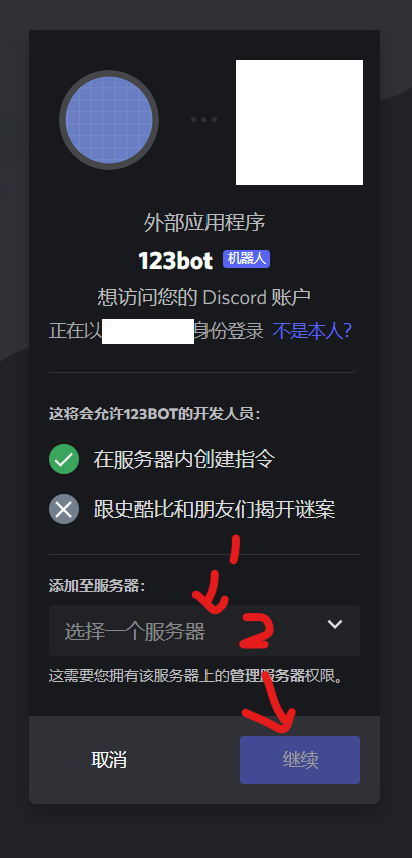
复制最下方生成的 URL,粘贴到新浏览器窗口打开,选择服务器并添加。如果你没有看到任何可选选项,那么你需要去 Discord 先自己创建一个服务器,然后回来刷新一下。事实上,其他服务器如果给你管理服务器的权限的话,这个服务器将出现在可选选项中。

到此,我们完成了搭建开发环境、创建机器人账号和邀请机器人进入服务器等操作。
Chapter 2 - 工程文件夹的初始化
创建工程文件夹
对于 IDE 用户,创建一个 Node.js 项目。对于编辑器用户,新建文件夹即可。
比如我的工程根文件夹是 C:\Users\root\WebstormProjects\discord_bot_2022
获取 discord.js
本文编写时,discord.js 的最新版本是 v14.0.3,咱们使用的版本也是 v14.0.3。后文的部分代码可能在过去和未来的版本(比如 v13 和 v15)中失效。
不过幸运的是,从 v13 升级到 v14 的情况来看,没啥大问题。何况 v14 才于 2022 年 7 月 18 日正式发布(本文于 2022 年 7 月 9 日开始撰写第一版,7 月 19 日完成针对 v14 的第二版),v15 的发布还远着呢。
(2023年1月11日注:本系列会尽量随着 discord.js 的升级而跟进升级,若要使用本项目的代码,最好从 Github 或 Gitee 上直接 clone 一份到本地,然后根据 readme 的指示安装指定版本的 discord.js)
注意:你的 Node.js 的版本需高于 16.16.0(含)
cd 到 工程根文件夹,在终端输入来获取 discord.js:
- 如果你用的是 npm:
npm install discord.js@v14.0.3
- 如果你用的是 yarn:
yarn add discord.js@v14.0.3
- 如果你用的是 pnpm:
pnpm add discord.js@v14.0.3
注意:因为 builders 已被内置于 discord.js 中的缘故,包 @discordjs/builders 在 v14 中已被废弃。如果你已有基于 v13 的旧代码,你需要在终端卸载该包:npm uninstall @discordjs/builders。保留该包会引起命名冲突,所以初学者切勿安装该包。
打开 Discord 开发者模式
为了方便地获取服务器 id、身份组 id 、消息 id 和用户 id,我们必须这么做。
网页版在Discord 设置 - 高级设置 里,勾选 开发者模式。
手机版在 DiscordAPP - "我"的头像 - APP设置栏 - 外观 - 高级设置栏 - 开发者模式。
创建配置文件 config.json
在工程根文件夹下创建文件 config.json,写入:
{
   "token": "bot-token-goes-here",
   "clientId": "bot-clientid-goes here",
   "guildId": "serverid-goes-here"
}
比如(这三条都是我瞎编的,不是真的)
{
   "token": "OBEzNDMyTEN0OTkzOTk1ODA4.Bhz0k7.97sjsWOGtmx-LBIlFvrkk6A9lkk9YGMX9OYbf",
   "clientId": "240832114973084058",
   "guildId": "1978274108637234708"
}
需要说明的是,token 字段就是那个极为重要不能外泄的机器人密钥,把你的粘贴过来。
clientId 字段就是 Application id。在 Discord 服务器里。右击机器人头像,点击 复制 ID 即可轻松获取。
guildId 字段是服务器的 ID,当然得是机器人所在的服务器的 ID。右击服务器头像,点击 复制 ID 即可轻松获取。
.gitignore 的配置
接下来确保你的工程根文件夹下存在 .gitignore 文件,确保文件内已写入
node_modules
config.json
.env
第一行的 node_module 防止你把包也给上传了,白白占用空间。
第二行的 config.json 是防止你的 token 在 git 推送后外泄。
第三行有就有吧。
无脑实现一个机器人
在 工程根文件夹 创建文件 deploy_commands.js,写入:
const fs = require("fs");  const { REST } = require('@discordjs/rest');  const { Routes } = require('discord.js');
const { clientId, guildId, token } = require('./config.json');

const commands = [];  //const commandFiles = fs.readdirSync("./commands").filter(file => file.endsWith(".js"));
const cmdPaths = require("./cmdPaths.js").data;
const commandFiles = [];
for (let i = 0; i < cmdPaths.length; i++) {
   commandFiles[i] = fs.readdirSync(cmdPaths[i]).filter(file => file.endsWith(".js")); // fs.readdirSync() 的结果是个数组,所以 commandFiles是个二维数组
   for (let j = 0; j < commandFiles[i].length; j++) {
      commandFiles[i][j] = cmdPaths[i] + "/" + commandFiles[i][j];
   }
}

//console.log(commandFiles);
for (const fileArray of commandFiles) {
   for (const file of fileArray) {
      console.log(file);
      let command = require(`./${file}`);
      commands.push(command.data.toJSON());

      // if any ‘aka' name exists
      if (command.akaNames != null && command.akaNames !== []) {
         for (let i = 0; i < command.akaNames.length; i++) {
            let akaData = command.data;
            akaData.name = command.akaNames[i];
            commands.push(akaData.toJSON());
         }
      }
   }
}

const rest = new REST({ version: '10' }).setToken(token);
  rest.put(Routes.applicationGuildCommands(clientId, guildId), { body: commands })
   .then(() => console.log('Successfully registered application commands.'))
   .catch(console.error);
在 工程根文件夹 下创建文件 cmdPaths.js,写入:
module.exports = {
    data: ["./commands"],
};
在 工程根文件夹 下创建文件夹 events,在这个文件夹里创建文件 ready.js,写入:
module.exports = {
   name: "ready",
   once: true,
   execute(client) {
      console.log(`Ready! Logged in as ${client.user.tag}`);
   },
};
在 工程根文件夹/event 文件夹里,创建文件 interactionCreate.js,写入:
module.exports = {
   name: "interactionCreate",
   execute(interaction) {
      console.log(`${interaction.user.tag} in #${interaction.channel.name} triggered an interaction.`);
   },
};
在 工程根文件夹 创建文件 index.js ,写入:
const fs = require('fs');
const { Client, Collection, GatewayIntentBits } = require('discord.js');
const { token } = require('./config.json');
const { InteractionType } = require("discord-api-types/v10");

const client = new Client({ intents: [GatewayIntentBits.Guilds, GatewayIntentBits.GuildMessages, GatewayIntentBits.MessageContent] });
  const eventFiles = fs.readdirSync('./events').filter(file => file.endsWith('.js'));

for (const file of eventFiles) {
    const event = require(`./events/${file}`);
    if (event.once) {
        client.once(event.name, (...args) => event.execute(...args));
    } else {
        client.on(event.name, (...args) => event.execute(...args));
    }
}

client.commands = new Collection();
const cmdPaths = require("./cmdPaths.js").data;
const commandFiles = [];
for (let i = 0; i < cmdPaths.length; i++) {
    commandFiles[i] = fs.readdirSync(cmdPaths[i]).filter(file => file.endsWith(".js")); // fs.readdirSync() 的结果是个数组,所以 commandFiles是个二维数组
    for (let j = 0; j < commandFiles[i].length; j++) {
        commandFiles[i][j] = cmdPaths[i] + "/" + commandFiles[i][j];
    }
}

for (const fileArray of commandFiles) {
    for (const file of fileArray) {
        const command = require(`./${file}`);
        client.commands.set(command.data.name, command);

        // if any ‘aka' name exists
        if (command.akaNames != null && command.akaNames !== []) {
            for (let i = 0; i < command.akaNames.length; i++) {
                client.commands.set(command.akaNames[i], command);
            }
        }
    }
}

client.once('ready', () => {});
client.on('interactionCreate', async interaction => {
    if (interaction.type !== InteractionType.ApplicationCommand) return;

    const command = client.commands.get(interaction.commandName);

    if (!command) return;

    try {
        await command.execute(interaction);
    } catch (error) {
        console.error(error);
        await interaction.reply({
            content: 'There was an error while executing this command!',
            ephemeral: true
        });
    }
});

client.login(token);
在 工程根文件夹 下创建文件夹 commands,在这个文件夹里创建文件 ping.js,写入:
const { SlashCommandBuilder } = require('discord.js');

module.exports = {
   data: new SlashCommandBuilder()
       .setName('ping')
       .setDescription('Replies with Pong!'),
   async execute(interaction) {
      await interaction.reply("Pong!");
   },
};
这些代码,不懂正常,先照做。
我们会在 Chapter 4 中,逐行解释这些代码的,何况我们的工作重点不是这些“框架”性的东西,而是真正的机器人交互逻辑代码。
咱们的工程根文件夹目录结构和单文件应该至少是这样的:
discord_bot_2022
├─commands
├─events
├─node_modules
├─.gitignore
├─cmdPaths.js
├─config.json
├─deploy_commands.js
├─index.js
├─package.json
├─package-lock.json
├─pnmp-lock.yaml
└─yarn.lock
对于 IDE 用户,创建该创建的运行配置后,点击“运行”或者什么之类的按钮即可让机器人跑起来。
对于非 IDE 用户(IDE 用户也可以),打开终端,cd 到工程根文件夹,输入
node deploy_commands.js
注册斜杠命令。成功消息是 Successfully registered application commands.。
提前说明一点,如果我们的 commands 文件夹里的各个 js 命令文件没有做过变动,则不需要每次启动机器人时注册部署一遍斜杠命令。
成功部署斜杠命令后,cd 到工程根文件夹,终端输入
node index.js
运行机器人。成功消息类似于 Ready! Logged in as abcde#0001。
如果出现 “ 无法将“node”项识别为 cmdlet、函数、脚本文件或可运行程序的名称。请检查名称的拼写,如果包括路径,请确保路径正确,然后再试一次。” 或者 “ 'node' 不是内部或外部命令,也不是可运行的程序或批处理文件。”亦或者“ -bash: node: command not found ”,请检查你的 PATH 是否有包含 node.exe 所在文件夹,这通常是 C:\Program Files\nodejs\node.exe。验证方法是 node -v 输出版本号。
如果抛出其他失败,请检查你的网络是否能连接到 Discord、你的上述步骤有没有漏做或者顺序错误的。
与机器人交互
cd 到工程根文件夹。
确保你已经通过 node deploy_commands.js 注册了斜杠命令,并已通过 node index.js (或者 node .) 使机器人程序保持运行状态。验证方法是:能在 Discord 服务器成员列表看到你的机器人是在线状态而非离线状态。
打开 Discord,在机器人所在的服务器的任何文字频道,输入 /ping,回车选定斜杠命令,再次回车发送命令,机器人应该会发送消息 Pong! ,而且在机器人后端程序,会输出类似于 xxxxx#xxxx in #bot triggered an interaction.
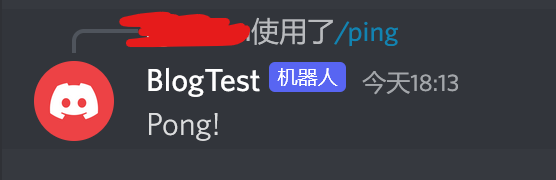

这样,一个非常简单的机器人就完成了。
后续我们将学习更多的东西,先写到这吧。记得关注从而收取最新消息。
原文链接:https://www.cnblogs.com/hhzm/p/16461628.html
转载需注明出处。

 浙公网安备 33010602011771号