

GAMES101作业2+提高题
声明:使用的是vs2022版,以下内容如有问题,感谢各位大佬指正!
作业要求:
作业目的:在屏幕上画出一个实心的三角形(深度测试)
我们需要做的:
关键词:包围盒;插值计算;深度测试;判断点是否在三角形内;光栅化;
1.粘贴自己第一次代码
Eigen::Matrix4f get_projection_matrix(float eye_fov, float aspect_ratio,float zNear, float zFar)
{
    // Students will implement this function

    Eigen::Matrix4f projection = Eigen::Matrix4f::Identity();

    // TODO: Implement this function
    // Create the projection matrix for the given parameters.
    // Then return it.

    //粘贴第一次作业
    float n = zNear;
    float f = zFar;
    Eigen::Matrix4f M_persp2Ortho;
    M_persp2Ortho << n, 0, 0, 0,
        0, n, 0, 0,
        0, 0, n + f, -n * f,
        0, 0, 1, 0;

    float fov = eye_fov * MY_PI / 180.0;
    float t = -n * tan(fov / 2.);//解决原三角倒着的方法,将t换为-t
    float b = -t;
    float r = aspect_ratio * t;
    float l = -r;

    Eigen::Matrix4f M_ortho, trans, scale;
    trans << 1, 0, 0, -(r + l) / 2,
        0, 1, 0, -(t + b) / 2,
        0, 0, 1, -(n + f) / 2,
        0, 0, 0, 1;
    scale << 2 / (r - l), 0, 0, 0,
        0, 2 / (t - b), 0, 0,
        0, 0, 2 / (n - f), 0,
        0, 0, 0, 1;
    M_ortho = scale * trans;

    projection = M_ortho * M_persp2Ortho;
    return projection;
}
2.rasterize_triangle(): 执行三角形栅格化算法
分三步:
1.写三角形包围盒,计算三角形在屏幕空间的边界值
void rst::rasterizer::rasterize_triangle(const Triangle& t)
{
    auto v = t.toVector4();//v 是三角形三个顶点的齐次坐标(x,y,z,w)

    // TODO : Find out the bounding box of current triangle.

    //包围盒(计算三角形在屏幕空间中的边界值)AABB
    float min_x = width;
    float max_x = 0;
    float min_y = height;
    float max_y = 0;

    for (int i = 0; i < 3; i++)
    {
        min_x = std::min(v[i].x(), min_x);
        max_x = std::max(v[i].x(), max_x);
        min_y = std::min(v[i].y(), min_y);
        max_y = std::max(v[i].y(), max_y);
    }
2.判断采样点是否在三角形内,计算采样点的重心坐标,然后透视矫正插值计算深度和颜色
    // iterate through the pixel and find if the current pixel is inside the triangle
    //遍历像素,找出当前像素是否在三角形内
    // If so, use the following code to get the interpolated z value.
    //如果是这样,请使用以下代码获取插值z值。
    //auto[alpha, beta, gamma] = computeBarycentric2D(x, y, t.v);
    //float w_reciprocal = 1.0/(alpha / v[0].w() + beta / v[1].w() + gamma / v[2].w());
    //float z_interpolated = alpha * v[0].z() / v[0].w() + beta * v[1].z() / v[1].w() + gamma * v[2].z() / v[2].w();
    //z_interpolated *= w_reciprocal;

    for (int y = min_y; y < max_y; y++)
    {
        for (int x = min_x; x < max_x; x++)
        {
            //遍历边界框内的所有像素,检查中心点是否在三角形内
            if (insideTriangle(x + 0.5, y + 0.5, t.v))//使用 (x + 0.5, y + 0.5) 作为像素中心点
            {
                //透视矫正插值计算深度和颜色
                auto [alpha, beta, gamma] = computeBarycentric2D(x + 0.5, y + 0.5, t.v);//计算该点的重心坐标
                // 计算:1/(α + β + γ)
                float w_reciprocal = 1.0 / (alpha / v[0].w() + beta / v[1].w() + gamma / v[2].w());
                // 计算:α(z₀/w₀) + β(z₁/w₁) + γ(z₂/w₂)
                float z_interpolated = alpha * v[0].z() / v[0].w() + beta * v[1].z() / v[1].w() + gamma * v[2].z() / v[2].w();
                // 相乘,得到最终插值结果
                z_interpolated *= w_reciprocal;
3.深度测试与像素更新
// TODO : set the current pixel (use the set_pixel function) to the color of the triangle (use getColor function) if it should be painted.

                int index = get_index(x, y);
                if (z_interpolated < depth_buf[index])
                {
                    Eigen::Vector3f p;
                    p << x, y, z_interpolated;
                    set_pixel(p, t.getColor());
                    depth_buf[index] = z_interpolated;
                }
            }
        }
    }
}
2.rasterize_triangle():的完整代码
void rst::rasterizer::rasterize_triangle(const Triangle& t)
{
    auto v = t.toVector4();//v 是三角形三个顶点的齐次坐标(x,y,z,w)

    // TODO : Find out the bounding box of current triangle.

    //包围盒(计算三角形在屏幕空间中的边界值)AABB
    float min_x = width;
    float max_x = 0;
    float min_y = height;
    float max_y = 0;

    for (int i = 0; i < 3; i++)
    {
        min_x = std::min(v[i].x(), min_x);
        max_x = std::max(v[i].x(), max_x);
        min_y = std::min(v[i].y(), min_y);
        max_y = std::max(v[i].y(), max_y);
    }

    // iterate through the pixel and find if the current pixel is inside the triangle
    // If so, use the following code to get the interpolated z value.
    //auto[alpha, beta, gamma] = computeBarycentric2D(x, y, t.v);
    //float w_reciprocal = 1.0/(alpha / v[0].w() + beta / v[1].w() + gamma / v[2].w());
    //float z_interpolated = alpha * v[0].z() / v[0].w() + beta * v[1].z() / v[1].w() + gamma * v[2].z() / v[2].w();
    //z_interpolated *= w_reciprocal;

    for (int y = min_y; y < max_y; y++)
    {
        for (int x = min_x; x < max_x; x++)
        {
            //遍历边界框内的所有像素,检查中心点是否在三角形内
            if (insideTriangle(x + 0.5, y + 0.5, t.v))//使用 (x + 0.5, y + 0.5) 作为像素中心点
            {
                //透视矫正插值计算深度和颜色
                auto [alpha, beta, gamma] = computeBarycentric2D(x + 0.5, y + 0.5, t.v);//计算该点的重心坐标
                // 计算:1/(α + β + γ)
                float w_reciprocal = 1.0 / (alpha / v[0].w() + beta / v[1].w() + gamma / v[2].w());
                // 计算:α(z₀/w₀) + β(z₁/w₁) + γ(z₂/w₂)
                float z_interpolated = alpha * v[0].z() / v[0].w() + beta * v[1].z() / v[1].w() + gamma * v[2].z() / v[2].w();
                // 相乘,得到最终插值结果
                z_interpolated *= w_reciprocal;

                // TODO : set the current pixel (use the set_pixel function) to the color of the triangle (use getColor function) if it should be painted.
                // 深度测试与像素更新
                int index = get_index(x, y);//将坐标转化为索引
                if (z_interpolated < depth_buf[index]) //将当前像素的深度值和缓冲区中的进行比较
                {
                    //z 值越小越近
                    //如果当前像素更近,就更新颜色和深度缓冲区
                    Eigen::Vector3f p;
                    p << x, y, z_interpolated;
                    //更新帧缓冲区的颜色
                    set_pixel(p, t.getColor());
                    //更新深度缓冲区的值
                    depth_buf[index] = z_interpolated;
                }
            }
        }
    }
}
3.测试点是否在三角形内(叉积)Cross product
static bool insideTriangle(float x, float y, const Vector3f* _v)
{
    // TODO : Implement this function to check if the point (x, y) is inside the triangle represented by _v[0], _v[1], _v[2]

    int flag = -1;

    for (int i = 0; i < 3; i++)
    {
        Eigen::Vector3f p0 = { x,y,0 };       //待检测点
        Eigen::Vector3f p1 = _v[i];           //当前边的起点
        Eigen::Vector3f p2 = _v[(i + 1) % 3]; //当前边的终点

        Eigen::Vector3f v1 = p1 - p0;         //从待检测点到边起点的向量
        Eigen::Vector3f v2 = p1 - p2;         //边的方向向量

        float cp = v1.cross(v2).z();          //计算叉积的z分量
        if (cp == 0) continue;                // 点在边上,继续检查下一条边

        int sign = cp < 0 ? 0 : 1;            // 获取叉积的符号(0为负,1为正)
        if (flag == -1) flag = sign;          // 记录第一个非零叉积的符号
        if (flag != sign)return false;        // 符号不一致,点在三角形外部
    }

    return true;                              // 所有边的叉积符号一致,点在三角形内部

 }
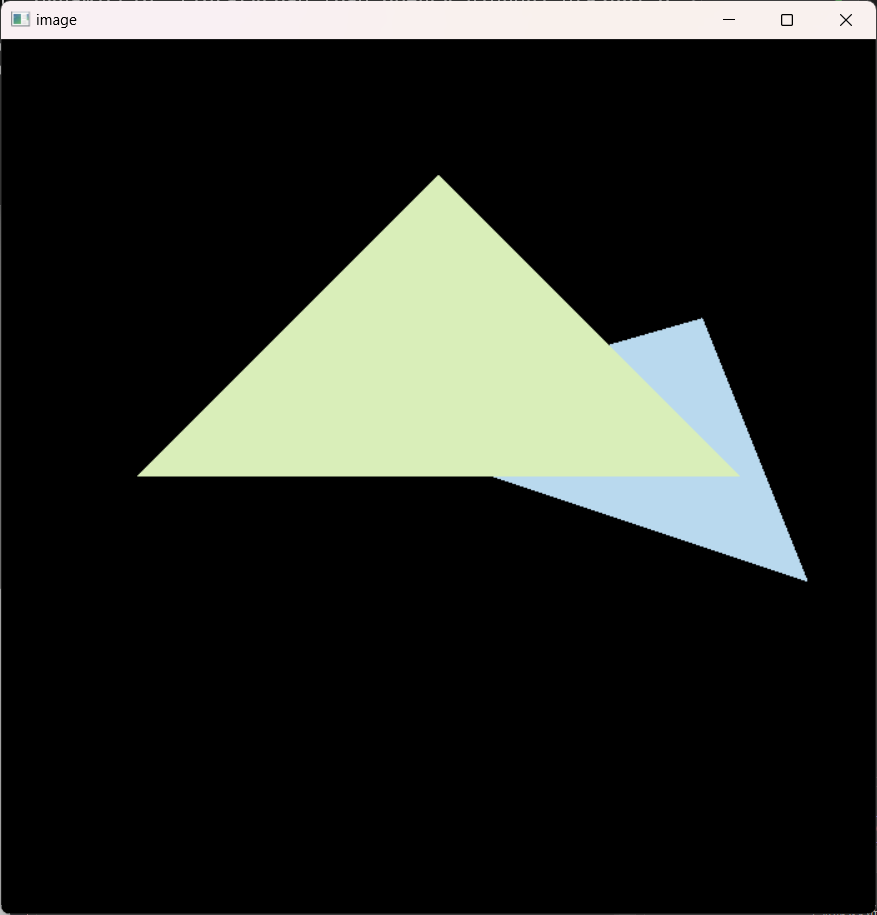
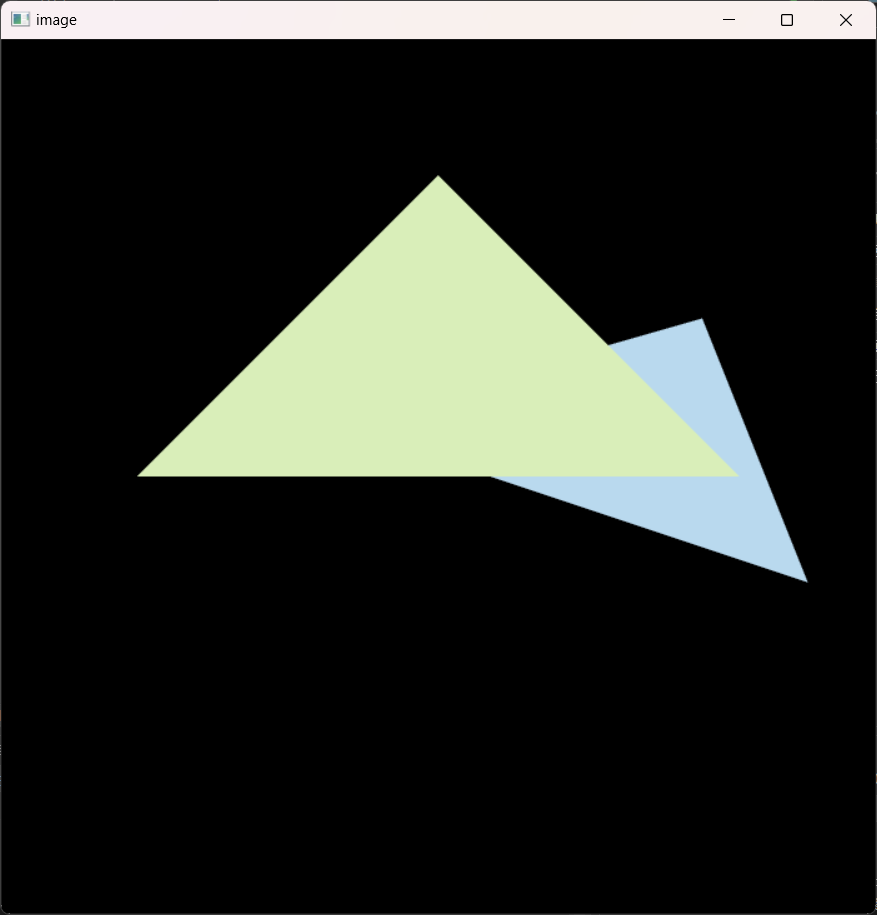
最后运行,得到这幅图
[提高项 5 分] :
用 super-sampling 处理 Anti-aliasing : 你可能会注意到,当我们放大图像时,图像边缘会有锯齿感。我们可以用 super-sampling来解决这个问题,即对每个像素进行 2 * 2 采样,并比较前后的结果 (这里并不需要考虑像素与像素间的样本复用)。需要注意的点有,对于像素内的每一个样本都需要维护它自己的深度值,即每一个像素都需要维护一个 samplelist。最后,如果你实现正确的话,你得到的三角形不应该有不正常的黑边。
超采样抗锯齿 (SSAA) 的核心思想是:
- 以更高的分辨率渲染场景(例如每个像素分成 2×2=4 个子像素)
- 对每个子像素执行完整的光栅化和深度测试
- 将多个子像素的颜色值平均,得到最终像素颜色
参考:https://zhuanlan.zhihu.com/p/1912986768225047690
1.修改光栅化器类(rasterizer.hpp)—增加ssaa的缓冲区和索引
 std::vector<Eigen::Vector3f> frame_buf;
 std::vector<Eigen::Vector3f> frame_buf_ssaa;//超采样颜色缓冲区

 std::vector<float> depth_buf;
 std::vector<float> depth_buf_ssaa;//超采样深度缓冲区

 int get_index(int x, int y);

 int ssaa_factor = 2;//超采样系数(2*2超采样)

 int get_ssaa_index(int x, int y);//索引
 void downsampling();

 int width, height;
2.修改 rasterizer.cpp
修改函数rasterizer
rst::rasterizer::rasterizer(int w, int h) : width(w), height(h)//初始化缓冲区
{
    frame_buf.resize(w * h);
    depth_buf.resize(w * h);
    frame_buf_ssaa.resize(w * ssaa_factor * h * ssaa_factor);// 超采样颜色缓冲区
    depth_buf_ssaa.resize(w * ssaa_factor * h * ssaa_factor);// 超采样深度缓冲区
}
修改清除函数clear
void rst::rasterizer::clear(rst::Buffers buff)
{
    //清除颜色缓冲区,避免上一帧的残留颜色影响当前帧
    if ((buff & rst::Buffers::Color) == rst::Buffers::Color)
    {
        std::fill(frame_buf.begin(), frame_buf.end(), Eigen::Vector3f{0, 0, 0});//重置为黑色
        std::fill(frame_buf_ssaa.begin(), frame_buf_ssaa.end(), Eigen::Vector3f{ 0, 0, 0 });
    }
    //清除深度缓冲区,确保所有新的几何体都能正确进行深度比较
    if ((buff & rst::Buffers::Depth) == rst::Buffers::Depth)
    {
        //初始化为无穷大确保所有新的片段都会通过测试
        std::fill(depth_buf.begin(), depth_buf.end(), std::numeric_limits<float>::infinity());
        std::fill(depth_buf_ssaa.begin(), depth_buf_ssaa.end(), std::numeric_limits<float>::infinity());
    }
}
增加ssaa索引函数get_ssaa_index,将坐标(x,y)转换为线性索引
int rst::rasterizer::get_index(int x, int y)
{
    return (height-1-y)*width + x;
}

int rst::rasterizer::get_ssaa_index(int x, int y) // 增加索引函数get_ssaa_index
{
    return (height * ssaa_factor - 1 - y) * width * ssaa_factor + x;
    //height * ssaa_factor - 1 - y:计算高分辨率下的目标行
    //* width * ssaa_factor:每行的元素数(考虑超采样系数)
    //+ x:当前行内的列偏移
}
修改光栅化三角形函数rasterize_triangle
未使用SSAA时的代码,不做修改
void rst::rasterizer::rasterize_triangle(const Triangle& t)
{
    //未使用SSAA时的代码,不做修改
    auto v = t.toVector4();//v 是三角形三个顶点的齐次坐标(x,y,z,w)

		// TODO : Find out the bounding box of current triangle.

		//包围盒(计算三角形在屏幕空间中的边界值)AABB
		float min_x = width;
		float max_x = 0;
		float min_y = height;
		float max_y = 0;

		for (int i = 0; i < 3; i++)
		{
    min_x = std::min(v[i].x(), min_x);
    max_x = std::max(v[i].x(), max_x);
    min_y = std::min(v[i].y(), min_y);
    max_y = std::max(v[i].y(), max_y);
		}

// iterate through the pixel and find if the current pixel is inside the triangle
// If so, use the following code to get the interpolated z value.
//auto[alpha, beta, gamma] = computeBarycentric2D(x, y, t.v);
//float w_reciprocal = 1.0/(alpha / v[0].w() + beta / v[1].w() + gamma / v[2].w());
//float z_interpolated = alpha * v[0].z() / v[0].w() + beta * v[1].z() / v[1].w() + gamma * v[2].z() / v[2].w();
//z_interpolated *= w_reciprocal;

		for (int y = min_y; y < max_y; y++)
		{
		    for (int x = min_x; x < max_x; x++)
		    {
		        //遍历边界框内的所有像素,检查中心点是否在三角形内
		        if (insideTriangle(x + 0.5, y + 0.5, t.v))//使用 (x + 0.5, y + 0.5) 作为像素中心点
		        {
		            //透视矫正插值计算深度和颜色
		            auto [alpha, beta, gamma] = computeBarycentric2D(x + 0.5, y + 0.5, t.v);//计算该点的重心坐标
		            // 计算:1/(α + β + γ)
		            float w_reciprocal = 1.0 / (alpha / v[0].w() + beta / v[1].w() + gamma / v[2].w());
		            // 计算: = α(z₀/w₀) + β(z₁/w₁) + γ(z₂/w₂)
		            float z_interpolated = alpha * v[0].z() / v[0].w() + beta * v[1].z() / v[1].w() + gamma * v[2].z() / v[2].w();
		            // 相乘,得到最终插值结果
		            z_interpolated *= w_reciprocal;
								// TODO : set the current pixel (use the set_pixel function) to the color of the triangle (use getColor function) if it should be painted.
		            // 深度测试与像素更新
		            int index = get_index(x, y);//将坐标转化为索引
		            if (z_interpolated < depth_buf[index]) //将当前像素的深度值和缓冲区中的进行比较
		            {
		                //z 值越小越近
		                //如果当前像素更近,就更新颜色和深度缓冲区
		                Eigen::Vector3f p;
		                p << x, y, z_interpolated;
		                //更新帧缓冲区的颜色
		                set_pixel(p, t.getColor());
		                //更新深度缓冲区的值
		                depth_buf[index] = z_interpolated;
		            }
		        }
		    }
		}
增加的ssaa部分
    //将普通分辨率的边界框转换为超采样分辨率
    float ss_min_x = min_x * ssaa_factor;
    float ss_max_x = max_x * ssaa_factor;
    float ss_min_y = min_y * ssaa_factor;
    float ss_max_y = max_y * ssaa_factor;

		//计算超采样空间中的整数边界,并确保不超出缓冲区范围
    int ss_xmin = std::max(0, static_cast<int>(std::floor(ss_min_x)));
    int ss_xmax = std::min(width * ssaa_factor - 1, static_cast<int>(std::ceil(ss_max_x)));
    int ss_ymin = std::max(0, static_cast<int>(std::floor(ss_min_y)));
    int ss_ymax = std::min(height * ssaa_factor - 1, static_cast<int>(std::ceil(ss_max_y)));

    // 遍历超采样分辨率下的像素
    for (int y = ss_ymin; y <= ss_ymax; ++y)
    {
        for (int x = ss_xmin; x <= ss_xmax; ++x)
        {
            // 转换为原始坐标系的坐标 (0.5是样本点偏移量)
            float pixel_x = x / static_cast<float>(ssaa_factor) + 0.5f;
            float pixel_y = y / static_cast<float>(ssaa_factor) + 0.5f;

            // 检查当前超采样点是否在三角形内
            if (insideTriangle(pixel_x, pixel_y, t.v))
            {
                auto [alpha, beta, gamma] = computeBarycentric2D(pixel_x, pixel_y, t.v);
                float w_reciprocal = 1.0 / (alpha / v[0].w() + beta / v[1].w() + gamma / v[2].w());
                float z_interpolated = alpha * v[0].z() / v[0].w() + beta * v[1].z() / v[1].w() + gamma * v[2].z() / v[2].w();
                z_interpolated *= w_reciprocal;

                int ss_index = get_ssaa_index(x, y);

                // 深度测试
                if (z_interpolated < depth_buf_ssaa[ss_index])
                {
                    // 更新超采样缓冲区的颜色和深度
                    depth_buf_ssaa[ss_index] = z_interpolated;
                    frame_buf_ssaa[ss_index] = t.getColor();
                }
            }
        }
    }
}
增加降采样 (Downsampling):将多个子像素的颜色值平均,得到最终像素颜色
void rst::rasterizer::downsampling()
{
    if (ssaa_factor == 1) // 特殊情况:如果SSAA系数为1,直接复制缓冲区(无需降采样)
    {
        std::copy(frame_buf_ssaa.begin(), frame_buf_ssaa.end(), frame_buf.begin());
        return;
    }
    // 遍历每个原始像素
    for (int y = 0; y < height; ++y)
    {
        for (int x = 0; x < width; ++x)
        {
            Eigen::Vector3f avg_color(0, 0, 0);

            // 遍历当前像素对应的所有子像素
            for (int dy = 0; dy < ssaa_factor; ++dy)
            {
                for (int dx = 0; dx < ssaa_factor; ++dx)
                {
		                // 计算子像素在超采样缓冲区中的坐标
                    int ss_x = x * ssaa_factor + dx;
                    int ss_y = y * ssaa_factor + dy;
										// 获取子像素的颜色并累加
                    int ss_index = get_ssaa_index(ss_x, ss_y);
                    avg_color += frame_buf_ssaa[ss_index];
                }
            }

            // 计算平均值
            avg_color /= (ssaa_factor * ssaa_factor);

            // 将平均颜色写入最终帧缓冲区
            int index = get_index(x, y);
            frame_buf[index] = avg_color;
        }
    }
}
修改绘制函数draw
void rst::rasterizer::draw(pos_buf_id pos_buffer, ind_buf_id ind_buffer, col_buf_id col_buffer, Primitive type)
{
    auto& buf = pos_buf[pos_buffer.pos_id];         // 顶点位置缓冲区
    auto& ind = ind_buf[ind_buffer.ind_id];         // 索引缓冲区
    auto& col = col_buf[col_buffer.col_id];         // 颜色缓冲区

    // 计算视口变换参数
    float f1 = (50 - 0.1) / 2.0;                    // 近平面和远平面的中间值
    float f2 = (50 + 0.1) / 2.0;                    // 近平面和远平面的平均值

    Eigen::Matrix4f mvp = projection * view * model;
    for (auto& i : ind)
    {
        Triangle t;
        // 1. 应用MVP变换
        Eigen::Vector4f v[] = {
                mvp * to_vec4(buf[i[0]], 1.0f),
                mvp * to_vec4(buf[i[1]], 1.0f),
                mvp * to_vec4(buf[i[2]], 1.0f)
        };
        // 2. 齐次除法(从裁剪空间到NDC)
        for (auto& vec : v) {
            vec /= vec.w();
        }
        // 3. 视口变换(从NDC到屏幕坐标)
        for (auto & vert : v)
        {
            vert.x() = 0.5*width*(vert.x()+1.0);
            vert.y() = 0.5*height*(vert.y()+1.0);
            vert.z() = vert.z() * f1 + f2;
        }
        // 4. 设置三角形顶点
        for (int i = 0; i < 3; ++i)
        {
            t.setVertex(i, v[i].head<3>());
            t.setVertex(i, v[i].head<3>());
            t.setVertex(i, v[i].head<3>());
        }
        // 5. 设置三角形颜色
        auto col_x = col[i[0]];
        auto col_y = col[i[1]];
        auto col_z = col[i[2]];

        t.setColor(0, col_x[0], col_x[1], col_x[2]);
        t.setColor(1, col_y[0], col_y[1], col_y[2]);
        t.setColor(2, col_z[0], col_z[1], col_z[2]);
        // 6. 光栅化三角形
        rasterize_triangle(t);
    }
    //7. 执行降采样
    downsampling();
}
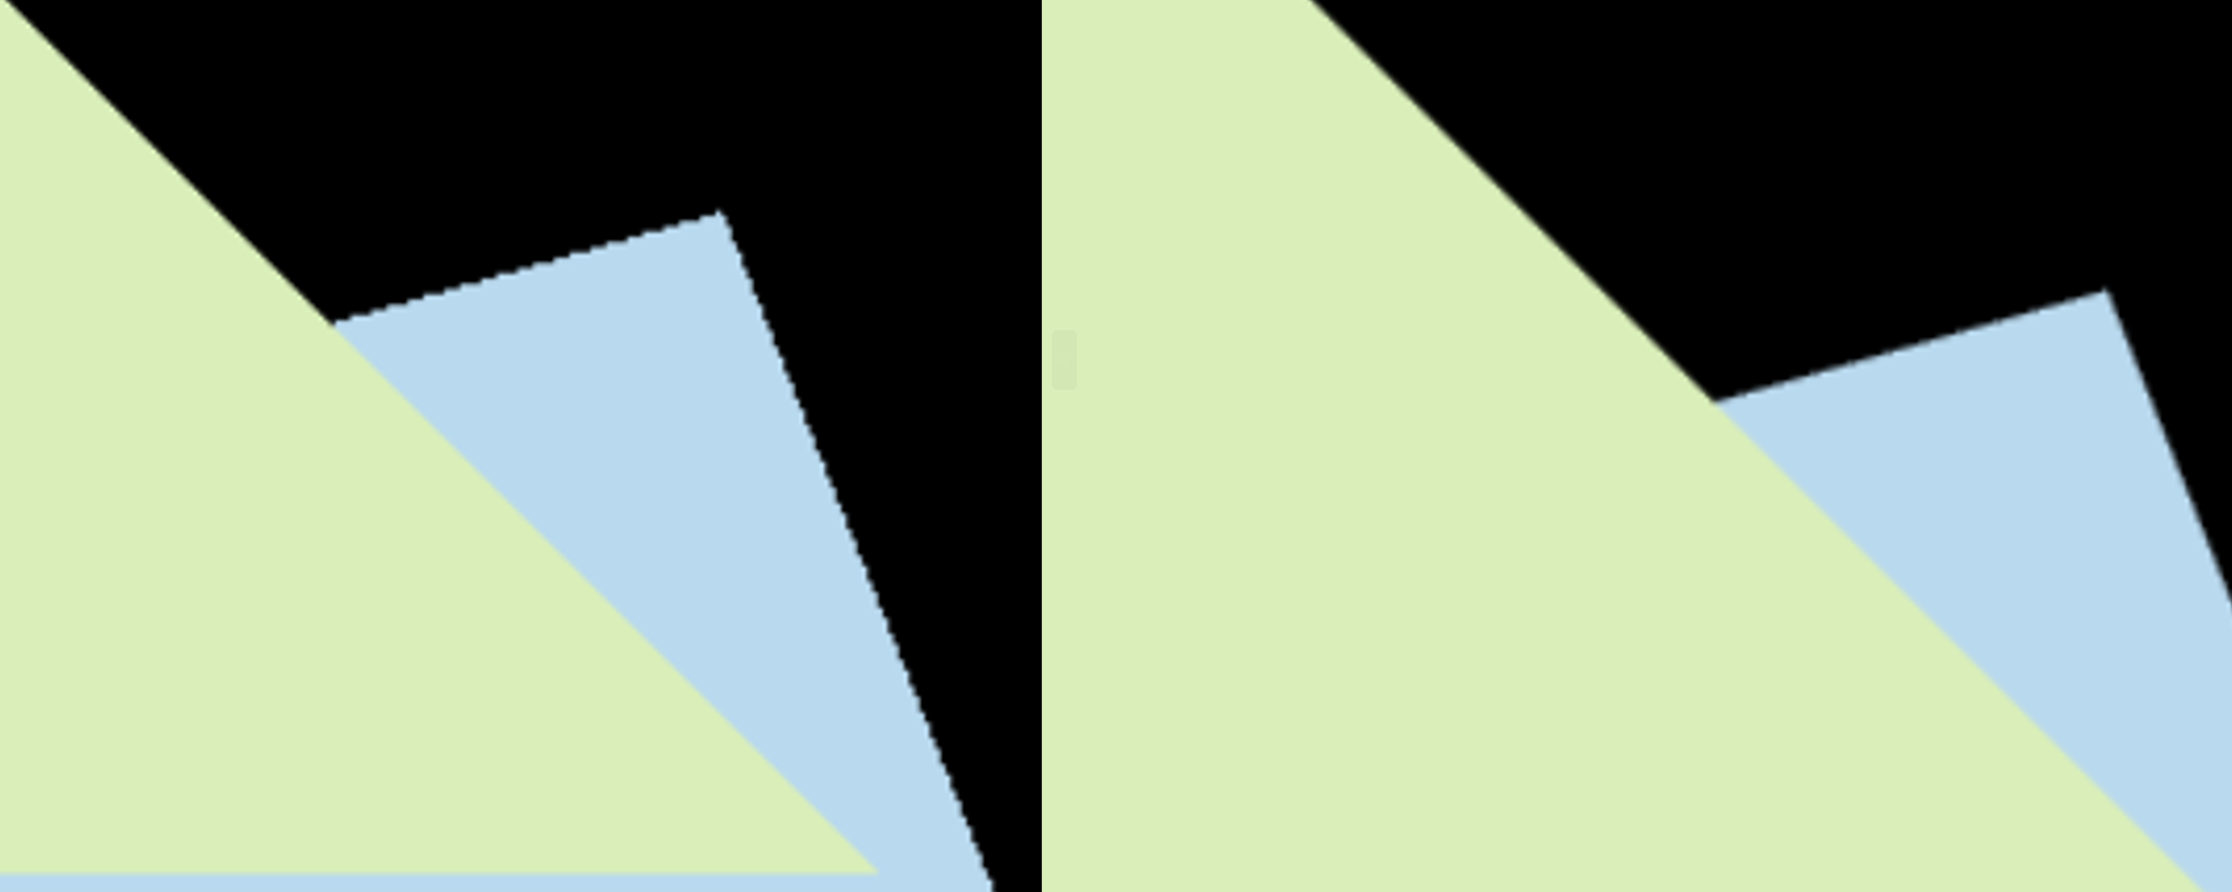
左图是未使用ssaa,右图是使用了ssaa,还是比较明显的

 浙公网安备 33010602011771号