
无影云电脑 Docker 容器运行 Oracle 19C
原先尝试在无影云电脑上安装 Oracle 19C,链接过程报错,没能力细看。转而安装 Docker,用官方的镜像运行 19C,作为手头的实验环境。
下面记录安装和运行过程:
安装 Docker Engine
Docker Engine 的安装过程参照 Docker 官方文档 (https://docs.docker.com/engine/install/),保持网络通畅,整个安装过程挺顺利的。
1. 删除可能存在的老版本软件
for pkg in docker.io docker-doc docker-compose docker-compose-v2 podman-docker containerd runc; do sudo apt-get remove $pkg; done
2. 配置 Docker 软件源
# Add Docker's official GPG key:
sudo apt-get update
sudo apt-get install ca-certificates curl
sudo install -m 0755 -d /etc/apt/keyrings
sudo curl -fsSL https://download.docker.com/linux/ubuntu/gpg -o /etc/apt/keyrings/docker.asc
sudo chmod a+r /etc/apt/keyrings/docker.asc

# Add the repository to Apt sources:
echo \
  "deb [arch=$(dpkg --print-architecture) signed-by=/etc/apt/keyrings/docker.asc] https://download.docker.com/linux/ubuntu \
  $(. /etc/os-release && echo "${UBUNTU_CODENAME:-$VERSION_CODENAME}") stable" | \
  sudo tee /etc/apt/sources.list.d/docker.list > /dev/null
sudo apt-get update
3. 安装软件包
sudo apt-get install docker-ce docker-ce-cli containerd.io docker-buildx-plugin docker-compose-plugin
4. 验证
admin@yrw2vjlhs6h8ulh:~$ sudo docker run hello-world

Hello from Docker!
This message shows that your installation appears to be working correctly.

To generate this message, Docker took the following steps:
 1. The Docker client contacted the Docker daemon.
 2. The Docker daemon pulled the "hello-world" image from the Docker Hub.
    (amd64)
 3. The Docker daemon created a new container from that image which runs the
    executable that produces the output you are currently reading.
 4. The Docker daemon streamed that output to the Docker client, which sent it
    to your terminal.

To try something more ambitious, you can run an Ubuntu container with:
 $ docker run -it ubuntu bash

Share images, automate workflows, and more with a free Docker ID:
 https://hub.docker.com/

For more examples and ideas, visit:
 https://docs.docker.com/get-started/

admin@yrw2vjlhs6h8ulh:~$
输出显示 Docker 安装成功。
5. 将 admin 用户增加到 docker 组,便于 admin 用户运行 docker 命令。
该项内容来自官方安装后操作说明(https://docs.docker.com/engine/install/linux-postinstall/),使普通用户可以调用 docker 命令,管理 Docker 中的镜像、容器、卷等。但是在无影云主机中使用命令增加用户所属组时提示 /etc/passwd 文件不能打开,之后手动修改 /etc/group 文件在 docker 组后追加 admin 用户,重启主机即可生效。
admin@yrw2vjlhs6h8ulh:~$ tail -1 /etc/group
docker:x:998:
admin@yrw2vjlhs6h8ulh:~$ sudo usermod -aG docker admin
usermod: cannot open /etc/passwd
admin@yrw2vjlhs6h8ulh:~$ vi /etc/group
admin@yrw2vjlhs6h8ulh:~$ tail -1 /etc/group
docker:x:998:admin
admin@yrw2vjlhs6h8ulh:~$
重启主机之后,检查用户组设置如下:
admin@yrw2vjlhs6h8ulh:~$ id
uid=1000(admin) gid=1000(admin) groups=1000(admin),27(sudo),44(video),998(docker)
这时 admin 用户可以不加 sudo,直接调用 docker 命令。
admin@yrw2vjlhs6h8ulh:~$ docker ps -a
CONTAINER ID   IMAGE                                                        COMMAND                  CREATED          STATUS                      PORTS     NAMES
5fd934f2c157   hello-world                                                  "/hello"                 13 minutes ago   Exited (0) 13 minutes ago             hardcore_elbakyan
admin@yrw2vjlhs6h8ulh:~$ docker start -a 5fd9

Hello from Docker!
This message shows that your installation appears to be working correctly.

To generate this message, Docker took the following steps:
 1. The Docker client contacted the Docker daemon.
 2. The Docker daemon pulled the "hello-world" image from the Docker Hub.
    (amd64)
 3. The Docker daemon created a new container from that image which runs the
    executable that produces the output you are currently reading.
 4. The Docker daemon streamed that output to the Docker client, which sent it
    to your terminal.

To try something more ambitious, you can run an Ubuntu container with:
 $ docker run -it ubuntu bash

Share images, automate workflows, and more with a free Docker ID:
 https://hub.docker.com/

For more examples and ideas, visit:
 https://docs.docker.com/get-started/

admin@yrw2vjlhs6h8ulh:~$ docker ps -a
CONTAINER ID   IMAGE                                                        COMMAND                  CREATED          STATUS                      PORTS     NAMES
5fd934f2c157   hello-world                                                  "/hello"                 13 minutes ago   Exited (0) 2 seconds ago              hardcore_elbakyan
admin@yrw2vjlhs6h8ulh:~$
拉取 Oracle 19C 镜像
-
在 https://signon.oracle.com/signin 注册 Oracle 账号;
-
打开 Oracle 镜像站点 Oracle Container Registry (OCR): https://container-registry.oracle.com/;
-
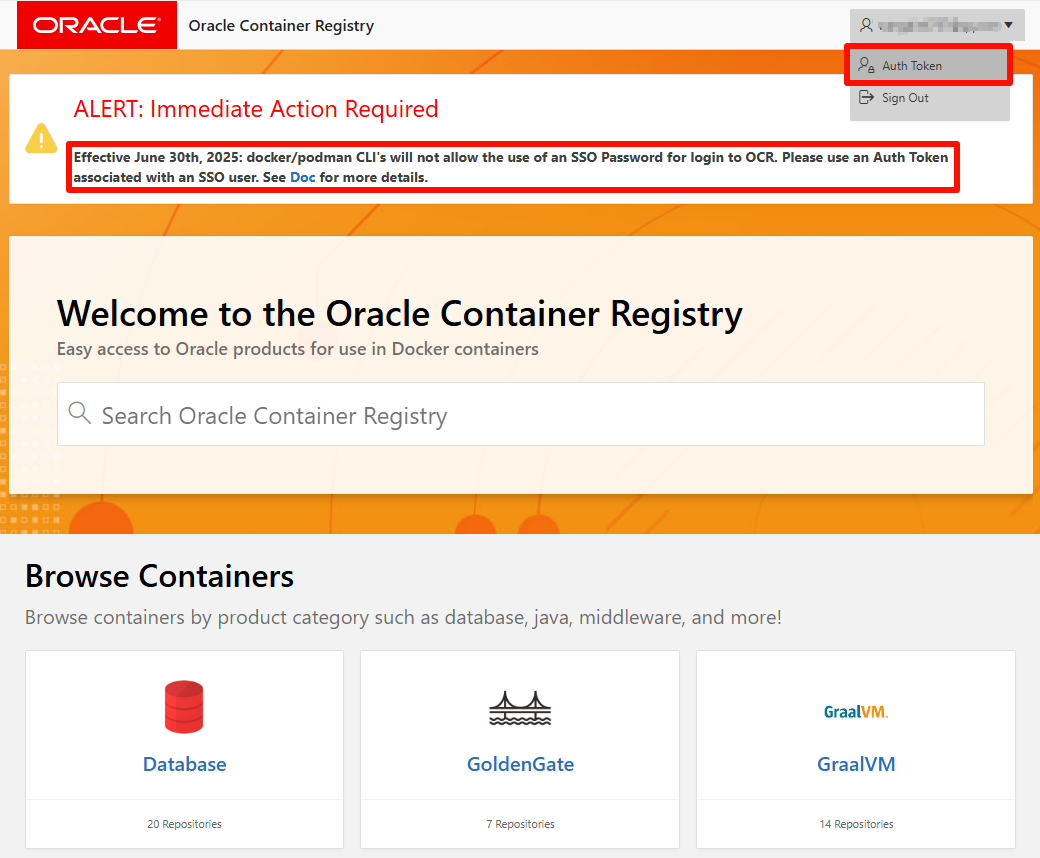
使用 Oracle 账号登录,并在右上角菜单中,选择并生成 Auth Token,在之后登录时作为密码使用;
![]()
-
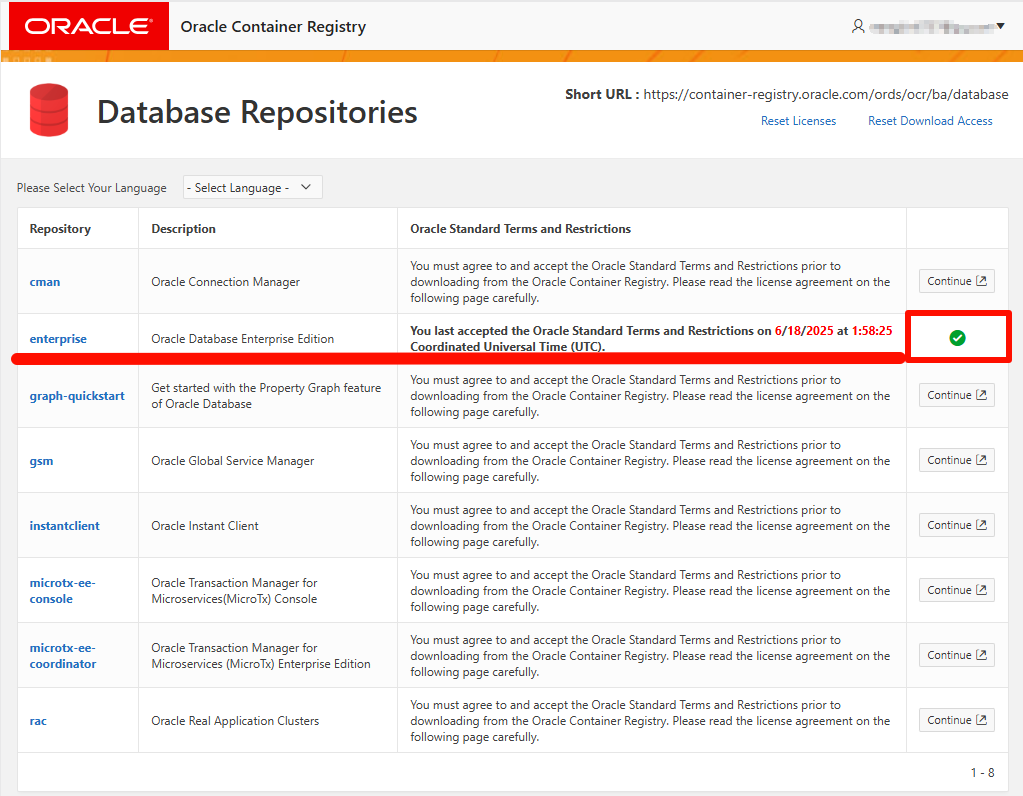
点击进入【Database】分类界面,同意 enterprise 镜像的用户协议(enterprise 指 Oracle 19C enterprise 版本);
![]()
-
使用 docker login 命令登录 OCR;
admin@yrw2vjlhs6h8ulh:~$ docker login container-registry.oracle.com
Username: # 输入用户名
Password: # 输入或粘贴 Auth Token

WARNING! Your credentials are stored unencrypted in '/home/admin/.docker/config.json'.
Configure a credential helper to remove this warning. See
https://docs.docker.com/go/credential-store/

Login Succeeded
- 拉取镜像。由于无影云电脑带宽只有 10M ,整个拉取过程耗时挺长。如果需要设置代理加速,可以参考我的这篇文章:Docker 配置代理服务。
docker pull container-registry.oracle.com/database/enterprise:19.3.0.0
- 拉取完成。
admin@yrw2vjlhs6h8ulh:~$ docker images
REPOSITORY                                          TAG        IMAGE ID       CREATED         SIZE
hello-world                                         latest     74cc54e27dc4   4 months ago    10.1kB
container-registry.oracle.com/database/enterprise   19.3.0.0   291fd8c7958b   22 months ago   8.32GB
配置和启动容器
参考 Oracle 官方文档(https://container-registry.oracle.com/ords/ocr/ba/database/enterprise)使用以下命令启动容器,验证数据库访问正常。
创建卷
admin@yrw2vjlhs6h8ulh:~$ docker volume list
DRIVER    VOLUME NAME
local     oradb19c
启动容器
admin@yrw2vjlhs6h8ulh:~$ docker run -d --name oradb19c -p 1521:1521 -p 5500:5500 -e ORACLE_PWD=<替换密码> -v oradb19c:/opt/oracle/oradata container-registry.oracle.com/database/enterprise:19.3.0.0
# 此处省略
admin@yrw2vjlhs6h8ulh:~$ docker ps
CONTAINER ID   IMAGE                                                        COMMAND                  CREATED        STATUS                   PORTS                                                                                      NAMES
4fa36ed36753   container-registry.oracle.com/database/enterprise:19.3.0.0   "/bin/bash -c 'exec …"   23 hours ago   Up 3 minutes (healthy)   0.0.0.0:1521->1521/tcp, [::]:1521->1521/tcp, 0.0.0.0:5500->5500/tcp, [::]:5500->5500/tcp   oradb19c
admin@yrw2vjlhs6h8ulh:~$ docker exec -it oradb19c sqlplus system@ORCLCDB

SQL*Plus: Release 19.0.0.0.0 - Production on Thu Jun 19 06:38:15 2025
Version 19.3.0.0.0

Copyright (c) 1982, 2019, Oracle.  All rights reserved.

Enter password:
Last Successful login time: Thu Jun 19 2025 06:36:55 +00:00

Connected to:
Oracle Database 19c Enterprise Edition Release 19.0.0.0.0 - Production
Version 19.3.0.0.0

SQL> select sysdate from dual;

SYSDATE
---------
19-JUN-25

SQL>
附:镜像配置参数说明:
docker run -d --name <container_name> \
 -p <host_port>:1521 -p <host_port>:5500 \
 -e ORACLE_SID=<your_SID> \
 -e ORACLE_PDB=<your_PDBname> \
 -e ORACLE_PWD=<your_database_password> \
 -e INIT_SGA_SIZE=<your_database_SGA_memory_MB> \
 -e INIT_PGA_SIZE=<your_database_PGA_memory_MB> \
 -e ORACLE_EDITION=<your_database_edition> \
 -e ORACLE_CHARACTERSET=<your_character_set> \
 -e ENABLE_ARCHIVELOG=true \
 -v [<host_mount_point>:]/opt/oracle/oradata \
container-registry.oracle.com/database/enterprise:19.3.0.0

Parameters:
 --name:                 The name of the container (default: auto generated
 -p:                     The port mapping of the host port to the container port.
                         Two ports are exposed: 1521 (Oracle Listener), 5500 (OEM Express)
 -e ORACLE_SID:          The Oracle Database SID that should be used (default:ORCLCDB)
 -e ORACLE_PDB:          The Oracle Database PDB name that should be used (default: ORCLPDB1)
 -e ORACLE_PWD:          The Oracle Database SYS, SYSTEM and PDBADMIN password (default: auto generated)
 -e INIT_SGA_SIZE:       The total memory in MB that should be used for all SGA components (optional)
 -e INIT_PGA_SIZE:       The target aggregate PGA memory in MB that should be used for all server processes attached to the instance (optional)
 -e ORACLE_EDITION:      The Oracle Database Edition (enterprise/standard, default: enterprise)
 -e ORACLE_CHARACTERSET: The character set to use when creating the database (default: AL32UTF8)
 -e ENABLE_ARCHIVELOG:   To enable archive log mode when creating the database (default: false). Supported 19.3 onwards.
 -v /opt/oracle/oradata
                         The data volume to use for the database. Has to be writable by the Unix "oracle" (uid: 54321) user inside the container
                         If omitted the database will not be persisted over container recreation.
 -v /opt/oracle/scripts/startup | /docker-entrypoint-initdb.d/startup
                         Optional: A volume with custom scripts to be run after database startup.
                         For further details see the "Running scripts after setup and on
                         startup" section below.
 -v /opt/oracle/scripts/setup | /docker-entrypoint-initdb.d/setup
                         Optional: A volume with custom scripts to be run after database setup.
                         For further details see the "Running scripts after setup and on startup" section below.
本文至此完结。

 浙公网安备 33010602011771号