

PCI Drivers [LDD3 12]
因为很多device都是PCI device,所以本章重点看一下PCI(Peripheral Component Interconnect),首先明确一点,PCI是总线类型,总线有两种接口类型组成,electrical interface和programming interface,软件层面都属于programming interface。
12.1. The PCI Interface
PCI由一系列的spec组成,我们只关注kernel里面,PCI device driver如何找到PCI device并且访问它。
PCI总线是为了替代ISA总线,主要为了实现三个目标:
1,提高计算机和外设之间数据传输的速率
2, 让外设与平台无关
3, 方便的添加和移除PCI设备
第一个目标,PCI总线提供了更好的频率,比如25MHz或者33MHz,66Mhz,甚至133MHz。PCI可以可以实现32bit或者64bit总线位宽,并且同时设计为与平台无关,比如IA-32,Alpha,PowerPC,SPARC64,以及IA-64系统。对于developer而言,PCI支持动态检测PCI设备,PCI设备在系统bootup阶段就会被配置,driver后续能直接访问device的配置信息,从而方便的完成设备初始化。
12.1.1. PCI Addressing
PC上存在很多的PCI设备,如何快速的找到某一个特定的PCI device?这就涉及到PCI设备的寻址。
每一个PCI device在系统中都有一个唯一的ID,这个ID由bus number,device number,function number组成,这三个值的组合在系统中是唯一的,所以说只要知道了BDF(Bus,Device,Function)值,就能找到对应的PCI device。
PC的标准,最开始只支持256个bus number,但是对于大型系统而言,256个bus显然太少了。所以Linux增加了一个domain的概念,一个domain最多包含256个bus,一个bus最多包含32个device,一个device最多包含8个function,BDF加起来就是16bit,所以一个16bit的地址就能标记一个function。不过device driver不需要直接使用BDF,而应该通过pci_dev来访问PCI device。
如果一个系统中有不止一个bus,就需要通过bus bridge把这些bus聚合到一起。而绝大部分的PCI都有不止一个PCI bus,所以一般都有PCI bus bridge,由PCI bridge把这些PCI bus链接到系统总线。PCI的整个系统按照树形结构来管理,每一个bus链接到上层的bus,直到bus 0,也就是root bus为止:

通常情况下,不需要使用BDF来访问PCI 设备,因为都被隐藏在了struct pci_dev这个结构体里面,但是有些情况下,需要直接使用BDF,比如在用户态,通过lspci查看pci device的id等情况,这个时候就需要打印所有PCI设备的BDF。比如某个PCI device的BDF是0000:00:00.1,其中前面的0000是domain,后面的00是8bit bus number,最大为255,再后面的00是5bit device number,最大为31,最后的1是3bit的function,最大为7.
$ lspci | cut -d: -f1-3
0000:00:00.0 Host bridge
0000:00:00.1 RAM memory
0000:00:00.2 RAM memory
0000:00:02.0 USB Controller
0000:00:04.0 Multimedia audio controller
0000:00:06.0 Bridge
0000:00:07.0 ISA bridge
0000:00:09.0 USB Controller
0000:00:09.1 USB Controller
0000:00:09.2 USB Controller
0000:00:0c.0 CardBus bridge
0000:00:0f.0 IDE interface
0000:00:10.0 Ethernet controller
0000:00:12.0 Network controller
0000:00:13.0 FireWire (IEEE 1394)
0000:00:14.0 VGA compatible controller
$ cat /proc/bus/pci/devices | cut -f1
0000
0001
0002
0010
0020
0030
0038
0048
0049
004a
0060
0078
0080
0090
0098
00a0
$ tree /sys/bus/pci/devices/
/sys/bus/pci/devices/
|-- 0000:00:00.0 -> ../../../devices/pci0000:00/0000:00:00.0
|-- 0000:00:00.1 -> ../../../devices/pci0000:00/0000:00:00.1
|-- 0000:00:00.2 -> ../../../devices/pci0000:00/0000:00:00.2
|-- 0000:00:02.0 -> ../../../devices/pci0000:00/0000:00:02.0
|-- 0000:00:04.0 -> ../../../devices/pci0000:00/0000:00:04.0
|-- 0000:00:06.0 -> ../../../devices/pci0000:00/0000:00:06.0
|-- 0000:00:07.0 -> ../../../devices/pci0000:00/0000:00:07.0
|-- 0000:00:09.0 -> ../../../devices/pci0000:00/0000:00:09.0
|-- 0000:00:09.1 -> ../../../devices/pci0000:00/0000:00:09.1
|-- 0000:00:09.2 -> ../../../devices/pci0000:00/0000:00:09.2
|-- 0000:00:0c.0 -> ../../../devices/pci0000:00/0000:00:0c.0
|-- 0000:00:0f.0 -> ../../../devices/pci0000:00/0000:00:0f.0
|-- 0000:00:10.0 -> ../../../devices/pci0000:00/0000:00:10.0
|-- 0000:00:12.0 -> ../../../devices/pci0000:00/0000:00:12.0
|-- 0000:00:13.0 -> ../../../devices/pci0000:00/0000:00:13.0
`-- 0000:00:14.0 -> ../../../devices/pci0000:00/0000:00:14.0
PCI hardware会提供三种地址空间的查询:memory locations, I/O ports, and configuration registers. 其中,前两个地址空间是per-bus的,也就是说,bus上所有的pci device共享这两个地址空间,比如说你访问了某个memory location,那么同一个bus上的所有devcie都会看到这个bus cycle。configuration的地址空间每个pci device都是唯一的,使用位寻址法(geographical addressing),并且在被kernel query的时候,是一个slot一个slot来,不会发生冲突。
从driver的使用角度看,memory和I/O region仍然通过inb,readb来访问;对于device 的configuraton space,需要通过kernel的接口才能访问。这里有提高PCI的中断pin脚,每个PCI slot有四个中断pin脚,每个device function可以使用其中任一个,并且不需要关系发出的中断如何到达CPU,因为这个是计算机平台自己实现的,并且对PCI bus透明。因为PCI 标准规定shareable的使用中断,所以即便在有很少IRQ line的PC上,也可以支持非常多的PCI设备。
PCI外设的I/O address使用32bit地址总线,因此可以访问4G的IO region;memory space的访问可以使用32bit或者64bit寻址,取决于PCI外设的实现,新的PCI设备越来越多的支持64bit memory寻址。而这些地址,如果由软件来配置,极容易出现问题,因为有可能多个device的地址是同一个,相互冲突,最后大家都不用了。幸运的是,这个地址不需要device driver来配置,而是由BIOS在系统启动的时候对PCI硬件进行初始化,并且把他们每个人的region都map到不同的地址上去,从而避免冲突。而这些map的地址已经被记录在PCI设备的configuration space里面,device driver可以直接读取configuration space,从而获取map后的地址,通过这个地址就能访问hardware的register,以及device memory。
这里其实说法并不严谨,并不是所有的PCI device都通过BIOS来处理region,考虑一下hotplug device。
在PCI设备中,每一个function都有一个configuration space(不是一个PCI device一个,而是每个function都有一个),这个configuration space大小一般是256Byte(PCIE则有4K byte),里面存放的内容都是PCI标准定义好的。比如一定有一个4byte的space存放着device function的id,driver通过id找到自己的device。总而言之,最开始的时候通过位寻址法找到device,之后就可以通过读取configuration space,直接访问device并做IO。
从上面的描述能看出,PCI和ISA的最大区别在于这个configuration space,这个space极大方便了PCI device driver控制device,并且省去了probe device的麻烦事。
12.1.2. Boot Time
PCI很多东西是在sysmte boot的时候初始化好的,所以有必要看一下这个过程。
当PCI device上电的时候,device本身还没有active,只能支持configuration space的读写,此时PCI device没有memory location,没有I/O region,也没有中断。
但是主板上存在一些PCI-aware firmware,比如BIOS,NVRAM,或者PROM,具体是哪种取决于平台,在x86上,就是BIOS。这个BIOS厉害了,可以在系统还没起来的时候,通过PCI controller读写所有PCI设备的configuration space,在读取了这些configuration space之后,就会为他们分配相互独立的IO region地址空间,以及device memory地址空间,并且把这些分配的地址又写会到PCI设备的configuration space之中,这样当kernel起来以后,就可以通过PCI configuration space读取每个PCI设备的IO、device memory地址,device driver也就能直接访问了。
user可以通过读取/proc/bus/pci/devices和/proc/bus/pci/*/*来获取PCI device的devcie funcition list,以及register。这里有个例子:
$ tree /sys/bus/pci/devices/0000:00:10.0
/sys/bus/pci/devices/0000:00:10.0
|-- class
|-- config
|-- detach_state
|-- device
|-- irq
|-- power
|   `-- state
|-- resource
|-- subsystem_device
|-- subsystem_vendor
`-- vendor
上面列出来的文件里面,有一个config,这个就是raw configuration space内容。文件irq表明当前PCI device使用的IRQ line。resource里是给当前的PCI device分配的memory resource。
12.1.3. Configuration Registers and Initialization
PCI的config space非常重要,BIOS等需要依靠config space才能正常probe PCI device,下面就讲一下这个config space。
PCI spec规定每个config space至少有256 byte那么大,PCIE有4K。256byte的话,结构如下:
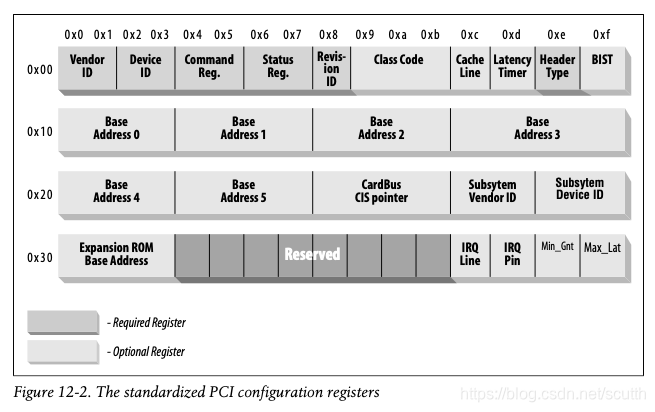
其中,最前面的64byte是标准固定死的,如上图所示,剩下的byte都是跟设备相关的了。
这个64Byte的space里,有的是必须的,有的是可选的。需要注意的是,PCI config space里,都是按照小尾端字节序存储的。关于PCI configuration space里的各个值,在这里不会详细讨论,细节可以参考PCI 的spec。我们这里只关心device driver如何找到device,并且如何访问configuration space。
这些寄存器里,Vendor ID,Device ID和class是都会被用到的,应当由设备写入,并且设置为只读的,driver也可以根据这几个寄存器找到device。subsystem vendorID and subsystem deviceID有时候也会用到的,用来标志device的不同型号等。下面是这几个寄存器的详细介绍:
vendorID
16bit,用来表示唯一的device厂商,由PCI Group负责维护。PCI厂商则需要向PCI 标准组织申请。
deviceID
16bit,由设备厂商自己指定,和vendor ID一起,组成device的signature,kernel或者driver通过这个signalture就可以唯一确定一个PCI device。
class
16bit,每个PCI device都属于某一个class,有些device功能类似,可以通过同一个class driver来驱动。
subsystem vendorID
subsystem deviceID
用于区分具体的device,有些chip是interface chip,这个chip可能支持很多的sub device,也许功能也并不一样,就需要区分这些具体的sub device。
正是因为有这么多的标记,driver才能告诉kernel,自己支持的是具体的哪个PCI device,做到driver和device完全匹配。一个driver也许可以支持很多的device,那就需要告诉kernel一个device list,这个结构就是struct pci_device_id,结构包含:
//用于表明driver支持的vendor和device,如果driver支持任何的vendor或者device,就设置为PCI_ANY_ID
__u32 vendor;
__u32 device;

//用于表明driver支持的sub vendor和sub device,如果driver支持任何的sub vendor或者sub device,就设置为PCI_ANY_ID
__u32 subvendor;
__u32 subdevice;

//用于表明driver支持的是哪一个class的device,比如VGA等。如果支持任何class,就设置PCI_ANY_ID。
__u32 class;
__u32 class_mask;

//不用于匹配device,但是driver可以用来存储自己的私有数据,比如用来区分具体device的数据结构。
kernel_ulong_t driver_data;
kernel提供了宏来方便的初始化struct pci_device_id:
//初始化一个struct pci_device_id,使用指定的vendor和device ID,同时把sub vendor和sub device的ID都设为PCI_ANY_ID
PCI_DEVICE(vendor, device)

//使用指定的class来初始化一个struct pci_device_id。
PCI_DEVICE_CLASS(device_class, device_class_mask)
这里有一个例子,
drivers/usb/host/ehci-hcd.c:

static const struct pci_device_id pci_ids[  ] = { {
        /* handle any USB 2.0 EHCI controller */
        PCI_DEVICE_CLASS(((PCI_CLASS_SERIAL_USB << 8) | 0x20), ~0),
        .driver_data =  (unsigned long) &ehci_driver,
        },
        { /* end: all zeroes */ }
};

drivers/i2c/busses/i2c-i810.c:

//设置一个pci_device_id array,并且以一个全0的pci_device_id结尾。
static struct pci_device_id i810_ids[] = {
    { PCI_DEVICE(PCI_VENDOR_ID_INTEL, PCI_DEVICE_ID_INTEL_82810_IG1) },
    { PCI_DEVICE(PCI_VENDOR_ID_INTEL, PCI_DEVICE_ID_INTEL_82810_IG3) },
    { PCI_DEVICE(PCI_VENDOR_ID_INTEL, PCI_DEVICE_ID_INTEL_82810E_IG) },
    { PCI_DEVICE(PCI_VENDOR_ID_INTEL, PCI_DEVICE_ID_INTEL_82815_CGC) },
    { PCI_DEVICE(PCI_VENDOR_ID_INTEL, PCI_DEVICE_ID_INTEL_82845G_IG) },
    { 0, },
};
这样的结构体会被后面的struct pci_driver用到,以及用来告诉user mode这个driver都支持哪些device。
12.1.4. MODULE_DEVICE_TABLE
module drive如何hardware之间的对应关系(pci_device_id)怎么传递给user mode?因为有些device支持hotplug,user mode需要根据device去load对应的driver,这就需要知道他们的对应关系。kernel提供了一个宏帮助做这个事情:
MODULE_DEVICE_TABLE(pci, i810_ids);加上这个宏,kernel就会自动创建一个局部变量__mod_pci_device_table,这个变量指向pci_id array,在kernel build的过程中,depmod这个用户态程序会loop查找所有的module,如果找到了这个变量,就把它的内容放到/lib/modules/KERNEL_VERSION/modules.pcimap里面去。当depmod执行完以后,系统中所有有driver的PCI设备,以及对应的module driver name就被保存在pcimap文件里面。有hotplug发生时,kernel就会告诉hotplug system,有一个新的PCI设备可用,hotplug system就查找modules.pcimap这个文件,然后找到对应的module driver,并加载。
12.1.5. Registering a PCI Driver
所有的PCI driver都需要创建一个结构体:struct pci_driver,通过这个结构体才能把driver注册到kernel里面去。这个结构体包含很多的callback,以及重要的变量,这些都是用来描述kernel的PCI core的。结构体中包含:
//这个名字必须在所有的PCI driver中名字唯一,一般设置为module的name,并且会显示在 /sys/bus/pci/drivers/下。
const char *name;

//指向struct pci_device_id结构体,包含了driver支持的所有device。
const struct pci_device_id *id_table;

//指向driver的probe函数,当找到匹配的device时,由kernel的PCI core调用。driver需要在probe中完成对device的初始化等工作,成功返回0,失败返回负值。
int (*probe) (struct pci_dev *dev, const struct pci_device_id *id);

//如果dev指向的device被移除,或者driver被unload,PCI core会调用这个remove。
void (*remove) (struct pci_dev *dev);

//当dev要suspend的时候,由PCI core调用,状态通过state传递给driver,driver可以不实现这个callback。
int (*suspend) (struct pci_dev *dev, u32 state);

//在resume的时候调用,可以不实现。
int (*resume) (struct pci_dev *dev);
下面也有一个例子,一个struct pci_driver怎么初始化:
static struct pci_driver pci_driver = {
    .name = "pci_skel",
    .id_table = ids,
    .probe = probe,
    .remove = remove,
};

static int __init pci_skel_init(void) {
    return pci_register_driver(&pci_driver);
}

static void __exit pci_skel_exit(void) {
    pci_unregister_driver(&pci_driver);
}
在pci_driver结构体有了之后,就调用kernel的pci_register_driver,将driver注册给kernel,一般在module init的时候做这个事情。在module_exit的时候,需要unregister自己 的driver。
pci_register_driver如果成功,就返回0;如果失败,返回负值。它不会返回被绑定的device 个数,也不会在没找到device的情况下报错,这个和kernel 2.6以前的版本是不一样,原因如下:
1, 很多device支持hotplug,也就说driver被load的时候device可以不存在,当device有了之后driver可以立即执行,省时间。
2, kernel允许在driver已经被load的情况下,赋予这个driver一个新的PCI ID,这通过所有PCI driver里都有的一个new_id的机制来实现的。当kernel对某一个正在被使用的device不了解时,这个方法非常有用,这样可以在以后才绑定driver。这个机制在虚拟化中使用的比较普遍,比如host机器上有一个device,正在被使用,如果要pass through给guest,就需要先从host把driver unbind掉,然后通过new id的方式,把这个device和VFIO driver绑定到一起,这样虚拟机启动时,就能通过VFIO driver访问device了。
12.1.6. Old-Style PCI Probing
在老的kernel中,driver并不总是使用pci_register_driver来注册driver,而是通过遍历PCI device list的方式来查找匹配的PCI device。kernel提供了接口来实现:
struct pci_dev *pci_get_device(unsigned int vendor, unsigned int device, struct pci_dev *from); 这个函数根据driver提供的vendor,device,去遍历kernel里的PCI device list,如果找到了匹配的device,就把对应的struct pci_dev的refcount加1,这样可以防止这个device被别人引用时被destroy导致的crash,然后返回pci_dev的指针。如果不在使用这个pci_dev,需要调用pci_dev_put来把pci_dev的refcount减1。from参数用于可能存在多个匹配的pci_dev的情况,用来存储最后一个匹配的pci_dev,这样当kernel再次遍历时,不需要从头开始,只需要从from开始就好了,如果需要从头开始,from设置为NULL。
示例如下:
struct pci_dev *dev;
dev = pci_get_device(PCI_VENDOR_FOO, PCI_DEVICE_FOO, NULL);
if (dev) {
    /* Use the PCI device */
    ...
    pci_dev_put(dev);
}
要注意的是,这个函数不能在interrupt context里使用,否则kernel会打印warning。 另一个接口:
struct pci_dev *pci_get_subsys(unsigned int vendor, unsigned int device,
                               unsigned int ss_vendor, unsigned int ss_device, struct pci_dev *from);
这个函数和pci_get_device功能类似,区别在于可以指定sub vendor 和sub device。同样的,这个函数也不能在interrupt context里使用。还有一个接口:
struct pci_dev *pci_get_slot(struct pci_bus *bus, unsigned int devfn); 这个函数可以指定从哪个PCI bus上搜索device。找到以后,pci_dev的refcount加1,并返回它的指针。使用完以后必须调用pci_dev_put。这个函数也不能用在interrupt context里。
12.1.7. Enabling the PCI Device
在driver的probe里,在driver想要访问device之前,必须enable device:
int pci_enable_device(struct pci_dev *dev);这个函数会enable pci device,wake up它,有时候需要assign interrupt或者I/O region等。
12.1.8. Accessing the Configuration Space
当driver找到了device以后,通常需要读写三种地址空间:memory location,IO region,和configuration。访问configuration space是必不可少的,因为只有通过config space,driver才知道device memory被map到了哪里,以及对应的I/O空间等。
至于怎么通过CPU访问configuration space,这个要computer vendor来实现,比如需要CPU读写PCI controller,但是andway,driver不需要关系底层的细节,只需要使用kernel提供的接口:
#include <linux/pci.h>
//dev就是对应的PCI 的device,where是从config space开始的offset,读出的值放在val里,返回值是error code。
int pci_read_config_byte(struct pci_dev *dev, int where, u8 *val);
int pci_read_config_word(struct pci_dev *dev, int where, u16 *val);
int pci_read_config_dword(struct pci_dev *dev, int where, u32 *val);
int pci_write_config_byte(struct pci_dev *dev, int where, u8 val);
int pci_write_config_word(struct pci_dev *dev, int where, u16 val);
int pci_write_config_dword(struct pci_dev *dev, int where, u32 val);

//上面的函数其实都会调用下面的,如果driver拿不到pci_dev,用下面的也是一样
int pci_bus_read_config_byte (struct pci_bus *bus, unsigned int devfn, int where, u8 *val);
int pci_bus_read_config_word (struct pci_bus *bus, unsigned int devfn, int where, u16 *val);
int pci_bus_read_config_dword (struct pci_bus *bus, unsigned int devfn, int where, u32 *val);
int pci_bus_write_config_byte (struct pci_bus *bus, unsigned int devfn, int where, u8 val);
int pci_bus_write_config_word (struct pci_bus *bus, unsigned int devfn, int where, u16 val);
int pci_bus_write_config_dword (struct pci_bus *bus, unsigned int devfn, int where, u32 val);

//通常读取会通过定义好的offset来读,比如:
pci_read_config_byte(dev, PCI_REVISION_ID, &revision);
12.1.9. Accessing the I/O and Memory Spaces
一个PCI device,最多支持6个I/O region(因为有六个BAR)。现代的设备,大多数通过memory的方式实现I/O region,所以IO register的操作和对device memory的操作非常相似,不过也有不同点。一般的memory访问都会有cache,但是对于register来说,就必须马上写进去,否则device读到的寄存器就是错误的。因此如果某个region是做I/O register用,那就要设置non-prefetchable,这样对它的访问就不会做cache。像device memory就无关紧要,比如显卡的video memory,设置prefetchable是可以的。
configuration space里这六个寄存器,存储的就是这个六个region的起始地址,以及size。这六个region,名字分别是PCI_BASE_ADDRESS_0到PCI_BASE_ADDRESS_5. 因为都是32bit寄存器,所以IO和memory都是32bit寻址,也就是不超过4G的地址空间之内。如果device想支持64bit,可以把两个32bit寄存器合并到一起使用。
在kernel中,IO region已经被整合进PCI resource里面,所以通过resource相关的接口就能访问这些信息,不是直接访问device的configuration space。这些接口有:
//返回对应bar的首地址,bar的值从0-5.
unsigned long pci_resource_start(struct pci_dev *dev, int bar);
//返回对应bar的memory最后可用的地址。
unsigned long pci_resource_end(struct pci_dev *dev, int bar);
//返回bar对应resource的flags。
unsigned long pci_resource_flags(struct pci_dev *dev, int bar);
flag可以用来定义resource的一些特性,通过pci_resource_flags得到的flags通常是定义的resource的property,比如:
#include <linux/ioport.h>
//如果有I/O region,设置下面中的一个
IORESOURCE_IO
IORESOURCE_MEM

//region 是否是prefetch,以及是否是写保护。READONLY这个flag PCI一般不设置
IORESOURCE_PREFETCH
IORESOURCE_READONLY
通过使用kernel的resource接口,device driver完全不需要关系底层的PCI configuration space。
12.1.10. PCI Interrupts
在BIOS启动系统的时候,每个PCI device就已经分配了中断号,kernel或者driver直接使用就好了。这个中断号存储在configuration space里,register 60(PCI_INTERRUPT_LINE),大小是一个byte,这个中断号根据当前使用的CPU,最多可以支持256个interrupt line,driver其实不用care这个,里面记录的中断号一定是可用的。
如果device 不支持中断,register 61 (PCI_INTERRUPT_PIN)设置为0,否则为非零值,driver当然知道设备是否支持中断,所以一般不会check PCI_INTERRUPT_PIN。
如果driver需要读取这个中断号,可以使用:
result = pci_read_config_byte(dev, PCI_INTERRUPT_LINE, &myirq);
if (result) {
    /* deal with error */
}
PCI内部的interrupt pin实现细节,大概明白,这里就不讲了。
12.1.11. Hardware Abstractions
kernel把对PCI设备的访问都抽象成了resource,但是其底层一定直接和device的configuration space交互,比如pci的ops:
struct pci_ops {
    int (*read)(struct pci_bus *bus, unsigned int devfn, int where, int size,
                u32 *val);
    int (*write)(struct pci_bus *bus, unsigned int devfn, int where, int size,
                 u32 val);
};
很显然,和PCI device的交互都是通过访问PCI device的memory region来实现的,所以只有这两个ops。


 浙公网安备 33010602011771号