nginx优化
一、隐藏版本号的两种方式
1.修改源码包
[root@localhost ~]# yum -y install pcre-devel zlib-devel openssl-devel gcc gcc-c++ make
[root@localhost ~]# useradd -M -s /sbin/nologin nginx
[root@localhost ~]# tar xf nginx-1.6.2.tar.gz -C /usr/src/
[root@localhost ~]# cd /usr/src/nginx-1.6.2/
[root@localhost nginx-1.6.2]# vim src/core/nginx.h
13 #define NGINX_VERSION "7.0.0 "
14 #define NGINX_VER "IIS/" NGINX_VERSION
[root@localhost nginx-1.6.2]# ./configure --prefix=/usr/local/nginx --user=nginx --group=nginx
&& make && make install
[root@localhost ~]# /usr/local/nginx/sbin/nginx [root@localhost ~]# netstat -anpt |grep nginx tcp 0 0 0.0.0.0:80 0.0.0.0:* LISTEN 4346/nginx
[root@localhost ~]# curl -I http://192.168.200.102
HTTP/1.1 200 OK
Server: IIS/7.0.0
Date: Thu, 17 Nov 2016 16:12:26 GMT
Content-Type: text/html
Content-Length: 612
Last-Modified: Thu, 17 Nov 2016 16:11:50 GMT
Connection: keep-alive
ETag: "582dd6c6-264"
Accept-Ranges: bytes
2.修改配置文件
[root@localhost ~]# vim /usr/local/nginx/conf/nginx.conf
28 server_tokens off;
[root@localhost ~]# /usr/local/nginx/sbin/nginx -t nginx: the configuration file /usr/local/nginx/conf/nginx.conf syntax is ok nginx: configuration file /usr/local/nginx/conf/nginx.conf test is successful
[root@localhost ~]# killall -HUP nginx
[root@localhost ~]# curl -I http://192.168.200.101
HTTP/1.1 200 OK
Server: nginx
Date: Thu, 17 Nov 2016 16:14:19 GMT
Content-Type: text/html
Content-Length: 612
Last-Modified: Thu, 17 Nov 2016 16:05:27 GMT
Connection: keep-alive
ETag: "582dd547-264"
Accept-Ranges: bytes
如果 php 配置文件中配置了 fastcgi_param SERVER_SOFTWARE 选项,则编辑 php-fpm 配置文件,将 fastcgi_param SERVER_SOFTWARE对应值修改为 fastcgi_param SERVER_SOFTWARE nginx;
二、修改Nginx用户与组
Nginx 运行时进程需要有用户与组身份的支持,以实现对网站文件读取时进行访问控制。
Nginx 默认使用 nobody 用户账号与组账号,一般也要进行修改。
1、编译安装时指定
[root@localhost ~]# useradd -M -s /sbin/nologin nginx
[root@localhost nginx-1.6.2]# ./configure --prefix=/usr/local/nginx --user=nginx --group=nginx && make && make install
2、修改配置文件
[root@localhost ~]# vim /usr/local/nginx/conf/nginx.conf
2 user nginx nginx;
[root@localhost ~]# killall -HUP nginx三、配置Nginx网页缓存时间
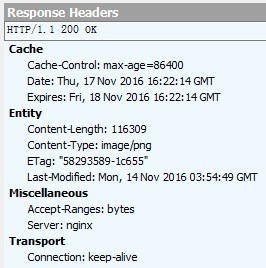
当 Nginx 将网页数据返回给客户端后,可设置资源在客户端缓存的时间,以方便客户端在日后进行相同内容的请求时直接返回,以避免重复请求,加快了访问速度,一般针对静态网页进行设置,对动态网页不用设置缓存时间。可在 Windows 客户端中使用 fiddler 查看网页缓存时间。
设置方法:可修改配置文件,在 http 段、或 server 段、或者 location 段加入对特定内容的过期参数。
[root@localhost ~]# vim /usr/local/nginx/conf/nginx.conf
49 location ~ \.(gif|jpg|jpeg|png|bmp|ico)$ {
50 expires 1d;
51 }
52 location ~ .*\.(js|css)$ {
53 expires 1h;
54 }
[root@localhost ~]# killall -HUP nginx
[root@localhost ~]# ll /usr/local/nginx/html/
total 124
-rw-r--r-- 1 root root 537 Nov 18 00:05 50x.html
-rw-r--r-- 1 root root 643 Nov 18 00:21 index.html
-rw-r--r-- 1 root root 116309 Nov 14 11:54 linux.png
[root@localhost ~]# vim /usr/local/nginx/html/index.html
15 <hr />
16 <img src="linux.png" />
抓包查看:
四、实现Nginx的日志切割
[root@localhost ~]# vim /opt/cut_nginx_log.sh
#!/bin/bash
# cut_nginx_log.sh
datetime=$(date -d "-1 day" "+%Y%m%d")
log_path="/usr/local/nginx/logs"
pid_path="/usr/local/nginx/logs/nginx.pid"
[ -d $log_path/backup ] || mkdir -p $log_path/backup
if [ -f $pid_path ]
then
mv $log_path/access.log $log_path/backup/access.log-$datetime
kill -USR1 $(cat $pid_path) find $log_path/backup -mtime +30 | xargs rm -f
else
echo "Error,Nginx is not working!" | tee -a /var/log/messages
fi
[root@localhost ~]# chmod +x /opt/cut_nginx_log.sh
[root@localhost ~]# crontab -e
0 0 * * * /opt/cut_nginx_log.sh
[root@localhost ~]# /opt/cut_nginx_log.sh [root@localhost ~]# ls /usr/local/nginx/logs/backup/ access.log-20161117
[root@localhost ~]# killall -9 nginx
[root@localhost ~]# /opt/cut_nginx_log.sh
Error,Nginx is not working!
[root@localhost ~]# tail -1 /var/log/messages
Error,Nginx is not working!
五、配置Nginx实现连接超时
在企业网站中,为了避免同一个客户长时间占用连接,造成服务器资源浪费,可以设置相应的连接超时参数,实现控制连接访问时间。
keepalived_timeout:设置连接保持超时时间,一般可只设置该参数,默认为 65 秒,可根据网站的情况设置,或者关闭,可在 http 段、server 段、或者 location 段设置。
client_header_timeout:指定等待客户端发送请求头的超时时间。
client_body_timeout:设置请求体读取超时时间。
注意:若出现超时,会返回 408 报错
[root@localhost ~]# vim /usr/local/nginx/conf/nginx.conf
34 keepalive_timeout 65;
35 client_header_timeout 60;
36 client_body_timeout 60;
[root@localhost ~]# killall -HUP nginx
六、更改Nginx运行进程数
在高并发场景,需要启动更多的 nginx 进程以保证快速影响,以处理用户的请求,避免造成阻塞。
修改配置文件的 worker_processes 参数,一般设置为 CPU 的个数或者核数的 2 倍
[root@localhost ~]# grep 'core id' /proc/cpuinfo | uniq | wc -l 1
[root@localhost ~]# vim /usr/local/nginx/conf/nginx.conf
3 worker_processes 2;
[root@localhost ~]# /usr/local/nginx/sbin/nginx
[root@localhost ~]# ps aux | grep nginx | grep -v grep
root 4431 0.0 0.2 45040 1160 ? Ss 00:50 0:00 nginx: master
process /usr/local/nginx/sbin/nginx
nginx 4432 0.0 0.3 45492 1844 ? S 00:50 0:00 nginx: worker
process
nginx 4433 0.0 0.3 45492 1756 ? S 00:50 0:00 nginx: worker
process
默认 Nginx 的多个进程可能更多的跑在一颗 CPU 上,可以分配不同的进程给不同的 CPU 处理,充分利用硬件多核多 CPU。在一台 4 核物理服务器,可以进行下面的配置,将进程进行分配。
worker_cpu_affinity 0001 0010 0100 1000
七、配置Nginx实现网页压缩功能
Nginx 的 ngx_http_gzip_module 压缩模块提供了对文件内容压缩的功能,允许 nginx 服务器将输出内容发送到客户端之前进行压缩,以节约网站带宽,提升用户的访问体验,模块默认已经安装。
[root@localhost ~]# vim /usr/local/nginx/conf/nginx.conf
38 gzip on; //开启 gzip 压缩输出
39 gzip_min_length 1k; //用于设置允许压缩的页面最小字节数
40 gzip_buffers 4 16k; //表示申请 4 个单位为 16k 的内存作为压缩结果流缓
存,默认值是申请与原始数据大小相同的内存空间来储存 gzip 压缩结果
41 gzip_http_version 1.1; //设置识别 http 协议版本,默认是 1.1
42 gzip_comp_level 2; //gzip 压缩比,1-9 等级
43 gzip_types text/plain text/javascript application/x-javascript text/css text/xml
application/xml application/xml+rss; //压缩类型,是就对哪些网页文档启用压缩功能
44 #gzip_vary on; //选项可以让前端的缓存服务器经过 gzip 压缩的页面
[root@localhost ~]# killall -HUP nginx
八、配置Nginx实现防盗链功能
Nginx防盗链功能也非常强大,在默认情况下只需要进行简单的配置,即可实现防盗处
理
实现环境:
资源主机 www.source.com 192.168.200.101
盗链主机 www.steal.com 192.168.200.102
1、建立资源主机的测试主页
[root@localhost ~]# vim /usr/local/nginx/html/index.html
<html>
<head>
<title>source page</title>
</head>
<body>
<h1>www.source.com</h1>
<img src="linux.png" />
</body>
</html>
[root@localhost ~]# ls /usr/local/nginx/html/
50x.html error.jpg index.html linux.png
客户机测试:
 、
、
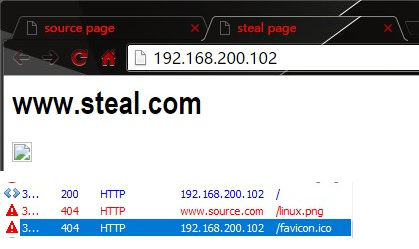
2、建立盗链主机的测试主页
[root@localhost ~]# vim /usr/local/nginx/html/index.html
<html>
<head>
<title>steal page</title>
</head>
<body>
<h1>www.steal.com</h1>
<img src="http://www.source.com/linux.png" />
</body>
</html>
客户机测试:

3、资源主机设置防盗链
配置说明:
valid_referers 设置信任网站
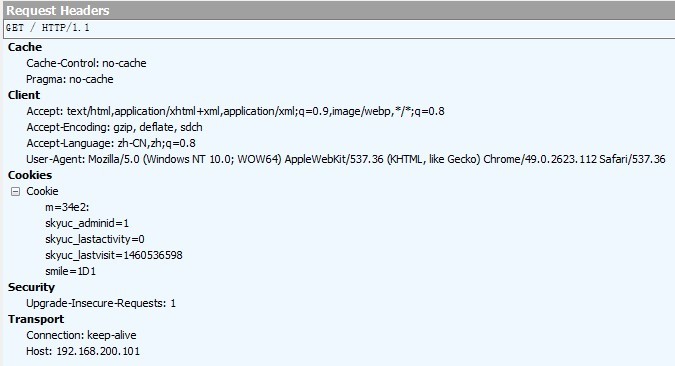
none 浏览器中referer(Referer是header的一部分,当浏览器向web服务器发送请求的时候,一般会带上Referer,告诉服务器我是从哪个页面链接过来的,服务
器基此可以获得一些信息用于处理)为空的情况,就直接在浏览器访问图片
blocked referrer不为空的情况,但是值被代理或防火墙删除了,这些值不以 http://或https://开头
[root@localhost ~]# ls /var/www/ error.jpg index.html test.jpg
[root@localhost ~]# vim /usr/local/nginx/conf/nginx.conf
location ~* \.(wma|wmv|asf|mp3|mmf|zip|rar|jpg|gif|png|swf|flv)$ {
valid_referers none blocked *.source.com source.com;
if ($invalid_referer) {
rewrite ^/ http://www.source.com/error.jpg;
#return 403;
}
}
第一行:wma|wmv|asf|mp3|mmf|zip|rar|jpg|gif|png|swf|flv表示对这些后缀的文件实行防盗链
第二行:none blocked *.source.com source.com; //不区分大小写表示referers信息中匹配none blocked *.source.com source.com (*代表任何,任何的二级域名) if{}里面内容的意思是,如果链接不是来自第二行指定的就强制跳转到403错误页面,当然直接返回404也是可以的,也可以是图片。
注意:设置客户机的 hosts 文件
客户测试:
九、对FPM模块进行参数优化
Nginx 的 PHP 解析功能实现如果是交由 FPM(fastcgi 进程管理器)处理的,为了提高 PHP 的处理速度,可对 FPM 模块进行参数跳转。
FPM 优化参数:
pm 使用哪种方式启动 fpm 进程,可以说 static 和 dynamic,前者将产生
固定数量的 fpm 进程,后者将以动态的方式产生 fpm 进程
pm.max_children static 方式下开启的 fpm 进程数
pm.start_servers 动态方式下初始的 fpm 进程数量
pm.min_spare_servers 动态方式下最小的 fpm 空闲进程数
pm.max_spare_servers 动态方式下最大的 fpm 空闲进程数
注:以上调整要根据服务器的内存与服务器负载进行调整
示例: 服务器为云服务器,运行了个人论坛,内存为 1.5G,fpm 进程数为 20,内存消耗近 1G,处理比较慢
优化参数调整:
# vim /usr/local/php5/etc/php-fpm.conf
pm = dynamic
pm=start_servers = 5
pm.min_spare_servers = 2
pm.max_spare_servers = 8
十、Nginx为目录添加访问控制
用户访问控制:使用 apache 的 htpasswd 来创建密码文件
[root@localhost ~]# yum -y install httpd
[root@localhost ~]# htpasswd -c /usr/local/nginx/.htpasswd crushlinux New password:
Re-type new password:
Adding password for user crushlinux
[root@localhost ~]# vim /usr/local/nginx/conf/nginx.conf
location ~ /status {
stub_status on;
access_log off;
auth_basic "Nginx Status";
auth_basic_user_file /usr/local/nginx/.htpasswd;
}
客户端地址访问控制:
[root@localhost ~]# vim /usr/local/nginx/conf/nginx.conf
location ~ /status {
stub_status on;
access_log off;
auth_basic "Nginx Status";
auth_basic_user_file /usr/local/nginx/.htpasswd;
allow 192.168.200.2;
deny 192.168.200.0/24;
}
十一、自定义错误页面
error_page 403 404 /404.html;
location = /404.html {
root html;
}
[root@localhost html]# echo "Sorry,Page Not Found" > /usr/local/nginx/html/404.html
[root@localhost html]# service nginx reload
浏览器访问 http://192.168.200.101/abc
返回结果: Sorry,Page Not Found
十二、自动索引
location /download { autoindex on;
}
[root@localhost ~]# cd /usr/local/nginx/html/
[root@localhost html]# mkdir download/dir{1,2} -p
[root@localhost html]# touch download/1.txt
[root@localhost html]# touch download/2.txt
[root@localhost html]# service nginx reload
浏览器访问 http://192.168.200.101/download
十三、目录别名功能
[root@localhost html]# mkdir Centos RedHat
[root@localhost ~]# echo "hello,students" > /usr/local/nginx/html/RedHat/index.html
[root@localhost ~]# vi /usr/local/nginx/conf/nginx.conf
location ~ /Centos {
alias /usr/local/nginx/html/RedHat;
}
[root@localhost ~]# service nginx restart
在浏览器中 http://192.168.200.101/Centos 进行测试
十四、通过 UA 实现手机端和电脑端的分离
实现 nginx区分 pc 和手机访问不同的网站,是物理上完全隔离的两套网站(一套移动端、一套 pc 端),这样带来的好处 pc 端和移动端的内容可以不一样,移动版网站不需要包含特别多的内容,只要包含必要的文字和较小的图片,这样会更节省流量。有好处当然也就会增加困难,难题就是你需要维护两套环境,并且需要自动识别出来用户的物理设备并跳转到相应的网站,当判断错误时用户可以自己手动切换回正确的网站。
有两套网站代码,一套 PC 版放在 /usr/local/nginx/html/web ,一套移动版放在 /usr/local/nginx/html/mobile。只需要修改 nginx 的配置文件,nginx 通过 UA 来判断是否来自移动端访问,实现不同的客户端访问不同内容。
location / {
#默认 PC 端访问内容
root /usr/local/nginx/html/web;
#如果是手机移动端访问内容
if ( $http_user_agent ~
"(MIDP)|(WAP)|(UP.Browser)|(Smartphone)|(Obigo)|(Mobile)|(AU.Browser)|(wxd.Mms)|(Wx dB.Browser)|(CLDC)|(UP.Link)|(KM.Browser)|(UCWEB)|(SEMC-Browser)|(Mini)|(Symbian)|(Palm)|(Nokia)|(Panasonic)|(MOT-)|(SonyEricsson)|(NEC-)|(Alcat el)|(Ericsson)|(BENQ)|(BenQ)|(Amoisonic)|(Amoi-)|(Capitel)|(PHILIPS)|(SAMSUNG)|(Lenovo) |(Mitsu)|(Motorola)|(SHARP)|(WAPPER)|(LG-)|(LG/)|(EG900)|(CECT)|(Compal)|(kejian)|(Bird)|(BIRD)|(G900/V1.0)|(Arima)|(CTL)|(TDG)|(Daxian)|(DAXIAN)|(DBTEL)|(Eastcom)|(EASTCOM)|(PANTECH)|(Dopod)|(Haier)|(HAIER)|(KONKA)|(KEJIAN)|(LENOVO)|(Soutec)|(SOUTEC)|(SAGEM)|(SEC-)|(SED-)|(EMOL-)|(INNO55)|(ZTE)|(iPhone)|(Android)|(WindowsCE)|(Wget)|(Java)|(curl)|(Opera)" )
{
root /usr/local/nginx/html/mobile;
}
index index.html index.htm;
}
实验模拟:不同浏览器访问到不同的页面:
[root@localhost html]# mkdir firefox msie
[root@localhost html]# echo "hello,firefox" > firefox/index.html [root@localhost html]# echo "hello,msie" > msie/index.html
location / {
if ($http_user_agent ~ Firefox) {
root /usr/local/nginx/html/firefox;
}
if ($http_user_agent ~ MSIE) {
root /usr/local/nginx/html/msie;
}
index index.html index.htm;
}
十五、nginx平滑升级版本
一、nginx 平滑升级概述
随着网站并发访问量越来越高,nginx web 服务器页越来越流行,nginx 版本换代越来越频繁,1.10.2 版本的 nginx 更新了许多新功能,生产环境中版本升级必然的,但是线上业务不能停,此时 nginx 的升级就是运维的重要工作了。
二、nginx 平滑升级原理
多进程模式下的请求分配方式
Nginx 默认工作在多进程模式下,即主进程(master process)启动后完成配置加载和端口绑定等动作,fork 出指定数量的工作进程(worker process),这些子进程会持有监听端口的文件描述符(fd),并通过在该描述符上添加监听事件来接受连接(accept)。
信号的接收和处理
Nginx 主进程在启动完成后会进入等待状态,负责响应各类系统消息,如 SIGCHLD、SIGHUP、
SIGUSR2 等。
Nginx 信号简介
主进程支持的信号
TERM, INT: 立刻退出
|
QUIT: |
等待工作进程结束后再退出 |
|
KILL: |
强制终止进程 |
|
HUP: |
重新加载配置文件,使用新的配置启动工作进程,并逐步关闭旧进程。 |
|
USR1: |
重新打开日志文件 |
|
USR2: |
启动新的主进程,实现热升级 |
|
WINCH: |
逐步关闭工作进程 |
工作进程支持的信号
TERM, INT: 立刻退出
QUIT: 等待请求处理结束后再退出
USR1: 重新打开日志文件
三、nginx平滑升级实战
[root@localhost ~]# rpm -q httpd
package httpd is not installed
[root@localhost ~]# yum -y install pcre-devel zlib-devel
[root@localhost ~]# ll nginx-*
-rw-r--r-- 1 root root 910812 Nov 15 15:00 nginx-1.10.2.tar.gz
-rw-r--r-- 1 root root 804164 Dec 11 2014 nginx-1.6.2.tar.gz
[root@localhost ~]# useradd -M -s /sbin/nologin nginx
[root@localhost ~]# tar xf nginx-1.6.2.tar.gz -C /usr/src/
[root@localhost ~]# cd /usr/src/nginx-1.6.2/
[root@localhost nginx-1.6.2]# ./configure --prefix=/usr/local/nginx --user=nginx --group=nginx --with-http_stub_status_module --with-http_ssl_module --with-http_flv_module --withhttp_gzip_static_module && make && make install
[root@localhost ~]# /usr/local/nginx/sbin/nginx
[root@localhost ~]# netstat -anpt |grep :80 tcp 0 0 0.0.0.0:80 0.0.0.0:* LISTEN 4178/nginx
[root@localhost ~]# elinks --dump http://localhost
Welcome to nginx! nginx 平滑升级实战
1.查看旧版 nginx 的编译参数
[root@localhost ~]# /usr/local/nginx/sbin/nginx -V
nginx version: nginx/1.6.2
built by gcc 4.4.7 20120313 (Red Hat 4.4.7-16) (GCC)
TLS SNI support enabled
configure arguments: --prefix=/usr/local/nginx --user=nginx --group=nginx --withhttp_stub_status_module --with-http_ssl_module --with-http_flv_module --withhttp_gzip_static_module
2.编译新版本 Nginx 源码包,安装路径需与旧版一致,注意:不要执行 make install
[root@localhost ~]# tar xf nginx-1.10.2.tar.gz -C /usr/src/
[root@localhost ~]# cd /usr/src/nginx-1.10.2/
[root@localhost nginx-1.10.2]# ./configure --prefix=/usr/local/nginx --user=nginx -group=nginx --with-http_stub_status_module --with-http_ssl_module --with-http_flv_module -with-http_gzip_static_module && make
3.备份二进制文件,用新版本的替换
[root@localhost nginx-1.10.2]# mv /usr/local/nginx/sbin/nginx /usr/local/nginx/sbin/nginx.old
[root@localhost nginx-1.10.2]# ls
auto CHANGES.ru configure html Makefile objs src
CHANGES conf contrib LICENSE man README
[root@localhost nginx-1.10.2]# cp objs/nginx /usr/local/nginx/sbin/
4.确保配置文件无报错
[root@localhost nginx-1.10.2]# /usr/local/nginx/sbin/nginx -t
nginx: the configuration file /usr/local/nginx/conf/nginx.conf syntax is ok
nginx: configuration file /usr/local/nginx/conf/nginx.conf test is successful
5.发送 USR2 信号
向主进程(master)发送 USR2 信号,Nginx 会启动一个新版本的 master 进程和对应工作进程,和旧版一起处理请求
[root@localhost ~]# ps aux | grep nginx | grep -v grep
root 4108 0.0 0.2 45028 1152 ? Ss 16:58 0:00 nginx: master process /usr/local/nginx/sbin/nginx
nginx 4109 0.0 0.4 45456 2012 ? S 16:58 0:00 nginx: worker process
[root@localhost ~]# kill -USR2 4108
[root@localhost ~]# ps aux | grep nginx | grep -v grep
root 4108 0.0 0.2 45028 1316 ? Ss 16:58 0:00 nginx: master process /usr/local/nginx/sbin/nginx
nginx 4109 0.0 0.4 45456 2012 ? S 16:58 0:00 nginx: worker process
root 6605 0.5 0.6 45196 3364 ? S 17:02 0:00 nginx: master process /usr/local/nginx/sbin/nginx
nginx 6607 0.0 0.3 45624 1756 ? S 17:02 0:00 nginx: worker process
6.发送 WINCH 信号
向旧的 Nginx 主进程(master)发送 WINCH 信号,它会逐步关闭自己的工作进程(主进程不退出),这时所有请求都会由新版 Nginx 处理
[root@localhost ~]# kill -WINCH 4108
[root@localhost ~]# ps aux | grep nginx | grep -v grep
root 4108 0.0 0.2 45028 1320 ? Ss 16:58 0:00 nginx: master process /usr/local/nginx/sbin/nginx
root 6605 0.0 0.6 45196 3364 ? S 17:02 0:00 nginx: master process /usr/local/nginx/sbin/nginx
nginx 6607 0.0 0.3 45624 1756 ? S 17:02 0:00 nginx: worker process
注意:回滚步骤,发送 HUP 信号
如果这时需要回退继续使用旧版本,可向旧的 Nginx 主进程发送 HUP 信号,它会重新启动工作进程,仍使用旧版配置文件。然后可以将新版 Nginx 进程杀死(使用 QUIT、TERM、或者 KILL)
[root@localhost ~]# kill -HUP 4108
7.发送 QUIT 信号
升级完毕,可向旧的 Nginx 主进程(master)发送(QUIT、TERM、或者 KILL)信号,使旧的主进程退出
[root@localhost ~]# kill -QUIT 4108
8.验证 nginx 版本号,并访问测试
[root@localhost nginx-1.10.2]# /usr/local/nginx/sbin/nginx -v附录:CPU 相关信息查看
查看 CPU 型号:
[root@localhost ~]# grep "model name" /proc/cpuinfo | uniq
1
[root@localhost ~]# grep 'physical id' /proc/cpuinfo |uniq |wc -l
1
查看CPU核心数
[root@localhost ~]# grep 'core id' /proc/cpuinfo | sort -u | wc -l
4
[root@localhost ~]# grep 'core id' /proc/cpuinfo | uniq | wc -l
4
查看CPU线程数
4
[root@localhost ~]# grep 'processor' /proc/cpuinfo | uniq | wc -l
4

 浙公网安备 33010602011771号