
IOC容器管理 bean
IOC容器管理 bean
Bean的命名以及实例化方法
Bean的命名

每一个交给Spring IOC(后面统称Spring容器)容器创建的对象必须被分配至少一个名称,如果开发者没有提供,Spring容器将会为其分配一个内部名称,通过Bean的名称,我们可以在其他类中查找该类并使用它,如前面的案例,也是通过Bean名称获取到实际对象并执行对应的操作。在基于xml的配置信息中,可以使用id属性来为一个Bean分配名称,在同一个xml配置文件中,id必须是唯一的,但不同的xml可以相同,当然还可以使用name来为Bean分配名称,name属性可以分配多个名称,此时可使用空格、逗号、分号来分离给定Bean分配多个名称,而id属性则无法这样使用。

<!-- name属性配置多个名称 -->
<bean name="accountDao,accountDao2" class="com.zejian.spring.springIoc.dao.impl.AccountDaoImpl"/>
<!-- id属性配置唯一名称而且不能与name相同-->
<bean id="accountDaoId" class="com.zejian.spring.springIoc.dao.impl.AccountDaoImpl"/>


在name属性中声明了两个名称,除了第一个名称外,其他的名称都被称为别名(aliase)。除了在Bean中定义名称外,还可利用<alias>标签向Bean赋予别名:

<bean id="accountDaoId" class="com.zejian.spring.springIoc.dao.impl.AccountDaoImpl"/>
<!-- name属性指明要给那个Bean赋予别名,alias则指明赋予的别名-->
<alias name="accountDaoId" alias="accountDao3" />


显然如果我们想要配置的Bean对象已存在,并且希望向一些Bean赋予特别的名称,此时别名就相当有用了。上述的Bean对象声明使用都在xml内声明手动声明的方式,一旦Bean对象多起来,管理Bean可能会发生繁琐的情况,为了Spring提供了基于Java注解的配置方式,下面分别使用org.springframework.stereotype.Service(@Service)和org.springframework.stereotype.Repository(@Repository)声明AccountServiceImpl和AccountDaoImpl类,使用@Autowired注解注入accountDao(需要在xml声明注解驱动)

//@Component 相同效果
@Service
public class AccountServiceImpl implements AccountService {
  @Autowired
  private AccountDao accountDao;
}


//@Component 相同效果
@Repository
public class AccountDaoImpl implements AccountDao{
//......
}

有了注解声明,我们就不需要在xml中声明以上两个Bean,但需要明确告诉Spring注解的Bean在那些包下,因此需要添加包扫描机制,此时需要启用Spring的context命名空间:
<beans xmlns="http://www.springframework.org/schema/beans"
       xmlns:xsi="http://www.w3.org/2001/XMLSchema-instance"
       xmlns:context="http://www.springframework.org/schema/context"
       xsi:schemaLocation="
        http://www.springframework.org/schema/beans http://www.springframework.org/schema/beans/spring-beans.xsd
        http://www.springframework.org/schema/context
        http://www.springframework.org/schema/context/spring-context.xsd
        ">
    <!-- 声明包扫描 -->
    <context:component-scan base-package="com.zejian.spring.springIoc" />

</beans>
以上的声明方式与之前在xml声明bean的效果相同。这里我们需要明白可以使用@Component注解达到与@Service和@Repository的效果,@Component与@Service的含义并无差异,只不过@Service更能让我们明白该类为业务类罢了。至于@Repository在表示数据访问层含义的同时还能够启用与Spring数据访问相关链的其他功能(这个在Spring jdbc相关内容时再详谈,此时我们只需明白@Repository与@Component等效即可),同时还可给@Component、@Service和@Repository输入一个String值的名称,如果没有提供名称,那么默认情况下就是一个简单的类名(第一个字符小写)变成Bean名称。
@Service("accountService")
public class AccountServiceImpl implements AccountService {
  @Autowired
  private AccountDao accountDao;
}

@Repository("accountDao")
public class AccountDaoImpl implements AccountDao{
//......
}
因此到这我们也就知道了,Spring的框架中提供了与@Component注解等效的三个注解,@Repository 用于对DAO实现类进行标注,@Service 用于对Service实现类进行标注,@Controller 用于对Controller实现类进行标注(web层控制器),同时也了解了Spring 容器通过xml的bean标签配置和java注解两种方式声明的Bean对象,我们可以单独使用其中一种也可以两种混合使用,取决于各自的需求。
Bean的重写机制
Bean的重写机制并没有那么神秘,主要是当不同的xml文件中出现同名id属性的bean时读取的优先级问题,同样简单看个例子就明白了。定义两个spring的配置文件并同时加载它们:spring-ioc.xml

<beans xmlns="http://www.springframework.org/schema/beans"
  xmlns:xsi="http://www.w3.org/2001/XMLSchema-instance"
  xmlns:context="http://www.springframework.org/schema/context"
  xsi:schemaLocation="
http://www.springframework.org/schema/beans http://www.springframework.org/schema/beans/spring-beans.xsd
http://www.springframework.org/schema/context
http://www.springframework.org/schema/context/spring-context.xsd
">
<!-- 默认构造创建,并通过property 注入属性值 -->
<bean id="account" class="com.zejian.spring.springIoc.pojo.Account" >
    <property name="name" value="I am SpringIOC1" />
    <property name="pwd" value="123" />
</bean>
</beans>


spring-ioc2.xml

<beans xmlns="http://www.springframework.org/schema/beans"
  xmlns:xsi="http://www.w3.org/2001/XMLSchema-instance"
  xmlns:context="http://www.springframework.org/schema/context"
  xsi:schemaLocation="
http://www.springframework.org/schema/beans http://www.springframework.org/schema/beans/spring-beans.xsd
http://www.springframework.org/schema/context
http://www.springframework.org/schema/context/spring-context.xsd
">
<!-- 默认构造创建,并通过property 注入属性值 -->
<bean id="account" class="com.zejian.spring.springIoc.pojo.Account" >
    <property name="name" value="I am SpringIOC2" />
    <property name="pwd" value="123" />
</bean>
</beans>
获取bean并调用
@Test
public void test1()  {
  ApplicationContext applicationContext=new
          ClassPathXmlApplicationContext("spring/spring-ioc.xml","spring/spring-ioc2.xml");
    Account account= (Account) applicationContext.getBean("account");
    System.out.println("调用结果:"+account.getName());
}
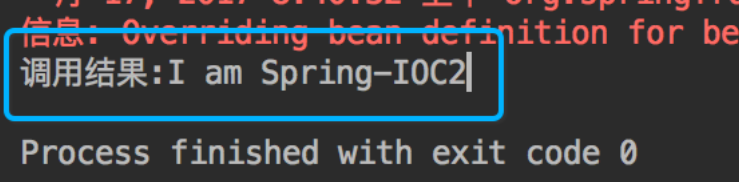
显然在不同的xml配置文件中使用相同id命名,并声明相同类型的bean对象时,spring容器会默认加载最后添加的spring-ioc2.xml中account而忽略spring-ioc.xml中的account,也就是说Bean的重写机制原则是当声明的bean的名称一样时,后者会覆盖前者。我们还需要明确的一点时,在web应用开发过程中,一般都会将配置进行分层管理,然后通过一个主springApplication.xml来聚合它,在这样的情况下分层的配置文件属于springApplication.xml的子文件,在这样的关系遇到上述的情况一般都子文件的优先级高,因此会加载子文件的bean。如在spring-ioc.xml主文件导入子文件spring-ioc2.xml:
<beans xmlns="http://www.springframework.org/schema/beans"
       xmlns:xsi="http://www.w3.org/2001/XMLSchema-instance"
       xmlns:context="http://www.springframework.org/schema/context"
       xsi:schemaLocation="
        http://www.springframework.org/schema/beans http://www.springframework.org/schema/beans/spring-beans.xsd
        http://www.springframework.org/schema/context
        http://www.springframework.org/schema/context/spring-context.xsd
        ">

    <!-- 默认构造创建,并通过property 注入属性值 -->
    <bean id="account" class="com.zejian.spring.springIoc.pojo.Account" >
        <property name="name" value="I am SpringIOC1" />
        <property name="pwd" value="123" />
    </bean>

    <!-- 导入的子文件 -->
    <import resource="spring-ioc2.xml" />
</beans>
运行代码:
@Test
  public void test1()  {
    ApplicationContext applicationContext=new
            ClassPathXmlApplicationContext("spring/spring-ioc.xml");
      Account account= (Account) applicationContext.getBean("account");
      System.out.println("调用结果:"+account.getName());
  }
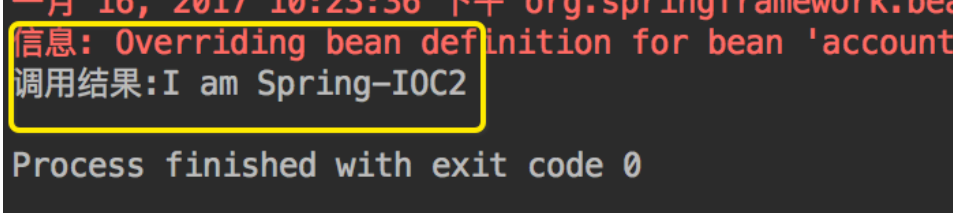
上述代码会优先加载spring-ioc2.xml中的account而忽略spring-ioc.xml中的account,效果与前面的代码相同。
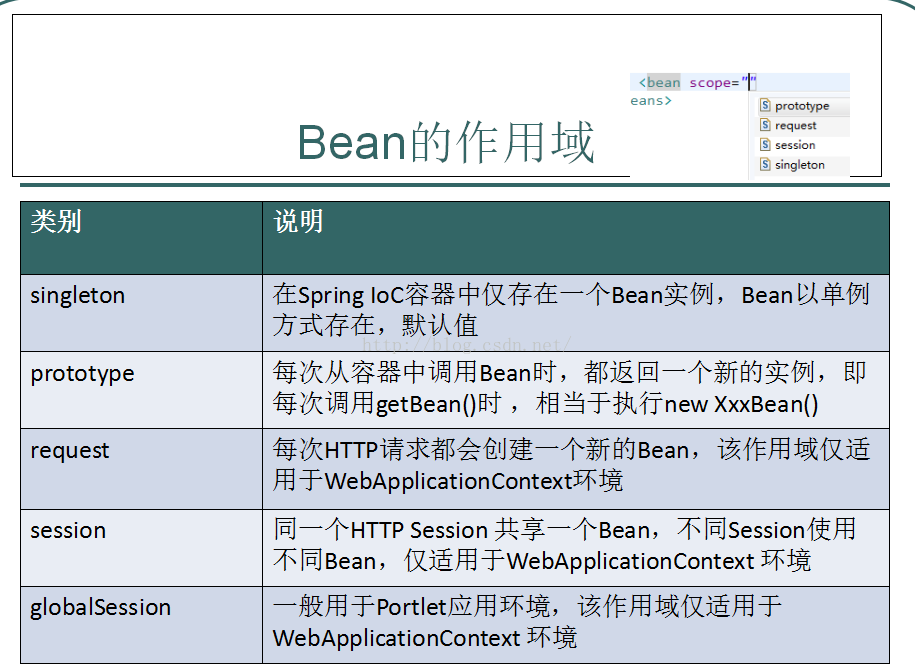
Spring中bean的作用域
Spring IOC容器创建一个Bean实例时,可以为Bean指定实例的作用域,作用域包括singleton(单例模式)、prototype(原型模式)、request(HTTP请求)、session(会话)、global-session(全局会话)。
Bean的延长加载
在某些情况下,我们可能希望把bean的创建延迟到使用阶段,以免消耗不必要的内存,Spring也非常自愿地支持了延迟bean的初始化。因此可以在配置文件中定义bean的延迟加载,这样Spring容器将会延迟bean的创建直到真正需要时才创建。通常情况下,从一个已创建的bean引用另外一个bean,或者显示查找一个bean时会触发bean的创建即使配置了延迟属性,因此如果Spring容器在启动时创建了那些设为延长加载的bean实例,不必惊讶,可能那些延迟初始化的bean可能被注入到一个非延迟创建且作用域为singleton的bean。在xml文件中使用bean的lazy-init属性可以配置改bean是否延迟加载,如果需要配置整个xml文件的bean都延迟加载则使用defualt-lazy-init属性,请注意lazy-init属性会覆盖defualt-lazy-init属性。
<beans xmlns="http://www.springframework.org/schema/beans"
       xmlns:xsi="http://www.w3.org/2001/XMLSchema-instance"
       xmlns:context="http://www.springframework.org/schema/context"
       xsi:schemaLocation="
        http://www.springframework.org/schema/beans http://www.springframework.org/schema/beans/spring-beans.xsd
        http://www.springframework.org/schema/context
        http://www.springframework.org/schema/context/spring-context.xsd
        " default-lazy-init="true">
    <!--default-lazy-init="true" xml中全部bean延迟加载 -->
    <!-- lazy-init="false" 表示非延长加载-->
    <bean name="accountDao" lazy-init="false"
          class="com.zejian.spring.springIoc.dao.impl.AccountDaoImpl"/>

    <!-- 声明accountService对象,交给spring创建 -->
    <bean name="accountService" class="com.zejian.spring.springIoc.service.impl.AccountServiceImpl">
          <!-- 注入accountDao对象,需要set方法-->
          <property name="accountDao" ref="accountDao"/>
    </bean>
</beans>
默认情况下Spring容器在启动阶段就会创建bean,这个过程被称为预先bean初始化,这样是有好处的,可尽可能早发现配置错误,如配置文件的出现错别字或者某些bean还没有被定义却被注入等。当然如存在大量bean需要初始化,这可能引起spring容器启动缓慢,一些特定的bean可能只是某些场合需要而没必要在spring容器启动阶段就创建,这样的bean可能是Mybatis的SessionFactory或者Hibernate SessionFactory等,延迟加载它们会让Spring容器启动更轻松些,从而也减少没必要的内存消耗。
<context:component-scan/>与<context:annotation-config/>
前面我们使用@Autowired、@Resource、@Value等自动装配注解时用<context:annotation-config/>进行注解驱动注册,从而使注解生效。实际上这样<context:annotation-config/>一条配置,它的作用是式地向 Spring 容器注册AutowiredAnnotationBeanPostProcessor、CommonAnnotationBeanPostProcessor、PersistenceAnnotationBeanPostProcessor 以及RequiredAnnotationBeanPostProcessor 这 4 个BeanPostProcessor。注册这4个 BeanPostProcessor后Spring容器就能够识别相应的注解了,当然它们也是也可单独配置的。
假如想使用@ Resource 、@ PostConstruct、@ PreDestroy等注解就可以单独声明CommonAnnotationBeanPostProcessor
如果想使用@PersistenceContext注解,声明PersistenceAnnotationBeanPostProcessor的Bean即可。
如果想使用 @Required的注解,就必须声明RequiredAnnotationBeanPostProcessor的Bean。
一般来说,这些注解是随处可见的,如果总是需要一条一条配置自然就非常繁琐了,于是spring容器非常智能地为我们提供<context:annotation-config/>的简化配置方式,自动声明。
对于<context:component-scan/>,前面在使用@Service、@Component、@Controller
、@Repository等注解时,需要在xml配置文件声明包扫描驱动<context:component-scan/>,它的作用是Spring容器在启动时会启动注解驱动去扫描对应包下的bean对象并将创建它们的实例,这样我们就无法一个个地进行bean配置声明了,极大简化了编程代码。请注意,当spring的xml配置文件出了<context:component-scan/>
后,<context:annotation-config/>就可以退休了,因为<context:component-scan/>已包含了<context:annotation-config/>的功能了。在大部分情况下,都会直接使用<context:component-scan/>进行注解驱动注册和包扫描功能。

 浙公网安备 33010602011771号