搭建K8S kubernetes
一、安装要求
1.CPU内核>=2
2.内存>=2G
3.注意Docker与kubernetes版本
二、安装前配置
1.分别设置计算机名
Hostnamectl set-hostname –static master
Hostnamectl set-hostname –static worker1
Hostnamectl set-hostname –static worker2
2.分别配置每台服务器的HOST文件
vim /etc/hosts

192.168.137.20 master
192.168.137.21 worker1
192.168.137.22 worker2
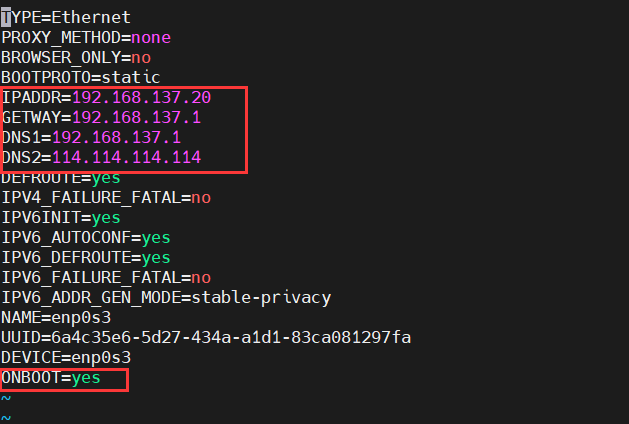
3.分别配置静态IP
cd /etc/sysconfig/network-scripts
vim ifcfg-enp0s3
4.安装依赖
yum install -y conntrack ntpdate ntp ipvsadm ipset jq iptables curl sysstatlibseccomp wget vim net-tools git iproute lrzsz bash-completion tree bridge-utils unzip bind-utils gcc
5.关闭防火墙,禁用交换区, 关闭selinux
System stop firewalld
System disable fillwalld
Swapoff -a
Setenforce 0
sed -i '/swap/s/^\(.*\)$/#\1/g' /etc/fstab
sed -i 's/^SELINUX=.*/SELINUX=disabled/' /etc/selinux/config
#查看结果
getenforce
6.调整内核参数
cat > kubernetes.conf <<EOF
net.bridge.bridge-nf-call-iptables=1
net.bridge.bridge-nf-call-ip6tables=1
net.ipv4.ip_forward=1
net.ipv4.tcp_tw_recycle=0
vm.swappiness=8
vm.overcommit_memory=1
vm.panic_on_oom=0
fs.inotify.max_user_instances=8192
fs.inotify.max_user_watches=1048576
fs.file-max=52706963
fs.nr_open=52786963
net.ipv6.conf.all.disable_ipv6=1
net.netfilter.nf_conntrack_max=2310728
EOF
cp kubernetes.conf /etc/sysctl.d/kubernetes.conf
sysctl -p /etc/sysctl.d / kubernetes.conf
7.调整文件数
echo "* soft nofile 65536">> /etc/security/limits.conf
echo "* hard nofile 65536">> /etc/security/limits.conf
8.开启IPVS前置条件
cat > /etc/sysconfig/modules/ipvs.modules <<EOF
# ! /bin/bash
modprobe -- ip_vs
modprobe -- ip_vs_rr
modprobe -- ip_vs_wrr
modprobe -- ip_vs_sh
modprobe -- nf_conntrack_ipv4
EOF

chmod 755 /etc/sysconfig/modules/ipvs.modules&&bash /etc/sysconfig/modules/ipvs.modules &&lsmod |grep -e ip_vs -e nf_conntrack_ipv4
9.配置docker
cat > /etc/docker/daemon.json <<EOF
{
"registry-mirrors": [
"https://lebkn7ykm.mirror.aliyuncs.com",
"https://docker.mirrors.ustc.edu.cn",
"http://f1361db2.m.daocloud.io",
"https://registry.docker-cn.com"
],

"exec-opts": ["native.cgroupdriver=systemd"],
"log-driver": "json-file",
"log-opts": {
"max-size": "100m"
},
"storage-driver": "overlay2"
}
EOF
三、安装
1.设置K8S镜像源
cat <<EOF > /etc/yum.repos.d/kubernetes.repo
[kubernetes]
name=Kubernetes
baseurl=http://mirrors.aliyun.com/kubernetes/yum/repos/kubernetes-el7-x86_64
enabled=1
gpgcheck=0
repo_gpgcheck=0
gpgkey=http://mirrors.aliyun.com/kubernetes/yum/doc/yum-key.gpg
http://mirrors.aliyun.com/kubernetes/yum/doc/rpm-package-key.gpg
EOF
2.安装Kubeadm,kubelet,kubectl
yum install -y kubelet-1.20.5 kubeadm-1.20.5 kubectl-1.20.5 --disableexcludes=kubernetes
systectl start kubelet
systemctl enable kubelet
四.Master配置
1.使用kubeadm下载配置文件,并修改
kubeadm config print init-defaults >kubeadm-init.yaml
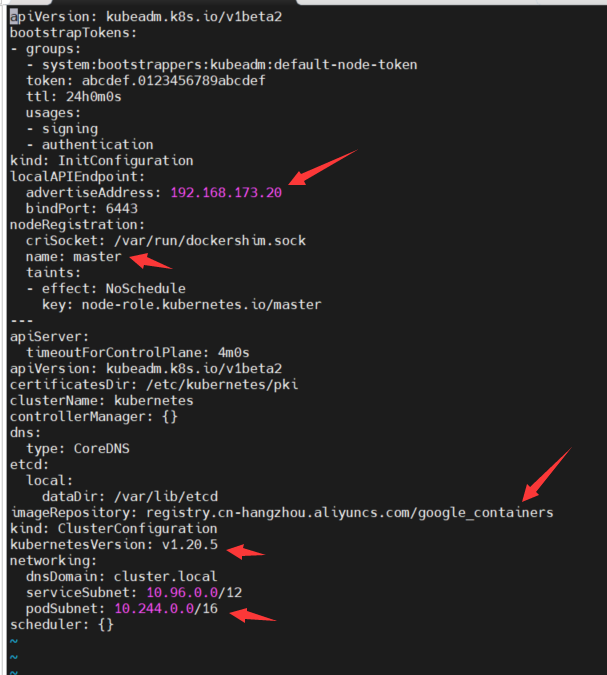
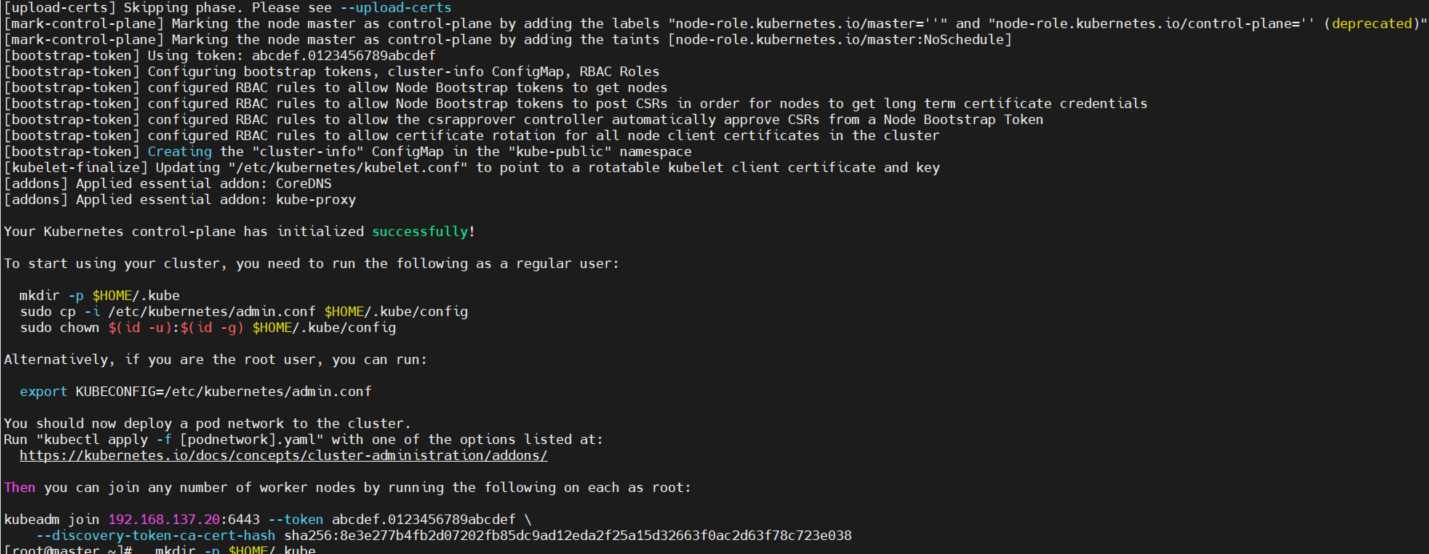
2.kubeadm根据配置文件初始化K8S
kubeadm init --config kubeadm-init.yaml
3.下载并修改calico网络配置文件
wget https://docs.projectcalico.org/v3.20/manifests/calico.yaml -O
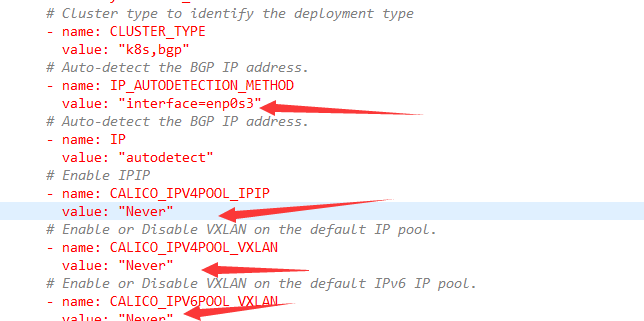
4.构建calico网络
Kubectl apply -f calico.yaml
四、woker加入master

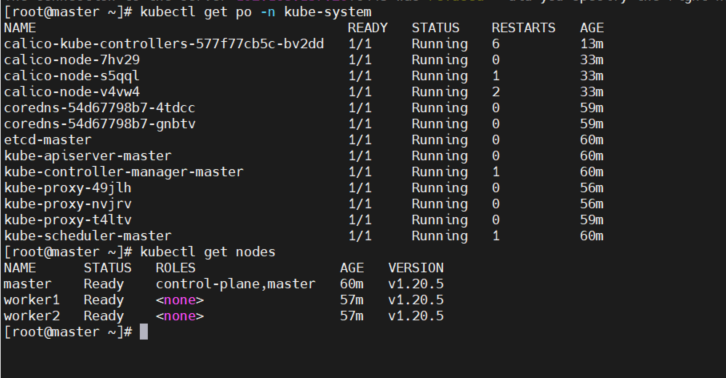
五、安装后检查

 浙公网安备 33010602011771号