[V&N CTF 2022][MISC]仔细找找
[MISC] 仔细找找
vnctf{34aE@w}

简洁的解题方案是对图片进行resize
import sys
from PIL import Image

img = Image.open(sys.argv[1])

img = img.resize((79,71),Image.NEAREST)
img.save(sys.argv[2])

(来自于官方WriteUp)
我比较笨,因此使用了一些繁琐的解决方案。
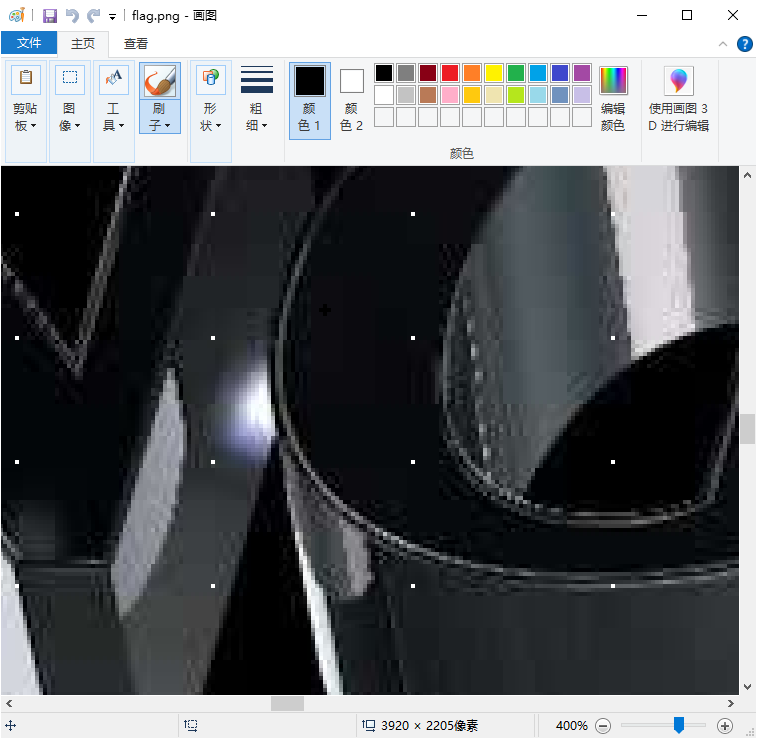
首先解压出图片之后看出存在孤立像素点:

这些像素点的排列是如此规律,以至于可以试着推算出其大小和分布数列。经计算,像素点自(15,24)开始出现,之后按照矩形(31,50)进行递归出现。要做的只是将像素取出重组为新图片即可。(试验方法代码后详)试验发现这样的操作是错误的,存在大量的偏移。
观察第一行像素点和第一列像素点发现他们是纯白(#ff000000)的。因此可以假定下述的所有像素点都是在这个矩形框架下推导的,因此要做的首先是获取第一行第一列像素点的行、列数据,然后在依葫芦画瓢获取其他点即可。
具体实现代码为:
#include <iostream>
#include <fstream>
#include <string>
#include <windows.h>
#include <gdiplus.h>
#pragma comment(lib, "gdiplus.lib")

using namespace std;
using namespace Gdiplus;
Color save[78][71];
int GetEncoderClsid(const WCHAR* format, CLSID* pClsid)
{
    UINT num = 0; // number of image encoders
    UINT size = 0; // size of the image encoder array in bytes
    ImageCodecInfo* pImageCodecInfo = NULL;
    GetImageEncodersSize(&num, &size);
    if (size == 0)
        return -1; // Failure
    pImageCodecInfo = (ImageCodecInfo*)(malloc(size));
    if (pImageCodecInfo == NULL)
        return -1; // Failure
    GetImageEncoders(num, size, pImageCodecInfo);
    for (UINT j = 0; j < num; ++j)
    {
        if (wcscmp(pImageCodecInfo[j].MimeType, format) == 0)
        {
            *pClsid = pImageCodecInfo[j].Clsid;
            free(pImageCodecInfo);
            return j; // Success
        }
    }
    free(pImageCodecInfo);
    return -1; // Failure
}
int main(int argc, char ** argv) {
    GdiplusStartupInput gdiplusstartupinput;
    ULONG_PTR gdiplustoken;
    GdiplusStartup(&gdiplustoken, &gdiplusstartupinput, NULL);
    wstring infilename(L"flag.bmp");
    wstring outfilename(L"extracted_flag.bmp");

    Bitmap* bmp = new Bitmap(infilename.c_str());
    Bitmap* savingbmp = new Bitmap(80, 80, PixelFormat32bppARGB);
    UINT height = bmp->GetHeight();
    UINT width = bmp->GetWidth();
    cout << "width " << width << ", height " << height << endl;

    Color color;
    int i = 0;
    int j = 0;
    //获取第一列的行数据,获取第一行的列数据类似,不再赘述
    printf("int indexarrayy[] = {");
    for (UINT y = 0; y < height; y++)
    {
        UINT x = 24;
        bmp->GetPixel(x, y, &color);
        if (color.GetValue() == 0xffffffff)
        {
            printf("%d,",y);
        }
    }
    printf("};");
    system("pause");//暂停输出数据之后便于生成下面的代码
    int indexarrayy[] = { 15, 46, 77, 108, 139, 170, 201, 232, 263, 295, 326, 357,
        388, 419, 450, 481, 512, 543, 574, 605, 636, 667, 698, 729, 760, 791, 822,
        854, 885, 916, 947, 978, 1009, 1040, 1071, 1102, 1133, 1164, 1195, 1226,
        1257, 1288, 1319, 1350, 1382, 1413, 1444, 1475, 1506, 1537, 1568, 1599, 1630,
        1661, 1692, 1723, 1754, 1785, 1816, 1847, 1878, 1909, 1941, 1972, 2003, 2034,
        2065, 2096, 2127, 2158, 2189 };
    int indexarrayx[] = { 24, 74, 124, 173, 223, 272, 322, 372, 421, 471, 521, 570,
        620, 669, 719, 769, 818, 868, 917, 967, 1017, 1066, 1116, 1166, 1215, 1265,
        1314, 1364, 1414, 1463, 1513, 1563, 1612, 1662, 1711, 1761, 1811, 1860, 1910,
        1960, 2009, 2059, 2108, 2158, 2208, 2257, 2307, 2356, 2406, 2456, 2505, 2555,
        2605, 2654, 2704, 2753, 2803, 2853, 2902, 2952, 3002, 3051, 3101, 3150, 3200,
        3250, 3299, 3349, 3398, 3448, 3498, 3547, 3597, 3647, 3696, 3746, 3795, 3845, 3895 };
//取出像素点并且拼接生成新图片
    for (UINT y = 0; y < 71; y ++) {
        i = 0;
        for (UINT x = 0; x < 79; x ++) {
            bmp->GetPixel(indexarrayx[x], indexarrayy[y], &color);
            savingbmp->SetPixel(i, j, color);
            i++;
        }
        j++;
    }
    printf("scanned %d,%d data", i, j);
    CLSID bmpClsid;
    GetEncoderClsid(L"image/bmp", &bmpClsid);
    savingbmp->Save(L"D:\\extracted_flag.bmp", &bmpClsid, nullptr);

    delete bmp;
    delete savingbmp;
    GdiplusShutdown(gdiplustoken);
    return 0;
}
这里使用了gdiplus进行处理,也可作为使用C语言处理图像的一种方法。
上面的indexarray是通过程序的前半部分运行获取的。

作者发布、转载的任何文章中所涉及的技术、思路、工具仅供以安全目的的学习交流,并严格遵守《中华人民共和国网络安全法》、《中华人民共和国数据安全法》等网络安全法律法规。
任何人不得将技术用于非法用途、盈利用途。否则作者不对未许可的用途承担任何后果。
本文遵守CC BY-NC-SA 3.0协议,您可以在任何媒介以任何形式复制、发行本作品,或者修改、转换或以本作品为基础进行创作
您必须给出适当的署名,提供指向本文的链接,同时标明是否(对原文)作了修改。您可以用任何合理的方式来署名,但是不得以任何方式暗示作者为您或您的使用背书。
同时,本文不得用于商业目的。混合、转换、基于本作品进行创作,必须基于同一协议(CC BY-NC-SA 3.0)分发。
如有问题, 可发送邮件咨询.


 浙公网安备 33010602011771号