Hive 的参数配置
Hive参数的配置
新建hive用户在MySql中新建名称hive_db的数据库,用来存储Hive元数据;并创建hive用户,密码为自定义,并且赋予权限:
create database hive_db;(新建hive_db数据库)
create user hive identified by 'Lover*159'(创建hive用户并配置密码)
grant all privileges on *.* to hive@'%' identified by 'Lover*159' with grant option;(赋予hive用户的权限)
grant all privileges on *.* to root@'%' identified by 'Lover*159' with grant option;(赋予root用户权限)
flush privileges(刷新MySql的系统权限相关表)
1.进入hive文件 /opt/hive/conf文件下编辑配置文件:
(1)配置hive-site.xml文件
cp /opt/hive/conf/hive-default.xml.template /opt/hive/conf/hive-site.xml
vim hive-site.xml
修改:
<property>
<name>javax.jdo.option.ConnectionURL</name>
<value>jdbc:mysql://master:3306/hive_db?createDatabaseIfNotExist=true&useSSL=false</value>
<description>JDBC connect string for a JDBC metastore</description>
</property>
<property>
<name>javax.jdo.option.ConnectionUserName</name>
<value>hive</value>
<description>Username to use against metastore database</description>
</property>
<property>
<name>javax.jdo.option.ConnectionPassword</name>
<value>Password123$</value>
<description>password to use against metastore database</description>
</property>
<property>
<name>javax.jdo.option.ConnectionDriverName</name>
<value>com.mysql.jdbc.Driver</value>
<description>Driver class name for a JDBC metastore</description>
</property>
<property>
<name>hive.downloaded.resources.dir</name>
<value>/opt/hive/tmp</value>
<description>Temporary local directory for added resources in the remote file system.</description>
</property>
<property>
<name>hive.exec.local.scratchdir</name>
<value>/opt/hive/tmp/${hive.session.id}_resources</value>
<description>Local scratch space for Hive jobs</description>
</property>
<property>
<name>hive.querylog.location</name>
<value>/opt/hive/tmp</value>
<description>Location of Hive run time structured log file</description>
</property>
<property>
<name>hive.server2.logging.operation.log.location</name>
<value>/opt/hive/tmp/operation_logs</value>
<description>Top level directory where operation logs are stored if logging functionality is enabled</description>
</property>
<property>
<name>hive.server2.webui.host</name>
<value>master</value>
<description>The host address the HiveServer2 WebUI will listen on</description>
</property>
<property>
<name>hive.server2.webui.port</name>
<value>10002</value>
<description>The port the HiveServer2 WebUI will listen on. This can beset to 0 or a negative integer to disable the web UI</description>
</property>
hdfs集群上创建文件并赋予权限:
hadoop fs -mkdir -p /user/hive/warehouse
hadoop fs -chmod g+w /user/hive/warehouse
(2)配置hive-site.xml文件;
cp /opt/hive/conf/hive-env.sh.template /opt/hive/conf/hive-env.sh
修改:
export JAVA_HOME=/opt/java
export HADOOP_HOME=/opt/hadoop
export HIVE_CONF_DIR=/opt/hive/conf
export HIVE_AUX_JARS_PATH=/opt/hive/lib
初始化:
cp /opt/hive/mysql-connector-java-5.1.48-bin.jar /opt/hive/lib/
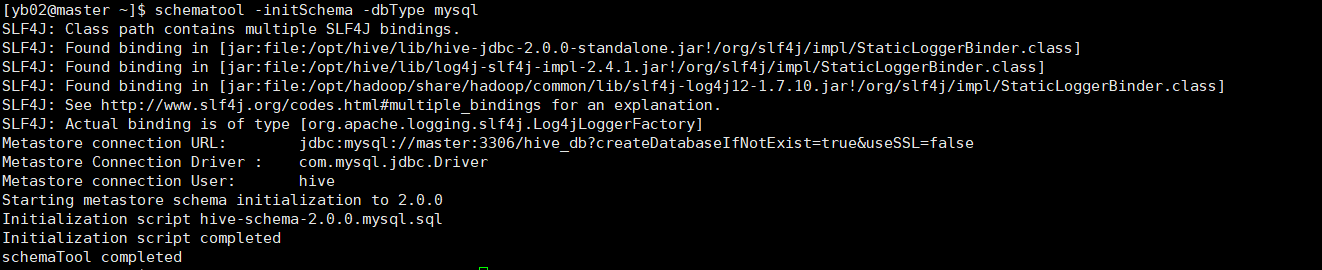
schematool -initSchema -dbType mysql
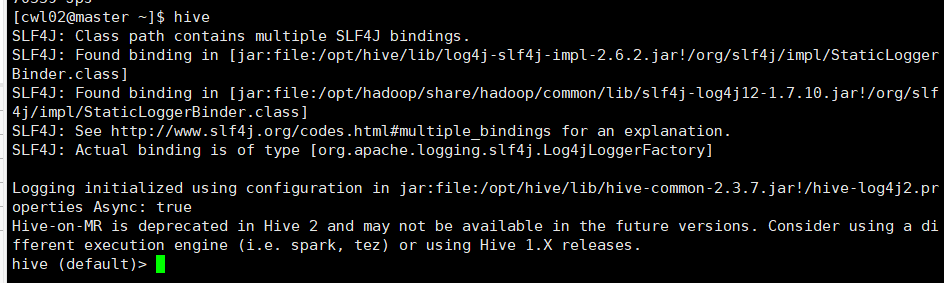
启动hive
hive启动前必须启动集群:start-all.sh
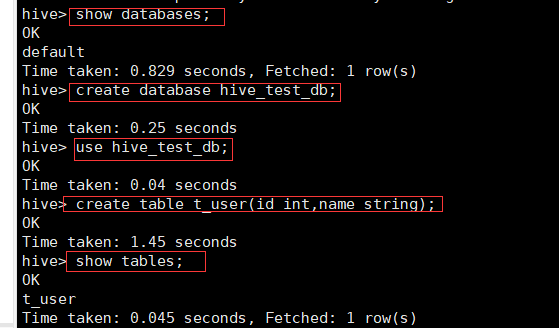
1.进入hive
2.创建表并验证mysql
show databases;
create database hive_test_db;
create table t_user(id int,name string);
show tables;

切换至MySql:
use hive_db
select * from TBLS;

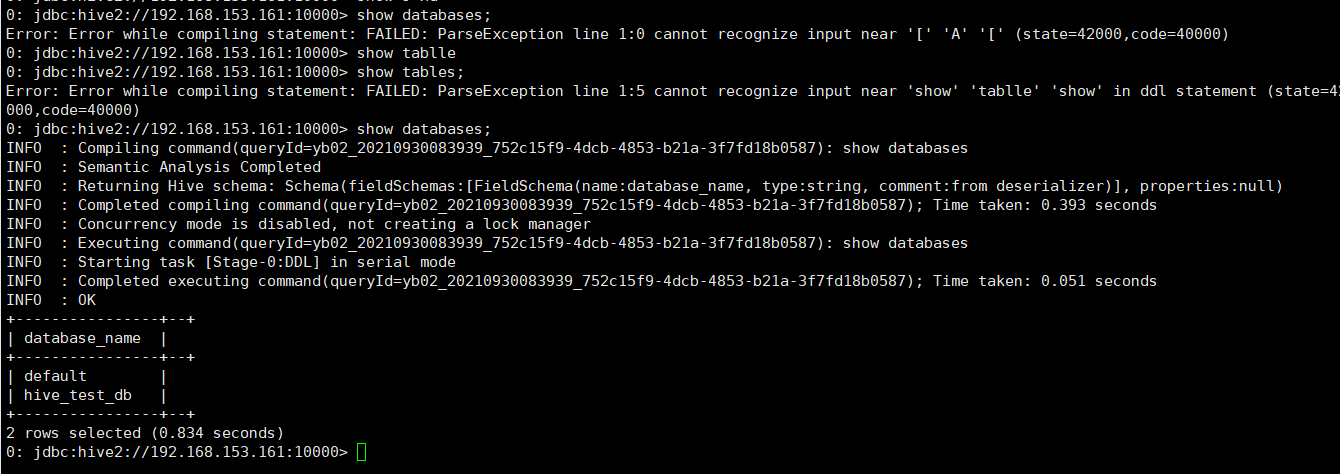
5.远程访问:Beeline CLi 远程访问Hive
(1)修改Hadoop的core-site.xml文件。给Hive赋予代理用户权限
sudo vim /opt/hadoop/etc/hadoop/core-site.xml
添加:
<property>
<name>hadoop.proxyuser.hadoop.hosts</name>
<value>*</value>
</property>
<property>
<name>hadoop.proxyuser.hadoop.groups</name>
<value>*</value>
</property>
(2)启动HiveServer2服务
在slave1添加远程访问节点。
beeline -u jdbc:hive2: 你的ip :10000
从master节点向slave1节点发送文件
而master节点提示OK
![]()
Hive库操作
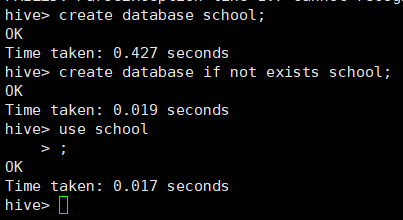
1、创建数据库
create database school
create database if not exists school;
use school
2、修改数据库并显示数据库的详细信息,使用extended查看数据库的详细信息
alter database school set dbproperties('creater'='H3C');
desc database extended school;

3、使用alter命令修改库信息,添加自定义属性,创建者为H3C:
alter database school set owner user root;
desc database extended school;

4、删除数据库并显示全部数据库
Drop database school;
Show databases;

Hive表操作
1.创建表
create database school
Use school
create table teacher(
> num int,
> name string,
> email map<string,int>,
> class array<string>);
2.在master:50070查看数据库,查看是否有表

3.创建分区表:
create table teacher11(
> num int,
> name string,
> email map<string,int>,
> class array<string>)
> partitioned by (age int)
> row format delimited fields terminated by ','
4.指定分桶表:
create table teacher3(
num int,
name string,
email map<string,int>,
class array<string>)
clustered by (num) into 4 buckets
row format delimited fields terminated by ',';
5.查看与修改表
show tables;
desc teacher
desc formatted teacher;
使用alter修改表名:
alter table teacher rename to new_teacher;
修改num为number。String类型添加注释:
alter table new_teacher change num number string comment 'the num of teacher,change datatype to string' after name;
增加/更新列:
alter table new_teacher add columns(age int);
6.删除表和推出表:
删除表:
drop table teacher2;
清空数据表:
truncate table teacher11;
Hive数据操作
1数据导入
(1)单条导入
新建学生表,具有学号,姓名,班级,身高体重信息,成绩,插入单条数据进行测试
hive> create table student(
num int,
name string,
class string,
body map<string,int>,
exam array<string>)
row format delimited
fields terminated by '|'
collection items terminated by ','
map keys terminated by ':'
lines terminated by '\n';
hive> create table lib(
num int,
book string)
row format delimited
fields terminated by '|'
collection items terminated by ','
map keys terminated by ':'
lines terminated by '\n';
hive> create table price(
book string,
price int)
row format delimited
fields terminated by '|'
collection items terminated by ','
map keys terminated by ':'
lines terminated by '\n';
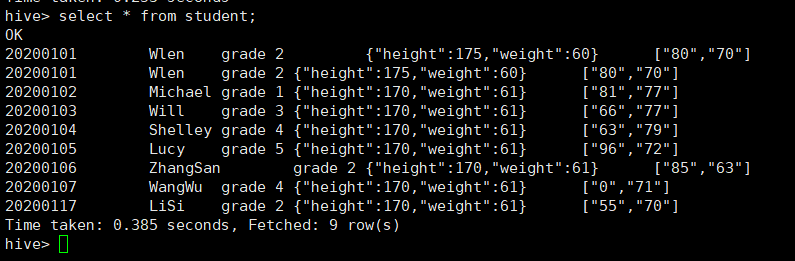
insert into student(num,name,class,body,exam) select 20200101,'Wlen','grade 2',map('height',175,'weight',60),array('80','70');
(2)批量导入
load data local inpath '/opt/software/student.txt' into table student;
hive查询
1.select语句
2.where cxcv语句
select * from student where class = 'grade 4';
select * from student where exam[0] = 96 or exam[1]=77;
select * from student where body['height'] = 170;
3.distinct语句
select class from student;
select distinct class from student;
4.group by语句
select class ,count(*) from student group by class;
select class ,count(*) num from student group by class having num>=2;
5.limit语句
select * from student limit 2,4;
select class from student union select num from student;
6.order by语句
set mapreduce.job.reduce=3;
select * from student sort by exam[0];
select * from student order by exam [0];
7. join语句
select * from student join lib on student.num = lib.num;
select * from student left outer join lib on student.numlib.num;

 浙公网安备 33010602011771号