学习使用React Native的心得体会
首先根据官网上的介绍,安装必须的环境需求。http://reactnative.cn/docs/0.20/getting-started.html#content
下面讲一下一些常用的命令:
1.下载npm运行环境的react-native依赖库(node_modules)

$ npm install
2. 安装全局的react-native-cli命令
$ npm install -g react-native-cli
3.初始化iOS项目,(根据个人选择是否需求)

$ react-native init AwesomeProject
如果需要手动开启开发服务器,那么就需要添加一个package.json到node_modules的同级目录下,如图

package.json内容如下:

添加了package.json后,只要在该文件目录下通过命令行执行 $ npm start ,就可以启动开发服务器了。
下面来讲讲如何生成jsbundle文件,还是在该根目录下,把需要生成jsbundle的js文件或者是存放js文件的文件拷贝到该根目录下,记得不要关闭开发服务器。然后另外打开一个终端,cd到该
根目录下,执行
$ curl http://localhost:8081/index.ios.bundle -o main.jsbundle
如果js文件在某个文件下,就应该这样执行
$ curl http://localhost:8081/ReactComponent/index.ios.bundle -o ReactComponent/main.jsbundle
这样就将指定文件夹下的js文件生成为了指定文件夹下的jsbundle文件了。
如果上面的不行,则试一下下面的命令:
需要在项目根目录下执行

react-native bundle --platform ios --entry-file index.ios.js --bundle-output ./bundles/main.jsbundle

或
react-native bundle --platform ios --dev false --entry-file index.ios.js --bundle-output ./bundles/main.jsbundle
实在不行,还可以试试这条命令:
/**
   * OPTION 2
   * Load from pre-bundled file on disk. To re-generate the static bundle, `cd`
   * to your Xcode project folder in the terminal, and run
   *
   * $ curl 'http://localhost:8081/Examples/2048/Game2048.bundle?platform=ios' -o main.jsbundle
   *
   * then add the `main.jsbundle` file to your project and uncomment this line:
   */
如果想要把图片资源一起打包进bundle,则需要使用一下命令:
react-native bundle --entry-file index.ios.js  --bundle-output ./bundle/main.jsbundle --platform ios --assets-dest ./bundle --dev false

或(需要文件夹)

react-native bundle --entry-file index.ios.js  --bundle-output ./bundle/localBundle/main.jsbundle --platform ios --assets-dest ./bundle/localBundle --dev false
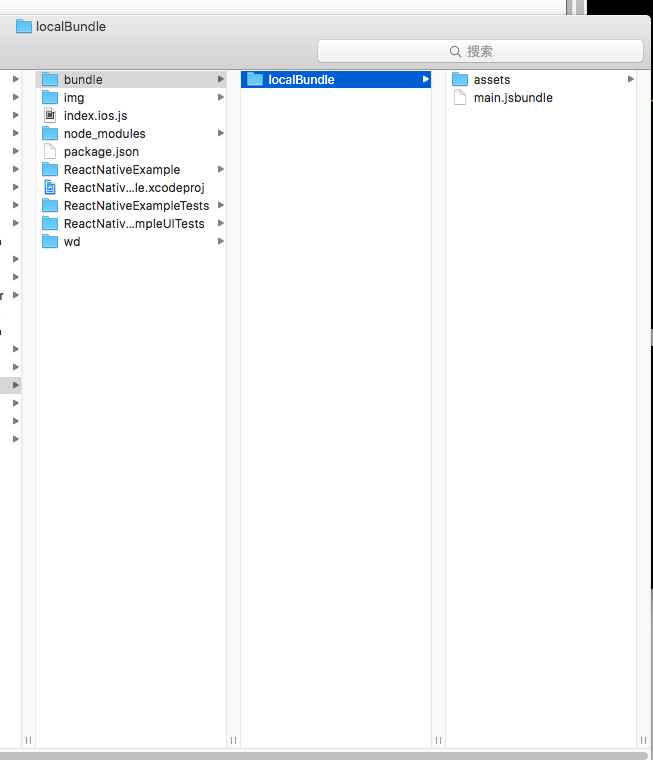
文件目录如图:
然后在xcode中添加assets【必须用Create folder references的方式,添加完是蓝色文件夹图标】和index.ios.jsbundle。
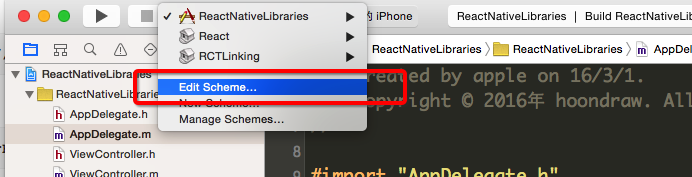
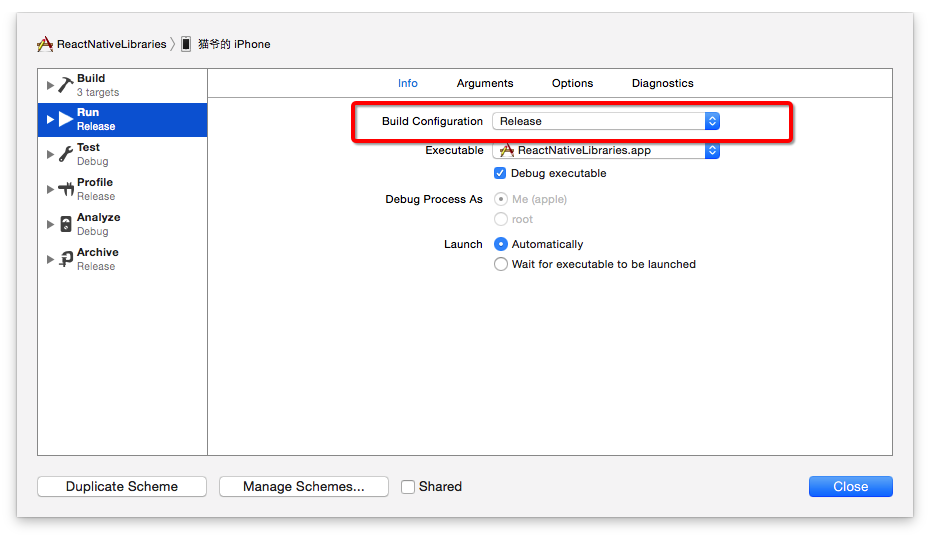
如果不希望显示状态栏的调试菜单,只要将scheme中的archive模式设置成release。
另外,手动链接react-native库的话,一定要记得添加查找头文件的路径,否则Xcode会报错找不到头文件。但是,即便如此,手动链接库在运行项目的时候还是会报一些错误。
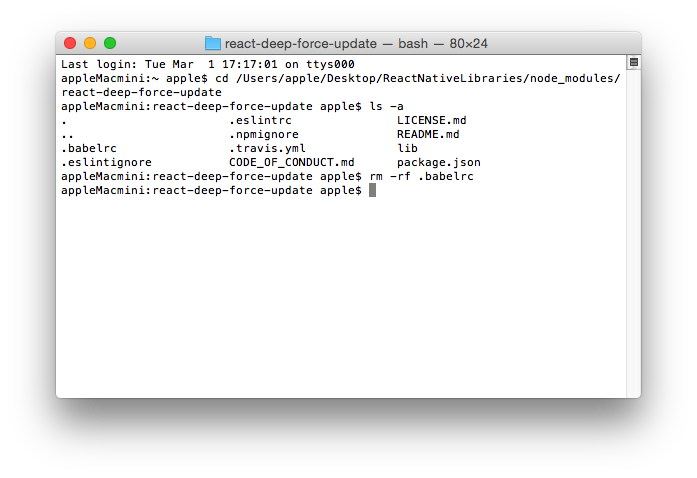
还有,当服务器报了这个错误的时候,应当按照提示找到该目录下的文件,并且删除。
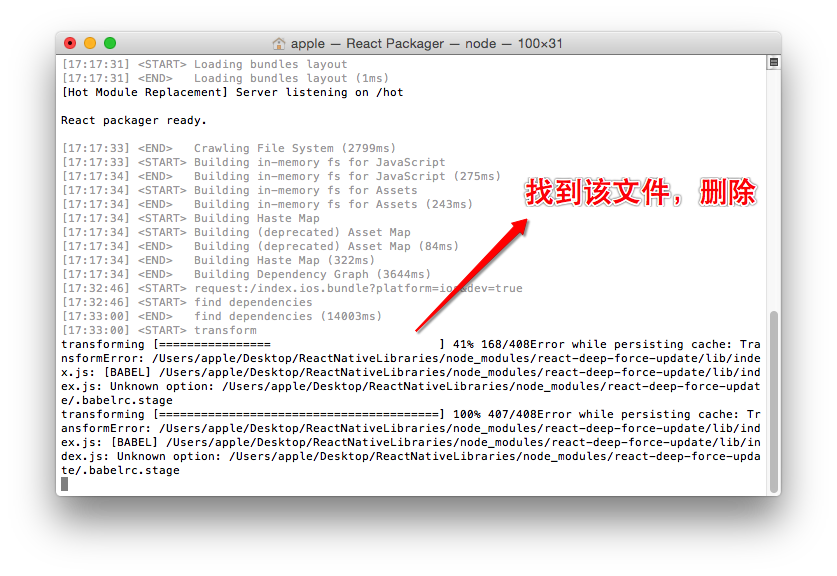
操作如下:
由于手动链接库会出各种错误,所以,我一般使用cocoapods的链接库方式。但是,用这种方式运行项目前,一定要记得在项目根目录下手动启动开发服务器。
启动开发服务器
$ npm start
或
$ react-native start
现在已经找到手动链接库报错的原因,这是最坑人的地方,一定要看。
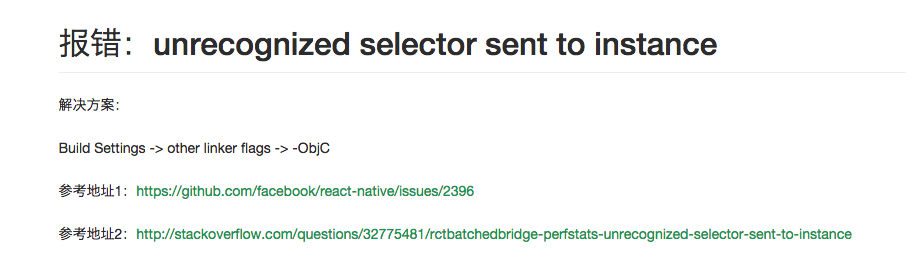
有时候也会因为添加了这个-ObjC而报错!!!
添加依赖库
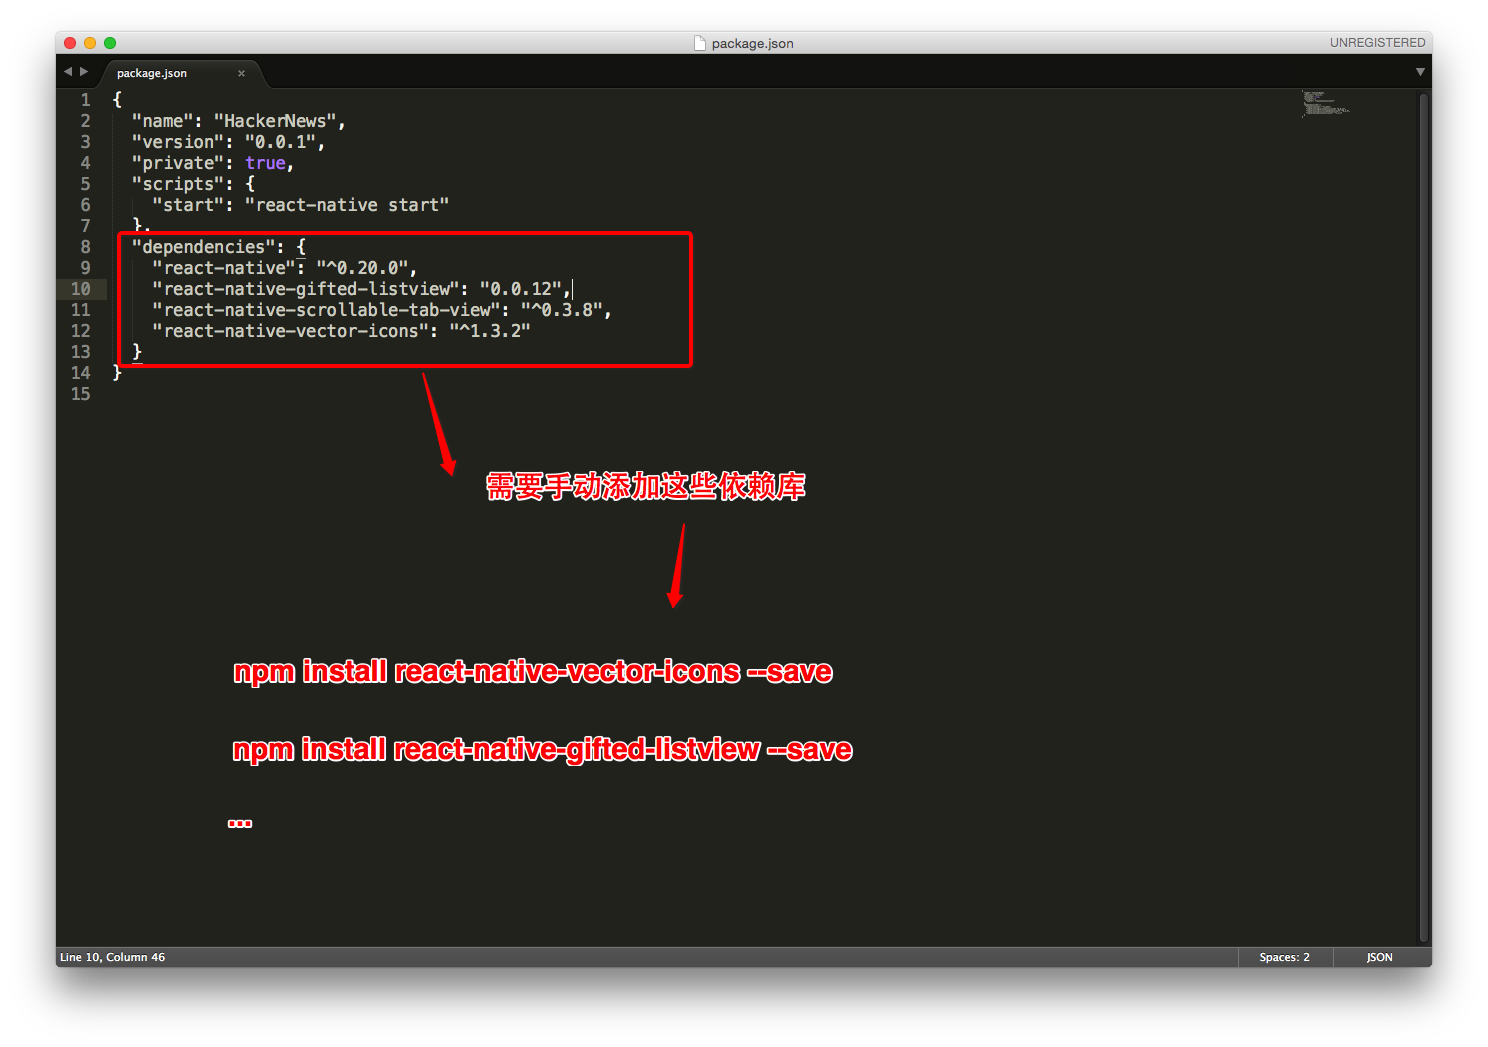
自动依赖库命令:提供原生依赖的自动链接。即不需要手动链接依赖到项目中。
rnpm link react-native-video
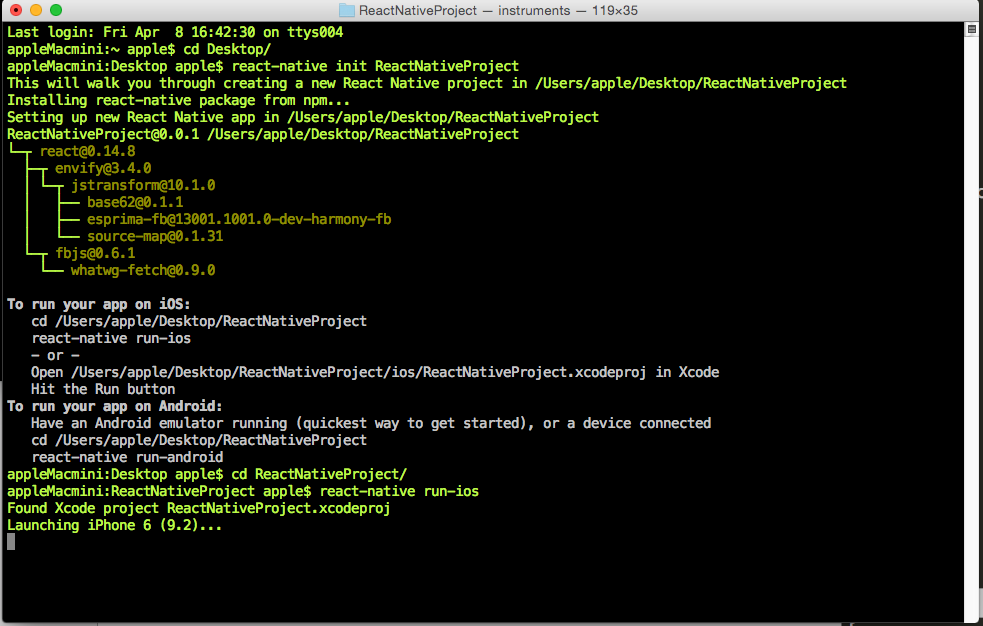
初始化一个项目后,可以根据终端的提示命令打开运行项目,如图:
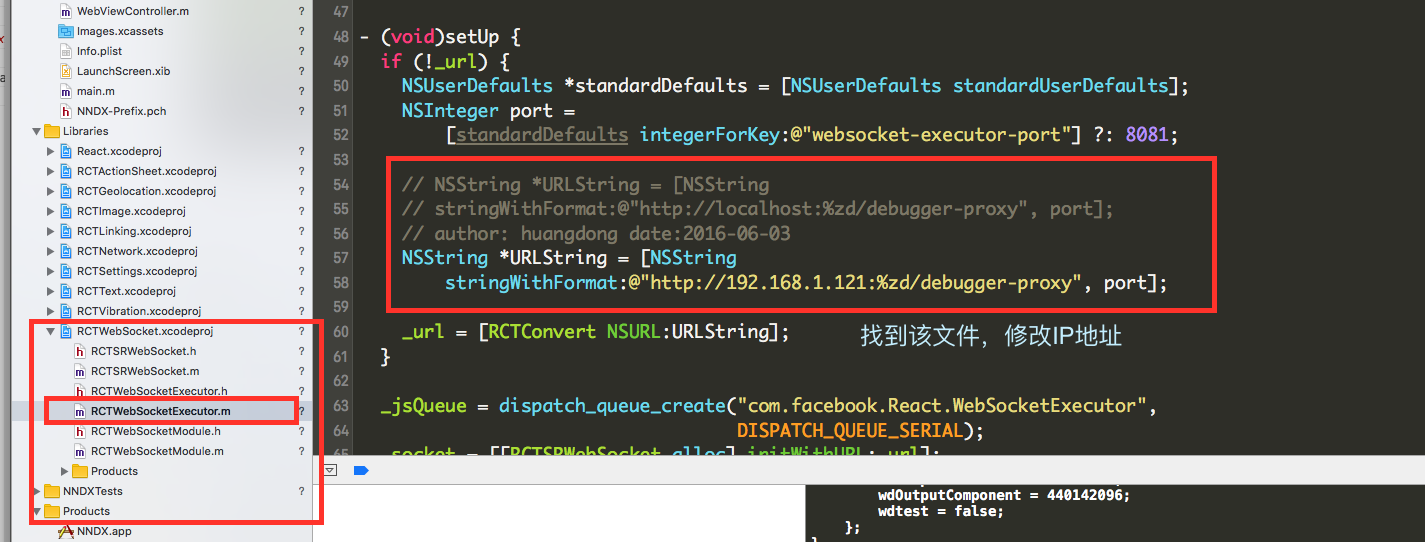
使用真机进行调试,需要控制台查看console的时候,需要修改本地IP地址。如图:
添加开发依赖库:
npm install --save-dev reactotron-react-native
Flow工具:FaceBook自家出品的一个js类型检查器。
使用方法,在项目目录终端下输入:$ flow check
使用其它的浏览来进行调试,输入地址:http://localhost:8081/debugger-ui
不过,还是推荐用google浏览器来调试比较好。

 浙公网安备 33010602011771号