httprunner做接口自动化和性能测试
【简介】
HttpRunner 是一款面向 HTTP(S) 协议的通用测试框架,只需编写维护一份YAML/JSON脚本,即可实现自动化测试、性能测试、线上监控、持续集成等多种测试需求;
【优缺点】
优点:基于YAML/JSON格式,专注于接口本身的编写, 写法简单,可生成测试报告, 支持抓包录制, 支持python扩展、可做接口自动化, 方便搭建接口框架;
缺点:属领域特定语言,官方文档不直白详细,没有编辑器插件对语法校验,编写易出错;
【结论】
可以考虑用来做接口测试,但是语法校验需要单独处理。
httprunnerManage地址: https://github.com/HttpRunner/HttpRunnerManager
mockserver地址:https://github.com/yinquanwang/MockServer
-----------------------------------------------------------------------------------------------------------------------------------------------------------------------------------------------------------------
【使用教程】:
1、安装
pip install httprunner
注:我安装的是python3.6 httprunner 1.5.8
验证:hrun -V
2、运行命令
运行测试用例的命令为hrun
运行全部用例:hrun testcase
运行单个用例:hrun c:/xx/xx/xx/xx.json
运行多个用例:hrun c:/xx/xx/xx/xx.json c:/xx/xx/xx/xx.json
运行失败后停止执行:hrun testcase --failfast
重复运行某个case: 在test下添加times参数,对应的times值为需要重复运行的次数
跳过某个case运行:研用unittest框架中的skip(无条件跳过)、skipIf(条件为真的时候跳过)、skipUnless(条件为假的时候跳过),关键字加在test中
3、生成脚手架
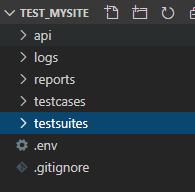
hrun --startproject test_mysite
创建一个名为test_mysite的目录,目录下结构如图:
-------------------------------------------
说明:
api目录下为接口的详细信息
reports目录下为生成的报告
testcases目录下为测试用例
testsuites为测试套件
新建debugtalk.py文件用于编写函数辅助测试
--------------------------------------------
4、结构说明

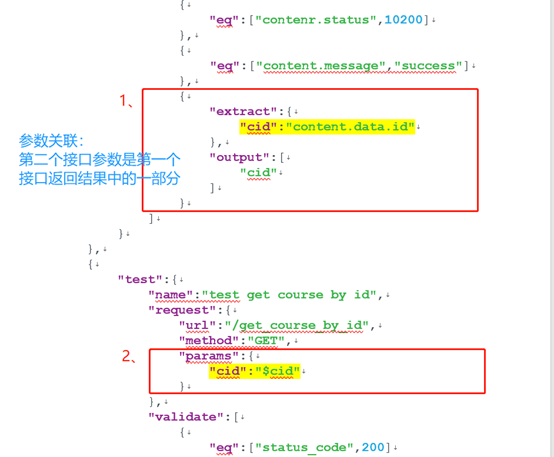
5、参数关联
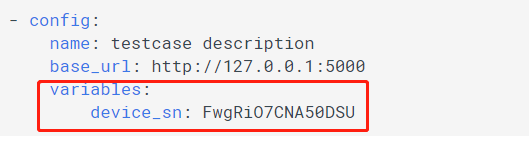
6、变量的声明和引用
【在config中定义的variables为全局变量,在test中定义的variables为局部变量,仅供当前test引用,test会继承config中的配置】

7、抽取公共变量到config [全局变量]
8、实现动态逻辑运算
操作步骤:在测试用例文件的同级或父级创建一个【debugtalk.py】文件,然后再其中定义相关的函数和变量;
如:定义一个生成随机数的函数:
import random
import string
SECRET_KEY = "DebugTalk"
def get_random_string(str_len):
random_char_list = []
for _ in range(str_len):
random_char = random.choice(string.ascii_letters + string.digits)
random_char_list.append(random_char)
random_string = ''.join(random_char_list)
return random_string
调用:
"variables": [
{"device_sn": "${get_random_string(12)}"}
]
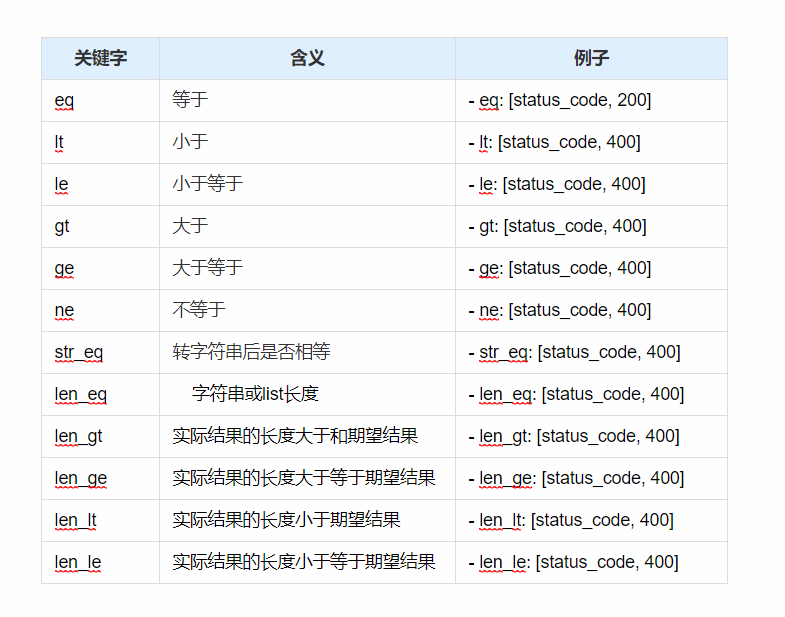
9、断言
【validate断言检查,eq是equals的缩写】
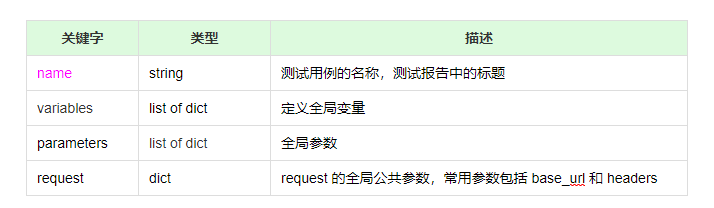
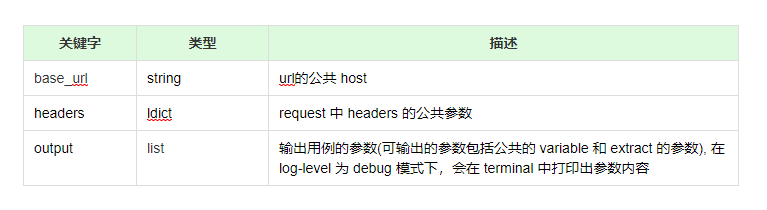
10、httprunner常用关键字列举
【config】
【test】
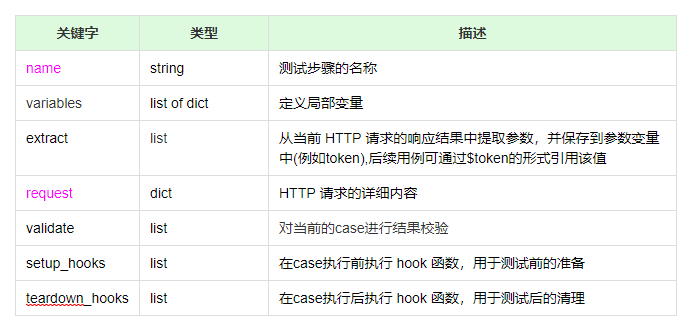
【request】
11、hook函数编写
【hook 函数的定义放置在项目的 debugtalk.py 中,在 YAML/JSON 中调用 hook 函数仍然是采用 ${func($a, $b)} 的形式。】
hook函数分为:setup_hooks和teardown_hooks
hook机制分为两个层级: testcase的config和test
config中的setup_hooks和teardown_hooks 类似于unittest中的setUpClass和tearDownClass
test中的setup_hooks和teardown_hooks 针对单个case生效
12、parameters参数化(httprunner版本为1.5.8,参数化支持在testcases中进行)
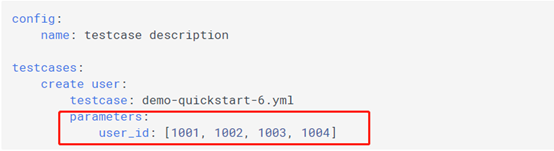
注:也可以使用.csv文件进行数据驱动。
一对一的参数化demo:


 1 - config:
 2     name: "接口测试test"
 3     request:
 4       base_url: http://xx.xx.xx
 5     parameters:
 6       - username-password-message-code:
 7         - ["test1", "123456", "OK", 1]
 8         - ["test2", "test", "用户名或密码错误", 2]
 9         - ["test3", "123456", "OK", 1]
10
11 - test:
12     name: login case
13     request:
14         url: /login
15         method: POST
16         headers:
17             Content-Type: application/json
18         json:
19             username: $username
20             password: $password
21
22     validate:
23         - eq: [status_code, 200]
24         - eq: [json.code, $code]
25         - eq: [json.message, $message]
多对一的参数化demo:
 1 - config:
 2     name: "接口测试test"
 3     request:
 4       base_url: http://xx.xx.xx
 5     parameters:
 6       - username: ["test1", "test2", "test3"]
 7       - password: ["123456"]
 8
 9 - test:
10     name: login case
11     request:
12         url: /login
13         method: POST
14         headers:
15             Content-Type: application/json
16         json:
17             username: $username
18             password: $password
19
20     validate:
21         - eq: [status_code, 200]
多对多的参数化demo:
[使用笛卡尔积组合:共2x3=6种组合]
 1 - config:
 2     name: "接口测试test"
 3     request:
 4       base_url: http://xx.xx.xx.xx
 5     parameters:
 6       - username: ["test1", "test2", "test3"]
 7       - password: ["123456","111111"]
 8
 9 - test:
10     name: login case
11     request:
12         url: /login
13         method: POST
14         headers:
15             Content-Type: application/json
16         json:
17             username: $username
18             password: $password
19     validate:
20         - eq: [status_code, 200]
使用csv文件参数化demo:
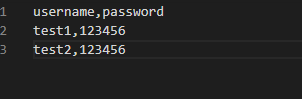
login.csv:
testcases:
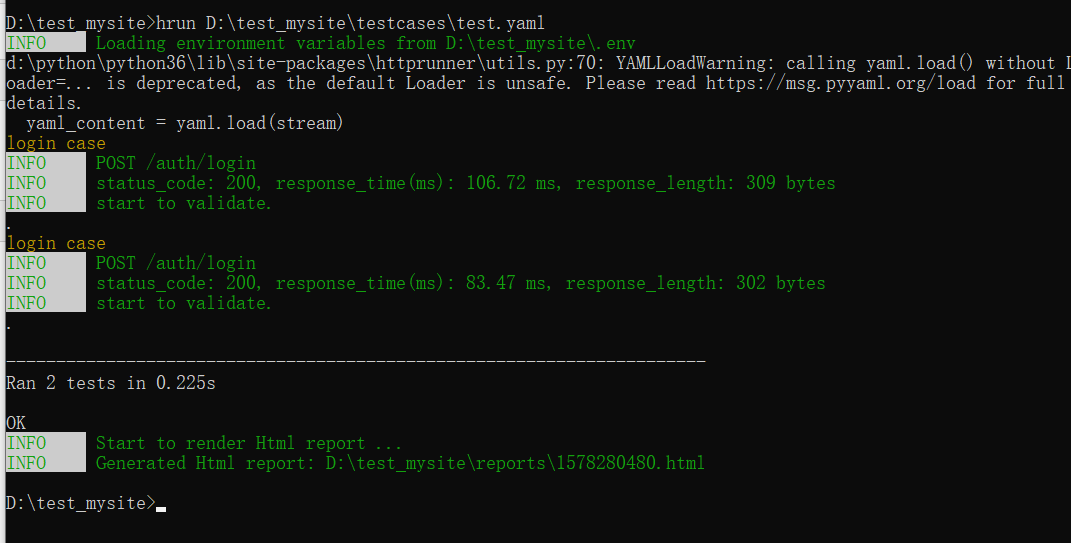
 1 - config:
 2     name: "接口测试test"
 3     request:
 4       base_url: http://xx.xx.xx.xx
 5     parameters:
 6       - username-password: ${P(login.csv)}
 7
 8 - test:
 9     name: login case
10     request:
11         url: /login
12         method: POST
13         headers:
14             Content-Type: application/json
15         json:
16             username: $username
17             password: $password
18
19     validate:
20         - eq: [status_code, 200]
21         - eq: [json.code, 1]
22         - eq: [json.message, 'OK']
运行结果:
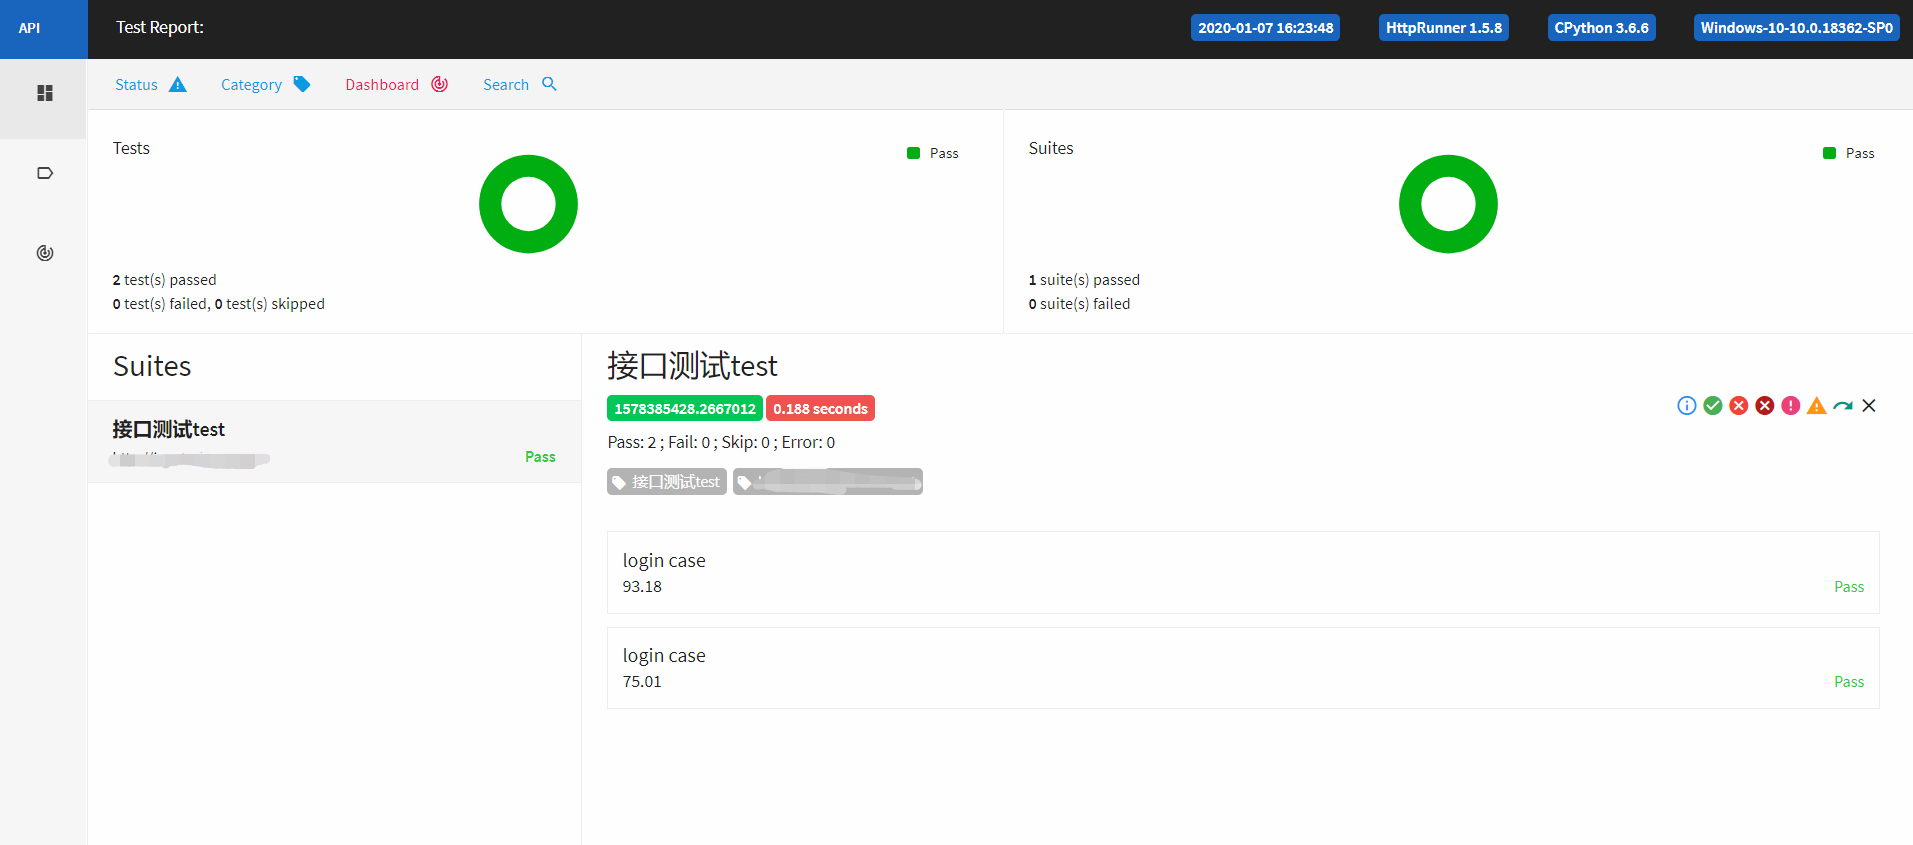
报告截图:
(报告的模板可以替换,位置在\python\Lib\site-packages\httprunner\templates下,但是2.0.0中只有一个默认的模板,1.5.8中有两个模板,可以拷贝一个,但是运行会报错)
默认模板:

替换模板:(hrun testcases/test.yaml --html-report-template D:/Python/Python36/Lib/site-packages/httprunner/templates/extent_report_template.htm
13、接口自动化demo(httprunner版本为2.0.0,支持分层的思想,并且参数化需要放在suite中进行)
【如果暂时很难理解分层思想,可以不用过多纠结,写的case多了会自然考虑到这些因素,届时再去找相应的文档学习理解】
【api】
[test0105.yaml]
 1 name: test0105
 2 variables:
 3     - username: name2
 4     - password: pwd2
 5 request:
 6     method: POST
 7     url: http://xx.xx.xx
 8     headers:
 9         Content-Type: application/json
10     json:
11         username: $username
12         password: $password
13 validate:
14     -   eq:
15         -   status_code
16         -   200
[test0106.yaml]
 1 name: test0106
 2 variables:
 3     - username: name1
 4     - password: pwd1
 5 request:
 6     method: POST
 7     url: http://xx.xx.xx
 8     headers:
 9         Content-Type: application/json
10     json:
11         username: $username
12         password: $password
13 validate:
14     -   eq:
15         -   status_code
16         -   200
【testcases】
[test0105.yaml]
1 - config:
2     name: "testcase05"
3
4 - test:
5     name: testcase1
6     api: api/test0105.yaml
[test0106.yaml]
1 - config:
2     name: "testcase06"
3
4 - test:
5     name: testcase2
6     api: api/test0106.yaml
【testsuite】
 1 config:
 2     name: "单接口测试testsuites"
 3 testcases:
 4     create1:
 5         testcase: testcases/test0105.yaml
 6         parameters:
 7          - username-password: ${P(data/login.csv)}
 8
 9
10     create2:
11         testcase: testcases/test0106.yaml
12         parameters:
13             - username-password: ${P(data/login.csv)}
【data】

【运行结果】
【报告】

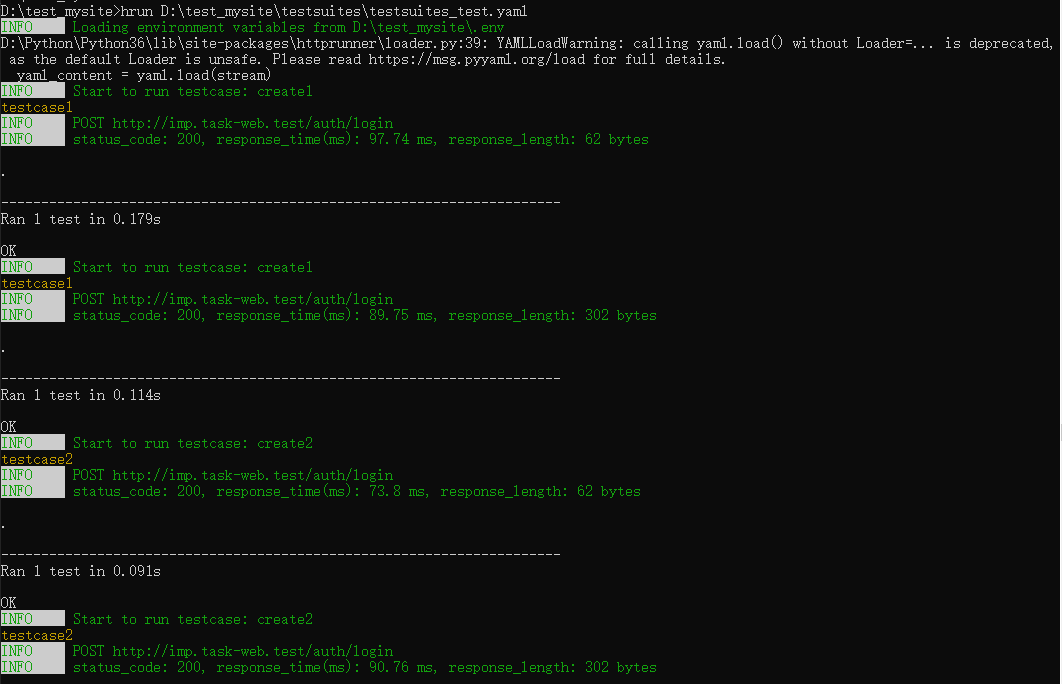
运行:在test_mysite路径下,hrun d:\xx\xx\testsuites\xxxx.yaml
报告:在当前路径下运行,就去这个路径下找reports文件夹,若是没有,则新建一个reports文件夹,生成报告;
11、httprunner性能测试
原理: 使用的还是locust,但是locusts -f 和 locust -f的区别是前者可以运行.yaml或.json文件,并且转换为python文件,再按照locust的方式运行;
【步骤:】
1) 安装locustio
pip install locustio
2) 在项目路径下执行
locusts -f xxxx/xxxxxx.yaml 或者是 locusts -f xxxx/xxxxxx.json
3) 访问 http://localhost:8089/,设置参数,点击start
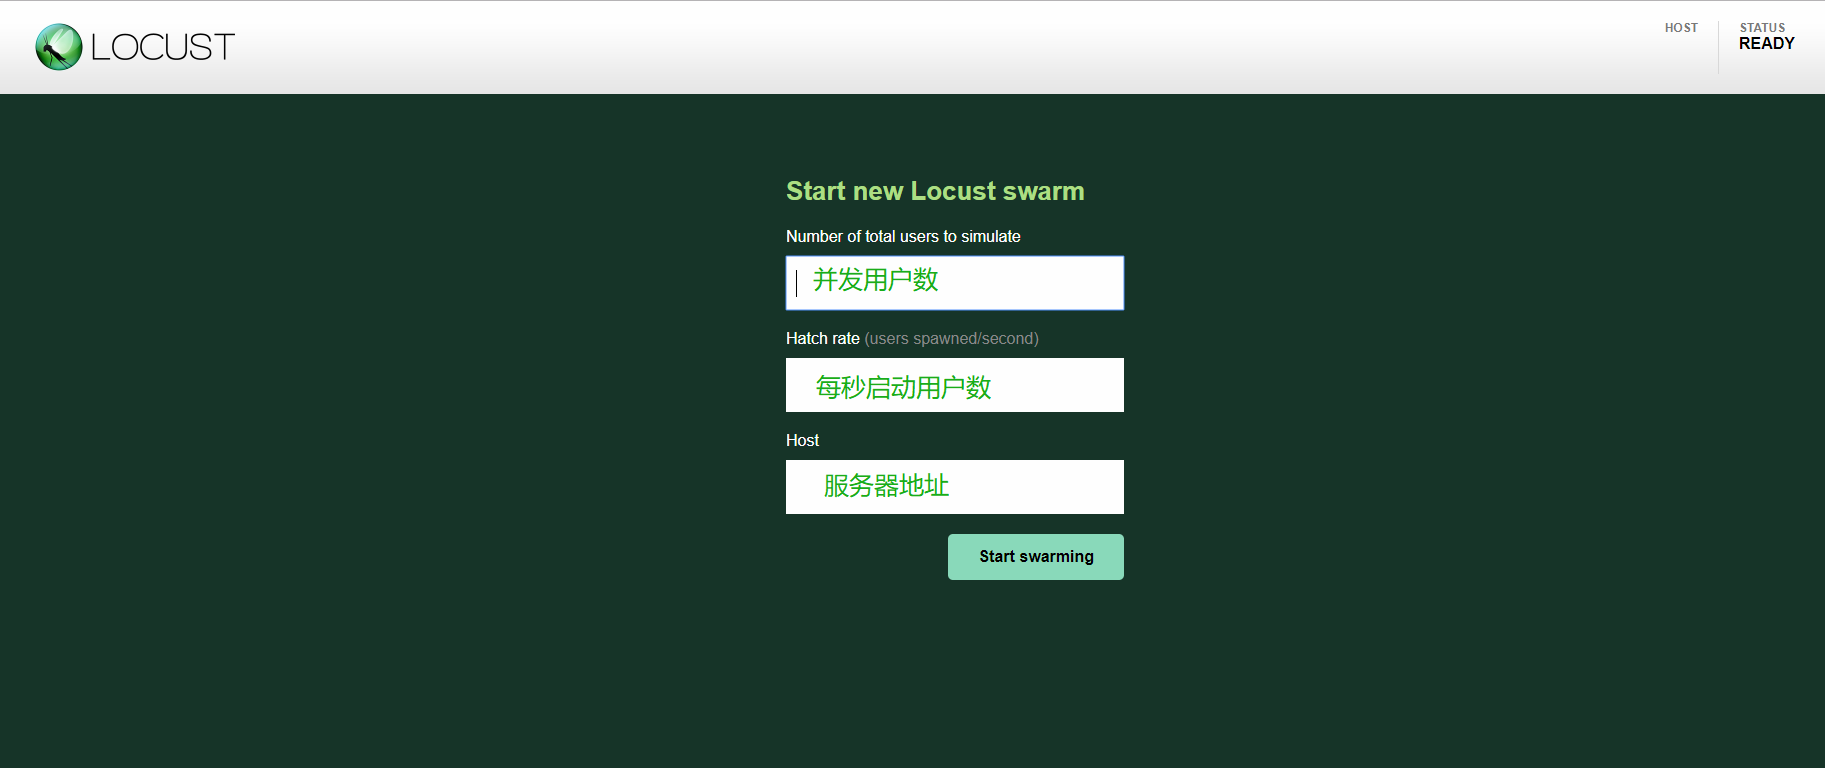
4) 查看结果:


5) 分析测试结果。
*** 有兴趣可加入测试交流群一起学习:QQ群号:744419090 ***
参考资料:
1、https://cn.httprunner.org/
2、https://www.cnblogs.com/snailgirl/p/10309519.html
3、https://www.cnblogs.com/yoyoketang/p/11575646.html
若有疑问,欢迎讨论指正;

 浙公网安备 33010602011771号