

Vue响应式原理
本文只分析了data中数据变为响应式对象,及修改触发dom更新的过程,computed和watch暂不讨论
一、Vue如何实现数据响应式
1、new Vue() 实例时,调用原型上_init() 方法
function Vue (options) {
  if (process.env.NODE_ENV !== 'production' &&
    !(this instanceof Vue)
  ) {
    warn('Vue is a constructor and should be called with the `new` keyword')
  }
  this._init(options)
}
2、_init方法中主要代码如下,其中调用initState方法
Vue.prototype._init = function (options?: Object) {
    const vm: Component = this
    // a uid
    vm._uid = uid++

    // a flag to avoid this being observed
    vm._isVue = true
    // merge options
    if (options && options._isComponent) {
      // optimize internal component instantiation
      // since dynamic options merging is pretty slow, and none of the
      // internal component options needs special treatment.
      initInternalComponent(vm, options)
    } else {
      vm.$options = mergeOptions(
        resolveConstructorOptions(vm.constructor),
        options || {},
        vm
      )
    }
    /* istanbul ignore else */
    if (process.env.NODE_ENV !== 'production') {
      initProxy(vm)
    } else {
      vm._renderProxy = vm
    }
    // expose real self
    vm._self = vm
    initLifecycle(vm)
    initEvents(vm)
    initRender(vm)
    callHook(vm, 'beforeCreate')
    initInjections(vm) // resolve injections before data/props
    initState(vm)
    initProvide(vm) // resolve provide after data/props
    callHook(vm, 'created')

    if (vm.$options.el) {
      vm.$mount(vm.$options.el)
    }
  }
3、initState方法主要初始化了props、data、methods、computed、watch等
export function initState (vm: Component) {
  vm._watchers = []
  const opts = vm.$options
  if (opts.props) initProps(vm, opts.props)
  if (opts.methods) initMethods(vm, opts.methods)
  if (opts.data) {
    initData(vm)
  } else {
    observe(vm._data = {}, true /* asRootData */)
  }
  if (opts.computed) initComputed(vm, opts.computed)
  if (opts.watch && opts.watch !== nativeWatch) {
    initWatch(vm, opts.watch)
  }
}
4、首先分析initData方法,方法最后调用 observe 方法
function initData (vm: Component) {
  let data = vm.$options.data
  data = vm._data = typeof data === 'function'
    ? getData(data, vm)
    : data || {}
  /** 省略代码
   *  1、提示data方法应该返回一个对象
   *  2、对比data和props、methods中的属性,如果重复则抛出警告
   *  3、代理 使通过this.x 访问data中的x属性值时,实际访问的是this._data.x
    */
  // observe data
  observe(data, true /* asRootData */)
}
observe 方法实现
function observe (value, asRootData) {
  // 如果观测的数据不是一个对象或者是一个VNode,则直接返回
  if (!isObject(value) || value instanceof VNode) {
    return
  }
  var ob;
  // 如果观测的对象已经包含了__ob__,说明该对象已经处于观测中,__ob__实际上是一个Observer实例,后面会介绍如何定义
  if (hasOwn(value, '__ob__') && value.__ob__ instanceof Observer) {
    ob = value.__ob__;
  } else if (
    shouldObserve &&
    !isServerRendering() &&
    (Array.isArray(value) || isPlainObject(value)) &&
    Object.isExtensible(value) &&
    !value._isVue
  ) {
    // 否则满足上述条件下,new Observer
    ob = new Observer(value);
  }
  if (asRootData && ob) {
    ob.vmCount++;
  }
  return ob
}
5、Observer对象源码如下
export class Observer {
  value: any;
  dep: Dep;
  vmCount: number; // number of vms that have this object as root $data
  constructor (value: any) {
    this.value = value
    this.dep = new Dep()
    this.vmCount = 0
  // 给被观测的数据定义__ob__ 属性,属性值为当前Observer实例对象
  // def方法是对Object.defineProperty方法的封装,第四个参数如果不传递或者传入false,则表示不可枚举
    def(value, '__ob__', this)
   // 被观测对象是数组
    if (Array.isArray(value)) {
    // 绑定一些数组方法,包括push、pop、shift、unshift、splice、reverse、sort方法,可以触发视图更新操作等
      if (hasProto) {
        protoAugment(value, arrayMethods)
      } else {
        copyAugment(value, arrayMethods, arrayKeys)
      }
    //  调用observeArray 方法,该方法主要遍历数组每项,并对每项执行observe方法,进行观测
      this.observeArray(value)
    } else {
    // 被观测数据是对象,调用walk方法,该方法主要遍历对象所有属性,并将对应属性值全部变成响应式对象
      this.walk(value)
    }
  }
  walk (obj: Object) {
    const keys = Object.keys(obj)
    for (let i = 0; i < keys.length; i++) {
    // 将对象变成响应式对象的方法调用
      defineReactive(obj, keys[i])
    }
  }
  observeArray (items: Array<any>) {
    for (let i = 0, l = items.length; i < l; i++) {
      observe(items[i])
    }
  }
}
6、defineReactive方法源码如下
export function defineReactive (
  obj: Object,
  key: string,
  val: any,
  customSetter?: ?Function,
  shallow?: boolean
) {
  const dep = new Dep()
 // 省略。。。,最终结果可以认为val = obj[key]
 val = obj[key]
 // 对对象属性递归执行observe方法,将每个对象属性值设置get、set方法,变成响应式对象
  let childOb = !shallow && observe(val)
  Object.defineProperty(obj, key, {
    enumerable: true,
    configurable: true,
    get: function reactiveGetter () {
    // 这个方法在render方法执行时,会访问数据,则调用get方法,在这个方法中会进行依赖收集
      const value = getter ? getter.call(obj) : val
      if (Dep.target) {
        dep.depend()
        if (childOb) {
          childOb.dep.depend()
          if (Array.isArray(value)) {
            dependArray(value)
          }
        }
      }
      return value
    },
    set: function reactiveSetter (newVal) {
      const value = getter ? getter.call(obj) : val
      /* eslint-disable no-self-compare */
      if (newVal === value || (newVal !== newVal && value !== value)) {
        return
      }
      /* eslint-enable no-self-compare */
      if (process.env.NODE_ENV !== 'production' && customSetter) {
        customSetter()
      }
      // #7981: for accessor properties without setter
      if (getter && !setter) return
      if (setter) {
        setter.call(obj, newVal)
      } else {
        val = newVal
      }
      childOb = !shallow && observe(newVal)
      dep.notify()
    }
  })
}
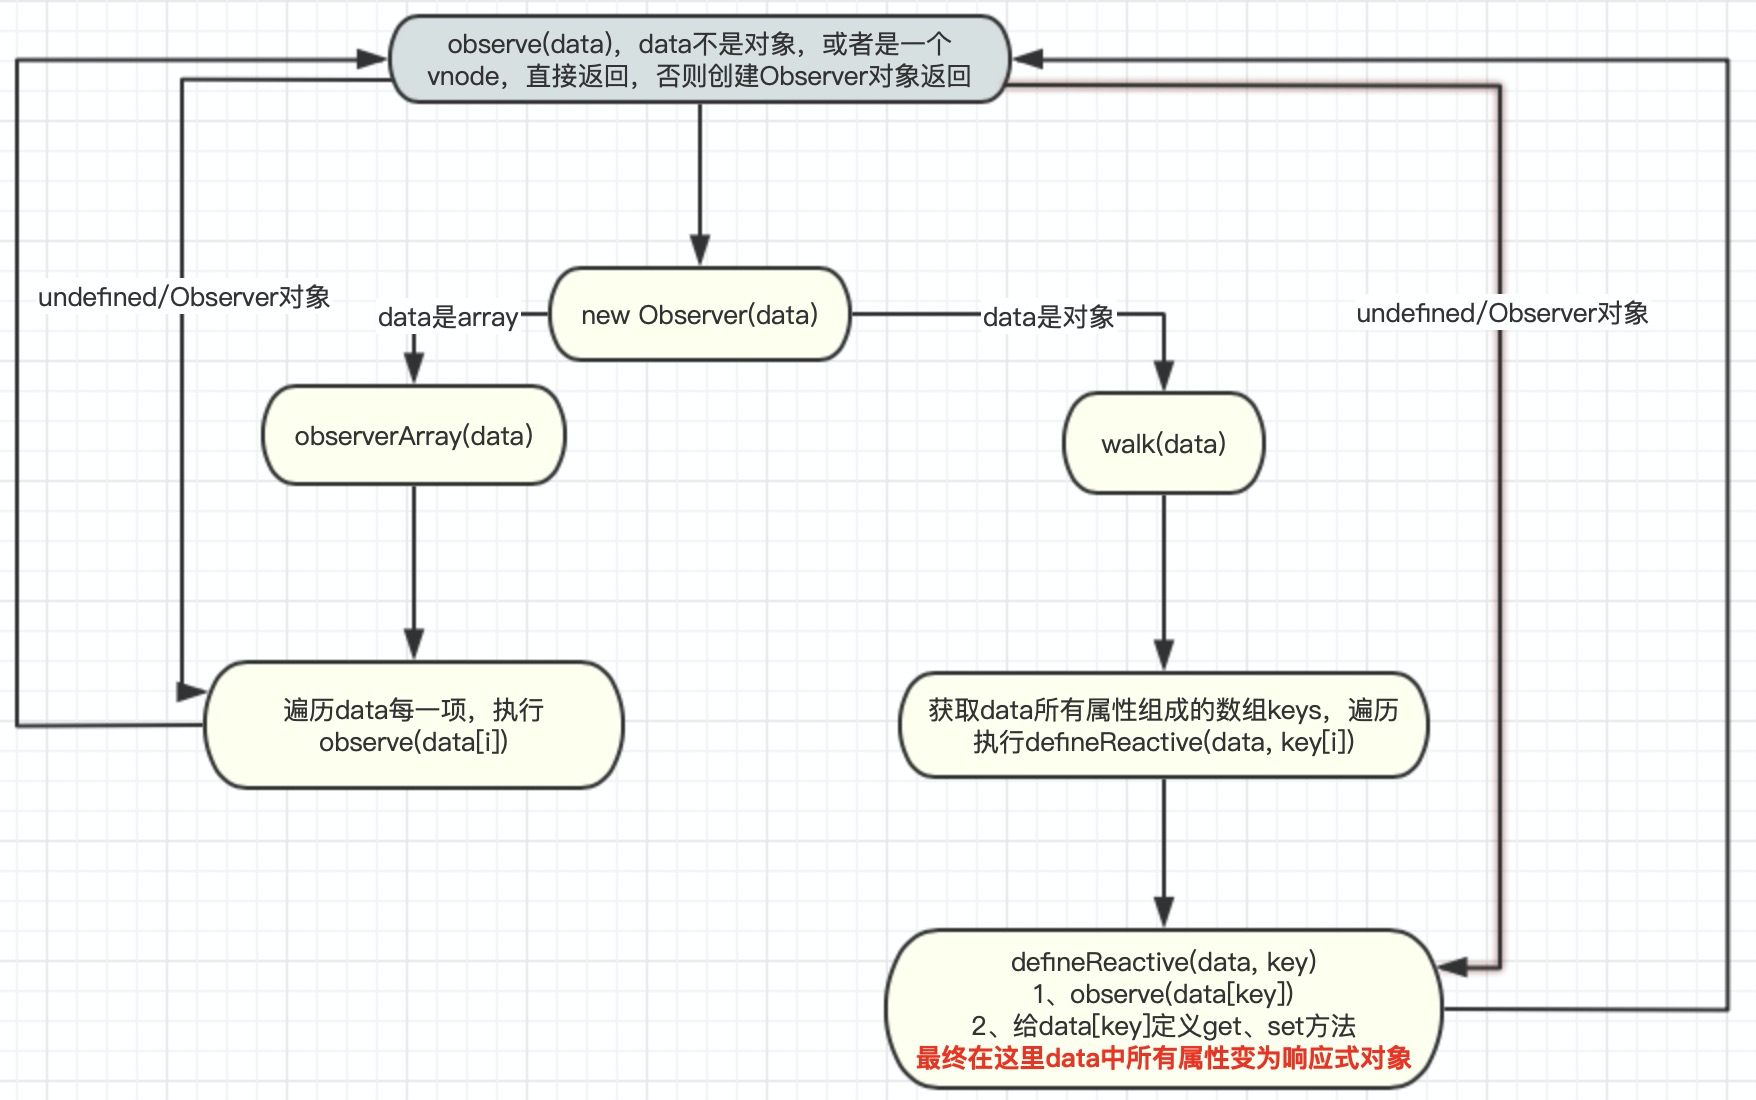
通过上述流程,则将data中的数据全部变成响应式对象,用一张图表示
二、依赖收集
上面提到,当访问某项数据时,会触发该数据的访问器get属性,那么什么时候会访问数据呢,其实是在render方法执行,生成vdom的过程中会进行数据的访问
从上面_init方法中看到,最后执行了vm.$mount ()方法
$mount()方法的前半部分主要是生成render函数,最后调用runtime-only和runtime-compiler版本共同的mount方法,可以参考 https://www.cnblogs.com/happy-dog/p/13697646.html
Vue.prototype.$mount = function (
  el?: string | Element,
  hydrating?: boolean
): Component {
  el = el && inBrowser ? query(el) : undefined
  return mountComponent(this, el, hydrating)
}
mountComponent 方法实现
export function mountComponent (
  vm: Component,
  el: ?Element,
  hydrating?: boolean
): Component {
  vm.$el = el
  /** 省略代码,提示使用了runtime-only版本下使用了template方式,应该换成render方式或者切换到runtime-compiler版本 */
  callHook(vm, 'beforeMount')    // 调用生命周期函数
  let updateComponent
  /** 省略updateComponent的一些判断赋值,主要是增加了性能统计的一些代码 */
  updateComponent = () => {
    vm._update(vm._render(), hydrating)       // 1、render方法在updateComponent方法执行时执行,那么updateComponent方法什么时候执行呢
  }
  new Watcher(vm, updateComponent, noop, {    // 2、updateComponent方法作为实例化Watcher对象的参数, 这个Watcher对象是一个渲染watcher
    before () {
      if (vm._isMounted && !vm._isDestroyed) {
        callHook(vm, 'beforeUpdate')
      }
    }
  }, true /* isRenderWatcher */)
  hydrating = false

  if (vm.$vnode == null) {
    vm._isMounted = true
    callHook(vm, 'mounted')
  }
  return vm
}
watcher 构造函数和get方法实现
constructor (
    vm: Component,
    expOrFn: string | Function,
    cb: Function,
    options?: ?Object,
    isRenderWatcher?: boolean
  ) {
    this.vm = vm
    if (isRenderWatcher) {
      vm._watcher = this
    }
    vm._watchers.push(this)
    /** 省略一些实例属性的赋值,目前不那么重要 */
    this.cb = cb
    this.id = ++uid // uid for batching
    this.deps = []
    this.newDeps = []
    this.depIds = new Set()
    this.newDepIds = new Set()
    this.expression = process.env.NODE_ENV !== 'production'
      ? expOrFn.toString()
      : ''
    this.getter = expOrFn

    this.value = this.get()           // 1、实例化Watcher时,最后调用了get方法
  }

  get () {
    pushTarget(this)                  // 2、首先执行pushTarget方法,该方法位于在源码dep.js文件中,给Dep订阅器设置唯一的watcher,并把当前watcher推入targetStack中
    let value
    const vm = this.vm
    try {
      // 实际调用updateComponent方法
      value = this.getter.call(vm, vm)   // 3、执行getter方法,实际上就是执行updateComponent方法,即会执行vm_render()方法,该方法返回vnode,会访问数据,从而触发访问器属性get
    } catch (e) {
      /** updateComponent函数调用错误处理, */
    } finally {
      if (this.deep) {
        traverse(value)
      }
      popTarget()                       // 4、此时依赖收集完成,从targetStack中弹出更新完的watcher,并把Dep.target置为targetStack中上一个watcher
      this.cleanupDeps()                // 5、做一个newDepIds —— depIds,newDeps —— deps;并把newDepIds 和 newDeps清空
    }
    return value
  }
回到Vue把数据变成响应式对象时,定义的get属性
get: function reactiveGetter () {
    const value = getter ? getter.call(obj) : val
    if (Dep.target) {
        dep.depend()             // Dep对象的depend方法判断Dep.target存在,执行Dep.target.addDep(dep),即调用Watcher对象的addDep方法
        if (childOb) {
          childOb.dep.depend()
          if (Array.isArray(value)) {
            dependArray(value)
          }
       }
    }
    return value
},
addDep (dep: Dep) {
    const id = dep.id
    if (!this.newDepIds.has(id)) {
      this.newDepIds.add(id)
      this.newDeps.push(dep)
      if (!this.depIds.has(id)) {     // 判断
        dep.addSub(this)
      }
    }
  }
// 把订阅器dep放在当前watcher的newDeps和newDepIds中,并且如果把当前watcher放在dep的subs中,即watcher中保存了dep,dep中也保存了watcher
通过上述过程,即完成了依赖收集
三、派发更新
从前面的分析中,知道vdom生成过程中,进行了数据的访问,完成了收集依赖,接下来分析修改数据,更新dom的过程
修改数据时,触发访问器属性,set方法中,最后调用了dep.notify()
  notify () {
    // stabilize the subscriber list first
    const subs = this.subs.slice()
    /** 省略判断非异步更新的情况 */
    // 遍历subs中的watcher,触发update方法
    for (let i = 0, l = subs.length; i < l; i++) {
      subs[i].update()
    }
  }
update () {
    if (this.lazy) {
      this.dirty = true
    } else if (this.sync) {
      this.run()            // 如果是同步更新,不用放在下一个tick,直接执行run方法
    } else {
      queueWatcher(this)     // 一般都会走到这里,调用queueWatcher方法
    }
  }
queueWatcher 主要代码实现
export function queueWatcher (watcher: Watcher) {
  const id = watcher.id
  if (has[id] == null) {
    has[id] = true
    queue.push(watcher)               // 用队列收集需要更新的watcher
     nextTick(flushSchedulerQueue)    // 执行nextTick方法
  }
}
// nextTick 主要代码实现
const callbacks = []
export function nextTick (cb?: Function, ctx?: Object) {
  let _resolve
  callbacks.push(() => {
    cb.call(ctx)
  })                                   // 回调函数统一收集传入的cb函数,即flushSchedulerQueue
  if (!pending) {
    pending = true
    timerFunc()                        // 执行timerFunc()
  }
}
let timerFunc
if (typeof Promise !== 'undefined' && isNative(Promise)) {
  const p = Promise.resolve()
  timerFunc = () => {
    p.then(flushCallbacks)
    if (isIOS) setTimeout(noop)
  }
  isUsingMicroTask = true
} else if (!isIE && typeof MutationObserver !== 'undefined' && (
  isNative(MutationObserver) ||
  MutationObserver.toString() === '[object MutationObserverConstructor]'
)) {
  let counter = 1
  const observer = new MutationObserver(flushCallbacks)
  const textNode = document.createTextNode(String(counter))
  observer.observe(textNode, {
    characterData: true
  })
  timerFunc = () => {
    counter = (counter + 1) % 2
    textNode.data = String(counter)
  }
  isUsingMicroTask = true
} else if (typeof setImmediate !== 'undefined' && isNative(setImmediate)) {
  timerFunc = () => {
    setImmediate(flushCallbacks)
  }
} else {
  timerFunc = () => {
    setTimeout(flushCallbacks, 0)
  }
}
主要是上面把callbacks中存放的flushSchedulerQueue方法放在异步中调用,如果浏览器支持原生Promise或者MutationObserver,则表示使用的微任务,否则表示回调放在宏任务中执行,
这样只有当执行栈中所有同步代码执行完成,才会执行nextTick方法中传入的flushSchedulerQueue
flushSchedulerQueue 主要代码实现
function flushSchedulerQueue () {
  currentFlushTimestamp = getNow()
  flushing = true
  let watcher, id
  /** 排序原因
   * 对watcher进行排序,因为组件更新是从父组件到子组件的,一个组件的自定义watcher在渲染watcher之前,
   * 自定义组件先于渲染watcher被创建(initState方法创建了自定义watcher,new Watcher创建渲染watcher),
   * 如果执行父组件的watcher时,子组件被销毁,则子组件的watcher可以被跳过,不执行  */
  queue.sort((a, b) => a.id - b.id)
  // 遍历queue队列中watcher,进行更新
  for (index = 0; index < queue.length; index++) {
    watcher = queue[index]
    if (watcher.before) {
      watcher.before()                                // 执行beforeUpdate钩子函数
    }
    id = watcher.id
    has[id] = null
    watcher.run()                                     // 执行watcher.run, 触发vdom的重新生成渲染
    /** 省略非生产环境下,判断是否触发了死循环,watcher一个对象变化,在里面又触发了这个对象变化,导致的死循环 */
  }

  const activatedQueue = activatedChildren.slice()    // keep-alive组件相关,暂时不管
  const updatedQueue = queue.slice()                  // 暂存watcher队列,因为下面一行代码会做一些变量重置,queue会被重置为空数组

  resetSchedulerState()                               // 重置queue,has,wait,flush

  callActivatedHooks(activatedQueue)                  // keep-alive组件相关,暂时不管
  callUpdatedHooks(updatedQueue)                      // 所有watcher执行完成之后触发updated钩子函数
}
watcher run主要代码实现
run () {
    if (this.active) {
    // 触发get方法实现,前面分析过get方法主要操作
    // 1、pushTarget
    // 2、调用this.getter() ,即updateComponent方法,该方法主要是先生成vdom,然后执行vm._update来更新dom
    // 3、popTarget
    // 4、cleanupDeps,清空newDeps
     const value = this.get()
    // 省略了不影响主逻辑的代码,涉及到自定义watcher的一些实现
    }
  }
cleanupDeps 主要代码实现
cleanupDeps () {
   // 不是第一次收集依赖时,deps不为空
    let i = this.deps.length
    while (i--) {
      const dep = this.deps[i]
    // 遍历deps,移除旧的订阅,防止某些组件被删除了,但是订阅却依然存在,导致不必要的浪费
    // 依赖收集是每次更新数据时都会做的事情,所以虽然旧的订阅被移除了,但是如果下次访问对应数据,还是会进行依赖的收集
      if (!this.newDepIds.has(dep.id)) {
        dep.removeSub(this)
      }
    }
   // 将newDeps和newDepIds分别赋值给deps和depIds,并移除newDeps和newDepIds
    let tmp = this.depIds
    this.depIds = this.newDepIds
    this.newDepIds = tmp
    this.newDepIds.clear()
    tmp = this.deps
    this.deps = this.newDeps
    this.newDeps = tmp
    this.newDeps.length = 0
  }
整个派发更新的过程到此就结束了,中间其实跳过了很多自己不理解的代码,但是对主要流程不影响
整个过程是看完 黄佚老师的视频之后(https://coding.imooc.com/learn/list/228.html),自己又梳理了一遍,后面如果有更深刻的认识,会在补充
beforeMount执行时机:new Watcher之前,创建vdom之前
beforeUpdate执行时机:调用watcher.run之前,即重新生成vdom之前
updated执行时机:页面更新完成之后

 浙公网安备 33010602011771号