Nginx从入门到实践(三)
动静分离
动静分离是将网站静态资源(JavaScript,CSS,img等文件)与后台应用分开部署,提高用户访问静态代码的速度,降低对后台应用访问。
动静分离的一种做法是将静态资源部署在nginx上,后台项目部署到应用服务器上,根据一定规则静态资源的请求全部请求nginx服务器,达到动静分离的目标。
rewrite规则
Rewrite 主要的功能就是实现URL的重写,Nginx的rewrite功能是使用nginx提供的全局变量或自己设置的变量,结合正则表达式和标志位实现url重写以及重定向。
Syntax: rewrite regex replacement [flag];
Default: —
Context: server, location, if
flag:
- last:停止处理当前的 ngx_http_rewrite_module 指令集合,开始搜索能够匹配修改过的 URI 的新的 location
- break:跟 break 指令一样,停止处理当前的 ngx_http_rewrite_module 指令集合
- redirect:返回使用 302 代码的临时重定向,在替换字符串不以“http//”,“https//”或“$scheme”开头时使用
- permanent:返回使用 301 代码的永久重定向
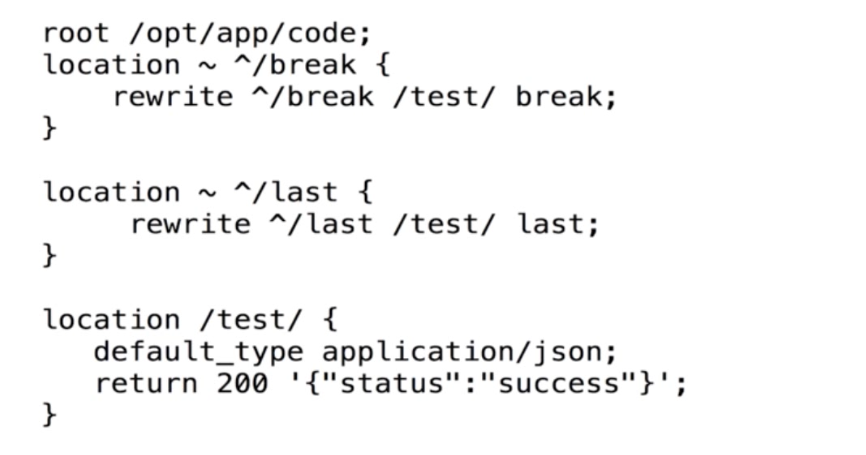
浏览器访问/break返回的时404, 访问/last和/test都是success
访问/break时会从 root中查找/test/文件,访问/last时会新建一个/test的请求
高级模块
secure_link模块
http://nginx.org/en/docs/http/ngx_http_secure_link_module.html
ngx_http_secure_link_module模块能够检查请求链接的权限以及是否过期,多用于下载服务器防盗链
原理
1)加密串与过期时间作为url中的参数
2)nginx服务器接收到了过期时间,也使用过期时间、配置里密钥、文件uri生成加密串
3)计算的加密串与url传递的加密串进行对比
通过将请求中传递的校验和值与为请求计算的值进行比较来验证所请求链接的真实性。如果链接的生命周期有限且时间已过,则该链接将被视为过时。这些检查的状态在$secure_link变量中可用 。
location  / {
    secure_link $arg_md5,$arg_expires;  #设置两个变量
    secure_link_md5 "xxxxxx$remote_addr$arg_expires";   #设置md5,当作口令

    if ($secure_link = "") {
        # 资源不存在或哈希比对失败
        return 403;
    }

    if ($secure_link = "0") {
        # 时间戳过期
        return 410;
    }
}


 $secret = 'xxxxxx'; # 密钥
 $path = '/web/nginx-1.4.2.tar.gz'; # 下载文件
 # 下载到期时间,time是当前时间,300表示300秒,也就是说从现在到300秒之内文件不过期
 $expire = time()+300;
# 用文件路径、密钥、过期时间生成加密串
 $md5 = base64_encode(md5($secret . $path . $expire, true));
 $md5 = strtr($md5, '+/', '-_');
 $md5 = str_replace('=', '', $md5);
# 加密后的下载地址
 echo '<a href=http://s1.down.ttlsa.com/web/nginx-1.4.2.tar.gz?md5='.$md5.'&expires='.$expire.'>nginx-1.4.2</a>';
 echo '<br>http://s1.down.ttlsa.com/web/nginx-1.4.2.tar.gz?md5='.$md5.'&expires='.$expire;
打开下载地址,等到5分钟后在下载一次,你会发现点击下载会跳转到410页面
Geoip读取地域信息
http://nginx.org/en/docs/http/ngx_http_geoip_module.html
安装
yum install nginx-module-geoip
安装的文件在/etc/nginx/modules文件夹下
[root@GYJ modules]# pwd
/etc/nginx/modules
[root@GYJ modules]# ls
ngx_http_geoip_module-debug.so         ngx_http_perl_module.so
ngx_http_geoip_module.so               ngx_http_xslt_filter_module-debug.so
ngx_http_image_filter_module-debug.so  ngx_http_xslt_filter_module.so
ngx_http_image_filter_module.so        ngx_stream_geoip_module-debug.so
ngx_http_js_module-debug.so            ngx_stream_geoip_module.so
ngx_http_js_module.so                  ngx_stream_js_module-debug.so
ngx_http_perl_module-debug.so          ngx_stream_js_module.so
创建目录geoip
mkdir -p /etc/nginx/geoip/
cd /etc/nginx/geoip/

# 下载IP库信息文件
wget http://geolite.maxmind.com/download/geoip/database/GeoLiteCountry/GeoIP.dat.gz
wget http://geolite.maxmind.com/download/geoip/database/GeoLiteCity.dat.gz

# 解压
gunzip GeoIP.dat.gz
gunzip GeoLiteCity.dat.gz


[root@GYJ geoip]# ls
GeoIP.dat  GeoLiteCity.dat
在nginx全局配置中加载模块
[root@GYJ nginx]# cat nginx.conf
# For more information on configuration, see:
#   * Official English Documentation: http://nginx.org/en/docs/
#   * Official Russian Documentation: http://nginx.org/ru/docs/

user nginx;
worker_processes auto;
error_log /var/log/nginx/error.log;
pid /run/nginx.pid;

# Load dynamic modules. See /usr/share/nginx/README.dynamic.
include /usr/share/nginx/modules/*.conf;
load_module "modules/ngx_http_geoip_module.so";
load_module "modules/ngx_stream_geoip_module.so";

events {
    worker_connections 1024;
}
配置访问接口
[root@GYJ conf.d]# cat HtmlTest.conf
geoip_country /etc/nginx/geoip/GeoIP.dat;
geoip_city /etc/nginx/geoip/GeoLiteCity.dat;

server {
    listen 80;
    server_name ip; # substitute your machine's IP address or FQDN

    sendfile on;

    location /ip {
            if ($geoip_country_code != CN) {
               return 403;
             }
        }

    location /myip {
            default_type text/plain;
            return 200 "$remote_addr $geoip_country_name $geoip_country_code $geoip_city";
     }

}
关闭代理,访问/myip即可看到自己的IP信息;使用国外代理,访问/ip会显示403
HTTPS服务
超文本传输协议HTTP协议被用于在Web浏览器和网站服务器之间传递信息,HTTP协议以明文方式发送内容,不提供任何方式的数据加密,如果攻击者截取了Web浏览器和网站服务器之间的传输报文,就可以直接读懂其中的信息,因此,HTTP协议不适合传输一些敏感信息,比如:信用卡号、密码等支付信息。
为了解决HTTP协议的这一缺陷,需要使用另一种协议:安全套接字层超文本传输协议HTTPS,为了数据传输的安全,HTTPS在HTTP的基础上加入了SSL协议,SSL依靠证书来验证服务器的身份,并为浏览器和服务器之间的通信加密。
HTTPS就是使用SSL/TLS协议进行加密传输,让客户端拿到服务器的公钥,然后客户端随机生成一个对称加密的秘钥,使用公钥加密,传输给服务端,后续的所有信息都通过该对称秘钥进行加密解密,完成整个HTTPS的流程。
证书签名生成
http://nginx.org/en/docs/http/ngx_http_ssl_module.html
检测是否安装openssl
[root@GYJ conf.d]# openssl version
OpenSSL 1.0.2k-fips  26 Jan 2017
- 生成key密钥
- 生成证书签名请求文件(csr文件)
- 生成证书签名文件(CA文件)
https://www.cnblogs.com/jingxiaoniu/p/6745254.html
cd /etc/nginx
mkdir ssl_key
cd ssl_key

# 创建服务器证书密钥文件 server.key:
openssl genrsa -des3 -out server.key 1024
输入密码,确认密码,自己随便定义,但是要记住,后面会用到。

# 创建服务器证书的申请文件 server.csr
openssl req -new -key server.key -out server.csr

# 输出内容为:
Enter pass phrase for root.key: ← 输入前面创建的密码
Country Name (2 letter code) [AU]:CN ← 国家代号,中国输入CN
State or Province Name (full name) [Some-State]:BeiJing ← 省的全名,拼音
Locality Name (eg, city) []:BeiJing ← 市的全名,拼音
Organization Name (eg, company) [Internet Widgits Pty Ltd]:MyCompany Corp. ← 公司英文名
Organizational Unit Name (eg, section) []: ← 可以不输入
Common Name (eg, YOUR name) []: ← 此时不输入
Email Address []:admin@mycompany.com ← 电子邮箱,可随意填
Please enter the following ‘extra’ attributes
to be sent with your certificate request
A challenge password []: ← 可以不输入
An optional company name []: ← 可以不输入

# 备份一份服务器密钥文件
cp server.key server.key.org

# 生成证书文件server.crt
openssl x509 -req -days 365 -in server.csr -signkey server.key -out server.crt
配置文件
server
 {
   listen       443;
   server_name  ip;
   ssl on;
   ssl_certificate /etc/nginx/ssl_key/server.crt;
   ssl_certificate_key /etc/nginx/ssl_key/server.key;

   index index.html index.htm;
   location / {
       root  /opt/app/code;
   }
}
重启nginx,浏览器访问,如果返回的是503,查看一下nginx的错误日志
tail -f /var/log/nginx/error.log

2018/12/14 21:03:55 [emerg] 30086#30086: SSL_CTX_use_PrivateKey_file("/etc/nginx/ssl_key/server.key") failed (SSL: error:0906406D:PEM routines:PEM_def_callback:problems getting password error:0906A068:PEM routines:PEM_do_header:bad password read error:140B0009:SSL routines:SSL_CTX_use_PrivateKey_file:PEM lib)


cd /etc/nginx/ssl_key
# 去除文件口令(重启nginx无需输入密码)
openssl rsa -in server.key.org -out server.key
重新启动即可,这个证书是自己颁发的,浏览器会提示不安全
苹果要求的openssl后台
先检查一下openssl版本
[root@GYJ ssl_key]# openssl version
OpenSSL 1.0.2k-fips  26 Jan 2017
如果版本不满足,可以升级一下版本
#!/bin/sh
cd /opt/download
wget https://www.openssl.org/source/openssl-1.0.2k.tar.gz
tar -zxvf openssl-1.0.2k.tar.gz
cd openssl-1.0.2k
./config --prefix=/usr/local/openssl
make && make install
mv /usr/bin/openssl   /usr/bin/openssl.OFF
mv /usr/include/openssl   /usr/include/openssl.OFF
ln -s   /usr/local/openssl/bin/openssl   /usr/bin/openssl
ln -s   /usr/local/openssl/include/openssl   /usr/include/openssl
echo "/usr/local/openssl/lib"  >>/etc/ld.so.conf
ldconfig -v
openssl version -a
查看签名文件
[root@GYJ ssl_key]# openssl x509 -noout -text -in server.crt
Certificate:
Data:
Version: 1 (0x0)
Serial Number:
f2:da:9a:30:90:5f:4a:1b
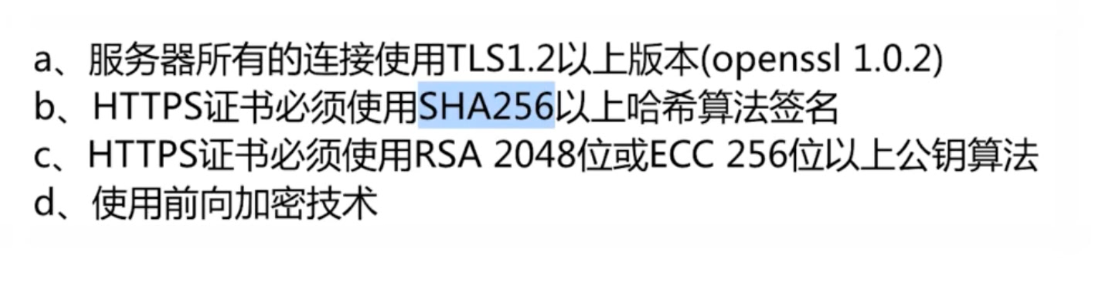
Signature Algorithm: sha256WithRSAEncryption
Issuer: C=CN, ST=HeNan, L=NanYang, O=Ice Corp
Validity
Not Before: Dec 14 12:59:08 2018 GMT
Not After : Dec 14 12:59:08 2019 GMT
Subject: C=CN, ST=HeNan, L=NanYang, O=Ice Corp
Subject Public Key Info:
Public Key Algorithm: rsaEncryption
Public-Key: (1024 bit)
Modulus:
...
Exponent: 65537 (0x10001)
Signature Algorithm: sha256WithRSAEncryption
...
可以看到,算法是sha256,公钥是1024 bit
生成满足苹果要求的crt文件
cd /etc/nginx/ssl_key

openssl req -x509 -days 365 -sha256 -nodes -newkey rsa:2048 -keyout server.key -out server_apple.crt
重新输入一些公司信息
修改一下配置文件
server
 {
   listen       443;
   server_name  ip;
   ssl on;
   # ssl_certificate /etc/nginx/ssl_key/server.crt;
   ssl_certificate /etc/nginx/ssl_key/server_apple.crt;
   ssl_certificate_key /etc/nginx/ssl_key/server.key;

   index index.html index.htm;
   location / {
       root  /usr/share/nginx/html;
   }
}
重新启动服务器即可
HTTPS服务优化
- 激活长连接
keepalive- 设置ssl session 缓存
Nginx与Lua的开发
实现灰度发布
LuaJIT
wget http://luajit.org/download/LuaJIT-2.0.2.tar.gz
tar -zxvf LuaJIT-2.0.2.tar.gz
cd LuaJIT-2.0.2
make install PREFIX=/usr/local/LuaJIT
/etc/profile 文件中加入环境变量
注意路径
export LUAJIT_LIB=/usr/local/LuaJIT/lib
export LUAJIT_INC=/usr/local/LuaJIT/include/luajit-2.0
ngx_devel_kit和lua-nginx-module
cd /root/download
wget https://github.com/simpl/ngx_devel_kit/archive/v0.3.0.tar.gz
wget https://github.com/openresty/lua-nginx-module/archive/v0.10.9rc7.tar.gz
分别解压
重新编译Nginx
cd /root/download
wget http://nginx.org/download/nginx-1.15.5.tar.gz
tar -zxvf nginx-1.15.5.tar.gz
cd nginx-1.15.5
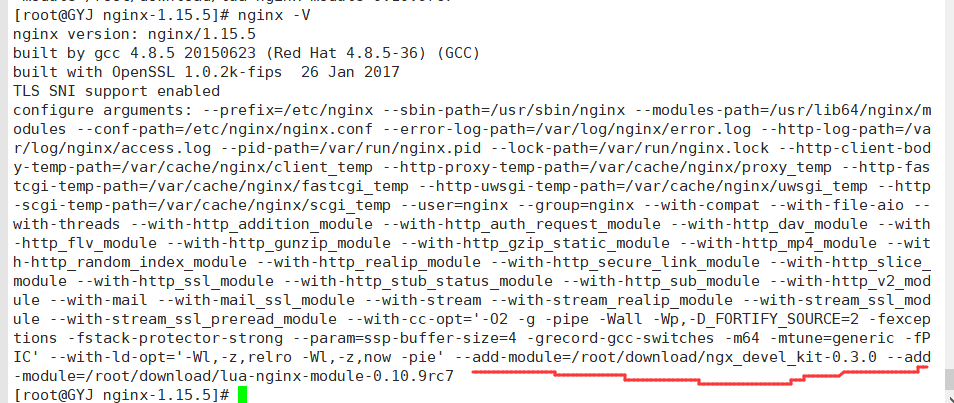
[root@GYJ nginx-1.15.5]# ./configure --prefix=/etc/nginx  \
 --sbin-path=/usr/sbin/nginx \
 --modules-path=/usr/lib64/nginx/modules \
 --conf-path=/etc/nginx/nginx.conf \
 --error-log-path=/var/log/nginx/error.log \
 --http-log-path=/var/log/nginx/access.log \
 --pid-path=/var/run/nginx.pid \
 --lock-path=/var/run/nginx.lock \
 --http-client-body-temp-path=/var/cache/nginx/client_temp \
 --http-proxy-temp-path=/var/cache/nginx/proxy_temp \
 --http-fastcgi-temp-path=/var/cache/nginx/fastcgi_temp \
 --http-uwsgi-temp-path=/var/cache/nginx/uwsgi_temp \
 --http-scgi-temp-path=/var/cache/nginx/scgi_temp \
 --user=nginx \
 --group=nginx \
 --with-compat \
 --with-file-aio \
 --with-threads \
 --with-http_addition_module \
 --with-http_auth_request_module \
 --with-http_dav_module \
 --with-http_flv_module \
 --with-http_gunzip_module \
 --with-http_gzip_static_module \
 --with-http_mp4_module \
 --with-http_random_index_module \
 --with-http_realip_module \
 --with-http_secure_link_module \
 --with-http_slice_module \
 --with-http_ssl_module \
 --with-http_stub_status_module \
 --with-http_sub_module \
 --with-http_v2_module \
 --with-mail \
 --with-mail_ssl_module \
 --with-stream \
 --with-stream_realip_module \
 --with-stream_ssl_module \
 --with-stream_ssl_preread_module \
 --with-cc-opt='-O2 -g -pipe -Wall -Wp,-D_FORTIFY_SOURCE=2 -fexceptions -fstack-protector-strong \
 --param=ssp-buffer-size=4 -grecord-gcc-switches -m64 -mtune=generic -fPIC' \
 --with-ld-opt='-Wl,-z,relro -Wl,-z,now -pie' \
 --add-module=/root/download/ngx_devel_kit-0.3.0 \
 --add-module=/root/download/lua-nginx-module-0.10.9rc7
最后加入lua的模块,注意路径别错了
# 如若出现:
# error: the HTTP gzip module requires the zlib library.
# yum install zlib zlib-devel 一下即可
make -j 4 && make install
加载lua库,加入到ld.so.conf文件
echo "/usr/local/LuaJIT/lib" >> /etc/ld.so.conf

# 然后执行如下命令:
ldconfig
查看一下是否安装成功
简单配置
wget https://github.com/agentzh/lua-resty-memcached/archive/v0.11.tar.gz
tar -zxvf v0.11.tar.gz
cp -r lua-resty-memcached-0.11/lib/resty /usr/local/share/lua/5.1/
server {
    listen       80;
    server_name  localhost;

    #charset koi8-r;
    access_log  /var/log/nginx/log/host.access.log  main;

    location /hello {
        default_type 'text/plain';
        content_by_lua 'ngx.say("hello, lua")';
    }

    location /myip {
        default_type 'text/plain';
        content_by_lua '
            clientIP = ngx.req.get_headers()["x_forwarded_for"]
            ngx.say("IP:",clientIP)
            ';
    }

    location / {
        default_type "text/html";
        content_by_lua_file /opt/app/lua/dep.lua;
        #add_after_body "$http_x_forwarded_for";
    }

    location @server{
        proxy_pass http://127.0.0.1:9090;
    }

    location @server_test{
        proxy_pass http://127.0.0.1:8080;
    }

    error_page   500 502 503 504 404  /50x.html;
    location = /50x.html {
        root   /usr/share/nginx/html;
    }

}
clientIP = ngx.req.get_headers()["X-Real-IP"]
if clientIP == nil then
    clientIP = ngx.req.get_headers()["x_forwarded_for"]
end
if clientIP == nil then
    clientIP = ngx.var.remote_addr
end
    local memcached = require "resty.memcached"
    local memc, err = memcached:new()
    if not memc then
        ngx.say("failed to instantiate memc: ", err)
        return
    end
    local ok, err = memc:connect("127.0.0.1", 11211)
    if not ok then
        ngx.say("failed to connect: ", err)
        return
    end
    local res, flags, err = memc:get(clientIP)
    ngx.say("value key: ",res,clientIP)
    if err then
        ngx.say("failed to get clientIP ", err)
        return
    end
    if  res == "1" then
        ngx.exec("@server_test")
        return
    end
    ngx.exec("@server")

 浙公网安备 33010602011771号