4、My Scripts
脚本目录列表
1、在windows编写的shell脚本利用dos2unix命令格式化一下(P308)
2、bash命令参数调试(P309)
3、使用set命令调试部分脚本内容(P312)
4、开发脚本实现触发信号后清理文件功能(P331)
5、expect的自动交互工作流程(P337)
6、执行ssh命令远程获取服务器负载值,并自动输入“yes”及用户密码(P339)
7、利用expect响应shell脚本中的多个read读入(P340)
8、开发expect脚本实现自动交互式批量执行命令(P348)
10、开发expect脚本以实现自动交互式批量发送文件或目录(P350)
11、开发一个综合上述expect的脚本,实现自动交互,批量执行shell的脚本(P352)
12、批量分发SSH密钥并安装ansible(P355)
13、每天晚上12点,打包站点目录/var/www/html备份到/data目录下
14、永久修改主机名
1、在windows编写的shell脚本利用dos2unix命令格式化一下(P308)
#dos2unix *.sh
#yum install dos2unix -y //如果没有安装。。。
2、bash命令参数调试(P309)
-n:不会执行脚本,只检查脚本是否有问题,并给出错误提示;
-v:在执行脚本时,先将内容输出到屏幕上,然后执行脚本,如有错误并输出错误;
-x:将执行的脚本内容及输出显示到屏幕上
3、使用set命令调试部分脚本内容(P312)
set -n:读命令但并不执行
set -v:显示读取的所有行
set -x:显示所有命令及其参数


 1 #!/bin/bash
 2 #
 3
 4 set -x
 5 for a in `seq 9`; do
 6   for b in `seq 9`; do
 7     [ $a -ge $b ] && echo -en "$a x $b = $(expr $a \* $b) "
 8   done
 9 set +x
10 echo " "
11 done
4、开发脚本实现触发信号后清理文件功能(P331)
1 #!/bin/bash
2 #
3
4 trap "find /tmp -type f -name "hello_*" | xargs rm -f && exit" INT
5 while true; do
6   touch /tmp/hello_$(date +%F-%H-%M-%S)
7   sleep 2
8   ls -l /tmp/hello*
9 done
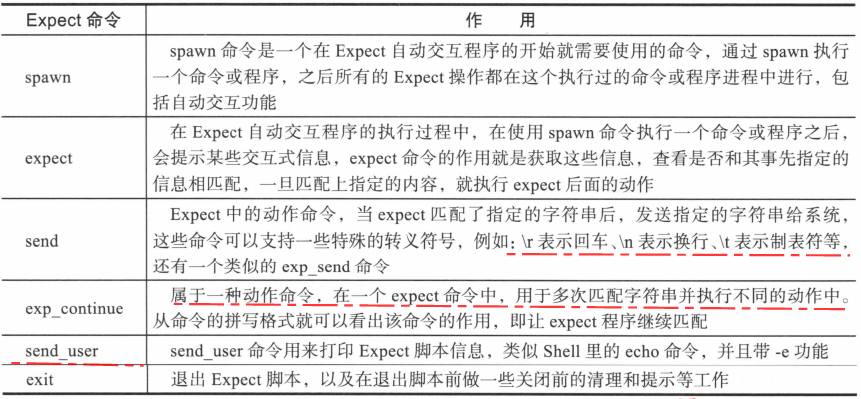
5、expect的自动交互工作流程(P337)
spawn启动指定进程-->expect获取期待的关键字-->send向指定进程发送指定字符-->进程执行完毕,退出结束
spawn [选项][需要自动交互的命令或程序]
-open:表示启动文件进程
-ignore:表示忽略某些信号
expect 表达式 [动作]
expect "*passowrd" {send "123456\r"}
#rpm -qa expect //查看是否安装
#vim expect.exp //扩展名需要使用exp代表是expect脚本
#which expect //查看expect的路径
1 #!/bin/expect    //脚本解释器
2
3 spawn ssh root@192.168.184.141 uptime   //开启expect自动交互,执行ssh命令
4
5 expect "*password" {send "123456\n"}   //如果ssh命令输出匹配*password,就发送123456给系统
6 expect eof     //要想输出结果,必须加eof,表示expect结束
expect "*password"
send "123456\n" //也可以把匹配动作放到下一行
expect eof
#expect 2.exp //执行脚本要是expect
6、执行ssh命令远程获取服务器负载值,并自动输入“yes”及用户密码(P339)
1 #!/bin/expect
2
3 spawn ssh root@192.168.184.143 uptime
4 expect {
5     "yes/no" {exp_send "yes\r";exp_continue}
6     "*password" {exp_send "123456\r"}
7 }
8
9 expect eof
exp_send和send类似,后面的\r(回车)和前文的\n类似
expect{},类似多行expect
匹配多个字符串,需要在每次匹配并执行动作后,加上exp_continue
7、利用expect响应shell脚本中的多个read读入(P340)
1 #!/bin/bash
2 #
3 read -p "Please inpunt your username: " name
4 read -p "Please inpunt your password: " pass
5 read -p "Please inpunt your email: " mail
6 echo  "your name is $name,"
7 echo  "your password is $pass,"
8 echo  "your email is $mail."
 1 #!/bin/expect
 2
 3 spawn /bin/bash 4.sh
 4 expect {
 5     "username" {exp_send "oldboy\r";exp_continue}
 6     "*pass*" {send "123456\r";exp_continue}
 7     "*mail*" {exp_send "1020421472@qq.com\r"}
 8 }
 9
10 expect eof
\r:表示回车
\n:表示换行
\t:表示制表符
如果需要一次匹配多个字符串,那么不同的匹配之间就要加上exp_continue,否则expect将不会自动输入指定的字符串,最后一个的结尾就不需要加上exp_continue了,因为都完成了。
exit功能
1 #!/bin/expect
2 #
3 send_user "I am hello.\n"
4 send_user "I am linuxer.\t"
5 send_user "I am world.\n"
6
7 exit -onexit {
8      send_user "Good bye.\n"
9 }
send_user功能
1 #!/bin/expect
2 #
3 send_user "I am hello.\n"
4 send_user "I am linuxer.\t"
5 send_user "I am world.\n"
expect参数变量
set 变量名 变量值
例:set password "123456"
puts $变量名
或
send_user "$变量名"
在expect中$argv表示参数数组,可以使用[lindex $argv n]接收expect脚本传参,n从0开始,分别表示一个[lindex $argv 0]参数,第二个[lindex $argv 1]参数等。
$argc表示传参的个数,$argv0表示脚本的名字
定义及输出特殊参数变量:
#!/bin/expect

set file    [lindex $argv 0]
set host  [lindex $argv 1]
set dir     [lindex $argv 2]

send_user "$file\t$host\t$dir\n"
puts "$file\t$host\t$dir"
#expect 1.exp hello 192.168.184.141 /tmp
8、开发expect脚本实现自动交互式批量执行命令(P348)
 1 #!/bin/expect
 2
 3 if { $argc != 2 } {
 4     puts "Usage: expect $argv0 ip command"
 5     exit
 6 }
 7
 8 set ip [lindex $argv 0]
 9 set cmd [lindex $argv 1]
10 set password "123456"
11
12 spawn ssh root@$ip $cmd
13 expect {
14     "yes/no" {send "yes\r";exp_continue}
15     "*password" {send "$password\r"}
16 }
17 expect eof
9、利用shell循环执行expect脚本命令(P349)
 1 #!/bin/bash
 2 #
 3 if [ $# -ne 1 ]; then
 4   echo "Usage:$0 cmd"
 5   exit 1
 6 fi
 7
 8 cmd=$1
 9 for n in 140 141 143; do
10   expect 2.exp 192.168.184.$n "$cmd"
11 done
10、开发expect脚本以实现自动交互式批量发送文件或目录(P350)
 1 #!/bin/expect
 2
 3 if { $argc != 3 } {
 4     puts "usage: expect $argv0 file host dir"
 5     exit
 6 }
 7
 8 set file [lindex $argv 0]
 9 set host [lindex $argv 1]
10 set dir  [lindex $argv 2]
11 set password "123456"
12
13 spawn scp -P22 $file root@$host:$dir
14 expect {
15     "yes/no" {send "yes\r";exp_continue}
16     "*password" {send "$password\r"}
17 }
18
19 expect eof
# expect 3.exp /root/scripts/2.exp 192.168.184.141 scripts
11、开发一个综合上述expect的脚本,实现自动交互,批量执行shell的脚本(P352)
例如192.168.184.140、141、142三台服务器都没有安装wget这个命令软件,以140为主节点,批量安装这三台服务器
#rpm -qa wget //没有输出任何信息
步骤1、首先实现主节点140与其他两台服务器自动交互,即无人工干预即可实现ssh密钥认证,并执行指定ip,指定命令
 1 #!/bin/expect
 2
 3 if { $argc != 2 } {
 4     puts "Usage: expect $argv0 ip command"
 5     exit
 6 }
 7
 8 set ip  [lindex $argv 0]
 9 set cmd [lindex $argv 1]
10 set password "123456"
11
12 spawn ssh root@$ip $cmd
13 expect {
14     "yes/no" {send "yes\r";exp_continue}
15     "*password" {send "$password\r"}
16 }
17
18 expect eof
# expect alter.exp 192.168.184.141 uptime //指定IP 指定命令
步骤2、借助步骤1的自动交互功能,同时利用shell脚本循环执行多个IP地址上指定的命令
 1 #!/bin/bash
 2 #
 3
 4 if [ $# -ne 1 ]; then
 5     echo "Usage:$0 cmd"
 6     exit 1
 7 fi
 8
 9 cmd=$1
10 for n in 140 141 143; do     //这里IP地址已经给出,只需加上想要执行的命令即可
11     expect alter.exp 192.168.184.$n "$cmd"
12 done
# bash install.sh "free -m" //不连贯字符要用双引号
步骤1和步骤2是不可分离的,因为只有实现服务器之间自动交互,才能利用shell循环执行指定在多个IP上的命令;
步骤3、这也是一个自动交互的脚本,但是定义的变量不一样,同时spawn执行的命令也不一样,这里是实现自动复制文件到另一个服务器的脚本
 1 #!/bin/expect
 2
 3 if { $argc != 3 } {
 4     puts "Usage: expect $argv0 file host dir"
 5     exit
 6 }
 7
 8 set file [lindex $argv 0]
 9 set host [lindex $argv 1]
10 set dir  [lindex $argv 2]
11 set password "123456"
12
13 spawn scp -P22 $file root@$host:$dir
14 expect {
15     "yes/no" {send "yes\r";exp_continue}
16     "*password" {send "$password\r"}
17 }
18
19 expect eof
# expect alter_file.exp /root/scripts/yum.sh 192.168.184.141 /tmp //输入本地文件、要传输至的IP、目录名

步骤4、借助步骤3的自动交互且传输功能,同时利用shell脚本循环执行多个IP地址上同时指定传输文件到指定的目录
 1 #!/bin/bash
 2
 3 if [ $# -ne 2 ]; then
 4       echo "Usage:$0 file dir"
 5       exit 1
 6 fi
 7
 8 file=$1
 9 dir=$2
10
11 for n in 141 143; do    //140本地已经有了,所以不再添加
12     expect 1.exp $file 192.168.184.$n $dir
13 done
#echo "yum install wget -y" >/root/scripts/yum.sh //创建安装wget的脚本文件
# bash cp_file.sh yum.sh /root/scripts/ //这里的yum.sh是相对路径即/root/scripts,把yum.sh文件批量发送到141和143主机上

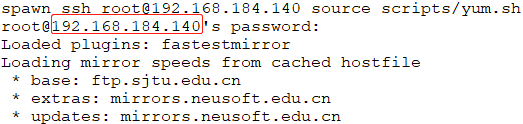
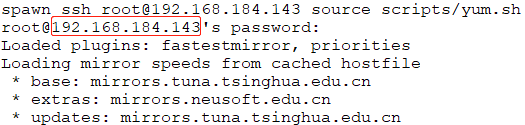
步骤5、使用主节点服务器连接141和143服务器并指执行脚本yum.sh安装wget
# bash install.sh "source scripts/yum.sh" //同时安装3台服务器

12、批量分发SSH密钥并安装ansible(P355)
1、本地生成密钥对
# rm -rf ~/.ssh/known_hosts //如果之前有认证信息可以先清除
# ssh-keygen -t dsa -P '' -f ~/.ssh/id_dsa &>/dev/null //本地生成密钥对
2、开发expect脚本自动化交互分发公钥到其他服务器
 1 #!/bin/expect
 2
 3 if { $argc != 2 } {
 4     send_user "Usage: expect.exp file host\n"
 5     exit
 6 }
 7
 8 set file [lindex $argv 0]
 9 set host [lindex $argv 1]
10 set password "123456"
11
12 spawn ssh-copy-id -i $file  -p 22 root@$host
13 expect {
14     "yes/no" {send "yes\r";exp_continue}
15     "*password" {send "$password\r"}
16 }
17 expect eof
# expect ssh_copy.exp /root/.ssh/id_dsa.pub 192.168.184.141 //测试是否可以分发公钥到其他主机
3、编辑shell循环脚本
1 #!/bin/bash
2 #
3
4 for n in 141; do
5     expect ni.exp ~/.ssh/id_dsa.pub 192.168.184.$n
6 done
#bash cycl.sh //执行此脚本即可分发公钥到各主机
4、编写执行脚本进行测试,两行
ssh 192.168.184.141 uptime
ssh 192.168.184.143 uptime
5、安装epel源和ansiable软件
yum install epel-release -y
yum install ansible -y
6、在ansible的配置文件/etc/ansible/hosts最后添加如下几行
[hanshan]
192.168.184.140
192.168.184.141
7、执行命令
# ansible hanshan -m command -a "uptime"

13、每天晚上12点,打包站点目录/var/www/html备份到/data目录下
1 #!/bin/bash
2 #
3 cd /var/www/ || {
4     echo "/var/www/ is not exist."
5     }
6
7 /bin/tar zcf /root/data/html-`date +%Y-%m-%d-%H:%M:%S`.tar.gz html/*
# crontab -e
00 00 * * * /bin/sh /root/a.sh
14、永久修改主机名
 1 #!/bin/bash
 2 #
 3
 4 echo "Look over the static hostname."
 5 hostnamectl --static
 6 echo ""
 7 echo "Look over the transient hostname."
 8 hostnamectl --transient
 9 echo ""
10
11 read -p "Do you want to change the num of node: " num
12
13 echo "The scripts will change the hostname"
14 hostnamectl set-hostname node$num
15
16 sed -i 's/^127/#127/g' /etc/hosts
17 sed -i 's/^::1/#::1/g' /etc/hosts
18 echo 127.0.0.1 node$num >> /etc/hosts
19 echo ::1 node$num >> /etc/hosts
20 cat /etc/hosts
你好

 浙公网安备 33010602011771号