学Shiro完结版-2
第四章 INI配置——《跟我学Shiro》
之前章节我们已经接触过一些INI配置规则了,如果大家使用过如Spring之类的IoC/DI容器的话,Shiro提供的INI配置也是非常类似的,即可以理解为是一个IoC/DI容器,但是区别在于它从一个根对象securityManager开始。
4.1 根对象SecurityManager
从之前的Shiro架构图可以看出,Shiro是从根对象SecurityManager进行身份验证和授权的;也就是所有操作都是自它开始的,这个对象是线程安全且真个应用只需要一个即可,因此Shiro提供了SecurityUtils让我们绑定它为全局的,方便后续操作。
因为Shiro的类都是POJO的,因此都很容易放到任何IoC容器管理。但是和一般的IoC容器的区别在于,Shiro从根对象securityManager开始导航;Shiro支持的依赖注入:public空参构造器对象的创建、setter依赖注入。
1、纯Java代码写法(com.github.zhangkaitao.shiro.chapter4.NonConfigurationCreateTest):
- DefaultSecurityManager securityManager = new DefaultSecurityManager();
- //设置authenticator
- ModularRealmAuthenticator authenticator = new ModularRealmAuthenticator();
- authenticator.setAuthenticationStrategy(new AtLeastOneSuccessfulStrategy());
- securityManager.setAuthenticator(authenticator);
- //设置authorizer
- ModularRealmAuthorizer authorizer = new ModularRealmAuthorizer();
- authorizer.setPermissionResolver(new WildcardPermissionResolver());
- securityManager.setAuthorizer(authorizer);
- //设置Realm
- DruidDataSource ds = new DruidDataSource();
- ds.setDriverClassName("com.mysql.jdbc.Driver");
- ds.setUrl("jdbc:mysql://localhost:3306/shiro");
- ds.setUsername("root");
- ds.setPassword("");
- JdbcRealm jdbcRealm = new JdbcRealm();
- jdbcRealm.setDataSource(ds);
- jdbcRealm.setPermissionsLookupEnabled(true);
- securityManager.setRealms(Arrays.asList((Realm) jdbcRealm));
- //将SecurityManager设置到SecurityUtils 方便全局使用
- SecurityUtils.setSecurityManager(securityManager);
- Subject subject = SecurityUtils.getSubject();
- UsernamePasswordToken token = new UsernamePasswordToken("zhang", "123");
- subject.login(token);
- Assert.assertTrue(subject.isAuthenticated());
2.1、等价的INI配置(shiro-config.ini)
- [main]
- #authenticator
- authenticator=org.apache.shiro.authc.pam.ModularRealmAuthenticator
- authenticationStrategy=org.apache.shiro.authc.pam.AtLeastOneSuccessfulStrategy
- authenticator.authenticationStrategy=$authenticationStrategy
- securityManager.authenticator=$authenticator
- #authorizer
- authorizer=org.apache.shiro.authz.ModularRealmAuthorizer
- permissionResolver=org.apache.shiro.authz.permission.WildcardPermissionResolver
- authorizer.permissionResolver=$permissionResolver
- securityManager.authorizer=$authorizer
- #realm
- dataSource=com.alibaba.druid.pool.DruidDataSource
- dataSource.driverClassName=com.mysql.jdbc.Driver
- dataSource.url=jdbc:mysql://localhost:3306/shiro
- dataSource.username=root
- #dataSource.password=
- jdbcRealm=org.apache.shiro.realm.jdbc.JdbcRealm
- jdbcRealm.dataSource=$dataSource
- jdbcRealm.permissionsLookupEnabled=true
- securityManager.realms=$jdbcRealm
即使没接触过IoC容器的知识,如上配置也是很容易理解的:
1、对象名=全限定类名 相对于调用public无参构造器创建对象
2、对象名.属性名=值 相当于调用setter方法设置常量值
3、对象名.属性名=$对象引用 相当于调用setter方法设置对象引用
2.2、Java代码(com.github.zhangkaitao.shiro.chapter4.ConfigurationCreateTest)
- Factory<org.apache.shiro.mgt.SecurityManager> factory =
- new IniSecurityManagerFactory("classpath:shiro-config.ini");
- org.apache.shiro.mgt.SecurityManager securityManager = factory.getInstance();
- //将SecurityManager设置到SecurityUtils 方便全局使用
- SecurityUtils.setSecurityManager(securityManager);
- Subject subject = SecurityUtils.getSubject();
- UsernamePasswordToken token = new UsernamePasswordToken("zhang", "123");
- subject.login(token);
- Assert.assertTrue(subject.isAuthenticated());
如上代码是从Shiro INI配置中获取相应的securityManager实例:
1、默认情况先创建一个名字为securityManager,类型为org.apache.shiro.mgt.DefaultSecurityManager的默认的SecurityManager,如果想自定义,只需要在ini配置文件中指定“securityManager=SecurityManager实现类”即可,名字必须为securityManager,它是起始的根;
2、IniSecurityManagerFactory是创建securityManager的工厂,其需要一个ini配置文件路径,其支持“classpath:”(类路径)、“file:”(文件系统)、“url:”(网络)三种路径格式,默认是文件系统;
3、接着获取SecuriyManager实例,后续步骤和之前的一样。
从如上可以看出Shiro INI配置方式本身提供了一个简单的IoC/DI机制方便在配置文件配置,但是是从securityManager这个根对象开始导航。
4.2 INI配置
ini配置文件类似于Java中的properties(key=value),不过提供了将key/value分类的特性,key是每个部分不重复即可,而不是整个配置文件。如下是INI配置分类:
- [main]
- #提供了对根对象securityManager及其依赖的配置
- securityManager=org.apache.shiro.mgt.DefaultSecurityManager
- …………
- securityManager.realms=$jdbcRealm
- [users]
- #提供了对用户/密码及其角色的配置,用户名=密码,角色1,角色2
- username=password,role1,role2
- [roles]
- #提供了角色及权限之间关系的配置,角色=权限1,权限2
- role1=permission1,permission2
- [urls]
- #用于web,提供了对web url拦截相关的配置,url=拦截器[参数],拦截器
- /index.html = anon
- /admin/** = authc, roles[admin], perms["permission1"]
[main]部分
提供了对根对象securityManager及其依赖对象的配置。
创建对象
- securityManager=org.apache.shiro.mgt.DefaultSecurityManager
其构造器必须是public空参构造器,通过反射创建相应的实例。
常量值setter注入
- dataSource.driverClassName=com.mysql.jdbc.Driver
- jdbcRealm.permissionsLookupEnabled=true
会自动调用jdbcRealm.setPermissionsLookupEnabled(true),对于这种常量值会自动类型转换。
对象引用setter注入
- authenticator=org.apache.shiro.authc.pam.ModularRealmAuthenticator
- authenticationStrategy=org.apache.shiro.authc.pam.AtLeastOneSuccessfulStrategy
- authenticator.authenticationStrategy=$authenticationStrategy
- securityManager.authenticator=$authenticator
会自动通过securityManager.setAuthenticator(authenticator)注入引用依赖。
嵌套属性setter注入
- securityManager.authenticator.authenticationStrategy=$authenticationStrategy
也支持这种嵌套方式的setter注入。
byte数组setter注入
- #base64 byte[]
- authenticator.bytes=aGVsbG8=
- #hex byte[]
- authenticator.bytes=0x68656c6c6f
默认需要使用Base64进行编码,也可以使用0x十六进制。
Array/Set/List setter注入
- authenticator.array=1,2,3
- authenticator.set=$jdbcRealm,$jdbcRealm
多个之间通过“,”分割。
Map setter注入
- authenticator.map=$jdbcRealm:$jdbcRealm,1:1,key:abc
即格式是:map=key:value,key:value,可以注入常量及引用值,常量的话都看作字符串(即使有泛型也不会自动造型)。
实例化/注入顺序
- realm=Realm1
- realm=Realm12
- authenticator.bytes=aGVsbG8=
- authenticator.bytes=0x68656c6c6f
后边的覆盖前边的注入。
测试用例请参考配置文件shiro-config-main.ini。
[users]部分
配置用户名/密码及其角色,格式:“用户名=密码,角色1,角色2”,角色部分可省略。如:
- [users]
- zhang=123,role1,role2
- wang=123
密码一般生成其摘要/加密存储,后续章节介绍。
[roles]部分
配置角色及权限之间的关系,格式:“角色=权限1,权限2”;如:
- [roles]
- role1=user:create,user:update
- role2=*
如果只有角色没有对应的权限,可以不配roles,具体规则请参考授权章节。
[urls]部分
配置url及相应的拦截器之间的关系,格式:“url=拦截器[参数],拦截器[参数],如:
- [urls]
- /admin/** = authc, roles[admin], perms["permission1"]
具体规则参见web相关章节。
第五章 编码/加密——《跟我学Shiro》
在涉及到密码存储问题上,应该加密/生成密码摘要存储,而不是存储明文密码。比如之前的600w csdn账号泄露对用户可能造成很大损失,因此应加密/生成不可逆的摘要方式存储。
5.1 编码/解码
Shiro提供了base64和16进制字符串编码/解码的API支持,方便一些编码解码操作。Shiro内部的一些数据的存储/表示都使用了base64和16进制字符串。
- String str = "hello";
- String base64Encoded = Base64.encodeToString(str.getBytes());
- String str2 = Base64.decodeToString(base64Encoded);
- Assert.assertEquals(str, str2);
通过如上方式可以进行base64编码/解码操作,更多API请参考其Javadoc。
- String str = "hello";
- String base64Encoded = Hex.encodeToString(str.getBytes());
- String str2 = new String(Hex.decode(base64Encoded.getBytes()));
- Assert.assertEquals(str, str2);
通过如上方式可以进行16进制字符串编码/解码操作,更多API请参考其Javadoc。
还有一个可能经常用到的类CodecSupport,提供了toBytes(str, "utf-8") / toString(bytes, "utf-8")用于在byte数组/String之间转换。
5.2 散列算法
散列算法一般用于生成数据的摘要信息,是一种不可逆的算法,一般适合存储密码之类的数据,常见的散列算法如MD5、SHA等。一般进行散列时最好提供一个salt(盐),比如加密密码“admin”,产生的散列值是“21232f297a57a5a743894a0e4a801fc3”,可以到一些md5解密网站很容易的通过散列值得到密码“admin”,即如果直接对密码进行散列相对来说破解更容易,此时我们可以加一些只有系统知道的干扰数据,如用户名和ID(即盐);这样散列的对象是“密码+用户名+ID”,这样生成的散列值相对来说更难破解。
- String str = "hello";
- String salt = "123";
- String md5 = new Md5Hash(str, salt).toString();//还可以转换为 toBase64()/toHex()
如上代码通过盐“123”MD5散列“hello”。另外散列时还可以指定散列次数,如2次表示:md5(md5(str)):“new Md5Hash(str, salt, 2).toString()”。
- String str = "hello";
- String salt = "123";
- String sha1 = new Sha256Hash(str, salt).toString();
使用SHA256算法生成相应的散列数据,另外还有如SHA1、SHA512算法。
Shiro还提供了通用的散列支持:
- String str = "hello";
- String salt = "123";
- //内部使用MessageDigest
- String simpleHash = new SimpleHash("SHA-1", str, salt).toString();
通过调用SimpleHash时指定散列算法,其内部使用了Java的MessageDigest实现。
为了方便使用,Shiro提供了HashService,默认提供了DefaultHashService实现。
- DefaultHashService hashService = new DefaultHashService(); //默认算法SHA-512
- hashService.setHashAlgorithmName("SHA-512");
- hashService.setPrivateSalt(new SimpleByteSource("123")); //私盐,默认无
- hashService.setGeneratePublicSalt(true);//是否生成公盐,默认false
- hashService.setRandomNumberGenerator(new SecureRandomNumberGenerator());//用于生成公盐。默认就这个
- hashService.setHashIterations(1); //生成Hash值的迭代次数
- HashRequest request = new HashRequest.Builder()
- .setAlgorithmName("MD5").setSource(ByteSource.Util.bytes("hello"))
- .setSalt(ByteSource.Util.bytes("123")).setIterations(2).build();
- String hex = hashService.computeHash(request).toHex();
1、首先创建一个DefaultHashService,默认使用SHA-512算法;
2、可以通过hashAlgorithmName属性修改算法;
3、可以通过privateSalt设置一个私盐,其在散列时自动与用户传入的公盐混合产生一个新盐;
4、可以通过generatePublicSalt属性在用户没有传入公盐的情况下是否生成公盐;
5、可以设置randomNumberGenerator用于生成公盐;
6、可以设置hashIterations属性来修改默认加密迭代次数;
7、需要构建一个HashRequest,传入算法、数据、公盐、迭代次数。
SecureRandomNumberGenerator用于生成一个随机数:
- SecureRandomNumberGenerator randomNumberGenerator =
- new SecureRandomNumberGenerator();
- randomNumberGenerator.setSeed("123".getBytes());
- String hex = randomNumberGenerator.nextBytes().toHex();
5.3 加密/解密
Shiro还提供对称式加密/解密算法的支持,如AES、Blowfish等;当前还没有提供对非对称加密/解密算法支持,未来版本可能提供。
AES算法实现:
- AesCipherService aesCipherService = new AesCipherService();
- aesCipherService.setKeySize(128); //设置key长度
- //生成key
- Key key = aesCipherService.generateNewKey();
- String text = "hello";
- //加密
- String encrptText =
- aesCipherService.encrypt(text.getBytes(), key.getEncoded()).toHex();
- //解密
- String text2 =
- new String(aesCipherService.decrypt(Hex.decode(encrptText), key.getEncoded()).getBytes());
- Assert.assertEquals(text, text2);
更多算法请参考示例com.github.zhangkaitao.shiro.chapter5.hash.CodecAndCryptoTest。
5.4 PasswordService/CredentialsMatcher
Shiro提供了PasswordService及CredentialsMatcher用于提供加密密码及验证密码服务。
- public interface PasswordService {
- //输入明文密码得到密文密码
- String encryptPassword(Object plaintextPassword) throws IllegalArgumentException;
- }
- public interface CredentialsMatcher {
- //匹配用户输入的token的凭证(未加密)与系统提供的凭证(已加密)
- boolean doCredentialsMatch(AuthenticationToken token, AuthenticationInfo info);
- }
Shiro默认提供了PasswordService实现DefaultPasswordService;CredentialsMatcher实现PasswordMatcher及HashedCredentialsMatcher(更强大)。
DefaultPasswordService配合PasswordMatcher实现简单的密码加密与验证服务
1、定义Realm(com.github.zhangkaitao.shiro.chapter5.hash.realm.MyRealm)
- public class MyRealm extends AuthorizingRealm {
- private PasswordService passwordService;
- public void setPasswordService(PasswordService passwordService) {
- this.passwordService = passwordService;
- }
- //省略doGetAuthorizationInfo,具体看代码
- @Override
- protected AuthenticationInfo doGetAuthenticationInfo(AuthenticationToken token) throws AuthenticationException {
- return new SimpleAuthenticationInfo(
- "wu",
- passwordService.encryptPassword("123"),
- getName());
- }
- }
为了方便,直接注入一个passwordService来加密密码,实际使用时需要在Service层使用passwordService加密密码并存到数据库。
2、ini配置(shiro-passwordservice.ini)
- [main]
- passwordService=org.apache.shiro.authc.credential.DefaultPasswordService
- hashService=org.apache.shiro.crypto.hash.DefaultHashService
- passwordService.hashService=$hashService
- hashFormat=org.apache.shiro.crypto.hash.format.Shiro1CryptFormat
- passwordService.hashFormat=$hashFormat
- hashFormatFactory=org.apache.shiro.crypto.hash.format.DefaultHashFormatFactory
- passwordService.hashFormatFactory=$hashFormatFactory
- passwordMatcher=org.apache.shiro.authc.credential.PasswordMatcher
- passwordMatcher.passwordService=$passwordService
- myRealm=com.github.zhangkaitao.shiro.chapter5.hash.realm.MyRealm
- myRealm.passwordService=$passwordService
- myRealm.credentialsMatcher=$passwordMatcher
- securityManager.realms=$myRealm
2.1、passwordService使用DefaultPasswordService,如果有必要也可以自定义;
2.2、hashService定义散列密码使用的HashService,默认使用DefaultHashService(默认SHA-256算法);
2.3、hashFormat用于对散列出的值进行格式化,默认使用Shiro1CryptFormat,另外提供了Base64Format和HexFormat,对于有salt的密码请自定义实现ParsableHashFormat然后把salt格式化到散列值中;
2.4、hashFormatFactory用于根据散列值得到散列的密码和salt;因为如果使用如SHA算法,那么会生成一个salt,此salt需要保存到散列后的值中以便之后与传入的密码比较时使用;默认使用DefaultHashFormatFactory;
2.5、passwordMatcher使用PasswordMatcher,其是一个CredentialsMatcher实现;
2.6、将credentialsMatcher赋值给myRealm,myRealm间接继承了AuthenticatingRealm,其在调用getAuthenticationInfo方法获取到AuthenticationInfo信息后,会使用credentialsMatcher来验证凭据是否匹配,如果不匹配将抛出IncorrectCredentialsException异常。
3、测试用例请参考com.github.zhangkaitao.shiro.chapter5.hash.PasswordTest。
另外可以参考配置shiro-jdbc-passwordservice.ini,提供了JdbcRealm的测试用例,测试前请先调用sql/shiro-init-data.sql初始化用户数据。
如上方式的缺点是:salt保存在散列值中;没有实现如密码重试次数限制。
HashedCredentialsMatcher实现密码验证服务
Shiro提供了CredentialsMatcher的散列实现HashedCredentialsMatcher,和之前的PasswordMatcher不同的是,它只用于密码验证,且可以提供自己的盐,而不是随机生成盐,且生成密码散列值的算法需要自己写,因为能提供自己的盐。
1、生成密码散列值
此处我们使用MD5算法,“密码+盐(用户名+随机数)”的方式生成散列值:
- String algorithmName = "md5";
- String username = "liu";
- String password = "123";
- String salt1 = username;
- String salt2 = new SecureRandomNumberGenerator().nextBytes().toHex();
- int hashIterations = 2;
- SimpleHash hash = new SimpleHash(algorithmName, password, salt1 + salt2, hashIterations);
- String encodedPassword = hash.toHex();
如果要写用户模块,需要在新增用户/重置密码时使用如上算法保存密码,将生成的密码及salt2存入数据库(因为我们的散列算法是:md5(md5(密码+username+salt2)))。
2、生成Realm(com.github.zhangkaitao.shiro.chapter5.hash.realm.MyRealm2)
- protected AuthenticationInfo doGetAuthenticationInfo(AuthenticationToken token) throws AuthenticationException {
- String username = "liu"; //用户名及salt1
- String password = "202cb962ac59075b964b07152d234b70"; //加密后的密码
- String salt2 = "202cb962ac59075b964b07152d234b70";
- SimpleAuthenticationInfo ai =
- new SimpleAuthenticationInfo(username, password, getName());
- ai.setCredentialsSalt(ByteSource.Util.bytes(username+salt2)); //盐是用户名+随机数
- return ai;
- }
此处就是把步骤1中生成的相应数据组装为SimpleAuthenticationInfo,通过SimpleAuthenticationInfo的credentialsSalt设置盐,HashedCredentialsMatcher会自动识别这个盐。
如果使用JdbcRealm,需要修改获取用户信息(包括盐)的sql:“select password, password_salt from users where username = ?”,而我们的盐是由username+password_salt组成,所以需要通过如下ini配置(shiro-jdbc-hashedCredentialsMatcher.ini)修改:
- jdbcRealm.saltStyle=COLUMN
- jdbcRealm.authenticationQuery=select password, concat(username,password_salt) from users where username = ?
- jdbcRealm.credentialsMatcher=$credentialsMatcher
1、saltStyle表示使用密码+盐的机制,authenticationQuery第一列是密码,第二列是盐;
2、通过authenticationQuery指定密码及盐查询SQL;
此处还要注意Shiro默认使用了apache commons BeanUtils,默认是不进行Enum类型转型的,此时需要自己注册一个Enum转换器“BeanUtilsBean.getInstance().getConvertUtils().register(new EnumConverter(), JdbcRealm.SaltStyle.class);”具体请参考示例“com.github.zhangkaitao.shiro.chapter5.hash.PasswordTest”中的代码。
另外可以参考配置shiro-jdbc-passwordservice.ini,提供了JdbcRealm的测试用例,测试前请先调用sql/shiro-init-data.sql初始化用户数据。
3、ini配置(shiro-hashedCredentialsMatcher.ini)
- [main]
- credentialsMatcher=org.apache.shiro.authc.credential.HashedCredentialsMatcher
- credentialsMatcher.hashAlgorithmName=md5
- credentialsMatcher.hashIterations=2
- credentialsMatcher.storedCredentialsHexEncoded=true
- myRealm=com.github.zhangkaitao.shiro.chapter5.hash.realm.MyRealm2
- myRealm.credentialsMatcher=$credentialsMatcher
- securityManager.realms=$myRealm
1、通过credentialsMatcher.hashAlgorithmName=md5指定散列算法为md5,需要和生成密码时的一样;
2、credentialsMatcher.hashIterations=2,散列迭代次数,需要和生成密码时的意义;
3、credentialsMatcher.storedCredentialsHexEncoded=true表示是否存储散列后的密码为16进制,需要和生成密码时的一样,默认是base64;
此处最需要注意的就是HashedCredentialsMatcher的算法需要和生成密码时的算法一样。另外HashedCredentialsMatcher会自动根据AuthenticationInfo的类型是否是SaltedAuthenticationInfo来获取credentialsSalt盐。
4、测试用例请参考com.github.zhangkaitao.shiro.chapter5.hash.PasswordTest。
密码重试次数限制
如在1个小时内密码最多重试5次,如果尝试次数超过5次就锁定1小时,1小时后可再次重试,如果还是重试失败,可以锁定如1天,以此类推,防止密码被暴力破解。我们通过继承HashedCredentialsMatcher,且使用Ehcache记录重试次数和超时时间。
com.github.zhangkaitao.shiro.chapter5.hash.credentials.RetryLimitHashedCredentialsMatcher:
- public boolean doCredentialsMatch(AuthenticationToken token, AuthenticationInfo info) {
- String username = (String)token.getPrincipal();
- //retry count + 1
- Element element = passwordRetryCache.get(username);
- if(element == null) {
- element = new Element(username , new AtomicInteger(0));
- passwordRetryCache.put(element);
- }
- AtomicInteger retryCount = (AtomicInteger)element.getObjectValue();
- if(retryCount.incrementAndGet() > 5) {
- //if retry count > 5 throw
- throw new ExcessiveAttemptsException();
- }
- boolean matches = super.doCredentialsMatch(token, info);
- if(matches) {
- //clear retry count
- passwordRetryCache.remove(username);
- }
- return matches;
- }
如上代码逻辑比较简单,即如果密码输入正确清除cache中的记录;否则cache中的重试次数+1,如果超出5次那么抛出异常表示超出重试次数了。
第六章 Realm及相关对象——《跟我学Shiro》
6.1 Realm
【2.5 Realm】及【3.5 Authorizer】部分都已经详细介绍过Realm了,接下来再来看一下一般真实环境下的Realm如何实现。
1、定义实体及关系

即用户-角色之间是多对多关系,角色-权限之间是多对多关系;且用户和权限之间通过角色建立关系;在系统中验证时通过权限验证,角色只是权限集合,即所谓的显示角色;其实权限应该对应到资源(如菜单、URL、页面按钮、Java方法等)中,即应该将权限字符串存储到资源实体中,但是目前为了简单化,直接提取一个权限表,【综合示例】部分会使用完整的表结构。
用户实体包括:编号(id)、用户名(username)、密码(password)、盐(salt)、是否锁定(locked);是否锁定用于封禁用户使用,其实最好使用Enum字段存储,可以实现更复杂的用户状态实现。
角色实体包括:、编号(id)、角色标识符(role)、描述(description)、是否可用(available);其中角色标识符用于在程序中进行隐式角色判断的,描述用于以后再前台界面显示的、是否可用表示角色当前是否激活。
权限实体包括:编号(id)、权限标识符(permission)、描述(description)、是否可用(available);含义和角色实体类似不再阐述。
另外还有两个关系实体:用户-角色实体(用户编号、角色编号,且组合为复合主键);角色-权限实体(角色编号、权限编号,且组合为复合主键)。
sql及实体请参考源代码中的sql\shiro.sql 和 com.github.zhangkaitao.shiro.chapter6.entity对应的实体。
2、环境准备
为了方便数据库操作,使用了“org.springframework: spring-jdbc: 4.0.0.RELEASE”依赖,虽然是spring4版本的,但使用上和spring3无区别。其他依赖请参考源码的pom.xml。
3、定义Service及Dao
为了实现的简单性,只实现必须的功能,其他的可以自己实现即可。
PermissionService
- public interface PermissionService {
- public Permission createPermission(Permission permission);
- public void deletePermission(Long permissionId);
- }
实现基本的创建/删除权限。
RoleService
- public interface RoleService {
- public Role createRole(Role role);
- public void deleteRole(Long roleId);
- //添加角色-权限之间关系
- public void correlationPermissions(Long roleId, Long... permissionIds);
- //移除角色-权限之间关系
- public void uncorrelationPermissions(Long roleId, Long... permissionIds);//
- }
相对于PermissionService多了关联/移除关联角色-权限功能。
UserService
- public interface UserService {
- public User createUser(User user); //创建账户
- public void changePassword(Long userId, String newPassword);//修改密码
- public void correlationRoles(Long userId, Long... roleIds); //添加用户-角色关系
- public void uncorrelationRoles(Long userId, Long... roleIds);// 移除用户-角色关系
- public User findByUsername(String username);// 根据用户名查找用户
- public Set<String> findRoles(String username);// 根据用户名查找其角色
- public Set<String> findPermissions(String username); //根据用户名查找其权限
- }
此处使用findByUsername、findRoles及findPermissions来查找用户名对应的帐号、角色及权限信息。之后的Realm就使用这些方法来查找相关信息。
UserServiceImpl
- public User createUser(User user) {
- //加密密码
- passwordHelper.encryptPassword(user);
- return userDao.createUser(user);
- }
- public void changePassword(Long userId, String newPassword) {
- User user =userDao.findOne(userId);
- user.setPassword(newPassword);
- passwordHelper.encryptPassword(user);
- userDao.updateUser(user);
- }
在创建账户及修改密码时直接把生成密码操作委托给PasswordHelper。
PasswordHelper
- public class PasswordHelper {
- private RandomNumberGenerator randomNumberGenerator =
- new SecureRandomNumberGenerator();
- private String algorithmName = "md5";
- private final int hashIterations = 2;
- public void encryptPassword(User user) {
- user.setSalt(randomNumberGenerator.nextBytes().toHex());
- String newPassword = new SimpleHash(
- algorithmName,
- user.getPassword(),
- ByteSource.Util.bytes(user.getCredentialsSalt()),
- hashIterations).toHex();
- user.setPassword(newPassword);
- }
- }
之后的CredentialsMatcher需要和此处加密的算法一样。user.getCredentialsSalt()辅助方法返回username+salt。
为了节省篇幅,对于DAO/Service的接口及实现,具体请参考源码com.github.zhangkaitao.shiro.chapter6。另外请参考Service层的测试用例com.github.zhangkaitao.shiro.chapter6.service.ServiceTest。
4、定义Realm
RetryLimitHashedCredentialsMatcher
和第五章的一样,在此就不罗列代码了,请参考源码com.github.zhangkaitao.shiro.chapter6.credentials.RetryLimitHashedCredentialsMatcher。
UserRealm
另外请参考Service层的测试用例com.github.zhangkaitao.shiro.chapter6.service.ServiceTest。
- public class UserRealm extends AuthorizingRealm {
- private UserService userService = new UserServiceImpl();
- protected AuthorizationInfo doGetAuthorizationInfo(PrincipalCollection principals) {
- String username = (String)principals.getPrimaryPrincipal();
- SimpleAuthorizationInfo authorizationInfo = new SimpleAuthorizationInfo();
- authorizationInfo.setRoles(userService.findRoles(username));
- authorizationInfo.setStringPermissions(userService.findPermissions(username));
- return authorizationInfo;
- }
- protected AuthenticationInfo doGetAuthenticationInfo(AuthenticationToken token) throws AuthenticationException {
- String username = (String)token.getPrincipal();
- User user = userService.findByUsername(username);
- if(user == null) {
- throw new UnknownAccountException();//没找到帐号
- }
- if(Boolean.TRUE.equals(user.getLocked())) {
- throw new LockedAccountException(); //帐号锁定
- }
- //交给AuthenticatingRealm使用CredentialsMatcher进行密码匹配,如果觉得人家的不好可以在此判断或自定义实现
- SimpleAuthenticationInfo authenticationInfo = new SimpleAuthenticationInfo(
- user.getUsername(), //用户名
- user.getPassword(), //密码
- ByteSource.Util.bytes(user.getCredentialsSalt()),//salt=username+salt
- getName() //realm name
- );
- return authenticationInfo;
- }
- }
1、UserRealm父类AuthorizingRealm将获取Subject相关信息分成两步:获取身份验证信息(doGetAuthenticationInfo)及授权信息(doGetAuthorizationInfo);
2、doGetAuthenticationInfo获取身份验证相关信息:首先根据传入的用户名获取User信息;然后如果user为空,那么抛出没找到帐号异常UnknownAccountException;如果user找到但锁定了抛出锁定异常LockedAccountException;最后生成AuthenticationInfo信息,交给间接父类AuthenticatingRealm使用CredentialsMatcher进行判断密码是否匹配,如果不匹配将抛出密码错误异常IncorrectCredentialsException;另外如果密码重试此处太多将抛出超出重试次数异常ExcessiveAttemptsException;在组装SimpleAuthenticationInfo信息时,需要传入:身份信息(用户名)、凭据(密文密码)、盐(username+salt),CredentialsMatcher使用盐加密传入的明文密码和此处的密文密码进行匹配。
3、doGetAuthorizationInfo获取授权信息:PrincipalCollection是一个身份集合,因为我们现在就一个Realm,所以直接调用getPrimaryPrincipal得到之前传入的用户名即可;然后根据用户名调用UserService接口获取角色及权限信息。
5、测试用例
为了节省篇幅,请参考测试用例com.github.zhangkaitao.shiro.chapter6.realm.UserRealmTest。包含了:登录成功、用户名错误、密码错误、密码超出重试次数、有/没有角色、有/没有权限的测试。
6.2 AuthenticationToken
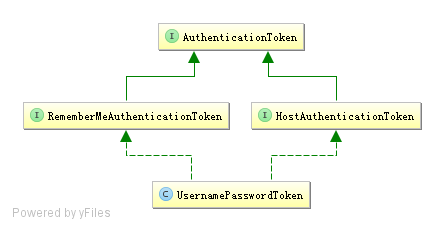
AuthenticationToken用于收集用户提交的身份(如用户名)及凭据(如密码):
- public interface AuthenticationToken extends Serializable {
- Object getPrincipal(); //身份
- Object getCredentials(); //凭据
- }
扩展接口RememberMeAuthenticationToken:提供了“boolean isRememberMe()”现“记住我”的功能;
扩展接口是HostAuthenticationToken:提供了“String getHost()”方法用于获取用户“主机”的功能。
Shiro提供了一个直接拿来用的UsernamePasswordToken,用于实现用户名/密码Token组,另外其实现了RememberMeAuthenticationToken和HostAuthenticationToken,可以实现记住我及主机验证的支持。
6.3 AuthenticationInfo
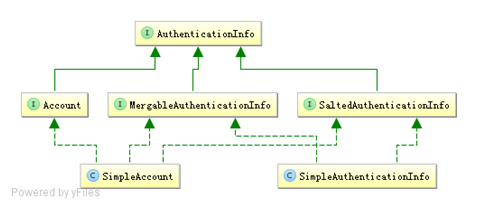
AuthenticationInfo有两个作用:
1、如果Realm是AuthenticatingRealm子类,则提供给AuthenticatingRealm内部使用的CredentialsMatcher进行凭据验证;(如果没有继承它需要在自己的Realm中自己实现验证);
2、提供给SecurityManager来创建Subject(提供身份信息);
MergableAuthenticationInfo用于提供在多Realm时合并AuthenticationInfo的功能,主要合并Principal、如果是其他的如credentialsSalt,会用后边的信息覆盖前边的。
比如HashedCredentialsMatcher,在验证时会判断AuthenticationInfo是否是SaltedAuthenticationInfo子类,来获取盐信息。
Account相当于我们之前的User,SimpleAccount是其一个实现;在IniRealm、PropertiesRealm这种静态创建帐号信息的场景中使用,这些Realm直接继承了SimpleAccountRealm,而SimpleAccountRealm提供了相关的API来动态维护SimpleAccount;即可以通过这些API来动态增删改查SimpleAccount;动态增删改查角色/权限信息。及如果您的帐号不是特别多,可以使用这种方式,具体请参考SimpleAccountRealm Javadoc。
其他情况一般返回SimpleAuthenticationInfo即可。
6.4 PrincipalCollection
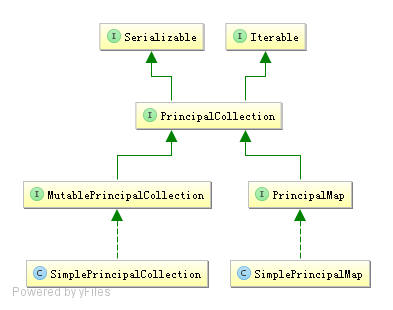
因为我们可以在Shiro中同时配置多个Realm,所以呢身份信息可能就有多个;因此其提供了PrincipalCollection用于聚合这些身份信息:
- public interface PrincipalCollection extends Iterable, Serializable {
- Object getPrimaryPrincipal(); //得到主要的身份
- <T> T oneByType(Class<T> type); //根据身份类型获取第一个
- <T> Collection<T> byType(Class<T> type); //根据身份类型获取一组
- List asList(); //转换为List
- Set asSet(); //转换为Set
- Collection fromRealm(String realmName); //根据Realm名字获取
- Set<String> getRealmNames(); //获取所有身份验证通过的Realm名字
- boolean isEmpty(); //判断是否为空
- }
因为PrincipalCollection聚合了多个,此处最需要注意的是getPrimaryPrincipal,如果只有一个Principal那么直接返回即可,如果有多个Principal,则返回第一个(因为内部使用Map存储,所以可以认为是返回任意一个);oneByType / byType根据凭据的类型返回相应的Principal;fromRealm根据Realm名字(每个Principal都与一个Realm关联)获取相应的Principal。
MutablePrincipalCollection是一个可变的PrincipalCollection接口,即提供了如下可变方法:
- public interface MutablePrincipalCollection extends PrincipalCollection {
- void add(Object principal, String realmName); //添加Realm-Principal的关联
- void addAll(Collection principals, String realmName); //添加一组Realm-Principal的关联
- void addAll(PrincipalCollection principals);//添加PrincipalCollection
- void clear();//清空
- }
目前Shiro只提供了一个实现SimplePrincipalCollection,还记得之前的AuthenticationStrategy实现嘛,用于在多Realm时判断是否满足条件的,在大多数实现中(继承了AbstractAuthenticationStrategy)afterAttempt方法会进行AuthenticationInfo(实现了MergableAuthenticationInfo)的merge,比如SimpleAuthenticationInfo会合并多个Principal为一个PrincipalCollection。
对于PrincipalMap是Shiro 1.2中的一个实验品,暂时无用,具体可以参考其Javadoc。接下来通过示例来看看PrincipalCollection。
1、准备三个Realm
MyRealm1
- public class MyRealm1 implements Realm {
- @Override
- public String getName() {
- return "a"; //realm name 为 “a”
- }
- //省略supports方法,具体请见源码
- @Override
- public AuthenticationInfo getAuthenticationInfo(AuthenticationToken token) throws AuthenticationException {
- return new SimpleAuthenticationInfo(
- "zhang", //身份 字符串类型
- "123", //凭据
- getName() //Realm Name
- );
- }
- }
MyRealm2
和MyRealm1完全一样,只是Realm名字为b。
MyRealm3
- public class MyRealm3 implements Realm {
- @Override
- public String getName() {
- return "c"; //realm name 为 “c”
- }
- //省略supports方法,具体请见源码
- @Override
- public AuthenticationInfo getAuthenticationInfo(AuthenticationToken token) throws AuthenticationException {
- User user = new User("zhang", "123");
- return new SimpleAuthenticationInfo(
- user, //身份 User类型
- "123", //凭据
- getName() //Realm Name
- );
- }
- }
和MyRealm1同名,但返回的Principal是User类型。
2、ini配置(shiro-multirealm.ini)
- [main]
- realm1=com.github.zhangkaitao.shiro.chapter6.realm.MyRealm1
- realm2=com.github.zhangkaitao.shiro.chapter6.realm.MyRealm2
- realm3=com.github.zhangkaitao.shiro.chapter6.realm.MyRealm3
- securityManager.realms=$realm1,$realm2,$realm3
3、测试用例(com.github.zhangkaitao.shiro.chapter6.realm.PrincialCollectionTest)
因为我们的Realm中没有进行身份及凭据验证,所以相当于身份验证都是成功的,都将返回:
- Object primaryPrincipal1 = subject.getPrincipal();
- PrincipalCollection princialCollection = subject.getPrincipals();
- Object primaryPrincipal2 = princialCollection.getPrimaryPrincipal();
我们可以直接调用subject.getPrincipal获取PrimaryPrincipal(即所谓的第一个);或者通过getPrincipals获取PrincipalCollection;然后通过其getPrimaryPrincipal获取PrimaryPrincipal。
- Set<String> realmNames = princialCollection.getRealmNames();
获取所有身份验证成功的Realm名字。
- Set<Object> principals = princialCollection.asSet(); //asList和asSet的结果一样
将身份信息转换为Set/List,即使转换为List,也是先转换为Set再完成的。
- Collection<User> users = princialCollection.fromRealm("c");
根据Realm名字获取身份,因为Realm名字可以重复,所以可能多个身份,建议Realm名字尽量不要重复。
6.4 AuthorizationInfo
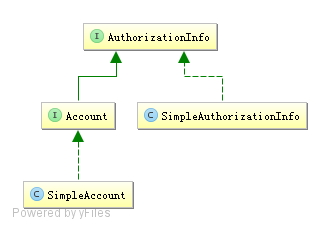
AuthorizationInfo用于聚合授权信息的:
- public interface AuthorizationInfo extends Serializable {
- Collection<String> getRoles(); //获取角色字符串信息
- Collection<String> getStringPermissions(); //获取权限字符串信息
- Collection<Permission> getObjectPermissions(); //获取Permission对象信息
- }
当我们使用AuthorizingRealm时,如果身份验证成功,在进行授权时就通过doGetAuthorizationInfo方法获取角色/权限信息用于授权验证。
Shiro提供了一个实现SimpleAuthorizationInfo,大多数时候使用这个即可。
对于Account及SimpleAccount,之前的【6.3 AuthenticationInfo】已经介绍过了,用于SimpleAccountRealm子类,实现动态角色/权限维护的。
6.5 Subject
Subject是Shiro的核心对象,基本所有身份验证、授权都是通过Subject完成。
1、身份信息获取
- Object getPrincipal(); //Primary Principal
- PrincipalCollection getPrincipals(); // PrincipalCollection
2、身份验证
- void login(AuthenticationToken token) throws AuthenticationException;
- boolean isAuthenticated();
- boolean isRemembered();
通过login登录,如果登录失败将抛出相应的AuthenticationException,如果登录成功调用isAuthenticated就会返回true,即已经通过身份验证;如果isRemembered返回true,表示是通过记住我功能登录的而不是调用login方法登录的。isAuthenticated/isRemembered是互斥的,即如果其中一个返回true,另一个返回false。
3、角色授权验证
- boolean hasRole(String roleIdentifier);
- boolean[] hasRoles(List<String> roleIdentifiers);
- boolean hasAllRoles(Collection<String> roleIdentifiers);
- void checkRole(String roleIdentifier) throws AuthorizationException;
- void checkRoles(Collection<String> roleIdentifiers) throws AuthorizationException;
- void checkRoles(String... roleIdentifiers) throws AuthorizationException;
hasRole*进行角色验证,验证后返回true/false;而checkRole*验证失败时抛出AuthorizationException异常。
4、权限授权验证
- boolean isPermitted(String permission);
- boolean isPermitted(Permission permission);
- boolean[] isPermitted(String... permissions);
- boolean[] isPermitted(List<Permission> permissions);
- boolean isPermittedAll(String... permissions);
- boolean isPermittedAll(Collection<Permission> permissions);
- void checkPermission(String permission) throws AuthorizationException;
- void checkPermission(Permission permission) throws AuthorizationException;
- void checkPermissions(String... permissions) throws AuthorizationException;
- void checkPermissions(Collection<Permission> permissions) throws AuthorizationException;
isPermitted*进行权限验证,验证后返回true/false;而checkPermission*验证失败时抛出AuthorizationException。
5、会话
- Session getSession(); //相当于getSession(true)
- Session getSession(boolean create);
类似于Web中的会话。如果登录成功就相当于建立了会话,接着可以使用getSession获取;如果create=false如果没有会话将返回null,而create=true如果没有会话会强制创建一个。
6、退出
- void logout();
7、RunAs
- void runAs(PrincipalCollection principals) throws NullPointerException, IllegalStateException;
- boolean isRunAs();
- PrincipalCollection getPreviousPrincipals();
- PrincipalCollection releaseRunAs();
RunAs即实现“允许A假设为B身份进行访问”;通过调用subject.runAs(b)进行访问;接着调用subject.getPrincipals将获取到B的身份;此时调用isRunAs将返回true;而a的身份需要通过subject. getPreviousPrincipals获取;如果不需要RunAs了调用subject. releaseRunAs即可。
8、多线程
- <V> V execute(Callable<V> callable) throws ExecutionException;
- void execute(Runnable runnable);
- <V> Callable<V> associateWith(Callable<V> callable);
- Runnable associateWith(Runnable runnable);
实现线程之间的Subject传播,因为Subject是线程绑定的;因此在多线程执行中需要传播到相应的线程才能获取到相应的Subject。最简单的办法就是通过execute(runnable/callable实例)直接调用;或者通过associateWith(runnable/callable实例)得到一个包装后的实例;它们都是通过:1、把当前线程的Subject绑定过去;2、在线程执行结束后自动释放。
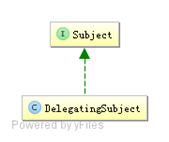
Subject自己不会实现相应的身份验证/授权逻辑,而是通过DelegatingSubject委托给SecurityManager实现;及可以理解为Subject是一个面门。
对于Subject的构建一般没必要我们去创建;一般通过SecurityUtils.getSubject()获取:
- public static Subject getSubject() {
- Subject subject = ThreadContext.getSubject();
- if (subject == null) {
- subject = (new Subject.Builder()).buildSubject();
- ThreadContext.bind(subject);
- }
- return subject;
- }
即首先查看当前线程是否绑定了Subject,如果没有通过Subject.Builder构建一个然后绑定到现场返回。
如果想自定义创建,可以通过:
- new Subject.Builder().principals(身份).authenticated(true/false).buildSubject()
这种可以创建相应的Subject实例了,然后自己绑定到线程即可。在new Builder()时如果没有传入SecurityManager,自动调用SecurityUtils.getSecurityManager获取;也可以自己传入一个实例。
对于Subject我们一般这么使用:
1、身份验证(login)
2、授权(hasRole*/isPermitted*或checkRole*/checkPermission*)
3、将相应的数据存储到会话(Session)
4、切换身份(RunAs)/多线程身份传播
5、退出
而我们必须的功能就是1、2、5。到目前为止我们就可以使用Shiro进行应用程序的安全控制了,但是还是缺少如对Web验证、Java方法验证等的一些简化实现。
第七章 与Web集成——《跟我学Shiro》
Shiro提供了与Web集成的支持,其通过一个ShiroFilter入口来拦截需要安全控制的URL,然后进行相应的控制,ShiroFilter类似于如Strut2/SpringMVC这种web框架的前端控制器,其是安全控制的入口点,其负责读取配置(如ini配置文件),然后判断URL是否需要登录/权限等工作。
7.1 准备环境
1、创建webapp应用
此处我们使用了jetty-maven-plugin和tomcat7-maven-plugin插件;这样可以直接使用“mvn jetty:run”或“mvn tomcat7:run”直接运行webapp了。然后通过URLhttp://localhost:8080/chapter7/访问即可。
2、依赖
Servlet3
- <dependency>
- <groupId>javax.servlet</groupId>
- <artifactId>javax.servlet-api</artifactId>
- <version>3.0.1</version>
- <scope>provided</scope>
- </dependency>
Servlet3的知识可以参考https://github.com/zhangkaitao/servlet3-showcase及Servlet3规范http://www.iteye.com/blogs/subjects/Servlet-3-1。
shiro-web
- <dependency>
- <groupId>org.apache.shiro</groupId>
- <artifactId>shiro-web</artifactId>
- <version>1.2.2</version>
- </dependency>
其他依赖请参考源码的pom.xml。
7.2 ShiroFilter入口
1、Shiro 1.1及以前版本配置方式
- <filter>
- <filter-name>iniShiroFilter</filter-name>
- <filter-class>org.apache.shiro.web.servlet.IniShiroFilter</filter-class>
- <init-param>
- <param-name>configPath</param-name>
- <param-value>classpath:shiro.ini</param-value>
- </init-param>
- </filter>
- <filter-mapping>
- <filter-name>iniShiroFilter</filter-name>
- <url-pattern>/*</url-pattern>
- </filter-mapping>
1、使用IniShiroFilter作为Shiro安全控制的入口点,通过url-pattern指定需要安全的URL;
2、通过configPath指定ini配置文件位置,默认是先从/WEB-INF/shiro.ini加载,如果没有就默认加载classpath:shiro.ini,即默认相对于web应用上下文根路径;
3、也可以通过如下方式直接内嵌ini配置文件内容到web.xml
- <init-param>
- <param-name>config</param-name>
- <param-value>
- ini配置文件贴在这
- </param-value>
- </init-param>
2、Shiro 1.2及以后版本的配置方式
从Shiro 1.2开始引入了Environment/WebEnvironment的概念,即由它们的实现提供相应的SecurityManager及其相应的依赖。ShiroFilter会自动找到Environment然后获取相应的依赖。
- <listener>
- <listener-class>org.apache.shiro.web.env.EnvironmentLoaderListener</listener-class>
- </listener>
通过EnvironmentLoaderListener来创建相应的WebEnvironment,并自动绑定到ServletContext,默认使用IniWebEnvironment实现。
可以通过如下配置修改默认实现及其加载的配置文件位置:
- <context-param>
- <param-name>shiroEnvironmentClass</param-name>
- <param-value>org.apache.shiro.web.env.IniWebEnvironment</param-value>
- </context-param>
- <context-param>
- <param-name>shiroConfigLocations</param-name>
- <param-value>classpath:shiro.ini</param-value>
- </context-param>
shiroConfigLocations默认是“/WEB-INF/shiro.ini”,IniWebEnvironment默认是先从/WEB-INF/shiro.ini加载,如果没有就默认加载classpath:shiro.ini。
3、与Spring集成
- <filter>
- <filter-name>shiroFilter</filter-name>
- <filter-class>org.springframework.web.filter.DelegatingFilterProxy</filter-class>
- <init-param>
- <param-name>targetFilterLifecycle</param-name>
- <param-value>true</param-value>
- </init-param>
- </filter>
- <filter-mapping>
- <filter-name>shiroFilter</filter-name>
- <url-pattern>/*</url-pattern>
- </filter-mapping>
DelegatingFilterProxy作用是自动到spring容器查找名字为shiroFilter(filter-name)的bean并把所有Filter的操作委托给它。然后将ShiroFilter配置到spring容器即可:
- <bean id="shiroFilter" class="org.apache.shiro.spring.web.ShiroFilterFactoryBean">
- <property name="securityManager" ref="securityManager"/>
- <!—忽略其他,详见与Spring集成部分 -->
- </bean>
最后不要忘了使用org.springframework.web.context.ContextLoaderListener加载这个spring配置文件即可。
因为我们现在的shiro版本是1.2的,因此之后的测试都是使用1.2的配置。
7.3 Web INI配置
ini配置部分和之前的相比将多出对url部分的配置。
- [main]
- #默认是/login.jsp
- authc.loginUrl=/login
- roles.unauthorizedUrl=/unauthorized
- perms.unauthorizedUrl=/unauthorized
- [users]
- zhang=123,admin
- wang=123
- [roles]
- admin=user:*,menu:*
- [urls]
- /login=anon
- /unauthorized=anon
- /static/**=anon
- /authenticated=authc
- /role=authc,roles[admin]
- /permission=authc,perms["user:create"]
其中最重要的就是[urls]部分的配置,其格式是: “url=拦截器[参数],拦截器[参数]”;即如果当前请求的url匹配[urls]部分的某个url模式,将会执行其配置的拦截器。比如anon拦截器表示匿名访问(即不需要登录即可访问);authc拦截器表示需要身份认证通过后才能访问;roles[admin]拦截器表示需要有admin角色授权才能访问;而perms["user:create"]拦截器表示需要有“user:create”权限才能访问。
url模式使用Ant风格模式
Ant路径通配符支持?、*、**,注意通配符匹配不包括目录分隔符“/”:
?:匹配一个字符,如”/admin?”将匹配/admin1,但不匹配/admin或/admin2;
*:匹配零个或多个字符串,如/admin*将匹配/admin、/admin123,但不匹配/admin/1;
**:匹配路径中的零个或多个路径,如/admin/**将匹配/admin/a或/admin/a/b。
url模式匹配顺序
url模式匹配顺序是按照在配置中的声明顺序匹配,即从头开始使用第一个匹配的url模式对应的拦截器链。如:
- /bb/**=filter1
- /bb/aa=filter2
- /**=filter3
如果请求的url是“/bb/aa”,因为按照声明顺序进行匹配,那么将使用filter1进行拦截。
拦截器将在下一节详细介绍。接着我们来看看身份验证、授权及退出在web中如何实现。
1、身份验证(登录)
1.1、首先配置需要身份验证的url
- /authenticated=authc
- /role=authc,roles[admin]
- /permission=authc,perms["user:create"]
即访问这些地址时会首先判断用户有没有登录,如果没有登录默会跳转到登录页面,默认是/login.jsp,可以通过在[main]部分通过如下配置修改:
- authc.loginUrl=/login
1.2、登录Servlet(com.github.zhangkaitao.shiro.chapter7.web.servlet.LoginServlet)
- @WebServlet(name = "loginServlet", urlPatterns = "/login")
- public class LoginServlet extends HttpServlet {
- @Override
- protected void doGet(HttpServletRequest req, HttpServletResponse resp)
- throws ServletException, IOException {
- req.getRequestDispatcher("/WEB-INF/jsp/login.jsp").forward(req, resp);
- }
- @Override
- protected void doPost(HttpServletRequest req, HttpServletResponse resp)
- throws ServletException, IOException {
- String error = null;
- String username = req.getParameter("username");
- String password = req.getParameter("password");
- Subject subject = SecurityUtils.getSubject();
- UsernamePasswordToken token = new UsernamePasswordToken(username, password);
- try {
- subject.login(token);
- } catch (UnknownAccountException e) {
- error = "用户名/密码错误";
- } catch (IncorrectCredentialsException e) {
- error = "用户名/密码错误";
- } catch (AuthenticationException e) {
- //其他错误,比如锁定,如果想单独处理请单独catch处理
- error = "其他错误:" + e.getMessage();
- }
- if(error != null) {//出错了,返回登录页面
- req.setAttribute("error", error);
- req.getRequestDispatcher("/WEB-INF/jsp/login.jsp").forward(req, resp);
- } else {//登录成功
- req.getRequestDispatcher("/WEB-INF/jsp/loginSuccess.jsp").forward(req, resp);
- }
- }
- }
1、doGet请求时展示登录页面;
2、doPost时进行登录,登录时收集username/password参数,然后提交给Subject进行登录。如果有错误再返回到登录页面;否则跳转到登录成功页面(此处应该返回到访问登录页面之前的那个页面,或者没有上一个页面时访问主页)。
3、JSP页面请参考源码。
1.3、测试
首先输入http://localhost:8080/chapter7/login进行登录,登录成功后接着可以访问http://localhost:8080/chapter7/authenticated来显示当前登录的用户:
- ${subject.principal}身份验证已通过。
当前实现的一个缺点就是,永远返回到同一个成功页面(比如首页),在实际项目中比如支付时如果没有登录将跳转到登录页面,登录成功后再跳回到支付页面;对于这种功能大家可以在登录时把当前请求保存下来,然后登录成功后再重定向到该请求即可。
Shiro内置了登录(身份验证)的实现:基于表单的和基于Basic的验证,其通过拦截器实现。
2、基于Basic的拦截器身份验证
2.1、shiro-basicfilterlogin.ini配置
- [main]
- authcBasic.applicationName=please login
- ………省略users
- [urls]
- /role=authcBasic,roles[admin]
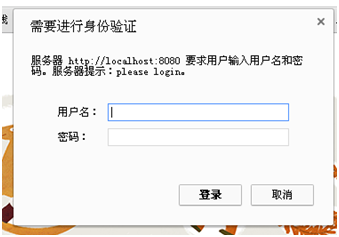
1、authcBasic是org.apache.shiro.web.filter.authc.BasicHttpAuthenticationFilter类型的实例,其用于实现基于Basic的身份验证;applicationName用于弹出的登录框显示信息使用,如图:
2、[urls]部分配置了/role地址需要走authcBasic拦截器,即如果访问/role时还没有通过身份验证那么将弹出如上图的对话框进行登录,登录成功即可访问。
2.2、web.xml
把shiroConfigLocations改为shiro-basicfilterlogin.ini即可。
2.3、测试
输入http://localhost:8080/chapter7/role,会弹出之前的Basic验证对话框输入“zhang/123”即可登录成功进行访问。
3、基于表单的拦截器身份验证
基于表单的拦截器身份验证和【1】类似,但是更简单,因为其已经实现了大部分登录逻辑;我们只需要指定:登录地址/登录失败后错误信息存哪/成功的地址即可。
3.1、shiro-formfilterlogin.ini
- [main]
- authc.loginUrl=/formfilterlogin
- authc.usernameParam=username
- authc.passwordParam=password
- authc.successUrl=/
- authc.failureKeyAttribute=shiroLoginFailure
- [urls]
- /role=authc,roles[admin]
1、authc是org.apache.shiro.web.filter.authc.FormAuthenticationFilter类型的实例,其用于实现基于表单的身份验证;通过loginUrl指定当身份验证时的登录表单;usernameParam指定登录表单提交的用户名参数名;passwordParam指定登录表单提交的密码参数名;successUrl指定登录成功后重定向的默认地址(默认是“/”)(如果有上一个地址会自动重定向带该地址);failureKeyAttribute指定登录失败时的request属性key(默认shiroLoginFailure);这样可以在登录表单得到该错误key显示相应的错误消息;
3.2、web.xml
把shiroConfigLocations改为shiro- formfilterlogin.ini即可。
3.3、登录Servlet
- @WebServlet(name = "formFilterLoginServlet", urlPatterns = "/formfilterlogin")
- public class FormFilterLoginServlet extends HttpServlet {
- @Override
- protected void doGet(HttpServletRequest req, HttpServletResponse resp)
- throws ServletException, IOException {
- doPost(req, resp);
- }
- @Override
- protected void doPost(HttpServletRequest req, HttpServletResponse resp)
- throws ServletException, IOException {
- String errorClassName = (String)req.getAttribute("shiroLoginFailure");
- if(UnknownAccountException.class.getName().equals(errorClassName)) {
- req.setAttribute("error", "用户名/密码错误");
- } else if(IncorrectCredentialsException.class.getName().equals(errorClassName)) {
- req.setAttribute("error", "用户名/密码错误");
- } else if(errorClassName != null) {
- req.setAttribute("error", "未知错误:" + errorClassName);
- }
- req.getRequestDispatcher("/WEB-INF/jsp/formfilterlogin.jsp").forward(req, resp);
- }
- }
在登录Servlet中通过shiroLoginFailure得到authc登录失败时的异常类型名,然后根据此异常名来决定显示什么错误消息。
4、测试
输入http://localhost:8080/chapter7/role,会跳转到“/formfilterlogin”登录表单,提交表单如果authc拦截器登录成功后,会直接重定向会之前的地址“/role”;假设我们直接访问“/formfilterlogin”的话登录成功将直接到默认的successUrl。
4、授权(角色/权限验证)
4.1、shiro.ini
- [main]
- roles.unauthorizedUrl=/unauthorized
- perms.unauthorizedUrl=/unauthorized
- [urls]
- /role=authc,roles[admin]
- /permission=authc,perms["user:create"]
通过unauthorizedUrl属性指定如果授权失败时重定向到的地址。roles是org.apache.shiro.web.filter.authz.RolesAuthorizationFilter类型的实例,通过参数指定访问时需要的角色,如“[admin]”,如果有多个使用“,”分割,且验证时是hasAllRole验证,即且的关系。Perms是org.apache.shiro.web.filter.authz.PermissionsAuthorizationFilter类型的实例,和roles类似,只是验证权限字符串。
4.2、web.xml
把shiroConfigLocations改为shiro.ini即可。
4.3、RoleServlet/PermissionServlet
- @WebServlet(name = "permissionServlet", urlPatterns = "/permission")
- public class PermissionServlet extends HttpServlet {
- @Override
- protected void doGet(HttpServletRequest req, HttpServletResponse resp)
- throws ServletException, IOException {
- Subject subject = SecurityUtils.getSubject();
- subject.checkPermission("user:create");
- req.getRequestDispatcher("/WEB-INF/jsp/hasPermission.jsp").forward(req, resp);
- }
- }
- @WebServlet(name = "roleServlet", urlPatterns = "/role")
- public class RoleServlet extends HttpServlet {
- @Override
- protected void doGet(HttpServletRequest req, HttpServletResponse resp)
- throws ServletException, IOException {
- Subject subject = SecurityUtils.getSubject();
- subject.checkRole("admin");
- req.getRequestDispatcher("/WEB-INF/jsp/hasRole.jsp").forward(req, resp);
- }
- }
4.4、测试
首先访问http://localhost:8080/chapter7/login,使用帐号“zhang/123”进行登录,再访问/role或/permission时会跳转到成功页面(因为其授权成功了);如果使用帐号“wang/123”登录成功后访问这两个地址会跳转到“/unauthorized”即没有授权页面。
5、退出
5.1、shiro.ini
- [urls]
- /logout=anon
指定/logout使用anon拦截器即可,即不需要登录即可访问。
5.2、LogoutServlet
- @WebServlet(name = "logoutServlet", urlPatterns = "/logout")
- public class LogoutServlet extends HttpServlet {
- protected void doGet(HttpServletRequest req, HttpServletResponse resp)
- throws ServletException, IOException {
- SecurityUtils.getSubject().logout();
- req.getRequestDispatcher("/WEB-INF/jsp/logoutSuccess.jsp").forward(req, resp);
- }
- }
直接调用Subject.logout即可,退出成功后转发/重定向到相应页面即可。
5.3、测试
首先访问http://localhost:8080/chapter7/login,使用帐号“zhang/123”进行登录,登录成功后访问/logout即可退出。
Shiro也提供了logout拦截器用于退出,其是org.apache.shiro.web.filter.authc.LogoutFilter类型的实例,我们可以在shiro.ini配置文件中通过如下配置完成退出:
- [main]
- logout.redirectUrl=/login
- [urls]
- /logout2=logout
通过logout.redirectUrl指定退出后重定向的地址;通过/logout2=logout指定退出url是/logout2。这样当我们登录成功后然后访问/logout2即可退出。

 浙公网安备 33010602011771号