springboot+druid+mybatis plus的多数据源配置
springboot+druid+mybatis plus的多数据源配置
https://www.cnblogs.com/puretuo/p/11365359.html
记得面试时候,有面试官会问道,你们多数据源是怎么实现的呀。.......,一阵蒙蔽中,然后说道我们之前项目中,没有用到多数据源。
所幸,目前做得项目中有一个业务逻辑中,用到多个数据库数据情况,多数据源华丽上线。
一. mybatis plus
因为我们项目是springboot+mybatis plus,有些人一看,mybatis还知道对吧,mybatis plus是什么鬼,其实字面意思可以理解,就是对mybatis进行一些功能改造,一些封装升级,然后用起来特别方便。
核心功能的升级主要是以下三点:
支持通用的 CRUD、代码生成器与条件构造器。
通用 CRUD:定义好 Mapper 接口后,只需要继承 BaseMapper<T> 接口即可获得通用的增删改查功能,无需编写任何接口方法与配置文件
条件构造器:通过 EntityWrapper<T> (实体包装类),可以用于拼接 SQL 语句,并且支持排序、分组查询等复杂的 SQL
代码生成器:支持一系列的策略配置与全局配置,比 MyBatis 的代码生成更好用
二.多数据源配置开始
思路:
1、yml中配置多个数据源信息
2、通过AOP切换不同数据源
3、配合mybatis plus使用
1、yml配置
|
1
2
3
4
5
6
7
8
9
10
11
12
13
14
15
16
17
18
19
20
21
22
|
spring: aop: proxy-target-class: true auto: true datasource: druid: db1: url: jdbc:mysql://localhost:3306/eboot username: root password: root driver-class-name: com.mysql.jdbc.Driver initialSize: 5 minIdle: 5 maxActive: 20 db2: url: jdbc:oracle:thin:@192.168.136.222:ORCL username: sa password: sa123456 driver-class-name: oracle.jdbc.OracleDriver initialSize: 5 minIdle: 5 maxActive: 20 |
2、启动多个数据源
|
1
2
3
4
5
6
7
8
9
10
11
12
13
14
15
16
17
18
19
20
21
22
23
24
25
26
27
28
29
30
31
32
33
34
35
36
37
38
39
40
41
42
43
44
45
46
47
48
49
50
51
52
53
54
55
56
57
58
59
60
61
62
63
64
65
66
67
68
69
70
71
72
73
|
@EnableTransactionManagement //开启事务@Configuration //spring中常用到注解,与xml配置相对立。是两种加载bean方式@MapperScan("com.df.openapi.**.mapper.db*") // 扫描mapperdao的地址public class MybatisPlusConfig { @Bean public PaginationInterceptor paginationInterceptor() { PaginationInterceptor paginationInterceptor = new PaginationInterceptor();// paginationInterceptor.setLocalPage(true); // 由于版本问题,有些类可能招不到这个方法,需要升级jar包 return paginationInterceptor; } @Bean(name = "db1") @ConfigurationProperties(prefix = "spring.datasource.druid.db1") public DataSource db1() { return DruidDataSourceBuilder.create().build(); } @Bean(name = "db2") @ConfigurationProperties(prefix = "spring.datasource.druid.db2") public DataSource db2() { return DruidDataSourceBuilder.create().build(); } /** * 动态数据源配置 * * @return */ @Bean @Primary public DataSource multipleDataSource(@Qualifier("db1") DataSource db1, @Qualifier("db2") DataSource db2) { DynamicDataSource dynamicDataSource = new DynamicDataSource(); Map<Object, Object> targetDataSources = new HashMap<>(); targetDataSources.put(DBTypeEnum.db1.getValue(), db1); targetDataSources.put(DBTypeEnum.db2.getValue(), db2); dynamicDataSource.setTargetDataSources(targetDataSources); dynamicDataSource.setDefaultTargetDataSource(db2); // 程序默认数据源,这个要根据程序调用数据源频次,经常把常调用的数据源作为默认 return dynamicDataSource; } @Bean("sqlSessionFactory") public SqlSessionFactory sqlSessionFactory() throws Exception { MybatisSqlSessionFactoryBean sqlSessionFactory = new MybatisSqlSessionFactoryBean(); sqlSessionFactory.setDataSource(multipleDataSource(db1(), db2())); MybatisConfiguration configuration = new MybatisConfiguration(); configuration.setJdbcTypeForNull(JdbcType.NULL); configuration.setMapUnderscoreToCamelCase(true); configuration.setCacheEnabled(false); sqlSessionFactory.setConfiguration(configuration);// 设置xml文件路径
sqlSessionFactory.setMapperLocations(new PathMatchingResourcePatternResolver().
getResources("classpath*:mapper/*Mapper.xml"));
//PerformanceInterceptor(),OptimisticLockerInterceptor() //添加分页功能 sqlSessionFactory.setPlugins(new Interceptor[]{ paginationInterceptor() });// sqlSessionFactory.setGlobalConfig(globalConfiguration()); //注释掉全局配置,因为在xml中读取就是全局配置 return sqlSessionFactory.getObject(); } /* @Bean public GlobalConfiguration globalConfiguration() { GlobalConfiguration conf = new GlobalConfiguration(new LogicSqlInjector()); conf.setLogicDeleteValue("-1"); conf.setLogicNotDeleteValue("1"); conf.setIdType(0); conf.setMetaObjectHandler(new MyMetaObjectHandler()); conf.setDbColumnUnderline(true); conf.setRefresh(true); return conf; }*/} |
3、DBType枚举类
|
1
2
3
4
5
6
7
8
9
10
11
12
13
14
15
|
package com.df.openapi.config.db;public enum DBTypeEnum { db1("db1"), db2("db2"); private String value; DBTypeEnum(String value) { this.value = value; } public String getValue() { return value; }} |
4、动态数据源决策
|
1
2
3
4
5
|
package com.df.openapi.config.db;import org.springframework.jdbc.datasource.lookup.AbstractRoutingDataSource;public class DynamicDataSource extends AbstractRoutingDataSource { |
private static final Logger LOGGER = LoggerFactory.getLogger(DynamicDataSource.class);

@Override
protected Object determineCurrentLookupKey() {
    String datasource = DataSourceContextHolder.getDbType();
    LOGGER.debug("使用数据源 {}", datasource);
    return datasource;
}
|
1
|
} |
5、设置、获取数据源
|
1
2
3
4
5
6
7
8
9
10
11
12
13
14
15
16
17
18
19
20
21
22
23
24
25
26
27
28
|
public class DataSourceContextHolder { private static final Logger LOGGER = LoggerFactory.getLogger(DataSourceContextHolder.class); private static final ThreadLocal contextHolder = new ThreadLocal<>(); //实际上就是开启多个线程,每个线程进行初始化一个数据源 /** * 设置数据源 * @param dbTypeEnum */ public static void setDbType(DBTypeEnum dbTypeEnum) { contextHolder.set(dbTypeEnum.getValue()); } /** * 取得当前数据源 * @return */ public static String getDbType() { return (String) contextHolder.get(); } /** * 清除上下文数据 */ public static void clearDbType() { contextHolder.remove(); }} |
6、AOP实现的数据源切换
@Order设置的足够小是为了让他先执行
|
1
2
3
4
5
6
7
8
9
10
11
12
13
14
15
16
17
18
19
20
21
22
23
24
25
26
27
28
29
|
/** * aop的实现的数据源切换<br> * aop切点,实现mapper类找寻,找到所属大本营以后,如db1Aspect(),则会调用<br> * db1()前面之前的操作,进行数据源的切换。 */@Component@Order(value = -100)@Slf4j@Aspectpublic class DataSourceAspect { @Pointcut("execution(* com.zwyl.bazhong.dao.mapper.db1..*.*(..))") private void db1Aspect() { } @Pointcut("execution(* com.zwyl.bazhong.dao.mapper.db2..*.*(..))") private void db2Aspect() { } @Before("db1Aspect()") public void db1() { log.info("切换到db1 数据源..."); DataSourceContextHolder.setDbType(DBTypeEnum.db1); } @Before("db2Aspect()") public void db2() { log.info("切换到db2 数据源..."); DataSourceContextHolder.setDbType(DBTypeEnum.db2); }} |
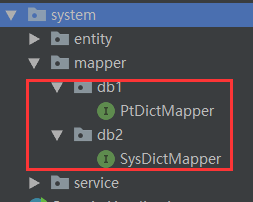
7、mapper层结构
8、写一个service测试一下
|
1
2
3
4
5
6
7
8
9
10
11
12
13
14
15
16
17
|
@Servicepublic class DictServiceImpl implements IDictService { @Resource private PtDictMapper ptDictMapper; //来自db1 @Resource private SysDictMapper sysDictMapper; // 来自db2 @Override public void getById(String id) { PtDict dict = ptDictMapper.selectById("2bf6257fc8fe483c84c1ad7e89d632f6"); SysDict sysDict = sysDictMapper.getById("49"); System.out.println("123"); }} |
9、测试结果

总结: 其实整个过程可以理解成,配置多数据源 xml中 -------> 然后通过加载多数源到spring工厂中-------->然后创建多线程,每个数据源对应一个数据源--------->然后实际调用时候,会先通过aop匹配到某一具体数据源------------->然后实例化当前数据源
记得面试时候,有面试官会问道,你们多数据源是怎么实现的呀。.......,一阵蒙蔽中,然后说道我们之前项目中,没有用到多数据源。
所幸,目前做得项目中有一个业务逻辑中,用到多个数据库数据情况,多数据源华丽上线。
一. mybatis plus
因为我们项目是springboot+mybatis plus,有些人一看,mybatis还知道对吧,mybatis plus是什么鬼,其实字面意思可以理解,就是对mybatis进行一些功能改造,一些封装升级,然后用起来特别方便。
核心功能的升级主要是以下三点:
支持通用的 CRUD、代码生成器与条件构造器。
通用 CRUD:定义好 Mapper 接口后,只需要继承 BaseMapper<T> 接口即可获得通用的增删改查功能,无需编写任何接口方法与配置文件
条件构造器:通过 EntityWrapper<T> (实体包装类),可以用于拼接 SQL 语句,并且支持排序、分组查询等复杂的 SQL
代码生成器:支持一系列的策略配置与全局配置,比 MyBatis 的代码生成更好用
二.多数据源配置开始
思路:
1、yml中配置多个数据源信息
2、通过AOP切换不同数据源
3、配合mybatis plus使用
1、yml配置
|
1
2
3
4
5
6
7
8
9
10
11
12
13
14
15
16
17
18
19
20
21
22
|
spring: aop: proxy-target-class: true auto: true datasource: druid: db1: url: jdbc:mysql://localhost:3306/eboot username: root password: root driver-class-name: com.mysql.jdbc.Driver initialSize: 5 minIdle: 5 maxActive: 20 db2: url: jdbc:oracle:thin:@192.168.136.222:ORCL username: sa password: sa123456 driver-class-name: oracle.jdbc.OracleDriver initialSize: 5 minIdle: 5 maxActive: 20 |
2、启动多个数据源
|
1
2
3
4
5
6
7
8
9
10
11
12
13
14
15
16
17
18
19
20
21
22
23
24
25
26
27
28
29
30
31
32
33
34
35
36
37
38
39
40
41
42
43
44
45
46
47
48
49
50
51
52
53
54
55
56
57
58
59
60
61
62
63
64
65
66
67
68
69
70
71
72
73
|
@EnableTransactionManagement //开启事务@Configuration //spring中常用到注解,与xml配置相对立。是两种加载bean方式@MapperScan("com.df.openapi.**.mapper.db*") // 扫描mapperdao的地址public class MybatisPlusConfig { @Bean public PaginationInterceptor paginationInterceptor() { PaginationInterceptor paginationInterceptor = new PaginationInterceptor();// paginationInterceptor.setLocalPage(true); // 由于版本问题,有些类可能招不到这个方法,需要升级jar包 return paginationInterceptor; } @Bean(name = "db1") @ConfigurationProperties(prefix = "spring.datasource.druid.db1") public DataSource db1() { return DruidDataSourceBuilder.create().build(); } @Bean(name = "db2") @ConfigurationProperties(prefix = "spring.datasource.druid.db2") public DataSource db2() { return DruidDataSourceBuilder.create().build(); } /** * 动态数据源配置 * * @return */ @Bean @Primary public DataSource multipleDataSource(@Qualifier("db1") DataSource db1, @Qualifier("db2") DataSource db2) { DynamicDataSource dynamicDataSource = new DynamicDataSource(); Map<Object, Object> targetDataSources = new HashMap<>(); targetDataSources.put(DBTypeEnum.db1.getValue(), db1); targetDataSources.put(DBTypeEnum.db2.getValue(), db2); dynamicDataSource.setTargetDataSources(targetDataSources); dynamicDataSource.setDefaultTargetDataSource(db2); // 程序默认数据源,这个要根据程序调用数据源频次,经常把常调用的数据源作为默认 return dynamicDataSource; } @Bean("sqlSessionFactory") public SqlSessionFactory sqlSessionFactory() throws Exception { MybatisSqlSessionFactoryBean sqlSessionFactory = new MybatisSqlSessionFactoryBean(); sqlSessionFactory.setDataSource(multipleDataSource(db1(), db2())); MybatisConfiguration configuration = new MybatisConfiguration(); configuration.setJdbcTypeForNull(JdbcType.NULL); configuration.setMapUnderscoreToCamelCase(true); configuration.setCacheEnabled(false); sqlSessionFactory.setConfiguration(configuration); //PerformanceInterceptor(),OptimisticLockerInterceptor() //添加分页功能 sqlSessionFactory.setPlugins(new Interceptor[]{ paginationInterceptor() });// sqlSessionFactory.setGlobalConfig(globalConfiguration()); //注释掉全局配置,因为在xml中读取就是全局配置 return sqlSessionFactory.getObject(); } /* @Bean public GlobalConfiguration globalConfiguration() { GlobalConfiguration conf = new GlobalConfiguration(new LogicSqlInjector()); conf.setLogicDeleteValue("-1"); conf.setLogicNotDeleteValue("1"); conf.setIdType(0); conf.setMetaObjectHandler(new MyMetaObjectHandler()); conf.setDbColumnUnderline(true); conf.setRefresh(true); return conf; }*/} |
3、DBType枚举类
|
1
2
3
4
5
6
7
8
9
10
11
12
13
14
15
|
package com.df.openapi.config.db;public enum DBTypeEnum { db1("db1"), db2("db2"); private String value; DBTypeEnum(String value) { this.value = value; } public String getValue() { return value; }} |
4、动态数据源决策
|
1
2
3
4
5
|
package com.df.openapi.config.db;import org.springframework.jdbc.datasource.lookup.AbstractRoutingDataSource;public class DynamicDataSource extends AbstractRoutingDataSource { |
private static final Logger LOGGER = LoggerFactory.getLogger(DynamicDataSource.class);

@Override
protected Object determineCurrentLookupKey() {
    String datasource = DataSourceContextHolder.getDbType();
    LOGGER.debug("使用数据源 {}", datasource);
    return datasource;
}
|
1
|
} |
5、设置、获取数据源
|
1
2
3
4
5
6
7
8
9
10
11
12
13
14
15
16
17
18
19
20
21
22
23
24
25
26
27
28
|
public class DataSourceContextHolder { private static final Logger LOGGER = LoggerFactory.getLogger(DataSourceContextHolder.class); private static final ThreadLocal contextHolder = new ThreadLocal<>(); //实际上就是开启多个线程,每个线程进行初始化一个数据源 /** * 设置数据源 * @param dbTypeEnum */ public static void setDbType(DBTypeEnum dbTypeEnum) { contextHolder.set(dbTypeEnum.getValue()); } /** * 取得当前数据源 * @return */ public static String getDbType() { return (String) contextHolder.get(); } /** * 清除上下文数据 */ public static void clearDbType() { contextHolder.remove(); }} |
6、AOP实现的数据源切换
@Order设置的足够小是为了让他先执行
|
1
2
3
4
5
6
7
8
9
10
11
12
13
14
15
16
17
18
19
20
21
22
23
24
25
26
27
28
29
|
/** * aop的实现的数据源切换<br> * aop切点,实现mapper类找寻,找到所属大本营以后,如db1Aspect(),则会调用<br> * db1()前面之前的操作,进行数据源的切换。 */@Component@Order(value = -100)@Slf4j@Aspectpublic class DataSourceAspect { @Pointcut("execution(* com.zwyl.bazhong.dao.mapper.db1..*.*(..))") private void db1Aspect() { } @Pointcut("execution(* com.zwyl.bazhong.dao.mapper.db2..*.*(..))") private void db2Aspect() { } @Before("db1Aspect()") public void db1() { log.info("切换到db1 数据源..."); DataSourceContextHolder.setDbType(DBTypeEnum.db1); } @Before("db2Aspect()") public void db2() { log.info("切换到db2 数据源..."); DataSourceContextHolder.setDbType(DBTypeEnum.db2); }} |
7、mapper层结构
8、写一个service测试一下
|
1
2
3
4
5
6
7
8
9
10
11
12
13
14
15
16
17
|
@Servicepublic class DictServiceImpl implements IDictService { @Resource private PtDictMapper ptDictMapper; //来自db1 @Resource private SysDictMapper sysDictMapper; // 来自db2 @Override public void getById(String id) { PtDict dict = ptDictMapper.selectById("2bf6257fc8fe483c84c1ad7e89d632f6"); SysDict sysDict = sysDictMapper.getById("49"); System.out.println("123"); }} |
9、测试结果
总结: 其实整个过程可以理解成,配置多数据源 xml中 -------> 然后通过加载多数源到spring工厂中-------->然后创建多线程,每个数据源对应一个数据源--------->然后实际调用时候,会先通过aop匹配到某一具体数据源------------->然后实例化当前数据源

 浙公网安备 33010602011771号