NUC980 运行 RT-Thread 时使用 UART
这里来体验下 NUC980 跑 RT-Thread 时,怎么使用 uart.
板子上的 UART
来体验下 uart ,手上的板子已经引出了一个 uart,如下:
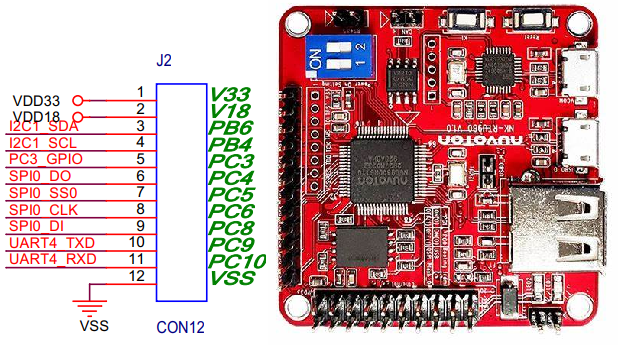
从图中可以看到使用 2.54 的排针引出了 uart4,很方便使用,不做要对板子做什么变动,
软件上,默认的工程中,先跑起来,看下启用了设备中是否有uart,在 shell 中,使用 list_device 查看:
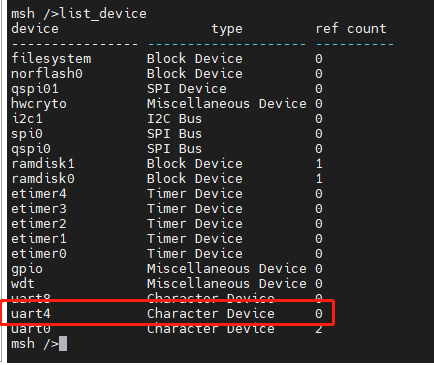
可以看到工程中已启用了 uart4,也就是说这里可以直接把 uart4 用起来。
RT-Thread 中关于 uart 的 API
RT-Thread 使用了设备驱动框架来驱动 uart,有标准的接口,应用程序只需 RT-Thread提供的 I/O 设备管理接口来访问串口硬件,相关接口如下所示:
| 函数 | 描述 |
|---|---|
| rt_device_find() | 查找设备 |
| rt_device_open() | 打开设备 |
| rt_device_read() | 读取数据 |
| rt_device_write() | 写入数据 |
| rt_device_control() | 控制设备 |
| rt_device_set_rx_indicate() | 设置接收回调函数 |
| rt_device_set_tx_complete() | 设置发送完成回调函数 |
| rt_device_close() | 关闭设备 |
详细说明,可以查看 rt-Thread 官方文档: 访问串口设备,
发送
这里尝试下通过 RT-Thread 的 uart 驱动框架来发送数据,代码如下:
#include <drv_uart.h>

#define USER_UART_DEVNAME "uart4"

int uart4_test(int argc, char **argv)
{
    rt_device_t serial;
    char txbuf[16];
    rt_err_t ret;
    int str_len;

    serial = rt_device_find(USER_UART_DEVNAME);
    if (!serial)
    {
        rt_kprintf("Can't find %s. EXIT.\n", USER_UART_DEVNAME);
        goto exit_test_uart4;
    }

    /* Interrupt RX */
    ret = rt_device_open(serial, RT_DEVICE_FLAG_INT_RX);
    RT_ASSERT(ret == RT_EOK);
    rt_kprintf("Open uart success\r\n");
    /* Say Hello */
    ret = rt_device_write(serial, 0, "Hello NUC980 using uart4", rt_strlen("Hello NUC980 using uart4"));
    ret = rt_device_close(serial);
    RT_ASSERT(ret == RT_EOK);

exit_test_uart4:

    return 0;
}
MSH_CMD_EXPORT(uart4_test, test uart4 write);
上述代码流程是,首先是使用 rt_device_find 查找对应的设备,然后使用 rt_device_open 打开设备,打开成功后使用rt_device_write 发送数据即可。
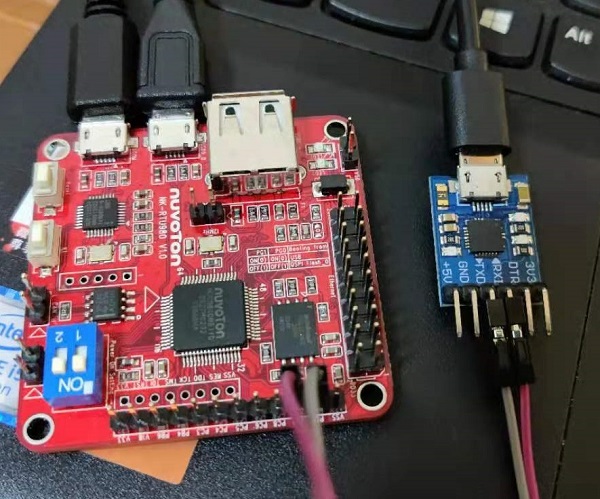
硬件上,使用 usb 转 ttl 连接到 NuMaker-RTU-NUC980 的 uart4,如下:
编译并烧录固件,在电脑中使用串口调试助手打开 usb 转 ttl 对应 COM 口,然后在 shell 中运行 uart4_test,结果如下:
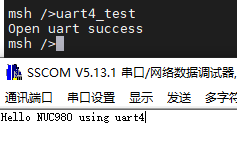
可以看到串口调试助手成功接收到了 nuc980 发送过来的数据。
接收
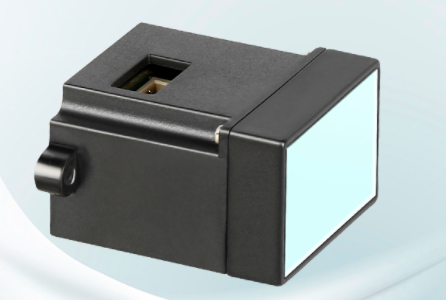
再来测试下接收,手里刚好有个 uart 接口的 TOF,如下:
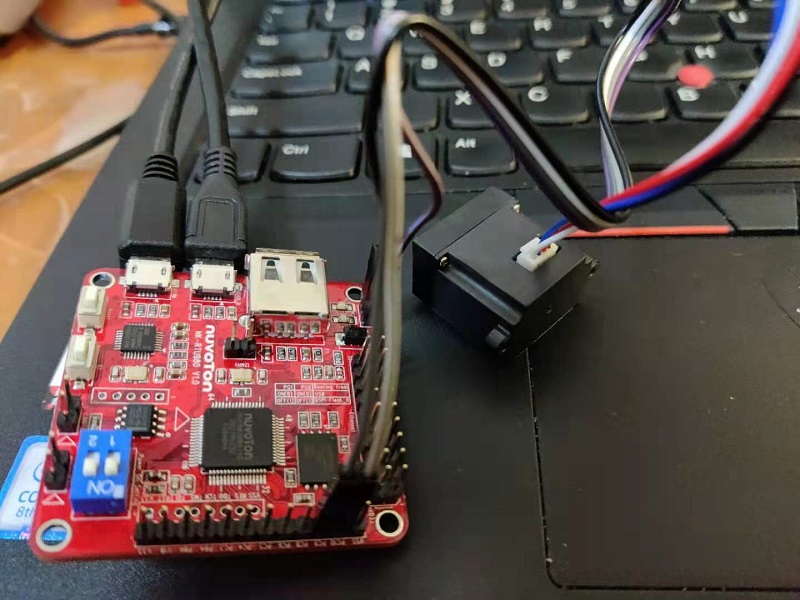
TOF 跟 NuMaker-RTU-NUC980 连接为:
相关代码为:
#include <rtthread.h>

#define SAMPLE_UART_NAME       "uart4"      /* 串口设备名称 */

/* 用于接收消息的信号量 */
static struct rt_semaphore rx_sem;
static rt_device_t serial;

/* 接收数据回调函数 */
static rt_err_t uart_input(rt_device_t dev, rt_size_t size)
{
    /* 串口接收到数据后产生中断,调用此回调函数,然后发送接收信号量 */
    rt_sem_release(&rx_sem);

    return RT_EOK;
}

static int read_tof_skz(int argc, char *argv[])
{
    rt_err_t ret = RT_EOK;
    uint8_t rx_buf[18];
    uint8_t rx_index = 0;
    uint16_t count =0 ;
    uint8_t i=0;

    uint8_t temp = 0;
    uint16_t value = 0;
    char ch;
    /* 查找串口设备 */
    serial = rt_device_find(SAMPLE_UART_NAME);
    if (!serial)
    {
        rt_kprintf("find %s failed!\n", SAMPLE_UART_NAME);
        return RT_ERROR;
    }

    /* 以中断接收及轮询发送方式打开串口设备 */
    rt_device_open(serial, RT_DEVICE_FLAG_INT_RX);
    /* 初始化信号量 */
    rt_sem_init(&rx_sem, "rx_sem", 0, RT_IPC_FLAG_FIFO);
    /* 设置接收回调函数 */
    rt_device_set_rx_indicate(serial, uart_input);
    while (1)
    {
        /* 从串口读取一个字节的数据,没有读取到则等待接收信号量 */
        while (rt_device_read(serial, 0, &ch, 1) != 1)
        {
            /* 阻塞等待接收信号量,等到信号量后再次读取数据 */
            rt_sem_take(&rx_sem, RT_WAITING_FOREVER);
        }
         rt_device_write(serial, 0, &ch, 1);
        if( ch == '~')
        {
            rx_index = 0;
        }

        rx_buf[rx_index ] = ch;
        //rt_kprintf("received index:%d\r\n",rx_index);
        if(rx_index >=1)
        {
            if(rx_buf[rx_index] == '\n' && rx_buf[rx_index-1] == '\r' )
            {
                // 9
                value = 0;
                temp = rx_buf[rx_index - 9] - '0';
                value = (value + temp <<24);

                 temp = rx_buf[rx_index - 8] - '0';
                value = (value + temp <<16);

                temp = rx_buf[rx_index - 7] - '0';
                value = (value + temp <<8);

                temp = rx_buf[rx_index - 6] - '0';
                value = (value + temp );
                rt_kprintf("Value is:%d\r\n",value);

                count ++;
            }
        }
        rx_index ++;
        if(rx_index >=19)
            rx_index = 0;

        if(count > 2500)
            break;
    }
    rt_device_close(serial);
    return ret;
}
/* 导出到 msh 命令列表中 */
MSH_CMD_EXPORT(read_tof_skz, uart device read sample);
代码中前面部分跟之前 发送的一样,首先都是查找所使用设备,找到后打开设备,这里使用中断的方式接收,需要设置中断回调函数,
/* 设置接收回调函数 */
rt_device_set_rx_indicate(serial, uart_input);
接收方式是,使用一个信号量,如果接收到了数据,回调函数中释放信号量,接收处理数据部分阻塞等待接收信号量。
这里使用的 TOF 发送过来的数据的协议为:
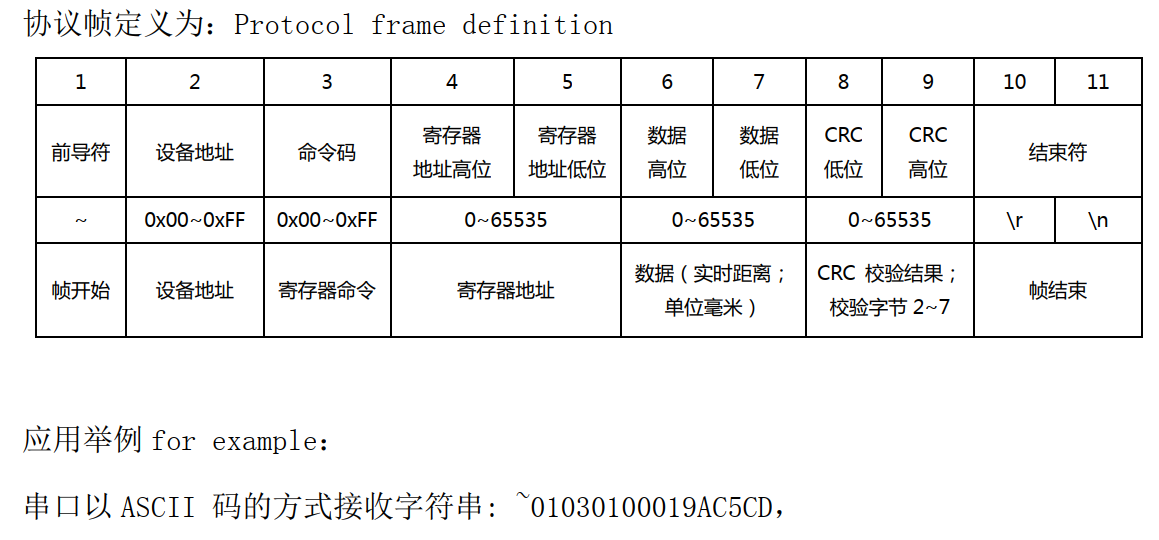
这里的处理方式是,如果接收到的数据为 ’~‘,从 0 开始计数,把接收到的数据存入数组,如果接收到了 “\r\n” ,就表示接收到了一个有效的数据包,数据包中有 CRC 校验的,这里只做个体验RT-Thread 串口接收,就不进行 CRC 校验了,直接获取TOF检测到的距离:
            if(rx_buf[rx_index] == '\n' && rx_buf[rx_index-1] == '\r' )
            {
                // 9
                value = 0;
                temp = rx_buf[rx_index - 9] - '0';
                value = (value + temp <<24);

                 temp = rx_buf[rx_index - 8] - '0';
                value = (value + temp <<16);

                temp = rx_buf[rx_index - 7] - '0';
                value = (value + temp <<8);

                temp = rx_buf[rx_index - 6] - '0';
                value = (value + temp );
                rt_kprintf("Value is:%d\r\n",value);

                count ++;
            }
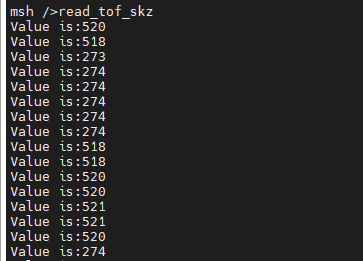
编译、运行,结果为:
参考:
- RT-Thread UART 设备
转载请注明出处:https://www.cnblogs.com/halin/
本文来自博客园,作者:哈拎,转载请注明原文链接:https://www.cnblogs.com/halin/p/14955785.html

 浙公网安备 33010602011771号