Mac 接手步骤
1. 恢复出厂设置
2. 下载各种软件
下载各种软件
WPS、微信、QQ、百度云、chrome、sublime、xmind
java、mysql、navicat、tomcat、maven、MyEclipse、intellij idea
3. 安装Homebrew
安装brew:mac安装brew 软件包管理工具Homebrew、Homebrew介绍和使用、Mac HomeBrew安装慢解决方案
--失败--
ping github.com 获取其IP
在etc/hosts后加获取到的IP 192.30.253.113 github.com
/usr/bin/ruby -e "$(curl -fsSL https://raw.githubusercontent.com/Homebrew/install/master/install)"
brew
brew list 列出已安装的软件
brew update 更新brew
brew home 用浏览器打开brew的官方网站
brew info 显示软件信息
brew deps 显示包依赖
4. 安装Java
下载Java、 Mac版-Jdk安装与环境配置,JAVA基础系列:运行环境
sudo -i vi /etc/.bash_profile
JAVA_HOME=//Library/Java/JavaVirtualMachines/jdk1.8.0_201.jdk/Contents/Home
CLASSPATH=./$JAVA_HOME/lib/dt.jar:$JAVA_HOME/lib/tools.jar
PATH=$JAVA_HOME/bin:$PATH:
export JAVA_HOME
export CLASSPATH
export PATH
source /etc/.bash_profile
java -version
5. 安装Mysql
配置MySQL:下载、
find /usr/ -iname “mysql”
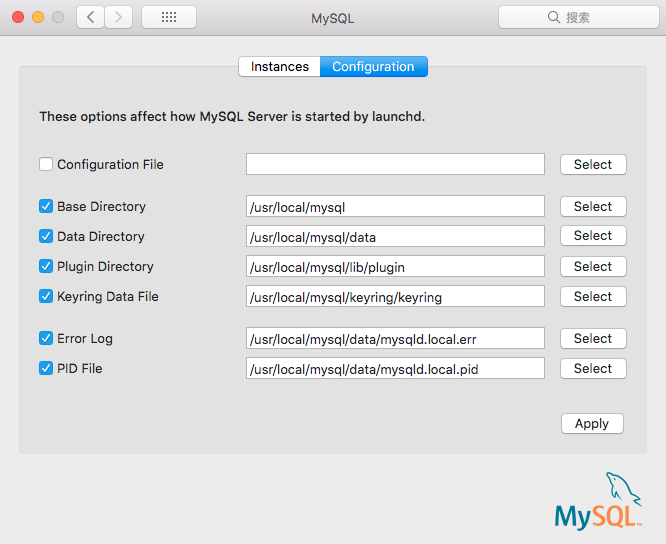
安装完后变成:
$ ps -ef|grep mysql
   74  8072     1   0  9:35下午 ??         0:40.44 /usr/local/mysql/bin/mysqld --user=_mysql --basedir=/usr/local/mysql --datadir=/usr/local/mysql/data --plugin-dir=/usr/local/mysql/lib/plugin --log-error=/usr/local/mysql/data/mysqld.local.err --pid-file=/usr/local/mysql/data/mysqld.local.pid --keyring-file-data=/usr/local/mysql/keyring/keyring --early-plugin-load=keyring_file=keyring_file.so --default_authentication_plugin=mysql_native_password
  501  8329  8322   0 10:28下午 ttys000    0:00.00 grep mysql
$ find /usr/ -iname “mysql”
find: /usr//sbin/authserver: Permission denied
find: /usr//local/mysql-8.0.19-macos10.15-x86_64/keyring: Permission denied
find: /usr//local/mysql-8.0.19-macos10.15-x86_64/data: Permission denied

sudo -i vi /etc/.bash_profile
JAVA_HOME=/Library/Java/JavaVirtualMachines/jdk1.8.0_201.jdk/Contents/Home
CLASSPATH=./$JAVA_HOME/lib/dt.jar:$JAVA_HOME/lib/tools.jar
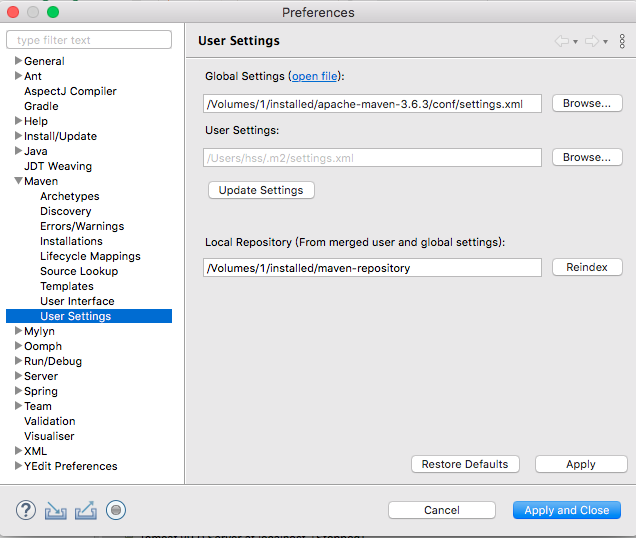
MAVEN_HOME=/Volumes/1/installed/apache-maven-3.6.3
PATH=$JAVA_HOME/bin:$PATH:$MAVEN_HOME/bin:/usr/local/mysql/bin
export JAVA_HOME
export CLASSPATH
export PATH
export MAVEN_HOME
source /etc/.bash_profile
mysql -uroot -p
root1234
6. 安装maven
配置maven: 下载、Maven的安装与配置-eclipse & intelliJ idea
sudo -i vi /etc/.bash_profile
JAVA_HOME=/Library/Java/JavaVirtualMachines/jdk1.8.0_201.jdk/Contents/Home
CLASSPATH=./$JAVA_HOME/lib/dt.jar:$JAVA_HOME/lib/tools.jar
MAVEN_HOME=/Volumes/1/installed/apache-maven-3.6.3
PATH=$JAVA_HOME/bin:$PATH:$MAVEN_HOME/bin
export JAVA_HOME
export CLASSPATH
export PATH
export MAVEN_HOME
source /etc/.bash_profile
mvn -v
配置apache-maven-3.6.0/conf/settings.xml
1.目录下新建maven-repository文件夹,该目录用作maven的本地库。
2.打开Apache\maven\conf\settings.xml文件,查找下面这行代码:
<localRepository>/path/to/local/repo</localRepository>
3.然后将localRepository节点的值改为创建的目录D:\Program Files\Apache\maven-repository。
4.修改 mirrors
 <mirrors>
     <mirror>
      <id>nexus-aliyun</id>
      <mirrorOf>*</mirrorOf>
      <name>Nexus aliyun</name>
      <url>http://maven.aliyun.com/nexus/content/groups/public</url>
    </mirror>
  </mirrors>

idea for mac 控制台 mvn command not found:https://blog.csdn.net/weixin_42684977/article/details/86217858?depth_1-utm_source=distribute.pc_relevant.none-task&utm_source=distribute.pc_relevant.none-task
7. 安装Tomcat
cd /Volumes/1/installed/apache-tomcat-9.0.30
sudo chmod 755 *.sh
sudo sh ./startup.sh
可以看到如下信息

Using CATALINA_BASE:   /Volumes/1/installed/apache-tomcat-9.0.30
Using CATALINA_HOME:   /Volumes/1/installed/apache-tomcat-9.0.30
Using CATALINA_TMPDIR: /Volumes/1/installed/apache-tomcat-9.0.30/temp
Using JRE_HOME:        /Library/Java/JavaVirtualMachines/jdk1.8.0_201.jdk/Contents/Home
Using CLASSPATH:       /Volumes/1/installed/apache-tomcat-9.0.30/bin/bootstrap.jar:/Volumes/1/installed/apache-tomcat-9.0.30/bin/tomcat-juli.jar
Tomcat started.
到浏览器输入网址localhost
关闭Tomcat,用终端输入sh ./shutdown.sh,回车即可关闭
sudo为系统超级管理员权限.
chmod 改变一个或多个文件的存取模式
755代表用户对该文件拥有读、写、执行的权限,同组的其他人员拥有执行和读的权限,没有写的权限,其它用户的权限和同组人员一样.
777代表,user,group ,others ,都有读写和可执行权限.
chmod -R 777 folername,获取文件夹权限.
8. 安装Navicat
安装Navicat
9. 安装Eclipse
安装eclipse,配server
配置server(tomcat):window->preferences->servers>tomat
没有server:
1. 点击 【help】->【about eclipse IDE】获取版本号
2. 点击【help】->【Install New Software…】
3. 点击work with的下拉条,选择版本号2019.8
4. 选择 Web,XML, Java EE and OSGi Enterprise Development下JST Server AdaptersExtensions,进行勾选。然后点击下一步NEXT。

 浙公网安备 33010602011771号