

SpringBoot集成WebSocket【基于纯H5】进行点对点[一对一]和广播[一对多]实时推送
代码全部复制,仅供自己学习用
1.环境搭建
因为在上一篇基于STOMP协议实现的WebSocket里已经有大概介绍过Web的基本情况了,所以在这篇就不多说了,我们直接进入正题吧,在SpringBoot中,我们还是需要导入WebSocket的包。
在pox.xml加上对springBoot对WebSocket的支持:
<!-- webSocket -->
<dependency>
<groupId>org.springframework.boot</groupId>
<artifactId>spring-boot-starter-websocket</artifactId>
</dependency>
这里大概说一下自己的一点小见解:客户端与服务器建立WebSocket连接,实际上是创建了一个Socket,这个Socket是共享与客户端和服务器的。两者只要往对应的Socket里操作,就可以实现双方实时通讯了
2.编码实现
一、在SpringBoot中,添加WebSocket的配置
package com.cloud.sbjm.configure;

import org.springframework.context.annotation.Configuration;
import org.springframework.web.socket.config.annotation.EnableWebSocket;
import org.springframework.web.socket.config.annotation.WebSocketConfigurer;
import org.springframework.web.socket.config.annotation.WebSocketHandlerRegistry;
import com.cloud.sbjm.security.WebSocketInterceptor;
import com.cloud.sbjm.service.Imp.MyHandler;


//实现接口来配置Websocket请求的路径和拦截器。
@Configuration
@EnableWebSocket
public class WebSocketH5Config implements WebSocketConfigurer{

@Override
public void registerWebSocketHandlers(WebSocketHandlerRegistry registry) {

    //handler是webSocket的核心,配置入口
    registry.addHandler(new MyHandler(), "/myHandler/{ID}").setAllowedOrigins("*").addInterceptors(new WebSocketInterceptor());

}


}
1.@Configuration:注解标识该类为Spring的配置类
2.@EnableWebSocket:开启注解接收和发送消息
3.实现WebSocketConfigurer接口,重写registerWebSocketHandlers方法,这是一个核心实现方法,配置websocket入口,允许访问的域、注册Handler、定义拦截器。客户端通过“/myHandler/{ID}”直接访问Handler核心类,进行socket的连接、接收、发送等操作,这里由于还加了个拦截器,所以建立新的socket访问时,都先进来拦截器再进去Handler类,“new WebSocketInterceptor()”是我实现的拦截器,“new MyHandler()”是我实现的一个Handler类。
二、WebSocketInterceptor拦截器的实现:
package com.cloud.sbjm.security;

import java.util.Map;

import javax.servlet.http.HttpSession;

import org.springframework.http.server.ServerHttpRequest;
import org.springframework.http.server.ServerHttpResponse;
import org.springframework.http.server.ServletServerHttpRequest;
import org.springframework.web.socket.WebSocketHandler;
import org.springframework.web.socket.server.HandshakeInterceptor;

public class WebSocketInterceptor implements HandshakeInterceptor {

    //在握手之前执行该方法, 继续握手返回true, 中断握手返回false. 通过attributes参数设置WebSocketSession的属性
@Override
public boolean beforeHandshake(ServerHttpRequest request, ServerHttpResponse serverHttpResponse, WebSocketHandler webSocketHandler, Map<String, Object> attributes) throws Exception {
if (request instanceof ServletServerHttpRequest) {
    String ID = request.getURI().toString().split("ID=")[1];
    System.out.println("当前session的ID="+ID);
//ServletServerHttpRequest serverHttpRequest = (ServletServerHttpRequest) request;
//HttpSession session = serverHttpRequest.getServletRequest().getSession();
attributes.put("WEBSOCKET_USERID",ID);
}
return true;
}
//完成握手之后执行该方法
@Override
public void afterHandshake(ServerHttpRequest serverHttpRequest, ServerHttpResponse serverHttpResponse, WebSocketHandler webSocketHandler, Exception e) {
System.out.println("进来webSocket的afterHandshake拦截器!");
}
}
1.实现了HandshakeInterceptor 接口,并实现了beforeHandshake该方法,该方法是在进入Handler核心类之前进行拦截。
这里主要实现的逻辑是:
截取客户端建立webSocket连接时发送的URL地址字符串,并通过对该字符串进行特殊标识截取操作,获取客户端发送的唯一标识(由自己定义的,一般是系统用户ID唯一标识,用以标识该用户),并把它以键值对的形式放到Session里,这样后期可以通过该session获取它对应的用户ID了。【一个session对应着一个webSocketSession】
三、MyHandler核心类的实现
package com.cloud.sbjm.service.Imp;

import java.io.IOException;
import java.util.HashMap;
import java.util.Map;
import java.util.Set;
import net.sf.json.JSONObject;
import org.springframework.stereotype.Service;
import org.springframework.web.socket.CloseStatus;
import org.springframework.web.socket.TextMessage;
import org.springframework.web.socket.WebSocketHandler;
import org.springframework.web.socket.WebSocketMessage;
import org.springframework.web.socket.WebSocketSession;


@Service
public class MyHandler implements WebSocketHandler {

    //在线用户列表
private static final Map<String, WebSocketSession> users;


static {
users = new HashMap<>();
}
//新增socket
@Override
public void afterConnectionEstablished(WebSocketSession session) throws Exception {
System.out.println("成功建立连接");
String ID = session.getUri().toString().split("ID=")[1];
System.out.println(ID);
if (ID != null) {
users.put(ID, session);
session.sendMessage(new TextMessage("成功建立socket连接"));
System.out.println(ID);
System.out.println(session);
}
System.out.println("当前在线人数:"+users.size());
}

//接收socket信息
@Override
public void handleMessage(WebSocketSession webSocketSession, WebSocketMessage<?> webSocketMessage) throws Exception {
try{
JSONObject jsonobject = JSONObject.fromObject(webSocketMessage.getPayload());
System.out.println(jsonobject.get("id"));
System.out.println(jsonobject.get("message")+":来自"+(String)webSocketSession.getAttributes().get("WEBSOCKET_USERID")+"的消息");
sendMessageToUser(jsonobject.get("id")+"",new TextMessage("服务器收到了,hello!"));
}catch(Exception e){
e.printStackTrace();
}

}

/**
* 发送信息给指定用户
* @param clientId
* @param message
* @return
*/
public boolean sendMessageToUser(String clientId, TextMessage message) {
if (users.get(clientId) == null) return false;
WebSocketSession session = users.get(clientId);
System.out.println("sendMessage:" + session);
if (!session.isOpen()) return false;
try {
session.sendMessage(message);
} catch (IOException e) {
e.printStackTrace();
return false;
}
return true;
}

/**
* 广播信息
* @param message
* @return
*/
public boolean sendMessageToAllUsers(TextMessage message) {
boolean allSendSuccess = true;
Set<String> clientIds = users.keySet();
WebSocketSession session = null;
for (String clientId : clientIds) {
try {
session = users.get(clientId);
if (session.isOpen()) {
session.sendMessage(message);
}
} catch (IOException e) {
e.printStackTrace();
allSendSuccess = false;
}
}

return allSendSuccess;
}


@Override
public void handleTransportError(WebSocketSession session, Throwable exception) throws Exception {
if (session.isOpen()) {
session.close();
}
System.out.println("连接出错");
users.remove(getClientId(session));
}

@Override
public void afterConnectionClosed(WebSocketSession session, CloseStatus status) throws Exception {
System.out.println("连接已关闭:" + status);
users.remove(getClientId(session));
}

@Override
public boolean supportsPartialMessages() {
return false;
}

/**
* 获取用户标识
* @param session
* @return
*/
private Integer getClientId(WebSocketSession session) {
try {
Integer clientId = (Integer) session.getAttributes().get("WEBSOCKET_USERID");
return clientId;
} catch (Exception e) {
return null;
}
}
}
1.实现了WebSocketHandler接口,并实现了关键的几个方法。
① afterConnectionEstablished(接口提供的):建立新的socket连接后回调的方法。主要逻辑是:将成功建立连接的webSocketSssion放到定义好的常量[private static final Map<String, WebSocketSession> users;]中去。这里也截取客户端访问的URL的字符串,拿到标识,以键值对的形式讲每一个webSocketSession存到users里,以记录每个Socket。
② handleMessage(接口提供的):接收客户端发送的Socket。主要逻辑是:获取客户端发送的信息。这里之所以可以获取本次Socket的ID,是因为客户端在第一次进行连接时,拦截器进行拦截后,设置好ID,这样也说明,双方在相互通讯的时候,只是对第一次建立好的socket持续进行操作。
③ sendMessageToUser(自己定义的):发送给指定用户信息。主要逻辑是:根据用户ID从常量users(记录每一个Socket)中,获取Socket,往该Socket里发送消息,只要客户端还在线,就能收到该消息。
④sendMessageToAllUsers (自己定义的):这个广播消息,发送信息给所有socket。主要逻辑是:跟③类型,只不过是遍历整个users获取每一个socket,给每一个socket发送消息即可完广播发送
⑤handleTransportError(接口提供的):连接出错时,回调的方法。主要逻辑是:一旦有连接出错的Socket,就从users里进行移除,有提供该Socket的参数,可直接获取ID,进行移除。这个在客户端没有正常关闭连接时,会进来,所以在开发客户端时,记得关闭连接
⑥afterConnectionClosed(接口提供的):连接关闭时,回调的方法。主要逻辑:一旦客户端/服务器主动关闭连接时,将个socket从users里移除,有提供该Socket的参数,可直接获取ID,进行移除。
后台的开发就开发完了,大家有没有发现比基于STOMP协议实现要灵活得多?
四、客户端页面的实现【基于H5】
不需要加入任何的JS包
<!DOCTYPE html>
<html>
<head>
<title>socket.html</title>
<meta name="keywords" content="keyword1,keyword2,keyword3">
<meta name="description" content="this is my page">
<meta name="content-type" content="text/html" charset="UTF-8">
<!--<link rel="stylesheet" type="text/css" href="./styles.css">-->
</head>
<body>
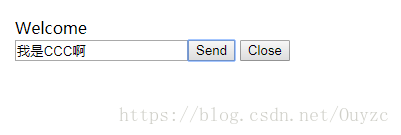
Welcome<br/>
<input id="text" type="text" /><button onclick="send()">Send</button> <button onclick="closeWebSocket()">Close</button>
<div id="message">
</div>
<!-- 公共JS -->
<script type="text/javascript" src="../webSocket/jquery.min.js"></script>
<script type="text/javascript">
var userID="888";
var websocket=null;
$(function() {
//创建WebSocket
connectWebSocket();
})
//强制关闭浏览器 调用websocket.close(),进行正常关闭
window.onunload = function() {
//关闭连接
closeWebSocket();
}
//建立WebSocket连接
function connectWebSocket(){
console.log("开始...");
//建立webSocket连接
websocket = new WebSocket("ws://127.0.0.1:9091/cloud-sbjm/myHandler/ID="+userID);
//打开webSokcet连接时,回调该函数
websocket.onopen = function () {
console.log("onpen");
}
//关闭webSocket连接时,回调该函数
websocket.onclose = function () {
//关闭连接
console.log("onclose");
}
//接收信息
websocket.onmessage = function (msg) {
console.log(msg.data);
}
}
//发送消息
function send(){
var postValue={};
postValue.id=userID;
postValue.message=$("#text").val();
websocket.send(JSON.stringify(postValue));
}
//关闭连接
function closeWebSocket(){
if(websocket != null) {
websocket.close();
}
}
</script>
</body>
</html>
页面比较简单,简单解释一下:
1.new WebSocket("ws://127.0.0.1:9091/cloud-sbjm/myHandler/ID="+userID),与服务器建立webSocket连接,后面的ID="+userID,是动态参数,跟服务器配置Handler的访问地址时对应"/myHandler/{ID}"。
2.H5也提供多个回调函数
onopen:打开webSokcet连接时,回调该函数
onclose:关闭webSocket连接时,回调该函数
onmessage:服务器给该socket发送消息时,回调该函数,获取消息
websocket.send(JSON.stringify(postValue));:给Socket发送消息,服务器获取
websocket.close();客户端主要关闭连接,会触发客户端的onclose方法和服务器的afterConnectionClosed方法
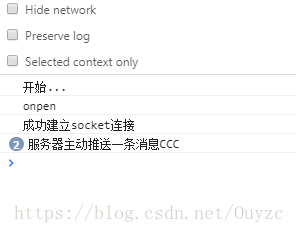
到此服务端的开发也完成了,下面执行一下程序效果图:
一、建立连接
客户端:
服务器:
二、发送消息
客户端:

服务器:

三、服务器主动推送消息
服务器代码:

到此已经完成了,各位可以根据自己需求进行修改,这会灵活多了!
如有错漏,请各位指导。

 浙公网安备 33010602011771号