Java+Swing实现仿QQ聊天源码+Socket编程实际案例
程序基本需求
这是一款简易的QQ软件,《我的QQ》软件需要采用采用图形界面编写,并具备如下基本功能:
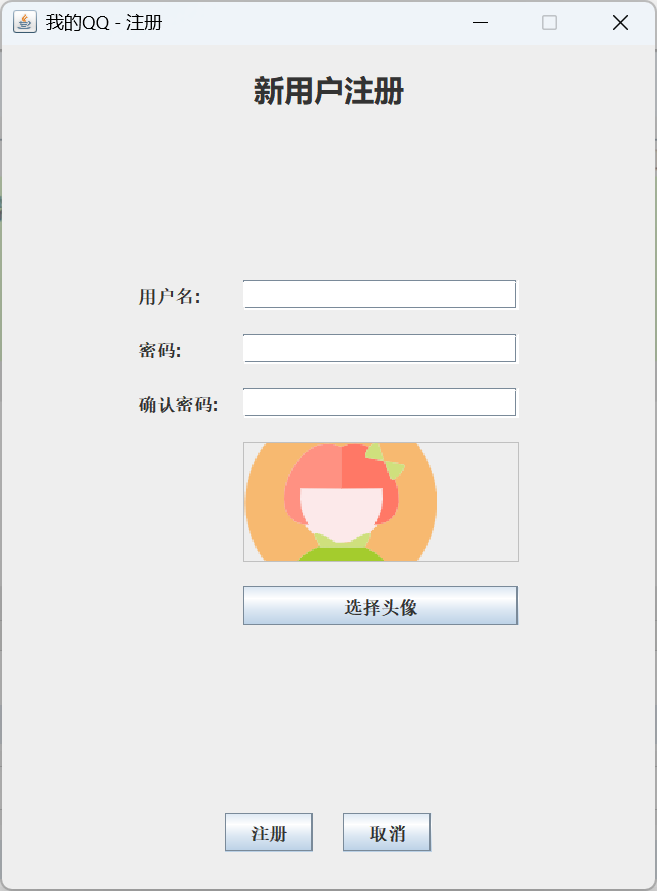
1、新用户注册
在用户可以使用《我的QQ》软件之前需要注册成为系统的合法用户。在用户注册成功后,可以在登录界面登录。
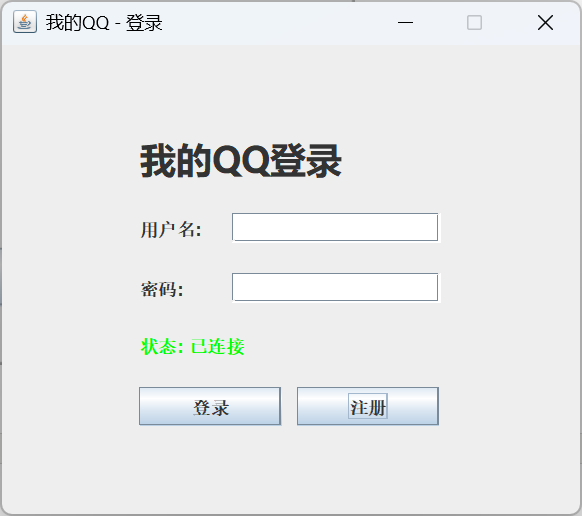
2、用户登录
用户在可以向其他用户发送消息之前,需要登录进入系统。成功登录的用户,在其界面中显示所有用户的列表,同时,将所有其他用户在该用户不在线时发送给他/她的信息转发给他/她。
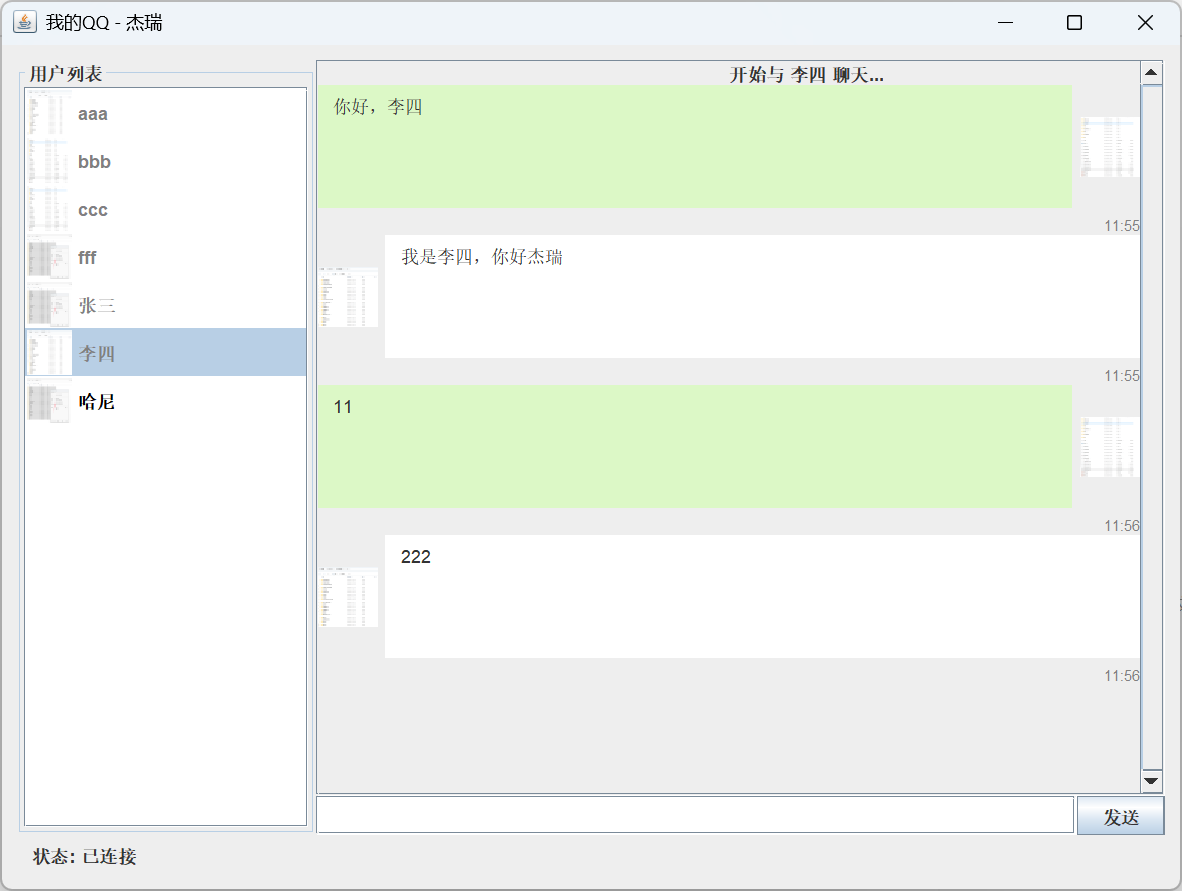
3、向其他用户发送信息
登录用户从界面中选择要发送信息的用户,然后输入要发送的信息,点击发送按钮后将输入的信息发送给选定的用户。如果目标用户在线,则将信息实时发送给目标用户,否则,如果目标用户不在线,你的程序将信息保存到数据库中,当目标用户登录后,应该将这些信息自动转发给目标用户。
运行环境
程序采用Java技术、采用IntelliJ IDEA及MySQL数据库开发环境完成该项目的设计开发。
演示视频
https://githubs.xyz/show/d6cdf5c0-8aca-4d13-87db-99d2fe868c37.mp4
图片演示
源码以及数据库我已经整理清楚,移步:
githubs点xyz/product/667
数据库表设计
一共需要两张表:user表和message表。user表存储所有已注册用户信息,message表存储所有发送给未在线用户的信息。
user表
|
字段名 |
字段数据类型 |
字段属性 |
备注 |
|
_id |
long |
Not Null,主键,自增 |
|
|
name |
varchar(40) |
Not null |
登录账号 |
|
password |
varchar(40) |
Not null |
密码 |
|
photo |
blob |
Nullable |
头像 |
|
reserved |
varchar(200) |
Nullable |
保留 |
message表
|
字段名 |
字段数据类型 |
字段属性 |
备注 |
|
_id |
long |
Not Null,主键,自增 |
|
|
sender |
long |
外键关联user的_id,Not Null |
发送者的id |
|
receiver |
long |
外键关联user的_id,Not Null |
接收者的id |
|
message |
varchar(200) |
Not Null |
消息 |
|
ddate |
date |
Not Null |
发送日期 |
源码实现设计
服务端设计
服务端为QQSystem目录, QQServer 为启动函数类,找到main函数:
public static void main(String[] args) {
        System.out.println("启动QQ服务器...");
        DatabaseManager dbManager = null;
        ExecutorService executor = Executors.newCachedThreadPool();

        try {
            System.out.println("初始化数据库连接...");
            dbManager = new DatabaseManager();

            // 启动服务器
            try (ServerSocket serverSocket = new ServerSocket(PORT)) {
                System.out.println("QQ服务器已启动,监听端口: " + PORT);

                while (true) {
                    System.out.println("等待客户端连接...");
                    Socket clientSocket = serverSocket.accept();
                    System.out.println("新的客户端连接: " + clientSocket.getInetAddress());

                    // 为每个客户端创建处理线程
                    ClientHandler handler = new ClientHandler(clientSocket, dbManager);
                    executor.execute(handler);
                }
            }
        } catch (IOException | SQLException | ClassNotFoundException e) {
            System.err.println("服务器启动失败: " + e.getMessage());
            e.printStackTrace();
        } finally {
            if (dbManager != null) {
                try {
                    dbManager.close();
                } catch (SQLException e) {
                    System.err.println("关闭数据库连接失败: " + e.getMessage());
                }
            }
            executor.shutdown();
            System.out.println("服务器已关闭");
        }
    }
首先初始化了 DatabaseManager , 这个是与数据库交互的工具,负责操作数据库的表。代码如下:
package com.myqq.server;


import com.myqq.constent.Constants;
import com.myqq.model.Message;
import com.myqq.model.User;

import java.sql.*;
import java.util.ArrayList;
import java.util.List;

public class DatabaseManager implements AutoCloseable {


    private Connection connection;

    public DatabaseManager() throws SQLException, ClassNotFoundException {
        try {
            Class.forName("com.mysql.cj.jdbc.Driver");
            System.out.println("尝试连接数据库: " + Constants.DB_URL);
            connection = DriverManager.getConnection(Constants.DB_URL, Constants.DB_USER, Constants.DB_PASSWORD);
            System.out.println("数据库连接成功");
        } catch (ClassNotFoundException e) {
            System.err.println("找不到MySQL驱动: " + e.getMessage());
            throw e;
        } catch (SQLException e) {
            System.err.println("数据库连接失败: " + e.getMessage());
            throw e;
        }
    }

    // 用户认证
    public User authenticateUser(String username, String password) throws SQLException {
        String sql = "SELECT * FROM user WHERE name = ? AND password = ?";
        try (PreparedStatement stmt = connection.prepareStatement(sql)) {
            stmt.setString(1, username);
            stmt.setString(2, password);
            ResultSet rs = stmt.executeQuery();

            if (rs.next()) {
                return new User(
                        rs.getLong("_id"),
                        rs.getString("name"),
                        rs.getString("password"),
                        rs.getString("photo")
                );
            }
            return null;
        }
    }

    // 获取所有用户
    public List<User> getAllUsers() throws SQLException {
        List<User> users = new ArrayList<>();
        String sql = "SELECT * FROM user";
        try (Statement stmt = connection.createStatement();
             ResultSet rs = stmt.executeQuery(sql)) {
            while (rs.next()) {
                users.add(new User(
                        rs.getLong("_id"),
                        rs.getString("name"),
                        null, // 不返回密码
                        rs.getString("photo")
                ));
            }
        }
        return users;
    }

    // 获取未读消息
    public List<Message> getUnreadMessages(long userId) throws SQLException {
        List<Message> messages = new ArrayList<>();
        String sql = "SELECT * FROM message WHERE receiver = ? AND `read` = 2";
        try (PreparedStatement stmt = connection.prepareStatement(sql)) {
            stmt.setLong(1, userId);
            ResultSet rs = stmt.executeQuery();

            while (rs.next()) {
                messages.add(new Message(
                        rs.getLong("_id"),        // id
                        rs.getLong("sender"),     // sender
                        rs.getLong("receiver"),   // receiver
                        rs.getString("message"),  // content
                        rs.getTimestamp("ddate"), // date
                        rs.getInt("read")         // status
                ));
            }
        }
        return messages;
    }

    // 标记消息为已读
    public void markMessageAsRead(long messageId) throws SQLException {
        String sql = "UPDATE message SET `read` = 1 WHERE _id = ?";
        try (PreparedStatement stmt = connection.prepareStatement(sql)) {
            stmt.setLong(1, messageId);
            stmt.executeUpdate();
        }
    }

    // 保存消息到数据库
    public void saveMessage(Message msg) throws SQLException {
        String sql = "INSERT INTO message (sender, receiver, message, ddate, `read`) VALUES (?, ?, ?, ?, ?)";
        try (PreparedStatement stmt = connection.prepareStatement(sql)) {
            stmt.setLong(1, msg.getSender());
            stmt.setLong(2, msg.getReceiver());
            stmt.setString(3, msg.getContent());
            stmt.setTimestamp(4, msg.getDate());
            stmt.setInt(5, msg.getStatus());
            stmt.executeUpdate();
        }
    }

    // 注册新用户
    public boolean registerUser(User newUser) throws SQLException {
        // 检查用户名是否已存在
        String checkSql = "SELECT COUNT(*) FROM user WHERE name = ?";
        try (PreparedStatement checkStmt = connection.prepareStatement(checkSql)) {
            checkStmt.setString(1, newUser.getName());
            ResultSet rs = checkStmt.executeQuery();
            if (rs.next() && rs.getInt(1) > 0) {
                return false; // 用户名已存在
            }
        }

        // 插入新用户
        String insertSql = "INSERT INTO user (name, password, photo) VALUES (?, ?, ?)";
        try (PreparedStatement insertStmt = connection.prepareStatement(insertSql)) {
            insertStmt.setString(1, newUser.getName());
            insertStmt.setString(2, newUser.getPassword());

            if (newUser.getPhoto() != null && !newUser.getPhoto().isEmpty()) {
                insertStmt.setString(3, newUser.getPhoto());
            } else {
                insertStmt.setNull(3, Types.BLOB);
            }

            int rowsAffected = insertStmt.executeUpdate();
            return rowsAffected > 0;
        }
    }

    // 关闭连接
    @Override
    public void close() throws SQLException {
        if (connection != null) {
            connection.close();
            System.out.println("数据库连接已关闭");
        }
    }
}
ClientHandler 类 为每个客户端socket处理的核心类。里面有消息协议处理,代码如下:
 private void handleCommand(String commandStr) throws IOException, SQLException {
        SocketMsg msg = null;
        try {
            msg = JSON.parseObject(commandStr, SocketMsg.class);
        } catch (Exception e) {
            return;
        }
        String command = msg.getType();

        if ("REGISTER".equals(command)) {
            // 注册
            handleRegistration(msg);
        }

        if("LOGIN".equals(command)) {
            //登录
            handleLogin(msg);
        }

        if("USERLIST".equals(command)) {
            //在线列表
            List<User> allUsers = dbManager.getAllUsers();
            Set<Long> longs = QQServer.onlineUsers.keySet();
            //提取在线的人
            for (User user : allUsers) {
                if(longs.contains(Long.parseLong(user.getId()+""))){
                    user.setOnline(true);
                }

                System.out.println("好友列表: " + user.getName());
            }
            SocketMsg socketMsg = new SocketMsg();
            socketMsg.setType("USERLIST");
            socketMsg.setData(allUsers);

            writer.println(JSON.toJSONString(socketMsg));
        }

        if("MSG".equals(command)){
            // 转发消息
            handleMessage(msg);
        }

    }
客户端设计
客户端在 QQSystem2目录下, 找到Main类,代码如下:
public class Main {
    public static void main(String[] args) {
        // 使用SwingUtilities确保在事件分发线程中创建UI
        SwingUtilities.invokeLater(() -> {
            LoginFrame loginFrame = new LoginFrame();
            loginFrame.setVisible(true);
        });
    }
}
LoginFrame为登录界面,有很多UI代码,我就不讲了,里面初始化了核心的socket连接,代码如下:
  private void connectToServer() {
        statusLabel.setText("正在连接服务器...");
        statusLabel.setForeground(Color.BLUE);

        new Thread(() -> {
            try {
                if (qqClient == null) {
                    qqClient = new QQClient("localhost", 8888);
                    qqClient.setLoginListener(this);

                    // 设置连接状态监听器
                    qqClient.setConnectionListener(new QQClient.ConnectionListener() {
                        @Override
                        public void onConnected() {
                            SwingUtilities.invokeLater(() -> {
                                statusLabel.setText("状态: 已连接");
                                statusLabel.setForeground(Color.GREEN);
                            });
                        }

                        @Override
                        public void onDisconnected() {
                            SwingUtilities.invokeLater(() -> {
                                statusLabel.setText("状态: 已断开");
                                statusLabel.setForeground(Color.RED);
                            });
                        }

                        @Override
                        public void onConnectionError(String error) {
                            SwingUtilities.invokeLater(() -> {
                                statusLabel.setText("错误: " + error);
                                statusLabel.setForeground(Color.RED);
                            });
                        }
                    });
                }

                if (!qqClient.isConnected()) {
                    qqClient.connect();
                }
            } catch (IOException e) {
                SwingUtilities.invokeLater(() -> {
                    statusLabel.setText("连接失败: " + e.getMessage());
                    statusLabel.setForeground(Color.RED);
                });
            }
        }).start();
    }
QQClient 为socket的核心处理,连接服务器的代码如下:
/**
     * 连接到服务器
     * @throws IOException 如果连接失败
     */
    public void connect() throws IOException {
        if (connected.get()) {
            disconnect();
        }

        try {
            // 创建新socket并设置连接超时
            socket = new Socket();
            socket.connect(new InetSocketAddress(serverAddress, serverPort), CONNECT_TIMEOUT);

            // 设置读取超时
            socket.setSoTimeout(READ_TIMEOUT);

//            // 创建对象流 - 注意顺序:先创建输出流并刷新头部
            writer = new PrintWriter(new OutputStreamWriter(socket.getOutputStream()), true);
            //接收服务端返回数据流
            bufferedReader = new BufferedReader(new InputStreamReader(socket.getInputStream()));
            connected.set(true);

            // 启动接收消息线程
            startReceiverThread();

            // 启动心跳检测线程
            startHeartbeatThread();

            // 通知连接成功
            if (connectionListener != null) {
                connectionListener.onConnected();
            }

            System.out.println("成功连接到服务器: " + serverAddress + ":" + serverPort);
        } catch (IOException e) {
            connected.set(false);
            cleanupResources();
            throw e;
        }
    }
startReceiverThread为开启消息处理线程 , 里面的消息协议处理如下:/** * 接收消息线程 */ private void receiveMessages() { System.out.println("开始接收消息线程"); while (connected.get()) { try { String input = null; while ((input = bufferedReader.readLine()) != null) { System.out.println("收到服务器消息: " + input); SocketMsg socketMsg = JSON.parseObject(input, SocketMsg.class); /// 注册消息 if (socketMsg.getType().equals("REGISTER")) { // 注册 registerListener.onMessageReceived(socketMsg); } // 登录 if (socketMsg.getType().equals("LOGIN")) { loginListener.onMessageReceived(socketMsg); } // 在线列表 if(socketMsg.getType().equals("USERLIST")) { userListListener.onUserListUpdated(socketMsg); } // 其他用户上线 if(socketMsg.getType().equals("USER_ONLIE")) { userOnlineListener.onUserOnlineUpdated(socketMsg); } // 消息转发 if(socketMsg.getType().equals("MSG")) { messageListener.onMessageReceived(socketMsg); } } }catch (SocketTimeoutException e) { }catch (Exception e) { e.printStackTrace(); try { Thread.sleep(500); } catch (InterruptedException e2) { } try { reconnect(); } catch (IOException ex) { } } }
源码部署
将服务端QQSystem和客户端QQSystem2直接导入到idea里面, 设置好maven即可。不会的可以自己百度搜索“idea导入普通maven项目流程” 。
运行服务端:
待项目编译好之后,找到QQSystem项目里面的 QQServer类,直接右键运行即可,下面图示表示运行成功:

运行客户端:
待项目编译好之后,找到QQSystem1项目里面的Main ,Main2类,分别直接右键运行即可,下面图示表示运行成功:


 浙公网安备 33010602011771号