
MQ全称为Message Queue, 消息队列(MQ)是一种应用程序对应用程序的通信方法。应用程序通过读写出入队列的消息(针对应用程序的数据)来通信,而无需专用连接来链接它们。消息传递指的是程序之间通过在消息中发送数据进行通信,而不是通过直接调用彼此来通信,直接调用通常是用于诸如远程过程调用的技术。排队指的是应用程序通过 队列来通信。队列的使用除去了接收和发送应用程序同时执行的要求
Linux下安装RabbitMQ
环境:Linux(CentOS 7.2)
1、安装Erlang环境,Erlang版本是21.1。参考【Erlang】源码安装
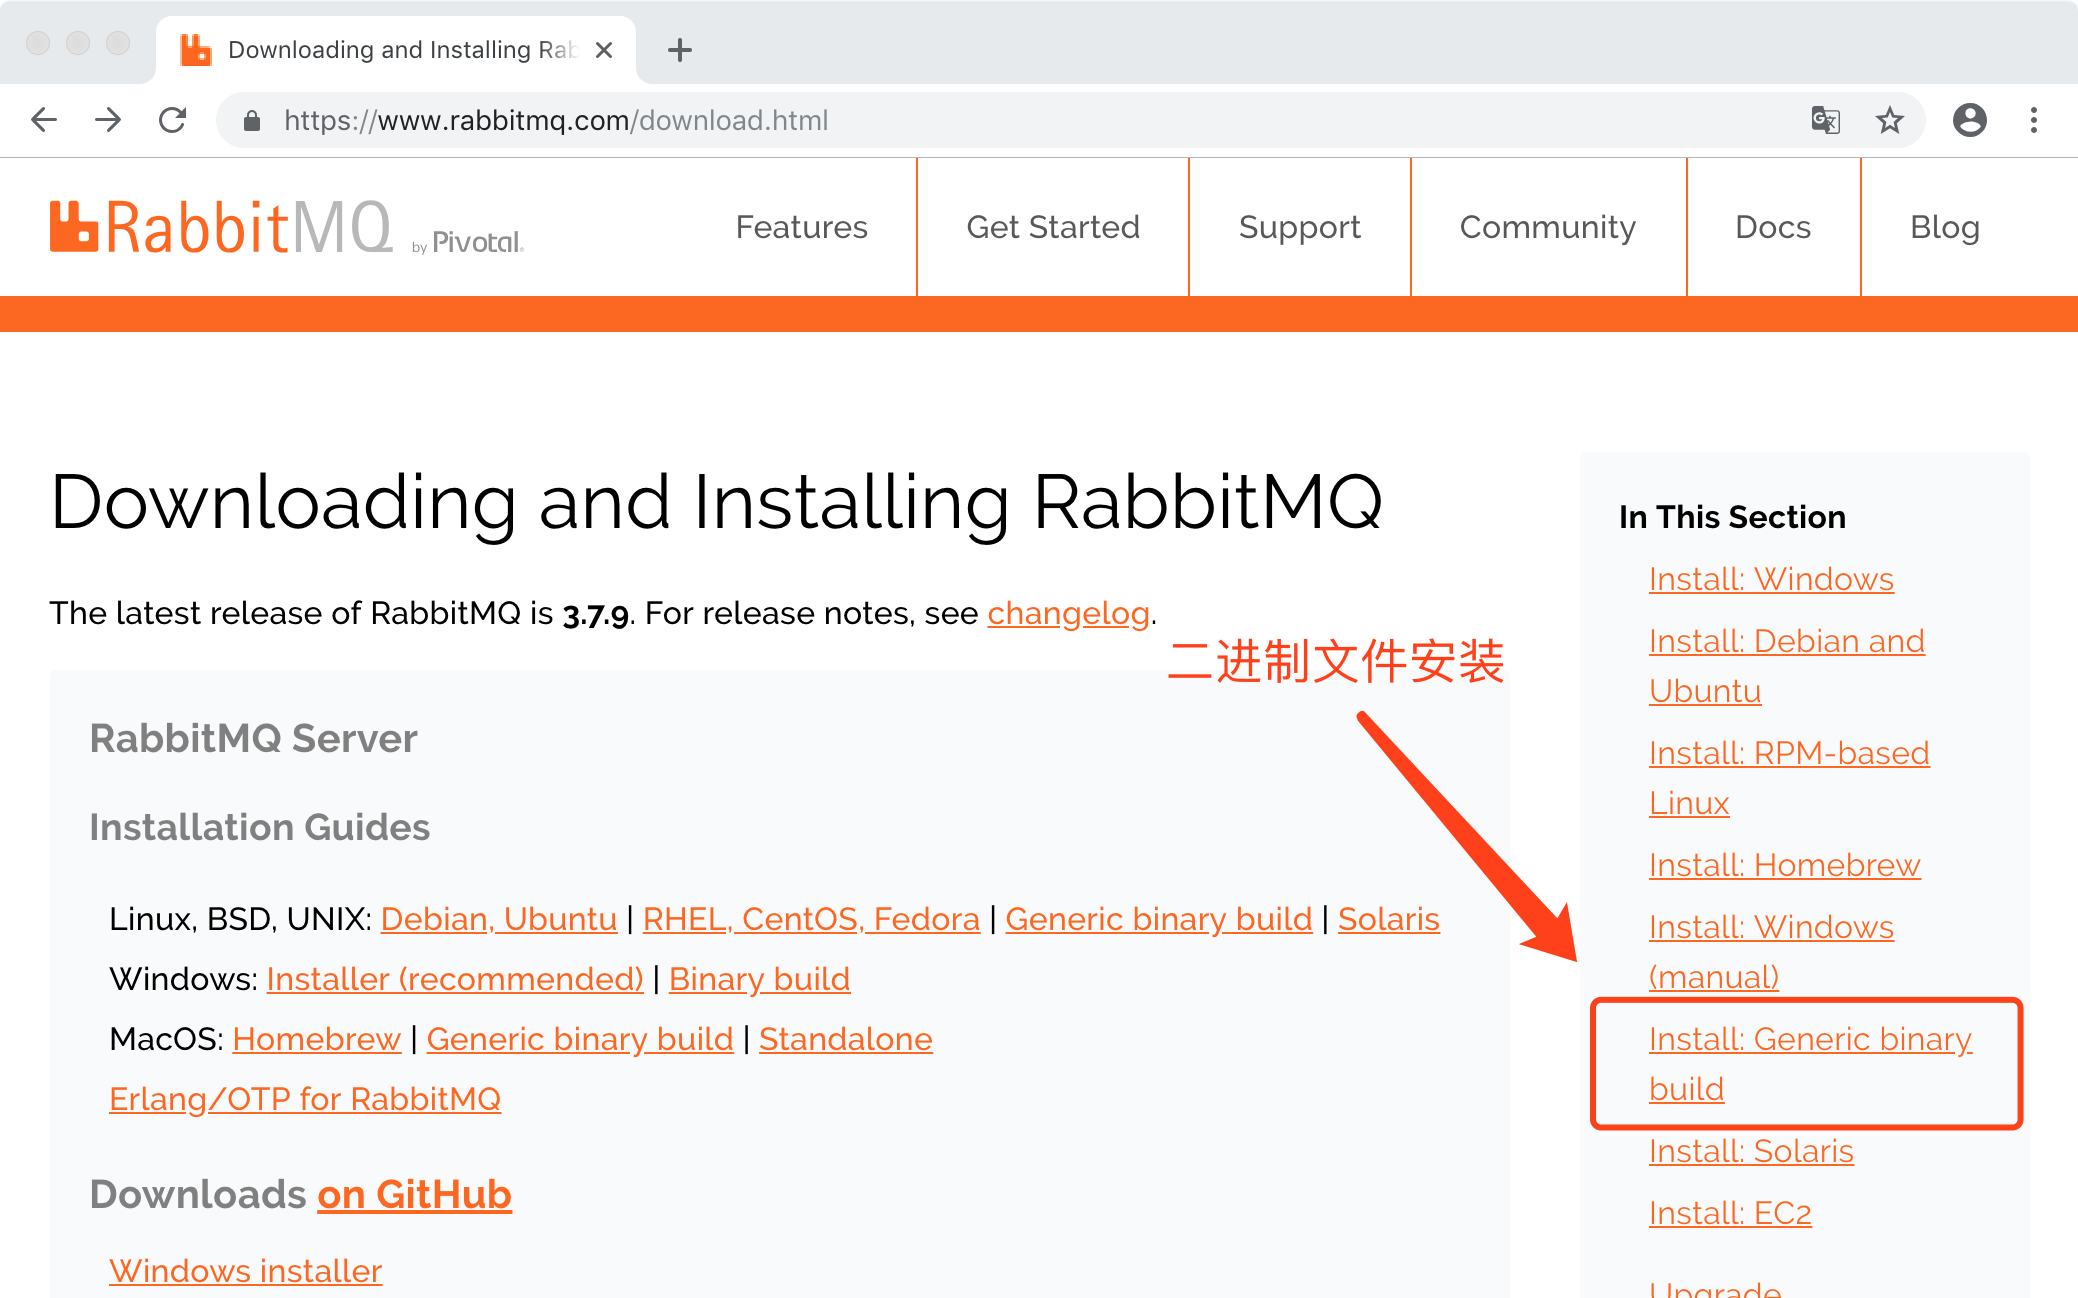
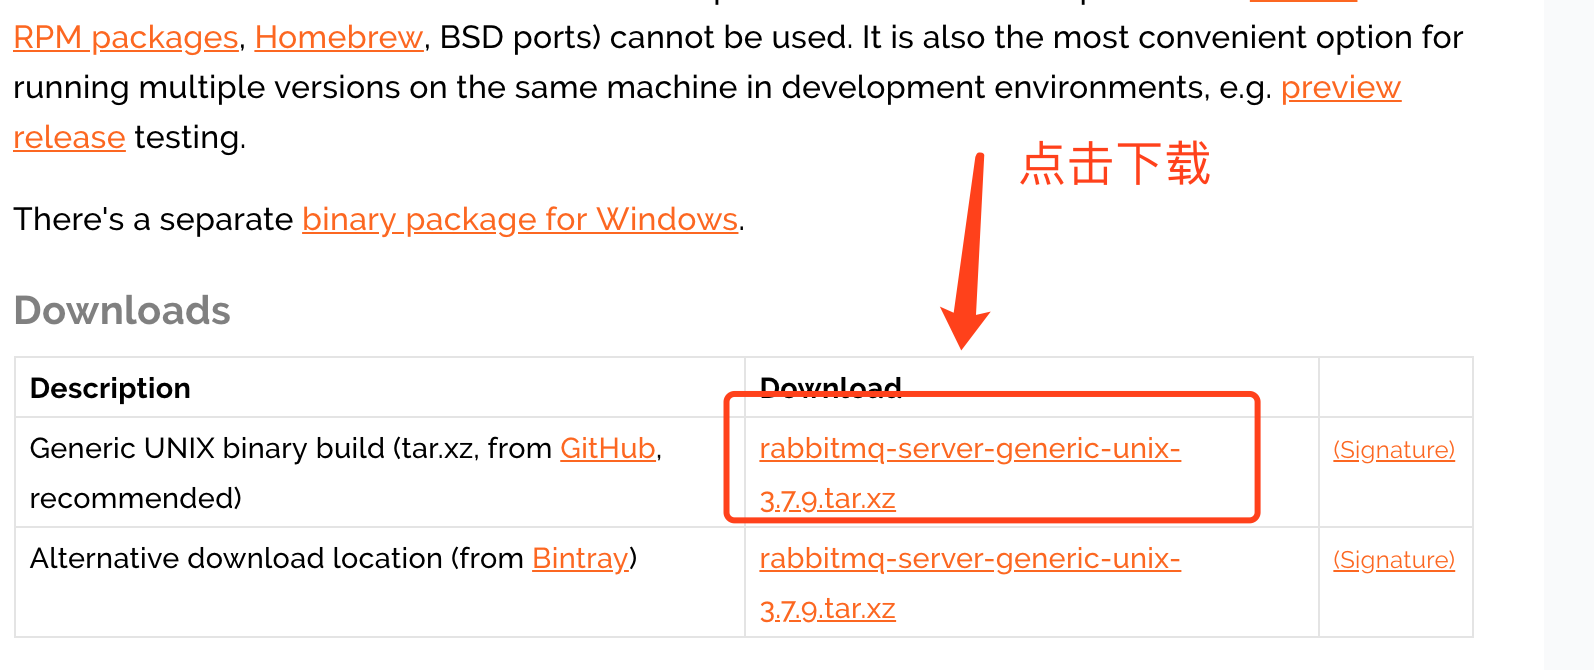
2、下载源码包(rabbitmq-server-generic-unix-3.7.9.tar.xz),版本:3.7.9
下载地址:https://www.rabbitmq.com/download.html
3、解压,命令:tar -xvf rabbitmq-server-generic-unix-3.7.9.tar.xz,解压后文件目录如下:
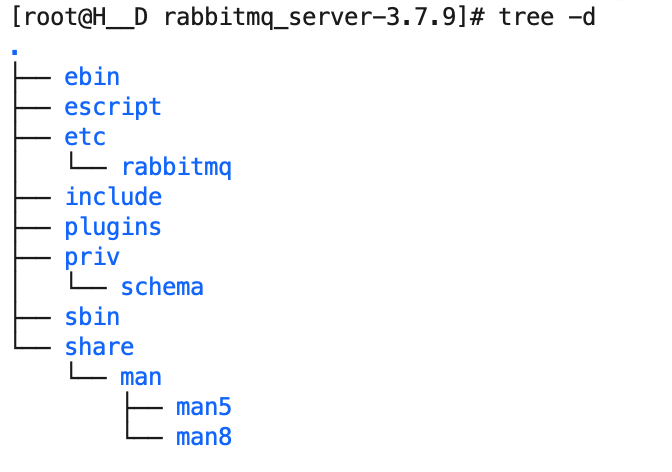
其中sbin目录下文件说明:
rabbitmq-env // 环境配置脚本
rabbitmq-defaults // 默认参数设置脚本
rabbitmqctl // 管理工具脚本
rabbitmq-plugins // 插件管理工具脚本
rabbitmq-server // rabbitmq服务脚本
4、可以自由拷贝解压后的文件到的制定目录,然后配置环境变量
a、编辑文件/etc/profile,命令:vim /etc/profile;增加如下内容:
1 export RABBIT_HOME=/data/soft/rabbitmq_server-3.7.9
2 export PATH=$RABBIT_HOME/sbin:$PATH
b、使环境变量生效,命令:source /etc/profile。
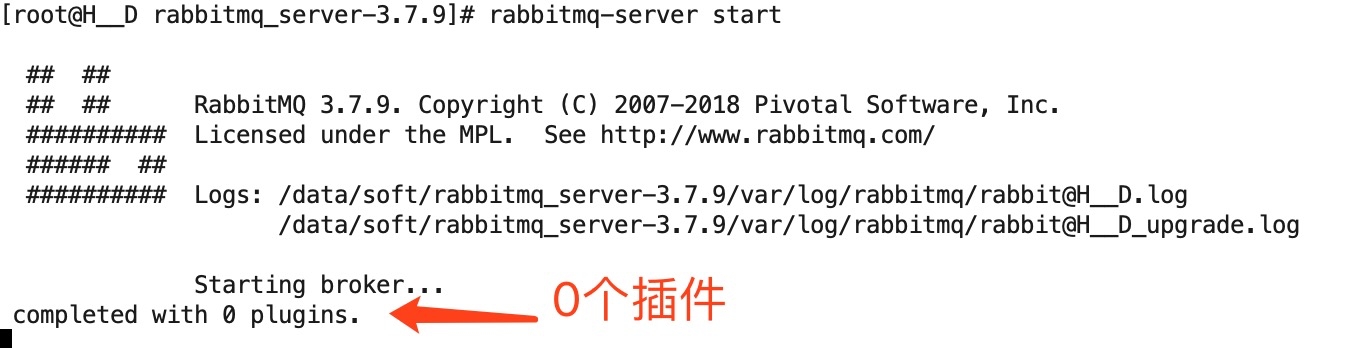
5、操作服务,启动默认监听端口:5672
启动服务(前台启动):rabbitmq-server start
启动服务(后台启动):rabbitmq-server start -detached
重启服务:rabbitmq-server restart
关闭服务:rabbitmqctl stop
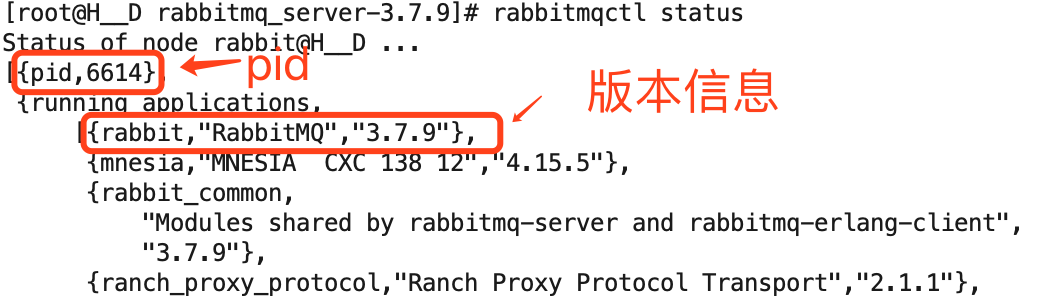
查看服务状态:rabbitmqctl status
查看mq用户:rabbitmqctl list_users
查看用户权限:rabbitmqctl list_user_permissions guest
新增用户: rabbitmqctl add_user admin 123456
赋予管理员权限:rabbitmqctl set_user_tags admin administrator
分配权限:rabbitmqctl set_permissions -p / admin '.*' '.*' '.*'
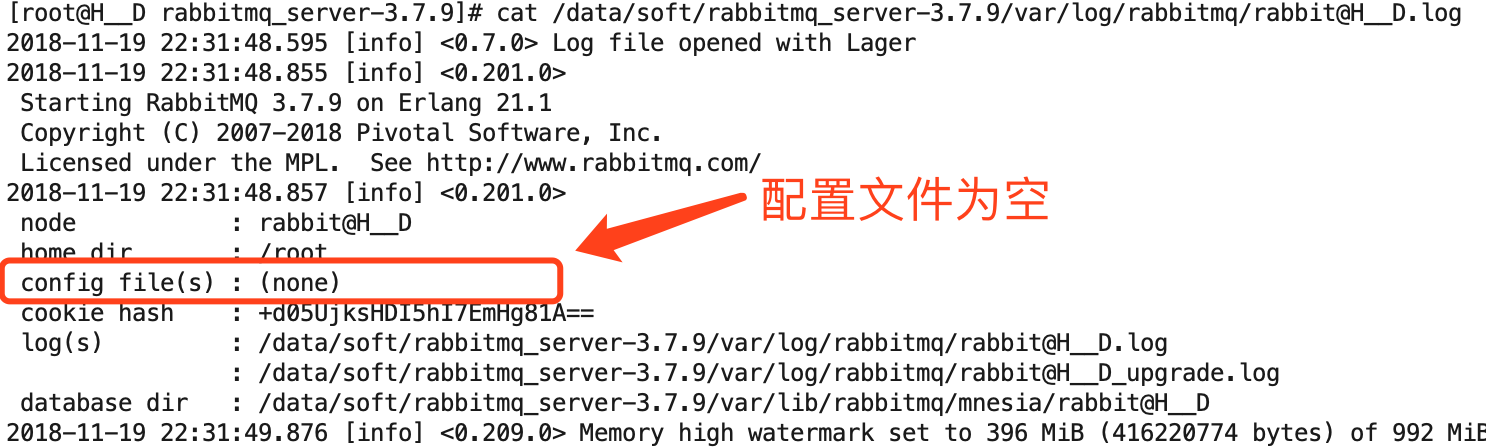
效果图如下:
a、启动命令
b、查看状态
c、查看日志配置文件为空
注意:a、启动报错:Error description: noproc。
解决方案:Erlang版本和RabbitMQ不支持的原因,应该安装对应版本。参考地址:https://www.rabbitmq.com/which-erlang.html
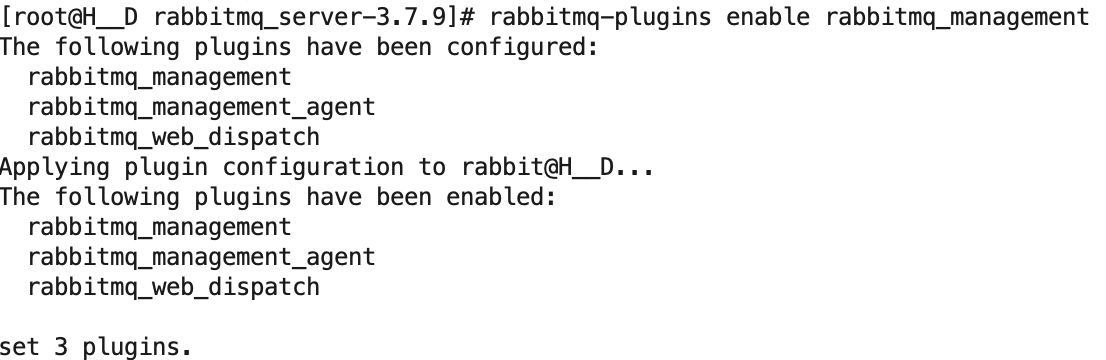
6、启用插件,RabbitMQ的web控制台,命令:rabbitmq-plugins enable rabbitmq_management,然后重启RabbitMQ服务
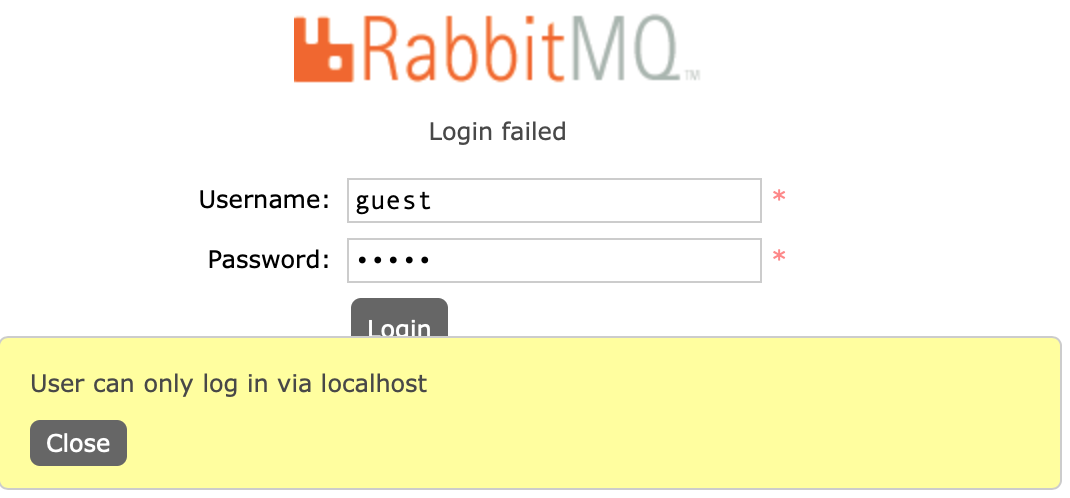
7、浏览器输入http://ip:15672,端口是15672,访问RabbitMQ的web控制台,默认用户名/密码:guest/guest。
默认情况下,RabbitMQ的默认的guest用户只允许本机访问
由于不是在本机上访问报错,如下:
8、通过 find / -name rabbitmq-defaults 查找rabbitmq-defaults文件(/data/soft/rabbitmq_server-3.7.9/sbin/rabbitmq-defaults),查看config文件的存储路径
a、下载模版,配置文件模版下载:https://github.com/rabbitmq/rabbitmq-server/blob/master/docs/rabbitmq.conf.example


  1 # ======================================
  2 # RabbitMQ broker section
  3 # ======================================
  4
  5 ## Related doc guide: http://rabbitmq.com/configure.html. See
  6 ## http://rabbitmq.com/documentation.html for documentation ToC.
  7
  8 ## Networking
  9 ## ====================
 10 ##
 11 ## Related doc guide: http://rabbitmq.com/networking.html.
 12 ##
 13 ## By default, RabbitMQ will listen on all interfaces, using
 14 ## the standard (reserved) AMQP 0-9-1 and 1.0 port.
 15 ##
 16 # listeners.tcp.default = 5672
 17
 18
 19 ## To listen on a specific interface, provide an IP address with port.
 20 ## For example, to listen only on localhost for both IPv4 and IPv6:
 21 ##
 22 # IPv4
 23 # listeners.tcp.local    = 127.0.0.1:5672
 24 # IPv6
 25 # listeners.tcp.local_v6 = ::1:5672
 26
 27 ## You can define multiple listeners using listener names
 28 # listeners.tcp.other_port = 5673
 29 # listeners.tcp.other_ip   = 10.10.10.10:5672
 30
 31
 32 ## TLS listeners are configured in the same fashion as TCP listeners,
 33 ## including the option to control the choice of interface.
 34 ##
 35 # listeners.ssl.default = 5671
 36
 37 ## Number of Erlang processes that will accept connections for the TCP
 38 ## and TLS listeners.
 39 ##
 40 # num_acceptors.tcp = 10
 41 # num_acceptors.ssl = 1
 42
 43
 44 ## Maximum time for AMQP 0-8/0-9/0-9-1 handshake (after socket connection
 45 ## and TLS handshake), in milliseconds.
 46 ##
 47 # handshake_timeout = 10000
 48
 49 ## Set to 'true' to perform reverse DNS lookups when accepting a
 50 ## connection. Hostnames will then be shown instead of IP addresses
 51 ## in rabbitmqctl and the management plugin.
 52 ##
 53 # reverse_dns_lookups = true
 54
 55 ##
 56 ## Security, Access Control
 57 ## ==============
 58 ##
 59
 60 ## Related doc guide: http://rabbitmq.com/access-control.html.
 61
 62 ## The default "guest" user is only permitted to access the server
 63 ## via a loopback interface (e.g. localhost).
 64 ## {loopback_users, [<<"guest">>]},
 65 ##
 66 # loopback_users.guest = true
 67
 68 ## Uncomment the following line if you want to allow access to the
 69 ## guest user from anywhere on the network.
 70 # loopback_users.guest = false
 71
 72 ## TLS configuration.
 73 ##
 74 ## Related doc guide: http://rabbitmq.com/ssl.html.
 75 ##
 76 # ssl_options.verify               = verify_peer
 77 # ssl_options.fail_if_no_peer_cert = false
 78 # ssl_options.cacertfile           = /path/to/cacert.pem
 79 # ssl_options.certfile             = /path/to/cert.pem
 80 # ssl_options.keyfile              = /path/to/key.pem
 81 #
 82 # ssl_options.honor_cipher_order   = true
 83 # ssl_options.honor_ecc_order      = true
 84
 85 # ssl_options.ciphers.1  = ECDHE-ECDSA-AES256-GCM-SHA384
 86 # ssl_options.ciphers.2  = ECDHE-RSA-AES256-GCM-SHA384
 87 # ssl_options.ciphers.3  = ECDHE-ECDSA-AES256-SHA384
 88 # ssl_options.ciphers.4  = ECDHE-RSA-AES256-SHA384
 89 # ssl_options.ciphers.5  = ECDH-ECDSA-AES256-GCM-SHA384
 90 # ssl_options.ciphers.6  = ECDH-RSA-AES256-GCM-SHA384
 91 # ssl_options.ciphers.7  = ECDH-ECDSA-AES256-SHA384
 92 # ssl_options.ciphers.8  = ECDH-RSA-AES256-SHA384
 93 # ssl_options.ciphers.9  = DHE-RSA-AES256-GCM-SHA384
 94 # ssl_options.ciphers.10 = DHE-DSS-AES256-GCM-SHA384
 95 # ssl_options.ciphers.11 = DHE-RSA-AES256-SHA256
 96 # ssl_options.ciphers.12 = DHE-DSS-AES256-SHA256
 97 # ssl_options.ciphers.13 = ECDHE-ECDSA-AES128-GCM-SHA256
 98 # ssl_options.ciphers.14 = ECDHE-RSA-AES128-GCM-SHA256
 99 # ssl_options.ciphers.15 = ECDHE-ECDSA-AES128-SHA256
100 # ssl_options.ciphers.16 = ECDHE-RSA-AES128-SHA256
101 # ssl_options.ciphers.17 = ECDH-ECDSA-AES128-GCM-SHA256
102 # ssl_options.ciphers.18 = ECDH-RSA-AES128-GCM-SHA256
103 # ssl_options.ciphers.19 = ECDH-ECDSA-AES128-SHA256
104 # ssl_options.ciphers.20 = ECDH-RSA-AES128-SHA256
105 # ssl_options.ciphers.21 = DHE-RSA-AES128-GCM-SHA256
106 # ssl_options.ciphers.22 = DHE-DSS-AES128-GCM-SHA256
107 # ssl_options.ciphers.23 = DHE-RSA-AES128-SHA256
108 # ssl_options.ciphers.24 = DHE-DSS-AES128-SHA256
109 # ssl_options.ciphers.25 = ECDHE-ECDSA-AES256-SHA
110 # ssl_options.ciphers.26 = ECDHE-RSA-AES256-SHA
111 # ssl_options.ciphers.27 = DHE-RSA-AES256-SHA
112 # ssl_options.ciphers.28 = DHE-DSS-AES256-SHA
113 # ssl_options.ciphers.29 = ECDH-ECDSA-AES256-SHA
114 # ssl_options.ciphers.30 = ECDH-RSA-AES256-SHA
115 # ssl_options.ciphers.31 = ECDHE-ECDSA-AES128-SHA
116 # ssl_options.ciphers.32 = ECDHE-RSA-AES128-SHA
117 # ssl_options.ciphers.33 = DHE-RSA-AES128-SHA
118 # ssl_options.ciphers.34 = DHE-DSS-AES128-SHA
119 # ssl_options.ciphers.35 = ECDH-ECDSA-AES128-SHA
120 # ssl_options.ciphers.36 = ECDH-RSA-AES128-SHA
121
122 ## Select an authentication/authorisation backend to use.
123 ##
124 ## Alternative backends are provided by plugins, such as rabbitmq-auth-backend-ldap.
125 ##
126 ## NB: These settings require certain plugins to be enabled.
127 ##
128 ## Related doc guides:
129 ##
130 ##  * http://rabbitmq.com/plugins.html
131 ##  * http://rabbitmq.com/access-control.html
132 ##
133
134 # auth_backends.1   = rabbit_auth_backend_internal
135
136 ## uses separate backends for authentication and authorisation,
137 ## see below.
138 # auth_backends.1.authn = rabbit_auth_backend_ldap
139 # auth_backends.1.authz = rabbit_auth_backend_internal
140
141 ## The rabbitmq_auth_backend_ldap plugin allows the broker to
142 ## perform authentication and authorisation by deferring to an
143 ## external LDAP server.
144 ##
145 ## Relevant doc guides:
146 ##
147 ## * http://rabbitmq.com/ldap.html
148 ## * http://rabbitmq.com/access-control.html
149 ##
150 ## uses LDAP for both authentication and authorisation
151 # auth_backends.1 = rabbit_auth_backend_ldap
152
153 ## uses HTTP service for both authentication and
154 ## authorisation
155 # auth_backends.1 = rabbit_auth_backend_http
156
157 ## uses two backends in a chain: HTTP first, then internal
158 # auth_backends.1   = rabbit_auth_backend_http
159 # auth_backends.2   = rabbit_auth_backend_internal
160
161 ## Authentication
162 ## The built-in mechanisms are 'PLAIN',
163 ## 'AMQPLAIN', and 'EXTERNAL' Additional mechanisms can be added via
164 ## plugins.
165 ##
166 ## Related doc guide: http://rabbitmq.com/authentication.html.
167 ##
168 # auth_mechanisms.1 = PLAIN
169 # auth_mechanisms.2 = AMQPLAIN
170
171 ## The rabbitmq-auth-mechanism-ssl plugin makes it possible to
172 ## authenticate a user based on the client's x509 (TLS) certificate.
173 ## Related doc guide: http://rabbitmq.com/authentication.html.
174 ##
175 ## To use auth-mechanism-ssl, the EXTERNAL mechanism should
176 ## be enabled:
177 ##
178 # auth_mechanisms.1 = PLAIN
179 # auth_mechanisms.2 = AMQPLAIN
180 # auth_mechanisms.3 = EXTERNAL
181
182 ## To force x509 certificate-based authentication on all clients,
183 ## exclude all other mechanisms (note: this will disable password-based
184 ## authentication even for the management UI!):
185 ##
186 # auth_mechanisms.1 = EXTERNAL
187
188 ## This pertains to both the rabbitmq-auth-mechanism-ssl plugin and
189 ## STOMP ssl_cert_login configurations. See the RabbitMQ STOMP plugin
190 ## configuration section later in this file and the README in
191 ## https://github.com/rabbitmq/rabbitmq-auth-mechanism-ssl for further
192 ## details.
193 ##
194 ## To use the TLS cert's CN instead of its DN as the username
195 ##
196 # ssl_cert_login_from   = common_name
197
198 ## TLS handshake timeout, in milliseconds.
199 ##
200 # ssl_handshake_timeout = 5000
201
202
203 ## Password hashing implementation. Will only affect newly
204 ## created users. To recalculate hash for an existing user
205 ## it's necessary to update her password.
206 ##
207 ## To use SHA-512, set to rabbit_password_hashing_sha512.
208 ##
209 # password_hashing_module = rabbit_password_hashing_sha256
210
211 ## When importing definitions exported from versions earlier
212 ## than 3.6.0, it is possible to go back to MD5 (only do this
213 ## as a temporary measure!) by setting this to rabbit_password_hashing_md5.
214 ##
215 # password_hashing_module = rabbit_password_hashing_md5
216
217 ##
218 ## Default User / VHost
219 ## ====================
220 ##
221
222 ## On first start RabbitMQ will create a vhost and a user. These
223 ## config items control what gets created.
224 ## Relevant doc guide: http://rabbitmq.com/access-control.html
225 ##
226 # default_vhost = /
227 # default_user = guest
228 # default_pass = guest
229
230 # default_permissions.configure = .*
231 # default_permissions.read = .*
232 # default_permissions.write = .*
233
234 ## Tags for default user
235 ##
236 ## For more details about tags, see the documentation for the
237 ## Management Plugin at http://rabbitmq.com/management.html.
238 ##
239 # default_user_tags.administrator = true
240
241 ## Define other tags like this:
242 # default_user_tags.management = true
243 # default_user_tags.custom_tag = true
244
245 ##
246 ## Additional network and protocol related configuration
247 ## =====================================================
248 ##
249
250 ## Set the default AMQP 0-9-1 heartbeat interval (in seconds).
251 ## Related doc guides:
252 ##
253 ## * http://rabbitmq.com/heartbeats.html
254 ## * http://rabbitmq.com/networking.html
255 ##
256 # heartbeat = 60
257
258 ## Set the max permissible size of an AMQP frame (in bytes).
259 ##
260 # frame_max = 131072
261
262 ## Set the max frame size the server will accept before connection
263 ## tuning occurs
264 ##
265 # initial_frame_max = 4096
266
267 ## Set the max permissible number of channels per connection.
268 ## 0 means "no limit".
269 ##
270 # channel_max = 128
271
272 ## Customising TCP Listener (Socket) Configuration.
273 ##
274 ## Related doc guides:
275 ##
276 ## * http://rabbitmq.com/networking.html
277 ## * http://www.erlang.org/doc/man/inet.html#setopts-2
278 ##
279
280 # tcp_listen_options.backlog = 128
281 # tcp_listen_options.nodelay = true
282 # tcp_listen_options.exit_on_close = false
283 #
284 # tcp_listen_options.keepalive = true
285 # tcp_listen_options.send_timeout = 15000
286 #
287 # tcp_listen_options.buffer = 196608
288 # tcp_listen_options.sndbuf = 196608
289 # tcp_listen_options.recbuf = 196608
290
291 ##
292 ## Resource Limits & Flow Control
293 ## ==============================
294 ##
295 ## Related doc guide: http://rabbitmq.com/memory.html.
296
297 ## Memory-based Flow Control threshold.
298 ##
299 # vm_memory_high_watermark.relative = 0.4
300
301 ## Alternatively, we can set a limit (in bytes) of RAM used by the node.
302 ##
303 # vm_memory_high_watermark.absolute = 1073741824
304
305 ## Or you can set absolute value using memory units (with RabbitMQ 3.6.0+).
306 ## Absolute watermark will be ignored if relative is defined!
307 ##
308 # vm_memory_high_watermark.absolute = 2GB
309 ##
310 ## Supported units suffixes:
311 ##
312 ## kb, KB: kibibytes (2^10 bytes)
313 ## mb, MB: mebibytes (2^20)
314 ## gb, GB: gibibytes (2^30)
315
316
317
318 ## Fraction of the high watermark limit at which queues start to
319 ## page message out to disc in order to free up memory.
320 ## For example, when vm_memory_high_watermark is set to 0.4 and this value is set to 0.5,
321 ## paging can begin as early as when 20% of total available RAM is used by the node.
322 ##
323 ## Values greater than 1.0 can be dangerous and should be used carefully.
324 ##
325 ## One alternative to this is to use durable queues and publish messages
326 ## as persistent (delivery mode = 2). With this combination queues will
327 ## move messages to disk much more rapidly.
328 ##
329 ## Another alternative is to configure queues to page all messages (both
330 ## persistent and transient) to disk as quickly
331 ## as possible, see http://rabbitmq.com/lazy-queues.html.
332 ##
333 # vm_memory_high_watermark_paging_ratio = 0.5
334
335 ## Selects Erlang VM memory consumption calculation strategy. Can be `allocated`, `rss` or `legacy` (aliased as `erlang`),
336 ## Introduced in 3.6.11. `rss` is the default as of 3.6.12.
337 ## See https://github.com/rabbitmq/rabbitmq-server/issues/1223 and rabbitmq/rabbitmq-common#224 for background.
338 # vm_memory_calculation_strategy = rss
339
340 ## Interval (in milliseconds) at which we perform the check of the memory
341 ## levels against the watermarks.
342 ##
343 # memory_monitor_interval = 2500
344
345 ## The total memory available can be calculated from the OS resources
346 ## - default option - or provided as a configuration parameter.
347 # total_memory_available_override_value = 2GB
348
349 ## Set disk free limit (in bytes). Once free disk space reaches this
350 ## lower bound, a disk alarm will be set - see the documentation
351 ## listed above for more details.
352 ##
353 ## Absolute watermark will be ignored if relative is defined!
354 # disk_free_limit.absolute = 50000
355
356 ## Or you can set it using memory units (same as in vm_memory_high_watermark)
357 ## with RabbitMQ 3.6.0+.
358 # disk_free_limit.absolute = 500KB
359 # disk_free_limit.absolute = 50mb
360 # disk_free_limit.absolute = 5GB
361
362 ## Alternatively, we can set a limit relative to total available RAM.
363 ##
364 ## Values lower than 1.0 can be dangerous and should be used carefully.
365 # disk_free_limit.relative = 2.0
366
367 ##
368 ## Clustering
369 ## =====================
370 ##
371 # cluster_partition_handling = ignore
372
373 ## pause_if_all_down strategy require additional configuration
374 # cluster_partition_handling = pause_if_all_down
375
376 ## Recover strategy. Can be either 'autoheal' or 'ignore'
377 # cluster_partition_handling.pause_if_all_down.recover = ignore
378
379 ## Node names to check
380 # cluster_partition_handling.pause_if_all_down.nodes.1 = rabbit@localhost
381 # cluster_partition_handling.pause_if_all_down.nodes.2 = hare@localhost
382
383 ## Mirror sync batch size, in messages. Increasing this will speed
384 ## up syncing but total batch size in bytes must not exceed 2 GiB.
385 ## Available in RabbitMQ 3.6.0 or later.
386 ##
387 # mirroring_sync_batch_size = 4096
388
389 ## Make clustering happen *automatically* at startup. Only applied
390 ## to nodes that have just been reset or started for the first time.
391 ##
392 ## Relevant doc guide: http://rabbitmq.com//cluster-formation.html
393 ##
394
395 # cluster_formation.peer_discovery_backend     = rabbit_peer_discovery_classic_config
396 #
397 # cluster_formation.classic_config.nodes.1 = rabbit1@hostname
398 # cluster_formation.classic_config.nodes.2 = rabbit2@hostname
399 # cluster_formation.classic_config.nodes.3 = rabbit3@hostname
400 # cluster_formation.classic_config.nodes.4 = rabbit4@hostname
401
402 ## DNS-based peer discovery. This backend will list A records
403 ## of the configured hostname and perform reverse lookups for
404 ## the addresses returned.
405
406 # cluster_formation.peer_discovery_backend = rabbit_peer_discovery_dns
407 # cluster_formation.dns.hostname = discovery.eng.example.local
408
409 ## This node's type can be configured. If you are not sure
410 ## what node type to use, always use 'disc'.
411 # cluster_formation.node_type = disc
412
413 ## Interval (in milliseconds) at which we send keepalive messages
414 ## to other cluster members. Note that this is not the same thing
415 ## as net_ticktime; missed keepalive messages will not cause nodes
416 ## to be considered down.
417 ##
418 # cluster_keepalive_interval = 10000
419
420 ##
421 ## Statistics Collection
422 ## =====================
423 ##
424
425 ## Set (internal) statistics collection granularity.
426 ##
427 ## Can be none, coarse or fine
428 # collect_statistics = none
429
430 # collect_statistics = coarse
431
432 ## Statistics collection interval (in milliseconds). Increasing
433 ## this will reduce the load on management database.
434 ##
435 # collect_statistics_interval = 5000
436
437 ##
438 ## Misc/Advanced Options
439 ## =====================
440 ##
441 ## NB: Change these only if you understand what you are doing!
442 ##
443
444 ## Explicitly enable/disable hipe compilation.
445 ##
446 # hipe_compile = false
447
448 ## Timeout used when waiting for Mnesia tables in a cluster to
449 ## become available.
450 ##
451 # mnesia_table_loading_retry_timeout = 30000
452
453 ## Retries when waiting for Mnesia tables in the cluster startup. Note that
454 ## this setting is not applied to Mnesia upgrades or node deletions.
455 ##
456 # mnesia_table_loading_retry_limit = 10
457
458 ## Size in bytes below which to embed messages in the queue index.
459 ## Related doc guide: http://rabbitmq.com/persistence-conf.html
460 ##
461 # queue_index_embed_msgs_below = 4096
462
463 ## You can also set this size in memory units
464 ##
465 # queue_index_embed_msgs_below = 4kb
466
467 ## Whether or not to enable background periodic forced GC runs for all
468 ## Erlang processes on the node in "waiting" state.
469 ##
470 ## Disabling background GC may reduce latency for client operations,
471 ## keeping it enabled may reduce median RAM usage by the binary heap
472 ## (see https://www.erlang-solutions.com/blog/erlang-garbage-collector.html).
473 ##
474 ## Before trying this option, please take a look at the memory
475 ## breakdown (http://www.rabbitmq.com/memory-use.html).
476 ##
477 # background_gc_enabled = false
478
479 ## Target (desired) interval (in milliseconds) at which we run background GC.
480 ## The actual interval will vary depending on how long it takes to execute
481 ## the operation (can be higher than this interval). Values less than
482 ## 30000 milliseconds are not recommended.
483 ##
484 # background_gc_target_interval = 60000
485
486 ## Whether or not to enable proxy protocol support.
487 ## Once enabled, clients cannot directly connect to the broker
488 ## anymore. They must connect through a load balancer that sends the
489 ## proxy protocol header to the broker at connection time.
490 ## This setting applies only to AMQP clients, other protocols
491 ## like MQTT or STOMP have their own setting to enable proxy protocol.
492 ## See the plugins documentation for more information.
493 ##
494 # proxy_protocol = false
495
496 ## ----------------------------------------------------------------------------
497 ## Advanced Erlang Networking/Clustering Options.
498 ##
499 ## Related doc guide: http://rabbitmq.com/clustering.html
500 ## ----------------------------------------------------------------------------
501
502 # ======================================
503 # Kernel section
504 # ======================================
505
506 # net_ticktime = 60
507
508 ## ----------------------------------------------------------------------------
509 ## RabbitMQ Management Plugin
510 ##
511 ## Related doc guide: http://rabbitmq.com/management.html.
512 ## ----------------------------------------------------------------------------
513
514 # =======================================
515 # Management section
516 # =======================================
517
518 ## Preload schema definitions from the following JSON file.
519 ## Related doc guide: http://rabbitmq.com/management.html#load-definitions.
520 ##
521 # management.load_definitions = /path/to/exported/definitions.json
522
523 ## Log all requests to the management HTTP API to a file.
524 ##
525 # management.http_log_dir = /path/to/access.log
526
527 ## Change the port on which the HTTP listener listens,
528 ## specifying an interface for the web server to bind to.
529 ## Also set the listener to use TLS and provide TLS options.
530 ##
531
532 # management.listener.port = 15672
533 # management.listener.ip   = 127.0.0.1
534 # management.listener.ssl  = true
535
536 # management.listener.ssl_opts.cacertfile = /path/to/cacert.pem
537 # management.listener.ssl_opts.certfile   = /path/to/cert.pem
538 # management.listener.ssl_opts.keyfile    = /path/to/key.pem
539
540 ## One of 'basic', 'detailed' or 'none'. See
541 ## http://rabbitmq.com/management.html#fine-stats for more details.
542 # management.rates_mode = basic
543
544 ## Configure how long aggregated data (such as message rates and queue
545 ## lengths) is retained. Please read the plugin's documentation in
546 ## http://rabbitmq.com/management.html#configuration for more
547 ## details.
548 ## Your can use 'minute', 'hour' and 'day' keys or integer key (in seconds)
549 # management.sample_retention_policies.global.minute    = 5
550 # management.sample_retention_policies.global.hour  = 60
551 # management.sample_retention_policies.global.day = 1200
552
553 # management.sample_retention_policies.basic.minute   = 5
554 # management.sample_retention_policies.basic.hour = 60
555
556 # management.sample_retention_policies.detailed.10 = 5
557
558 ## ----------------------------------------------------------------------------
559 ## RabbitMQ Shovel Plugin
560 ##
561 ## Related doc guide: http://rabbitmq.com/shovel.html
562 ## ----------------------------------------------------------------------------
563
564 ## See advanced.config.example for a Shovel plugin example
565
566
567 ## ----------------------------------------------------------------------------
568 ## RabbitMQ STOMP Plugin
569 ##
570 ## Related doc guide: http://rabbitmq.com/stomp.html
571 ## ----------------------------------------------------------------------------
572
573 # =======================================
574 # STOMP section
575 # =======================================
576
577 ## Network Configuration. The format is generally the same as for the core broker.
578 ##
579 # stomp.listeners.tcp.default = 61613
580
581 ## Same for ssl listeners
582 ##
583 # stomp.listeners.ssl.default = 61614
584
585 ## Number of Erlang processes that will accept connections for the TCP
586 ## and TLS listeners.
587 ##
588 # stomp.num_acceptors.tcp = 10
589 # stomp.num_acceptors.ssl = 1
590
591 ## Additional TLS options
592
593 ## Extract a name from the client's certificate when using TLS.
594 ##
595 # stomp.ssl_cert_login = true
596
597 ## Set a default user name and password. This is used as the default login
598 ## whenever a CONNECT frame omits the login and passcode headers.
599 ##
600 ## Please note that setting this will allow clients to connect without
601 ## authenticating!
602 ##
603 # stomp.default_user = guest
604 # stomp.default_pass = guest
605
606 ## If a default user is configured, or you have configured use TLS client
607 ## certificate based authentication, you can choose to allow clients to
608 ## omit the CONNECT frame entirely. If set to true, the client is
609 ## automatically connected as the default user or user supplied in the
610 ## TLS certificate whenever the first frame sent on a session is not a
611 ## CONNECT frame.
612 ##
613 # stomp.implicit_connect = true
614
615 ## Whether or not to enable proxy protocol support.
616 ## Once enabled, clients cannot directly connect to the broker
617 ## anymore. They must connect through a load balancer that sends the
618 ## proxy protocol header to the broker at connection time.
619 ## This setting applies only to STOMP clients, other protocols
620 ## like MQTT or AMQP have their own setting to enable proxy protocol.
621 ## See the plugins or broker documentation for more information.
622 ##
623 # stomp.proxy_protocol = false
624
625 ## ----------------------------------------------------------------------------
626 ## RabbitMQ MQTT Adapter
627 ##
628 ## See https://github.com/rabbitmq/rabbitmq-mqtt/blob/stable/README.md
629 ## for details
630 ## ----------------------------------------------------------------------------
631
632 # =======================================
633 # MQTT section
634 # =======================================
635
636 ## Set the default user name and password used for anonymous connections (when client
637 ## provides no credentials). Anonymous connections are highly discouraged!
638 ##
639 # mqtt.default_user = guest
640 # mqtt.default_pass = guest
641
642 ## Enable anonymous connections. If this is set to false, clients MUST provide
643 ## credentials in order to connect. See also the mqtt.default_user/mqtt.default_pass
644 ## keys. Anonymous connections are highly discouraged!
645 ##
646 # mqtt.allow_anonymous = true
647
648 ## If you have multiple vhosts, specify the one to which the
649 ## adapter connects.
650 ##
651 # mqtt.vhost = /
652
653 ## Specify the exchange to which messages from MQTT clients are published.
654 ##
655 # mqtt.exchange = amq.topic
656
657 ## Specify TTL (time to live) to control the lifetime of non-clean sessions.
658 ##
659 # mqtt.subscription_ttl = 1800000
660
661 ## Set the prefetch count (governing the maximum number of unacknowledged
662 ## messages that will be delivered).
663 ##
664 # mqtt.prefetch = 10
665
666 ## TCP/SSL Configuration (as per the broker configuration).
667 ##
668 # mqtt.listeners.tcp.default = 1883
669
670 ## Same for ssl listener
671 ##
672 # mqtt.listeners.ssl.default = 1884
673
674 ## Number of Erlang processes that will accept connections for the TCP
675 ## and TLS listeners.
676 ##
677 # mqtt.num_acceptors.tcp = 10
678 # mqtt.num_acceptors.ssl = 10
679
680 ## TCP listener options (as per the broker configuration).
681 ##
682 # mqtt.tcp_listen_options.backlog = 128
683 # mqtt.tcp_listen_options.nodelay = true
684
685 ## Whether or not to enable proxy protocol support.
686 ## Once enabled, clients cannot directly connect to the broker
687 ## anymore. They must connect through a load balancer that sends the
688 ## proxy protocol header to the broker at connection time.
689 ## This setting applies only to STOMP clients, other protocols
690 ## like STOMP or AMQP have their own setting to enable proxy protocol.
691 ## See the plugins or broker documentation for more information.
692 ##
693 # mqtt.proxy_protocol = false
694
695 ## ----------------------------------------------------------------------------
696 ## RabbitMQ AMQP 1.0 Support
697 ##
698 ## See https://github.com/rabbitmq/rabbitmq-amqp1.0/blob/stable/README.md.
699 ## ----------------------------------------------------------------------------
700
701 # =======================================
702 # AMQP 1.0 section
703 # =======================================
704
705
706 ## Connections that are not authenticated with SASL will connect as this
707 ## account. See the README for more information.
708 ##
709 ## Please note that setting this will allow clients to connect without
710 ## authenticating!
711 ##
712 # amqp1_0.default_user = guest
713
714 ## Enable protocol strict mode. See the README for more information.
715 ##
716 # amqp1_0.protocol_strict_mode = false
717
718 ## Logging settings.
719 ##
720 ## See http://rabbitmq.com/logging.html and https://github.com/erlang-lager/lager for details.
721 ##
722
723 ## Log direcrory, taken from the RABBITMQ_LOG_BASE env variable by default.
724 ##
725 # log.dir = /var/log/rabbitmq
726
727 ## Logging to file. Can be false or a filename.
728 ## Default:
729 # log.file = rabbit.log
730
731 ## To disable logging to a file
732 # log.file = false
733
734 ## Log level for file logging
735 ##
736 # log.file.level = info
737
738 ## File rotation config. No rotation by default.
739 ## DO NOT SET rotation date to ''. Leave the value unset if "" is the desired value
740 # log.file.rotation.date = $D0
741 # log.file.rotation.size = 0
742
743 ## Logging to console (can be true or false)
744 ##
745 # log.console = false
746
747 ## Log level for console logging
748 ##
749 # log.console.level = info
750
751 ## Logging to the amq.rabbitmq.log exchange (can be true or false)
752 ##
753 # log.exchange = false
754
755 ## Log level to use when logging to the amq.rabbitmq.log exchange
756 ##
757 # log.exchange.level = info
758
759
760
761 ## ----------------------------------------------------------------------------
762 ## RabbitMQ LDAP Plugin
763 ##
764 ## Related doc guide: http://rabbitmq.com/ldap.html.
765 ##
766 ## ----------------------------------------------------------------------------
767
768 # =======================================
769 # LDAP section
770 # =======================================
771
772 ##
773 ## Connecting to the LDAP server(s)
774 ## ================================
775 ##
776
777 ## Specify servers to bind to. You *must* set this in order for the plugin
778 ## to work properly.
779 ##
780 # auth_ldap.servers.1 = your-server-name-goes-here
781
782 ## You can define multiple servers
783 # auth_ldap.servers.2 = your-other-server
784
785 ## Connect to the LDAP server using TLS
786 ##
787 # auth_ldap.use_ssl = false
788
789 ## Specify the LDAP port to connect to
790 ##
791 # auth_ldap.port = 389
792
793 ## LDAP connection timeout, in milliseconds or 'infinity'
794 ##
795 # auth_ldap.timeout = infinity
796
797 ## Or number
798 # auth_ldap.timeout = 500
799
800 ## Enable logging of LDAP queries.
801 ## One of
802 ##   - false (no logging is performed)
803 ##   - true (verbose logging of the logic used by the plugin)
804 ##   - network (as true, but additionally logs LDAP network traffic)
805 ##
806 ## Defaults to false.
807 ##
808 # auth_ldap.log = false
809
810 ## Also can be true or network
811 # auth_ldap.log = true
812 # auth_ldap.log = network
813
814 ##
815 ## Authentication
816 ## ==============
817 ##
818
819 ## Pattern to convert the username given through AMQP to a DN before
820 ## binding
821 ##
822 # auth_ldap.user_dn_pattern = cn=${username},ou=People,dc=example,dc=com
823
824 ## Alternatively, you can convert a username to a Distinguished
825 ## Name via an LDAP lookup after binding. See the documentation for
826 ## full details.
827
828 ## When converting a username to a dn via a lookup, set these to
829 ## the name of the attribute that represents the user name, and the
830 ## base DN for the lookup query.
831 ##
832 # auth_ldap.dn_lookup_attribute = userPrincipalName
833 # auth_ldap.dn_lookup_base      = DC=gopivotal,DC=com
834
835 ## Controls how to bind for authorisation queries and also to
836 ## retrieve the details of users logging in without presenting a
837 ## password (e.g., SASL EXTERNAL).
838 ## One of
839 ##  - as_user (to bind as the authenticated user - requires a password)
840 ##  - anon    (to bind anonymously)
841 ##  - {UserDN, Password} (to bind with a specified user name and password)
842 ##
843 ## Defaults to 'as_user'.
844 ##
845 # auth_ldap.other_bind = as_user
846
847 ## Or can be more complex:
848 # auth_ldap.other_bind.user_dn  = User
849 # auth_ldap.other_bind.password = Password
850
851 ## If user_dn and password defined - other options is ignored.
852
853 # -----------------------------
854 # Too complex section of LDAP
855 # -----------------------------
856
857 ##
858 ## Authorisation
859 ## =============
860 ##
861
862 ## The LDAP plugin can perform a variety of queries against your
863 ## LDAP server to determine questions of authorisation.
864 ##
865 ## Related doc guide: http://rabbitmq.com/ldap.html#authorisation.
866
867 ## Following configuration should be defined in additional.config file
868 ## DO NOT UNCOMMENT THIS LINES!
869
870 ## Set the query to use when determining vhost access
871 ##
872 ## {vhost_access_query, {in_group,
873 ##                       "ou=${vhost}-users,ou=vhosts,dc=example,dc=com"}},
874
875 ## Set the query to use when determining resource (e.g., queue) access
876 ##
877 ## {resource_access_query, {constant, true}},
878
879 ## Set queries to determine which tags a user has
880 ##
881 ## {tag_queries, []}
882 #   ]},
883 # -----------------------------
rabbitmq-defaults文件内容如下:
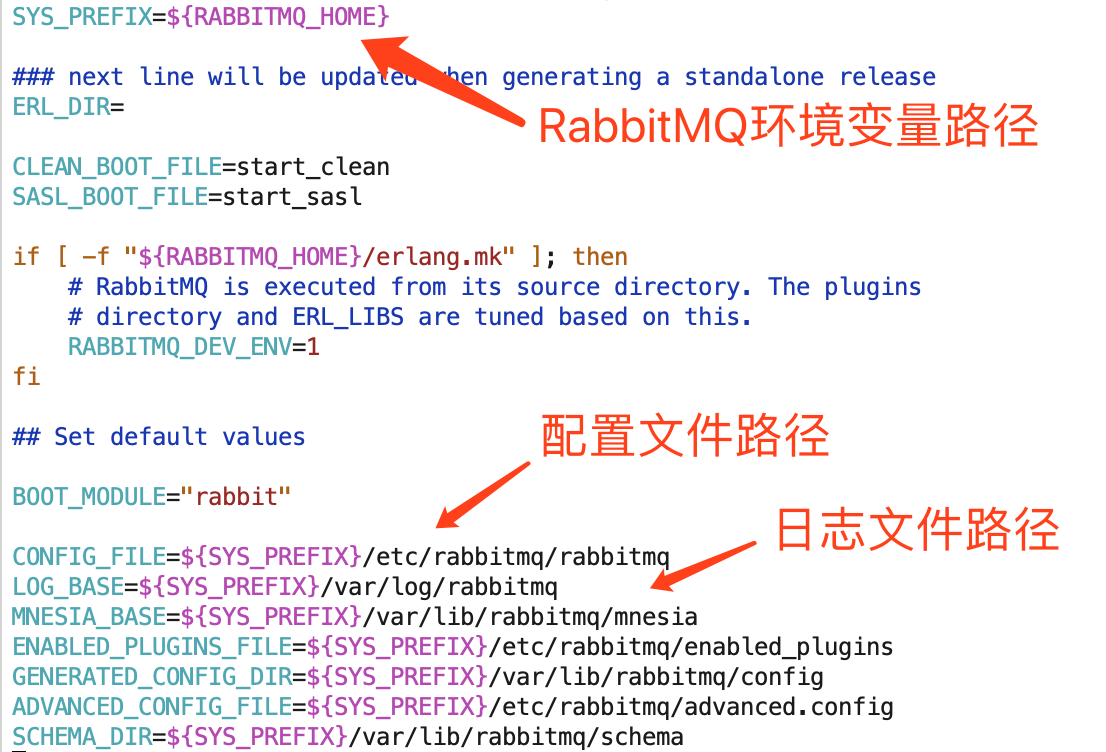
b、RABBITMQ_HOME是环境变量的位置,由上看出配置文件是/data/soft/rabbitmq_server-3.7.9/etc/rabbitmq/rabbitmq.conf(注意是rabbitmq.conf,不是rabbitmq,不知道为啥rabbitmq-defaults是rabbitmq),将模版改名为rabbitmq.conf,放入/data/soft/rabbitmq_server-3.7.9/etc/rabbitmq/下
c、在配置文件rabbitmq.conf中,增加内容或去掉注,改成为
1 loopback_users.guest = false
9、修改配置文件后重新启动RabbitMQ服务,浏览器输入http://ip:15672,进入web控制台。


 浙公网安备 33010602011771号