【以太坊开发】如何开发一个编译以太坊智能合约并且发布的平台(二)
接上一章的内容,这篇介绍 deploy相关和结果演示。
deploy一个合约的过程中,需要计算发布的消耗和nonce值。
当进行每笔交易时,发送人设定Gas Limit 和Gas Price,将 Gas Limit*Gas Price ,就得到了ETH交易佣金的成本。
nonce:以太坊要求一个账户的每笔交易有一个连续的计数。每个节点将根据计数顺序严格执行来自一个用户的交易。
app.js中有下面两个函数:
var web3 = new Web3(new Web3.providers.HttpProvider("http://localhost:8545"));

function etherSpentInPendingTransactions(address, callback)
{
    web3.currentProvider.sendAsync({
          method: "txpool_content",
           params: [],
           jsonrpc: "2.0",
           id: new Date().getTime()
    }, function (error, result) {
        console.log(result)
        if(typeof(result.result.pending)!="undefined" && result.result.pending)
        {
            if(result.result.pending[address])
            {
                var txns = result.result.pending[address];
                var cost = new BigNumber(0);

                for(var txn in txns)
                {
                    cost = cost.add((new BigNumber(parseInt(txns[txn].value))).add((new BigNumber(parseInt(txns[txn].gas))).mul(new BigNumber(parseInt(txns[txn].gasPrice)))));
                }

                callback(null, web3.fromWei(cost, "ether"));
            }
            else
            {
                callback(null, "0");
            }
        }
        else
        {
            callback(null, "0");
        }
    })
}
上面函数的流程:
1 使用sendAsync异步调用JSON PRC,调用的方法是 :txpool_content,这个方法用于查询交易池中待处理的交易,返回的结果属性有pending和queqed。想了解这个函数可以查看:https://github.com/ethereum/go-ethereum/wiki/Management-APIs#txpool_content
2 通过返回结果的属性 pending和账户的地址获取所以交易:
var txns = result.result.pending[address];对交易的结果进行循环,累加每个交易的value和gas消耗,就是所有将要打包到下个块的交易的总消耗。

在介绍一下getNonce函数:
function getNonce(address, callback)
{
    web3.eth.getTransactionCount(address, function(error, result){
        var txnsCount = result;

        web3.currentProvider.sendAsync({
              method: "txpool_content",
              params: [],
              jsonrpc: "2.0",
              id: new Date().getTime()
        }, function (error, result) {
            if(result.result.pending)
            {
                if(result.result.pending[address])
                {
                    txnsCount = txnsCount + Object.keys(result.result.pending[address]).length;
                    callback(null, txnsCount);
                }
                else
                {
                    callback(null, txnsCount);
                }
            }
            else
            {
                callback(null, txnsCount);
            }
        })
    })
}
eth中每个交易的nonce是累加的,它是把挖出的交易总数和待定的交易总数加起来得到的。
所以对于deploy函数来说,只需要利用上面两个函数构造交易的消耗cost和nonce值然后调用sendRawTranstaction,当然还需要对交易签署,需要提供秘钥,所以界面设计也会需要账户秘钥。代码如下:
app.get("/deploy", function(req, res){
    var code = req.query.code;
    var arguments = JSON.parse(req.query.arguments);
    var address = req.query.address;

    var output = solc.compile(code, 1);

    var contracts = output.contracts;

    for(var contractName in contracts)
    {
        var abi = JSON.parse(contracts[contractName].interface);
        var byteCode = contracts[contractName].bytecode;

        var contract = web3.eth.contract(abi);

        var data = contract.new.getData.call(null, ...arguments, {
            data: byteCode
        });
        console.log(data);
        console.log(web3.eth.defaultAccount)
        var gasRequired = web3.eth.estimateGas({
            from:address,
            data: "0x" + data
        });

        web3.eth.getBalance(address, function(error, balance){
            var etherAvailable = web3.fromWei(balance, "ether");
            etherSpentInPendingTransactions(address, function(error, balance){
                etherAvailable = etherAvailable.sub(balance)
                if(etherAvailable.gte(web3.fromWei(new BigNumber(web3.eth.gasPrice).mul(gasRequired), "ether")))
                {
                    getNonce(address, function(error, nonce){
                        var rawTx = {
                            gasPrice: web3.toHex(web3.eth.gasPrice),
                            gasLimit: web3.toHex(gasRequired),
                            from: address,
                            nonce: web3.toHex(nonce),
                            data: "0x" + data
                        };

                        var privateKey = ethereumjsUtil.toBuffer(req.query.key, 'hex');
                        var tx = new ethereumjsTx(rawTx);
                        tx.sign(privateKey);

                        web3.eth.sendRawTransaction("0x" + tx.serialize().toString('hex'), function(err, hash) {
                            res.send({result: {
                                hash: hash,
                            }});
                        });
                    })
                }
                else
                {
                    res.send({error: "Insufficient Balance"});
                }
            })
        })

        break;
    }
})
到这里基本流程已经很清晰了。具体的代码可以到git上下载:https://github.com/figo050518/deployContract
配置app.js的web3地址。
进入项目根目录 执行 npm install
node app.js 启动前端服务。
我定义的端口是7070。下面是笔者执行的截图:
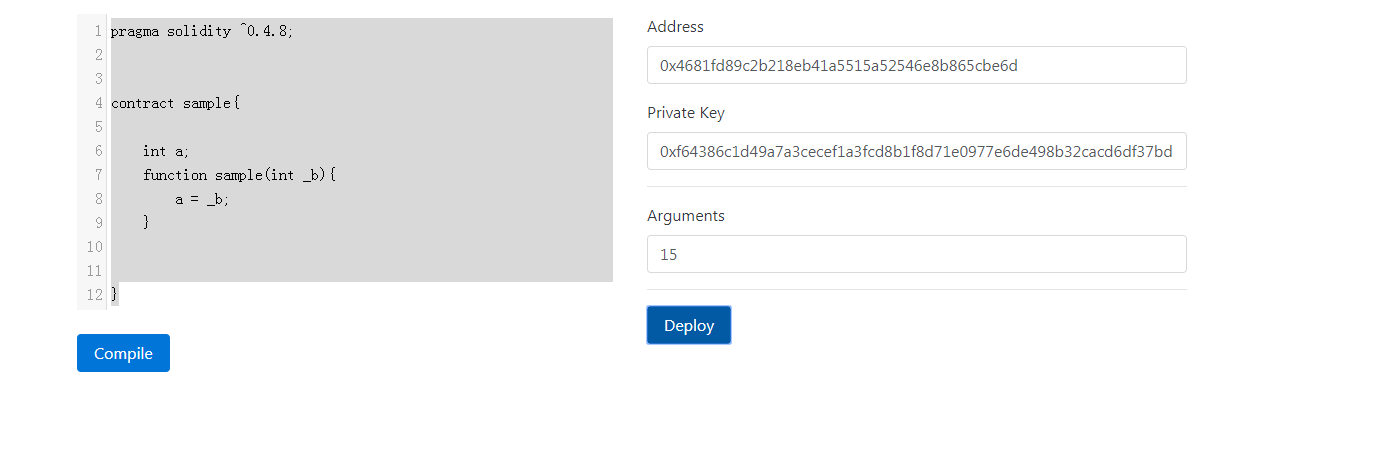
到这里就完成了一个编译 部署合约的平台,前端页面没有过多介绍,读者可以看下源码。

 浙公网安备 33010602011771号