ASP.NET Core 学习笔记 第三篇 依赖注入框架(Autofac)的使用
前言
首先感谢支持,写了这个系列的第二篇后,得到了好多人的鼓励,也更加坚定我把这个系列写完的决心,也能更好的督促自己的学习,分享自己的学习成果。还记得上篇文章中最后提及到,假如服务越来越多怎么处理呢,本篇文章将会带来解决办法。这篇是接上一篇文章的,概念方面的可以参考上一篇文章。
IoC框架
先说说常见的Ioc框架吧。
Autofac: 目前net用的比较多,好多大佬的项目比较优先选择的框架。
Ninject: 已经很少用了,还时在很早的文章中见过。
Unity: 比较常见的了,好多地方有用到的,
Core: Core中自带的,业务逻辑不太复杂的情况下,还是比较方便的。
IoC-Autofac
Autofac是.NET领域最为流行的IOC框架之一,传说是速度最快的一个。
优点:
- 它是C#语言联系很紧密,也就是说C#里的很多编程方式都可以为Autofac使用。
- 较低的学习曲线,学习它非常的简单,只要你理解了IoC和DI的概念以及在何时需要使用它们。
- XML.Json配置支持。
- 自动装配。
- 与Asp.Net MVC 集成。
- 微软的Orchad开源程序使用的就是Autofac,从该源码可以看出它的方便和强大。
大多数讲Autofac框架的文章中都会提及上面几点优点,可见其框架的优秀。
.NET Core中自带DI的使用
1.首先创建一个 ASP.Net Core Web Api项目(选用的.NET 5.0),整体如下,红色部分为Core中自带DI使用的部分。
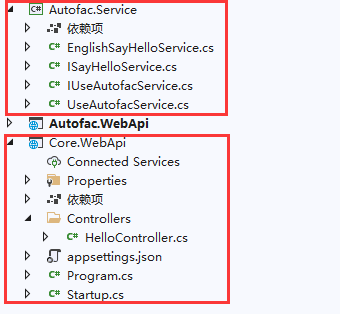
2.新建类库项目,分别添加一个接口文件和类文件。
接口:
    public interface ISayHelloService
    {
        string SayHello(string name);
    }
类:
    public class EnglishSayHelloService : ISayHelloService
    {
        public string SayHello(string name)
        {
            return $"Hello,{name}!";
        }
    }
3.在 Startup 里面的 ConfigureServices 方法内注入。
services.AddScoped<ISayHelloService, EnglishSayHelloService>();
4.然后在控制器中使用刚刚注入的服务。
    [Route("api/[controller]/[action]")]
    [ApiController]
    public class HelloController : ControllerBase
    {
        public readonly ISayHelloService sayHelloService;

        public HelloController(ISayHelloService sayHelloService)
        {
            this.sayHelloService = sayHelloService;
        }

        [HttpGet]
        public string CoreDI()
        {
            return  sayHelloService.SayHello("CoreDI");
        }

    }
注意: 路由访问地址,出现404错误时,可能是路由问题,路由可根据自己的实际需要自己在 [Route("api/[controller]/[action]")] 处修改。
5.访问测试。
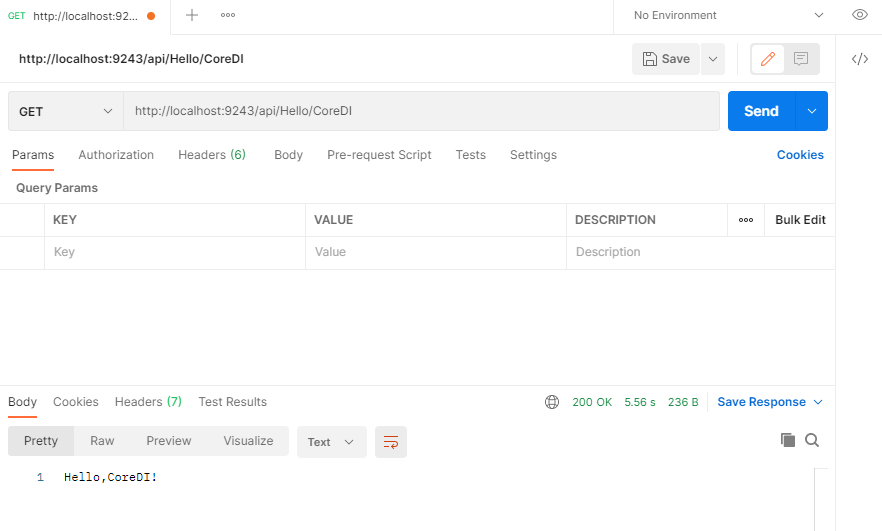
这里使用的接口测试软件是Postman,Api测试很方便,网上可以搜索到,找不到我到的可以联系我。
Autofac 使用
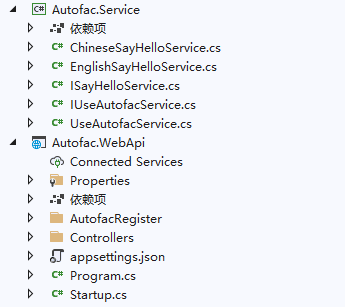
1.在新建一个ASP.Net Core Web Api项目(选用的.NET 5.0)用于区分前面的Core自带的DI。
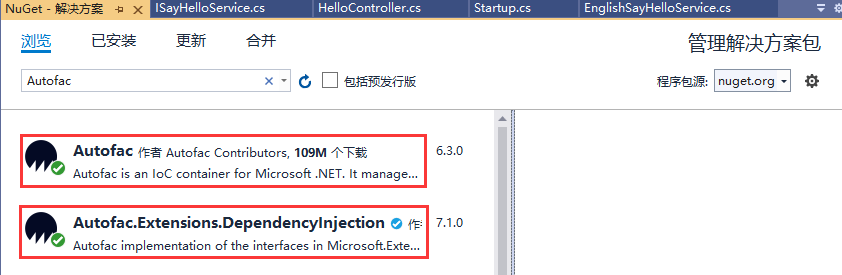
2.引用引用 Autofac 的包,看看这下载量,还是很哇塞的
3.在 Program 中改用 Autofac 来实现依赖注入
    public class Program
    {
        public static void Main(string[] args)
        {
            CreateHostBuilder(args).Build().Run();
        }

        public static IHostBuilder CreateHostBuilder(string[] args) =>
            Host.CreateDefaultBuilder(args)
                .ConfigureWebHostDefaults(webBuilder =>
                {
                    webBuilder.UseStartup<Startup>();
                });
    }
4.在 Startup 类中添加方法:ConfigureContainer,注入我们之前的服务。
    public class Startup
    {
        public Startup(IConfiguration configuration)
        {
            Configuration = configuration;
        }

        public IConfiguration Configuration { get; }

        public void ConfigureServices(IServiceCollection services)
        {
            services.AddControllers();
        }
        //在这里注入
        public void ConfigureContainer(ContainerBuilder builder)
        {
            builder.RegisterType<EnglishSayHelloService>().As<ISayHelloService>();

        }

        public void Configure(IApplicationBuilder app, IWebHostEnvironment env)
        {
            if (env.IsDevelopment())
            {
                app.UseDeveloperExceptionPage();
            }

            app.UseRouting();

            app.UseAuthorization();

            app.UseEndpoints(endpoints =>
            {
                endpoints.MapControllers();
            });
        }

    }
5.控制器这里基本不需要更改。
    [Route("api/[controller]/[action]")]
    [ApiController]
    public class HelloController : ControllerBase
    {
        public readonly ISayHelloService sayHelloService;

        public HelloController(ISayHelloService sayHelloService)
        {
            this.sayHelloService = sayHelloService;
        }

        [HttpGet]
        public string CoreDI()
        {
            return  sayHelloService.SayHello("AutofacDI");
        }

    }
6.运行项目继续用Postman测试接口。
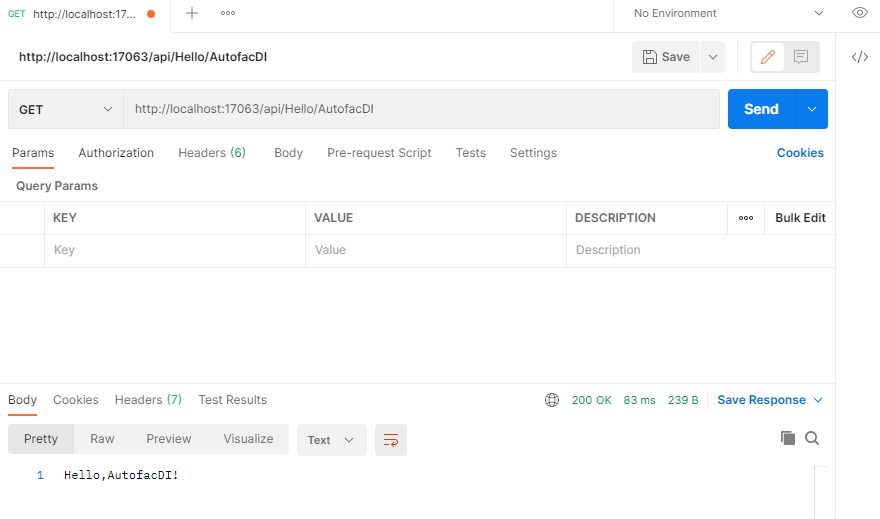
好了关于Autofac的基本使用基本就讲完了,是不是还是挺简单的。
批量注入
简单的几个服务写着还可以接受,当服务到几十个,甚至上百个时,想想就可怕。这就不得不说到批量注入了,Autofac的优势就体现出来了。
1.在服务中分别在添加一个接口,和类。
接口:
   public interface IUseAutofacService
   {
       string UseAutofac(string name);
   }
类:
   public class UseAutofacService : IUseAutofacService
   {
       public string UseAutofac(string name)
       {
           return $"{name}批量注入测试!";
       }
   }
2.回到我们之前的Startup 类中修改方法:ConfigureContainer。
       public void ConfigureContainer(ContainerBuilder builder)
       {
           //builder.RegisterType<EnglishSayHelloService>().As<ISayHelloService>();

           //服务项目程序集
           Assembly service = Assembly.Load("Autofac.Service");

           //服务接口项目程序集
           Assembly iservice = Assembly.Load("Autofac.Service");

           builder.RegisterAssemblyTypes(service, iservice).Where(n => n.FullName.EndsWith("Service") && !n.IsAbstract)
               .InstancePerLifetimeScope().AsImplementedInterfaces();

       }
注意: 如果需要注入的服务没有 IXXXService的接口 ,那么 builder.RegisterAssemblyTypes 就只需要传一个程序集。如果服务与接口同在一个项目,那也是要传两个程序集的。
3.接下来在刚刚的控制器中略作修改。
    [Route("api/[controller]/[action]")]
    [ApiController]
    public class HelloController : ControllerBase
    {
        public readonly ISayHelloService sayHelloService;

        public readonly IUseAutofacService useAutofacService;

        public HelloController(ISayHelloService _sayHelloService, IUseAutofacService _useAutofacService)
        {
            this.sayHelloService = _sayHelloService;
            this.useAutofacService = _useAutofacService;
        }

        [HttpGet]
        public string AutofacDI()
        {
            return sayHelloService.SayHello("AutofacDI");
        }

        public string BathAutofacDI()
        {
            var name = sayHelloService.SayHello("AutofacDI");
            return useAutofacService.UseAutofac(name);
        }
    }
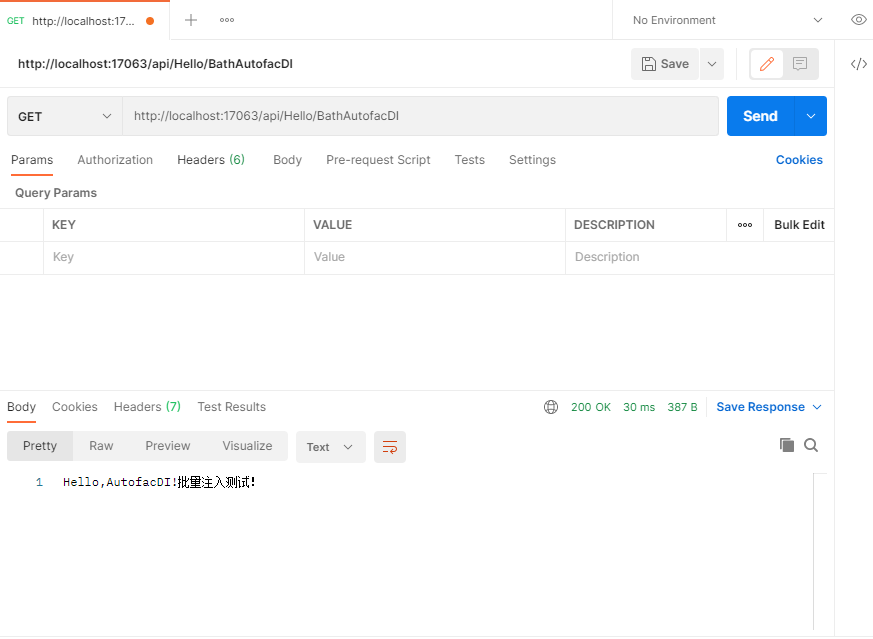
4.用Postman测试注入的情况。

 浙公网安备 33010602011771号