struts2访问servlet API
搭建环境:
引入jar包,src下建立struts.xml文件
项目配置文件web.xml.
web.xml:
 1 <?xml version="1.0" encoding="UTF-8"?>
 2 <web-app xmlns:xsi="http://www.w3.org/2001/XMLSchema-instance" xmlns="http://java.sun.com/xml/ns/javaee" xsi:schemaLocation="http://java.sun.com/xml/ns/javaee http://java.sun.com/xml/ns/javaee/web-app_3_0.xsd" id="WebApp_ID" version="3.0">
 3   <display-name>struts2Test</display-name>
 4   <welcome-file-list>
 5     <welcome-file>index.html</welcome-file>
 6     <welcome-file>index.htm</welcome-file>
 7     <welcome-file>index.jsp</welcome-file>
 8     <welcome-file>default.html</welcome-file>
 9     <welcome-file>default.htm</welcome-file>
10     <welcome-file>default.jsp</welcome-file>
11   </welcome-file-list>
12
13   <filter>
14         <filter-name>struts2</filter-name>
15         <filter-class>org.apache.struts2.dispatcher.ng.filter.StrutsPrepareAndExecuteFilter</filter-class>
16     </filter>
17
18     <filter-mapping>
19         <filter-name>struts2</filter-name>
20         <url-pattern>*.action</url-pattern>
21     </filter-mapping>
22
23 </web-app>
struts.xml:
 1 <?xml version="1.0" encoding="UTF-8" ?>
 2 <!DOCTYPE struts PUBLIC
 3     "-//Apache Software Foundation//DTD Struts Configuration 2.3//EN"
 4     "http://struts.apache.org/dtds/struts-2.3.dtd">
 5
 6 <struts>
 7     <constant name="struts.enable.DynamicMethodInvocation" value="false" />
 8     <constant name="struts.devMode" value="true" />
 9
10     <package name="default" namespace="/gys" extends="struts-default">
11         <action name="test" class="action.GetServletAPIAction">
12             <result name="api">/servletApi.jsp</result>
13         </action>
14     </package>
15 </struts>
Struts2的Action类并不直接与任何Servlet API耦合,这是Struts2的一个改良之处,因为Action类不在于Servlet API耦合,从而能更轻松地测试该Action.
Web中通常访问Servlet API就是HttpServletRequest,HttpSession和ServletContext,这3个类分别代表JSP内置对象中的request,session,application.
Struts2提供了一个ActionContext类来访问API,
该类提供了几个常用的方法:
Object get(Object key):该方法类似于调用HttpServletRequest的getAttribute(String name)方法.
Map getApplication():返回一个Map对象,该对象模拟了ServletContext实例.
static ActionContext getContext():静态方法,获取系统的ActionContext实例.
Map getParameters():获取所有的请求参数.类似于调用HttpServletRequest对象的getParameterMap方法.
Map getSession()返回一个Map对象,模拟了HttpSession实例.
void setApplication(Map application)直接传入一个Map实例,将该Map实例里的key-value转换成application的属性名,属性值.
void setSession(Map session)直接传入一个Map实例,将该Map实例里的key-value转换成session的属性名,属性值.
建立action类:
 1 package action;
 2
 3 import com.opensymphony.xwork2.ActionContext;
 4
 5 public class GetServletAPIAction {
 6     private String name;
 7     private String pass;
 8     public String getName() {
 9         return name;
10     }
11     public void setName(String name) {
12         this.name = name;
13     }
14     public String getPass() {
15         return pass;
16     }
17     public void setPass(String pass) {
18         this.pass = pass;
19     }
20
21     public void getServletAPI1(){
22         //获取ActionContext实例,通过该实例访问Servlet API
23         ActionContext ctx=ActionContext.getContext();
24         //获取ServletContext里的count属性
25         Integer count=(Integer)ctx.getApplication().get("count");
26         if(count==null){
27             count=1;
28         }
29         else {
30             count++;
31         }
32         //将访问人数设置成application的一个属性
33         ctx.getApplication().put("count", count);
34         ctx.getSession().put("username", "思思博士");
35
36     }
37
38     public String execute(){
39         getServletAPI1();
40         return "api";
41     }
42
43 }
建立页面servletApi.jsp:
 1 <%@ page language="java" import="java.util.*" contentType="text/html; charset=utf-8"%>
 2 <%
 3 String path = request.getContextPath();
 4 String basePath = request.getScheme()+"://"+request.getServerName()+":"+request.getServerPort()+path+"/";
 5 %>
 6
 7 <!DOCTYPE HTML PUBLIC "-//W3C//DTD HTML 4.01 Transitional//EN">
 8 <html>
 9   <head>
10     <base href="<%=basePath%>">
11
12     <title>My JSP 'index.jsp' starting page</title>
13     <meta http-equiv="pragma" content="no-cache">
14     <meta http-equiv="cache-control" content="no-cache">
15     <meta http-equiv="expires" content="0">
16     <meta http-equiv="keywords" content="keyword1,keyword2,keyword3">
17     <meta http-equiv="description" content="This is my page">
18     <!--
19     <link rel="stylesheet" type="text/css" href="styles.css">
20     -->
21   </head>
22
23   <body>
24     <h1>访问次数:${applicationScope.count }</h1>
25     <h1>登陆人:${sessionScope.username }</h1>
26   </body>
27 </html>
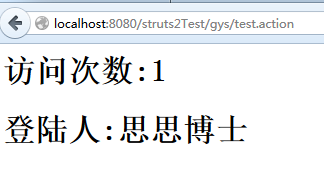
测试一下:
虽然Struts2提供了ActionCotext来访问Servlet API,但这种访问毕竟不能直接获得Servlet API实例,为了在Action中直接访问Servlet API,struts2还提供了如下系统接口.
ServletContextAware:实现该接口的Action可以直接访问web应用的ServletContext实例.
ServletRequestAwart:实现该接口的Action可以直接访问用户请求的HttpServletRequest实例
ServletResponseAware:实现该接口的Action可以直接访问服务器响应的HttpServletResponse实例.
下面以ServletRequestAware为例,介绍如何在Action中访问HttpServletRequest对象.
修改上面的代码:
ServletApi.jsp
 1 <%@ page language="java" import="java.util.*" contentType="text/html; charset=utf-8"%>
 2 <%
 3 String path = request.getContextPath();
 4 String basePath = request.getScheme()+"://"+request.getServerName()+":"+request.getServerPort()+path+"/";
 5 %>
 6
 7 <!DOCTYPE HTML PUBLIC "-//W3C//DTD HTML 4.01 Transitional//EN">
 8 <html>
 9   <head>
10     <base href="<%=basePath%>">
11
12     <title>My JSP 'index.jsp' starting page</title>
13     <meta http-equiv="pragma" content="no-cache">
14     <meta http-equiv="cache-control" content="no-cache">
15     <meta http-equiv="expires" content="0">
16     <meta http-equiv="keywords" content="keyword1,keyword2,keyword3">
17     <meta http-equiv="description" content="This is my page">
18     <!--
19     <link rel="stylesheet" type="text/css" href="styles.css">
20     -->
21   </head>
22
23   <body>
24    <%--  <h1>访问次数:${applicationScope.count }</h1>
25     <h1>登陆人:${sessionScope.username }</h1> --%>
26     <h3>${requestScope.API }</h3>
27   </body>
28 </html>
GetServletAPIAction.java
package action;

import javax.servlet.http.HttpServletRequest;
import javax.servlet.http.HttpServletResponse;

import org.apache.struts2.interceptor.ServletRequestAware;
import org.apache.struts2.interceptor.ServletResponseAware;

import com.opensymphony.xwork2.ActionContext;

public class GetServletAPIAction implements ServletRequestAware{
    private HttpServletRequest request;


    private String name;
    private String pass;
    public String getName() {
        return name;
    }
    public void setName(String name) {
        this.name = name;
    }
    public String getPass() {
        return pass;
    }
    public void setPass(String pass) {
        this.pass = pass;
    }

    public void getServletAPI1(){
        //获取ActionContext实例,通过该实例访问Servlet API
        ActionContext ctx=ActionContext.getContext();
        //获取ServletContext里的count属性
        Integer count=(Integer)ctx.getApplication().get("count");
        if(count==null){
            count=1;
        }
        else {
            count++;
        }
        //将访问人数设置成application的一个属性
        ctx.getApplication().put("count", count);
        ctx.getSession().put("username", "思思博士");

    }
    public void getServletAPI2(){
        request.setAttribute("API","我来自于struts2中直接访问servletAPI的request");
    }

    @Override
    public void setServletRequest(HttpServletRequest request) {
        this.request=request;
    }
    public String execute(){
        //getServletAPI1();
        getServletAPI2();
        return "api";
    }

}
测试结果:


 浙公网安备 33010602011771号