Eclipse配置Maven私服
Eclipse配置Maven私服
前言:
搭建Maven私有仓库的主要目的,是为了在团队多人开发时,只要内网的私有仓库有下载过依赖的jar包,就直接从私有仓库获取,不再通过外网的中央仓库。如果私服上面没有,就通过私服上面的索引到中央仓库中缓存到私服中。
配置方式:
Eclipse配置Maven私服有两种,一种是在pom.xml里面配置,只针对pom所在的工程;另一种是在Eclipse安装目录中的setting.xml中配置,这是针对Eclipse中所有工程;
一、配置私服的位置(从私服中下载jar);
1、 pom.xml中配置:
在pom.xml中的<project>中加入如下配置
1.    <repositories>
2.         <repository>
3.              <id>nexus</id>
4.              <name>nexus</name>
5.              <url>http://192.168.100.52:8081/nexus/content/groups/public/</url>
6.              <releases>
7.                   <enabled>true</enabled>
8.              </releases>
9.              <snapshots>
10.                   <enabled>true</enabled>
11.              </snapshots>
12.            </repository>
13.        </repositories>
url指向本地私服的仓库组,并启用了releases库(稳定版本库)以及snapshots(开发版本库);其实我们的仓库组中除了包含了这两个库之外还包含了第三方库(3rd parth)以及中央库(central);
2、setting.xml中配置:
setting中配置要比pom麻烦多一点,不过毕竟人家是针对eclipse中的所有工程:
先在<servers>标签中添加私服的权限
14.    <server>
15.         <id>nexus-releases</id>
16.         <username>admin</username>
17.         <password>admin123</password>
18.    </server>
19.    <server>
20.         <id>nexus-snapshots</id>
21.         <username>admin</username>
22.         <password>admin123</password>
23.    </server>
这里的权限是用于上传jar到私服的;
接下来继续在setting.xml找到<mirrors>标签,我们来配置一下私服的镜像:
24.    <mirror>
25.         <id>nexus-releases</id>
26.         <mirrorOf>*</mirrorOf>
27.         <url>http://192.168.100.52:8081/nexus/content/groups/public/</url>
28.    </mirror>
29.    <mirror>
30.         <id>nexus-snapshots</id>
31.         <mirrorOf>*</mirrorOf>
32.         <url>http://192.168.100.52:8081/nexus/content/repositories/snapshots/</url>
33.    </mirror>
这里的id与前面的权限的id其实……没什么关系。
接下来继续找到<profiles>标签,开始配置私服:
34.    <profile>
35.         <id>nexus</id>
36.         <repositories>
37.             <repository>
38.                 <id>nexus-releases</id>
39.                 <name>Nexus</name>
40.                 <url>http://nexus-releases</url> <!—这里要引入上面的镜像-->
41.                 <releases>
42.               <enabled>true</enabled>
43.               <updatePolicy>never</updatePolicy>
44.               <checksumPolicy>warn</checksumPolicy>
45.              </releases>
46.              <snapshots>
47.               <enabled>true</enabled>
48.              </snapshots>
49.                 </repository>
50.              <repository>
51.                  <id>nexus-snapshots</id>
52.               <name>Nexus</name>
53.               <url>http://nexus-snapshots</url> <!—同样引入上面的镜像-->
54.               <releases>
55.                 <enabled>true</enabled>
56.                 <updatePolicy>never</updatePolicy>
57.                 <checksumPolicy>warn</checksumPolicy>
58.               </releases>
59.               <snapshots>
60.                 <enabled>true</enabled>
61.               </snapshots>
62.             </repository>
63.           </repositories>
64.           <pluginRepositories>     <!—同样是插件的配置-->
65.            <pluginRepository>
66.              <id>nexus-releases</id>
67.              <name>Nexus</name>
68.              <url>http://nexus-releases</url> <!—同样引入上面的镜像-->
69.              <snapshots>
70.                 <enabled>true</enabled>
71.                 <updatePolicy>never</updatePolicy>
72.                 <checksumPolicy>warn</checksumPolicy>
73.                     </snapshots>
74.              <releases>
75.                <enabled>true</enabled>
76.              </releases>
77.             </pluginRepository>
78.                <pluginRepository>
79.               <id>nexus-snapshots</id>
80.               <name>Nexus</name>
81.               <url>http://nexus-snapshots</url> <!—同样引入上面的镜像-->
82.               <snapshots>
83.                    <enabled>true</enabled>
84.                 <updatePolicy>never</updatePolicy>
85.                 <checksumPolicy>warn</checksumPolicy>
86.               </snapshots>
87.               <releases>
88.                 <enabled>true</enabled>
89.               </releases>
90.          </pluginRepository>
91.         </pluginRepositories>
92.    </profile>
最后,根据配置id激活这些配置,
93.     <activeProfiles>
94.           <activeProfile>nexus</activeProfile>
95.      </activeProfiles>
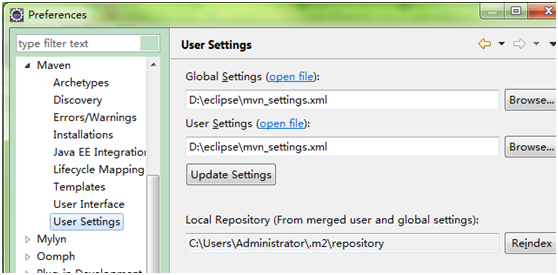
当然,如果你是新建一个setting.xml的话,要在eclipse里面更改setting.xml的路径,指向你新建的setting.xml
Window->Prederences ->Maven -> User Settings
二、上传jar到私服:
如果工程编译出的jar包要上传到私服,那就要在要上传的工程的pom.xml中的<project>下,增加
1.    <distributionManagement>
2.         <repository>
3.              <id>nexus-releases</id>
4.              <name>Nexus</name>
5.              <url>http://192.168.100.52:8081/nexus/content/repositories/releases/</url>
6.          </repository>
7.          <snapshotRepository>
8.              <id>nexus-snapshot</id>
9.              <name>Nexus</name>
10.              <url>http://192.168.100.52:8081/nexus/content/repositories/snapshots/</url>
11.            </snapshotRepository>
12.        </distributionManagement>
上传时,右键项目Run As->Run Configurations->Maven Build
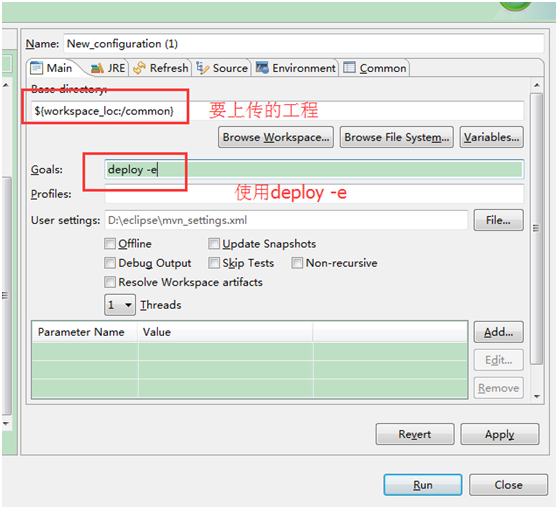
注:deploy后面的-e可以省略
扩展:
1、设置Maven的本地缓存:
Maven的本地缓存一般默认都是在C盘,这就有点让人难以接受了,不过还好,可以在setting.xml中配置一下缓存的位置:
<localRepository>D:\maven</localRepository>
2、配置在eclipse中配置jdk:
可以在setting.xml中的可以配置一下默认的jdk版本,这样就不用每个项目都去指定jdk的版本了
14.    <profile>
15.         <id>jdk-1.8</id>
16.         <activation>
17.              <activeByDefault>true</activeByDefault>
18.              <jdk>1.8</jdk>
19.         </activation>
20.           <properties>
21.            <maven.compiler.source>1.8</maven.compiler.source>
22.            <maven.compiler.target>1.8</maven.compiler.target>
23.            <maven.compiler.compilerVersion>1.8</maven.compiler.compilerVersion>
24.          </properties>
25.    </profile>

 浙公网安备 33010602011771号