机器学习之TensorFlow编程环境_TensorFlow_Estimator
1. 预创建的 Estimator
本文档介绍了 TensorFlow 编程环境,并展示了如何在 TensorFlow 中解决鸢尾花分类问题。
安装TensorFlow
TensorFlow在以下64位系统上经过测试和支持:
- Ubuntu 16.04或更高版本
- Windows 7或更高版本
- macOS 10.12.6(Sierra)或更高版本(无GPU支持)
- Raspbian 9.0或更高版本
- 官方安装文档
本人运行底层环境(Python2+3)
附安装教程
> 底层环境:
[root@CentOS1511 ~]# cat /etc/*release*
CentOS Linux release 7.2.1511 (Core)
Derived from Red Hat Enterprise Linux 7.2 (Source)
NAME="CentOS Linux"
VERSION="7 (Core)"
ID="centos"
ID_LIKE="rhel fedora"
VERSION_ID="7"
PRETTY_NAME="CentOS Linux 7 (Core)"
ANSI_COLOR="0;31"
CPE_NAME="cpe:/o:centos:centos:7"
HOME_URL="https://www.centos.org/"
BUG_REPORT_URL="https://bugs.centos.org/"

CENTOS_MANTISBT_PROJECT="CentOS-7"
CENTOS_MANTISBT_PROJECT_VERSION="7"
REDHAT_SUPPORT_PRODUCT="centos"
REDHAT_SUPPORT_PRODUCT_VERSION="7"

CentOS Linux release 7.2.1511 (Core)
CentOS Linux release 7.2.1511 (Core)
> 安装python3 + pip3
1.查看是否已经安装Python
Centos7 默认安装了Python2.7.5 因为一些命令要用它比如 yum 它使用的是 python2.7.5.使用 python -V 命令查看一下是否安装 Python:
# python -V
Python 2.7.5

然后查看一下 Python 可执行文件的位置:
# which python
/usr/bin/python

进入到 bin 目录:
# cd /usr/bin/
# ls -al python*
lrwxrwxrwx. 1 root root   34 8月  25 08:18 python -> python2
lrwxrwxrwx. 1 root root    9 8月  19 21:32 python2 -> python2.7
-rwxr-xr-x. 1 root root 7136 11月  6 2016 python2.7

可以看到可执行文件 python 指向 python2 ,python2 又指向 python2.7 也就是说 Python 命令执行的系统预装的 Python2.7.要安装 Python 的其他版本先执行mv python python.bak 命令备份 python 文件。
# mv python python.bak
# ls -al /usr/bin/python*
lrwxrwxrwx 1 root root    7 10月 15 14:35 /usr/bin/python.bak -> python2
lrwxrwxrwx 1 root root    9 10月 15 14:35 /usr/bin/python2 -> python2.7
-rwxr-xr-x 1 root root 7216 7月  13 21:07 /usr/bin/python2.7

2.修改 yum 配置文件
因为yum使用CentOS7.3默认安装的Python 2.7.5,因此替换为Python 3.6.2后无法正常工作.
# yum repolist
File "/usr/bin/yum", line 30
    except KeyboardInterrupt, e:
                            ^
SyntaxError: invalid syntax

因此修改yum配置文件,继续使用Python2.7.5.
更改yum脚本的python依赖
# cd /usr/bin
# ls -al yum*
-rwxr-xr-x. 1 root root   801 11月 15 2016 yum
-rwxr-xr-x. 1 root root  9429 11月  6 2016 yum-builddep
-rwxr-xr-x. 1 root root  8582 11月  6 2016 yum-config-manager
-rwxr-xr-x. 1 root root  7609 11月  6 2016 yum-debug-dump
-rwxr-xr-x. 1 root root  7903 11月  6 2016 yum-debug-restore
-rwxr-xr-x. 1 root root 10999 11月  6 2016 yumdownloader
-rwxr-xr-x. 1 root root 11031 11月  6 2016 yum-groups-manager
使用vim更改以上文件头,把 #!/usr/bin/python 改为 #!/usr/bin/python2

修改gnome-tweak-tool配置文件
# vim /usr/bin/gnome-tweak-tool
把文件头 #!/usr/bin/python 改为 #!/usr/bin/python2

修改urlgrabber配置文件
# vim /usr/libexec/urlgrabber-ext-down
把文件头 #!/usr/bin/python 改为 #!/usr/bin/python2

3.编译环境准备
安装开发套件用于编译 Python3.6.4 源码
# yum groupinstall 'Development Tools'

安装 python3.6.4 可能会使用到的依赖
# yum install -y ncurses-libs zlib-devel mysql-devel bzip2-devel openssl-devel ncurses-devel sqlite-devel readline-devel tk-devel gdbm-devel db4-devel libpcap-devel xz-devel

yum -y groupinstall “Development tools”
yum -y install zlib-devel bzip2-devel openssl-devel ncurses-devel sqlite-devel readline-devel tk-devel gdbm-devel db4-devel libpcap-devel xz-devel

4.安装 Python3.6.4
执行wget 命令直接下载到当前文件夹:
# wget https://www.python.org/ftp/python/3.6.4/Python-3.6.4.tgz

解压:
# mkdir /usr/local/python3/
# tar -zxvf Python-3.6.4.tgz  -C  /usr/src/

进入到Python-3.6.4文件夹下,编译源码
[root@CentOS1511 ~]# cd /usr/src/Python-3.6.4/
[root@CentOS1511 Python-3.6.4]# ./configure --prefix=/usr/local/python3/ --enable-optimizations
--prefix选项是配置安装的路径,如果不配置该选项,安装后可执行文件默认放在/usr/local/bin,库文件默认放在/usr/local/lib,配置文件默认放在/usr/local/etc,其它的资源文件放在/usr/local/share,比较凌乱.

如果配置--prefix,如:./configure --prefix=/usr/local/python3可以把所有资源文件放在/usr/local/python3的路径中,不会杂乱.用了--prefix选项的另一个好处是卸载软件或移植软件。

当某个安装的软件不再需要时,只须简单的删除该安装目录,就可以把软件卸载得干干净净;移植软件只需拷贝整个目录到另外一个相同的操作系统机器即可.当然要卸载程序,也可以在原来的make目录下用一次make uninstall,但前提是make文件指定过uninstall.

--enable-optimizations 是优化选项(LTO,PGO 等)加上这个 flag 编译后,
性能有 10% 左右的优化,但是这会明显的增加编译时间,老久了.

./configure命令执行完毕之后创建一个文件 Makefile, 供下面的make命令使用,执行make install之后就会把程序安装到我们指定的文件夹中去.

[root@CentOS1511 Python-3.6.4]# make
[root@CentOS1511 Python-3.6.4]# make install
安装完成之后进入到/usr/local/python3目录,可以看到Python的可执行文件目录bin等相关目录.
# cd /usr/local/python3
# ll
总用量 4
drwxr-xr-x. 2 root root 4096 8月  25 08:07 bin
drwxr-xr-x. 3 root root   24 8月  25 08:07 include
drwxr-xr-x. 4 root root   63 8月  25 08:07 lib
drwxr-xr-x. 3 root root   17 8月  25 08:07 share

5.修改软链接配置 Python3.6 、pip3.6 为系统默认
# ln -s /usr/local/python3/bin/python3.6 /usr/bin/python
# ln -s /usr/local/python3/bin/pip3.6 /usr/bin/pip
ln: 无法创建符号链接"/usr/bin/pip": 文件已存在
[root@CentOS1511 bin]# cd /usr/bin/
[root@CentOS1511 bin]# ls -al pip*
[root@CentOS1511 bin]# mv pip pip.bak
查看系统默认 Python、pip版本:
> 运行环境(python3 + pip3):
[root@CentOS1511 ~]# python2 -V
Python 2.7.5
[root@CentOS1511 ~]# python -V
Python 3.6.4
[root@CentOS1511 ~]# pip -V
pip 18.1 from /usr/local/python3/lib/python3.6/site-packages/pip (python 3.6)
[root@CentOS1511 ~]# ls^Cusr/local/python3/

[root@CentOS1511 ~]# ls -al /usr/bin/python*
lrwxrwxrwx 1 root root   32 10月 21 15:42 /usr/bin/python -> /usr/local/python3/bin/python3.6
lrwxrwxrwx 1 root root    9 10月 15 14:35 /usr/bin/python2 -> python2.7
-rwxr-xr-x 1 root root 7216 7月  13 21:07 /usr/bin/python2.7
lrwxrwxrwx 1 root root    7 10月 15 14:35 /usr/bin/python.bak -> python2

[root@CentOS1511 ~]# ls -al /usr/bin/pip*
lrwxrwxrwx 1 root root  29 10月 21 15:42 /usr/bin/pip -> /usr/local/python3/bin/pip3.6
-rwxr-xr-x 1 root root 215 10月 15 19:36 /usr/bin/pip2
-rwxr-xr-x 1 root root 215 10月 15 19:36 /usr/bin/pip2.7
-rwxr-xr-x 1 root root 215 10月 15 19:36 /usr/bin/pip.bak
[root@CentOS1511 ~]#

> 可忽略
[root@CentOS1511 Tensorflow]# vim ~/.bash_profile
[root@CentOS1511 ~]# cat  ~/.bash_profile
# .bash_profile

# Get the aliases and functions
if [ -f ~/.bashrc ]; then
        . ~/.bashrc
fi

# User specific environment and startup programs

PATH=$PATH:$HOME/bin:/usr/local/python3/bin

export PATH
[root@CentOS1511 Tensorflow]# source ~/.bash_profile
前提条件
如果您是使用 virtualenv 或 Anaconda 安装的 TensorFlow,请激活 TensorFlow 环境。
安装Tensorflow
[root@CentOS1511 ~]# mkdir /Tensorflow
[root@CentOS1511 ~]# cd /Tensorflow/
> 安装Tensorflow:
[root@CentOS1511 Tensorflow]# pip install tensorflow
> 安装或升级 Pandas:
[root@CentOS1511 ~]# pip install pandas
获取示例代码
按照下列步骤获取我们将要使用的示例代码:
通过输入以下命令从 GitHub 克隆 TensorFlow 模型代码库:
[root@CentOS1511 Tensorflow]# git clone https://github.com/tensorflow/models
将此分支内的目录更改为包含本文档中所用示例的位置:
[root@CentOS1511 Tensorflow]# cd /Tensorflow/models/samples/core/get_started/
运行程序
[root@CentOS1511 get_started]# python premade_estimator.py
该程序应该会输出训练日志,然后对测试集进行一些预测。例如,以下输出的第一行显示该模型认为测试集中的第一个样本是山鸢尾的可能性为 99.6%。由于测试集中的第一个样本确实是山鸢尾,因此该模型预测得还比较准确。
···
Prediction is "Setosa" (99.9%), expected "Setosa"

Prediction is "Versicolor" (98.6%), expected "Versicolor"

Prediction is "Virginica" (98.9%), expected "Virginica"
如果程序生成错误(而不是答案),请思考下列问题:
- 是否正确安装了 TensorFlow?
- 使用的 TensorFlow 版本是否正确?
- 是否激活了 TensorFlow 所在的安装环境?(此问题仅与某些安装机制有关。)
2. 编程堆栈
在详细了解程序本身之前,先来了解编程环境。如下图所示,TensorFlow 提供一个包含多个 API 层的编程堆栈:
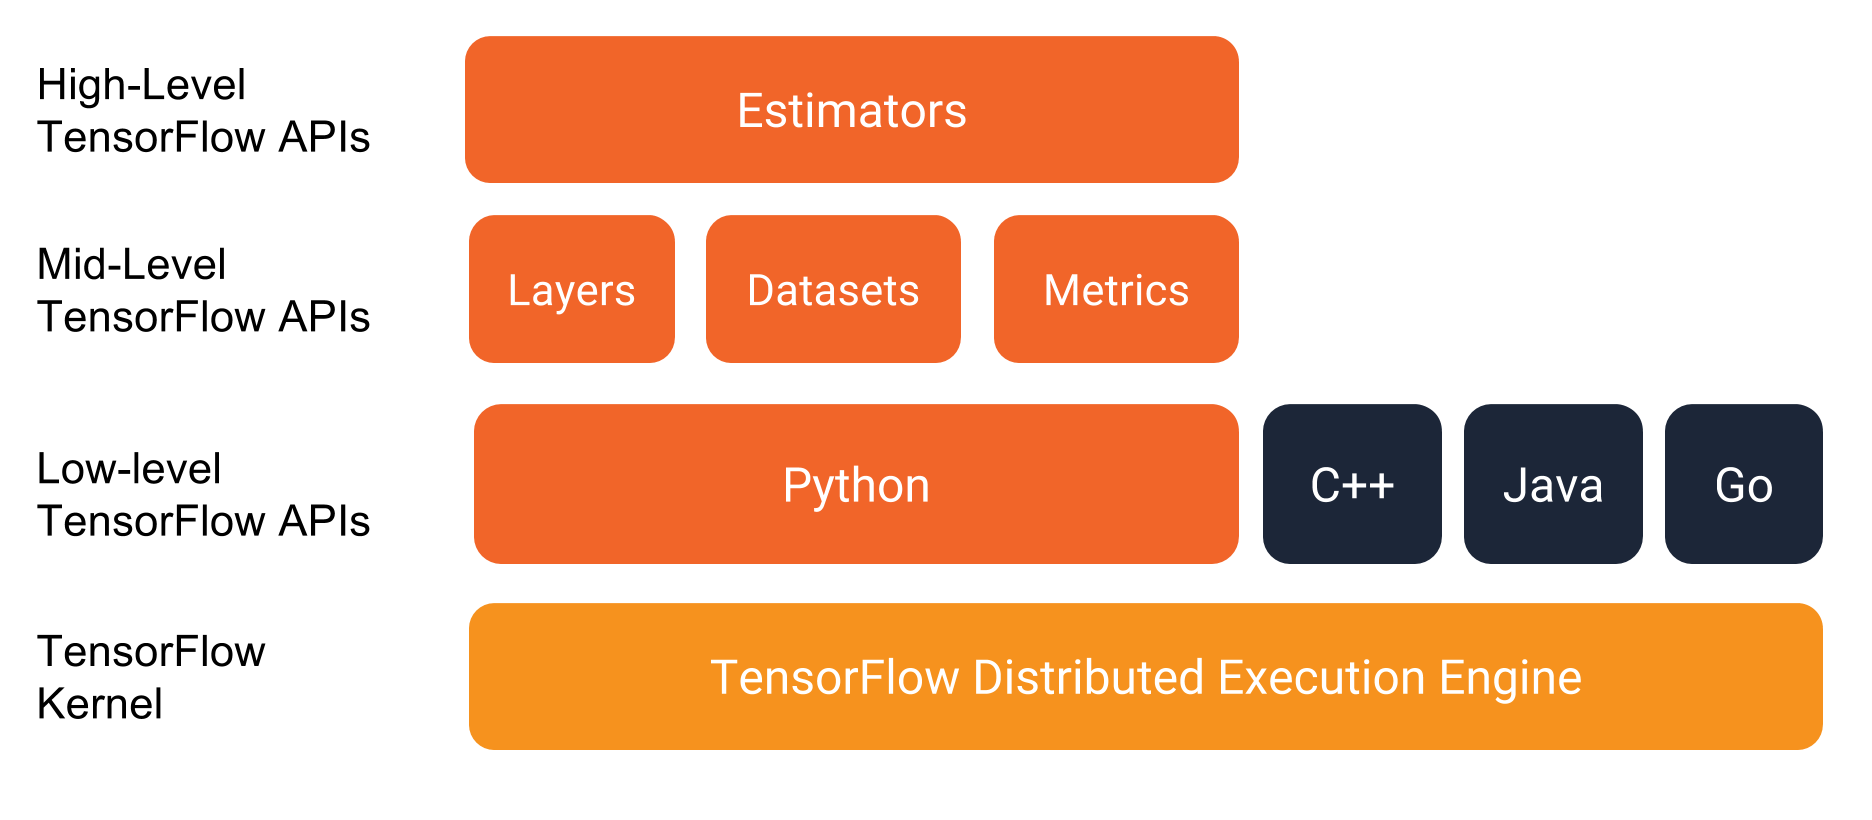
强烈建议使用下列 API 编写 TensorFlow 程序:
Estimator:代表一个完整的模型。Estimator API 提供一些方法来训练模型、判断模型的准确率并生成预测。
Estimator的数据集:构建数据输入管道。Dataset API 提供一些方法来加载和操作数据,并将数据馈送到模型中。Dataset API 与 Estimator API 合作无间。
3. 对鸢尾花进行分类:概览
示例程序构建并测试了一个模型,此模型根据鸢尾花的花萼和花瓣大小将其分为三种不同的品种。
三个鸢尾花品种的花瓣几何对比:山鸢尾、维吉尼亚鸢尾和变色鸢尾

从左到右:山鸢尾(提供者:Radomil,依据 CC BY-SA 3.0 使用)、变色鸢尾(提供者:Dlanglois,依据 CC BY-SA 3.0 使用)和维吉尼亚鸢尾(提供者:Frank Mayfield,依据 CC BY-SA 2.0 使用)。
数据集
鸢尾花数据集包含四个特征和一个标签。这四个特征确定了单株鸢尾花的下列植物学特征:
- 花萼长度
- 花萼宽度
- 花瓣长度
- 花瓣宽度
模型会将这些特征表示为 float32 数值数据。
该标签确定了鸢尾花品种,品种必须是下列任意一种:
- 山鸢尾 (0)
- 变色鸢尾 (1)
- 维吉尼亚鸢尾 (2)
模型会将该标签表示为 int32 分类数据。
下表显示了数据集中的三个样本:
| 花萼长度 | 花萼宽度 | 花瓣长度 | 花瓣宽度 | 品种(标签) |
|---|---|---|---|---|
| 5.1 | 3.3 | 1.7 | 0.5 | 0(山鸢尾) |
| 5.0 | 2.3 | 3.3 | 1.0 | 1(变色鸢尾) |
| 6.4 | 2.8 | 5.6 | 2.2 | 2(维吉尼亚鸢尾) |
算法
该程序会训练一个具有以下拓扑结构的深度神经网络分类器模型:
- 2 个隐藏层。
- 每个隐藏层包含 10 个节点。
下图展示了特征、隐藏层和预测(并未显示隐藏层中的所有节点):
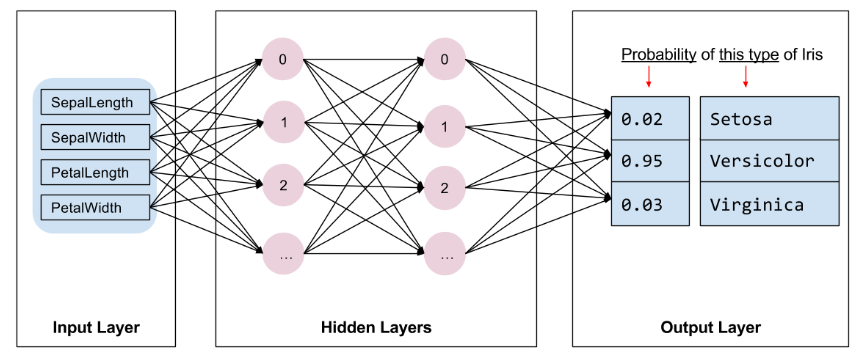
网络架构图:输入、2 个隐藏层和输出
推理
在无标签样本上运行经过训练的模型会产生三个预测,即相应鸢尾花属于指定品种的可能性。这些输出预测的总和是 1.0。例如,对无标签样本的预测可能如下所示:
- 0.03(山鸢尾)
- 0.95(变色鸢尾)
- 0.02(维吉尼亚鸢尾)
上面的预测表示指定无标签样本是变色鸢尾的概率为 95%。
4. 采用 Estimator 进行编程的概览
Estimator 是 TensorFlow 对完整模型的高级表示。它会处理初始化、日志记录、保存和恢复等细节部分,并具有很多其他功能,以便可以专注于模型。有关更多详情,请参阅 Estimator。
Estimator 是从 tf.estimator.Estimator 衍生而来的任何类。TensorFlow 提供一组预创建的 Estimator(例如 LinearRegressor)来实现常见的机器学习算法。除此之外,可以编写自定义 Estimator。我们建议在刚开始使用 TensorFlow 时使用预创建的 Estimator。
要根据预创建的 Estimator 编写 TensorFlow 程序,必须执行下列任务:
- 创建一个或多个输入函数。
- 定义模型的特征列。
- 实例化 Estimator,指定特征列和各种超参数。
- 在 Estimator 对象上调用一个或多个方法,传递适当的输入函数作为数据的来源。
- 来看看如何针对鸢尾花分类实施这些任务。
5. 创建输入函数
必须创建输入函数来提供用于训练、评估和预测的数据。
输入函数是返回 tf.data.Dataset 对象的函数,此对象会输出下列含有两个元素的元组:
features - Python 字典,其中:
每个键都是特征的名称。
每个值都是包含此特征所有值的数组。
label - 包含每个样本的标签值的数组。
为了向展示输入函数的格式,请查看下面这个简单的实现:
def input_evaluation_set():
    features = {'SepalLength': np.array([6.4, 5.0]),
                'SepalWidth':  np.array([2.8, 2.3]),
                'PetalLength': np.array([5.6, 3.3]),
                'PetalWidth':  np.array([2.2, 1.0])}
    labels = np.array([2, 1])
    return features, labels
输入函数可以以您需要的任何方式生成 features 字典和 label 列表。不过,我们建议使用 TensorFlow 的 Dataset API,它可以解析各种数据。概括来讲,Dataset API 包含下列类:
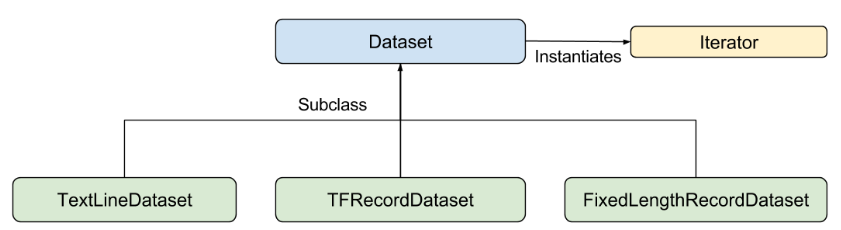
各个类如下所示:
- Dataset - 包含创建和转换数据集的方法的基类。您还可以通过该类从内存中的数据或 Python 生成器初始化数据集。
- TextLineDataset - 从文本文件中读取行。
- TFRecordDataset - 从 TFRecord 文件中读取记录。
- FixedLengthRecordDataset - 从二进制文件中读取具有固定大小的记录。
- Iterator - 提供一次访问一个数据集元素的方法。
Dataset API 可以处理很多常见情况。例如,使用 Dataset API,可以轻松地从大量并行文件中读取记录,并将它们合并为单个数据流。
为了简化此示例,使用 Pandas 加载数据,并利用此内存中的数据构建输入管道。
以下是用于在此程序中进行训练的输入函数(位于 iris_data.py 中):
def train_input_fn(features, labels, batch_size):
    """An input function for training"""
    # Convert the inputs to a Dataset.
    dataset = tf.data.Dataset.from_tensor_slices((dict(features), labels))

    # Shuffle, repeat, and batch the examples.
    return dataset.shuffle(1000).repeat().batch(batch_size)
6. 定义特征列
特征列是一个对象,用于说明模型应该如何使用特征字典中的原始输入数据。在构建 Estimator 模型时,您会向其传递一个特征列的列表,其中包含您希望模型使用的每个特征。tf.feature_column 模块提供很多用于在模型中表示数据的选项。
对于鸢尾花问题,4 个原始特征是数值,因此我们会构建一个特征列的列表,以告知 Estimator 模型将这 4 个特征都表示为 32 位浮点值。因此,创建特征列的代码如下所示:
# Feature columns describe how to use the input.
my_feature_columns = []
for key in train_x.keys():
    my_feature_columns.append(tf.feature_column.numeric_column(key=key))
特征列可能比上述示例复杂得多。我们将在入门指南的后面部分详细介绍特征列。
我们已经介绍了希望模型如何表示原始特征,现在可以构建 Estimator 了。
7. 实例化 Estimator
鸢尾花问题是一个经典的分类问题。幸运的是,TensorFlow 提供了几个预创建的分类器 Estimator,其中包括:
- tf.estimator.DNNClassifier:适用于执行多类别分类的深度模型。
- tf.estimator.DNNLinearCombinedClassifier:适用于宽度和深度模型。
- tf.estimator.LinearClassifier:适用于基于线性模型的分类器。
对于鸢尾花问题,tf.estimator.DNNClassifier 似乎是最好的选择。我们将如下所示地实例化此Estimator:
# Build a DNN with 2 hidden layers and 10 nodes in each hidden layer.
classifier = tf.estimator.DNNClassifier(
    feature_columns=my_feature_columns,
    # Two hidden layers of 10 nodes each.
    hidden_units=[10, 10],
    # The model must choose between 3 classes.
    n_classes=3)
8. 训练、评估和预测
我们已经有一个 Estimator 对象,现在可以调用方法来执行下列操作
- 训练模型。
- 评估经过训练的模型。
- 使用经过训练的模型进行预测。
训练模型
通过调用 Estimator 的 train 方法训练模型,如下所示:
# Train the Model.
classifier.train(
    input_fn=lambda:iris_data.train_input_fn(train_x, train_y, args.batch_size),
    steps=args.train_steps)
我们将 input_fn 调用封装在 lambda 中以获取参数,同时提供一个不采用任何参数的输入函数,正如 Estimator 预计的那样。steps 参数告知方法在训练多步后停止训练。
评估经过训练的模型
模型已经过训练,现在我们可以获取一些关于其效果的统计信息。以下代码块会评估经过训练的模型对测试数据进行预测的准确率:
# Evaluate the model.
eval_result = classifier.evaluate(
    input_fn=lambda:iris_data.eval_input_fn(test_x, test_y, args.batch_size))

print('\nTest set accuracy: {accuracy:0.3f}\n'.format(**eval_result))
与我们对 train 方法的调用不同,我们没有传递 steps 参数来进行评估。我们的 eval_input_fn 只生成一个周期的数据。
运行此代码会生成以下输出(或类似输出):
Test set accuracy: 0.967
利用经过训练的模型进行预测(推理)
我们已经有一个经过训练的模型,可以生成准确的评估结果。我们现在可以使用经过训练的模型,根据一些无标签测量结果预测鸢尾花的品种。与训练和评估一样,我们使用单个函数调用进行预测:
# Generate predictions from the model
expected = ['Setosa', 'Versicolor', 'Virginica']
predict_x = {
    'SepalLength': [5.1, 5.9, 6.9],
    'SepalWidth': [3.3, 3.0, 3.1],
    'PetalLength': [1.7, 4.2, 5.4],
    'PetalWidth': [0.5, 1.5, 2.1],
}

predictions = classifier.predict(
    input_fn=lambda:iris_data.eval_input_fn(predict_x, batch_size=args.batch_size))
predict 方法返回一个 Python 可迭代对象,为每个样本生成一个预测结果字典。以下代码输出了一些预测及其概率:
template = ('\nPrediction is "{}" ({:.1f}%), expected "{}"')

for pred_dict, expec in zip(predictions, expected):
    class_id = pred_dict['class_ids'][0]
    probability = pred_dict['probabilities'][class_id]

    print(template.format(iris_data.SPECIES[class_id], 100 * probability, expec))
运行上面的代码会生成以下输出:
...
Prediction is "Setosa" (99.6%), expected "Setosa"

Prediction is "Versicolor" (99.8%), expected "Versicolor"

Prediction is "Virginica" (97.9%), expected "Virginica"
9. 总结
使用预创建的 Estimator 可以快速高效地创建标准模型。
您已经开始编写 TensorFlow 程序,现在请查看以下资料:
- 检查点:了解如何保存和恢复模型。
- Estimator 的数据集:详细了解如何将数据导入模型中。
- 创建自定义 Estimator:了解如何编写针对特定问题进行自定义的 Estimator。

 浙公网安备 33010602011771号