
Openresty介绍以及应用
简介
openresty是一个全功能的 Web 应用服务器。它打包了标准的 Nginx 核心,很多的常用的第三方模块。通过揉和众多设计良好的 Nginx 模块,OpenResty 有效地把 Nginx 服务器转变为一个强大的 Web 应用服务器,基于它开发人员可以使用 Lua 编程语言对 Nginx 核心以及现有的各种 Nginx C 模块进行脚本编程,构建出可以处理一万以上并发请求的极端高性能的 Web 应用。
Openresty的核心Nginx
nginx是一个高性能的 HTTP 和反向代理服务器,其将源代码以类 BSD 许可证的形式发布,因它的稳定性、丰富的功能集、示例配置文件和低系统资源的消耗而闻名。由于 Nginx 使用基于事件驱动的架构,能够并发处理百万级别的 TCP 连接,高度模块化的设计和自由的许可证使得扩展 Nginx 功能的第三方模块层出不穷。因此其作为 Web 服务器被广泛应用到大流量的网站上
nginx特点
- 处理响应请求很快
- 高并发连接,有号称能跑到10w并发的
- 低内存消耗
- 很高的可靠性
- 高扩展性,庞大的第三方模块
- 热部署,master 管理进程与 worker 工作进程的分离,可以在不停止服务的情况下修改配置文件,更换日志文件
- BSD 许可协议,免费使用,随意修改,允许商用
Nginx 配置
配置目录 conf 下有以下配置文件
.
├── fastcgi.conf
├── fastcgi_params
├── koi-utf
├── koi-win
├── mime.types
├── nginx.conf
├── scgi_params
├── uwsgi_params
└── win-utf
除了 <font style="color:#333333;">nginx.conf</font>,其余配置文件,一般只需要使用默认提供即可。
<font style="color:#333333;">nginx.conf</font> 是主配置文件,默认配置去掉注释之后的内容如下
worker_process      # 表示工作进程的数量,一般设置为cpu的核数
worker_connections  # 表示每个工作进程的最大连接数
server{}            # 块定义了虚拟主机
    listen          # 监听端口
    server_name     # 监听域名
    location {}     # 是用来为匹配的 URI 进行配置,URI 即语法中的“/uri/”
    location /{}    # 匹配任何查询,因为所有请求都以 / 开头
        root        # 指定对应uri的资源查找路径,这里html为相对路径,完整路径为nginx/html
        index       # 指定首页index文件的名称,可以配置多个,以空格分开。如有多个,按配置顺序查找。
location 匹配规则
location [=|~|~*|^~] /uri/ { … }
| 模式 | 含义 |
|---|---|
| location = /uri | = 表示精确匹配,只有完全匹配上才能生效 |
| location ^~ /uri | ^~ 开头对URL路径进行前缀匹配,并且在正则之前。 |
| location ~ pattern | 开头表示区分大小写的正则匹配 |
| location ~* pattern | 开头表示不区分大小写的正则匹配 |
| location /uri | 不带任何修饰符,也表示前缀匹配,但是在正则匹配之后 |
| location / | 通用匹配,任何未匹配到其它location的请求都会匹配到,相当于switch中的default |
前缀匹配时,Nginx 不对 url 做编码,因此请求为 /static/20%/aa,可以被规则 ^~ /static/ /aa 匹配到(注意是空格)
多个 location 配置的情况下匹配顺序为
- 首先精确匹配
= - 其次前缀匹配
^~ - 其次是按文件中顺序的正则匹配
<font style="color:#333333;">然后匹配不带任何修饰的前缀匹配</font>- 最后是交给
/通用匹配 - 当有匹配成功时候,停止匹配,按当前匹配规则处理请求
注意:前缀匹配,如果有包含关系时,按最大匹配原则进行匹配。比如在前缀匹配:_location /dir01__ 与__location /dir01/dir02__,如有请求 [_http://localhost/dir01/dir02/file_](http://localhost/dir01/dir02/file) 将最终匹配到 __location /dir01/dir02_
location = / {
   echo "规则A";
}
location = /login {
   echo "规则B";
}
location ^~ /static/ {
   echo "规则C";
}
location ^~ /static/files {
    echo "规则X";
}
location ~ \.(gif|jpg|png|js|css)$ {
   echo "规则D";
}
location ~* \.png$ {
   echo "规则E";
}
location /img {
    echo "规则Y";
}
location / {
   echo "规则F";
}
那么产生的效果如下:
- 访问根目录
/,比如http://localhost/将匹配规则A - 访问
http://localhost/login将匹配规则B,http://localhost/register则匹配规则F - 访问
http://localhost/static/a.html将匹配规则C - 访问
http://localhost/static/files/a.exe将匹配规则X,虽然规则C也能匹配到,但因为最大匹配原则,最终选中了规则X。你可以测试下,去掉规则 X ,则当前 URL 会匹配上规则C。 - 访问
http://localhost/a.gif,http://localhost/b.jpg将匹配规则D和规则 E,但是规则 D顺序优先,规则 E不起作用,而http://localhost/static/c.png则优先匹配到规则 C - 访问
http://localhost/a.PNG则匹配规则 E,而不会匹配规则 D,因为规则 E不区分大小写。 - 访问
http://localhost/img/a.gif会匹配上规则D,虽然规则Y也可以匹配上,但是因为正则匹配优先,而忽略了规则Y。 - 访问
http://localhost/img/a.tiff会匹配上规则Y。
访问 http://localhost/category/id/1111 则最终匹配到规则 F ,因为以上规则都不匹配,这个时候应该是 Nginx 转发请求给后端应用服务器,Nginx 作为反向代理服务器存在。
rewrite 语法
rewrite regex replacement [flag];
- regex 规则:可以是字符串或者正则来表示想匹配的目标url
- replacement 定向路径:表示匹配到规则后要定向的路径,如果规则里有正则,则可以使用$index来表示正则里的捕获分组
- flag 重写类型
- last – 停止当前这个请求,并根据rewrite匹配的规则重新发起一个请求
- break – 中止 rewrite,不再继续匹配
- redirect – 返回临时重定向的 HTTP 状态 302
- permanent – 返回永久重定向的 HTTP 状态 301
# 访问 /last.html 的时候,页面内容重写到 /index.html 中
rewrite /last.html /index.html last;
# 访问 /break.html 的时候,页面内容重写到 /index.html 中,并停止后续的匹配
rewrite /break.html /index.html break;
# 访问 /redirect.html 的时候,页面直接302定向到 /index.html中
rewrite /redirect.html /index.html redirect;
# 访问 /permanent.html 的时候,页面直接301定向到 /index.html中
rewrite /permanent.html /index.html permanent;
# 把 /html/*.html => /post/*.html ,301定向
rewrite ^/html/(.+?).html$ /post/$1.html permanent;
# 把 /search/key => /search.html?keyword=key
rewrite ^/search\/([^\/]+?)(\/|$) /search.html?keyword=$1 permanent;
last和break的区别
因为301和302不能简单的只返回状态码,还必须有重定向的URL,这就是return指令无法返回301,302的原因了。这里 last 和 break 区别有点难以理解:
last一般写在server和if中,而break一般使用在location中
last不终止重写后的url匹配,即新的url会再从server走一遍匹配流程,而break终止重写后的匹配
break和last都能组织继续执行后面的rewrite指令
if判断
- 当表达式只是一个变量时,如果值为空或任何以0开头的字符串都会当做false
- 直接比较变量和内容时,使用=或!=
- 正则表达式匹配,*不区分大小写的匹配,!~区分大小写的不匹配
-f 和 !-f 用来判断是否存在文件
-d 和 !-d 用来判断是否存在目录
-e 和 !-e 用来判断是否存在文件或目录
-x 和 !-x 用来判断文件是否可执行
$args :这个变量等于请求行中的参数,同$query_string
$content_length : 请求头中的Content-length字段。
$content_type : 请求头中的Content-Type字段。
$document_root : 当前请求在root指令中指定的值。
$host : 请求主机头字段,否则为服务器名称。
$http_user_agent : 客户端agent信息
$http_cookie : 客户端cookie信息
$limit_rate : 这个变量可以限制连接速率。
$request_method : 客户端请求的动作,通常为GET或POST。
$remote_addr : 客户端的IP地址。
$remote_port : 客户端的端口。
$remote_user : 已经经过Auth Basic Module验证的用户名。
$request_filename : 当前请求的文件路径,由root或alias指令与URI请求生成。
$scheme : HTTP方法(如http,https)。
$server_protocol : 请求使用的协议,通常是HTTP/1.0或HTTP/1.1。
$server_addr : 服务器地址,在完成一次系统调用后可以确定这个值。
$server_name : 服务器名称。
$server_port : 请求到达服务器的端口号。
$request_uri : 包含请求参数的原始URI,不包含主机名,如:”/foo/bar.php?arg=baz”。
$uri : 不带请求参数的当前URI,$uri不包含主机名,如”/foo/bar.html”。
$document_uri : 与$uri相同。
# 如果文件不存在则返回400
if (!-f $request_filename) {
     return 400;
}
# 如果host不是thpower.com,则301到thpower.com中
if ( $host != 'thpower.com' ){
     rewrite ^/(.*)$ https://thpower.com/$1 permanent;
}
# 如果请求类型不是POST则返回405
if ($request_method = POST) {
    return 405;
}
# 如果参数中有 a=1 则301到指定域名
if ($args ~ a=1) {
    rewrite ^ http://thpower.com/ permanent;
}
防盗链
valid_referers none | blocked | server_names | string ...;
该指令会根据Referer Header头的内容分配一个值为0或1给变量$invalid_referer。如果Referer Header头不符合valid_referers指令设置的有效Referer,变量$invalid_referer
- none:表示无Referer值的情况。
- blocked:表示Referer值被防火墙进行伪装。
- server_names:表示一个或多个主机名称。server_names中可以使用通配符"*"号。
location ~* \.(gif|jpg|swf)$ {
    valid_referers none blocked xxxx.oooo.com xxxxx.oooo.com;
    if ($invalid_referer) {
       rewrite ^/ http://$host/403.html;
    }
}
静态文件服务
server {
        listen       80;
        server_name www.thpower.com;
        charset utf-8;
        root   /lvm/static/;
        index  index.html index.htm;
}
文件缓存
# 这个将为打开文件指定缓存,默认是没有启用的,max 指定缓存数量,建议和打开文件数一致,inactive 是指经过多长时间文件没被请求后删除缓存。
open_file_cache max=204800 inactive=20s;
# open_file_cache 指令中的inactive 参数时间内文件的最少使用次数,如果超过这个数字,文件描述符一直是在缓存中打开的,如上例,如果有一个文件在inactive 时间内一次没被使用,它将被移除。
open_file_cache_min_uses 1;
# 这个是指多长时间检查一次缓存的有效信息
open_file_cache_valid 30s;
浏览器缓存
<font style="color:#8e908c;"># 这个是告诉浏览器缓存5天</font>expires 5d; 工作流程如下  |
|---|
gzip压缩
#默认情况下,Nginx的gzip压缩是关闭的,gzip压缩功能就是可以让你节省不少带宽,但是会增加服务器CPU的开销,Nginx默认只对text/html进行压缩 如果要对html之外的内容进行压缩传输,我们需要手动来设置
gzip on;
gzip_min_length 1k;
gzip_buffers 4 16k;
gzip_http_version 1.0;
gzip_comp_level 2;
gzip_types text/plain application/x-javascript text/css application/xml;
反向代理
反向代理(Reverse Proxy)方式是指nginx受的连接请求,后将请求转发给内部网络上的服务器,并将从服务器上得到的结果返回给上游的客户端,此时nginx对外就表现为一个反向代理服务器。
location / {
  # 将请求反向代理到指定的url上
  proxy_pass  https://github.com;
  # 当上游服务器返回的响应是重定向或刷新请求(301|302)
  # proxy_redirect可以重设HTTP头部的location或refresh字段
  proxy_redirect   off;
  # 默认情况下,反向代理不会转发原始请求中的 Host 头部,如果需要转发,就需要加上
  proxy_set_header Host $host;
  proxy_set_header X-Real-IP $remote_addr;
  proxy_set_header X-Forwarded-For $proxy_add_x_forwarded_for;
}
location /thpower {
  proxy_set_header X-Real-IP  $remote_addr;
  proxy_set_header X-Forwarded-For $proxy_add_x_forwarded_for;
  proxy_pass https://github.com/thpower;
}
upstream 负载均衡
当需要反向代理的服务器不止一个时,我们需要动态的根据环境分配负载以达到最佳化资源使用,最大化吞吐率,最小化响应时间,同时避免过载的目的;upstream 是 Nginx 的 HTTP Upstream 模块,这个模块通过一个简单的调度算法来实现客户端 IP 到后端服务器的负载均衡。
#这个名字随便起
upstream test{
    ip_hash;
    server 192.168.0.1:80;
    server 192.168.0.2:80  down;
    server 192.168.0.3:8009  max_fails=3  fail_timeout=20s;
    server 192.168.0.4:8080 backup;
}
server {
    location / {
        proxy_pass  http://test; #与这里对应即可
    }
}
upstream 支持的6种算法
- 轮询(默认):每个请求按时间顺序逐一分配到不同的后端服务器,如果后端某台服务器宕机,故障系统被自动剔除,使用户访问不受影响。Weight 指定轮询权值,Weight 值越大,分配到的访问机率越高,主要用于后端每个服务器性能不均的情况下。
- ip_hash:每个请求按访问 IP 的 hash 结果分配,这样来自同一个 IP 的访客固定访问一个后端服务器,后端使用session的且没有用共享session方案的 可以这个解决问题。
- fair:这是比上面两个更加智能的负载均衡算法。此种算法可以依据加载时间长短智能地进行负载均衡,也就是根据后端服务器的响应时间来分配请求,响应时间短的优先分配。Nginx 本身是不支持 fair 的,如果需要使用这种调度算法,必须下载 Nginx 的 upstream_fair 模块。
- url_hash:此方法按访问 url 的 hash 结果来分配请求,使每个 url 定向到同一个后端服务器,可以进一步提高后端缓存服务器的效率。Nginx 本身是不支持 url_hash 的,如果需要使用这种调度算法,必须安装 Nginx 的 hash 软件包。
- least_conn:最少连接负载均衡算法,简单来说就是每次选择的后端都是当前最少连接的一个 server(这个最少连接不是共享的,是每个 worker 都有自己的一个数组进行记录后端 server 的连接数)。
- hash:这个 hash 模块又支持两种模式 hash, 一种是普通的 hash, 另一种是一致性 hash(consistent)。
- 普通的hash算法支持配置http变量值作为hash值计算的key,通过hash计算得出的hash值和总权重的余数作为挑选server的依据
- 一致性hash是普通hash的增强版,具体算法见 官网
upstream 支持4种状态参数
- down:表示当前的 server 暂时不参与负载均衡
- backup:预留的备份机器。当其他所有的非 backup 机器出现故障或者忙的时候,才会请求 backup 机器,因此这台机器的压力最轻
- max_fails:允许请求失败的次数,默认为 1 。当超过最大次数时,返回 proxy_next_upstream 模块定义的错误
- fail_timeout:在经历了 max_fails 次失败后,暂停服务的时间。max_fails 可以和 fail_timeout 一起使用
问题以及注意事项
万恶的if
详见官方文档 邪恶的 if 指令
在 HTTPS 中使用 SSLv3
由于 SSLv3 的 POODLE 漏洞, 不要在开启 SSL 的网站使用 SSLv3。 你可以简单粗暴的直接禁用 SSLv3,用 TLS 来替代:
ssl_protocols TLSv1 TLSv1.1 TLSv1.2;
openresty的lua模块
location / {
  default_type text/html;
  content_by_lua_block {
    ngx.say("HelloWorld")
  }
}
lua入门简介
Lua 是一门轻量级脚本语言遵从着简单、小巧、可移植、快速的原则。Lua 在游戏开发、机器人控制、分布式应用、图像处理、生物信息学等各种各样的领域中得到了广泛的应用。其中尤以游戏开发为最,比如World of Warcraft、大话西游,都采用了 Lua 来配合引擎完成数据描述、配置管理和逻辑控制等任务。即使像 Redis 这样中性的内存键值数据库也提供了内嵌用户 Lua 脚本的官方支持
Lua 有着如下的特性:
- 变量名没有类型,值才有类型,变量名在运行时可与任何类型的值绑定
- 语言只提供唯一一种数据结构,称为表(table),它混合了数组、哈希,可以用任何类型的值作为 key 和 value
- 函数是一等类型,支持匿名函数和正则尾递归
- 支持词法定界(lexical scoping)和闭包(closure)
- 提供 thread 类型和结构化的协程(coroutine)机制,在此基础上可方便实现协作式多任务
- 运行期能编译字符串形式的程序文本并载入虚拟机执行
- 通过元表(metatable)和元方法(metamethod)提供动态元机制(dynamic meta-mechanism),从而允许程序运行时根据需要改变或扩充语法设施的内定语义
- 能方便地利用表和动态元机制实现基于原型(prototype-based)的面向对象模型;
Lua 基础数据类型
nil(空)
nil 是一种类型,Lua 将 nil 用于表示“无效值”。一个变量在第一次赋值前的默认值是 nil,将 nil 赋予给一个全局变量就等同于删除它
local num
print(num)        -->output:nil
num = 100
print(num)        -->output:100
值得一提的是,OpenResty 的 Lua 接口还提供了一种特殊的空值,即 ngx.null,用来表示不同于 nil 的“空值”。
boolean
布尔类型,可选值 true/false;Lua 中 nil 和 false 为“假”,其它所有值均为“真”。比如 0 和空字符串就是“真”;
local a = true
local b = 0
local c = nil
if a then
    print("a")        -->output:a
else
    print("not a")    --这个没有执行
end
if b then
    print("b")        -->output:b
else
    print("not b")    --这个没有执行
end
if c then
    print("c")        --这个没有执行
else
    print("not c")    -->output:not c
end
number
Number 类型用于表示实数,和 C/C++ 里面的 double 类型很类似
local order = 3.99
local score = 98.01
print(math.floor(order))   -->output:3
print(math.ceil(score))    -->output:99
string
Lua 中有三种方式表示字符串
使用一对匹配的单引号。例:'hello'
使用一对匹配的双引号。例:"abclua"
字符串还可以用一种长括号(即[[ ]])括起来的方式定义
我们把两个正的方括号(即[[)间插入 n 个等号定义为第 n 级正长括号。就是说,0 级正的长括号写作 [[ ,一级正的长括号写作 [=[,如此等等。反的长括号也作类似定义;举个例子,4 级反的长括号写作 ]====]。一个长字符串可以由任何一级的正的长括号开始,而由第一个碰到的同级反的长括号结束。整个词法分析过程将不受分行限制,不处理任何转义符,并且忽略掉任何不同级别的长括号。这种方式描述的字符串可以包含任何东西,当然本级别的反长括号除外。例:[[abc\nbc]],里面的 "\n" 不会被转义
注意,Lua 的字符串是不可改变的值,不能像在其他语言中那样直接修改字符串的某个字符,而是根据修改要求来创建一个新的字符串。Lua 也不能通过下标来访问字符串的某个字符。两个完全一样的 Lua 字符串在 Lua 虚拟机中只会存储一份。每一个 Lua 字符串在创建时都会插入到 Lua 虚拟机内部的一个全局的哈希表中。 这意味着
创建相同的 Lua 字符串并不会引入新的动态内存分配操作,所以相对便宜(但仍有全局哈希表查询的开销)
内容相同的 Lua 字符串不会占用多份存储空间,
已经创建好的 Lua 字符串之间进行相等性比较时是 O(1) 时间度的开销,而不是通常见到的 O(n) <font style="color:#333333;">即需要逐个字节(或按若干个连续字节)进行比较</font>
local str1 = 'hello world'
local str2 = "hello lua"
local str3 = [["add\name",'hello']]
local str4 = [=[string have a [[]].]=]
print(str1)    -->output:hello world
print(str2)    -->output:hello lua
print(str3)    -->output:"add\name",'hello'
print(str4)    -->output:string have a [[]].
table
Table 类型实现了一种抽象的“关联数组”。“关联数组”是一种具有特殊索引方式的数组,索引通常是字符串(string)或者 number 类型,但也可以是除 nil 以外的任意类型的值。
local corp = {
    web = "www.google.com",   --索引为字符串,key = "web",
                              --            value = "www.google.com"
    telephone = "12345678",   --索引为字符串
    staff = {"Jack", "Scott", "Gary"}, --索引为字符串,值也是一个表
    100876,              --相当于 [1] = 100876,此时索引为数字
                         --      key = 1, value = 100876
    100191,              --相当于 [2] = 100191,此时索引为数字
    [10] = 360,          --直接把数字索引给出
    ["city"] = "Beijing" --索引为字符串
}
print(corp.web)               -->output:www.google.com
print(corp["telephone"])      -->output:12345678
print(corp[2])                -->output:100191
print(corp["city"])           -->output:"Beijing"
print(corp.staff[1])          -->output:Jack
print(corp[10])               -->output:360
function
在 Lua 中,函数 也是一种数据类型,函数可以存储在变量中,可以通过参数传递给其他函数,还可以作为其他函数的返回值。
-- 由于全局变量一般会污染全局名字空间,同时也有性能损耗(即查询全局环境表的开销),因此我们应当尽量使用“局部函数”,其记法是类似的,只是开头加上 local 修饰符
local function foo(args) --args参数,函数的参数列表可以为空
    print(args.." in the function")
    --dosomething()
    local x = 10
    local y = 20
    return x + y
end
local a = foo    --把函数赋给变量
print(a("foo"))
--output:
foo in the function
30
由于函数定义本质上就是变量赋值,而变量的定义总是应放置在变量使用之前,所以函数的定义也需要放置在函数调用之前。有名函数的定义本质上是匿名函数对变量的赋值。
function foo()
end
等价于
foo = function ()
end
Lua 函数的参数大部分是按值传递的。值传递就是调用函数时,实参把它的值通过赋值运算传递给形参,然后形参的改变和实参就没有关系了。在这个过程中,实参是通过它在参数表中的位置与形参匹配起来的。
local function swap(a, b) --定义函数swap,函数内部进行交换两个变量的值
   local temp = a
   a = b
   b = temp
   print(a, b)
end
local x = "hello"
local y = 20
print(x, y)
swap(x, y)    --调用swap函数
print(x, y)   --调用swap函数后,x和y的值并没有交换
-->output
hello 20
20  hello
hello 20
在调用函数的时候,若形参个数和实参个数不同时,Lua 会自动调整实参个数。调整规则:若实参个数大于形参个数,从左向右,多余的实参被忽略;若实参个数小于形参个数,从左向右,没有被实参初始化的形参会被初始化为 nil。
local function fun1(a, b)       --两个形参,多余的实参被忽略掉
   print(a, b)
end
local function fun2(a, b, c, d) --四个形参,没有被实参初始化的形参,用nil初始化
   print(a, b, c, d)
end
local x = 1
local y = 2
local z = 3
fun1(x, y, z)         -- z被函数fun1忽略掉了,参数变成 x, y
fun2(x, y, z)         -- 后面自动加上一个nil,参数变成 x, y, z, nil
-->output
1   2
1   2   3   nil
上面函数的参数都是固定的,其实 Lua 还支持变长参数。若形参为 <font style="color:#333333;">...</font> , 表示该函数可以接收不同长度的参数。访问参数的时候也要使用 <font style="color:#333333;">...</font>。
local function func( ... )                -- 形参为 ... ,表示函数采用变长参数
   local temp = {...}                     -- 访问的时候也要使用 ...
   local ans = table.concat(temp, " ")    -- 使用 table.concat 库函数对数
                                          -- 组内容使用 " " 拼接成字符串。
   print(ans)
end
func(1, 2)        -- 传递了两个参数
func(1, 2, 3, 4)  -- 传递了四个参数
-->output
1 2
1 2 3 4
Lua 还支持通过名称来指定实参,这时候要把所有的实参组织到一个 table 中,并将这个 table 作为唯一的实参传给函数。
local function change(arg) -- change 函数,改变长方形的长和宽,使其各增长一倍
  arg.width = arg.width * 2
  arg.height = arg.height * 2
  return arg  --这里去掉return 最后结果是怎样的?
end
local rectangle = { width = 20, height = 15 }
print("before change:", "width  =", rectangle.width,
                        "height =", rectangle.height)
rectangle = change(rectangle)
print("after  change:", "width  =", rectangle.width,
                        "height =", rectangle.height)
-->output
before change: width = 20  height =  15
after  change: width = 40  height =  30
当函数参数是 table 类型时,传递进来的是 实际参数的引用,此时在函数内部对该 table 所做的修改,会直接对调用者所传递的实际参数生效
Lua 具有一项与众不同的特性,允许函数返回多个值。
local s, e = string.find("hello world", "llo")
print(s, e)  -->output 3  5
local function swap(a, b)   -- 定义函数 swap,实现两个变量交换值
   return b, a              -- 按相反顺序返回变量的值
end
local x = 1
local y = 20
x, y = swap(x, y)           -- 调用 swap 函数
print(x, y)                 --> output   20     1
当函数返回值的个数和接收返回值的变量的个数不一致时,Lua 也会自动调整参数个数。调整规则: 若返回值个数大于接收变量的个数,多余的返回值会被忽略掉; 若返回值个数小于参数个数,从左向右,没有被返回值初始化的变量会被初始化为 nil。
function init()             --init 函数 返回两个值 1 和 "lua"
  return 1, "lua"
end
x = init()
print(x)
x, y, z = init()
print(x, y, z)
--output
1
1 lua nil
当一个函数有一个以上返回值,且函数调用不是一个列表表达式的最后一个元素,那么函数调用只会产生一个返回值, 也就是第一个返回值。
local function init()       -- init 函数 返回两个值 1 和 "lua"
    return 1, "lua"
end
local x, y, z = init(), 2   -- init 函数的位置不在最后,此时只返回 1
print(x, y, z)              -->output  1  2  nil
local a, b, c = 2, init()   -- init 函数的位置在最后,此时返回 1 和 "lua"
print(a, b, c)              -->output  2  1  lua
print(init(), 2)   -->output  1  2
print(2, init())   -->output  2  1  lua
print((init()), 2)   -->output  1  2
print(2, (init()))   -->output  2  1
表达式
算术运算符
| 算术运算符 | 说明 |
|---|---|
| + | 加 |
| - | 减 |
| * | 乘 |
| / | 除 |
| ^ | 指数 |
| % | 取模 |
print(1 + 2)       -->打印 3
print(5 / 10)      -->打印 0.5。 这是Lua不同于c语言的
print(5.0 / 10)    -->打印 0.5。 浮点数相除的结果是浮点数
-- print(10 / 0)   -->注意除数不能为0,计算的结果会出错
print(2 ^ 10)      -->打印 1024。 求2的10次方
local num = 1357
print(num % 2)       -->打印 1
print((num % 2) == 1) -->打印 true。 判断num是否为奇数
print((num % 5) == 0)  -->打印 false。判断num是否能被5整数
关系运算符
| 关系运算符 | 说明 |
|---|---|
| < | 小于 |
| > | 大于 |
| <= | 小于等于 |
| >= | 大于等于 |
| == | 等于 |
| ~= | 不等于 |
print(1 < 2)    -->打印 true
print(1 == 2)   -->打印 false
print(1 ~= 2)   -->打印 true
local a, b = true, false
print(a == b)  -->打印 false
| 在使用“==”做等于判断时,要注意对于 table, userdate 和函数, Lua 是作引用比较的。也就是说,只有当两个变量引用同一个对象时,才认为它们相等。可以看下面的例子 |
|---|
local a = { x = 1, y = 0}
local b = { x = 1, y = 0}
if a == b then
  print("a==b")
else
  print("a~=b")
end
---output:
a~=b
逻辑运算符
| 逻辑运算符 | 说明 |
|---|---|
| and | 逻辑与 |
| or | 逻辑或 |
| not | 逻辑非 |
local c = nil
local d = 0
local e = 100
print(c and d)  -->打印 nil
print(c and e)  -->打印 nil
print(d and e)  -->打印 100
print(c or d)   -->打印 0
print(c or e)   -->打印 100
print(not c)    -->打印 true
print(not d)    -->打印 false
| 所有逻辑操作符将 false 和 nil 视作假,其他任何值视作真,对于 and 和 or,“短路求值”,对于 not,永远只返回 true 或者 false。 |
|---|
字符串连接
在 Lua 中连接两个字符串,可以使用操作符“..”(两个点)。如果其任意一个操作数是数字的话,Lua 会将这个数字转换成字符串。注意,连接操作符只会创建一个新字符串,而不会改变原操作数。也可以使用 string 库函数 string.format 连接字符串。
print("Hello " .. "World")    -->打印 Hello World
print(0 .. 1)                 -->打印 01
str1 = string.format("%s-%s","hello","world")
print(str1)              -->打印 hello-world
str2 = string.format("%d-%s-%.2f",123,"world",1.21)
print(str2)              -->打印 123-world-1.21
由于 Lua 字符串本质上是只读的,因此字符串连接运算符几乎总会创建一个新的(更大的)字符串。这意味着如果有很多这样的连接操作(比如在循环中使用 .. 来拼接最终结果),则性能损耗会非常大。在这种情况下,推荐使用 table 和 table.concat() 来进行很多字符串的拼接,例如:
local pieces = {}
for i, elem in ipairs(my_list) do
    pieces[i] = my_process(elem)
end
local res = table.concat(pieces)
优先级
优先级如下表所示(从高到低)
| 优先级 |
|---|
| ^ |
| not # - |
| * / % |
| + - |
| .. |
| < > <= >= == ~= |
| and |
| or |
local a, b = 1, 2
local x, y = 3, 4
local i = 10
local res = 0
res = a + i < b/2 + 1  -->等价于res =  (a + i) < ((b/2) + 1)
res = 5 + x^2*8        -->等价于res =  5 + ((x^2) * 8)
res = a < y and y <=x  -->等价于res =  (a < y) and (y <= x)
结构控制
if/else
score = 0
if score == 100 then
    print("Very good!Your score is 100")
elseif score >= 60 then
    print("Congratulations, you have passed it,your score greater or equal to 60")
else
    if score > 0 then
        print("Your score is better than 0")
    else
        print("My God, your score turned out to be 0")
    end --与上一示例代码不同的是,此处要添加一个end
end
while
x = 1
sum = 0
while x <= 5 do
    sum = sum + x
    x = x + 1
end
print(sum)  -->output 15
Lua 并没有像许多其他语言那样提供类似 continue这样的控制语句用来立即进入下一个循环迭代(如果有的话)。因此,我们需要仔细地安排循环体里的分支,以避免这样的需求。只提供了 break,可以跳出当前循环。 |
|---|
local t = {1, 3, 5, 8, 11, 18, 21}
local i
for i, v in ipairs(t) do
    if 11 == v then
        print("index[" .. i .. "] have right value[11]")
        break
    end
end
repeat
类似于do-while
x = 10
repeat
    print(x)
until false -- 死循环
for
for 数字型
for var = begin, finish, step do
    --body
end
| + var 从 begin 变化到 finish,每次变化都以 step 作为步长递增 var + begin、finish、step 三个表达式只会在循环开始时执行一次 + 第三个表达式 step 是可选的,默认为 1 + 控制变量 var 的作用域仅在 for 循环内,需要在外面控制,则需将值赋给一个新的变量 + 循环过程中不要改变控制变量的值,那样会带来不可预知的影响 |
|---|
for i = 1, 5 do
  print(i)
end
-- output:
1
2
3
4
5
for i = 1, 10, 2 do
  print(i)
end
-- output:
1
3
5
7
9
for i = 10, 1, -1 do
  print(i)
end
-- output : ?
for 泛型
local a = {"a", "b", "c", "d"}
for i, v in ipairs(a) do
  print("index:", i, " value:", v)
end
-- output:
index:  1  value: a
index:  2  value: b
index:  3  value: c
index:  4  value: d
break goto
break
语句 <font style="color:#333333;">break</font> 用来终止 <font style="color:#333333;">while</font>、<font style="color:#333333;">repeat</font> 和 <font style="color:#333333;">for</font> 三种循环的执行,并跳出当前循环体, 继续执行当前循环之后的语句。下面举一个 <font style="color:#333333;">while</font> 循环中的 <font style="color:#333333;">break</font> 的例子来说明:
-- 计算最小的x,使从1到x的所有数相加和大于100
sum = 0
i = 1
while true do
    sum = sum + i
    if sum > 100 then
        break
    end
    i = i + 1
end
print("The result is " .. i)  -->output:The result is 14
goto
LuaJIT 一开始对标的是 Lua 5.1,但渐渐地也开始加入部分 Lua 5.2 甚至 Lua 5.3 的有用特性。 goto 就是其中一个不得不提的例子。有了 goto,我们可以实现 continue 的功能:
for i=1, 3 do
    if i <= 2 then
        print(i, "yes continue")
        goto continue
    end
    print(i, " no continue")
    ::continue::
    print([[i'm end]])
end
openresty
HelloWorld
location / {
  default_type text/html;
  content_by_lua_block {
    ngx.say("HelloWorld")
  }
}
与nginx local的组合
内部调用
location = /sum {
    # 只允许内部调用
    internal;
    # 这里做了一个求和运算只是一个例子,可以在这里完成一些数据库、
    # 缓存服务器的操作,达到基础模块和业务逻辑分离目的
    content_by_lua_block {
        local args = ngx.req.get_uri_args()
        ngx.say(tonumber(args.a) + tonumber(args.b))
    }
}
location = /app/test {
    content_by_lua_block {
        local res = ngx.location.capture(
                        "/sum", {args={a=3, b=8}}
                        )
        ngx.say("status:", res.status, " response:", res.body)
    }
}
并行调用
location = /sum {
    internal;
    content_by_lua_block {
        ngx.sleep(0.1)
        local args = ngx.req.get_uri_args()
        ngx.print(tonumber(args.a) + tonumber(args.b))
    }
}
location = /subduction {
    internal;
    content_by_lua_block {
        ngx.sleep(0.1)
        local args = ngx.req.get_uri_args()
        ngx.print(tonumber(args.a) - tonumber(args.b))
    }
}
location = /app/test_parallels {
    content_by_lua_block {
        local start_time = ngx.now()
        local res1, res2 = ngx.location.capture_multi( {
                        {"/sum", {args={a=3, b=8}}},
                        {"/subduction", {args={a=3, b=8}}}
                    })
        ngx.say("status:", res1.status, " response:", res1.body)
        ngx.say("status:", res2.status, " response:", res2.body)
        ngx.say("time used:", ngx.now() - start_time)
    }
}
location = /app/test_queue {
    content_by_lua_block {
        local start_time = ngx.now()
        local res1 = ngx.location.capture_multi( {
                        {"/sum", {args={a=3, b=8}}}
                    })
        local res2 = ngx.location.capture_multi( {
                        {"/subduction", {args={a=3, b=8}}}
                    })
        ngx.say("status:", res1.status, " response:", res1.body)
        ngx.say("status:", res2.status, " response:", res2.body)
        ngx.say("time used:", ngx.now() - start_time)
    }
}
➜  ~ curl 127.0.0.1/app/test_parallels
status:200 response:11
status:200 response:-5
time used:0.10099983215332
➜  ~ curl 127.0.0.1/app/test_queue
status:200 response:11
status:200 response:-5
time used:0.20199990272522
利用 ngx.location.capture_multi 函数,直接完成了两个子请求并行执行。当两个请求没有相互依赖,这种方法可以极大提高查询效率。两个无依赖请求,各自是 100ms,顺序执行需要 200ms,但通过并行执行可以在 100ms 完成两个请求。
重定向
location = /foo {
    content_by_lua_block {
        ngx.say([[I am foo]])
    }
}
location = / {
    rewrite_by_lua_block {
        return ngx.redirect('/foo');
    }
}
一些常用的api
- 获取请求 uri 参数 body 偶尔读取不到的问题
location /print_param {
       content_by_lua_block {
           local arg = ngx.req.get_uri_args()
           for k,v in pairs(arg) do
               ngx.say("[GET ] key:", k, " v:", v)
           end
           ngx.req.read_body() -- 解析 body 参数之前一定要先读取 body
           local arg = ngx.req.get_post_args()
           for k,v in pairs(arg) do
               ngx.say("[POST] key:", k, " v:", v)
           end
       }
   }
➜  ~  curl '127.0.0.1/print_param?a=1&b=2%26' -d 'c=3&d=4%26'
[GET ] key:b v:2&
[GET ] key:a v:1
[POST] key:d v:4&
[POST] key:c v:3
- 传递请求 uri 参数
local res = ngx.location.capture('/print_param',
         {
            method = ngx.HTTP_POST,
            args = {a = 1, b = '2&'},
            body = 'c=3&d=4%26'
        }
     )
ngx.say(res.body)
- 输出响应体
对于 HTTP 响应体的输出,在 OpenResty 中调用 ngx.say 或 ngx.print 即可。区别是 ngx.say 会对输出响应体多输出一个 \n 。如果你用的是浏览器完成的功能调试,使用这两着是没有区别的。但是如果使用各种终端工具,这时候使用 ngx.say 明显就更方便了。
ngx.say 与 ngx.print 均为异步输出 也就是说当调用 ngx.say 后并不会立刻输出响应体。
location /test {
  content_by_lua_block {
    ngx.say("hello")
    ngx.sleep(3)
    ngx.say("the world")
  }
}
location /test2 {
  content_by_lua_block {
    ngx.say("hello")
    ngx.flush() -- 显式的向客户端刷新响应输出
    ngx.sleep(3)
    ngx.say("the world")
  }
}
location /test3 {
  content_by_lua_block {
     ngx.say(string.rep("hello", 1000))
     ngx.sleep(3)
     ngx.say("the world")
  }
}
/test 响应内容实在触发请求 3s 后一起接收到响应体,而 /test2 则是先收到一个 hello 停顿 3s 后又接收到后面的 the world<font style="color:#333333;">,/test3首先收到了所有的 "hello" ,停顿大约 3 秒后,接着又收到了 "the world" </font>
应用点: 响应体过大的输出
利用 HTTP 1.1 特性 CHUNKED 编码来完成 把一个大的响应体拆分成多个小的应答体,分批、有节制的响应给请求方。
location /test {
    content_by_lua_block {
        -- ngx.var.limit_rate = 1024*1024
        local file, err = io.open(ngx.config.prefix() .. "data.db","r")
        if not file then
            ngx.log(ngx.ERR, "open file error:", err)
            ngx.exit(ngx.HTTP_SERVICE_UNAVAILABLE)
        end
        local data
        while true do
            data = file:read(1024)
            if nil == data then
                break
            end
            ngx.print(data)
            ngx.flush(true)
        end
        file:close()
    }
}
按块读取本地文件内容(每次 1KB),并以流式方式进行响应。
- 日志输出
content_by_lua_block {
        ngx.log(ngx.ERR, "this is err")
        ngx.log(ngx.INFO, "this is info")
        ngx.log(ngx.DEBUG, "this is debug")
 }
ngx.STDERR     -- 标准输出
ngx.EMERG      -- 紧急报错
ngx.ALERT      -- 报警
ngx.CRIT       -- 严重,系统故障,触发运维告警系统
ngx.ERR        -- 错误,业务不可恢复性错误
ngx.WARN       -- 告警,业务中可忽略错误
ngx.NOTICE     -- 提醒,业务比较重要信息
ngx.INFO       -- 信息,业务琐碎日志信息,包含不同情况判断等
ngx.DEBUG      -- 调试
如果你的日志需要归集,并且对时效性要求比较高那么可以用 lua-resty-logger-socket 以非阻塞 IO 方式推送 access log 到远程服务器上。对远程服务器的要求是支持 syslog-ng 的日志服务。目前生产上的elk服务就支持 syslog-ng
执行阶段概念
OpenResty 处理一个请求,它的处理流程请参考下图(从 Request start 开始):
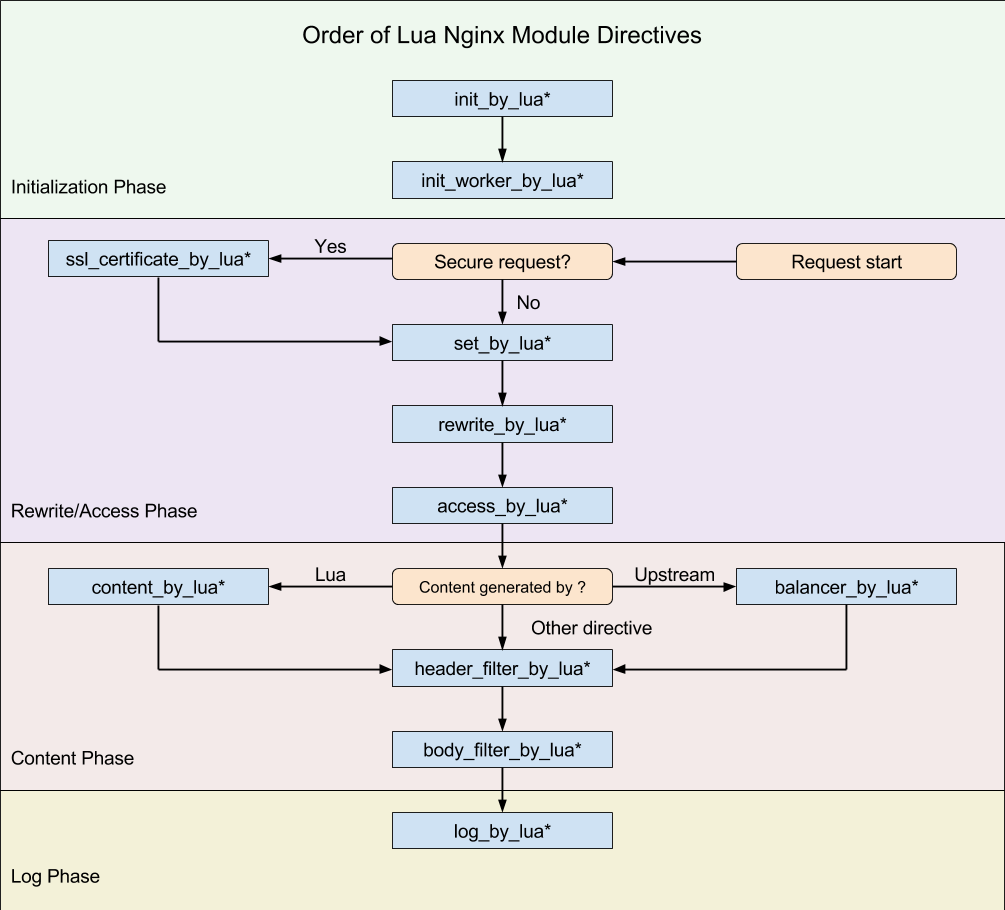
这几个阶段的存在,应该是 OpenResty 不同于其他多数 Web 平台编程的最明显特征了。由于 Nginx 把一个请求分成了很多阶段,这样第三方模块就可以根据自己行为,挂载到不同阶段进行处理达到目的。OpenResty 也应用了同样的特性。所不同的是,OpenResty 挂载的是我们编写的 Lua 代码。这样我们就可以根据我们的需要,在不同的阶段直接完成大部分典型处理了。
- set_by_lua*: 流程分支处理判断变量初始化
- rewrite_by_lua*: 转发、重定向、缓存等功能(例如特定请求代理到外网)
- access_by_lua*: IP 准入、接口权限等情况集中处理(例如配合 iptable 完成简单防火墙)
- content_by_lua*: 内容生成
- header_filter_by_lua*: 响应头部过滤处理(例如添加头部信息)
- body_filter_by_lua*: 响应体过滤处理(例如完成应答内容统一成大写)
- log_by_lua*: 会话完成后本地异步完成日志记录(日志可以记录在本地,还可以同步到其他机器)
举一个例子,请求体和响应体都需要使用 aes 加密,利用不同的执行阶段,我们可以非常简单的实现:
# 明文协议版本
location /mixed {
    content_by_lua_file ...;       # 请求处理
}
# 加密协议版本
location /mixed {
    access_by_lua_file ...;        # 请求加密解码
    content_by_lua_file ...;       # 请求处理,不需要关心通信协议
    body_filter_by_lua_file ...;   # 应答加密编码
}
实际系统中的应用
获取系统时间
https://xxxx.oooo.com/api/currentTime
location = /api/currentTime {
   default_type "application/json; charset=utf-8";
   content_by_lua '
     local cjson = require("cjson")
     local t = {data = ngx.time().."000"}
     ngx.say(cjson.encode(t))
  ';

  proxy_redirect off;
}
客户端检测页
location /check {
  alias /lvm/client-detection/;
  index index.html;
  expires 5d;
}
location = /testmethod {
  add_header Access-Control-Allow-Origin $http_origin;
  add_header Access-Control-Allow-Credentials "true";
  add_header 'Access-Control-Allow-Methods' 'GET,PUT, POST, OPTIONS, DELETE';
  default_type "application/json; charset=utf-8";
  content_by_lua_file testmethod.lua;
  proxy_redirect off;
}
location = /getdomains {
  add_header Access-Control-Allow-Origin $http_origin;
  add_header Access-Control-Allow-Credentials "true";
  add_header 'Access-Control-Allow-Methods' 'GET,PUT, POST, OPTIONS, DELETE';
  default_type "application/json; charset=utf-8";
  content_by_lua '
    local mainHost = {"x.oooo.com","xx.oooo.com","xxxx.oooo.com","xxxx.oooo.com","xxxxx.oooo.com","xxxx.oooo.com"}
    local cjson = require("cjson")
    ngx.say(cjson.encode(mainHost))
  ';
}
local cjson = require("cjson")
if ngx.req.get_method() == "OPTIONS" then
ngx.exit(204)
end
local t = {time = ngx.time(),method = ngx.req.get_method()}
t.urlargs =  ngx.req.get_uri_args()
ngx.req.read_body()
local postargs = ngx.req.get_post_args()
if postargs then
   t.postargs = postargs
end
t.host = ngx.req.get_headers()["Host"]
ngx.say(cjson.encode(t))
从缓存中读取结果
upstream statredis_pool_stream {
  server redis:6379;
  keepalive 128;
}
location ^~ /api/getUserFromRedis/{
   default_type "application/json; charset=utf-8";
   if ($uri ~* "^/api/getUserFromRedis/([^/]+)/user/([0-9a-z]{1,32})$"){
     set $projectid $1;
     set $userid $2;
     set $redis_key "user:${projectid}:${userid}";
     redis_pass statredis_pool_stream;
      error_page 404 = @user404;
   }
   proxy_pass http://user-web/;
   proxy_redirect off;
   proxy_set_header   Host            $host;
}
location @user404 {
   rewrite . /stat-web/${projectid}/user/${userid} break;
   proxy_pass http://stat;
}
在线人数/请求数系列
location ^~ /api/ {
  proxy_set_header Host $host;
  proxy_set_header X-Real-IP $remote_addr;
  proxy_set_header X-Forwarded-For $proxy_add_x_forwarded_for;
  proxy_pass http://user_web/;
  proxy_redirect off;
  log_by_lua_file sitelog.lua;
}
local online = require("online")
local handler
function handler(premature,domain,uri,userInfo)
  --ngx.log(ngx.ERR,"domain=",domain)
  --ngx.log(ngx.ERR,"uri=",uri)
  --ngx.log(ngx.ERR,"userInfo=",userInfo)
  online.broadcast(premature,domain,uri,userInfo)
end
local ok, err = ngx.timer.at(0, handler,tostring(ngx.var.HTTP_HOST),tostring(ngx.var.uri),ngx.var.cookie_userInfo)
if not ok then
  ngx.log(ngx.ERR, "onlineCount error", err)
end
local redis = require "resty.redis"
local ResourceTemplate = {}
function ResourceTemplate:new(o)
        o = o or {}
        setmetatable(o,self)
    self.__index = self
    return o
end
function ResourceTemplate:dealWith(callback)
        local r = self:open()
        if not r then
            error("No resource opened")
        end
        local ok, data = pcall(callback,r)
        self:close(r)
        if not ok then
            error(data)
        else
            return data
        end
end
local RedisTemplate = ResourceTemplate:new({
    open = function(self)
        local red = redis:new()
        red:set_timeout(1000)
--        local ips = {{host="10.0.0.246",port=6379},{host="10.0.0.247",port=6379}}
--    math.randomseed( tonumber(tostring(os.time()):reverse():sub(1,6)) )
--        local ip = ips[math.random(2)]
--        local ok, err = red:connect(ip.host, ip.port,{ pool = "my_redis_cluster" })
        local ok, err = red:connect("10.0.0.220", 6379)
        if not ok then
            error("failed to connect: "..err)
        end
        return red
    end,
    close = function(self, red)
        local ok, err = red:set_keepalive(10000, 100)
        if not ok then
            error("failed to set keepalive: "..err)
        end
    end
})
return {
    ResourceTemplate = ResourceTemplate,
    RedisTemplate = RedisTemplate
}
local SID_PERFIX ="sid:"
local UID_PERFIX ="uid:"
local VID_PERFIX ="vid:"
local PV_PREFIX ="pv:"
local mainHost = {"id.oooo.com"}
local cjson = require("cjson")
local Resource = require("resource")
local DecodeCookie = require("decode_cookie")
local redis = Resource.RedisTemplate
local Online = {}
function Online:broadcast(domain,uri,userInfo)
	--判断请求地址是否记录
	local address = "www.oooo.com"
	for key,value in pairs(mainHost) do
		if string.find(domain..uri,value.."*") then
			address = value
		end
	end
	local cookie = DecodeCookie:new({token=userInfo})
	local userid
	local userkey
	if cookie:isValid() then
		--登陆用户
		local currentUser = cookie:currentUser()
		local index = string.find(currentUser,"@")
		userid = string.sub(currentUser,0,index-1)
		userkey = UID_PERFIX..userid
	else
		-- 未登录用户记录
		userid = userInfo
		userkey = SID_PERFIX..userid
	end

	redis:dealWith(function(red)
  	--red:init_pipeline()
    red:incr(PV_PREFIX..address)
    red:expire(PV_PREFIX..address,120)
    red:set(VID_PERFIX..address..":"..userid,"","EX",120,"NX")
    red:set(userkey,userid,"EX",1800)
    --red:commit_pipeline()
	end)

end
return Online
以上逻辑执行完后redis的数据如下:
vid:id.oooo.com:{userid}
...
vid:iot.oooo.com:{userid}

uid:{userId}

pv:{domain}
以上的数据经过后端一个服务简单的处理后,又把处理结果再次放回redis内
key :online
value: 取以uid:开头的key的数量
key :OnLine:{domain}
value: [{
"domain": "{domain}",
"vidCount": 65475,  取以vid:开头的key的数量
"pvCount": 84934,   取pv:{domain}这个计数器的值
"date": 1561087844540 这次计算的时间戳
}
,
{
"domain": "{domain}",
"vidCount": 66683,
"pvCount": 84654,
"date": 1561087783763
}
,......]
再通过openresty读取
location ^~ /dapi/online/ {
    proxy_set_header   Host            $host;
    add_header Access-Control-Allow-Origin *;
    content_by_lua_file 'readUser.lua';
}
local cjson = require("cjson")
--local Resource = require("redisCl")
--local redis = Resource.RedisTemplate
local Resource = require("resource")
local redis = Resource.RedisTemplate
ngx.header.content_type = "application/json; charset=utf-8"
redis:dealWith(function(red)
	local count,err = red:get("online")
	ngx.say(count)
end)
curl https://xxxx.oooo.com/dapi/online/
"155606"
location /dapi/site/ {
      proxy_set_header   Host            $host;
	  add_header Access-Control-Allow-Origin *;
	  content_by_lua_file 'readOnline.lua';
}
local cjson = require("cjson")
--local Resource = require("redisCl")
--local redis = Resource.RedisTemplate
local Resource = require("resource")
local redis = Resource.RedisTemplate
ngx.header.content_type = "application/json; charset=utf-8"
local domain = ngx.var.arg_domain
local _max = ngx.var.arg_max
local _min = ngx.var.arg_min
if domain == nil then
	ngx.say("错误的请求")
	return
end
if _max == nil then
	_max=1440
end
if _min == nil then
	_min=0
end
redis:dealWith(function(red)
	local view,err = red:lrange("OnLine:"..domain,_min,_max)

	local list = {}
	for key, value in pairs(view) do
		local item = cjson.decode(value)
		--ngx.say(item.count)
		table.insert(list,item)
	end
	ngx.say(cjson.encode(list))
end)
curl https://xxxx.oooo.com/dapi/site/?domain=www.oooo.com&max=1
[{
  "domain": "www.oooo.com",
  "date": 1561088634171,
  "vidCount": 61324,
  "pvCount": 79789,
  "@class": "xxxx.oooo.pv.OnLineEvent"},
{
"domain": "www.oooo.com",
"date": 1561088573488,
"vidCount": 61703,
"pvCount": 80486,
"@class": "com.oooo.pv.OnLineEvent"}
]
应用场景
任何一个开发语言、开发框架,都有它存在的明确目的,重心是为了解决什么问题。没有说我们学习一门语言或技术,就可以解决所有的问题。
OpenResty适合使用的场景,官网 wiki :
- 在 Lua 中混合处理不同 Nginx 模块输出(proxy, drizzle, postgres, Redis, memcached 等)。
- 在请求真正到达上游服务之前,Lua 中处理复杂的准入控制和安全检查。
- 比较随意的控制应答头(通过 Lua)。
- 从外部存储中获取后端信息,并用这些信息来实时选择哪一个后端来完成业务访问。
- 在内容 handler 中随意编写复杂的 web 应用,同步编写异步访问后端数据库和其他存储。
- 在 rewrite 阶段,通过 Lua 完成非常复杂的处理。
- 在 Nginx 子查询、location 调用中,通过 Lua 实现高级缓存机制。
- 对外暴露强劲的 Lua 语言,允许使用各种 Nginx 模块,自由拼合没有任何限制。该模块的脚本有充分的灵活性,同时提供的性能水平与本地 C 语言程序无论是在 CPU 时间方面以及内存占用差距非常小。
不适合的场景
- 有长时间阻塞调用的过程,
- 例如通过
Lua完成系统命令行调用 - 使用阻塞的
Lua API完成相应操作
- 例如通过
- 单个请求处理逻辑复杂,尤其是需要和请求方多次交互的长连接场景
- 内存占用高的处理 受制于Lua VM的最大使用内存 1G 的限制
- 两个请求之间有交流的场景 如在线聊天
- 与行业专用的组件对接 由于OpenResty必须要使用非阻塞 API ,所以传统的阻塞 API ,我们是没法直接使用的

 浙公网安备 33010602011771号