Spirng集成web环境SpringMVC学习笔记
1、Spring与Web环境集成
在Web项目中,Spring提供了一个监听器ContextLoaderListener启动时加载Spring的配置文件,创建应用上下文对象ApplicationContext,在将其存储到最大的域servletContext域中,提供了一个客户端工具WebApplicationContextUtils供使用者获得应用上下文对象。
1.1、首先导入spring-web坐标
<dependency>
    <groupId>org.springframework</groupId>
    <artifactId>spring-webmvc</artifactId>
    <version>5.0.3.RELEASE</version>
</dependency>
1.2、在web.xml中配置全局参数applicationContext.xml、配置ContextLoaderListener监听器
<!--配置全局变量-->
<context-param>
    <param-name>contextConfigLocation</param-name>
    <param-value>classpath:applicationContext.xml</param-value>
</context-param>

<!--配置Spring监听器-->
<listener>
    <listener-class>
        org.springframework.web.context.ContextLoaderListener
    </listener-class>
</listener>
1.3、使用WebApplicationContextUtils获得应用上下文对象ApplicationContext
public class UserServlet extends HttpServlet {
    @Override
    protected void doGet(HttpServletRequest req, HttpServletResponse resp){
        ServletContext servletContext = req.getServletContext();
        WebApplicationContext app = WebApplicationContextUtils.getWebApplicationContext(servletContext);
        UserServer userServer = app.getBean(UserServer.class);
        userServer.save();
    }
}
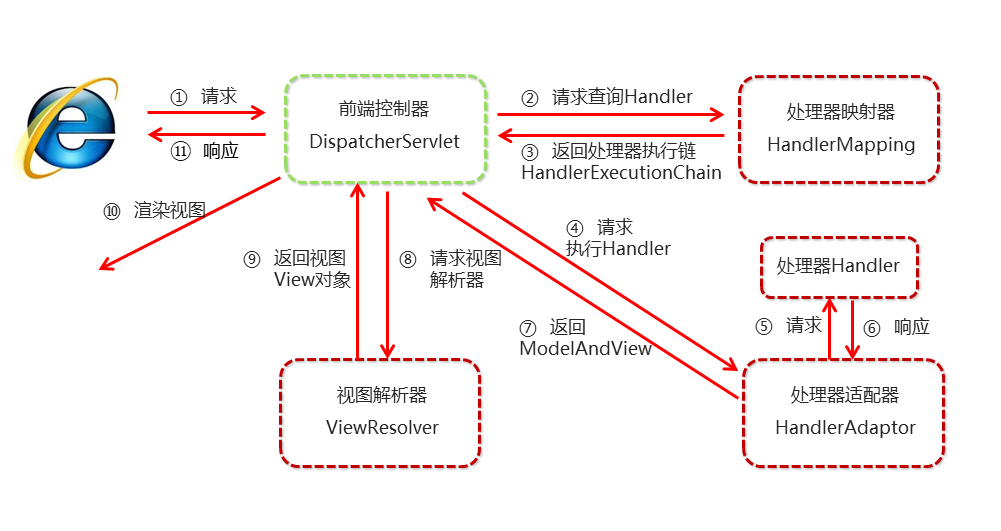
2、 SpringMVC快速入门
SpringMVC相关组件及执行流程:
2.1、导入Spring和SpringMVC的坐标、导入Servlet和Jsp的坐标
 <!--Spring坐标-->
 <dependency>
     <groupId>org.springframework</groupId>
     <artifactId>spring-context</artifactId>
     <version>5.0.3.RELEASE</version>
 </dependency>
 <!--SpringMVC坐标-->
 <dependency>
     <groupId>org.springframework</groupId>
     <artifactId>spring-webmvc</artifactId>
     <version>5.0.3.RELEASE</version>
 </dependency>
 <!--Servlet坐标-->
 <dependency>
     <groupId>javax.servlet</groupId>
     <artifactId>javax.servlet-api</artifactId>
     <version>3.1.0</version>
     <scope>provided</scope>
 </dependency>
 <!--Jsp坐标-->
 <dependency>
     <groupId>javax.servlet.jsp</groupId>
     <artifactId>jsp-api</artifactId>
     <version>2.2</version>
     <scope>provided</scope>
 </dependency>
2.2在web.xml配置SpringMVC的核心控制器
<!--配置前端控制器DispatcherServlet-->
<servlet>
    <servlet-name>DispatcherServlet</servlet-name>
    <servlet-class>org.springframework.web.servlet.DispatcherServlet</servlet-class>
    <!--加载配置文件-->
    <init-param>
        <param-name>contextConfigLocation</param-name>
        <param-value>classpath:spring-mvc.xml</param-value>
    </init-param>
    <!--服务器启动时加载Servlet-->
    <load-on-startup>1</load-on-startup>
</servlet>
<servlet-mapping>
    <servlet-name>DispatcherServlet</servlet-name>
    <url-pattern>/</url-pattern>
</servlet-mapping>
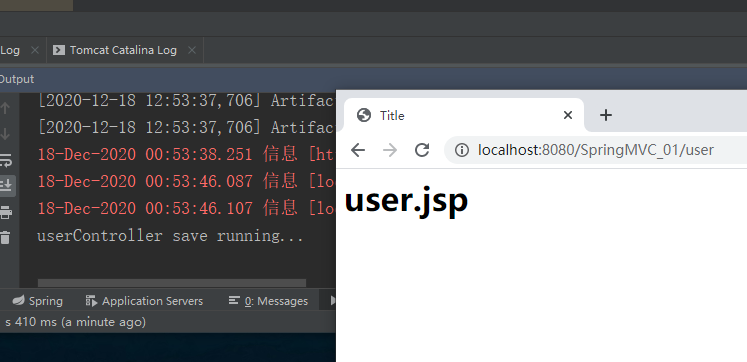
2.3、创建Controller类配置注解和user.jsp
@Controller
public class UserController {

    @RequestMapping("/user")
    public String save(){
        System.out.println("userController save running...");
        return "user.jsp";
    }
}
<html>
    <body>
        <h1>user.jsp</h1>
    </body>
</html>
2.4、创建spring-mvc.xml
<?xml version="1.0" encoding="UTF-8"?>
<beans xmlns="http://www.springframework.org/schema/beans"
       xmlns:xsi="http://www.w3.org/2001/XMLSchema-instance"
       xmlns:context="http://www.springframework.org/schema/context"
       xsi:schemaLocation="http://www.springframework.org/schema/beans http://www.springframework.org/schema/beans/spring-beans.xsd
                            http://www.springframework.org/schema/context http://www.springframework.org/schema/context/spring-context.xsd">

    <!--Controller组件扫描-->
    <context:component-scan base-package="cn.guixinchn">
        <context:include-filter type="annotation" expression="org.springframework.stereotype.Controller"/>
    </context:component-scan>
</beans>
2.5、访问测试地址
http://localhost:8080/SpringMVC_01/user
3、SpringMVC注解
-
@RequestMapping:用于建立请求 URL 和处理请求方法之间的对应关系,可在类上或者方法上使用属性有:
-
value:用于指定请求的URL,只有一个属性时,可省略,value = "/user"
-
method:用于指定请求的方式,method = RequestMethod.POST
-
params:用于指定限制请求参数的条件。它支持简单的表达式。params = {"name"},表示请求参数必须有name
-
-
@ResponseBody:让SpringMVC框架直接写回字符串,告知SpringMVC框架,方法返回的字符串不是跳转是直接在http响应体中返回
-
@RequestBody:在方法参数位置使用,数据使用ajax提交时,直接接收集合数据而无需使用POJO进行包装
-
@RequestParam:当请求的参数名称与Controller的业务方法参数名称不一致时,就需要通过@RequestParam注解显示的绑定。
-
value:与请求参数名称
-
required:此在指定的请求参数是否必须包括,默认是true,提交时如果没有此参数则参数报错
-
defaultValue:当没有指定请求参数时,则使用指定的默认值赋值
-
-
@PathVariable:在业务方法中使用@PathVariable注解进行占位符的匹配获取工作(配合Restful风格代码)
-
@RequestHeader:可以获得请求头信息,相当于request.getHeader(name)
-
value:请求头的名称
-
required:是否必须携带此请求头
-
-
@CookieValue:可以获得指定Cookie的值
-
value:指定cookie的名称
-
required:是否必须携带此cookie
-
4、InternalResourceViewResolver内部视图资源解析器
SpringMVC有默认组件配置,默认组件都是DispatcherServlet.properties配置文件中,例如视图解析器:
org.springframework.web.servlet.ViewResolver=org.springframework.web.servlet.view.InternalResourceViewResolver
有默认设置:
REDIRECT_URL_PREFIX = "redirect:"  --重定向前缀
FORWARD_URL_PREFIX = "forward:"    --转发前缀(默认值)
prefix = "";     --视图名称前缀
suffix = "";     --视图名称后缀
	<!--配置视图解析器-->
    <bean id="viewResolver" class="org.springframework.web.servlet.view.InternalResourceViewResolver">
        <property name="prefix" value="/jsp/"></property>
        <property name="suffix" value=".jsp"></property>
    </bean>
    @RequestMapping(value = "/user")
    public String save(){
        System.out.println("userController save running...");
        return "user";
    }
5、SpringMVC的数据响应方式
5.1、页面跳转
通过ModelAndView对象返回,或者直接返回字符串并向request域存储数据
	@RequestMapping(value = "/user2")
    public ModelAndView save2(){
        ModelAndView modelAndView = new ModelAndView();
        modelAndView.addObject("username","张三");
        modelAndView.setViewName("user");
        return modelAndView;
    }


    @RequestMapping(value = "/user3")
    public String save3(HttpServletRequest request){
        request.setAttribute("username","李四");
        return "user";
    }
页面跳转可以使用return"redirect:/user.jsp"重定向
5.2、回写数据
注入response对象,使用response.getWriter().print(“hello world”) 回写数据
    @RequestMapping(value = "/user4")
    public void save4(HttpServletResponse response) throws IOException {
        response.getWriter().println("Hello world");
    }
直接返回字符串(需要加上@ResponseBody注解)
	@RequestMapping(value = "/user5")
    @ResponseBody
    public String save5(){
        return "Hello world";
    }
返回对象或集合:
开发中往往要将复杂的java对象转换成json格式的字符串,导入jackson坐标
<dependency>
    <groupId>com.fasterxml.jackson.core</groupId>
    <artifactId>jackson-core</artifactId>
    <version>2.9.10</version>
</dependency>
<dependency>
    <groupId>com.fasterxml.jackson.core</groupId>
    <artifactId>jackson-databind</artifactId>
    <version>2.9.10.1</version>
</dependency>
<dependency>
    <groupId>com.fasterxml.jackson.core</groupId>
    <artifactId>jackson-annotations</artifactId>
    <version>2.9.10</version>
</dependency>
通过jackson转换json格式字符串,回写字符串
    @RequestMapping(value = "/user6")
    @ResponseBody
    public String save6() throws JsonProcessingException {
        User user = new User();
        user.setName("李四");
        user.setAge(18);
        ObjectMapper objectMapper = new ObjectMapper();
        String s = objectMapper.writeValueAsString(user);
        System.out.println(s);
        return s;
    }
或者使用Spring配置的方式,为处理器适配器配置消息转换参数,指定使用jackson进行对象或集合的转换
spring-mvc.xml中进行如下配置:
    <bean class="org.springframework.web.servlet.mvc.method.annotation.RequestMappingHandlerAdapter">
        <property name="messageConverters">
            <list>
                <bean class="org.springframework.http.converter.json.MappingJackson2HttpMessageConverter"></bean>
            </list>
        </property>
    </bean>
    @RequestMapping(value = "/user7")
    @ResponseBody
    public User save7(){
        User user = new User();
        user.setName("王五");
        user.setAge(20);
        return user;
    }
也可以使用mvc的注解驱动代替上述配置
<?xml version="1.0" encoding="UTF-8"?>
<beans xmlns="http://www.springframework.org/schema/beans"
       xmlns:xsi="http://www.w3.org/2001/XMLSchema-instance"
       xmlns:context="http://www.springframework.org/schema/context"
       xmlns:mvc="http://www.springframework.org/schema/mvc"
       xsi:schemaLocation="http://www.springframework.org/schema/beans http://www.springframework.org/schema/beans/spring-beans.xsd
                            http://www.springframework.org/schema/context http://www.springframework.org/schema/context/spring-context.xsd
                            http://www.springframework.org/schema/mvc http://www.springframework.org/schema/mvc/spring-mvc.xsd">

    <!--SrpingMVC的注解驱动-->
    <mvc:annotation-driven/>
6、SpringMVC获取请求数据
-
获得基本类型参数:Controller中的业务方法的参数名称要与请求参数的name一致,参数值会自动映射匹配。
-
获得POJO类型参数:先定义一个实体类,Controller中的业务方法的POJO参数的属性名与请求参数的name一致,参数值会自动映射匹配。
public class User {
    private String name;
    private int age;
    //省略set、get、tostring方法
    }
@RequestMapping(value = "/user9") @ResponseBody public void save9(User user){ System.out.println(user); }浏览器输入:
http://localhost:8080/SpringMVC_01/user9?name=zhangsan&age=18控制台输出结果:
User{name='zhangsan', age=18} -
获得数组类型参数:Controller中的业务方法数组名称与请求参数的name一致,参数值会自动映射匹配。
-
获得集合类型参数:获得集合参数时,要将集合参数包装到一个POJO中才可以。
public class VO {
    private List<User> userList;
    //省略set、get、tostring方法
    }
@RequestMapping(value = "/user11") @ResponseBody public void save11(VO vo){ System.out.println(vo.getUserList()); }创建一个表单页面测试:
<form action="${pageContext.request.contextPath}/user11" method="post"> <input type="text" name="userList[0].name"></br> <input type="text" name="userList[0].age"></br> <input type="text" name="userList[1].name"></br> <input type="text" name="userList[1].age"></br> <input type="submit" value="提交"> </form>post请求时,数据会出现乱码解决办法:在web.xml中配置过滤器
<!--配置全局过滤的filter--> <filter> <filter-name>CharacterEncodingFilter</filter-name> <filter-class>org.springframework.web.filter.CharacterEncodingFilter</filter-class> <init-param> <param-name>encoding</param-name> <param-value>utf-8</param-value> </init-param> </filter> <filter-mapping> <filter-name>CharacterEncodingFilter</filter-name> <url-pattern>/*</url-pattern> </filter-mapping> -
当使用ajax提交时,可以指定contentType为json形式,那么在方法参数位置使用@RequestBody可以直接接收集合数据而无需使用POJO进行包装
<script type="text/javascript" src="${pageContext.request.contextPath}/js/jquery-3.3.1.js"></script>
<script>
    var userList = new Array();
    userList.push({name:"张三",age:18});
    userList.push({name:"lisi",age:19});
    $.ajax({
        type:"post",
        url:"${pageContext.request.contextPath}/user12",
        data:JSON.stringify(userList),
        contentType:"application/json;charset=utf-8"
    })
</script>
@RequestMapping(value = "/user12") @ResponseBody public void save12(@RequestBody List<User> userList){ System.out.println(userList); }SpringMVC的前端控制器DispatcherServlet的url-pattern配置的是/,代表对所有的资源都进行过滤操作
可以通过以下两种方式指定放行静态资源:
<!--开放资源访问,mapping是映射的路径,location是真实的地址-->
<mvc:resources mapping="/js/**" location="/js/"/>

<!--当虚拟路径缺省时,交给原始的容器处理,找静态资源-->
<mvc:default-servlet-handler/>
7、Restful风格的参数
Restful风格的请求是使用“url+请求方式”表示一次请求目的的,HTTP 协议里面四个表示操作方式的动词如下:
- GET:用于获取资源
- POST:用于新建资源
- PUT:用于更新资源
- DELETE:用于删除资源
8、自定义类型转换器
自定义类型转换器的开发步骤:
-
定义转换器类实现Converter接口
public class DateConverter implements Converter<String,Date>{ public Date convert(String dataStr) { // 将日期字符串转换成日期对象,返回 SimpleDateFormat formatter = new SimpleDateFormat("yyyy-MM-dd"); Date date = null; try { date = formatter.parse(dataStr); } catch (ParseException e) { e.printStackTrace(); } return date; } } -
在配置文件中声明转换器
<!--声明转换器--> <bean id="ConversionService" class="org.springframework.context.support.ConversionServiceFactoryBean"> <property name="converters"> <list> <bean class="cn.guixinchn.Converter.DateConverter"></bean> </list> </property> </bean> -
在
<annotation-driven>中引用转换器<!--SrpingMVC的注解驱动--> <mvc:annotation-driven conversion-service="ConversionService"/>

 浙公网安备 33010602011771号