

ArkUI框架之Canvas 画布
Canvas 画布
Canvas提供画布组件,用于自定义绘制图形,开发者使用CanvasRenderingContext2D对象在Canvas组件上进行绘制,绘制对象可以是基础形状、文本、图片等。
1.Canvas 快速入门
onReady(event: () => void)是Canvas组件初始化完成时的事件回调,调用该事件后,可获取Canvas组件的确定宽高,进一步使用CanvasRenderingContext2D对象调用相关API进行图形绘制。
@Entry
@Component
struct CanvasDemo {
//画笔配置对象,true表示开启抗锯齿
private settings: RenderingContextSettings = new RenderingContextSettings(true)
//画笔对象,传递画笔配置对象
private context: CanvasRenderingContext2D = new CanvasRenderingContext2D(this.settings)
build() {
Column(){
Canvas(this.context)
.width('100%')
.height('100%')
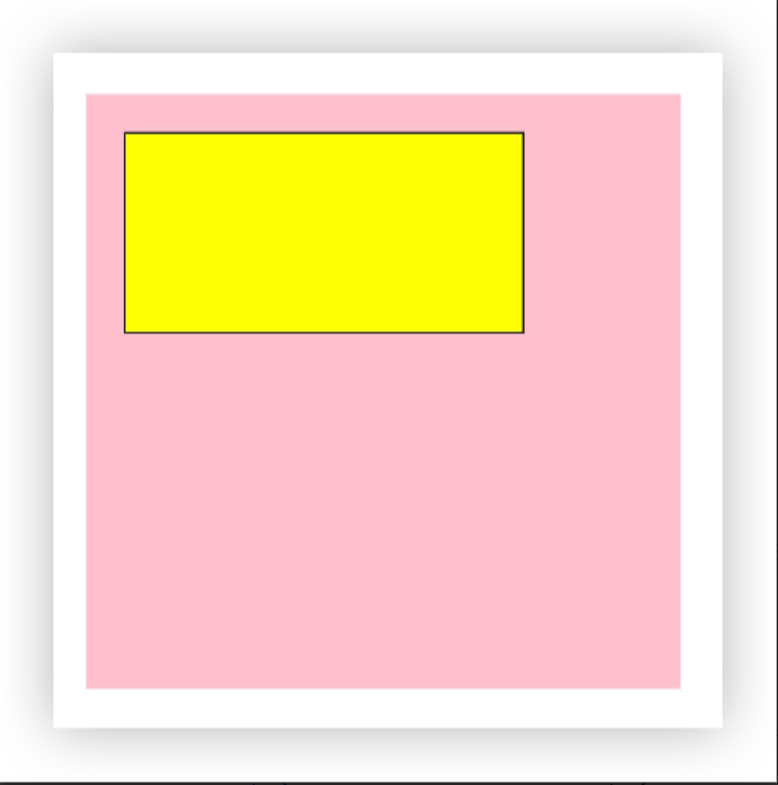
.backgroundColor(Color.Pink)
.onReady(() => {
this.context.fillStyle = Color.Yellow; //设置填充色
this.context.fillRect(50, 50, 100, 100); //填充矩形
})
}
.height('100%')
.width('100%')
}
}
2.常用绘制方法
CanvasRenderingContext2D对象提供了大量的属性和方法,可以用来绘制文本、图形,处理像素等,是Canvas组件的核心。常用接口有fill(对封闭路径进行填充)、clip(设置当前路径为剪切路径)、stroke(进行边框绘制操作)等等,同时提供了fillStyle(指定绘制的填充色)、globalAlpha(设置透明度)与strokeStyle(设置描边的颜色)等属性修改绘制内容的样式。
2.1 绘制矩形
以下是绘制矩形的方法
rect(
  x: number,		//矩形左上角x坐标
  y: number, 		//矩形左上角y坐标
  w: number, 		//矩形宽度
  h: number			//矩形高度
): void
在Canvas画布上绘制一个矩形
@Entry
@Component
struct CanvasDemo {
  //画笔配置对象,true表示开启抗锯齿
  private settings: RenderingContextSettings = new RenderingContextSettings(true)
  //画笔对象,传递画笔配置对象
  private context: CanvasRenderingContext2D = new CanvasRenderingContext2D(this.settings)

  build() {
    Column(){
      Canvas(this.context)
        .width(300)
        .height(300)
        .backgroundColor(Color.Pink)
        .onReady(() => {
          //1. 绘制一个矩形,带边框和填充色
          this.context.beginPath()

          //1.1 矩形范围(x坐标,y坐标,宽,高)
          this.context.rect(20,20,200,100)

          //1.2 矩形边框
          this.context.strokeStyle = Color.Black    //边框颜色
          this.context.lineWidth = 2    //边框粗细
          this.context.stroke()         //绘制边框

          //1.3 矩形填充色
          this.context.fillStyle = Color.Yellow
          this.context.fill()
        })
    }
    .height("100%")
    .width('100%')
  }
}
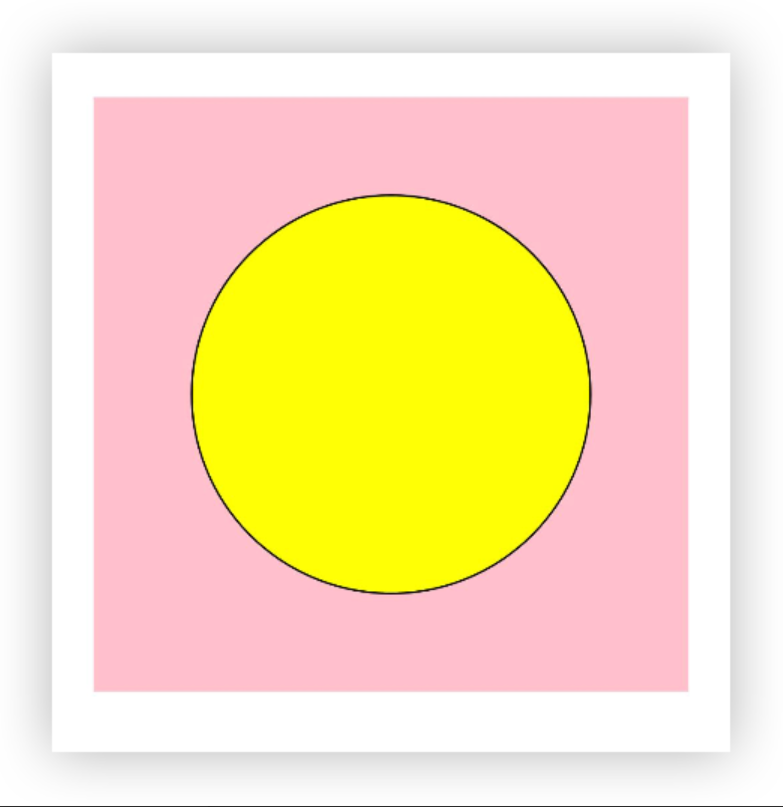
2.2 绘制圆形
以下是绘制圆形的方法
arc(
  x: number, 				//圆心x坐标
  y: number, 				//圆心y坐标
  radius: number, 	//圆的半径
  startAngle: number, 	//开始弧度
  endAngle: number, 		//结束弧度
  counterclockwise?: boolean	//是否逆时针默认false
): void
在Canvas画布上绘制一个圆形
@Entry
@Component
struct CanvasDemo {
  //画笔配置对象,true表示开启抗锯齿
  private settings: RenderingContextSettings = new RenderingContextSettings(true)
  //画笔对象,传递画笔配置对象
  private context: CanvasRenderingContext2D = new CanvasRenderingContext2D(this.settings)

  build() {
    Column(){
      Canvas(this.context)
        .width(300)
        .height(300)
        .backgroundColor(Color.Pink)
        .onReady(() => {
          //1. 绘制一个圆形,带边框和填充色
          this.context.beginPath()

          //1.1 圆形范围(圆心x坐标,圆心y坐标,半径,开始弧度,结束弧度)
          this.context.arc(150,150,100,0,Math.PI*2)

          //1.2 圆形边框
          this.context.strokeStyle = Color.Black    //边框颜色
          this.context.lineWidth = 2    //边框粗细
          this.context.stroke()         //绘制边框

          //1.3 圆形填充色
          this.context.fillStyle = Color.Yellow
          this.context.fill()
        })
    }
    .height("100%")
    .width('100%')
  }
}
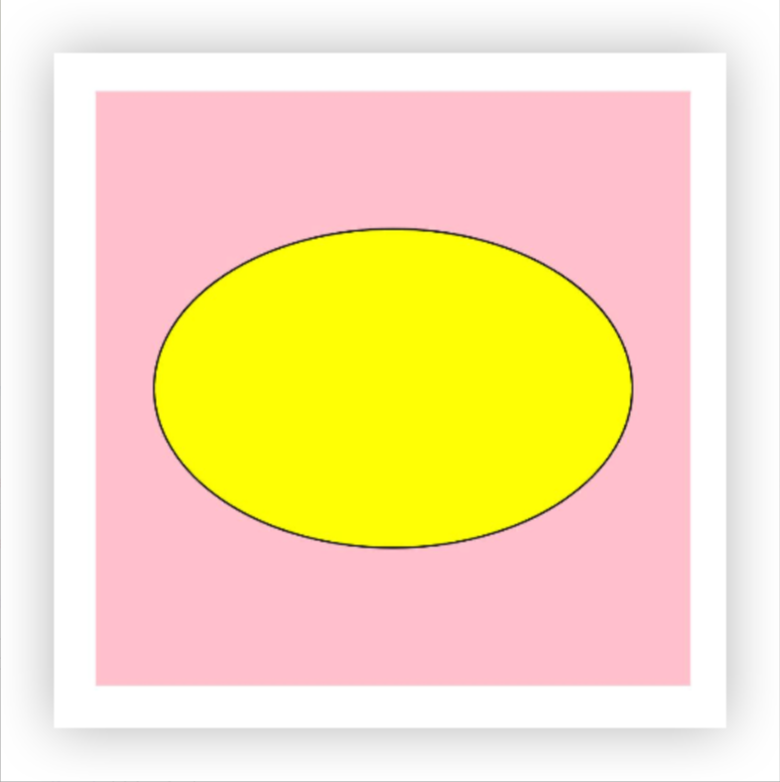
2.3 绘制椭圆
绘制椭圆的方法
ellipse(
  x: number, 	//圆心x轴坐标
  y: number, 	//圆心y坐标
  radiusX: number, 	//x轴半径
  radiusY: number, 	//y轴半径
  rotation: number, //椭圆整体旋转的弧度
  startAngle: number,	//起点弧度
  endAngle: number		//终点弧度
): void
@Entry
@Component
struct CanvasDemo {
  //画笔配置对象,true表示开启抗锯齿
  private settings: RenderingContextSettings = new RenderingContextSettings(true)
  //画笔对象,传递画笔配置对象
  private context: CanvasRenderingContext2D = new CanvasRenderingContext2D(this.settings)

  build() {
    Column() {
      Canvas(this.context)
        .width(300)
        .height(300)
        .backgroundColor(Color.Pink)
        .onReady(() => {
          //1. 绘制一个矩形,带边框和填充色
          this.context.beginPath()

          //1.1 椭圆范围(圆心x坐标,圆心y坐标,x轴半径,y轴半径, 旋转弧度, 起始弧度,结束弧度宽)
          this.context.ellipse(150, 150, 120, 80, 0, 0, Math.PI * 2)

          //1.2 矩形边框
          this.context.strokeStyle = Color.Black //边框颜色
          this.context.lineWidth = 2 //边框粗细
          this.context.stroke() //绘制边框

          //1.3 矩形填充色
          this.context.fillStyle = Color.Yellow
          this.context.fill()
        })
    }
    .height("100%")
    .width('100%')
  }
}
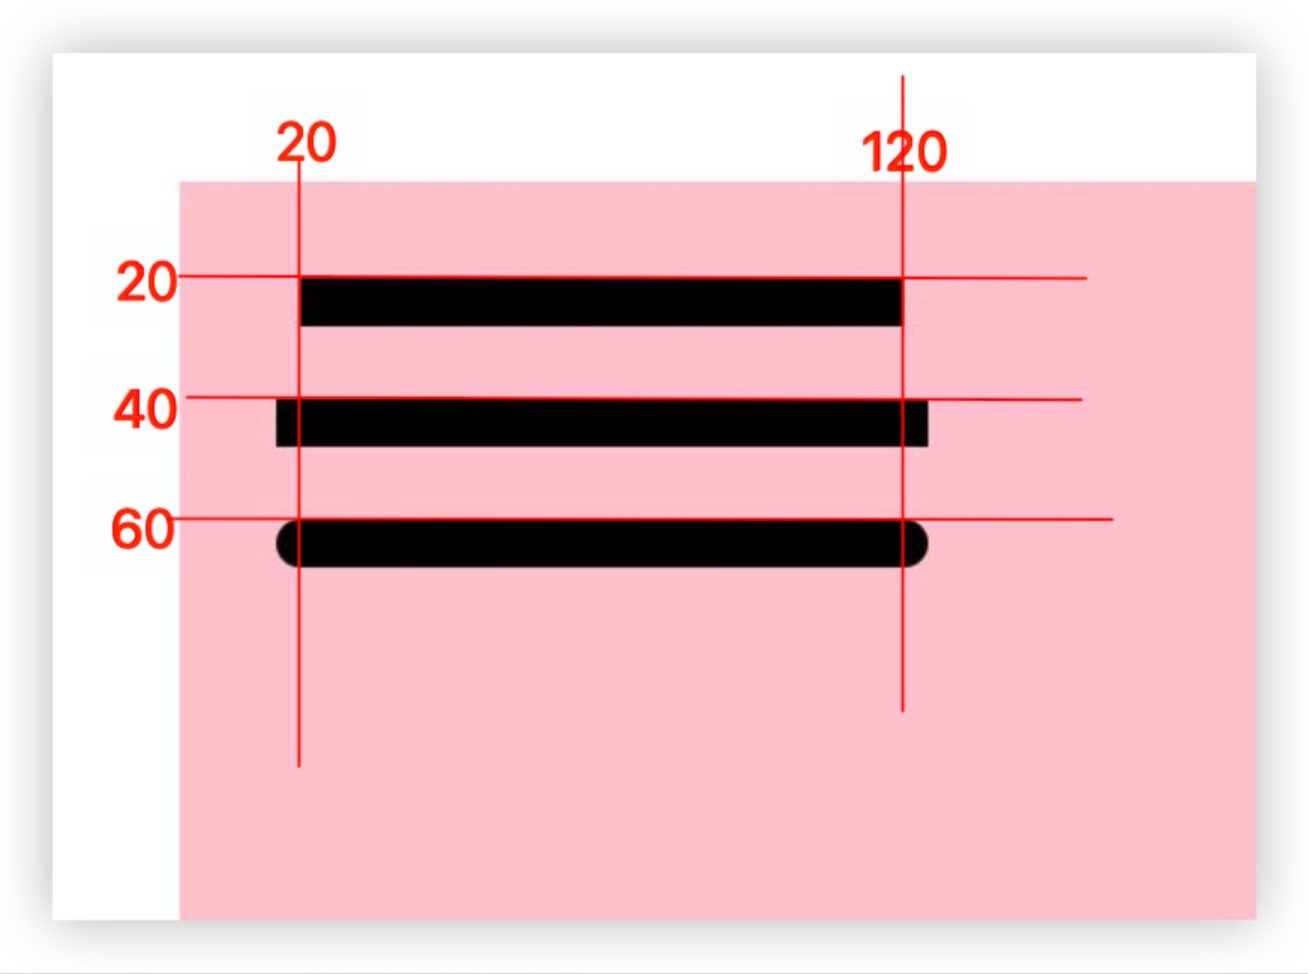
2.4 绘制直线
绘制如下图所示的三条直线,确定一条直线至少需要2个端点。
@Entry
@Component
struct CanvasDemo {
  //画笔配置对象,true表示开启抗锯齿
  private settings: RenderingContextSettings = new RenderingContextSettings(true)
  //画笔对象,传递画笔配置对象
  private context: CanvasRenderingContext2D = new CanvasRenderingContext2D(this.settings)

  build() {
    Column() {
      Canvas(this.context)
        .width(300)
        .height(300)
        .backgroundColor(Color.Pink)
        .onReady(() => {
          //1. 创建一条新路径
          this.context.beginPath()
          //1.1 设置线条颜色
          this.context.strokeStyle = Color.Black
          //1.1 设置线条端点样式(butt两端方形)
          this.context.lineCap = "butt"
          //1.2 设置线条宽度(线粗)
          this.context.lineWidth = 8
          //1.3 移动到(20,20)坐标点
          this.context.moveTo(20,20)
          //1.4 连接到 (120,20) 坐标点
          this.context.lineTo(120,20)
          //1.5 绘制线条
          this.context.stroke()

          //2. 创建一条新路径
          this.context.beginPath()
          //2.1 设置线条端点样式(square两端方形,两端新增长度为宽度线宽度的一半)
          this.context.lineCap = "square"
          this.context.lineWidth = 8
          this.context.moveTo(20,40)
          this.context.lineTo(120,40)
          this.context.stroke()

          //3. 创建一条新路径
          this.context.beginPath()
          //3.1 设置线条端点样式(round线条端点为圆形)
          this.context.lineCap = 'round'
          this.context.lineWidth = 8
          this.context.moveTo(20, 60)
          this.context.lineTo(120, 60)
          this.context.stroke()
        })
    }
    .height("100%")
    .width('100%')
  }
}
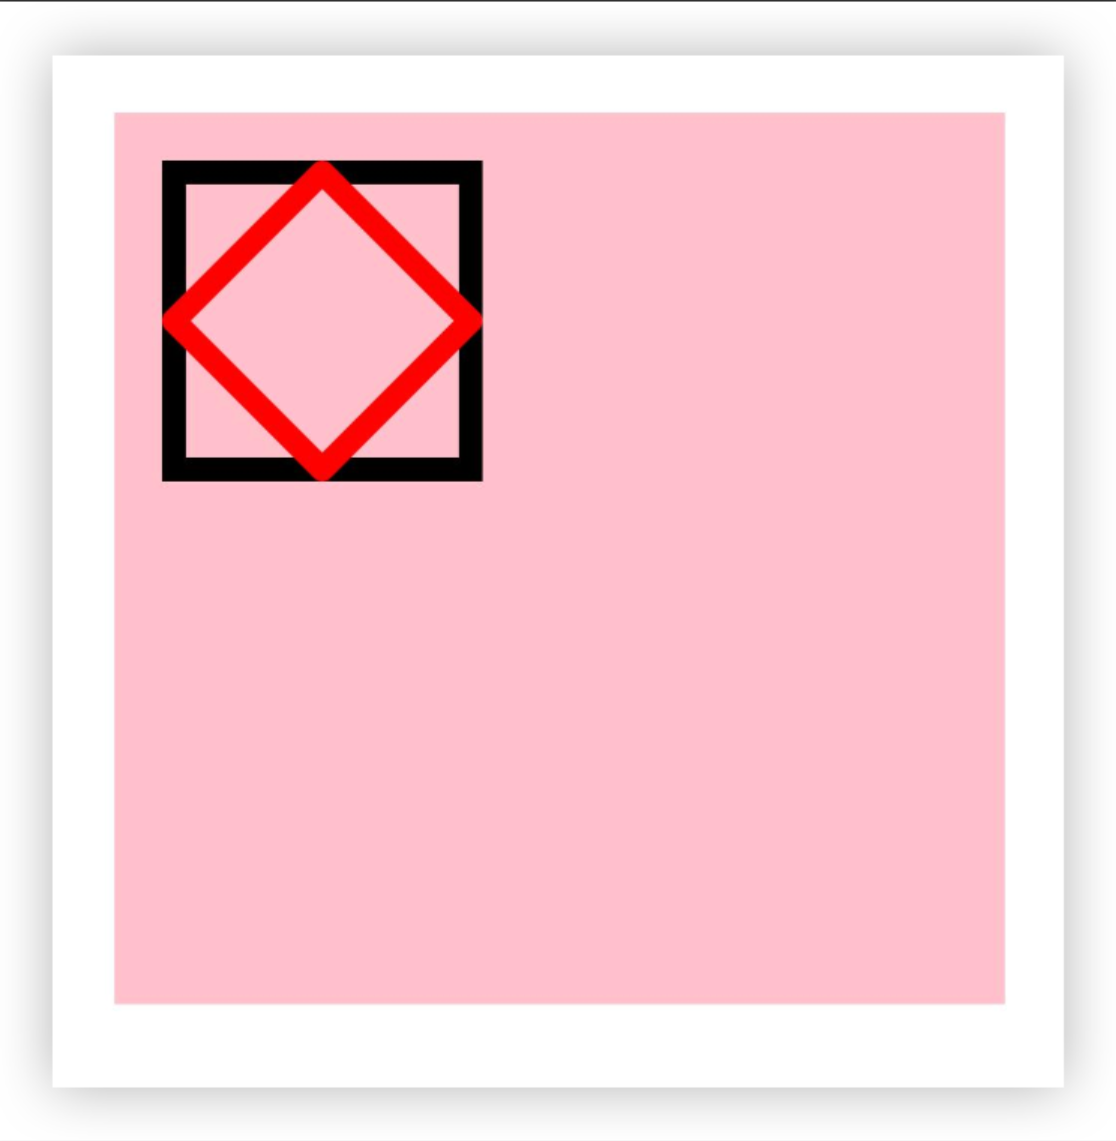
2.5 交点样式
绘制线条时,相交点可以是圆角也可以是尖角。通过this.context.lineJoin 属性设置 设置
● this.context.lineJoin = 'miter' 设置交点为尖叫
● this.context.lineJoin = 'round' 设置交点为圆角
@Entry
@Component
struct CanvasDemo {
  //画笔配置对象,true表示开启抗锯齿
  private settings: RenderingContextSettings = new RenderingContextSettings(true)
  //画笔对象,传递画笔配置对象
  private context: CanvasRenderingContext2D = new CanvasRenderingContext2D(this.settings)

  build() {
    Column() {
      Canvas(this.context)
        .width(300)
        .height(300)
        .backgroundColor(Color.Pink)
        .onReady(() => {
          //1. 绘制多边形
          this.context.beginPath()
          this.context.lineWidth = 8
          this.context.lineJoin = 'miter' //尖角
          this.context.moveTo(20, 20)
          this.context.lineTo(120, 20)
          this.context.lineTo(120, 120)
          this.context.lineTo(20, 120)
          this.context.closePath()
          this.context.stroke()

          //2. 绘制多边形
          this.context.beginPath()
          this.context.lineWidth = 8
          this.context.lineJoin = "round"	//圆角
          this.context.strokeStyle = Color.Red
          this.context.moveTo(70, 20)
          this.context.lineTo(20, 70)
          this.context.lineTo(70, 120)
          this.context.lineTo(120, 70)
          this.context.closePath()
          this.context.stroke()
        })
    }
    .height("100%")
    .width('100%')
  }
}
2.6 绘制文本
在画布上绘制两行文本,一种是填充色文本,一种是描边文本。

@Entry
@Component
struct CanvasDemo {
  //画笔配置对象,true表示开启抗锯齿
  private settings: RenderingContextSettings = new RenderingContextSettings(true)
  //画笔对象,传递画笔配置对象
  private context: CanvasRenderingContext2D = new CanvasRenderingContext2D(this.settings)

  build() {
    Column() {
      Canvas(this.context)
        .width(300)
        .height(300)
        .backgroundColor(Color.Pink)
        .onReady(() => {
          //绘制填充类文本
          this.context.beginPath()
          this.context.font = '40vp serif'; //大小、字体
          this.context.fillStyle = Color.Yellow
          this.context.fillText("Hello World!", 0, 50);
          this.context.closePath()

          //绘制描边类文本
          this.context.beginPath()
          this.context.font = '30vp serif'  //大小、字体
          this.context.strokeStyle = Color.Red
          this.context.lineWidth = 1
          this.context.strokeText("Hello HarmonyOS NEXT",0,100,300)
        })
    }
    .height("100%")
    .width('100%')
  }
}
2.7 绘制渐变色
在矩形范围内从左到右按照太阳光色谱从红色渐变到紫色
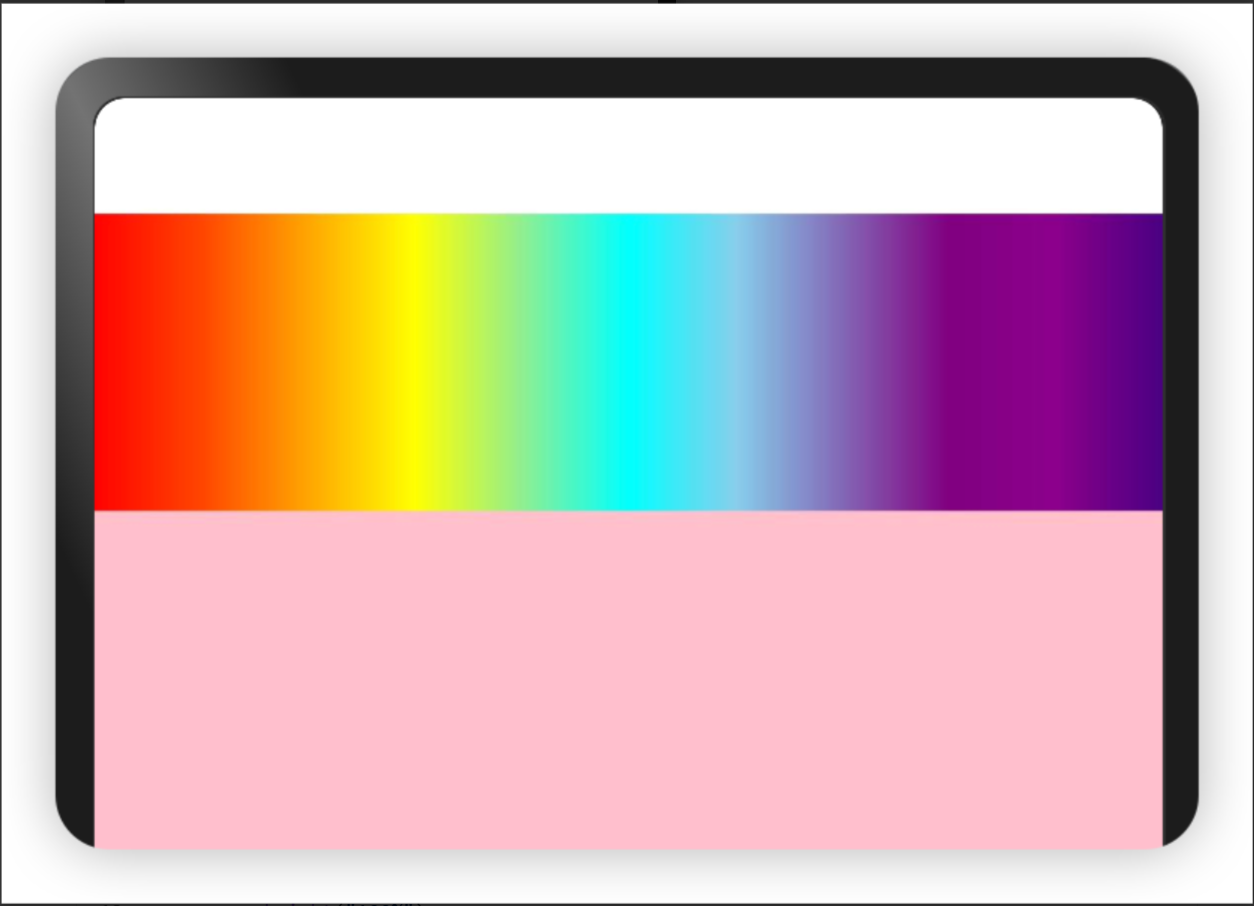
- 线性渐变
@Entry
@Component
struct CanvasDemo {
  //画笔配置对象,true表示开启抗锯齿
  private settings: RenderingContextSettings = new RenderingContextSettings(true)
  //画笔对象,传递画笔配置对象
  private context: CanvasRenderingContext2D = new CanvasRenderingContext2D(this.settings)

  build() {
    Column() {
      Canvas(this.context)
        .width("100%")
        .height("100%")
        .backgroundColor(Color.Pink)
        .onReady(() => {
          const width = this.context.width
          //1. 线性渐变
          //创建一个线性渐变色的CanvasGradient对象
          let grad = this.context.createLinearGradient(0, 0, width, 0)
          //为CanvasGradient对象设置渐变断点值,包括偏移和颜色
          const colors: string[] = [
            "#FF0000", //# 红色
            "#FF4500", //# 橙红色
            "#FFA500", //# 橙色
            "#FFFF00", //# 黄色
            "#90EE90", //# 浅黄绿色(偏向绿色过渡)
            "#00FFFF", //# 青绿色(但在此作为绿色到蓝色的过渡色)
            "#87CEEB", //# 天蓝色
            "#800080", //# 紫色
            "#8B008B", //# 深紫色
            "#4B0082",//# 靛蓝色(偏向紫色)
          ]
          grad.addColorStop(0.0, colors[0]);
          grad.addColorStop(0.1, colors[1]);
          grad.addColorStop(0.2, colors[2]);
          grad.addColorStop(0.3, colors[3]);
          grad.addColorStop(0.4, colors[4]);
          grad.addColorStop(0.5, colors[5]);
          grad.addColorStop(0.6, colors[6]);
          grad.addColorStop(0.8, colors[7]);
          grad.addColorStop(0.9, colors[8]);
          grad.addColorStop(1.0, colors[9]);
          //用CanvasGradient对象填充矩形
          this.context.fillStyle = grad;
          this.context.fillRect(0, 0, width, 100);
        })
    }
    .height("100%")
    .width('100%')
  }
}
- 径向渐变
createRadialGradient(
  x0: number, 	//起点圆心x坐标
  y0: number,		//起点圆心y坐标
  r0: number, 	//起点圆半径
  x1: number, 	//终点圆心x坐标
  y1: number, 	//终点圆心y坐标
  r1: number		//终点圆半径
): CanvasGradient
@Entry
@Component
struct CanvasDemo {
  //画笔配置对象,true表示开启抗锯齿
  private settings: RenderingContextSettings = new RenderingContextSettings(true)
  //画笔对象,传递画笔配置对象
  private context: CanvasRenderingContext2D = new CanvasRenderingContext2D(this.settings)

  build() {
    Column() {
      Canvas(this.context)
        .width("100%")
        .height("100%")
        .backgroundColor(Color.Pink)
        .onReady(() => {
          const width = this.context.width
          //1. 径向渐变
          //创建一个渐变色的CanvasGradient对象
          let grad = this.context.createRadialGradient(150, 150, 30, 150, 150, 150)
          //为CanvasGradient对象设置渐变断点值,包括偏移和颜色
          grad.addColorStop(0.0, '#FF0000');
          grad.addColorStop(0.5, '#FFFFFF');
          grad.addColorStop(1.0, '#BDDB69');
          //用CanvasGradient对象填充矩形
          this.context.fillStyle = grad;
          this.context.fillRect(0, 0, 300, 300);
        })
    }
    .height("100%")
    .width('100%')
  }
}
2.8 绘制图像
如图所示将图像绘制在Canvas画布上;截取屏幕上
@Entry
@Component
struct CanvasDemo {
  //画笔配置对象,true表示开启抗锯齿
  private settings: RenderingContextSettings = new RenderingContextSettings(true)
  //画笔对象,传递画笔配置对象
  private context: CanvasRenderingContext2D = new CanvasRenderingContext2D(this.settings)
  private offCanvas: OffscreenCanvas = new OffscreenCanvas(600, 600)
  private img: ImageBitmap = new ImageBitmap("/images/1234.jpg")

  build() {
    Column() {
      Canvas(this.context)
        .width("100%")
        .height("100%")
        .backgroundColor(Color.Pink)
        .onReady(() => {
          let offContext = this.offCanvas.getContext("2d", this.settings)
          // 使用drawImage接口将图片画在(0,0)为起点,宽高130的区域
          offContext.drawImage(this.img, 0, 0, 150, 150);
          // 使用getImageData接口,获得canvas组件区域中,(50,50)为起点,宽高130范围内的绘制内容
          let imagedata = offContext.getImageData(50, 50, 130, 130);
          // 使用putImageData接口将得到的ImageData画在起点为(150, 150)的区域中
          offContext.putImageData(imagedata, 150, 150);
          // 将离屏绘制的内容画到canvas组件上
          let image = this.offCanvas.transferToImageBitmap();
          this.context.transferFromImageBitmap(image);
        })
    }
    .height("100%")
    .width('100%')
  }
}

 浙公网安备 33010602011771号