Storageclass 外挂NFS配置与应用
Storageclass 外挂NFS配置与应用
1.StorageClass概念
PV 都是静态的,要使用的一个 PVC 的话就必须手动去创建一个 PV,这种方式在很大程度上并不能满足我们的需求,比如我们有一个应用需要对存储的并发度要求比较高,而另外一个应用对读写速度又要求比较高,特别是对于 StatefulSet 类型的应用简单的来使用静态的 PV 就很不合适了,这种情况下我们就需要用到动态 PV,这就需要 StorageClass动态的创建PV。
要使用 StorageClass,需要安装对应的自动配置程序,比如我们这里存储后端使用的是 nfs,那么我们就需要使用到一个 nfs-client 的自动配置程序,我们也叫它 Provisioner,这个程序使用我们已经配置好的 nfs 服务器,来自动创建持久卷,也就是自动帮我们创建 PV。
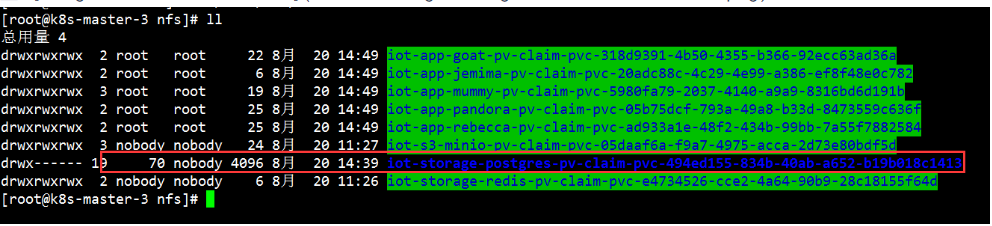
自动创建的 PV 以 ${namespace}-${pvcName}-${pvName} 这样的命名格式创建在 NFS 服务器上的共享数据目录中。
2.部署NFS
2.1 配置服务端
使用nfs作为外挂存储首先就是部署nfs服务器。
[root@k8s-master-3 ~]# yum -y install nfs-utils
[root@k8s-master-3 ~]# cat /etc/exports
/data/nfs 172.16.1.0/24(rw,sync,no_subtree_check,no_root_squash)

no_root_squash   # 以root身份来执行文件的操作,这样数据目录中的文件就可以被挂载对象使用权限更改的命令,笔者因权限问题,k8s一直报错 already present on machine ;通过pod日志查看才知道在容器中执行chown命令而出错。
# 建议将数据目录的权限调到最大来避免因权限引发对k8s内部的错误。
# 下面的图片中容器通过chown命令更改了属组,而引发了一系列的报错。起先就是在nfs上面没有权限的原因。
mkdir /data/nfs
chmod 777 /data/nfs

systemctl start nfs
systemctl enable nfs
2.2 客户端验证
[root@k8s-master-3 nfs]# exportfs -avr
exporting 172.16.1.0/24:/data/nfs

[root@k8s-master-2 mnt]# showmount -e 172.16.1.83
Export list for 172.16.1.83:
/data/nfs 172.16.1.0/24
3.部署Storageclass
3.1 克隆代码
git clone https://github.com/kubernetes-incubator/external-storage.git
3.2 创建角色绑定
cd external-storage/nfs-client/deploy

cat rbac.yaml
apiVersion: v1
kind: ServiceAccount
metadata:
  name: nfs-client-provisioner
  # replace with namespace where provisioner is deployed
  namespace: default
---
kind: ClusterRole
apiVersion: rbac.authorization.k8s.io/v1
metadata:
  name: nfs-client-provisioner-runner
rules:
  - apiGroups: [""]
    resources: ["persistentvolumes"]
    verbs: ["get", "list", "watch", "create", "delete"]
  - apiGroups: [""]
    resources: ["persistentvolumeclaims"]
    verbs: ["get", "list", "watch", "update"]
  - apiGroups: ["storage.k8s.io"]
    resources: ["storageclasses"]
    verbs: ["get", "list", "watch"]
  - apiGroups: [""]
    resources: ["events"]
    verbs: ["create", "update", "patch"]
---
kind: ClusterRoleBinding
apiVersion: rbac.authorization.k8s.io/v1
metadata:
  name: run-nfs-client-provisioner
subjects:
  - kind: ServiceAccount
    name: nfs-client-provisioner
    # replace with namespace where provisioner is deployed
    namespace: default
roleRef:
  kind: ClusterRole
  name: nfs-client-provisioner-runner
  apiGroup: rbac.authorization.k8s.io
---
kind: Role
apiVersion: rbac.authorization.k8s.io/v1
metadata:
  name: leader-locking-nfs-client-provisioner
  # replace with namespace where provisioner is deployed
  namespace: default
rules:
  - apiGroups: [""]
    resources: ["endpoints"]
    verbs: ["get", "list", "watch", "create", "update", "patch"]
---
kind: RoleBinding
apiVersion: rbac.authorization.k8s.io/v1
metadata:
  name: leader-locking-nfs-client-provisioner
  # replace with namespace where provisioner is deployed
  namespace: default
subjects:
  - kind: ServiceAccount
    name: nfs-client-provisioner
    # replace with namespace where provisioner is deployed
    namespace: default
roleRef:
  kind: Role
  name: leader-locking-nfs-client-provisioner
  apiGroup: rbac.authorization.k8s.io

kubectl apply -f rbac.yaml
3.2 部署 nfs client 插件
[root@k8s-master-1 deploy]# cat deployment.yaml
apiVersion: apps/v1
kind: Deployment
metadata:
  name: nfs-client-provisioner
  labels:
    app: nfs-client-provisioner
  # replace with namespace where provisioner is deployed
  namespace: default
spec:
  replicas: 1
  strategy:
    type: Recreate
  selector:
    matchLabels:
      app: nfs-client-provisioner
  template:
    metadata:
      labels:
        app: nfs-client-provisioner
    spec:
      serviceAccountName: nfs-client-provisioner
      containers:
        - name: nfs-client-provisioner
          # 如果地址下载比较慢可以先把镜像下载下来然后,修改这里的地址
          image: quay.io/external_storage/nfs-client-provisioner:latest
		  # 1.20 之后的版本用这个image easzlab/nfs-subdir-external-provisioner:v4.0.1
          volumeMounts:
            - name: nfs-client-root
              mountPath: /persistentvolumes
          env:
            - name: PROVISIONER_NAME
              # 与class 中的provisioner要一致
              value: fuseim.pri/ifs
            - name: NFS_SERVER
              value: 172.16.1.83    # <=====NFS服务器的地址
            - name: NFS_PATH
              value: /data/nfs      # <=====NFS服务器的路径
      volumes:
        - name: nfs-client-root
          nfs:
            server: 172.16.1.83     # <=====NFS服务器的地址
            path: /data/nfs         # <=====NFS服务器的路径

 kubectl apply -f deployment.yaml
3.3 创建Storageclass
[root@k8s-master-1 deploy]# cat class.yaml
apiVersion: storage.k8s.io/v1
kind: StorageClass
metadata:
  name: managed-nfs-storage
# or choose another name, must match deployment's env PROVISIONER_NAME'
# 这里的名字要与deployment中PROVISIONER_NAME的名字一致
provisioner: fuseim.pri/ifs
parameters:
  archiveOnDelete: "false"

kubectl apply -f class.yaml
4.查看 nfs 客户端 和 Storageclass
[root@k8s-master-1 deploy]#  kubectl  get sc
NAME                            PROVISIONER      RECLAIMPOLICY   VOLUMEBINDINGMODE   ALLOWVOLUMEEXPANSION   AGE
managed-nfs-storage (default)   fuseim.pri/ifs   Delete          Immediate           false                  6h42m
[root@k8s-master-1 deploy]# kubectl get pod
NAME                                      READY   STATUS    RESTARTS   AGE
nfs-client-provisioner-7bf6ff7b75-8p55n   1/1     Running   4          6h43m
5.验证storageclass
5.1 创建pvc
申请一个名字叫做test-claim的pv,从storageclass managed-nfs-storage中申请。
[root@k8s-master-1 pvtest]# cat pvc.yaml
kind: PersistentVolumeClaim
apiVersion: v1
metadata:
  name: test-claim
  annotations:
    # 这里指定了是用storageclass
    volume.beta.kubernetes.io/storage-class: "managed-nfs-storage"
spec:
  accessModes: # 策略
    - ReadWriteMany
  resources:
    requests:
      storage: 1Mi # 请求空间大小

kubectl  apply -f pvc.yaml
5.2 使pvc,绑定pv
[root@k8s-master-1 pvtest]# cat test-pod.yaml
kind: Pod
apiVersion: v1
metadata:
  name: test-pod
spec:
  containers:
  - name: test-pod
    image: docker.io/library/busybox:latest
    command:
      - "/bin/sh"
    args:
      - "-c"
      - "touch /mnt/SUCCESS && exit 0 || exit 1"
    volumeMounts:
      - name: nfs-pvc # 绑定pvc
        mountPath: "/mnt"
  restartPolicy: "Never"
  volumes:
    - name: nfs-pvc #pvc 通过pvc 动态创建pv
      persistentVolumeClaim:
        claimName: test-claim     # <=====这里指向了上面创建的pvc

kubectl  apply -f test-pod.yaml
查看、验证
[root@k8s-master-1 pvtest]# kubectl get pv
pvc-c1dde5e5-c91a-4d4e-98f1-2b022438bcd7   1Mi        RWX            Delete           Bound    default/test-claim              managed-nfs-storage            7m19s
6.设置为默认存储
使用storageclass的方式有两种一种是在创建pvc资源配置清单中指定使用。另外一种方法就是把它设置为默认的存储。
[root@k8s-master-1 pvtest]# cat pvc.yaml
kind: PersistentVolumeClaim
apiVersion: v1
metadata:
  name: test-claim
  annotations:
    # 这里指定了是用storageclass,如果storageclass是默认的存储方式则这里可以不用写。
    volume.beta.kubernetes.io/storage-class: "managed-nfs-storage"
spec:
  accessModes: # 策略
    - ReadWriteMany
  resources:
    requests:
      storage: 1Mi # 请求空间大小

kubectl  apply -f pvc.yaml
6.1 设置为默认的存储方式
 kubectl patch storageclass managed-nfs-storage -p '{"metadata": {"annotations":{"storageclass.kubernetes.io/is-default-class":"true"}}}'

managed-nfs-storage    # storageclass 配置的名字

[root@k8s-master-1 pvtest]# kubectl get sc
NAME                            PROVISIONER      RECLAIMPOLICY   VOLUMEBINDINGMODE   ALLOWVOLUMEEXPANSION   AGE
managed-nfs-storage (default)   fuseim.pri/ifs   Delete          Immediate           false                  7h28m

 浙公网安备 33010602011771号