
Spring之深入理解IoC
1 IoC 控制反转
- 控制反转是一种思想。
- 控制反转,反转的是什么?
- 将对象的创建权交出去,交给第三方容器负责。
- 将对象和对象之间关系的维护权交出去,交给第三方容器负责。
- 控制反转这种思想如何实现呢?
- DI(Dependency Injection):依赖注入
2 依赖注入
Spring是通过依赖注入的方式来完成Bean管理的。
Bean管理指的是:Bean对象的创建,以及Bean对象中属性的赋值(或者叫做Bean对象之间关系的维护)。
依赖注入:
- 依赖指的是对象和对象之间的关联关系。
- 注入指的是一种数据传递行为,通过注入行为来让对象和对象产生关系。
依赖注入常见的实现方式包括两种:
- 第一种:set注入
- 第二种:构造注入
2.1 set注入
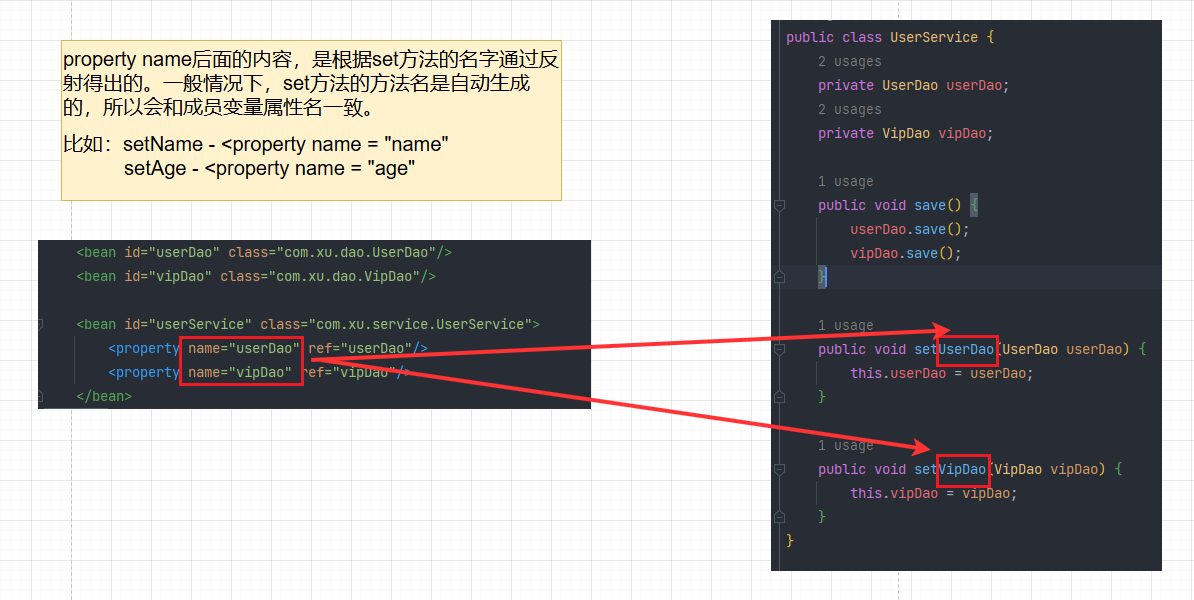
set注入是基于set方法实现的,底层会通过反射机制调用属性对应的set方法然后给属性赋值。这种方式要求必须对外提供属性的set方法。
通过一个例子来学习set注入
pom.xml
<?xml version="1.0" encoding="UTF-8"?>
<project xmlns="http://maven.apache.org/POM/4.0.0"
         xmlns:xsi="http://www.w3.org/2001/XMLSchema-instance"
         xsi:schemaLocation="http://maven.apache.org/POM/4.0.0 http://maven.apache.org/xsd/maven-4.0.0.xsd">
    <modelVersion>4.0.0</modelVersion>

    <groupId>com.xu</groupId>
    <artifactId>spring6-002-dependency-injection</artifactId>
    <version>1.0-SNAPSHOT</version>
    <packaging>jar</packaging>

    <properties>
        <maven.compiler.source>17</maven.compiler.source>
        <maven.compiler.target>17</maven.compiler.target>
    </properties>

    <dependencies>
        <!--spring context依赖-->
        <dependency>
            <groupId>org.springframework</groupId>
            <artifactId>spring-context</artifactId>
            <version>6.0.0</version>
        </dependency>
        <!--junit-->
        <dependency>
            <groupId>junit</groupId>
            <artifactId>junit</artifactId>
            <version>4.13.2</version>
            <scope>test</scope>
        </dependency>

        <!--log4j2的依赖-->
        <dependency>
            <groupId>org.apache.logging.log4j</groupId>
            <artifactId>log4j-core</artifactId>
            <version>2.20.0</version>
        </dependency>
        <dependency>
            <groupId>org.apache.logging.log4j</groupId>
            <artifactId>log4j-slf4j2-impl</artifactId>
            <version>2.20.0</version>
        </dependency>
    </dependencies>
</project>
UserService
package com.xu.service;

import com.xu.dao.UserDao;
import com.xu.dao.VipDao;

public class UserService {
    private UserDao userDao;
    private VipDao vipDao;

    public void save() {
        userDao.save();
        vipDao.save();
    }

    public void setUserDao(UserDao userDao) {
        this.userDao = userDao;
    }

    public void setVipDao(VipDao vipDao) {
        this.vipDao = vipDao;
    }
}
UserDao
package com.xu.dao;

import org.slf4j.Logger;
import org.slf4j.LoggerFactory;

public class UserDao {
    private static Logger LOGGER = LoggerFactory.getLogger(UserDao.class);

    public void save() {
        LOGGER.info("UserDao正在保存用户信息");
    }
}
VipDao
package com.xu.dao;

import org.slf4j.Logger;
import org.slf4j.LoggerFactory;

public class VipDao {
    private Logger LOGGER = LoggerFactory.getLogger(VipDao.class);

    public void save() {
        LOGGER.info("VipDao正在保存用户信息");
    }
}
log4j2.xml
<?xml version="1.0" encoding="UTF-8"?>

<configuration>
    <loggers>
        <root level="INFO">
            <appender-ref ref="log"/>
        </root>
    </loggers>

    <appenders>
        <console name="log" target="SYSTEM_OUT">
            <PatternLayout pattern="%d{yyyy-MM-dd HH:mm:ss SSS} [%t] %-3level %logger{1024} - %msg%n"/>
        </console>
    </appenders>
</configuration>
spring.xml
<?xml version="1.0" encoding="UTF-8"?>
<beans xmlns="http://www.springframework.org/schema/beans"
       xmlns:xsi="http://www.w3.org/2001/XMLSchema-instance"
       xsi:schemaLocation="http://www.springframework.org/schema/beans http://www.springframework.org/schema/beans/spring-beans.xsd">
    <bean id="userDao" class="com.xu.dao.UserDao"/>
    <bean id="vipDao" class="com.xu.dao.VipDao"/>

    <bean id="userService" class="com.xu.service.UserService">
        <property name="userDao" ref="userDao"/>
        <property name="vipDao" ref="vipDao"/>
    </bean>
</beans>
测试类
package com.xu.test;

import com.xu.service.UserService;
import org.junit.Test;
import org.springframework.context.ApplicationContext;
import org.springframework.context.support.ClassPathXmlApplicationContext;

public class SpringTest {
    @Test
    public void testIoC() {
        ApplicationContext applicationContext = new ClassPathXmlApplicationContext("spring.xml");
        UserService userService = applicationContext.getBean("userService", UserService.class);
        userService.save();
    }
}
运行结果:

原理是什么?
set注入的核心实现原理:通过反射机制调用set方法来给属性赋值,让两个对象之间产生关系。
举例验证:
1.将成员属性的属性名改为userhaha和viphaha,然后保持set方法的方法名不变,测试这种情况下,程序应该可以正常运行。不会报错。
package com.xu.service;

import com.xu.dao.UserDao;
import com.xu.dao.VipDao;

public class UserService {
    private UserDao userhaha;
    private VipDao viphaha;

    public void save() {
        userhaha.save();
        viphaha.save();
    }

    public void setUserDao(UserDao userDao) {
        this.userhaha = userDao;
    }

    public void setVipDao(VipDao vipDao) {
        this.viphaha = vipDao;
    }
}
<?xml version="1.0" encoding="UTF-8"?>
<beans xmlns="http://www.springframework.org/schema/beans"
       xmlns:xsi="http://www.w3.org/2001/XMLSchema-instance"
       xsi:schemaLocation="http://www.springframework.org/schema/beans http://www.springframework.org/schema/beans/spring-beans.xsd">
    <bean id="userDao" class="com.xu.dao.UserDao"/>
    <bean id="vipDao" class="com.xu.dao.VipDao"/>

    <bean id="userService" class="com.xu.service.UserService">
        <property name="userDao" ref="userDao"/>
        <property name="vipDao" ref="vipDao"/>
    </bean>
</beans>
运行结果:成功

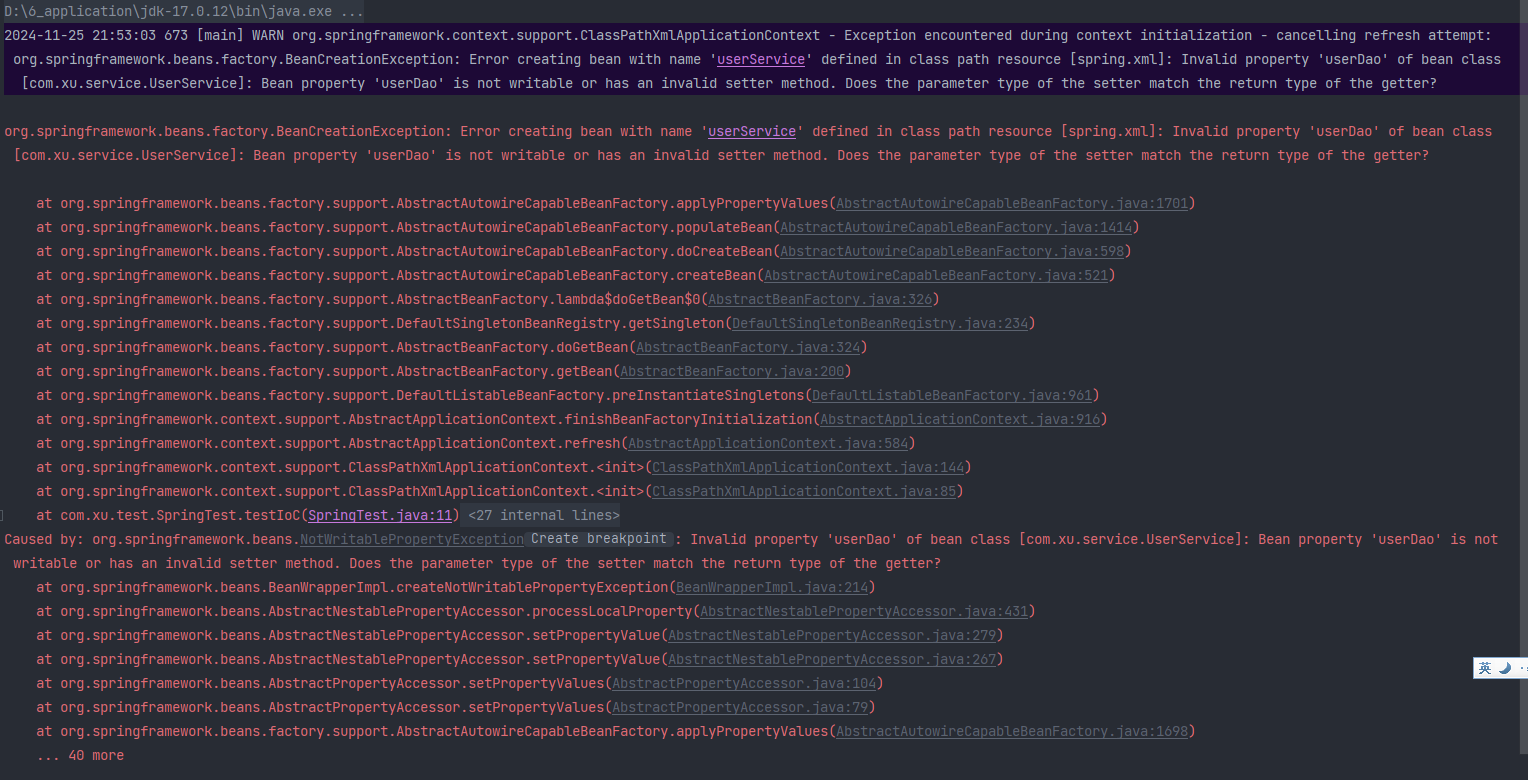
2.保持成员属性的属性名不变,将set方法的方法名改为setUserDaoHaHa和setVipDaoHaHa,测试这种情况下,程序应该会报错。
package com.xu.service;

import com.xu.dao.UserDao;
import com.xu.dao.VipDao;

public class UserService {
    private UserDao userDao;
    private VipDao vipDao;

    public void save() {
        userDao.save();
        vipDao.save();
    }

    public void setUserDaoHaHa(UserDao userDao) {
        this.userDao = userDao;
    }

    public void setVipDaoHaHa(VipDao vipDao) {
        this.vipDao = vipDao;
    }
}
如果property的name还是传的userDao和vipDao就会报错
<?xml version="1.0" encoding="UTF-8"?>
<beans xmlns="http://www.springframework.org/schema/beans"
       xmlns:xsi="http://www.w3.org/2001/XMLSchema-instance"
       xsi:schemaLocation="http://www.springframework.org/schema/beans http://www.springframework.org/schema/beans/spring-beans.xsd">
    <bean id="userDao" class="com.xu.dao.UserDao"/>
    <bean id="vipDao" class="com.xu.dao.VipDao"/>

    <bean id="userService" class="com.xu.service.UserService">
        <property name="userDao" ref="userDao"/>
        <property name="vipDao" ref="vipDao"/>
    </bean>
</beans>
将property的name改为userDaoHaHa和vipDaoHaHa就成功了
<?xml version="1.0" encoding="UTF-8"?>
<beans xmlns="http://www.springframework.org/schema/beans"
       xmlns:xsi="http://www.w3.org/2001/XMLSchema-instance"
       xsi:schemaLocation="http://www.springframework.org/schema/beans http://www.springframework.org/schema/beans/spring-beans.xsd">
    <bean id="userDao" class="com.xu.dao.UserDao"/>
    <bean id="vipDao" class="com.xu.dao.VipDao"/>

    <bean id="userService" class="com.xu.service.UserService">
        <property name="userDaoHaHa" ref="userDao"/>
        <property name="vipDaoHaHa" ref="vipDao"/>
    </bean>
</beans>

2.2 构造注入
原理:通过调用构造方法来给属性赋值。
使用下标注入
package com.xu.dao;

import org.slf4j.Logger;
import org.slf4j.LoggerFactory;

public class OrderDao {
    private static Logger LOGGER = LoggerFactory.getLogger(OrderDao.class);

    public void orderService() {
        LOGGER.info("服务已预约~");
    }
}
package com.xu.service;

import com.xu.dao.OrderDao;

public class OrderService {
    private OrderDao orderDao;

    public OrderService(OrderDao orderDao) {
        this.orderDao = orderDao;
    }

    public void order() {
        orderDao.orderService();
    }
}
<bean id="orderDao" class="com.xu.dao.OrderDao" />

<bean id="orderService" class="com.xu.service.OrderService">
    <!--index="0"表示构造方法的第一个参数,将orderDao对象传递给构造方法的第一个参数。-->
    <constructor-arg index="0" ref="orderDao"/>
    <!-- 如果有多个构造方法参数,则继续加index="1" -->
    <!-- <constructor-arg index="1" ref="orderDao"/>-->
</bean>
@Test
public void testConstructorDI() {
    ApplicationContext applicationContext = new ClassPathXmlApplicationContext("spring.xml");
    OrderService orderService = applicationContext.getBean("orderService", OrderService.class);
    orderService.order();
}
运行结果如下:

使用构造方法参数名注入
package com.xu.service;

import com.xu.dao.UserDao;
import com.xu.dao.VipDao;

public class UserService2 {
    private UserDao userDao;
    private VipDao vipDao;

    public UserService2(UserDao userDao, VipDao vipDao) {
        this.userDao = userDao;
        this.vipDao = vipDao;
    }

    public void save() {
        userDao.save();
        vipDao.save();
    }
}
@Test
public void testConstructorDIByName() {
    ApplicationContext applicationContext = new ClassPathXmlApplicationContext("beans.xml");
    UserService2 userService2 = applicationContext.getBean("userService", UserService2.class);
    userService2.save();
}
<?xml version="1.0" encoding="UTF-8"?>
<beans xmlns="http://www.springframework.org/schema/beans"
       xmlns:xsi="http://www.w3.org/2001/XMLSchema-instance"
       xsi:schemaLocation="http://www.springframework.org/schema/beans http://www.springframework.org/schema/beans/spring-beans.xsd">
    <bean id="userDao" class="com.xu.dao.UserDao"/>
    <bean id="vipDao" class="com.xu.dao.VipDao"/>

    <bean id="userService" class="com.xu.service.UserService2">
        <constructor-arg name="userDao" ref="userDao"/>
        <constructor-arg name="vipDao" ref="vipDao"/>
    </bean>
</beans>

即不指定下标,也不指定参数名,让Spring自行判断
<bean id="userServiceBean" class="com.xu.service.UserService2">
    <constructor-arg ref="userDao"/>
    <constructor-arg ref="vipDao"/>
</bean>
@Test
public void testConstructorDIWithNothing() {
    ApplicationContext applicationContext = new ClassPathXmlApplicationContext("beans.xml");
    UserService2 userService = applicationContext.getBean("userServiceBean", UserService2.class);
    userService.save();
}

3 set注入专题
3.1 注入外部Bean
<?xml version="1.0" encoding="UTF-8"?>
<beans xmlns="http://www.springframework.org/schema/beans"
       xmlns:xsi="http://www.w3.org/2001/XMLSchema-instance"
       xsi:schemaLocation="http://www.springframework.org/schema/beans http://www.springframework.org/schema/beans/spring-beans.xsd">

    <bean id="userDaoBean" class="com.powernode.spring6.dao.UserDao"/>

    <bean id="userServiceBean" class="com.powernode.spring6.service.UserService">
        <property name="userDao" ref="userDaoBean"/> <!-- 这个就叫做注入外部bean -->
    </bean>

</beans>
外部Bean的特点:bean定义在外面,在property标签中使用ref属性进行注入。这种方式比较常用。
3.2 注入内部Bean
内部Bean的方式:在bean标签中嵌套bean标签。
<?xml version="1.0" encoding="UTF-8"?>
<beans xmlns="http://www.springframework.org/schema/beans"
       xmlns:xsi="http://www.w3.org/2001/XMLSchema-instance"
       xsi:schemaLocation="http://www.springframework.org/schema/beans http://www.springframework.org/schema/beans/spring-beans.xsd">

    <bean id="userServiceBean" class="com.powernode.spring6.service.UserService">
        <property name="userDao">
            <bean class="com.powernode.spring6.dao.UserDao"/>
        </property>
    </bean>

</beans>
3.3 注入简单类型
package com.xu.entity;

public class User {
    private String name;
    private int age;

    public void setName(String name) {
        this.name = name;
    }

    public void setAge(int age) {
        this.age = age;
    }

    @Override
    public String toString() {
        return "User{" +
                "name='" + name + '\'' +
                ", age=" + age +
                '}';
    }
}
第二步:编写spring配置文件:spring-simple-di.xml
<?xml version="1.0" encoding="UTF-8"?>
<beans xmlns="http://www.springframework.org/schema/beans"
       xmlns:xsi="http://www.w3.org/2001/XMLSchema-instance"
       xsi:schemaLocation="http://www.springframework.org/schema/beans http://www.springframework.org/schema/beans/spring-beans.xsd">
    <bean id="user" class="com.xu.entity.User">
        <property name="name" value="xu"/>
        <property name="age" value="22"/>
    </bean>
</beans>
第三步:编写测试程序
@Test
public void testSimpleValue() {
    ApplicationContext applicationContext = new ClassPathXmlApplicationContext("spring-simple-di.xml");
    User user = applicationContext.getBean("user", User.class);
    System.out.println(user);
}
第四步:运行测试程序


 浙公网安备 33010602011771号