
数据库连接池之c3p0-0.9.1.2,16年的古董,发生连接泄露怎么查(二)
背景
本篇是c3p0连接泄露问题的第二篇,在前面一篇里面,大体介绍了问题,问题就是,我们发现线上服务不响应的原因是拿不到连接。而为啥拿不到连接呢,因为空闲链表为空,那么为什么空闲链表为空呢?
这个我一开始的猜测就是,估计是某处代码从连接池里获取了连接,用完了没有归还,那么,怎么才能找到这些罪恶的代码呢?
结合简单的源码分析、文档、搜索引擎,发现了两个配置项。
<property name="unreturnedConnectionTimeout">50</property>
<property name="debugUnreturnedConnectionStackTraces">true</property>
配置项的官方解释
首先说下,官方文档去哪里看呢,由于这个版本07年发布的,而官网一般只有近期版本的文档,所以我也是费了一些周折才找到。
https://sourceforge.net/projects/c3p0/files/c3p0-bin/c3p0-0.9.1.2/
另外,这里也额外补充下源码的地址:源码有两种方式获得,一是通过mvn仓库,二是https://sourceforge.net/projects/c3p0/files/c3p0-src/c3p0-0.9.1.2/,两种方式获得的源码我对比过,是一致的。
在下载的zip包中,doc/index.html即是该版本的离线文档。
其中的Configuring to Debug and Workaround Broken Client Applications章节,讲述了这两个配置项的意思。喜欢看原文的看下图即可:

我简单翻译下意思:
有时候,应用程序比较大意,它们从连接池中获取的连接可能未调用close进行关闭。最终,池子膨胀到maxSize,然后因为这些大意的应用程序耗尽连接池。
解决这个问题的正确方式是修复程序。c3p0能帮你debug,让你知道是哪里发生了借出连接不归还的情况。也有比较少见的情况下,程序的开发周期已经结束,即使你明知其有bug也无法修复。在这种情况下,c3p0能帮你绕过这个问题,阻止其耗尽连接池。
unreturnedConnectionTimeout 定义了一个连接被借出后可以多久不归还的时间(单位秒),如果设置为非0的值,未归还的被借出的连接,超过这个时间后会被销毁,然后在连接池中重新生成新的连接。显然,你必须设置这个参数在一个合理的值,以确保程序在拿到连接后有时间能去完成自己的所有潜在操作(增删改查)。你能使用这个参数绕过那些有问题的借了连接不还的程序代码。
比绕过问题更好的办法是修复代码。除了设置上述参数外,还需要设置debugUnreturnedConnectionStackTraces为true,那么,在连接被借出时,会生成一个借用线程的线程堆栈快照。等到这类未归还的连接超过unreturnedConnectionTimeout 的时候,就可以打印出对应的线程堆栈,从而揭示出问题所在。这个参数主要用于找出异常代码,修复后可以关掉,因为借出连接时生成线程堆栈也是一个较为耗时的行为。
配置项在源码中如何初始化
1、datasource的初始化
首先是配置,我们这边是框架从一个xml文件读配置:
<datasource id="test" desc="">
    <property name="driver-name">oracle.jdbc.driver.OracleDriver</property>
    <property name="url">jdbc:oracle:thin:@1.1.1.1:1521:orcl</property>
    <property name="user">111</property>
    <property name="password">111</property>
    <property name="initialPoolSize">1</property>
    <property name="minPoolSize">1</property>
    <property name="maxPoolSize">50</property>
    <property name="maxIdleTime">0</property>
    <property name="checkoutTimeout">10000</property>
    <property name="maxStatements">0</property>
    <property name="idleConnectionTestPeriod">0</property>
    <property name="acquireRetryAttempts">30</property>
    <property name="acquireIncrement">2</property>
    <property name="unreturnedConnectionTimeout">50</property>
    <property name="debugUnreturnedConnectionStackTraces">true</property>
  </datasource>
初始化代码如下:
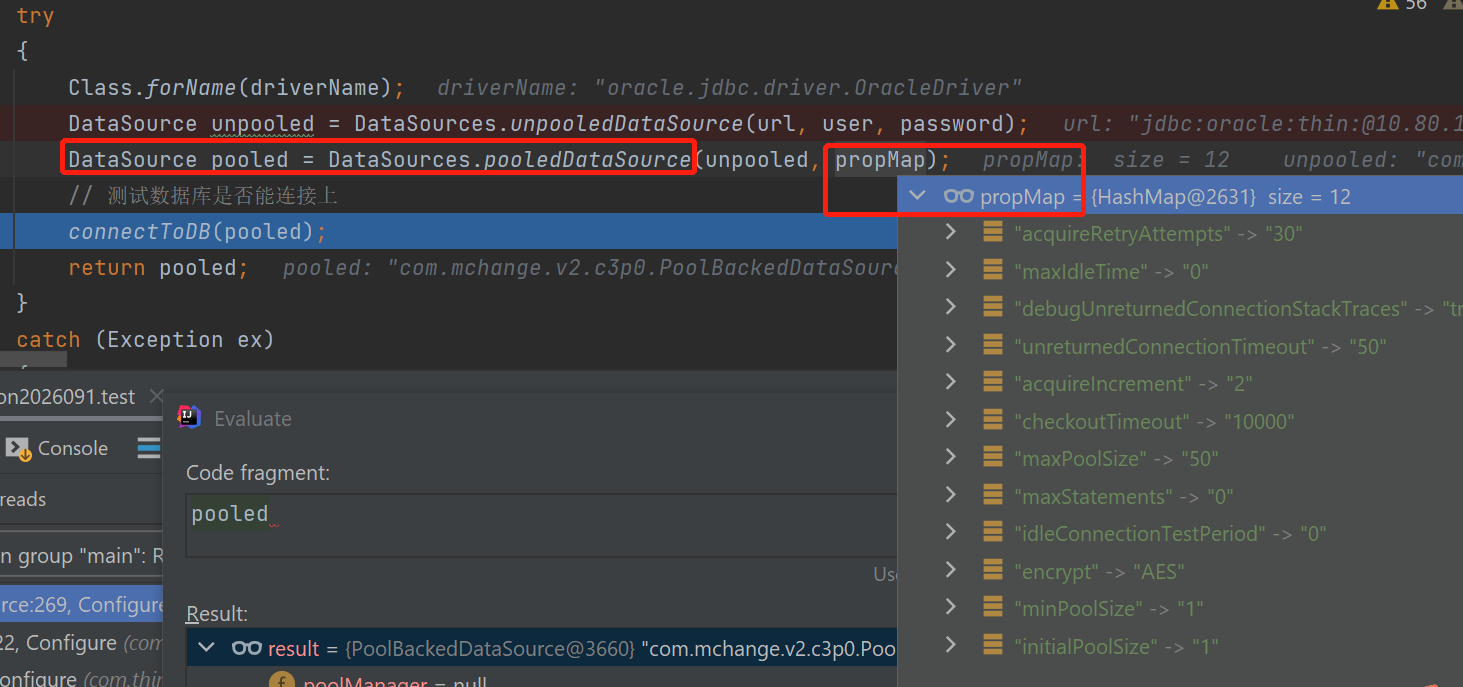
核心的代码是上图红框,一方面接收一个未池化的只封装了url、用户名密码的datasource,一方面接收配置项map。
进入函数内部后,会生成一个WrapperConnectionPoolDataSource对象,内部会把用户的配置项map设置进去,这也包含了前面我们要设置进去的unreturnedConnectionTimeout 和 debugUnreturnedConnectionStackTraces。
WrapperConnectionPoolDataSource wcpds = new WrapperConnectionPoolDataSource(configName);
// 设置原始的未池化datasource
wcpds.setNestedDataSource( unpooledDataSource );
// 设置用户配置项
BeansUtils.overwriteAccessiblePropertiesFromMap( overrideProps);
接下来呢,返回给用户的datasource的实际类型为PoolBackedDataSource:
PoolBackedDataSource nascent_pbds = new PoolBackedDataSource(configName);
nascent_pbds.setConnectionPoolDataSource( wcpds );
其实呢,这个PoolBackedDataSource,有个关键字段poolManager还没初始化,也就是说,连接池此时还没生成(懒加载),看图:
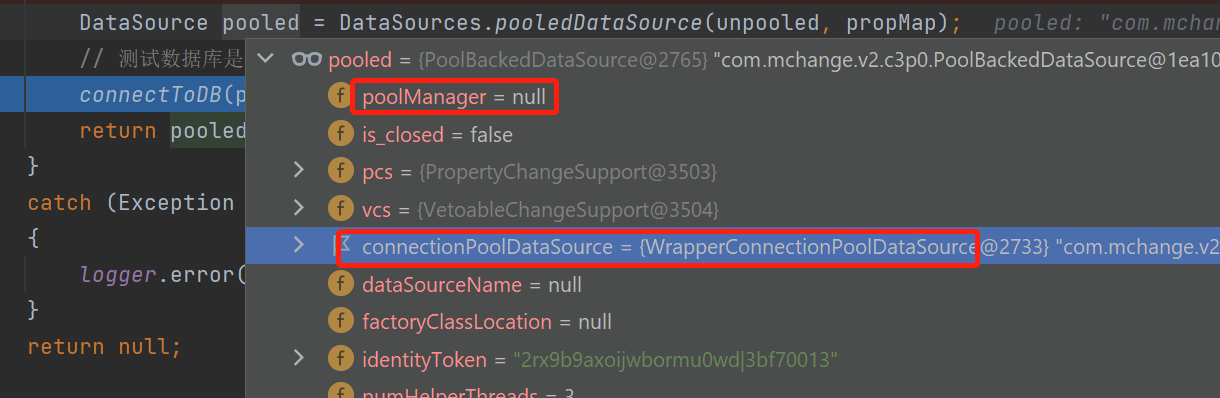
什么时候生成连接池呢?要等到第一次调用的时候,如获取连接。所以,我们框架是启动时,先去调用一次,确保连接池初始化。
private static void connectToDB(DataSource dataSource)
{
    // datasource:  com.mchange.v2.c3p0.PoolBackedDataSource
    Connection conn =  dataSource.getConnection();
}
此时,就会进入如下方法:
com.mchange.v2.c3p0.impl.AbstractPoolBackedDataSource#getConnection()
public Connection getConnection() throws SQLException
{
    PooledConnection pc = getPoolManager().getPool().checkoutPooledConnection();
    return pc.getConnection();
}
首先进入getPoolManager:
private synchronized C3P0PooledConnectionPoolManager getPoolManager() throws SQLException
{
    if (poolManager == null)
    {
        ConnectionPoolDataSource cpds = assertCpds();
        poolManager = new C3P0PooledConnectionPoolManager(cpds, null, null, this.getNumHelperThreads(), this.getIdentityToken());
    }
    return poolManager;
}
可以看到,是个懒加载方法,首次进入时才开始new:
2、poolManager的初始化
com.mchange.v2.c3p0.impl.C3P0PooledConnectionPoolManager#poolsInit
首先是生成一个定时任务执行线程:
this.timer = new Timer( true );
再下来,是生成一个线程池,当然,我们知道,线程池的线程,如果执行一些阻塞还不带超时的方法(如网络请求,而对方完全不返回或者很久才返回的时候),就会导致线程完全hang死,所以,这个线程池支持设置一个时间阈值,超过这个阈值,就会把这个线程给中断。
至于要不要生成这么一个带中断功能的线程池,是根据配置项:maxAdministrativeTaskTime。如果值大于0,就开启该功能。
int matt = this.getMaxAdministrativeTaskTime( null );
if ( matt > 0 )
{
    int matt_ms = matt * 1000;
    this.taskRunner = new ThreadPoolAsynchronousRunner( num_task_threads,
                                                       true,
                                                       matt_ms,
                                                       matt_ms * 3,
                                                       matt_ms * 6,
                                                       timer );
}
生成的线程池赋值给taskRunner字段。
如果maxAdministrativeTaskTime为0,则调用如下方法生成:
this.taskRunner = new ThreadPoolAsynchronousRunner( num_task_threads, true, timer );
线程池生成后,还要生成一个工厂,一个用来创建资源池(即连接池)的工厂:
ResourcePoolFactory          rpfact;

this.rpfact = BasicResourcePoolFactory.createNoEventSupportInstance( taskRunner, timer );
3、线程池的生成
// 设置线程池大小,它这个线程池是不能扩缩容的,是固定大小
this.num_threads = num_threads;
// 后台运行
this.daemon = daemon;
// maxAdministrativeTaskTime的值,一个任务最多运行多久
this.max_individual_task_time = max_individual_task_time;
// 死锁检测相关配置
this.deadlock_detector_interval = deadlock_detector_interval;
this.interrupt_delay_after_apparent_deadlock = interrupt_delay_after_apparent_deadlock;
this.myTimer = myTimer;
this.should_cancel_timer = should_cancel_timer;
// 根据配置创建线程
recreateThreadsAndTasks();
// 周期运行死锁检测任务
myTimer.schedule( deadlockDetector, deadlock_detector_interval, deadlock_detector_interval );
从上我们看到,这里面有个timer,而且给这个timer传递了一个周期调度的job,这个job呢,是进行死锁检测的,为啥叫这个名字,我估计,作者也他么知道自己用了太多多线程的东西了,太多syn关键字,容易导致出问题,所以搞个死锁检测的job,看看是不是有问题,有问题的话,就会打日志、重建线程池等。
而创建线程的部分如下:
private void recreateThreadsAndTasks()
{
    this.managed = new HashSet();
    this.available = new HashSet();
    this.pendingTasks = new LinkedList();
    for (int i = 0; i < num_threads; ++i)
    {
        Thread t = new PoolThread(i, daemon);
        managed.add( t );
        available.add( t );
        t.start();
    }
}
这里就是并没有线程池,有的只是n个线程,线程继承了jdk自带的线程:
class PoolThread extends Thread
运行逻辑如下:
HashSet    managed; // 所有的线程
HashSet    available; // 空闲线程
LinkedList pendingTasks; // 待执行的任务链表

while (true)
{
	Runnable myTask;
	synchronized ( ThreadPoolAsynchronousRunner.this )
	{
        // 1 没有任务,睡眠
		while ( pendingTasks.size() == 0 )
			ThreadPoolAsynchronousRunner.this.wait( POLL_FOR_STOP_INTERVAL );
		// 2 有任务,准备执行,则先把自己从空闲线程中摘掉
		if (! available.remove( this ) )
			throw new InternalError("An unavailable PoolThread tried to check itself out!!!");
        // 3 获取要执行的任务,队头获取
		myTask = (Runnable) pendingTasks.remove(0);
		currentTask = myTask;
	}
	// 4 检查是否设置了task的最长运行时间,设置了的话,要给timer调度一个n秒后执行的task,task届时会打断我们
	if (max_individual_task_time > 0)
		setMaxIndividualTaskTimeEnforcer();
    // 5 执行任务
	myTask.run();

	finally
	{   // 6 走到这,说明执行完成了,取消给timer调度的task
		if ( maxIndividualTaskTimeEnforcer != null )
			cancelMaxIndividualTaskTimeEnforcer();

		synchronized ( ThreadPoolAsynchronousRunner.this )
		{	// 7 把自己放回空闲线程列表
            available.add( this )
			currentTask = null;
		}
	}
}
4、连接池factory的创建
首先是连接池工厂的创建,工厂的创建并不复杂,工厂在构造器中,只是接收了从外部传递进来的timer和线程池:
BasicResourcePoolFactory( AsynchronousRunner taskRunner,
                         RunnableQueue asyncEventQueue,
                         Timer timer,
                         int default_num_task_threads)
{
    this.taskRunner = taskRunner;
    this.timer = timer;
    this.default_num_task_threads = default_num_task_threads;
}
5、poolManager创建完成,创建pool
public Connection getConnection() throws SQLException
{
    PooledConnection pc = getPoolManager().getPool().checkoutPooledConnection();
    return pc.getConnection();
}
接下来即进入getPool方法:
	com.mchange.v2.c3p0.impl.C3P0PooledConnectionPoolManager

    private C3P0PooledConnectionPool createPooledConnectionPool(DbAuth auth) throws SQLException
    {
        C3P0PooledConnectionPool out =  new C3P0PooledConnectionPool( cpds,
                        auth,
                        this.getMinPoolSize( userName ),
                        this.getMaxPoolSize( userName ),
                        this.getInitialPoolSize( userName ),
                        this.getAcquireIncrement( userName ),
                        this.getAcquireRetryAttempts( userName ),
                        this.getAcquireRetryDelay( userName ),
                        this.getBreakAfterAcquireFailure( userName ),
                        this.getCheckoutTimeout( userName ),
                        this.getIdleConnectionTestPeriod( userName ),
                        this.getMaxIdleTime( userName ),
                        this.getMaxIdleTimeExcessConnections( userName ),
                        this.getMaxConnectionAge( userName ),
                        this.getPropertyCycle( userName ),
                        this.getUnreturnedConnectionTimeout( userName ),
                        this.getDebugUnreturnedConnectionStackTraces( userName ),
                        this.getTestConnectionOnCheckout( userName ),
                        this.getTestConnectionOnCheckin( userName ),
                        this.getMaxStatements( userName ),
                        this.getMaxStatementsPerConnection( userName ),
                        this.getConnectionTester( userName ),
                        this.getConnectionCustomizer( userName ),
                        realTestQuery,
                        rpfact,
                        taskRunner,
                        parentDataSourceIdentityToken );
	}
从上面可以看到,这里获取很多配置项,以我们关注的getUnreturnedConnectionTimeout为例:
private int getUnreturnedConnectionTimeout(String userName)
{
    return getInt("unreturnedConnectionTimeout", userName );
}
实际最终取值呢,就是从如下字段中取值,这个大家看前文就知道,里面存储了我们的用户配置项:
final ConnectionPoolDataSource cpds;

propName = "unreturnedConnectionTimeout";
Method m = (Method) propNamesToReadMethods.get( propName );
if (m != null)
{
    // cpds中取值
    Object readProp = m.invoke( cpds, null );
    if (readProp != null)
        out = readProp.toString();
}
在new C3P0PooledConnectionPool的内部,实现如下:
- 如果设置了statement的缓存相关参数,则创建缓存:
this.scache = new DoubleMaxStatementCache( taskRunner, maxStatements, maxStatementsPerConnection );
-
根据传入的参数,设置到ResourcePoolFactory fact,如我们关注的
fact.setDestroyOverdueResourceTime( unreturnedConnectionTimeout * 1000 );
fact.setDebugStoreCheckoutStackTrace( debugUnreturnedConnectionStackTraces );
注意,我们传入的unreturnedConnectionTimeout,被换算成毫秒,赋值给:
long destroy_overdue_resc_time;而debugUnreturnedConnectionStackTraces,变成了:
boolean debug_store_checkout_stacktrace = false;完整的如下:
fact.setMin( min ); fact.setMax( max ); fact.setStart( start ); fact.setIncrement( inc ); fact.setIdleResourceTestPeriod( idleConnectionTestPeriod * 1000); fact.setResourceMaxIdleTime( maxIdleTime * 1000 ); fact.setExcessResourceMaxIdleTime( maxIdleTimeExcessConnections * 1000 ); fact.setResourceMaxAge( maxConnectionAge * 1000 ); fact.setExpirationEnforcementDelay( propertyCycle * 1000 ); fact.setDestroyOverdueResourceTime( unreturnedConnectionTimeout * 1000 ); fact.setDebugStoreCheckoutStackTrace( debugUnreturnedConnectionStackTraces ); fact.setAcquisitionRetryAttempts( acq_retry_attempts ); fact.setAcquisitionRetryDelay( acq_retry_delay ); fact.setBreakOnAcquisitionFailure( break_after_acq_failure ); -
创建资源池
rp = fact.createPool( manager ); -
resourcePool创建
首先是,把传入的配置保存下来:
this.start                            = start;
this.min                              = min;
this.max                              = max;
this.inc                              = inc;
this.num_acq_attempts                 = num_acq_attempts;
this.acq_attempt_delay                = acq_attempt_delay;
this.check_idle_resources_delay       = check_idle_resources_delay;
this.max_resource_age                 = max_resource_age;
this.max_idle_time                    = max_idle_time;
this.excess_max_idle_time             = excess_max_idle_time;
// 我们关注的属性
this.destroy_unreturned_resc_time     = destroy_unreturned_resc_time;
this.debug_store_checkout_exceptions  = (debug_store_checkout_exceptions && destroy_unreturned_resc_time > 0

this.break_on_acquisition_failure     = break_on_acquisition_failure;
其次,外部传入的timer、线程池的引用也存储下来:
this.taskRunner                       = taskRunner;
// 就是最前面那个死锁检测的timer,传进来换了名字
this.cullAndIdleRefurbishTimer        = cullAndIdleRefurbishTimer;
开始池子的初始化:
// 计算初始的池子大小
this.target_pool_size = Math.max(start, min);
//start acquiring our initial resources
ensureStartResources();
private void ensureStartResources() { recheckResizePool(); } private void expandPool(int count) { for (int i = 0; i < count; ++i) taskRunner.postRunnable( new AcquireTask() ); }注意,这里是异步去创建资源的,这里只负责生成创建任务。为啥c3p0代码难懂,就是动不动整个多线程,最终难以维护也是这个原因。线程池taskRunner,就是前文那个线程池
资源创建完成后,开始给timer生成一个周期task,该task主要检测有没有连接过期了,或者空闲太长时间,如果找到这种资源,就进行人道毁灭。
if (mustEnforceExpiration())
{
    this.cullTask = new CullTask();
    // 给timer整个周期job
    cullAndIdleRefurbishTimer.schedule( cullTask, minExpirationTime(), this.expiration_enforcement_delay );
}
而注意上面的方法mustEnforceExpiration,我们关注的参数就会参与到这里:
    private boolean mustEnforceExpiration()
    {
        return
                max_resource_age > 0 ||
                        max_idle_time > 0 ||
                        excess_max_idle_time > 0 ||
            			// 这里
                        destroy_unreturned_resc_time > 0;
    }
如果你其他几个属性都没设置,只设置了 unreturnedConnectionTimeout,它就会进入该分支,否则大家都为0,是开启不了分支的,
CullTask就不会被调度。至此,我们完成了pool的初始化。
配置项在连接借出时如何生效
再回到下面这个代码:
public Connection getConnection() throws SQLException
{
    PooledConnection pc = getPoolManager().getPool().checkoutPooledConnection();
    return pc.getConnection();
}
上面,我们完成了 getPoolManager().getPool()的源码分析,终于可以去获取连接了。
com.mchange.v2.c3p0.impl.C3P0PooledConnectionPool#checkoutPooledConnection

public PooledConnection checkoutPooledConnection() throws SQLException
{
    // rp: final ResourcePool rp;
	return (PooledConnection) rp.checkoutResource( checkoutTimeout );
}
这里找pool获取连接,实际内部会去找rp借连接:
private synchronized Object prelimCheckoutResource( long timeout )
{
	// 检查空闲链表的size
    int available = unused.size();
    if (available == 0)
    {
        // 空闲链表为空,检测是否可以扩容
        int msz = managed.size();
        if (msz < max)
        {
            int desired_target = msz + acquireWaiters.size() + 1;
            if (desired_target >= target_pool_size)
            {
                desired_target = Math.max(desired_target, target_pool_size + inc);
                target_pool_size = Math.max( Math.min( max, desired_target ), min );

                _recheckResizePool();
            }
        }
		// 扩容是异步的,在这里等待
        awaitAvailable(timeout); //throws timeout exception
    }
	// 有连接,取队列头部的
    Object  resc = unused.get(0);
	// 取到的连接有问题,毁灭资源
    if ( shouldExpire( resc ) )
    {
        removeResource( resc );
        ensureMinResources();
        return prelimCheckoutResource( timeout );
    }
    else
    {
        // 资源ok,正常返回
        unused.remove(0);
        return resc;
    }
}
如果借到的连接ok,则获取该连接对应的卡片,在卡片上记录借出时间、当前线程的堆栈:
PunchCard card = (PunchCard) managed.get( resc );
// 借出时间
card.checkout_time = System.currentTimeMillis();
// 如果开启了这个debugUnreturnedConnectionStackTraces选项,记录当前线程的堆栈
if (debug_store_checkout_exceptions)
    card.checkoutStackTraceException = new Exception("DEBUG ONLY: Overdue resource check-out stack trace.");
这里是new了一个异常,在异常上调用getStackTrace就能获取堆栈。
配置项在连接毁灭时如何生效
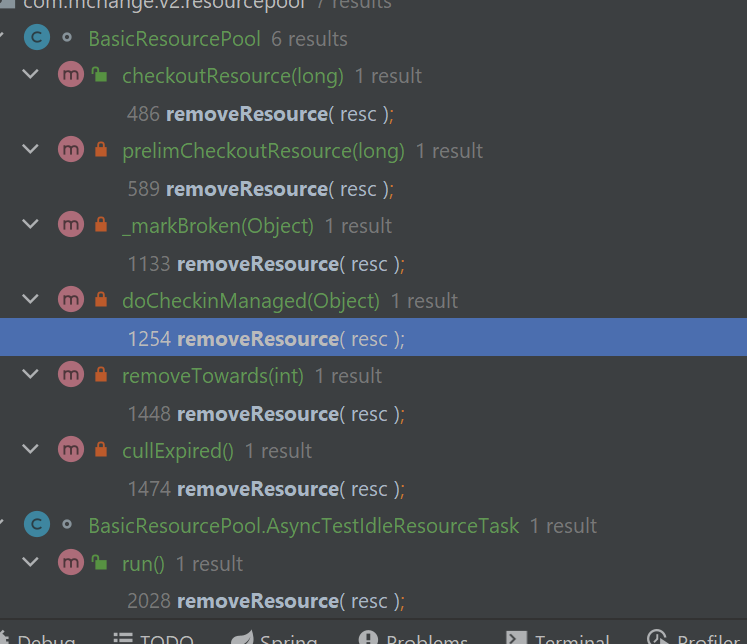
查找PunchCard的checkoutStackTraceException的usage,发现在毁灭连接的方法中会使用该字段:
com.mchange.v2.resourcepool.BasicResourcePool#removeResource(java.lang.Object, boolean)

private void removeResource(Object resc, boolean synchronous)
{
    PunchCard pc = (PunchCard) managed.remove(resc);

    if (pc != null)
    {
        // 资源的卡片中,借出时间大于0,表示资源当前是被借出的,正常我们是不会去destroy正常的连接,既然被destroy,说明这个连接是有问题的,就是那种没归还的连接,因为归还的话,checkout_time会置为-1
        if ( pc.checkout_time > 0 && !broken)
        {
            logger.info("A checked-out resource is overdue, and will be destroyed: " + resc);
            // 这里打印借出者的堆栈
            if (pc.checkoutStackTraceException != null)
            {
                logger.log( MLevel.INFO,
                           "Logging the stack trace by which the overdue resource was checked-out.",
                           pc.checkoutStackTraceException );
            }
        }
    }
	// 从空闲链表删除
    unused.remove(resc);
    // 调用底层方法关闭连接
    destroyResource(resc, synchronous);
    addToFormerResources( resc );
}
那么,destroyResource什么时候触发呢,说实话,实际很多:
我们很多连接池都有这样的机制,借出连接后,可以检测,如select 1,select from dual等,如果检测失败,就可以destroy;归还时,也可以检测,失败就destroy。
也有一些定时任务,检测是否空闲太久、检测能不能正常使用,不能的话,就destroy。
总结
看起来,作者的这套机制也是没啥问题的,借出时打标机。然后靠timer定时调度的job,去检测这些连接,看看是不是超时、过期、不正常、空闲太久等,只要满足这些异常条件,就会destroy这个异常连接,destroy的时候,就打印借出者的堆栈,方便开发者修复bug。
可以这么说,如果只是单纯的代码问题,写的代码太粗心而导致连接未关闭,而不是什么别的问题,看起来这个机制是没啥问题的。
但是,我按照目前这个配置,弄到线上后,我以为可以解决我这边的问题了,但是,打印出来的堆栈却非常误导人,我在按照对应的堆栈发起测试,发现本地是会正常关闭连接的。
那么,我觉得,有可能我这边的问题,不是简单的连接泄露,但是我这边的这个场景,造成的结果却几乎和连接泄露一模一样。
所以,我担心我这边的情况是,会不会是我归还了,但是在执行c3p0的归还代码时,归还失败了呢?
具体情况,等到下一篇我再分析。

 浙公网安备 33010602011771号