

spring2
Spring原理
组件注册@Configuration和@Bean
配置类
package com.great.config;

import com.great.service.BookService;
import org.springframework.context.annotation.Bean;
import org.springframework.context.annotation.ComponentScan;
import org.springframework.context.annotation.Configuration;
import org.springframework.context.annotation.FilterType;
import org.springframework.context.annotation.ComponentScan.Filter;
import org.springframework.context.annotation.ComponentScans;
import com.great.bean.Person;
import org.springframework.stereotype.Controller;
import org.springframework.stereotype.Repository;

//配置类==配置文件
@Configuration  //告诉Spring这是一个配置类
//@ComponentScans(
//        value = {
//                @ComponentScan(value="com.great",includeFilters = {
//                            //按照注解
////                            @Filter(type=FilterType.ANNOTATION,classes={Controller.class}),
//                            @Filter(type=FilterType.ANNOTATION,classes={Repository.class}),
////                            //按照给定的类型
////                            @Filter(type=FilterType.ASSIGNABLE_TYPE,classes={BookService.class}),
//                            //使用自定义规则。因为上面的value="com.great"所有该包下的所有的类都会进入这个自定义的规则里面进行匹配。
//                            @Filter(type=FilterType.CUSTOM,classes={MyTypeFilter.class})
//                },useDefaultFilters = false)
//        }
//)
//@ComponentScan  value:指定要扫描的包
//excludeFilters = Filter[] :指定扫描的时候按照什么规则排除那些组件
//includeFilters = Filter[] :指定扫描的时候只需要包含哪些组件
//FilterType.ANNOTATION:按照注解
//FilterType.ASSIGNABLE_TYPE:按照给定的类型;
//FilterType.ASPECTJ:使用ASPECTJ表达式  (这个基本不用)
//FilterType.REGEX:使用正则指定
//FilterType.CUSTOM:使用自定义规则

//@ComponentScan(value="com.great")
public class MainConfig {

    //给容器中注册一个Bean;类型为返回值的类型,id默认是用方法名作为id,这里我们指定的id是person
    @Bean("person")
    public Person person01(){
        return new Person("lisi", 20);
    }

}
测试一下
package com.great;

import com.great.config.MainConfig;
import org.springframework.context.ApplicationContext;
import org.springframework.context.annotation.AnnotationConfigApplicationContext;
import com.great.bean.Person;

public class MainTest {

	public static void main(String[] args) {
                                                   //AnnotationConfigApplicationContext注解式的ApplicationContext
		ApplicationContext applicationContext = new AnnotationConfigApplicationContext(MainConfig.class);
		Person bean = applicationContext.getBean(Person.class);
		System.out.println(bean);

		//获取ioc容器里面的Person类型的所有bean的名字
		String[] namesForType = applicationContext.getBeanNamesForType(Person.class);
		for (String name : namesForType) {
			System.out.println(name);
		}

	}

}
运行结果
Person [name=张三, age=18, nickName=${person.nickName}]
person
分割线
---
组件注册@Configuration和@ComponentScans自动扫描组件和指定扫描啊规则

我们在看MyTypeFilter.class
package com.great.config;

import java.io.IOException;
import org.springframework.core.io.Resource;
import org.springframework.core.type.AnnotationMetadata;
import org.springframework.core.type.ClassMetadata;
import org.springframework.core.type.classreading.MetadataReader;
import org.springframework.core.type.classreading.MetadataReaderFactory;
import org.springframework.core.type.filter.TypeFilter;

public class MyTypeFilter implements TypeFilter {

    /**
     * metadataReader:读取到的当前正在扫描的类的信息
     * metadataReaderFactory:可以获取到其他任何类信息的
     */
    @Override
    public boolean match(MetadataReader metadataReader, MetadataReaderFactory metadataReaderFactory)
                                                                                throws IOException {
        //获取当前类注解的信息
        AnnotationMetadata annotationMetadata = metadataReader.getAnnotationMetadata();
        //获取当前正在扫描的类的类信息
        ClassMetadata classMetadata = metadataReader.getClassMetadata();
        //获取当前类资源(类的路径)
        Resource resource = metadataReader.getResource();

        String className = classMetadata.getClassName();
        System.out.println("--->"+className);
        //如果className包含er就匹配成功,也就扫描进IOC容器里面了。
        if(className.contains("er")){
            return true;
        }
        return false;
    }

}
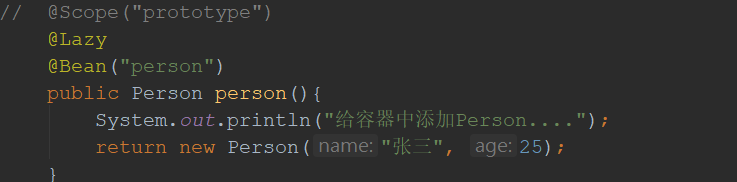
作用域
懒加载只针对单实例bean

分割线
注解@Conditional
在配置类中进行配置,如下图

package com.great.condition;

import org.springframework.beans.factory.config.ConfigurableListableBeanFactory;
import org.springframework.beans.factory.support.BeanDefinitionRegistry;
import org.springframework.context.annotation.Condition;
import org.springframework.context.annotation.ConditionContext;
import org.springframework.core.env.Environment;
import org.springframework.core.type.AnnotatedTypeMetadata;

//判断是否linux系统
public class LinuxCondition implements Condition {

    /**
     * ConditionContext:判断条件能使用的上下文(环境)
     * AnnotatedTypeMetadata:注释信息
     */
    @Override
    public boolean matches(ConditionContext context, AnnotatedTypeMetadata metadata) {
        // 是否为linux系统
        //1、能获取到ioc使用的beanfactory
        ConfigurableListableBeanFactory beanFactory = context.getBeanFactory();
        //2、获取类加载器
        ClassLoader classLoader = context.getClassLoader();
        //3、获取当前环境信息
        Environment environment = context.getEnvironment();
        //4、获取到bean定义的注册类
        BeanDefinitionRegistry registry = context.getRegistry();

        String property = environment.getProperty("os.name");
        //可以判断容器中的bean注册情况,也可以给容器中注册bean。
        boolean definition = registry.containsBeanDefinition("person");
        if(property.contains("linux")){
            return true;
        }
        return false;
    }

}
package com.great.condition;

import org.springframework.context.annotation.Condition;
import org.springframework.context.annotation.ConditionContext;
import org.springframework.core.env.Environment;
import org.springframework.core.type.AnnotatedTypeMetadata;

//判断是否为windows系统
public class WindowsCondition implements Condition {

	@Override
	public boolean matches(ConditionContext context, AnnotatedTypeMetadata metadata) {
		Environment environment = context.getEnvironment();
		String property = environment.getProperty("os.name");
		if(property.contains("Windows")){
			return true;
		}
		return false;
	}

}
测试一下

运行结果

注意注解Conditional也可以放在类上面的

@Import注解
该注解是给容器中注册组件

第一种import
可以直接用import导

第二种import
@Configuration
//@Import(Color.class)
//@Import导入组件,id默认是组件的全类名
@Import({Color.class,MyImportSelector.class})
public class MainConfig2 {
package com.great.condition;

import org.springframework.context.annotation.ImportSelector;
import org.springframework.core.type.AnnotationMetadata;

//自定义逻辑返回需要导入的组件
public class MyImportSelector implements ImportSelector {

    //返回值,就是到导入到容器中的组件全类名
    //AnnotationMetadata:当前标注@Import注解的类的所有注解信息
    @Override
    public String[] selectImports(AnnotationMetadata importingClassMetadata) {
        //importingClassMetadata
        //方法不要返回null值,要不然报空指针异常
        //这样就把实体类Blue,Yellow扫描进容器里面了。
        return new String[]{"com.great.bean.Blue","com.great.bean.Black"};
    }

}
这样就把Bule和Black加载到容器里面了
第三种import

package com.great.condition;

import org.springframework.beans.factory.support.BeanDefinitionRegistry;
import org.springframework.beans.factory.support.RootBeanDefinition;
import org.springframework.context.annotation.ImportBeanDefinitionRegistrar;
import org.springframework.core.type.AnnotationMetadata;
import com.great.bean.RainBow;

public class MyImportBeanDefinitionRegistrar implements ImportBeanDefinitionRegistrar {

    /**
     * AnnotationMetadata:当前类的注解信息
     * BeanDefinitionRegistry:BeanDefinition注册类;
     * 		把所有需要添加到容器中的bean;调用
     * 		BeanDefinitionRegistry.registerBeanDefinition手工注册进来
     */
    @Override
    public void registerBeanDefinitions(AnnotationMetadata importingClassMetadata, BeanDefinitionRegistry registry) {

        //判断是否有Black和Blue的bean
        boolean definition = registry.containsBeanDefinition("com.great.bean.Black");
        boolean definition2 = registry.containsBeanDefinition("com.great.bean.Blue");
        if(definition && definition2){
            //指定Bean定义信息;(Bean的类型,Bean。。。)
            RootBeanDefinition beanDefinition = new RootBeanDefinition(RainBow.class);
            //注册一个Bean,指定bean名
            registry.registerBeanDefinition("rainBow", beanDefinition);
        }
    }

}
运行结果就是把RainBow注册进容器里了,bean的名字是rainBow
给容器中注册组件的方式

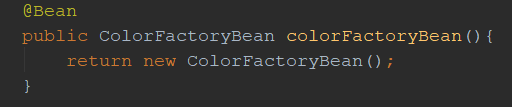
如上图所示有四种方式,上面我们介绍完了import的方式,下面我们看FactoryBean的方式
在配置类里面加下面的代码
package com.great.bean;

import org.springframework.beans.factory.FactoryBean;

//创建一个Spring定义的FactoryBean
public class ColorFactoryBean implements FactoryBean<Color> {

    //返回一个Color对象,这个对象会添加到容器中
    @Override
    public Color getObject() throws Exception {
        System.out.println("ColorFactoryBean...getObject...");
        return new Color();
    }

    @Override
    public Class<?> getObjectType() {
        return Color.class;
    }

    //是单例?
    //true:这个bean是单实例,在容器中保存一份
    //false:多实例,每次获取都会创建一个新的bean;
    @Override
    public boolean isSingleton() {
        return false;
    }

}
测试一下

bean的生命周期


指定指定初始化和销毁方法的几种方式

我们先看第一种@Bean的方式
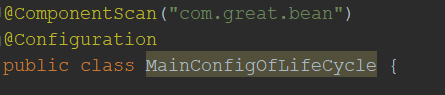
@Configuration
public class MainConfigOfLifeCycle {

//    @Scope("prototype") //多实例:容器不会管理这个bean;容器不会调用销毁方法。
    @Bean(initMethod="init",destroyMethod="detory")
    public Car car(){
        return new Car();
    }

}
package com.great.bean;

import org.springframework.stereotype.Component;

@Component
public class Car {

	public Car(){
		System.out.println("car constructor...");
	}

	public void init(){
		System.out.println("car ... init...");
	}

	public void detory(){
		System.out.println("car ... detory...");
	}

}
测试
package com.great.test;

import org.junit.Test;
import org.springframework.context.annotation.AnnotationConfigApplicationContext;
import com.great.config.MainConfigOfLifeCycle;

public class IOCTest_LifeCycle {

    @Test
    public void test01(){
        //1、创建ioc容器
        AnnotationConfigApplicationContext applicationContext = new AnnotationConfigApplicationContext(MainConfigOfLifeCycle.class);
        System.out.println("容器创建完成...");

//        applicationContext.getBean("car");
        //关闭容器
        applicationContext.close();
    }

}
构造(对象创建):
单实例:在容器启动的时候创建对象
多实例:在每次获取的时候创建对象

第二种方式

第三种方式
加两个注解就可以了

第四种方式
这里使用的BBP的原理也就是BeanPostProcessor bean的后置处理器




容器里面的所有的bean都是要走这个我们自定义的MyBeanPostProcessor

BeanPostProcessor的原理
还是上面我们自定义的

断点进来


BeanPostProcessor原理深挖

这里我们看一下这个ApplicationContextAwareProcessor


这样我们自定义一个类来试一下

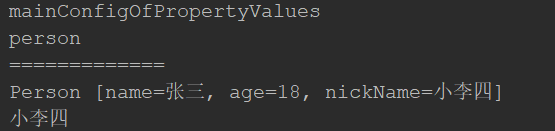
属性赋值 @Value注解




运行结果
自动装配
@Autowired&@Qualifier&@Primary


自动装配-@Resource&@Inject


@Autowired不仅能标注在属性位置
1 . 标注在方法参数上面 @Bean+方法参数

2.放在构造器上面和放在方法上面

总结:

分割线
自定义组件想要使用Spring容器底层的一些组件

新建一个red类
package com.great.bean;

import org.springframework.beans.BeansException;
import org.springframework.beans.factory.BeanNameAware;
import org.springframework.context.ApplicationContext;
import org.springframework.context.ApplicationContextAware;
import org.springframework.context.EmbeddedValueResolverAware;
import org.springframework.stereotype.Component;
import org.springframework.util.StringValueResolver;

@Component
public class Red implements ApplicationContextAware,BeanNameAware,EmbeddedValueResolverAware {

    private ApplicationContext applicationContext;

    @Override
    public void setApplicationContext(ApplicationContext applicationContext) throws BeansException {
        System.out.println("传入的ioc:"+applicationContext);
        this.applicationContext = applicationContext;
    }

    @Override
    public void setBeanName(String name) {
        System.out.println("当前bean的名字:"+name);
    }

    @Override
    public void setEmbeddedValueResolver(StringValueResolver resolver) {
       //解析字符串
        String resolveStringValue = resolver.resolveStringValue("你好 ${os.name} 我是 #{20*18}");
        System.out.println("解析的字符串:"+resolveStringValue);
    }

}
这样就完成自定义组件想要使用Spring容器底层的一些组件
我们来看一下原理
以ApplicationContextAware接口为列例子

我们在Red类里面的setApplicationContext上面打断点
我们debug进去

可以看出来是ApplicationContextAwareProcessor和BeanPostProcessor在起作用


原理总结:
我们的bean在初始化的时候,利用后置处理器,判断这个bean是否实现某个aware接口,然后调用相应的方法把组件传过来
取配置文件里面的常量值

@Profile注解
package com.great.config;


import javax.sql.DataSource;

import org.springframework.beans.factory.annotation.Value;
import org.springframework.context.EmbeddedValueResolverAware;
import org.springframework.context.annotation.Bean;
import org.springframework.context.annotation.Configuration;
import org.springframework.context.annotation.Profile;
import org.springframework.context.annotation.PropertySource;
import org.springframework.util.StringValueResolver;
import com.great.bean.Yellow;
import com.mchange.v2.c3p0.ComboPooledDataSource;


/**
 * Profile:
 * 		Spring为我们提供的可以根据当前环境,动态的激活和切换一系列组件的功能;
 *
 * 开发环境、测试环境、生产环境;
 * 数据源:(/A)(/B)(/C);
 *
 *
 * @Profile:指定组件在哪个环境的情况下才能被注册到容器中,不指定,任何环境下都能注册这个组件
 *
 *      1)、加了环境标识的bean,只有这个环境被激活的时候才能注册到容器中。默认是default环境
 *      2)、写在配置类上,只有是指定的环境的时候,整个配置类里面的所有配置才能开始生效
 *      3)、没有标注环境标识的bean在,任何环境下都是加载的;
 */

@PropertySource("classpath:/dbconfig.properties")
@Configuration
public class MainConfigOfProfile implements EmbeddedValueResolverAware{

    @Value("${db.user}")
    private String user;

    //实现EmbeddedValueResolverAware接口把我们的值解析器引进来
    //这也是一种方式用于解析值
    private StringValueResolver valueResolver;

    private String  driverClass;

    @Bean
    public Yellow yellow(){
        return new Yellow();
    }

    //默认是default
//    @Profile("default")
    @Profile("test")
    @Bean("testDataSource")         //@Value注解也可以直接写在参数上面
    public DataSource dataSourceTest(@Value("${db.password}")String pwd) throws Exception{
        ComboPooledDataSource dataSource = new ComboPooledDataSource();
        dataSource.setUser(user);
        dataSource.setPassword(pwd);
        dataSource.setJdbcUrl("jdbc:mysql://localhost:3306/test");
        dataSource.setDriverClass(driverClass);
        return dataSource;
    }


    @Profile("dev")
    @Bean("devDataSource")
    public DataSource dataSourceDev(@Value("${db.password}")String pwd) throws Exception{
        ComboPooledDataSource dataSource = new ComboPooledDataSource();
        dataSource.setUser(user);
        dataSource.setPassword(pwd);
        dataSource.setJdbcUrl("jdbc:mysql://localhost:3306/ssm_crud");
        dataSource.setDriverClass(driverClass);
        return dataSource;
    }

    @Profile("prod")
    @Bean("prodDataSource")
    public DataSource dataSourceProd(@Value("${db.password}")String pwd) throws Exception{
        ComboPooledDataSource dataSource = new ComboPooledDataSource();
        dataSource.setUser(user);
        dataSource.setPassword(pwd);
        dataSource.setJdbcUrl("jdbc:mysql://localhost:3306/scw_0515");
        dataSource.setDriverClass(driverClass);
        return dataSource;
    }

    @Override
    public void setEmbeddedValueResolver(StringValueResolver resolver) {
        this.valueResolver = resolver;
        driverClass = valueResolver.resolveStringValue("${db.driverClass}");
    }

}
package com.great.test;

import javax.sql.DataSource;
import org.junit.Test;
import org.springframework.context.annotation.AnnotationConfigApplicationContext;
import com.great.bean.Yellow;
import com.great.config.MainConfigOfProfile;

public class IOCTest_Profile {

    //1、使用命令行动态参数: 在虚拟机参数位置加载 -Dspring.profiles.active=test
    //2、代码的方式激活某种环境;
    @Test
    public void test01(){
        AnnotationConfigApplicationContext applicationContext =
                //这里用无参构造,目的是后面设置值
                new AnnotationConfigApplicationContext();
        //1、创建一个applicationContext
        //2、设置需要激活的环境
        applicationContext.getEnvironment().setActiveProfiles("dev");
        //3、注册主配置类
        applicationContext.register(MainConfigOfProfile.class);
        //4、启动刷新容器
        applicationContext.refresh();

        String[] namesForType = applicationContext.getBeanNamesForType(DataSource.class);
        for (String string : namesForType) {
            System.out.println(string);
        }

        Yellow bean = applicationContext.getBean(Yellow.class);
        System.out.println(bean);
        applicationContext.close();
    }

}
AOP功能测试

【动态代理】
- 指在程序运行期间动态的将某段代码切入到指定方法指定位置进行运行的编程方式;
建一个目标类

然后是切面类

然后是配置类

测试一下

没有异常的时候运行结果如下
div运行。。。@Before:参数列表是:{[1, 1]}
MathCalculator...div...
div结束。。。@After
div正常返回。。。@AfterReturning:运行结果:{1}
有异常的时候运行结果如下
div运行。。。@Before:参数列表是:{[1, 0]}
MathCalculator...div...
div结束。。。@After
div异常。。。异常信息:{java.lang.ArithmeticException: / by zero}
AOP原理
//给配置类中加 @EnableAspectJAutoProxy 【开启基于注解的aop模式】
@EnableAspectJAutoProxy
一切从这个注解说起。
要明白enable开头的看给容器中注册了什么组件,这个组件什么时候工作,这个组件的功能是什么?
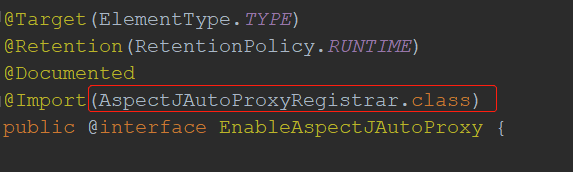

上面流程可以看出注解@EnableAspectJAutoProxy注入了AnnotationAwareAspectJAutoProxyCreator.class
AnnotationAwareAspectJAutoProxyCreator.class是一个后置处理器,这个可以从他的父类看的出来


现在我们重点研究AnnotationAwareAspectJAutoProxyCreator.

 浙公网安备 33010602011771号