

RTCD-7.3.a Octrees
RTCD-7.3.a Octrees
Real-Time Collision Detection 阅读笔记。
关于概念的介绍可以参见:https://baike.baidu.com/item/八叉树
Pointer Based
octree node示例:
// Octree node data structure
struct Node {
    Point center;         // 节点的中心,并不是必须的
    float halfWidth;      // 节点体素的半宽,不是必须的
    Node *pChild[8];      // 指向八个子节点
    Object *pObjList;     // 这个节点包含的对象列表
};
如果用数组表示一个完整的树,假如某个父节点是node[i],那么对于八叉树,对应的子节点的范围是node[8*i+1]到node[8*i+8]。节点的总数为\((d^n-1)/(d-1)\)。
基于数组的实现更适用于静态场景,元素在场景中的位置是固定的;基于指针的实现,更适用于动态场景,元素在场景中的位置会动态变化。
对于静态场景经常使用从上到下的方式。在划分的时候,不同的节点可能会有相同给的元素,直到节点中的元素少于固定值,或所有的元素分布到所有的节点中的时候停止划分。
对八叉树按照特定深度进行构建,代码如下:
// Preallocates an octree down to a specific depth
Node *BuildOctree(Point center, float halfWidth, int stopDepth)
{
    if (stopDepth < 0) return NULL;
    else {
        // Construct and fill in 'root' of this subtree
        Node *pNode = new Node;
        pNode->center = center;
        pNode->halfWidth = halfWidth;
        pNode->pObjList = NULL;

        // Recursively construct the eight children of the subtree
        Point offset;
        float step = halfWidth * 0.5f;
        for (int i=0; i<8; ++i) {
            // 赞
            offset.x = ((i & 1) ? step : -step);
            offset.y = ((i & 2) ? step : -step);
            offset.z = ((i & 4) ? step : -step);
            pNode->pChild[i] = BuildOctree(center + offset, step, stopDepth-1);
        }
        return pNode;
    }
}
假设对象是球,数据结构如下:
struct Object {
    Point center;
    float radius;
    Object *pNextObject;
}
插入一个对象的代码如下(对于if (Abs(delta) < pTree->halfWidth + pObject->radius)应该有问题)(具体讨论见:https://www.cnblogs.com/grass-and-moon/p/13266715.html):
void InsertObject(Node *pTree, Object *pObject)
{
    int index = 0, straddle = 0;
    // Compute the octant number [0..7] the object sphere center is in
    // If straddling any of the dividing x, y, or z planes, exit directly
    for (int i=0; i<3; i++)
    {
        float delta = pObject->center[i] - pTree->center[i];
        if (Abs(delta) < pTree->halfWidth + pObject->radius)
        // 这个应该是有问题的, 应该是:
        // if (Abs(delta) < pObject->radius)
        {
            straddle = 1;
            break;
        }
        if (delta > 0.0f) index |= (1 << i);
    }
    if (!straddle && pTree->pChild[index]) {
        // Fully contained in existing child node; insert in that subtree
        InsertObject(pTree->pChild[index], pObject);
    } else {
        // Straddling, or no child node to descend into, so
        // link object into linked list at this node
        pObject->pNextObject = pTree->pObjList;
        pTree->pObjList = pObject;
    }
    // 如果需要自动创建node,采用如下实现
    //if (!straddle) {
    //    if (pTree->pChild[index] == NULL) {
    //        pTree->pChild[index] = new Node;
    //        // ...
    //    }
    //    InsertObject(pTree->pChild[index], pObject);
    //} else {
    //    // ... same as before
    //}
}
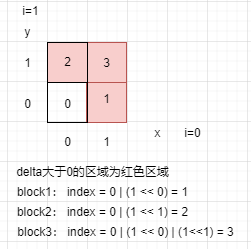
index |= (1 << i);这一句的逻辑怎么理解呢?以二维图为例:
如果需要在node没有object的时候能够自行删除,需要node能够获取到parent node 的指针用来更新该node(或者类似的机制)。
碰撞检测的示例代码如下(下面的代码示例,depth设置的貌似有问题???):
// Test all objects that could possibly overlap due to cell ancestry and coexistence
// in the same cell. Assumes objects exist in a single cell only, and fully inside it
void TestAllCollisions(Node *pTree)
{
    // Keep track of all ancestor object lists in a stack
    const int MAX_DEPTH = 40;
    static Node *ancestorStack[MAX_DEPTH];
    static int depth = 0;

    // Check collision between all objects on this level and all
    // all ancestor objects. The current level is included as its
    // ancestor so all nessary pairwise tests are done
    ancestorStack[depth++] = pTree;
    for (int n = 0; n < depth; n++) {
        Object *pA, *pB;
        for (pA = ancestorStack[n]->pObjList; pA; pA = pA->pNextObject) {
            for (pB = pTree->pObjList; pB; pB = pB->pNextObject) {
                // Avoid testing both A->B and B->A
                if (pA == pB) break;
                // Now perform the collision test between pA and pB in some manner
                TestCollision(pA, pB);
            }
        }
    }

    // Recursively visit all existing children
    for (int i = 0; i < 8; i++)
        if (pTree->pChild[i])
            TestAllCollisions(pTree->pChild[i]);

    // Remove current node from ancestor stack before returning
    depth--;
}
Hash-based
尽管基于指针的表示可能比基于平均树的平面数组表示节省内存,但前者仍需要在八叉树节点中存储多达八个指针。这些可能构成了保存树所需内存的主要部分。
聪明的基于非指针的表示方法是线性八叉树。线性八叉树只有包含数据的八叉树节点,其中每个节点都经过了增强,以包含自己的位置代码。父节点和所有子节点的位置代码都可以从存储的位置代码中计算出来。因此,八叉树节点不再需要指向子节点的显式指针,因此变得更小。
// Octree node data structure (hashed)
struct Node {
    Point center;     // 八叉树的中心,并不是必须的
    int key;          // the location (Morton) code for this node
    int8 hasChildK;   // Bitmask indicating which eight children exist (optional)
    Object *pObjList; // Linked list of objects contained at this node
}
节点的大小可以显式地存储,也可以从位置代码的“深度”中导出。在后一种情况下,位置码中需要一个哨兵位,以便能够区分,例如011和000000011,将它们分别转换为1011和1000000011。代码如下:
int NodeDepth(unsigned int key)
{
    // Keep shifting off three bits at a time, increasing depth counter
    for (int d = 0; key; d++) {
        // If only sentinel bit remains, exit with node depth
        if (key == 1) return d;
        key >>= 3;
    }
    assert(0); // bad key
}
为了能够在给定位置码的情况下快速访问八叉树节点,将节点的位置代码作为哈希键存储在哈希表中。这种散列存储表示提供了对任何节点的O(1)访问,而在基于指针的树中定位任意节点需要O(logn)操作。
为了避免哈希表查找失败,节点通常会用一个位掩码(如前所述)进行增强,以指示八个子节点中存在哪一个子节点。下面用于访问线性八叉树中所有现有节点的代码说明了如何计算子节点以及如何使用位掩码。
void VisitLinearOctree(Node *pTree)
{
    // For all eight possible children
    for (int i = 0; i < 8; ++i) {
        // See if the ith child exist
        if (pTree->hasChildK & (1 << i)) {
            // Compute new Morton key for the child
            int key = (pTree->key << 3) + i;
            Node *pChild = HashTableLookup(gHashTable, key);
            VisitLinearOctree(pChild);
        }
    }
}
这里使用到了morton key,莫顿码的简单介绍,见:https://blog.csdn.net/qq_32832803/article/details/82314679。接着继续看怎么通过octree leaf的x,y,z坐标获取morton key。如下:
uint32 Morton3(uint32 x, uint32 y, uint32 z)
{
    // z--z--z--z--z--z--z--z--z--z-- : Part1By2(z) << 2
    // -y--y--y--y--y--y--y--y--y--y- : Part1By2(y) << 1
    // --x--x--x--x--x--x--x--x--x--x : Part1By2(x)
    // zyxzyxzyxzyxzyxzyxzyxzyxzyxzyx : Final result
    return (Part1By2(z) << 2) + (Part1By2(y) << 1) + Part1By2(x);
}
函数Part1By2()的作用是将原始坐标bits表示的各个bit之间插入两个0.然后通过左移和叠加获取最后的结果。实现如下:
// Separates low 10 bits of input by two bits
uint32 Part1By2(uint32 n)
{
    // n = ----------------------9876543210 : Bits initially
    // n = ------98----------------76543210 : After (1)
    // n = ------98--------7654--------3210 : After (2)
    // n = ------98----76----54----32----10 : After (3)
    // n = ----9--8--7--6--5--4--3--2--1--0 : After (4)
    n=(n^(n << 16)) & 0xff0000ff;// (1)
    n=(n^(n <<  8)) & 0x0300f00f;// (2)
    n=(n^(n <<  4)) & 0x030c30c3;// (3)
    n=(n^(n <<  2)) & 0x09249249;// (4)
    return n;
}
对于2D情况如下:
// Takes two 16-bit numbers and bit-interleaves them into one number
uint32 Morton2(uint32 x, uint32 y)
{
    return (Part1By1(y) << 1) + Part1By1(x);
}

// Separates low 16 bits of input by one bit
uint32 Part1By1(uint32 n)
{
    // n = ----------------fedcba9876543210 : Bits initially
    // n = --------fedcba98--------76543210 : After (1)
    // n = ----fedc----ba98----7654----3210 : After (2)
    // n = --fe--dc--ba--98--76--54--32--10 : After (3)
    // n = -f-e-d-c-b-a-9-8-7-6-5-4-3-2-1-0 : After (4)
    n=(n∧(n <<  8)) & 0x00ff00ff;// (1)
    n=(n∧(n <<  4)) & 0x0f0f0f0f;// (2)
    n=(n∧(n <<  2)) & 0x33333333;// (3)
    n=(n∧(n <<  1)) & 0x55555555;// (4)
    return n;
}
作者: grassofsky
出处: http://www.cnblogs.com/grass-and-moon
本文版权归作者,欢迎转载,但未经作者同意必须保留此段声明,且在文章页面明显位置给出, 原文链接 如有问题, 可邮件(grass-of-sky@163.com)咨询.

 浙公网安备 33010602011771号