xxx-job docker 安装 和spring boot 接入
1:新建xxxl-job 数据库
数据库文件地址(注意版本号 不同版本可能会不同):https://github.com/xuxueli/xxl-job/blob/master/doc/db/tables_xxl_job.sql
这是2.4.1的库
#
# XXL-JOB v2.4.1-SNAPSHOT
# Copyright (c) 2015-present, xuxueli.

CREATE database if NOT EXISTS `xxl_job` default character set utf8mb4 collate utf8mb4_unicode_ci;
use `xxl_job`;

SET NAMES utf8mb4;

CREATE TABLE `xxl_job_info` (
  `id` int(11) NOT NULL AUTO_INCREMENT,
  `job_group` int(11) NOT NULL COMMENT '执行器主键ID',
  `job_desc` varchar(255) NOT NULL,
  `add_time` datetime DEFAULT NULL,
  `update_time` datetime DEFAULT NULL,
  `author` varchar(64) DEFAULT NULL COMMENT '作者',
  `alarm_email` varchar(255) DEFAULT NULL COMMENT '报警邮件',
  `schedule_type` varchar(50) NOT NULL DEFAULT 'NONE' COMMENT '调度类型',
  `schedule_conf` varchar(128) DEFAULT NULL COMMENT '调度配置,值含义取决于调度类型',
  `misfire_strategy` varchar(50) NOT NULL DEFAULT 'DO_NOTHING' COMMENT '调度过期策略',
  `executor_route_strategy` varchar(50) DEFAULT NULL COMMENT '执行器路由策略',
  `executor_handler` varchar(255) DEFAULT NULL COMMENT '执行器任务handler',
  `executor_param` varchar(512) DEFAULT NULL COMMENT '执行器任务参数',
  `executor_block_strategy` varchar(50) DEFAULT NULL COMMENT '阻塞处理策略',
  `executor_timeout` int(11) NOT NULL DEFAULT '0' COMMENT '任务执行超时时间,单位秒',
  `executor_fail_retry_count` int(11) NOT NULL DEFAULT '0' COMMENT '失败重试次数',
  `glue_type` varchar(50) NOT NULL COMMENT 'GLUE类型',
  `glue_source` mediumtext COMMENT 'GLUE源代码',
  `glue_remark` varchar(128) DEFAULT NULL COMMENT 'GLUE备注',
  `glue_updatetime` datetime DEFAULT NULL COMMENT 'GLUE更新时间',
  `child_jobid` varchar(255) DEFAULT NULL COMMENT '子任务ID,多个逗号分隔',
  `trigger_status` tinyint(4) NOT NULL DEFAULT '0' COMMENT '调度状态:0-停止,1-运行',
  `trigger_last_time` bigint(13) NOT NULL DEFAULT '0' COMMENT '上次调度时间',
  `trigger_next_time` bigint(13) NOT NULL DEFAULT '0' COMMENT '下次调度时间',
  PRIMARY KEY (`id`)
) ENGINE=InnoDB DEFAULT CHARSET=utf8mb4;

CREATE TABLE `xxl_job_log` (
  `id` bigint(20) NOT NULL AUTO_INCREMENT,
  `job_group` int(11) NOT NULL COMMENT '执行器主键ID',
  `job_id` int(11) NOT NULL COMMENT '任务,主键ID',
  `executor_address` varchar(255) DEFAULT NULL COMMENT '执行器地址,本次执行的地址',
  `executor_handler` varchar(255) DEFAULT NULL COMMENT '执行器任务handler',
  `executor_param` varchar(512) DEFAULT NULL COMMENT '执行器任务参数',
  `executor_sharding_param` varchar(20) DEFAULT NULL COMMENT '执行器任务分片参数,格式如 1/2',
  `executor_fail_retry_count` int(11) NOT NULL DEFAULT '0' COMMENT '失败重试次数',
  `trigger_time` datetime DEFAULT NULL COMMENT '调度-时间',
  `trigger_code` int(11) NOT NULL COMMENT '调度-结果',
  `trigger_msg` text COMMENT '调度-日志',
  `handle_time` datetime DEFAULT NULL COMMENT '执行-时间',
  `handle_code` int(11) NOT NULL COMMENT '执行-状态',
  `handle_msg` text COMMENT '执行-日志',
  `alarm_status` tinyint(4) NOT NULL DEFAULT '0' COMMENT '告警状态:0-默认、1-无需告警、2-告警成功、3-告警失败',
  PRIMARY KEY (`id`),
  KEY `I_trigger_time` (`trigger_time`),
  KEY `I_handle_code` (`handle_code`)
) ENGINE=InnoDB DEFAULT CHARSET=utf8mb4;

CREATE TABLE `xxl_job_log_report` (
  `id` int(11) NOT NULL AUTO_INCREMENT,
  `trigger_day` datetime DEFAULT NULL COMMENT '调度-时间',
  `running_count` int(11) NOT NULL DEFAULT '0' COMMENT '运行中-日志数量',
  `suc_count` int(11) NOT NULL DEFAULT '0' COMMENT '执行成功-日志数量',
  `fail_count` int(11) NOT NULL DEFAULT '0' COMMENT '执行失败-日志数量',
  `update_time` datetime DEFAULT NULL,
  PRIMARY KEY (`id`),
  UNIQUE KEY `i_trigger_day` (`trigger_day`) USING BTREE
) ENGINE=InnoDB DEFAULT CHARSET=utf8mb4;

CREATE TABLE `xxl_job_logglue` (
  `id` int(11) NOT NULL AUTO_INCREMENT,
  `job_id` int(11) NOT NULL COMMENT '任务,主键ID',
  `glue_type` varchar(50) DEFAULT NULL COMMENT 'GLUE类型',
  `glue_source` mediumtext COMMENT 'GLUE源代码',
  `glue_remark` varchar(128) NOT NULL COMMENT 'GLUE备注',
  `add_time` datetime DEFAULT NULL,
  `update_time` datetime DEFAULT NULL,
  PRIMARY KEY (`id`)
) ENGINE=InnoDB DEFAULT CHARSET=utf8mb4;

CREATE TABLE `xxl_job_registry` (
  `id` int(11) NOT NULL AUTO_INCREMENT,
  `registry_group` varchar(50) NOT NULL,
  `registry_key` varchar(255) NOT NULL,
  `registry_value` varchar(255) NOT NULL,
  `update_time` datetime DEFAULT NULL,
  PRIMARY KEY (`id`),
  KEY `i_g_k_v` (`registry_group`,`registry_key`,`registry_value`)
) ENGINE=InnoDB DEFAULT CHARSET=utf8mb4;

CREATE TABLE `xxl_job_group` (
  `id` int(11) NOT NULL AUTO_INCREMENT,
  `app_name` varchar(64) NOT NULL COMMENT '执行器AppName',
  `title` varchar(12) NOT NULL COMMENT '执行器名称',
  `address_type` tinyint(4) NOT NULL DEFAULT '0' COMMENT '执行器地址类型:0=自动注册、1=手动录入',
  `address_list` text COMMENT '执行器地址列表,多地址逗号分隔',
  `update_time` datetime DEFAULT NULL,
  PRIMARY KEY (`id`)
) ENGINE=InnoDB DEFAULT CHARSET=utf8mb4;

CREATE TABLE `xxl_job_user` (
  `id` int(11) NOT NULL AUTO_INCREMENT,
  `username` varchar(50) NOT NULL COMMENT '账号',
  `password` varchar(50) NOT NULL COMMENT '密码',
  `role` tinyint(4) NOT NULL COMMENT '角色:0-普通用户、1-管理员',
  `permission` varchar(255) DEFAULT NULL COMMENT '权限:执行器ID列表,多个逗号分割',
  PRIMARY KEY (`id`),
  UNIQUE KEY `i_username` (`username`) USING BTREE
) ENGINE=InnoDB DEFAULT CHARSET=utf8mb4;

CREATE TABLE `xxl_job_lock` (
  `lock_name` varchar(50) NOT NULL COMMENT '锁名称',
  PRIMARY KEY (`lock_name`)
) ENGINE=InnoDB DEFAULT CHARSET=utf8mb4;

INSERT INTO `xxl_job_group`(`id`, `app_name`, `title`, `address_type`, `address_list`, `update_time`) VALUES (1, 'xxl-job-executor-sample', '示例执行器', 0, NULL, '2018-11-03 22:21:31' );
INSERT INTO `xxl_job_info`(`id`, `job_group`, `job_desc`, `add_time`, `update_time`, `author`, `alarm_email`, `schedule_type`, `schedule_conf`, `misfire_strategy`, `executor_route_strategy`, `executor_handler`, `executor_param`, `executor_block_strategy`, `executor_timeout`, `executor_fail_retry_count`, `glue_type`, `glue_source`, `glue_remark`, `glue_updatetime`, `child_jobid`) VALUES (1, 1, '测试任务1', '2018-11-03 22:21:31', '2018-11-03 22:21:31', 'XXL', '', 'CRON', '0 0 0 * * ? *', 'DO_NOTHING', 'FIRST', 'demoJobHandler', '', 'SERIAL_EXECUTION', 0, 0, 'BEAN', '', 'GLUE代码初始化', '2018-11-03 22:21:31', '');
INSERT INTO `xxl_job_user`(`id`, `username`, `password`, `role`, `permission`) VALUES (1, 'admin', 'e10adc3949ba59abbe56e057f20f883e', 1, NULL);
INSERT INTO `xxl_job_lock` ( `lock_name`) VALUES ( 'schedule_lock');

commit;
2:docker 镜像部署 xxx-job(注意这里的mysql 连接 和用户名密码 记得改 如果8080端口已经用了 也记得改下 还有配置文件里的端口号)
- 注:192.168.20.13 为虚拟机ip 上面装了mysql 同时也 装了xxx-job
docker pull xuxueli/xxl-job-admin:2.4.0
docker run -e PARAMS="--spring.datasource.url=jdbc:mysql://192.168.20.13:3306/xxl_job?Unicode=true&characterEncoding=UTF-8 --spring.datasource.username=root --spring.datasource.password=123456" --restart=always -p 8080:8080 -v /tmp:/data/applogs --name xxl-job-admin xuxueli/xxl-job-admin:2.4.0
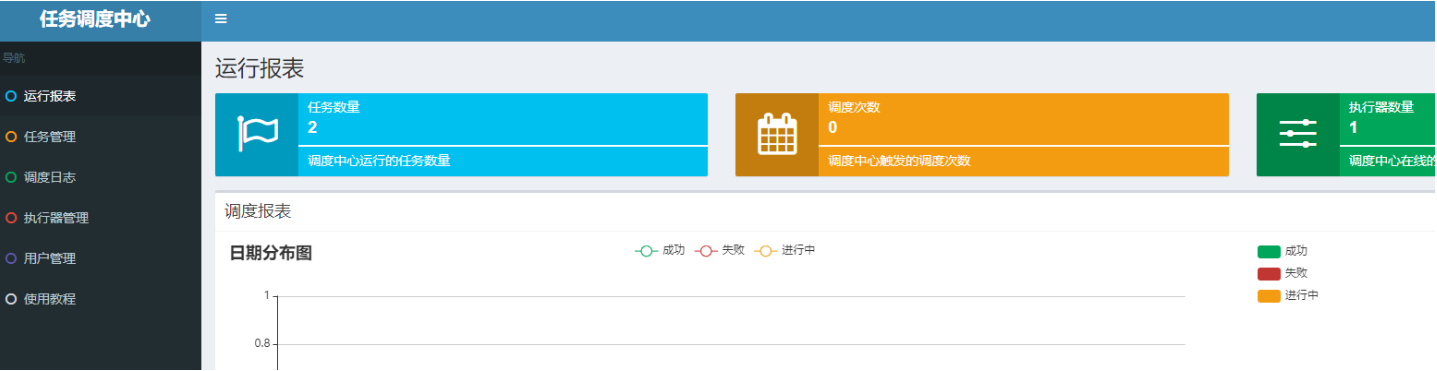
3:浏览器登录
- http://192.168.20.13:8080/xxl-job-admin
- 账号/密码:admin/123456
- 打开界面如下图所示
4:spring boot 引入xxxl-job 依赖
<dependency>
    <groupId>com.xuxueli</groupId>
    <artifactId>xxl-job-core</artifactId>
    <version>2.4.0</version>
</dependency>
5:在 applytion.yml 里配置你的xxx-job配置
xxl:
  job:
    admin:
      addresses: http://192.168.20.13:8080/xxl-job-admin
    accessToken: default_token
    executor:
      ip:
      address:
      appname: xxl-job-executor-${spring.application.name}
      port: 10002
      logpath: ./logs
      logretentiondays: 1
6:新建xxxl-job 配置文件
import com.xxl.job.core.executor.impl.XxlJobSpringExecutor;
import lombok.extern.slf4j.Slf4j;
import org.springframework.beans.factory.annotation.Value;
import org.springframework.boot.autoconfigure.condition.ConditionalOnMissingBean;
import org.springframework.context.annotation.Bean;
import org.springframework.context.annotation.Configuration;

@Configuration
@Slf4j
public class XxlJobConfig {

    @Value("${xxl.job.admin.addresses}")
    private String adminAddresses;

    @Value("${xxl.job.accessToken}")
    private String accessToken;

    @Value("${xxl.job.executor.appname}")
    private String appname;

    @Value("${xxl.job.executor.address}")
    private String address;

    @Value("${xxl.job.executor.ip}")
    private String ip;

    @Value("${xxl.job.executor.port}")
    private int port;

    @Value("${xxl.job.executor.logpath}")
    private String logPath;

    @Value("${xxl.job.executor.logretentiondays}")
    private int logRetentionDays;


    @ConditionalOnMissingBean
    @Bean
    public XxlJobSpringExecutor xxlJobExecutor() {
        log.info(">>>>>>>>>>> xxl-job config init.");
        XxlJobSpringExecutor xxlJobSpringExecutor = new XxlJobSpringExecutor();
        xxlJobSpringExecutor.setAdminAddresses(adminAddresses);
        xxlJobSpringExecutor.setAppname(appname);
        xxlJobSpringExecutor.setAddress(address);
        xxlJobSpringExecutor.setAccessToken(accessToken);
        xxlJobSpringExecutor.setLogPath(logPath);
        xxlJobSpringExecutor.setLogRetentionDays(logRetentionDays);

        return xxlJobSpringExecutor;
    }
}
7:新建执行器
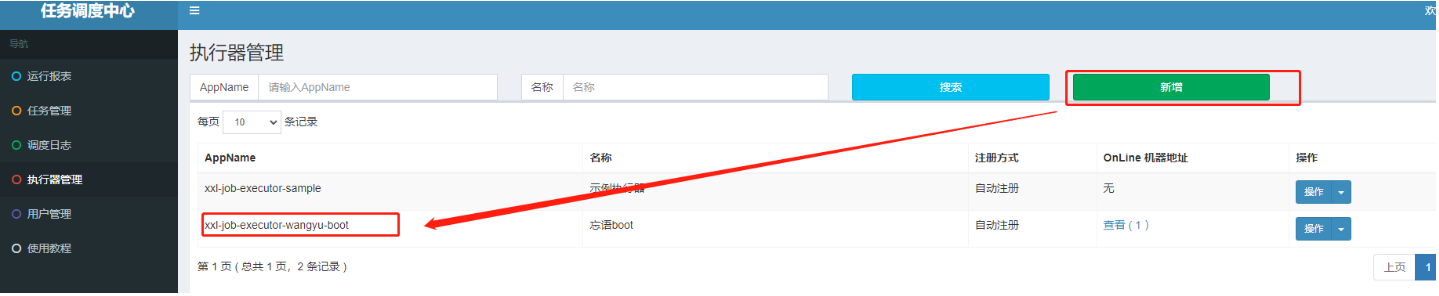
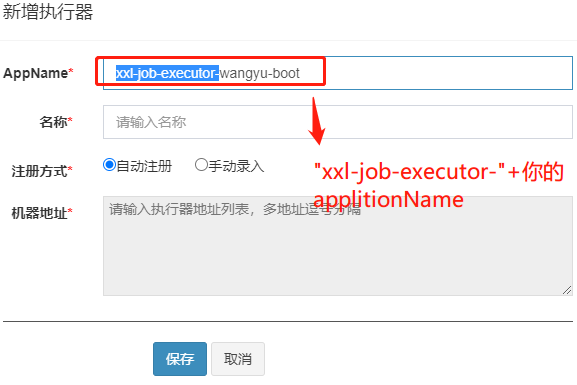
这个applicationName就是 配置文件里的 如下图所示

8:新建 被定时任务 调取的 逻辑代码
新建一个 JobHandler 调度任务处理类 并建一个测试的调度方法
import com.wangyu.service.JobTaskService;
import com.xxl.job.core.handler.annotation.XxlJob;
import lombok.extern.slf4j.Slf4j;
import org.springframework.beans.factory.annotation.Autowired;
import org.springframework.stereotype.Component;

@Component
@Slf4j
public class JobHandler {
    @XxlJob("testJobHandler")
    public void testJobHandler() throws Exception {
        log.info("任务开始");
        log.info("...");
        log.info("任务结束");
    }
}
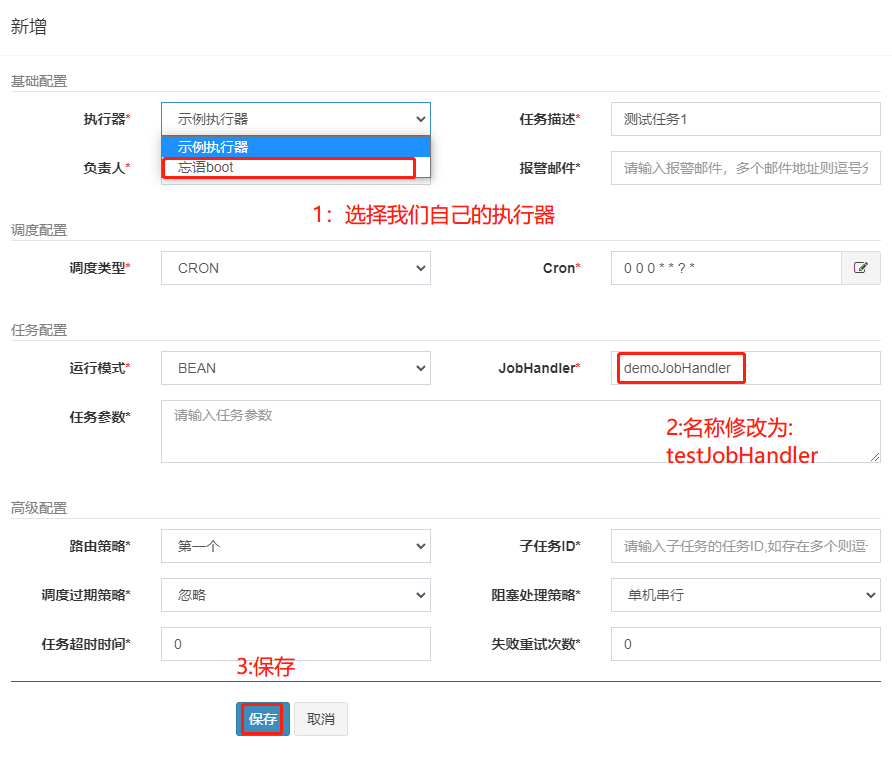
9:新建 定时任务
新建 测试的调度方法 对应的 定时任务( testJobHandler)(官方提供了一个 示例执行器 点击他的的copy按钮 然后 改下就可以了)
10:测试定时任务 调取业务代码 和 ip 注册
运行你的srping boot程序 执行一次 让你的spring boot程序 运行ip 可以注册到xxx-job里
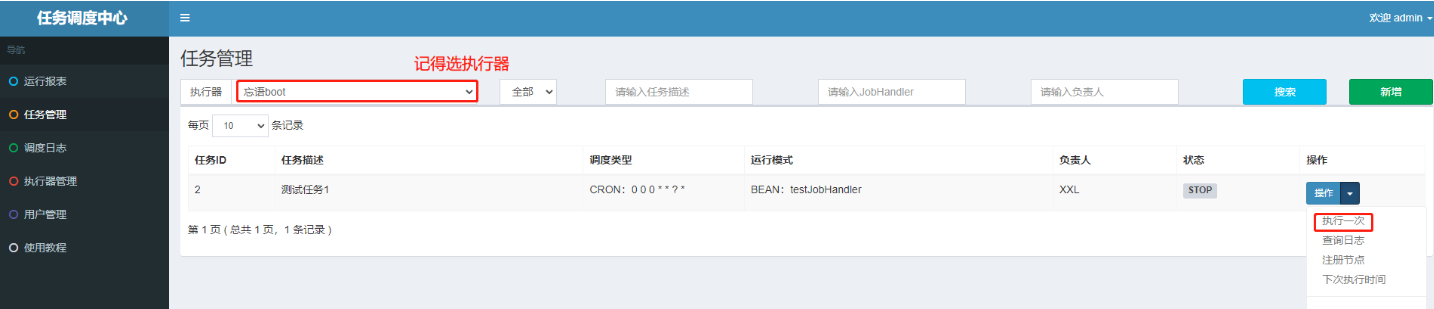
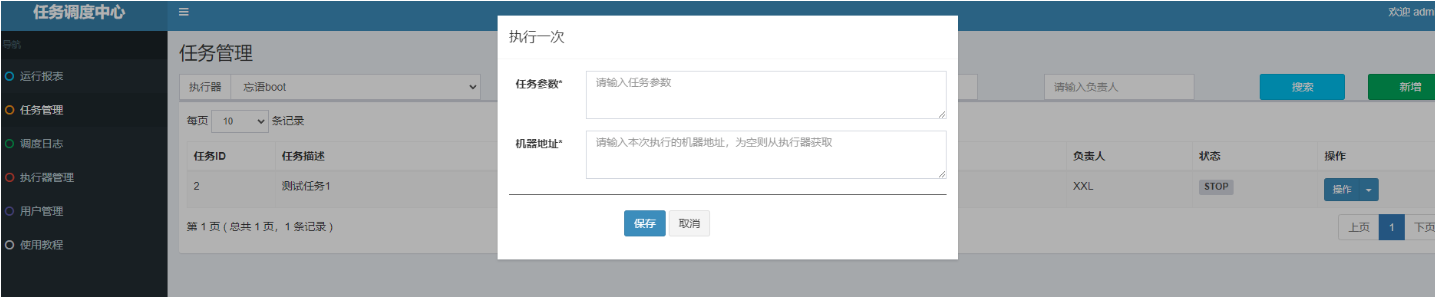
直接保存就是执行 可以看到spring boot里的执行结果(记得要运行spring boot 程序)

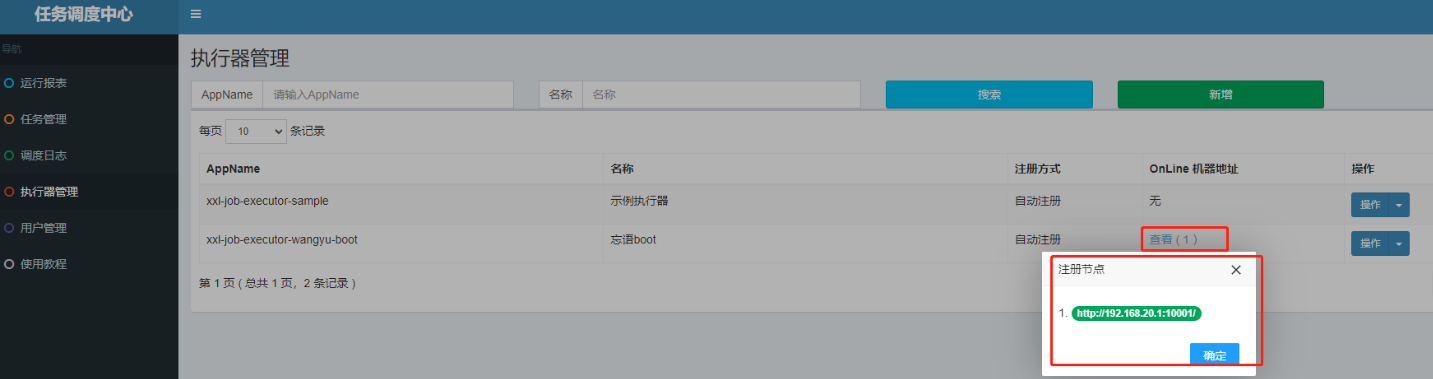
然后返回执行器里 看你的执行器 就有一个ip 注册了
11:完结
到这里 xxx-job 对接spring boot 就完成了 后面 就可以在 JobHandler 里新增 你的任务 处理方法名 然后 在任务管理器 里创建 对应的任务 即可
12:xxx-job 传参
(场景:比如上线了 这个定时任务 在不同的时间点 执行的逻辑不一样 就可以新建2个 不同时间点的任务 对应一个JobHandler 里的方法 )
String param = XxlJobHelper.getJobParam();
1. 传单参数
@Component
public class TestOneHandler {
    @XxlJob("TestOneHandler")
    public ReturnT<String> jobDemo(String s) throws Exception {
        String param = XxlJobHelper.getJobParam();
        System.out.println("TestOneHandler执行参数:"+param);
        return SUCCESS;
    }
}
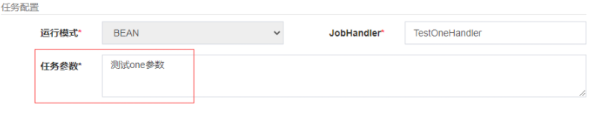
运行结果

2. 传多参数
@Component
public class TestOneHandler {

    @XxlJob("TestOneHandler")
    public ReturnT<String> jobDemo(String s) throws Exception {
        String param = XxlJobHelper.getJobParam();
        String[] methodParams = param.split(",");
        System.out.println("TestOneHandler执行参数1:"+methodParams[0]);
        System.out.println("TestOneHandler执行参数2:"+methodParams[1]);
        return SUCCESS;
    }

运行结果


 浙公网安备 33010602011771号