


安装CGAL我百感交集过,因为我是菜鸟级别,没有办法,首先第一步就是网上狂搜资料,不过真是中国互联网络混乱不堪啊,所搜集的资料多数通不过,费了几天功夫挑出了基本说法不错的方法,我就开始了艰难的验证过程。失败成了家常便饭,还好,最后勉强是成功了。为了以后自己能比较好的回顾,同时也是为了尽一份技术人员的基本责任,我将这个资料分享给各位,虽然其中多数是他人的意见,不过也有不少我自己的感触,同时也请尊重一个“集大成者”,呵呵,要是有好的意见的话请及时回馈于我。
vs2008安装cmake2.6.4
1.从官网下载windows的安装包
2.双击安装程序直接安装即可,注意为了编译通过,对于需要选择的默认项全部选,正所谓不求一万就怕万一嘛。
3.最后查看环境变量的PATH是否有配置路径(我的路径是C:\Program Files\CMake 2.6\bin),没有的话在PATH中添加路径即可
vs2008安装boost1.44
对于网络所说在windows下是使用安装包了还是使用boost_1_44_0.7z文件,我其实一直在纠结,不过在全部试验了一遍之后,我觉得还是推荐下载boost_1_44_0.7z。
boost官方也提供了说法支持了我的看法:
We recommend downloading boost_1_45_0.7z and using 7-Zip to decompress it. We no longer recommend .zip files for Boost because they are twice as large as the equivalent .7z files. We don't recommend using Windows' built-in decompression as it can be painfully slow for large archives.
[2] If you used the installer from Boost Consulting and deselected “Source and Documentation” (it's selected by default), you won't see the libs/ subdirectory. That won't affect your ability to use precompiled binaries, but you won't be able to rebuild libraries from scratch
所以给位还是试试我的建议吧!呵呵
1.打开 www.boost.org 下载最新版本 1.44.0, 解压至 D 盘根目录。
2.打开 Visual Studio 2008 命令提示窗口
3.进入 D:\boost_1_44_0\tools\jam\src
4.执行 build.bat ,会在 D:\boost_1_44_0\tools\jam\src\bin.ntx86 生成 bjam.exe 文件,复制 bjam.exe 文件到 D:\boost_1_44_0 下。
5.修改 D:\boost_1_44_0\tools\build\v2\user-config.jam 找到下面的文字
# -------------------
# MSVC configuration.
# -------------------
# Configure msvc (default version, searched for in standard locations and PATH).
# using msvc ;
# Configure specific msvc version (searched for in standard locations and PATH).
# using msvc : 8.0 ;
#在这里添加 vs2008 的配置
using msvc : 9.0 : : /wd4819 /D_CRT_SECURE_NO_DEPRECATE /D_SCL_SECURE_NO_DEPRECATE /D_SECURE_SCL=0 ;
6.进入 D:\boost_1_44_0 目录
7.执行bjam.exe 编译命令
bjam --without-python --toolset=msvc-9.0 --prefix=c:\boost install
等待编译完成,会很久。
最终会在C盘生成boost目录(C:\boost),目录有两个文件夹:include和lib两个文件夹
8.在visual studio 2008 中tools->options->projects and solutions->VC++ directories,添加
include files:c:\boost\include\boost-1_44_0
library files: c:\boost\lib
9.测试, 新建一个win32 console application
#include "stdafx.h"
#include <boost/lexical_cast.hpp>
#include <iostream>
using namespace std;
int _tmain(int argc, _TCHAR* argv[])
{
using boost::lexical_cast;
int a=lexical_cast<int>("123");
double b=lexical_cast<double>("123.0123456789");
string s0=lexical_cast<string>(a);
string s1=lexical_cast<string>(b);
cout<<"number: "<<a<<" "<<b<<endl;
cout<<"string: "<<s0<<" "<<s1<<endl;
int c=0;
try{
c=lexical_cast<int>("abcd");
}
catch(boost::bad_lexical_cast& e)
{
cout<<e.what()<<endl;
}
return 0;
}
vs2008安装boost1.44
1,到底需要下载什么软件?软件版本混乱。那些安装说明只是针对过去旧版本的QT,还有要求下载VS2008 SP1补丁的等等。很混乱,实际都没必要。
2,到底要配置什么环境变量?很多path,QTDIR 和WindowsSdkDir:等等吧。实际都是旧版本中需要的,新版本种已经用不着设置
3,需要configure 和nmake QT吗?编译过程中为什么还出错?我们下载的是编译好的QT库,不需要编译的。好像旧版本4.6以下需要。
总结一下我的安装过程:
上面的所有问题,我都一点点实验过,有的按照网上的说明可以解决,有的解决不了,最后创建项目还编译不过去,有错误。实际上QT现在的版本对于我们安装起来已经很简单了,前提是一定要下对软件的版本。
第一步:安装VS2008(Visual.Studio.Team.System.2008.Team.Suite-ZWTiSO),我也用过中文版VS2008安装过QT,也没有错误的。
第二步:去QT官方网站http://qt.nokia.com/downloads-cn下载2个软件。
1,下载安装VS2008编译过的QT库4.7:qt-win-opensource-4.7.0-vs2008.exe
(minGW版本不用下,他是minGW工具编译下的QT库。QTSDK-qt-sdk-win-opensource-2010.05.exe 也不用下载,它是用QT独立进行开发下的完整软件安装包)
2,下载安装VS2008的QT集成插件:qt-vs-addin-1.1.7.exe (这个插件的1.1.5版本的,和QT4.7VS2008兼容有错误,不过我用了最新的1.1.7版本,很好用,一点问题也没有)
实际就这么简单的安装,就可以使用QT在VS2008下的开发环境了。
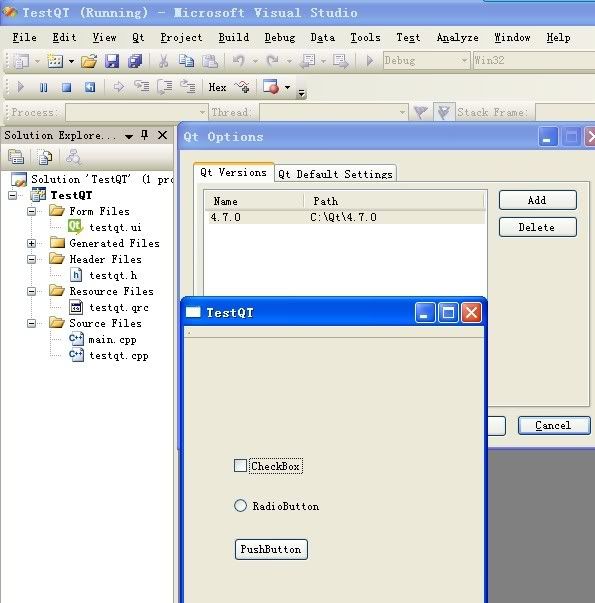
下载这两个版本后的软件按顺序安装后,在VS2008的菜单栏上会多了个QT菜单,打开QT-OPTIONS可以看到QT的version已经被自动识别为C:\QT\4.7.0(不像旧的版本中需要手动设置)。
虽然在软件开发中,为了稳定,不提倡用最新版本的软件,但是为了顺利安装平台,只好用最新版本的啦。旧版本的安装确实是个大麻烦。到现在我也没调试成功。
编译成功结果展示见下图。
现在正是开始安装CGAL了。
安装 CGAL 3.7
我是照着网上一哥们的思路做的,挺管用,他的网址为:http://www.cnblogs.com/sudoleo/archive/2010/07/16/1778524.html
安装CGAL我遇到的问题也不少,我截了不少图,不过遗憾上传不了。总之虽说安装好说话,但是安装后是否需要编译等问题我就不清楚了,因为我心中也没底啊,有人说最新版的CGAL3.7不用编译(这个哥们语:http://blog.sina.com.cn/s/blog_6d68e6090100m6rc.html),我在前面编译失败之后信了这哥们。不过后来我觉得这个说法也欠考虑。其实后来想想我之所以失败的原因不在于我又没有编译CGAL的问题了,而是之前的QT和boost出现了问题,在那些地方我也是一直徘徊于编译还是不用编译的纠结中,网络上的说法不一,我终于知道了搜集资料后的痛苦,特别是一个陌生领域,要是不亲自验证的话,估计就要被忽悠了。还好我有的是时间去验证,所以我发现boost直接用windows安装包问题很大,至少等你讲所选的预编译包下载完毕就一天一夜吧,哈哈,我是实在看不下去了,停止了这种方式安装,不过也不是说这个方式不对,对于windows下的情况还是有用的,不过太慢了,可能是网络速度问题还有就是官方本身问题了,至少我发现很多预编译包下载不了。QT的问题是因为网络上牛人 们使得都是QT的老版本了,据闻老版本必须经过编译这一步(nmake),但是最新版本免了这一步,至少我一直用最新版本编译不成功,而且在vs08下试了自带的例子程序,很顺畅。我想应该是成功了吧。至于说要不要编译,我还想请各位高手指点。我就是个低级菜鸟,照葫芦画瓢来的。虽说程序通过了不过心里还是有些没底的感觉,呵呵。
1.安装 CMake, Boost, QT,如上所述。下载CGAL最新版本3.7, www.cgal.org,貌似3.7.1也有了,现在windows安装包。
2.页面:http://www.cgal.org/download.html,文件名类似于“CGAL-3.7-Setup.exe”,安装时为避免有不能编译的,在安装选项页面全选安装,环境变量CGAL_DIR也选上,我的安装目录是 D:\CGAL-3.7,等待完成。最好将CGAL安装到系统盘之外的空间大的盘符里,因为编译CGAL之后所占空间超过10G,所以各位需要有所心里准备啊。
3.增加环境变量QTDIR = C:\Qt\4.7.1,增加环境变量BOOST_ROOT = C:\boost
4.打开命令行窗口(start->run->cmd),键入 cd D:\CGAL-3.7,键入 "cmake-gui ."
5.点击 Configure 并选择你的编译器,完成后可以看到红色的变量,其中后边那些WITH_XXX是要Build的库,不用的可以去掉,如Qt3。如果不怕慢,可以选择把demos和examples也配置了,设置好之后再按一次 Configue 按钮
6.点击 Configure,直到Generate能够操作之后,点击Generate,完成后可以关掉CMake。(祈祷吧,如果在这里出现问题会比较麻烦,只好重来或者重新安装CGAL了再试)
7.在 D:\CGAL-3.7 中将会产生一个解决方案,用 Visual Studio 打开。
8.CGAL 需要的 Boost 库是 Multithread 和 Multithread Debug 版本,
9.选择 Build->Clean Solution,选择 Build->Rebuild Solution。如果选择了demos和examples会很久。等待安装完成。我大概用了好几个小时才编译运行完成。
10.检查环境变量PATH中是否有 D:\CGAL-3.7\auxiliary\gmp\lib。set Path=%Path%;D:\CGAL-3.7\auxiliary\gmp\lib
11.Creating a Visual Studio Project that uses CGAL and QT
新建一个空的 win32 console application 工程,tools->options->projects and solutions->VC++ directories,添加
Include Files:
D:\CGAL-3.7\auxiliary\gmp\include
C:\Qt\4.7.1\include
C:\Qt\4.7.1\include\QtCore
C:\Qt\4.7.1\include\QtGui
C:\Qt\4.7.1\include\ActiveQt
C:\Qt\4.7.1\mkspecs\win32-msvc2008(或win32-msvc2005)
C:\boost\include\boost-1_44
D:\CGAL-3.7\include
Library Files:
D:\CGAL-3.7\auxiliary\gmp\lib
D:\CGAL-3.7\lib
C:\boost\lib
C:\Qt\4.7.1\lib
Right click your project and select Properties
Go to Configuration Properties -> Linker -> Input and copy the following line to the Additional Dependancies line : C:\Qt\4.7.1\lib\qtmaind.lib C:\Qt\4.7.1\lib\QtGuid4.lib C:\Qt\4.7.1\lib\QtCored4.lib
That's it, you can write your code and compile it here is an example of a main.cpp that should compile now :
----------------- CUT HERE ------------------
#include <iostream>
#include <boost/format.hpp>
#include <QtGui>
#include <CGAL/Qt/GraphicsViewNavigation.h>
#include <QLineF>
#include <QRectF>
int main(int argc, char **argv)
{
QApplication app(argc, argv);
QGraphicsScene scene;
scene.setSceneRect(0,0, 100, 100);
scene.addRect(QRectF(0,0, 100, 100), QPen(QColor(255,0,0)));
scene.addLine(QLineF(0,0, 100, 100));
scene.addLine(QLineF(0,100, 100, 0));
QGraphicsView* view = new QGraphicsView(&scene);
CGAL::Qt::GraphicsViewNavigation navigation;
view->installEventFilter(&navigation);
view->viewport()->installEventFilter(&navigation);
view->setRenderHint(QPainter::Antialiasing);
view->show();
return app.exec();
}
验证通过说明CGAL全程安装即可了。
以下是cgal官方的英文说明:
The following section explains how to install CGAL 3.4 with Boost 1.38 with QT4.5 on Windows XP/Vista with Visual Studio 2008/2005
Note that during the entire setup you need internet connection!
Note that the installation requires significant disk space. Make sure to free enough disk space before the installation.
Instructions on adding Enviroment Variables in Windows are at the end.
- Downloading stuff
- First download CGAL (3.4) windows installer from here. (it is at the bottom of the page)
- Get the latest version of CMake (currently 2.6.3) from here.
- Download the latest version of QT framework (currently 4.6.3) from here.
- Download the latest version of Boost (currently 1.42) from here OR the automated windows installer from here (I installed it by compiling myself but other people installed it with the installer with no problems). It seems that there are some problems with version 1.42 and VC 9: https://lists-sop.inria.fr/sympa/arc/cgal-discuss/2010-02/msg00147.html
- Install CMake
- Use the default configuration and don't forget to add C:\Program Files\CMake
2.6\bin to the PATH (if it wasn't added for you)
- Use the default configuration and don't forget to add C:\Program Files\CMake
- Install Boost
There are several options/configurations for installing boost. The minimal requirements for CGAL will be added soon. In the meantime, if in doubt, perform a full install.
- If you downloaded the installer just install boost and continue to the next section otherwise continue to step 2. Don't forget to choose the boost_thread components for the Visual Studio version you have downloaded/installed when you use the installer.
- Create a directory c:\boost and copy boost_1_38_0.7z into it.
- Extract the Boost files to the C:\boost\boost_1_38_0 directory (right-click the file, go to 7zip and press extract here. If you don't have 7zip download and install from here)
- Don't delete boost_1_38_0.7z file after you are done extracting!!!
- open cmd (Strart->Run->cmd) and do : cd c:\boost\boost_1_38_0
- in the cmd type cmake-gui . ( <-- this dot is important!!!)
- Create a new Visual Studio 2008 Generator (or the generator that fits your version of VS) by pressing Configure
- Press "Add Entry" and create a boolean item called CMAKE_IS_EXPERIMENTAL and set the value to true
- Press "configure"
- Select "Build Static" if it not yet selected (infact you should have all the BUILD_XXXXX flags set to true except from BUILD_TESTING)
- Click Configure until the Generate button becomes available
- Click Generate
- Close CMake. (here the dot is not important)
- Open the newly generated solution in the boost directory and press Build -> Clean Solution when this is done press Build -> Rebuild Solution
- Wait a long time.... If it asks you to save and restart visual studio using some sort of macro agree to it and let the macro finish.
- add C:\boost\boost_1_38_0\bin directory to the PATH
- Remeber I told you not to delete the 7zip file?
- Extract the Boost files to the C:\boost\boost_1_38_0 directory (right-click the file, go to 7zip and press extract here) tell it to overwrite all existing files. (In case you are having a de-ja-vu from step 2. You are right. For some unknown reason CMake destroys some of the files so you need to extract them all over again)
- Thats it Boost is installed.
- Install QT
- Be warned! This installation took me 5 hours to complete so you might want to start it at the evening and leave it for the night.
- Run the QT installer executable (no, this is not the 5 hour part).
- Yes, you might need MinGW (not the source code) so download and install that to C:\MinGW. It is easiest to install directly through the QT installer. If you run into problems (with trolltech mirror), you can download the minGW installer seperately from sourceforge.net (currently version 5.1.4), install it, and then continue the QT installation, disregarding the warning message about version compatibility.
- once the installation of QT is finished Add C:\MinGW\bin to the path (if it wasnt done for you)
- If you open the lib directory of QT you will see it is filled with a bunch of files but non of them are lib files. So now lets create the lib files.
- Open Visual Studio Command Prompt (Start->Programs->Visual Studio->Visual Studio Tools->Visual Studio CommandPrompt) and write "cd c:\QT\4.5.0"
- in the black window write "configure"
- agree to the license and wait a while (still not 7 hours but I would go eat dinner about now)
- in the cmd window write "nmake" and go to sleep. This will take about 5 hours (at least on my old slow computer)
- Add C:\Qt\4.5.0\bin to the path
- Thats it QT is installed
- Restart your computer (don't forget to bookmark this page or something)
- Install CGAL
- Finally we install the crown jewel. Run the installer and select your compiler and all the variants, next, next.
- I sugest installing CGAL to C:\CGAL\CGAL-3.4
- Tell the setup to create all the enviroment variables and wait for the install to complete. Including the downloads at the end.
- Add the enviroment variable QTDIR = C:\Qt\4.5.0
- Add the enviroment variable BOOST_ROOT = C:\boost\boost_1_38
- Open the command prompt (start->run->cmd)
- Type cd C:\CGAL\CGAL-3.4
- run cmake-gui . (<-- this dot is important again!)
- press configure and select your compiler
- If you have Cygwin installed (like me) the configure will fail becuase it was looking for the GMP and the MPFR code in the wrong place. Edit the GMP_INCLUDE_DIR and MPFR_INCLUDE_DIR to be C:/CGAL/CGAL-3.4/auxiliary/gmp/include
- Edit the CMAKE_BUILD_TYPE to Debug
- Select WITH_demos and WITH_examples if you wish the demos and the examples to be installed (although I don't see any reason to include those. You can just compile what you need when you need it).
- You may need to add the variable Boost_INCLUDE_DIR (=C:/boost/boost_1_38_0), and edit the variables Boost_THREAD_LIBRARY_DEBUG (=C:/boost/boost_1_38_0/lib/libboost_thread-vc90-mt-gd-1_38.lib) and Boost_THREAD_LIBRARY_RELEASE (= C:/boost/boost_1_38_0/lib/libboost_thread-vc90-mt-1_38.lib)
- Press Configure until you can press Generate and then press Generate
- A solution file will be created here : C:\CGAL\CGAL-3.4. Open it with your visual studio.
- Close CMAKE
- Press Build->Clean Solution, Press Build->Rebuild Solution. If you did everything I wrote before, including step 17 in the boost install the compile should work without problems (maybe some examples will not compile because you are missing 3rd party components but that isn't important).
- You are done! CGAL is installed.
At the end of the installation, your PATH should look something like that (this is my PATH) :
PATH=C:\Windows\system32;C:\Windows;C:\Windows\System32\Wbem;
C:\Program Files\ATI Technologies\ATI.ACE\Core-Static;c:\Program Files\Microsoft
SQL Server\90\Tools\binn\;C:\cygwin\bin;C:\cygwin\usr\bin;C:\cygwin\usr\local\b
in;C:\cygwin\usr\X11R6\bin;C:\gs\gs8.63\bin;C:\gs\gs8.63\lib;C:\boost\boost_1_38
_0\bin;C:\cygwin\usr\include;C:\MinGW\bin;C:\Qt\4.5.0\bin;C:\Program Files\CMake
2.6\bin;C:\CGAL\CGAL-3.4\auxiliary\gmp\lib
- Creating a Visual Studio Project that uses CGAL and QT
- Now that you have installed CGAL you need to configure your visual studio to work with it.
- Open an empty C++ project using the Win32 Console Application wizard (select empty project and click finish) File->New->Project ... Other Languages -> C++ -> Win32 -> Win32 Console Application
- When the solution loads up go to Tools->Options ... Projects and Solutions -> VC++ Directories
- Make sure that Executable Files (Combobox at the top right) contains the $(PATH) variable (at the end there)
- Select Include Files in the combobox and add :
- C:\CGAL\CGAL-3.4\auxiliary\gmp\include
- C:\Qt\4.5.0\include
- C:\boost\boost_1_38_0
- C:\CGAL\CGAL-3.4\include
- They should appear at that order at the topmost part of the list (use the arrows to move items up and down)
- Select Library Files from the combobox and add :
- C:\CGAL\CGAL-3.4\auxiliary\gmp\lib
- C:\CGAL\CGAL-3.4\lib
- C:\boost\boost_1_38_0\lib
- C:\Qt\4.5.0\lib
- Press OK until you are back at the main window
- Right click your project and select Properties
- Go to Configuration Properties -> C/C++ -> General. In there you will see Additional Include Directories. Copy this line there :"C:\Qt\4.5.0\include\QtCore","C:\Qt\4.5.0\include\QtCore","C:\Qt\4.5.0\include\QtGui","C:\Qt\4.5.0\include\QtGui","C:\Qt\4.5.0\include","C:\Qt\4.5.0\include\ActiveQt","debug",".",C:\Qt\4.5.0\mkspecs\win32-msvc2005
- QT has a bunch of directories in their include so you need to add each directory individualy. The ones I write there should be enough for a beginner
- Go to Configuration Properties -> Linker -> Input and copy the following line to the Additional Dependancies line : C:\Qt\4.5.0\lib\qtmaind.lib C:\Qt\4.5.0\lib\QtGuid4.lib C:\Qt\4.5.0\lib\QtCored4.lib
- You will generaly need some of the libs as dependant files. The ones I gave above should be enoguh for a beginner program.
- Thats it, you can write your code and compile it here is an example of a main.cpp that should compile now :
----------------- CUT HERE ------------------
#include <iostream>
#include <boost/format.hpp>
#include <QtGui>
#include <CGAL/Qt/GraphicsViewNavigation.h>
#include <QLineF>
#include <QRectF>
int main(int argc, char **argv)
{
QApplication app(argc, argv);
QGraphicsScene scene;
scene.setSceneRect(0,0, 100, 100);
scene.addRect(QRectF(0,0, 100, 100), QPen(QColor(255,0,0)));
scene.addLine(QLineF(0,0, 100, 100));
scene.addLine(QLineF(0,100, 100, 0));
QGraphicsView* view = new QGraphicsView(&scene);
CGAL::Qt::GraphicsViewNavigation navigation;
view->installEventFilter(&navigation);
view->viewport()->installEventFilter(&navigation);
view->setRenderHint(QPainter::Antialiasing);
view->show();
return app.exec();
}
----------------- CUT HERE -------------------
Good Luck and feel free to ask us questions.
Setting up PATH variable or other Enviroment variables on windows systems
- From the desktop, right-click My Computer and click properties.
- (on Vista click Advanced system settings on the left side)
- In the System Properties window, click on the Advanced tab.
- In the Advanced section, click the Environment Variables button.
- Finally, in the Environment Variables window, highlight the path variable in the Systems Variable section and click edit. Add or modify the path lines with the paths you wish the computer to access. Each different directory is separated with a semicolon as shown below.
C:\Program Files;C:\Winnt;C:\Winnt\System32
The following section explains how to install older versions of CGAL:
- Install Microsoft Compiler
- CGAL needs at least Visual C++ 7.1 (or, of course, gcc running under Cygwin – but this is not the subject of this document).
- The best free options is probably to download the Express version of Visual C++.
- Installing Boost - installing boost is quite easy using the BoostPro Computing installer (at the time this document was written the updated version of boost was 1.36.0).
- Installing CGAL
- The Windows installer is pretty convenient: http://www.cgal.org/download.html
(Notice that you should tell the installer where Boost is installed). - Visual Studio 2008 users:
The CGAL installation contains no binaries for Visual Studio 2008 (VC9.0). You need to compile GMP and MPFR or download this archive file that contains the compiled binaries for CGAL, GMP and MPFR (x86) and also updated auto_link.h to enable auto-linking of projects. Just open the archive to the CGAL installation directory.
- The Windows installer is pretty convenient: http://www.cgal.org/download.html

 浙公网安备 33010602011771号